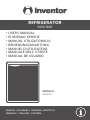
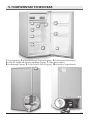
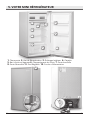
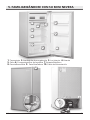
Inventor MP862W Refrigerator Mini Bar Manuel utilisateur
- Taper
- Manuel utilisateur

MODELS:
MP862W
• USER’S MANUAL
• ΕΓΧΕΙΡΙΔΙΟ ΧΡΗΣΗΣ
• MANUAL UTILIZATORULUI
• BEDIENUNGSANLEITUNG
• MANUEL D'UTILISATEUR
• MANUALE DELL’ UTENTE
• MANUAL DE USUARIO
REFRIGERATOR
ENGLISH | ΕΛΛΗΝΙΚΑ | ROMANA | DEUTSCH |
FRANÇAIS | ITALIANO | ESPAÑOL
MINI BAR

LANGUAGES
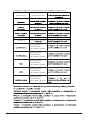
ENGLISH .....................................................................................................3
ΕΛΛΗΝΙΚΑ .................................................................................................20
ROMANA ..................................................................................................38
DEUTSCH ..................................................................................................56
FRANÇAIS .................................................................................................74
ITALIANO ..................................................................................................92
ESPAÑOL ..................................................................................................110

3
EN
TABLE OF CONTENTS
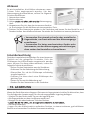
1. SAFETY & WARNING INSTRUCTIONS ................................................................. 4
2. ELECTRICAL INFORMATION ............................................................................... 6
3. SOCIABLE REMARKS ENVIRONMENTAL PROTECTION ..................................... 6
4. STEPS BEFORE USE ............................................................................................. 7
5. GETTING TO KNOW YOUR MINI BAR ................................................................. 8
6. MINI BAR FEATURES ........................................................................................... 9
7. INSTALLATION GUIDELINES ............................................................................10
8. SETTINGS ........................................................................................................... 13
9. MAINTENANCE & CLEANING ........................................................................... 14
10. STORAGE ......................................................................................................... 15
11. TIPS .................................................................................................................. 16
12. TROUBLESHOOTING ....................................................................................... 16
Dear Consumer,
Congratulations on your choice!
Inventor Mini Bars, cover multiple needs and demands,
not limited only to small student's apartments but also
accommodating hotel rooms.
F Energy class efficiency , low energy consumption
and a modern design, is an ideal combination, making
Inventor Mini Bars the best choice!
Please refer to this manual of the Mini Bar, through the

4EN
!
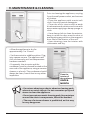
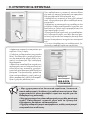
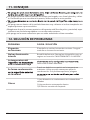
1. SAFETY & WARNING INSTRUCTIONS
l No children under the age of 8 should be permitted to operate this electric device.
Be certain, that children, handicapped people, or people with the lack of knowledge
and experience, must be supervised, depending the situation, by persons responsible
for their well-being and do not undertake procedures such as the cleaning or the
maintenance of this device.
l It is important that adequate supervision is provided and no minors are left unattended
with this device.
l This refrigerator is intended to be used in household and similar residential applications
such as:
1) Farmhouses; sta kitchen areas in shops, oces and other working environments;
2) By clients in hotels, motels bed and breakfast and other residential type
environments.
l Do not install the appliance in areas that are too humid or too cold, such as construction
appendices, garages or wine cellars.
l This device should always be kept in an upright position to avoid any damage.
l If the supply cord is damaged, it must be replaced by the manufacturer, its service
agent or similarly qualied persons to avoid a hazard. Never attempt to dismantle, repair
or modify the device.
l Ventilation openings, in both the appliance’s enclosure and in the built-in structure
should be clear of obstructions. Mechanical devices or other means of accelerated
defrosting should not be used, only methods recommended from the manufacturer
should be applied.
l As this device is heavy, always be cautious when relocating, safety gloves are
recommended.
l When relocating this appliance, slightly lift from the front, in order to avoid any oor
damage.
l Do not attempt to repair, dismantle or modify this appliance. Contact your authorized
service technician for repair or maintenance of this device.
l Do not operate this unit by switching the main power supply on or o.
l During operation, do not touch the compressor or the condenser, be cautious as they
are hot.
l Do not place heavy objects on the power cord. Make sure that the cord is not
compressed.
l Do not place cord under any obstacles (carpets rugs or runners etc). Cord should be
arranged away from areas where accidental tripping may occur.
l Do not operate other electric appliances inside the food storage compartments of this
device, unless recommended by the manufacturer.
l Do not store explosive substances such us aerosol cans with a ammable propellant
in this appliance.
l The refrigerant circuit should remain intact. If damage occurs, be extremely cautious
of any ames or sources of ignition. Ventilate the room.
l Do not sit or climb on the device.
l Do not place the unit in direct sunlight or near other heating sources like radiators,
cookers, ovens or hobs.
l Do not use the unit near heat sources, chemicals, radiators, ammable materials or
re.

EN 5
For EN standard: This appliance can be used by children aged from 8 years and
above and persons with reduce physical sensory or mental capabilities or lack of
experience and knowledge if they have been given supervision or instruction
concerning use of the appliance in a safe way and
understand the hazards involved. Children shall not play with the appliance. Cleaning
and user
maintenance shall not be made by children without supervision. Children aged from 3
to 8 years are allowed to load and unload refrigerating appliances.
To avoid contamination of food, please respect the following instructions:
– Opening the door for long periods can cause a significant increase of the temperature
in the compartments of the appliance.
– Clean regularly surfaces that can come in contact with food and accessible drainage
systems.
– Clean water tanks if they have not been used for 48 h; flush the water system
connected to a water supply if water has not been drawn for 5 days. note 1
– Store raw meat and fish in suitable containers in the refrigerator, so that it is not in
contact with or drip onto other food.
– Two-star frozen-food compartments are suitable for storing pre-frozen food, storing
or making ice-cream and making ice cubes. note 2
– One-, two- and three-star compartments are not suitable for the freezing of fresh
food. note 3
– For appliances without a 4-star compartment: this refrigerating appliance is not
suitable for freezing foodstuffs. note 4
– If the refrigerating appliance is left empty for long periods, switch off, defrost, clean,
dry, and leave the door open to prevent mould developing within the appliance.
Note 1,2,3,4: Please confirm whether it is applicable according to your product
compartment type.
For a freestanding appliance: this refrigerating appliance is not intended to be used
as a built-in appliance.

EN
6
2. ELECTRICAL INFORMATION
The nameplate, with all the electrical and technical data of this appliance, is located
on the rear panel.
The appliance should be installed in accordance with national wiring regulations.
Be sure the device is grounded properly. Proper grounding is important as it minimizes
for protection against electric shock hazards.
you intend to use is not adequately grounded or protected by a time delay fuse or
Ensure the wall socket is still accessible after the installation of the refrigerator.
Do not use extension cords or adapter plugs with this device.
Make sure not to cause damage to the electrical components (e.g. main plug, main
cable, compressor). Contact the Service or an electrician to change the electrical
components.
To avoid personal injury, always disconnect the power supply of the device, before
maintenance.
disconnect the plug from the wall socket by pulling on the cord.
3. SOCIABLE REMARKS
ENVIRONMENTAL PROTECTION
Disposal of equipment no longer used:
Please follow the instructions below, when using this refrigerator in European countries.
This appliance requires special treatment for disposal. In the European Union,
electronic equipment must not be treated as domestic waste, but must be disposed of
professionally in accordance with Directive 2002/96/EC of the European Parliament and
Council of 27th January 2003 concerning old electrical and electronic equipment. The
disposal of this unit should follow all legal requirements and should not be disposed as
unsorted municipal waste.
The hazardous substances can leak into the ground water supply thus entering the food
chain, endangering your health and the environment.
There are several alternative solutions for disposal. Please remove all doors before
disposal to prevent children’s accidental trapping.
A) Your local municipality has established free collection systems for electronic
waste.
B) Your local retailer upon purchase of a new product.
C) The manufacturer may accept the old appliance for disposal.
D) Old appliances sometimes contain valuable resources for scrap metal
dealers.

EN 7
For warranty purposes, please
note the SN (serial number).
The SN is labeled opposite the
device.
Please refer to the electronic
warranty instructions,
in the last page (English
section) of this manual.
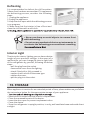
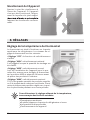
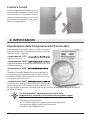
4. STEPS BEFORE USE
Mini Bar
SN: D2002255780115715200209
User's manual

EN
8
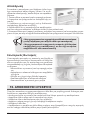
8
910
1
2
4
4
4
3
6
6
7
5
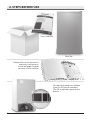
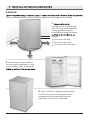
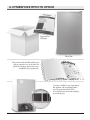
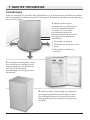
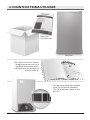
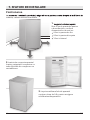
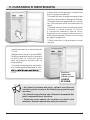
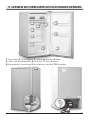
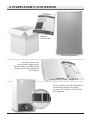
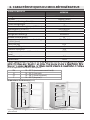
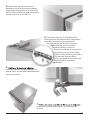
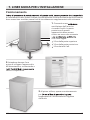
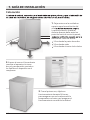
1. Thermostat 2. Defrosting Pan 3. Interior Light 4. Shelf
5. Bucket 6. Door Compartments 7. Bottle Rack 8. Reversible Door
9. Adjustable Foot 10. Power Cord
5. GETTING TO KNOW YOUR MINI BAR

EN 9
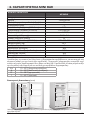
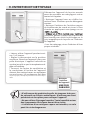
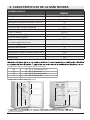
6. MINI BAR FEATURES
Place the appliance in a location where the ambient temperature corresponds to the
ambient temperature:
SN 10 - 32ºC (cold environment)
N 16 - 32ºC (normal)
ST 16 - 38ºC (semi-tropical)
T 16 - 43ºC (tropical)
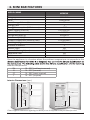
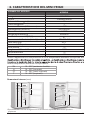
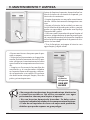
Interior Dimensions (mm)
*There might be a deviation regarding the above prices. Kindly refer to the purchased product.
600
750
145
265 155
160
75
75
175
115
175
120
150
160
360
95
400
320
355
100
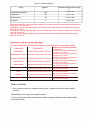
MODEL NAME MP862W
Category MINI BAR
Color Silver/White
Total Storage Volume (L) 93
Energy Class F
Energy Consumption (kWh/annum) 107
Power Supply (V/Hz/Ph) 220-240/50/1
Climate Class N/ST/T
Refrigerant/Mass (g) R600a/24
Noise Level [dB(A)] 41
Product Dimensions (WxDxH) (mm) 472x450x860
Net Weight (Kg) 20.3
Number of shelves 3
Interior Light YES
Power Cord Length (mm) 1700
Reversible Door YES
Built-in NO

EN
10
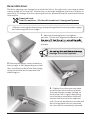
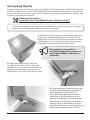
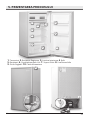
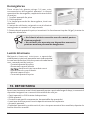
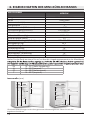
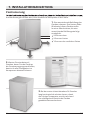
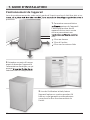
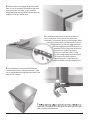
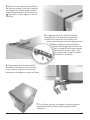
7. INSTALLATION GUIDELINES
1.
ventilation surrounding the
unit. The rear end (backside)
of this appliance should
stand against a wall allowing
follows:
10cm from the top
10cm from the back
10cm from the rest sides
2. Wait at least 4 hours before
connecting the appliance to the
power supply, thus, allowing all
3. Upon initial use, operate continuously
for 24 hours, thus ensuring the correct
temperature is reached and smooth
operation of the unit is achieved.
Position
room should be well ventilated, without additional heating sources nearby.

EN 11
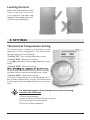
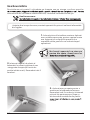
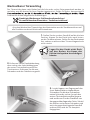
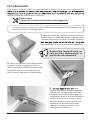
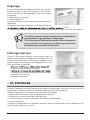
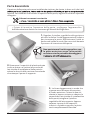
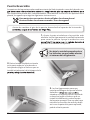
Reversible Door
The door opening can change from either the left or the right side, according to what
is best suited for its location. Ensure there is enough adequate space for the door to
open fully. To change the door opening direction, please follow the mentioned below
instructions:
Required tools:
Head Screwdriver / Slot head Screwdriver / Hexagonal Spanner
• Before reversing the door swing, unplug the appliance from the power supply
and remove goods from fridge.
2. Remove the plastic cover located on
the top right or left (depending on initial
door installation side) of the door hinge,
and unscrew the two screws with the
stabilizing pin.
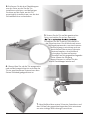
3. Slightly tilt so that you may have
access to the front bottom bracket.
Unscrew the two screws located on
the bottom left or right (depending
on initial door installation side)and
remove the foot from the opposite
side. Once top and bottom screws and
also the opposite foot are removed,
the door will be completely released.
1. Adjust the leveling foot to its highest
position. Tilt the unit slightly backwards to take
so that it will not slip during the door reversing
process.
damage the coolant system.

EN
12
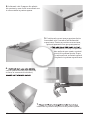
4. Remove the three plastic caps
from the side you are going to install
the door, and place them on the
side where the door was originally
installed, in order to cover the three
screw holes.
5. Place the door on the desired side
making sure it is in its upright position.
Screw the top two screws of the door
hinge. Slightly tilt, for better positioning,
and screw the bottom hinge
into place, and also screw the
removed foot on the other side.
Once completed clip on the top
plastic cap.
6. Check if door is aligned
horizontally and vertically and that
the door when shut is completely
sealed from all sides.
7. Finally tighten the bottom hinge and re-adjust
the foot on the opposite side for correct leveling.

EN 13
Leveling the Unit
Adjust the levelling foot at the
front of the unit. If the unit
is not aligned, the door and
magnetic seal alignments will
not be covered properly.
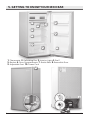
Thermorstat Temperature Setting
The thermostat is located in the interior at the
upper part of the refrigerator. The thermostat
setting levels are the following:
• Setting “OFF”: the cooling operation stops
• Setting “MIN”: Minimum cooling
It is suggested when the storage quantity is very
small.
• Setting “MED”: Normal cooling
be sure to set the thermostat to the MED setting
and wait 24hours before placing items inside.
• Setting “MAX”: Maximum cooling
If there is a large amount of frozen goods, or if
the outside temperature is high, the thermostat
knob may be set to its highest position, for a short
time.
For determining the correct temperature control setting,
consider the following:
Room temperature
How frequent the Mini Bar door opens
The quantity of stored goods
Position of the appliance
8. SETTINGS
x

EN
14
Prior to cleaning the appliance, un-plug
from the wall power socket, and remove
all shelves.
•Clean the appliance with a moist soft
cloth. Use only neutral detergents.
•Clean the unit’s interior with a weak
bicarbonate soda solution and rinse with
warm water applying a damp sponge or
cloth.
•Use a damp cloth to clean the exterior,
keep in mind the door must be shut to
avoid getting any polish on the magnetic
door seal or the interior of the unit.
•Upon cleaning, rinse the interior with
clean water and dry.
•Allow the appliance to dry for
approximately 1 to 2 hours.
•Set thermostat to middle position. Plug
into a power source. The appliance will
chill continuously until set temperature
has been reached.
•Frequently the air vents and the
condenser must be cleaned located at the
rear end of the appliance, using a vacuum
cleaner or a brush. The condenser should
always be clean, free of dust or any other
impurities.
•Do not use abrasive products, abrasive cleaning pads,
solvents or metal objects. Do not use water spray and
steam to clean the appliance.
•Do not use extreme moist cleaning pads. Any moisture
around the electric components, should be avoided.
•The use of a steam cleaner is prohibited, as this may
be very dangerous.
9. MAINTENANCE & CLEANING
Clean the
interior of
the appliance
ONCE A
MONTH

EN 15
Defrosting
It is recommended to defrost the chill box when
3-4mm frost has been accumulated. To implement
the defrosting process, consider the following
steps:
1. Unplug the appliance.
2. Empty the appliance.
3. Keep the door open while the defrosting process
is on progress.
4. Make sure that the interior is free of frost and
clean the chill box with a soft cloth.
• Never use sharp or metal objects to remove frost
while defrosting
• Do not use any mechanical devices or instruments to
accelerate the defrosting process without consulting
Interior Light
Thanks to the interior lighting you can have a better
insight of your products storage. In the event of a
malfunction, you can change the interior light bulb
of the refrigerator by yourself, following the below
steps:
• pull the plug from the socket
• remove the cover from the lighting
• check if the bulb is fully screwed in
• replace it with a bulb of the same type
• replace the cover
• put the plug into the socket
10. STORAGE
When appliance is inactive for an extended period of time, please make sure you follow
the instructions below, for the appropriate storage of your appliance:
• Remove all the items from the interior compartment.
• Clean the removable parts of the device.
• Leave the door open to prevent unpleasant odors.
• Cover the device.
• Store the refrigerator in upright position, in a dry, well ventilated area and avoid direct
sunlight.

EN
16
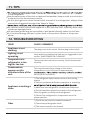
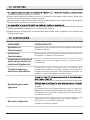
11. TIPS
in the refrigerator.
Avoid extensive use of the door on wet and hot weather, keep in mind, once the door
is opened to shut the soonest possible.
Do not place goods in direct contact with the wall of the refrigerator, always allow
some space.Suggested storage time 3days to 5days.
Be certain the wall behind the appliance is dirt and dust free, especially with outer
condenser equipped units.
Do
It is the most energy efficient to place food in the position shown in the picture
above.
not place goods that are not sealed or well packed directly under the chill box.
12. TROUBLESHOOTING
ISSUE CAUSE / REMMEDY
Appliance is not
working The plug is not in the socket. Put the plug in the socket.
Lighting is not
operating Lamp defective. Replace the bulb as it is suggested on the
section “MAINTENANCE & CLEANING”.
Temperature in
refrigerator is too
high or too low
Thermostat has been set incorrectly. Set the thermostat
correctly.
Condensation
appears on the
outside surface of the
unit
This may be caused by a change in the room’s
temperature. Use a soft cloth to wipe away any
technician for assistance.
Appliance is making a
noise
1) The refrigerant liquid causes noises in the cooling
system.
2) Noise is produced while the compressor is operating,
3) Make sure the refrigerator is levelled and balanced.
4) Goods have been placed incorrectly in the refrigerator.
Place the goods correctly in the refrigerator.
5) Check if the refrigerator’s components are in the
proper position.
Odor
1) Goods are not stored in sealed containers
2) There are spoiled goods inside
3) The interior needs to be cleaned

EN 17
The refrigerator door
can’t be properly
closed
Make sure items are not blocking the door.
Make sure the refrigerator is not tilted.
Long term operation
of the compressor
It is normal if the compressor runs for a long time during
high ambient temperatures.
Allow warm and hot goods to chill prior to placing them
in the unit.
Avoid the frequent opening of the door.
There is ice all around
the chill box Follow the “defrosting process” mentioned on Section 9.
All the pictures in the manual are for explanatory purposes only. The actual shape of the
The company may not be held responsible for any misprinted information. The design and
change without any prior notice.
Please consult with the manufacturer at +30 211 300 3300 or with the Sales agency for
further details. Any future updates to the manual will be uploaded to the service website,
and it is advised to always check for the latest version.
Scan here to download the latest version of this manual.
www.inventorappliances.com/manuals

。
。
+。+
+ 。+
。 + 。+
。 + 。+
。。’ ;
。。’ ;
‘
。’ ;
‘
。。’ ;
S
S
S
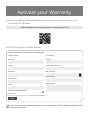
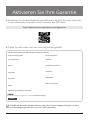
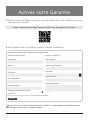
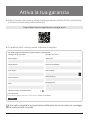
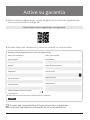
Dear customer

Full Name*
Address*
Postal Code*
Phone Number*
E-mail*
Unit Type*
Serial Number of the unit*
Date of Purchase*
Invoice Number*
Additional Details
Subscribe to Inventor's Newsletter
Owner details Unit details
To activate the warranty card, please ll in the following elds
Activate your Warranty
l Fill all the elds as shown below
þ
once the warranty submission has been completed a conrmation message will be
sent to your email
* Required eld
With the current warranty card you accept the terms and conditions.
SEND
l Visit our web site and activate your warranty via the below link or by
scanning the QR code
https://www.inventorappliances.com/warranty-card

20 GR
Αγαπητέ καταναλωτή,
Συγχαρητήρια για την επιλογή σας!
Τα Inventor Mini Bar είναι εδώ για να καλύψουν πλήθος
αναγκών σας, από τον εξοπλισμό μιας ξενοδοχειακής
μονάδας μέχρι ένα μικρό φοιτητικό νοικοκυριό!
Ενεργειακής κλάσης F, χαμηλής κατανάλωσης, με μο-
ναδικό σχεδιασμό και χαρακτηριστικά, είναι μερικοί μό-
νο λόγοι που τα Mini Bar της Inventor αποτελούν την
απόλυτη λύση για εσάς.
Παρακαλούμε διαβάστε προσεκτικά το εγχειρίδιο χρή-
σης και γνωρίστε το Mini Bar σας μέσα από αναλυτικές
οδηγίες, ώστε να εξασφαλίσετε μέγιστες αποδόσεις με
τον πιο οικονομικό τρόπο.
La page est en cours de chargement...
La page est en cours de chargement...
La page est en cours de chargement...
La page est en cours de chargement...
La page est en cours de chargement...
La page est en cours de chargement...
La page est en cours de chargement...
La page est en cours de chargement...
La page est en cours de chargement...
La page est en cours de chargement...
La page est en cours de chargement...
La page est en cours de chargement...
La page est en cours de chargement...
La page est en cours de chargement...
La page est en cours de chargement...
La page est en cours de chargement...
La page est en cours de chargement...
La page est en cours de chargement...
La page est en cours de chargement...
La page est en cours de chargement...
La page est en cours de chargement...
La page est en cours de chargement...
La page est en cours de chargement...
La page est en cours de chargement...
La page est en cours de chargement...
La page est en cours de chargement...
La page est en cours de chargement...
La page est en cours de chargement...
La page est en cours de chargement...
La page est en cours de chargement...
La page est en cours de chargement...
La page est en cours de chargement...
La page est en cours de chargement...
La page est en cours de chargement...
La page est en cours de chargement...
La page est en cours de chargement...
La page est en cours de chargement...
La page est en cours de chargement...
La page est en cours de chargement...
La page est en cours de chargement...
La page est en cours de chargement...
La page est en cours de chargement...
La page est en cours de chargement...
La page est en cours de chargement...
La page est en cours de chargement...
La page est en cours de chargement...
La page est en cours de chargement...
La page est en cours de chargement...
La page est en cours de chargement...
La page est en cours de chargement...
La page est en cours de chargement...
La page est en cours de chargement...
La page est en cours de chargement...
La page est en cours de chargement...
La page est en cours de chargement...
La page est en cours de chargement...
La page est en cours de chargement...
La page est en cours de chargement...
La page est en cours de chargement...
La page est en cours de chargement...
La page est en cours de chargement...
La page est en cours de chargement...
La page est en cours de chargement...
La page est en cours de chargement...
La page est en cours de chargement...
La page est en cours de chargement...
La page est en cours de chargement...
La page est en cours de chargement...
La page est en cours de chargement...
La page est en cours de chargement...
La page est en cours de chargement...
La page est en cours de chargement...
La page est en cours de chargement...
La page est en cours de chargement...
La page est en cours de chargement...
La page est en cours de chargement...
La page est en cours de chargement...
La page est en cours de chargement...
La page est en cours de chargement...
La page est en cours de chargement...
La page est en cours de chargement...
La page est en cours de chargement...
La page est en cours de chargement...
La page est en cours de chargement...
La page est en cours de chargement...
La page est en cours de chargement...
La page est en cours de chargement...
La page est en cours de chargement...
La page est en cours de chargement...
La page est en cours de chargement...
La page est en cours de chargement...
La page est en cours de chargement...
La page est en cours de chargement...
La page est en cours de chargement...
La page est en cours de chargement...
La page est en cours de chargement...
La page est en cours de chargement...
La page est en cours de chargement...
La page est en cours de chargement...
La page est en cours de chargement...
La page est en cours de chargement...
La page est en cours de chargement...
La page est en cours de chargement...
La page est en cours de chargement...
La page est en cours de chargement...
La page est en cours de chargement...
La page est en cours de chargement...
La page est en cours de chargement...
La page est en cours de chargement...
La page est en cours de chargement...
La page est en cours de chargement...
La page est en cours de chargement...
-
 1
1
-
 2
2
-
 3
3
-
 4
4
-
 5
5
-
 6
6
-
 7
7
-
 8
8
-
 9
9
-
 10
10
-
 11
11
-
 12
12
-
 13
13
-
 14
14
-
 15
15
-
 16
16
-
 17
17
-
 18
18
-
 19
19
-
 20
20
-
 21
21
-
 22
22
-
 23
23
-
 24
24
-
 25
25
-
 26
26
-
 27
27
-
 28
28
-
 29
29
-
 30
30
-
 31
31
-
 32
32
-
 33
33
-
 34
34
-
 35
35
-
 36
36
-
 37
37
-
 38
38
-
 39
39
-
 40
40
-
 41
41
-
 42
42
-
 43
43
-
 44
44
-
 45
45
-
 46
46
-
 47
47
-
 48
48
-
 49
49
-
 50
50
-
 51
51
-
 52
52
-
 53
53
-
 54
54
-
 55
55
-
 56
56
-
 57
57
-
 58
58
-
 59
59
-
 60
60
-
 61
61
-
 62
62
-
 63
63
-
 64
64
-
 65
65
-
 66
66
-
 67
67
-
 68
68
-
 69
69
-
 70
70
-
 71
71
-
 72
72
-
 73
73
-
 74
74
-
 75
75
-
 76
76
-
 77
77
-
 78
78
-
 79
79
-
 80
80
-
 81
81
-
 82
82
-
 83
83
-
 84
84
-
 85
85
-
 86
86
-
 87
87
-
 88
88
-
 89
89
-
 90
90
-
 91
91
-
 92
92
-
 93
93
-
 94
94
-
 95
95
-
 96
96
-
 97
97
-
 98
98
-
 99
99
-
 100
100
-
 101
101
-
 102
102
-
 103
103
-
 104
104
-
 105
105
-
 106
106
-
 107
107
-
 108
108
-
 109
109
-
 110
110
-
 111
111
-
 112
112
-
 113
113
-
 114
114
-
 115
115
-
 116
116
-
 117
117
-
 118
118
-
 119
119
-
 120
120
-
 121
121
-
 122
122
-
 123
123
-
 124
124
-
 125
125
-
 126
126
-
 127
127
-
 128
128
-
 129
129
-
 130
130
-
 131
131
-
 132
132


Inventor MP862W Refrigerator Mini Bar Manuel utilisateur
- Taper
- Manuel utilisateur
dans d''autres langues
Documents connexes
-
 Inventor MP850S Refrigerator Mini Bar Manuel utilisateur
-
 Inventor MP862W Mini Bar Refrigerator Manuel utilisateur
-
 Inventor MB492S Mini Bar Refrigerator Manuel utilisateur
-
 Inventor MB492S Mini Bar Refrigerator Manuel utilisateur
-
 Inventor DP1710NFW Double Door Refrigerator Manuel utilisateur
-
 Inventor MB490W Refrigerator Mini Bar Manuel utilisateur
-
 Inventor INVMS93A2 Manuel utilisateur


