Tefcold BLC5 Le manuel du propriétaire
- Catégorie
- Chauffe-eau
- Taper
- Le manuel du propriétaire

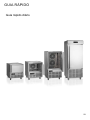
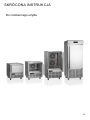
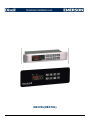
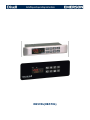
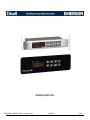
BLAST CHILLER/FREEZER
User Manual
PT
SL
85
97
SE
FR
IT
ES
25
49
61
73
EN 3
DK 13
FI 37
PL 109

2

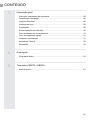
CONTENTS
1.
2.
3.
Important safety instructions .................................................................................. 4
Unpacking and installation ..................................................................................... 4
Electrical connection .............................................................................................. 5
Start-up of the cabinet ........................................................................................... 5
Capacity ................................................................................................................. 5
Recommendations for use ..................................................................................... 5
Blast chilling cycle ................................................................................................. 6
Shock freezing cycle .............................................................................................. 6
Cleaning and maintenance .................................................................................... 6
Service ................................................................................................................... 7
Disposal ................................................................................................................. 7
Technical manual ............................................................................................... 121
Daily quick guide ................................................................................................... 9
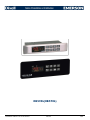
General information
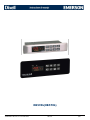
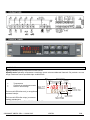
Thermostat XB570L / XB590L
Quick guide
3

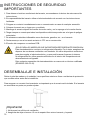
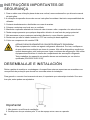
IMPORTANT SAFETY INSTRUCTIONS
Important !
1. To obtain full use of the cabinet, we recommend reading this instruction manual.
2. It is the user’s responsibility to operate the appliance in accordance with the instructions given.
3. Contact your dealer immediately in case of any malfunctions.
4. Place the cabinet in a dry and ventilated place.
5. Keep the cabinet away from strongly heat-emitting sources and do not expose it to direct sunlight.
6. Always keep in mind that all electrical devices are sources of potential danger.
7. Do not store inammable material such as thinner, gasoline etc. in the cabinet.
8. We declare that no asbestos nor any CFC are used in the construction.
9. The oil in the compressor does not contain PCB
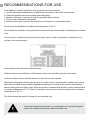
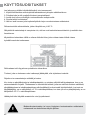
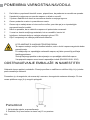
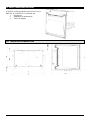
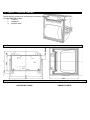
1. Do not block the ventilation holes.
2. Make sure that there is at least 15 cm. free space between the cabinet and the wall.
4
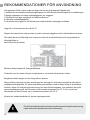
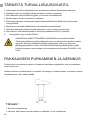
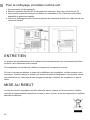
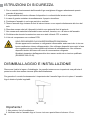
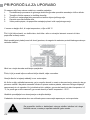
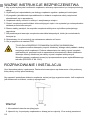
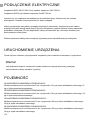
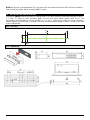
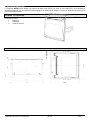
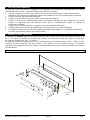
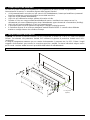
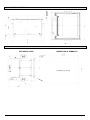
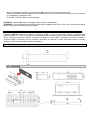
UNPACKING AND INSTALLATION
Remove the wooden pallet and the packing. External surfaces are supplied with a protection foil,
which must be removed before installation.
To ensure correct function it is important that the cabinet is level. If the cabinet is supplied with legs,
these can be adjusted.
ONLY FOR APPLIANCES WITH REFRIGERANT R290/R600a!
This appliance contains a ammable refrigerant, so make sure of good ventilation
around the appliance. Do not use mechanical devices when defrosting, this can cause
leakage of the cooling system. Do not use electrical appliances inside the refrigerated
storage compartment.
Any repair of the appliance should be carried out by a skilled technician (EN 60335-2-
89: 2010).

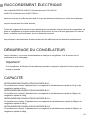
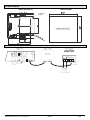
ELECTRICAL CONNECTION
Important !
BLC3, BLC5 and BLC10 cabinets operates on 230 V/50 Hz.
BLC14 operates on 3x400 V/50 Hz.
Make sure that the cabinet is connected to a separate electrical group to avoid overload.
The wall socket should be easily accessible.
All earthing requirements stipulated by the local electricity authorities must be observed. The cabinet
plug and wall socket should then give correct earthing. If in doubt, contact your local supplier or
authorized electrician.
The main electrical connections must be done by skilled electricians.
If the cabinet has been horizontally placed during transport, please wait 2 hours before starting up
the cabinet.
5
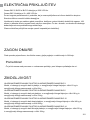
START-UP OF THE CABINET
Before use, we recommend that the cabinet is cleaned, see the section on maintenance and
cleaning.
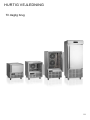
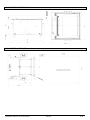
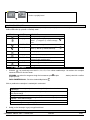
CAPACITY
BLC3 BLAST CHILLER/FREEZER
Model suitable to contain 3 trays with blast chilling capacity of 12kg and 8 kg in shock freezing.
BLC5 BLAST CHILLER/FREEZER
Model suitable to contain 5 trays with blast chilling capacity of 18kg and 14kg in shock freezing.
BLC10 BLAST CHILLER/FREEZER
Model suitable to contain 10 trays with blast chilling capacity of 40kg and 28 kg in shock freezing.
BLC14 BLAST CHILLER/FREEZER
Model suitable to contain 14 trays with blast chilling capacity of 55kg and 38kg in shock freezing.

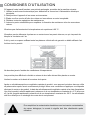
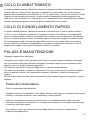
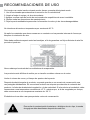
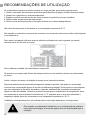
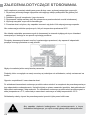
RECOMMENDATIONS FOR USE
If the appliance remains inactive for a long period, proceed as follows
1. Use the automatic isolating switch to deactivate connection to the main electrical line.
2. Clean the appliance and surrounding areas thoroughly.
3. Spread a thin layer of cooking oil onto the stainless steel surfaces
4. Carry out all maintenance operations
5. Leave the door ajar to prevent the formation of mould and / or unpleasant odour.
Do not insert foodstus that are above the temperature of 90 °C.
Do not stack the materials to be preserved in contact with the internal walls so blocking the circulation
of air.
There must be a sucient space between the trays used in order to guarantee a sucient ow of
cold air on the entire product.
Never obstruct the inlet of the evaporator fans.
Products that are more dicult to chill because of their size should be placed in the centre.
Limit the number of times and the duration of time the door are opened.
After blast chilling/shock freezing the product, it can be stored in a preservation cabinet after having
been duly protected .A tag should be applied describing the contents of the product, blast chilling/
shock freezing date and expiry date. When the product has been blast chilled it must be preserved at
a constant temperature of +2 °C while if it has been shock frozen it must be preserved at a constant
temperature of -20 °C.
The chiller should be used for storage for short periods only.
To prevent bacterial contamination or contamination of any other biological
nature, the needle probe must be disinfected after use.
6

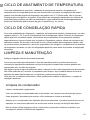
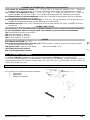
BLAST CHILLING CYCLE
7
With this operating modality the chiller keeps the temperature of the refrigerating compartment close
to zero during the entire chilling process in order to ensure a gradual drop in the temperature of the
product to +3 °C.In this way, ice crystals do not form on the surface of the product .This blast chilling
method should be used preferably for products that are not packed and whose physical/organoleptic
characteristics could be damaged by the formation of supercial ice (e.g. sh)
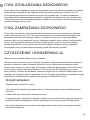
SHOCK FREEZING CYCLE
With this blast chilling modality the blast chiller maintains the temperature at a negative value below
-18 °C which is the end temperature of shock freezing .For shock freezing to be successful and fast,
food should be in small pieces, especially if it has a high fat content. The largest pieces should be
placed in central trays .If it takes longer than standard time to shock freeze and the sizes cannot
be reduced, decrease the quantity and precool the chiller compartment by starting an empty shock
freezing cycle before shock freezing the product.
CLEANING AND MAINTENANCE
Switch o the electrical connection at the socket.
The cabinet must be periodically cleaned. Clean the external and internal surfaces of the cabinet with
a light soap solution and subsequently wipe dry. External surfaces can be maintained using steel oil.
Do not spray the appliance with direct jets of water or using high pressure appliances.
Do not use iron wool. brushes or scrapers to clean the stainless steel as ferrous particles could be
deposited which ,on oxidizing, could lead to rust.
To remove hardened residues, use wooden or plastic spatulas or abrasive rubber pads.
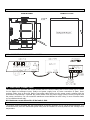
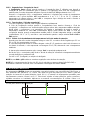
Clean the condenser
Clean the condenser periodically.
As the ns of the condenser are very sharp, always wear protective gloves for the next phases.
Use protective masks and glasses in the presence of dust.
Whenever the condenser has a deposit of dust in correspondence with the ns, this can be
removed using a suction device or with a brush applied, using a vertical movement along the
direction of the ns.
No other instruments must be used, which may deform the ns and therefore the eciency of the
appliance.

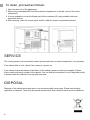
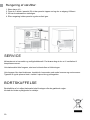
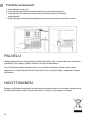
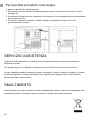
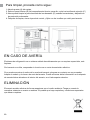
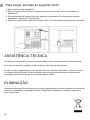
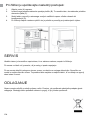
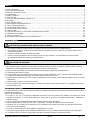
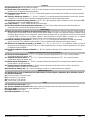
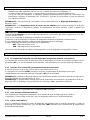
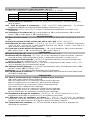
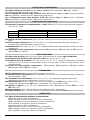
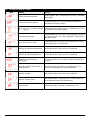
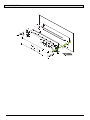
To clean, proceed as follows:
1. Open the door (A) of the appliances.
2. Remove the lower panel(B) from the technical compartment: to do this, remove the screw
fasteners(C)
3. It is now possible to clean the nned part of the condenser (D) using suitable tools and
protection devices.
4. After cleaning, close the control panel and x it with the screws removed beforehand.
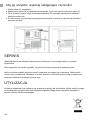
SERVICE
The cooling system is a hermetically sealed system and does not require supervision, only cleaning.
If the cabinet fails to cool, check if the reason is a power cut.
If you cannot locate the reason to the failure of the cabinet, please contact your supplier. Please
inform model and serial number of the cabinet. You can nd this information on the rating label which
is placed inside the cabinet in the top right hand side.
DISPOSAL
Disposal of the cabinet must take place in an environmentally correct way. Please note existing
regulation on disposal. There may be special requirements and conditions which must be observed.
8

9
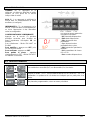
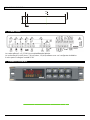
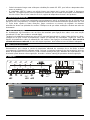
QUICK GUIDE
For the daily use

10
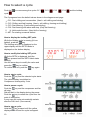
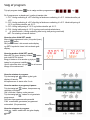
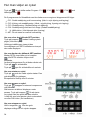
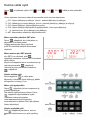
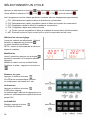
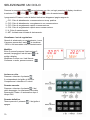
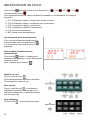
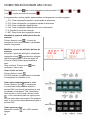
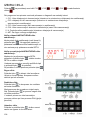
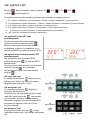
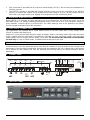
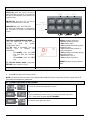
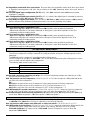
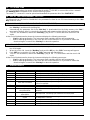
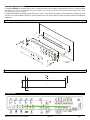
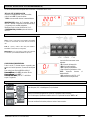
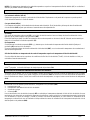
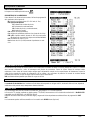
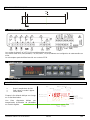
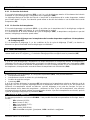
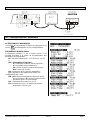
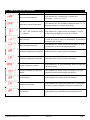
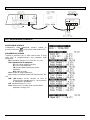
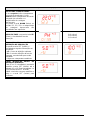
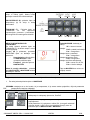
How to select a cycle
Push the to move among the cycles CY1 , CY2 , CY3 , CY4 and the holding
cycle .
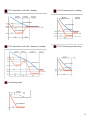
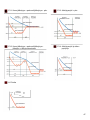
The 5 programs have the default values shown in the diagrams next page.
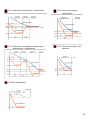
CY1: Fast chilling and conservation. (Hard + soft chilling and holding)
CY2: Chilling and fast freezing. (Hard + soft chilling, freezing and holding)
CY3: Fast freezing. (Fast freezing and holding)
CY4: Fast freezing with alarm and stop. (Only fast freezing)
H: Hold mode function. (Hard chill or freezing)
dEF: For starting a manual defrost.
1.
2.
3.
4.
5.
6.
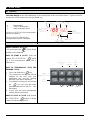
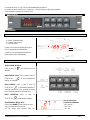
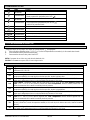
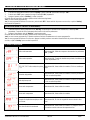
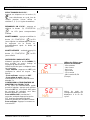
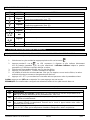
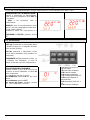
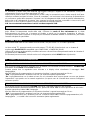
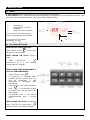
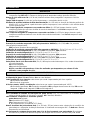
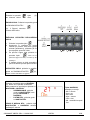
How to display the holding SET point.
While the Holding cycle is running (H-icon
lighted), push the key.
The Holding set point is displayed on the
upper display and the SETH labels is
displayed on the bottom display.
How to modify the holding SET point.
While the SETH is displayed, hold the
key pressed until the SETH label starts
ashing.
Use the arrow keys to modify the value and
press the key to conrm.
To conrm and exit, push the key again.
How to start a cycle.
Push the key and the selected cycle starts.
The yellow display is switched on.
Compressor is delayed by 3 min.
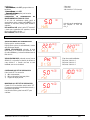
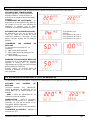
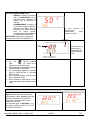
How to pause a cycle.
Push the key and the compressor and fan
will stop.
Stb will ash in the display during the pause.
Push the key to restart the cycle from the
point of interruption.
In any case the cycle automatically restarts
after the PAU time. (See manual)
How to stop a cycle.
Hold the key pressed untill the yellow
display switch o and the cycle is stopped.

11
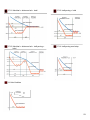
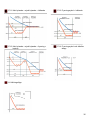
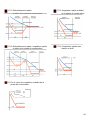
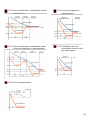
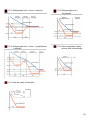
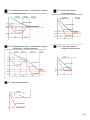
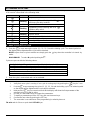
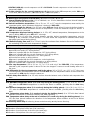
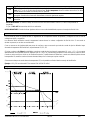
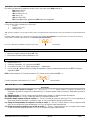
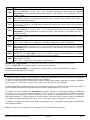
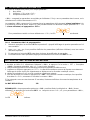
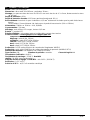
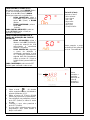
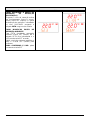
CY1: Hard chill + soft chill + holding CY3: Freezing cycle + holding
CY2: Hard chill + soft chill + freezing + holding CY4: Freezing cycle then stop
H: Holding mode

© TEFCOLD A/S 2022
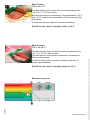
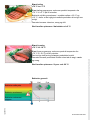
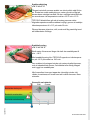
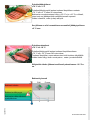
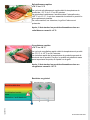
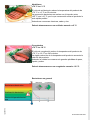
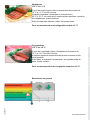
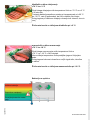
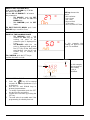
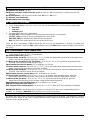
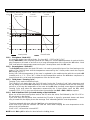
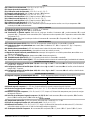
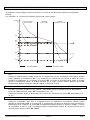
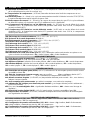
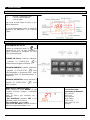
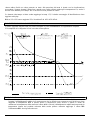
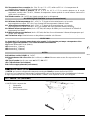
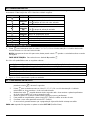
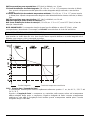
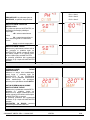
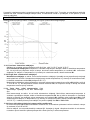
Blast Chillers
+70 °C to +3 °C
The blast chilling cycle reduce the product temperature from
+70 °C to +3 °C in 90 minuttes.
Bacterial generation is accelerating in the gap between +60 °C
and +10 °C, therefore it is essential to cool the product as fast
as possible.
Furthermore vitamins, taste and odour are preserved.
Should then be stored in normally chiller at +2 °C.
Bacterials in general
Bacterials destroyed
Bacterial acceleration
Bacterial reduction/stop
Chill Freeze
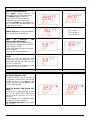
Blast Freezers
+70 °C to -18 °C
The blast freezing cycle reduce the product temperature from
+70 °C to -18 °C in 240 minuttes.
The fast reduction of the product temperature increases the
lifetime of the product.
Furthermore the quality is preserved without major loss of
weight, liquid and taste.
Should then be stored in normally freezer at -20 °C.
rfj_220502

PT
SL
85
97
SE
FR
IT
ES
25
49
61
73
DK 13
FI 37
PL 109
BLÆST-KØLER/FRYSER
Brugsvejledning

14

INDHOLD
1.
2.
3.
Vigtige informationer ............................................................................................ 16
Udpakning og opstilling ....................................................................................... 16
El-tilslutning ......................................................................................................... 17
Opstart ................................................................................................................. 17
Køle kapacitet ...................................................................................................... 17
Generelle anvisninger .......................................................................................... 17
Nedkølings program ............................................................................................ 18
Indfrysnings program ........................................................................................... 18
Rengøring og vedligehold .................................................................................... 18
Service ................................................................................................................. 19
Bortskaelse ........................................................................................................ 19
Teknisk manual .................................................................................................. 121
Kort vejledning om programmer, til daglig brug .................................................... 21
Generel information
Termostat XB570L / XB590L
Hurtig vejledning
15

VIGTIGE INFORMATIONER
Vigtigt !
1. For at få det fulde udbytte af kølemøblet, bør De læse denne brugsvejledning igennem.
2. Det er brugers ansvar at anvende kølemøblet i henhold til instruktionerne.
3. Kontakt omgående forhandleren, såfremt der opstår fejl ved kølemøblet.
4. Kølemøblet bør anbringes i et tørt og tilstrækkeligt ventileret rum.
5. Kølemøblet bør ikke placeres i nærheden af varmekilder eller direkte sollys.
6. Bemærk at alle elektriske apparater kan medføre farer.
7. Opbevar ikke eksplosionsfarlige stoer, f.eks. gas, benzin, æter og lignende.
8. Der er ikke brugt asbest eller CFC i konstruktionen.
9. Olien i kompressoren indeholder ikke PCB.
1. Placer ikke genstande der kan blokere ventilations huller foran kølemøblet.
2. Sørg for at der er mindst 15 cm. fri luft mellem kølemøblets bagside og væg.
16
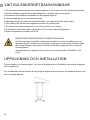
UDPAKNING OG OPSTILLING
Kølemøblet fjernes fra pallen og udpakkes. Udvendige overader er beskyttet af en folie, denne
fjernes inden installation.
For at kølemøblet fungerer korrekt er det vigtigt at det er i vater, hvis møblet er forsynet med ben kan
de justeres.
KUN FOR KØLEMØBLER MED KØLEMIDDEL R290 ELLER R600a.
Kølemøblet indeholder det energirigtige og ikke ozonnedbrydende kølemiddel R600a/
R290. Da R600a/R290 er en brandfarlig gasart, er det vigtigt, at kølekredsløbet ikke
beskadiges under transport og ved installering.
Hvis kølekredsløbet alligevel beskadiges, skal du undgå at bruge åben ild i nærheden
af køleskabet, ligesom der heller ikke må tilsluttes strøm til skabet. Sørg desuden for
god udluftning i rummet. Er du i tvivl, skal du kontakte din leverandør.
Alle reparationer på kølekredsløbet skal foretages af en godkendt kølemontør
(EN 60335-2-89: 2010).

EL-TILSLUTNING
Vigtigt !
BLC3, BLC5 og BLC10 er designet til 230 V/50 Hz.
BLC14 er designet til 3x400 V/50 Hz.
For at undgå overbelastning skal alle tilsluttes deres egen separate sikrings-gruppe.
Stikproppen skal være let tilgængelig.
Alle elektriske tilslutninger inklusiv jordforbindelser skal være godkendt af en el-installatør.
Hvis kølemøblet har ligget ned under transport, anbefales det at det står opret mindst 2 timer inden
det tilsluttes.
17
OPSTART
Inden ibrugtagning, anbefaler vi at kølemøblet rengøres som anvist i afsnittet rengøring.
KØLEKAPACITET
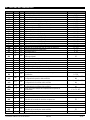
BLC3
Kan rumme 3 GN1/1 kantiner og kan nedkøle 12 kg eller indfryse 8 kg.
BLC5
Kan rumme 5 GN1/1 kantiner og kan nedkøle 18 kg eller indfryse 14 kg.
BLC10
Kan rumme 10 GN1/1 kantiner og kan nedkøle 40 kg eller indfryse 28 kg.
BLC14
Kan rumme 14 GN1/1 kantiner og kan nedkøle 55 kg eller indfryse 38 kg.

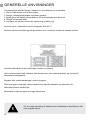
GENERELLE ANVISNINGER
Hvis kølemøblet ikke skal bruges i længere tid, bør følgende trin overholdes:
1. Afbryd / træk stikket ud til el-forsyningen.
2. Rengør indvendige/udvendige overader grundigt.
3. Sprøjt gerne lidt stålolie på overaderne, så de er beskyttet mod yverust.
4. Rengør kondensator lter.
5. Lad døren stå på klem så der ikke opstår mug og dårlig lugt.
Kom ikke varer i kølemøblet med en temperatur over 90 °C.
Kantiner må ikke overfyldes og må ikke blokere for fri ventilation mellem de indsatte kantiner.
Fyld ikke kølemøblet så den indvendige ventilator er blokeret.
Hvis et større produkt skal nedkøles, skal det placeres i den miderste position og i henhold til
kølemøblets kølekapacitet.
Begræns eller undlad døråbninger under et program.
Efter et program-forløb skal varene mærkes med dato/tid-mærkater og opbevares i.h.t.
fødevarestyrelsens anvisninger.
Kølemøblet er ikke beregnet som lager-køler/fryser.
For at undgå spredning af bakterier skal indsiksføleren desinceres efter
hver program-cyklus.
18

NEDKØLINGS PROGRAM
19
Program der holder temperaturen i kølemøblet tæt på 0 °C under hele programmet.
Det forhindrer at der kommer krystaller på overaden af produkterne og at de nedkøles til +3 °C
hurtigst muligt.
Varer skal efterfølgende forsegles med folie og opbevares på køl.
INDFRYSNINGS PROGRAM
Program der holder temperaturen i kølemøblet under - 28 °C under indfrysning, indtil
kernetemperaturen er - 18 °C. Fordel produkter jævnt i hele kølemøblet for den bedste udnyttelse.
Produkter med højt fedtprocent kræver længere tid og skal placeres i miderste position for bedste
ydelse. Det kan være en fordel at køre et nedkølings program inden hvis det større produkter.
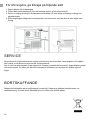
RENGØRING OG VEDLIGEHOLD
Afbryd kølemøblet ved stikkontakten.
Kølemøblet bør rengøres dagligt. Indvendige og udvendige overader rengøres med mildt
opvaskemiddel i varmt vand, og aftørres med en tør klud. Udvendige overader kan vedligeholdes
med stålolie.
Der må ikke bruges ståluld eller andre kulstofholdige værktøjer da det kan give yverust.
Der må ikke spules med vand direkte på kølemøblet.
Der må ikke bruges trykluft til at rense lter/kompressorrum.
Rengøring af kondensatoren
Kondensatoren skal rengøres jævnligt.
Da kondensatoren er opbygget af tynde og skarpe metalplader bør man bruge handsker under
rengøring.
Det anbefales også at bruge sikkerhedsbriller og åndedrætsmaske under rengøring.
Kondensatoren rengøres bedst med en støvsuger, med en blød børste der føres langs ribberne i
kondensatoren.
Der må ikke bruges skarpe værktøjer, da det kan forårsage lækage i kølekredsløbet.

Rengøring af støvlter:
1. Åben døren (A) .
2. Fjern de 2 skruer i panelet (B) så kan panelet vippes ned og der er adgang til lteret.
3. Nu kan kondensatoren støvsuges.
4. Efter rengøring lukkes panelet og skrues fast igen.
SERVICE
Kølesystemet er hermetisk og vedligeholdelsesfri. Det kræver dog at der er fri ventilation til
kompressorrummet.
Hvis kølemøblet ikke fungerer, start med at kontrollere el-tilslutningen.
Hvis årsagen ikke kan lokaliseres, kontakt din leverandør med model nummer og serienummer.
Typeskilt er typisk placeret inde i møblet i højre side og på bagsiden.
BORTSKAFFELSE
Bortskaelse af et udtjent kølemøbel skal foretages efter de gældende regler.
Kontakt de lokale myndigheder for detaljer.
20
La page est en cours de chargement...
La page est en cours de chargement...
La page est en cours de chargement...
La page est en cours de chargement...
La page est en cours de chargement...
La page est en cours de chargement...
La page est en cours de chargement...
La page est en cours de chargement...
La page est en cours de chargement...
La page est en cours de chargement...
La page est en cours de chargement...
La page est en cours de chargement...
La page est en cours de chargement...
La page est en cours de chargement...
La page est en cours de chargement...
La page est en cours de chargement...
La page est en cours de chargement...
La page est en cours de chargement...
La page est en cours de chargement...
La page est en cours de chargement...
La page est en cours de chargement...
La page est en cours de chargement...
La page est en cours de chargement...
La page est en cours de chargement...
La page est en cours de chargement...
La page est en cours de chargement...
La page est en cours de chargement...
La page est en cours de chargement...
La page est en cours de chargement...
La page est en cours de chargement...
La page est en cours de chargement...
La page est en cours de chargement...
La page est en cours de chargement...
La page est en cours de chargement...
La page est en cours de chargement...
La page est en cours de chargement...
La page est en cours de chargement...
La page est en cours de chargement...
La page est en cours de chargement...
La page est en cours de chargement...
La page est en cours de chargement...
La page est en cours de chargement...
La page est en cours de chargement...
La page est en cours de chargement...
La page est en cours de chargement...
La page est en cours de chargement...
La page est en cours de chargement...
La page est en cours de chargement...
La page est en cours de chargement...
La page est en cours de chargement...
La page est en cours de chargement...
La page est en cours de chargement...
La page est en cours de chargement...
La page est en cours de chargement...
La page est en cours de chargement...
La page est en cours de chargement...
La page est en cours de chargement...
La page est en cours de chargement...
La page est en cours de chargement...
La page est en cours de chargement...
La page est en cours de chargement...
La page est en cours de chargement...
La page est en cours de chargement...
La page est en cours de chargement...
La page est en cours de chargement...
La page est en cours de chargement...
La page est en cours de chargement...
La page est en cours de chargement...
La page est en cours de chargement...
La page est en cours de chargement...
La page est en cours de chargement...
La page est en cours de chargement...
La page est en cours de chargement...
La page est en cours de chargement...
La page est en cours de chargement...
La page est en cours de chargement...
La page est en cours de chargement...
La page est en cours de chargement...
La page est en cours de chargement...
La page est en cours de chargement...
La page est en cours de chargement...
La page est en cours de chargement...
La page est en cours de chargement...
La page est en cours de chargement...
La page est en cours de chargement...
La page est en cours de chargement...
La page est en cours de chargement...
La page est en cours de chargement...
La page est en cours de chargement...
La page est en cours de chargement...
La page est en cours de chargement...
La page est en cours de chargement...
La page est en cours de chargement...
La page est en cours de chargement...
La page est en cours de chargement...
La page est en cours de chargement...
La page est en cours de chargement...
La page est en cours de chargement...
La page est en cours de chargement...
La page est en cours de chargement...
La page est en cours de chargement...
La page est en cours de chargement...
La page est en cours de chargement...
La page est en cours de chargement...
La page est en cours de chargement...
La page est en cours de chargement...
La page est en cours de chargement...
La page est en cours de chargement...
La page est en cours de chargement...
La page est en cours de chargement...
La page est en cours de chargement...
La page est en cours de chargement...
La page est en cours de chargement...
La page est en cours de chargement...
La page est en cours de chargement...
La page est en cours de chargement...
La page est en cours de chargement...
La page est en cours de chargement...
La page est en cours de chargement...
La page est en cours de chargement...
La page est en cours de chargement...
La page est en cours de chargement...
La page est en cours de chargement...
La page est en cours de chargement...
La page est en cours de chargement...
La page est en cours de chargement...
La page est en cours de chargement...
La page est en cours de chargement...
La page est en cours de chargement...
La page est en cours de chargement...
La page est en cours de chargement...
La page est en cours de chargement...
La page est en cours de chargement...
La page est en cours de chargement...
La page est en cours de chargement...
La page est en cours de chargement...
La page est en cours de chargement...
La page est en cours de chargement...
La page est en cours de chargement...
La page est en cours de chargement...
La page est en cours de chargement...
La page est en cours de chargement...
La page est en cours de chargement...
La page est en cours de chargement...
La page est en cours de chargement...
La page est en cours de chargement...
La page est en cours de chargement...
La page est en cours de chargement...
La page est en cours de chargement...
La page est en cours de chargement...
La page est en cours de chargement...
La page est en cours de chargement...
La page est en cours de chargement...
La page est en cours de chargement...
La page est en cours de chargement...
La page est en cours de chargement...
La page est en cours de chargement...
La page est en cours de chargement...
La page est en cours de chargement...
La page est en cours de chargement...
La page est en cours de chargement...
La page est en cours de chargement...
La page est en cours de chargement...
La page est en cours de chargement...
La page est en cours de chargement...
La page est en cours de chargement...
La page est en cours de chargement...
La page est en cours de chargement...
La page est en cours de chargement...
La page est en cours de chargement...
La page est en cours de chargement...
La page est en cours de chargement...
La page est en cours de chargement...
La page est en cours de chargement...
La page est en cours de chargement...
La page est en cours de chargement...
La page est en cours de chargement...
La page est en cours de chargement...
La page est en cours de chargement...
La page est en cours de chargement...
La page est en cours de chargement...
La page est en cours de chargement...
La page est en cours de chargement...
La page est en cours de chargement...
La page est en cours de chargement...
La page est en cours de chargement...
La page est en cours de chargement...
La page est en cours de chargement...
La page est en cours de chargement...
La page est en cours de chargement...
La page est en cours de chargement...
La page est en cours de chargement...
La page est en cours de chargement...
La page est en cours de chargement...
La page est en cours de chargement...
La page est en cours de chargement...
La page est en cours de chargement...
La page est en cours de chargement...
La page est en cours de chargement...
La page est en cours de chargement...
La page est en cours de chargement...
La page est en cours de chargement...
La page est en cours de chargement...
La page est en cours de chargement...
La page est en cours de chargement...
La page est en cours de chargement...
La page est en cours de chargement...
La page est en cours de chargement...
La page est en cours de chargement...
La page est en cours de chargement...
La page est en cours de chargement...
La page est en cours de chargement...
La page est en cours de chargement...
La page est en cours de chargement...
La page est en cours de chargement...
La page est en cours de chargement...
La page est en cours de chargement...
La page est en cours de chargement...
La page est en cours de chargement...
La page est en cours de chargement...
La page est en cours de chargement...
La page est en cours de chargement...
La page est en cours de chargement...
La page est en cours de chargement...
La page est en cours de chargement...
La page est en cours de chargement...
La page est en cours de chargement...
La page est en cours de chargement...
La page est en cours de chargement...
La page est en cours de chargement...
La page est en cours de chargement...
La page est en cours de chargement...
La page est en cours de chargement...
La page est en cours de chargement...
La page est en cours de chargement...
-
 1
1
-
 2
2
-
 3
3
-
 4
4
-
 5
5
-
 6
6
-
 7
7
-
 8
8
-
 9
9
-
 10
10
-
 11
11
-
 12
12
-
 13
13
-
 14
14
-
 15
15
-
 16
16
-
 17
17
-
 18
18
-
 19
19
-
 20
20
-
 21
21
-
 22
22
-
 23
23
-
 24
24
-
 25
25
-
 26
26
-
 27
27
-
 28
28
-
 29
29
-
 30
30
-
 31
31
-
 32
32
-
 33
33
-
 34
34
-
 35
35
-
 36
36
-
 37
37
-
 38
38
-
 39
39
-
 40
40
-
 41
41
-
 42
42
-
 43
43
-
 44
44
-
 45
45
-
 46
46
-
 47
47
-
 48
48
-
 49
49
-
 50
50
-
 51
51
-
 52
52
-
 53
53
-
 54
54
-
 55
55
-
 56
56
-
 57
57
-
 58
58
-
 59
59
-
 60
60
-
 61
61
-
 62
62
-
 63
63
-
 64
64
-
 65
65
-
 66
66
-
 67
67
-
 68
68
-
 69
69
-
 70
70
-
 71
71
-
 72
72
-
 73
73
-
 74
74
-
 75
75
-
 76
76
-
 77
77
-
 78
78
-
 79
79
-
 80
80
-
 81
81
-
 82
82
-
 83
83
-
 84
84
-
 85
85
-
 86
86
-
 87
87
-
 88
88
-
 89
89
-
 90
90
-
 91
91
-
 92
92
-
 93
93
-
 94
94
-
 95
95
-
 96
96
-
 97
97
-
 98
98
-
 99
99
-
 100
100
-
 101
101
-
 102
102
-
 103
103
-
 104
104
-
 105
105
-
 106
106
-
 107
107
-
 108
108
-
 109
109
-
 110
110
-
 111
111
-
 112
112
-
 113
113
-
 114
114
-
 115
115
-
 116
116
-
 117
117
-
 118
118
-
 119
119
-
 120
120
-
 121
121
-
 122
122
-
 123
123
-
 124
124
-
 125
125
-
 126
126
-
 127
127
-
 128
128
-
 129
129
-
 130
130
-
 131
131
-
 132
132
-
 133
133
-
 134
134
-
 135
135
-
 136
136
-
 137
137
-
 138
138
-
 139
139
-
 140
140
-
 141
141
-
 142
142
-
 143
143
-
 144
144
-
 145
145
-
 146
146
-
 147
147
-
 148
148
-
 149
149
-
 150
150
-
 151
151
-
 152
152
-
 153
153
-
 154
154
-
 155
155
-
 156
156
-
 157
157
-
 158
158
-
 159
159
-
 160
160
-
 161
161
-
 162
162
-
 163
163
-
 164
164
-
 165
165
-
 166
166
-
 167
167
-
 168
168
-
 169
169
-
 170
170
-
 171
171
-
 172
172
-
 173
173
-
 174
174
-
 175
175
-
 176
176
-
 177
177
-
 178
178
-
 179
179
-
 180
180
-
 181
181
-
 182
182
-
 183
183
-
 184
184
-
 185
185
-
 186
186
-
 187
187
-
 188
188
-
 189
189
-
 190
190
-
 191
191
-
 192
192
-
 193
193
-
 194
194
-
 195
195
-
 196
196
-
 197
197
-
 198
198
-
 199
199
-
 200
200
-
 201
201
-
 202
202
-
 203
203
-
 204
204
-
 205
205
-
 206
206
-
 207
207
-
 208
208
-
 209
209
-
 210
210
-
 211
211
-
 212
212
-
 213
213
-
 214
214
-
 215
215
-
 216
216
-
 217
217
-
 218
218
-
 219
219
-
 220
220
-
 221
221
-
 222
222
-
 223
223
-
 224
224
-
 225
225
-
 226
226
-
 227
227
-
 228
228
-
 229
229
-
 230
230
-
 231
231
-
 232
232
-
 233
233
-
 234
234
-
 235
235
-
 236
236
-
 237
237
-
 238
238
-
 239
239
-
 240
240
-
 241
241
-
 242
242
-
 243
243
-
 244
244
-
 245
245
-
 246
246
-
 247
247
-
 248
248
-
 249
249
-
 250
250
-
 251
251
-
 252
252
-
 253
253
-
 254
254
-
 255
255


Tefcold BLC5 Le manuel du propriétaire
- Catégorie
- Chauffe-eau
- Taper
- Le manuel du propriétaire
dans d''autres langues
- italiano: Tefcold BLC5 Manuale del proprietario
- español: Tefcold BLC5 El manual del propietario
- português: Tefcold BLC5 Manual do proprietário
Documents connexes
-
Tefcold SK6310BT Le manuel du propriétaire
-
-
-
Nordcap DB125H-I Le manuel du propriétaire
-
-
-
-
-
-
Autres documents
-
Franke FST PLUS 1208 X Manuel utilisateur
-
Vemer FR NTC-4P3D Manuel utilisateur
-
AKO Advanced temperature controller for cold room store AKO-16524A /16525A Guide de démarrage rapide
-
GGM Gastro SFF1046NR Le manuel du propriétaire
-
AKO Temperature and moisture controller for cold room store AKO-16624 Guide de démarrage rapide
-
-
-
 Arcaboa 750CHVWH Le manuel du propriétaire
-
 Thomas & friends Track Master Mode d'emploi
-

