kaercher 6 P S Wet And Dry Vacuum Cleaner Manuel utilisateur
- Catégorie
- Aspirateurs
- Taper
- Manuel utilisateur


2English
WET/DRY VACUUM OPERATOR MANUAL
Contents
IMPORTANT
SAFETY
INSTRUCTIONS
When using this product basic precau-
tions should always be followed, in-
cluding the following:
READ ALL
INSTRUCTIONS
BEFORE USING
THIS MACHINE
This device is exclusively intended for
private household use.
몇WARNING
●Read all safety warnings and all
instructions. Failure to follow the
warnings and instructions may result
in electric shock, fire and/or serious
injury.
To reduce the risk of fire, electric
shock, or injury:
●Never leave the device unsuper-
vised while it is plugged in. Pull the
plug out of the power socket when
not using the device and before all
maintenance work.
●Turn off all controls before unplug-
ging
●Unplug before connecting accesso-
ries.
●Check that the outlet voltage match-
es the information on the type plate.
●Use only accessories recommend-
ed by the manufacturer.
●Use and store the device only in dry
indoor spaces at ambient tempera-
tures above 32 °F (0 °C). Protect the
device from moisture.
●Store the device in closed rooms.
●Store the device in a suitable loca-
tion after use to avoid tripping acci-
dents.
●Do not use the device outdoors or
on wet surfaces.
●Do not expose to rain.
●Repairs are only to be carried out by
qualified personnel. Ensure that on-
ly identical original spare parts are
installed.
●Immediately replace a damaged
power cable with an original part.
●If the power cable is damaged, or
the device has fallen down, has
been left outside or has been im-
mersed in water, please contact our
Customer Service department be-
fore using it.
●Never touch the device, plug or out-
let with wet hands.
●Do not carry the device by the power
cable.
●Protect the power cable from heat,
sharp edges, oil and moving parts.
WET/DRY VACUUM OPERATOR
MANUAL ............................................ 2
IMPORTANT SAFETY INSTRUC-
TIONS ................................................ 2
GROUNDING INSTRUCTIONS......... 3
Customer Service .............................. 5
Technical data .................................... 5
Environmental protection ................... 5
Accessories and spare parts.............. 5
Description of the device.................... 6
Mount the steering rollers and acces-
sory storage holder ............................ 7
Initial startup....................................... 8
Operation ........................................... 9
Care and service................................ 13
Troubleshooting guide........................ 14

English 3
●Always pull the plug and never the
cable in order to disconnect the de-
vice from the electrical outlet.
●Never use the device with an exten-
sion cord.
●Never use the device without a dust
container and / or filter.
●Do not vacuum any flammable or ig-
nitable liquids, e.g. gasoline. Do not
use the device in an environment
containing flammable or ignitable
liquids.
●Do not vacuum burning or glowing
objects, e.g. cigarettes, matches or
hot ash
●Only use the device for the intended
use.
●The device is not a toy. Exercise
special care when using the device
in the presence of children.
●Avoid vacuuming up hard and/or
sharp objects with the device. These
can damage the device and the fil-
ter.
●The device must be placed horizon-
tally on the floor during use.
●Unintentional starting of the device:
Ensure that the device is switched
off before lifting or transporting it.
●Exercise caution when using the de-
vice on stairs.
●Never insert objects into the device
openings. Do not use the device if
the device openings are blocked.
●Keep the device free of all materials
that can reduce the air flow, e.g.
dust, fluff or hair.
●Danger of being pulled in: Keep hair,
loose clothing, fingers and body
parts away from openings and mov-
ing parts in the device.
●Do not vacuum poisonous substanc-
es, e.g. chlorine bleach, ammonia,
drain cleaner.
●Connect to a properly grounded out-
let only. See grounding instructions.
SAVE THESE IN-
STRUCTIONS
GROUNDING
INSTRUCTIONS
●This device must be grounded. If it
should malfunction or break down,
grounding provides a path of least
resistance for electric current to re-
duce the risk of electric shock.
●This device is equipped with a cord
having an equipment grounding
conductor and ground plug.
●The plug must be inserted into an
appropriate outlet that is properly in-
stalled and grounded in accordance
with all local codes and ordinances.
WARNING:
●Improper connection of the equip-
ment grounding conductor can re-
sult in a risk of electric shock.
●Check with a qualified electrician or
service person if you are in doubt as
to whether the outlet is properly
grounded.
●Do not modify the plug provided with
the appliance.
●If it will not fit the outlet, have a prop-
er outlet installed by a qualified elec-
trician.
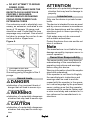
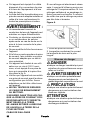
●This appliance is for use on a nomi-
nal 120-volt circuit, and has a
grounded plug that looks like the
plug illustrated in Fig.A.
●Make sure that the appliance is con-
nected to an outlet having the same
configuration as the plug. No adap-
tor should be used with this appli-
ance.

4English
●DO NOT ATTEMPT TO REPAIR
POWER CORD.
IN ALL CASES, MAKE SURE THE
RECEPTACLE IN QUESTION IS
PROPERLY GROUNDED.
NEVER REMOVE GROUNDING
PRONG FROM POWER PLUG.
EXTENSION CORDS
If an extension cord is absolutely nec-
essary, an extension cord rated a min-
imum of 15 ampere 14 gauge cord
should be used. Cords rated for less
amperage may overheat. Care should
be taken to arrange the cord so it can-
not be pulled or tripped over.
Figure A
1 Grounded outlet box
2 Current carrying prongs
Grounding prong is longest of the 3
prongs.
Hazard levels
DANGER
●Indication of an imminent threat of
danger that will lead to severe inju-
ries or even death.
몇WARNING
●Indication of a potentially dangerous
situation that may lead to severe inju-
ries or even death.
몇CAUTION
●Indication of a potentially dangerous
situation that may lead to minor inju-
ries.
ATTENTION
●Indication of a potentially dangerous
situation that may lead to damage to
property.
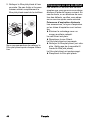
Intended use
Only use the device in private house-
holds.
The device is intended for use as a wet
and dry vacuum cleaner in accordance
with the descriptions and the safety in-
structions given in these operating in-
structions.
Cold ashes may only be vacuumed
with suitable accessories.
Protect the device from rain and do not
store it outdoors.
Note
The manufacturer is not liable for any
damage caused by improper use or in-
correct operation.
Owner/User Responsibility
The owner and/or user must have an
understanding of the manufacturer’s
operating instructions and warnings
before using this device.
Warning information should be empha-
sized and understood.
If the operator is not fluent in English,
the manufacturer’s instructions and
warnings shall be read to and dis-
cussed with the operator in the opera-
tor’s native language by the purchaser/
owner, making sure that the operator
comprehends its contents.Owner and/
or user must study and maintain for fu-
ture reference the manufacturer’s in-
structions.

English 5
Customer Service
Registration
Your device must be registered in order
to help with any questions or issues
that you have. You can register your
device at www.karcher-register.com
if located in the U.S.A.,
www.karcher/ca if located in Canada,
or www.karcher.com/mx if located in
Mexico.
Warranty
In the case of a warranty claim, you
can contact customer support. Please
see the contact information listed be-
low for either the USA, Canada, or
Mexico. You MUST provide your proof
of purchase in order to file a warranty
claim either via email, phone, or fax.
USA Customer Service
You can contact our Customer Service
department by phone at
1-800-537-4129 or via the website at
www.karcher-help.com
Mexico Customer Service
You can contact our Customer Service
department by phone at
01-800-024-13-13 or via the website at
www.karcher.com/mx.
Canada Customer Service
You can contact our Customer Service
department by phone at
1-800-465-4980 or via the website at
www.karcher.com/ca.
Scope of delivery
The scope of delivery for the device is
shown on the packaging. During un-
packing, check the contents for com-
pleteness. If any accessories are
missing or in the event of any shipping
damage, please notify our Customer
Service department as stated above
either by phone or via the website.
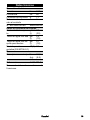
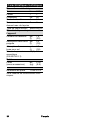
Technical data
Subject to technical changes without
notice.
Electrical connection
Voltage V 120
Frequency Hz 60
Power consumption A 11
Max. connection out-
put of socket
A6
Power cable type 3xAWG14SJTW
Device performance data
Tank content gal
(l)
7.9
(30)
Water absorption with
handle
gal
(l)
5.0
(19)
Water absorption with
floor nozzle
gal
(l)
4.7
(18)
Sound pressure level
(EN 60704-2-1)
dB(A) 74
Weight
Weight (without acces-
sories)
lbs
(kg)
21.8
(9.9)
Part number 1.628-375.0

6English
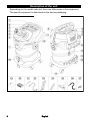
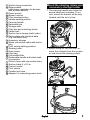
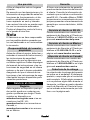
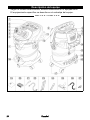
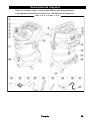
Description of the unit
Depending on the model selected, there are differences in the equipment.
The specific equipment is described on the device packaging.

English 7
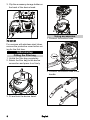
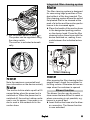
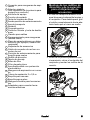
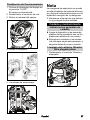
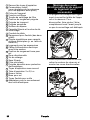
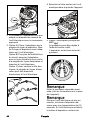
Mount the steering rollers and
accessory storage holder
1. The carrying handle also locks the
device head and container. To un-
lock, swivel the bracket all the way
forward until the lock is free.
2. Before using for the first time, re-
move the contents from the contain-
er and mount the steering rollers.
1.
2.
5x
1Suction hose connection
2Rotary switch
(with power regulation for devices
with a power socket)
3Power socket
4Blower function
5Filter cleaning button
6Handle parking position
7Carrying handle
8Recessed grip
9Storage area
10 Filter box and unlocking button
11 Cable hook
12 Suction hose storage (both sides)
13 Rating plate with technical data
(e.g. container size)
14 Accessory storage
15 Mains connection cable with mains
plug
16 Floor nozzle parking position
17 Steering roller
18 Drain screw
19 Filter bag
20 Flat pleated filter
21 Removable handle with electrostat-
ic protection
22 Suction hose with connection piece
23 Suction tubes 2 x 0.5 m
24 Crevice nozzle
25 Floor nozzle
26 Flexible tool hose
27 Adapter for connecting power tools

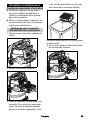
8English
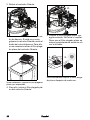
3. Clip the accessory storage holder on
the back of the device head.
Note
For versions with stainless steel tubes,
remove the protective cover before us-
ing for the first time.
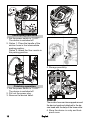
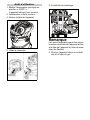
Initial startup
Fitting the filter bag
1. Unfold the filter bag completely.
2. Attach the filter bag to the device
connection and press it on firmly.
3. Fit and lock the device head.
Using accessories
1. Connect the suction hose.
2. Connect the suction hose to the
handle.
2.
1.
1.
1.
2.

English 9
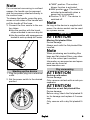
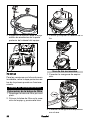
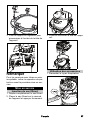
Note
For convenient vacuuming in confined
spaces, the handle can be removed
and the accessory attached directly to
the suction hose.
To release the handle, press the gray
areas on both sides of the handle and
pull the handle off the hose.
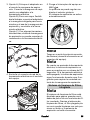
3. Connect the floor nozzle to the suc-
tion tubes.
Use the position with the brush
strips extended to vacuum dry dirt.
Use the position with squeegees ex-
tended to suck up damp dirt / water.
Starting up the device
1. Plug the power plug into a electrical
outlet.
2. Set the power switch to the desired
position.
"MAX" position: The suction /
blower function is activated.
MAX position : The suction is
activated automatically when a
power tool is connected.
Position "0 OFF": The device is
switched off.
Note
As long as the device is supplied with
power, the device socket can be used
as a power source.
Operation
ATTENTION
Missing flat pleated filter
Device damage
Always work with the flat pleated filter
inserted.
Note
When purchasing and installing filter
bags and flat pleated filters, pay atten-
tion to the current part numbers.
Information on accessories and spare
parts can be found at
www.kaercher.com.
Dry vacuuming
ATTENTION
Sucking cold ashes
Device damage
Only vacuum cold ash with an ash pre-
separator.
ATTENTION
Defective or wet flat pleated filter
Device damage
Before using, check the flat pleated fil-
ter for damage and replace it if neces-
sary.
Only vacuum with a dry flat pleated fil-
ter.

10 English
Note
Regularly replace the filter bag when
full as a filter bag that is too full could
be damaged. The filling level of the fil-
ter bag depends on the dirt being vac-
uumed. The filter bag should be
replaced more often in the case of fine
dust, sand, etc.
Wet vacuuming
ATTENTION
Wet vacuuming with a filter bag
Device damage
Do not use a filter bag when vacuum-
ing wet debris.
ATTENTION
Operation with full container
When the container is full, the float
switch closes the suction opening and
the device runs at a higher speed.
Switch off the device immediately and
empty the container.
Note
If the device falls over, the float can al-
so close. To make sure the device
works absorbent again, set up the de-
vice, switch it off, wait 5 seconds and
then switch it on again.
Working with power tools (only
for devices with a built-in socket)
몇CAUTION
Unintentional starting of the power
tool
Injuries or material damage
Make sure that the power tool is ready
for operation as soon as it is connected
to the device socket.
Note
Depending on the model selected, an
adapter or an adapter and a thin tool
hose are included in the scope of deliv-
ery.
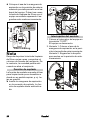
1. Connect the suction hose.
2. If necessary, the adapter can be ad-
justed to the connection diameter of
the power tool with a suitable tool.
3. Option A) Fit the adapter on the han-
dle of the suction hose. Connect the
suction hose to the power tool using
the adapter.
Option B) For more flexibility when
working, connect the adapter to the
thin tool hose and the handle of the
suction hose and connect it to the
power tool.
Option C) With some power tools,
the handle of the suction hose can
be connected directly to the power
tool.
4. Plug the power plug of the power
tool into the device socket.
B
C
A
D

English 11
5. Set the power switch to MAX .
The power can be regulated using
the rotary switch.
The suction is activated automati-
cally.
Note
Note the maximum connected load
(see information on the device socket).
Note
The suction turbine starts up with a 0.5
second delay when the power tool is
switched on. When the power tool is
switched off, the suction turbine contin-
ues to run for approx. 5 seconds in or-
der to suck in the residual dirt in the
suction hose.
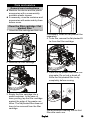
Integrated filter cleaning system
Note
The filter cleaning system is designed
for vacuuming large quantities of fine
dust without a filter bag inserted. The
filter cleaning system allows the soiled
flat pleated filter to be cleaned at the
push of a button and the suction perfor-
mance to be increased again.
Place the handle of the suction hose
in the designated parking position
on the device head. Press the filter
cleaning button three times with the
device switched on, waiting 4 sec-
onds between the individual actua-
tions.
Note
After pressing the filter cleaning button
several times, check the container for
its filling volume. Otherwise dirt can es-
cape when the container is opened
Blower function
The blower function can be used to
clean areas that are difficult to reach or
where vacuuming is not possible, e.g.
leaves in a gravel bed.
Insert the suction hose into the blow-
er connection. The blower function
is now activated.
1.
2.
D
Filter cleaning
3 x PUSH
1.
2.

12 English
Interrupting operation
1. Set the power switch to "0 OFF".
The device is switched off.
2. Option 1: Place the handle of the
suction hose in the intermediate
parking position.
Option 2: Attach the floor nozzle in
the parking position.
Finishing operation
1. Set the power switch to "0 OFF".
The device is switched off.
2. Pull out the power plug.
3. Remove the device head.
4. Empty the container.
5. Storage possibility:
Note
The suction hose can be wrapped around
the device head and attached to the de-
vice head with the help of the hose collar.
6. Store the device in a dry and frost-
proof room.

English 13
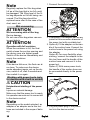
Care and service
General care instructions
Maintain the device and the plastic
accessories with a commercially
available plastic cleaner.
If necessary, rinse the container and
accessories with water and dry them
before reuse.
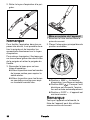
Clean the filter cartridge / flat
pleated filter
1. Unlock the filter cartridge and fold it out.
2. Remove the filter cartridge.
3. Empty the filter cartridge into a
waste container. In the case of
heavy soiling, tap the filter cartridge
against the edge of the waste con-
tainer. The flat pleated filter does not
have to be removed from the filter
cartridge.
If necessary, clean the flat pleated filter
separately.
4. To do this, remove the flat pleated fil-
ter from the filter cartridge.
5. Clean the flat pleated filter under run-
ning water. Do not rub or brush off.
Allow the flat pleated filter to dry
completely before reusing.
We recommend cleaning the flat fold
filter after each use.
2.
1.
1.
2.
1. 2.

14 English
Troubleshooting guide
Malfunctions often have simple causes
that you can remedy yourself using the
following overview. When in doubt, or
in the case of malfunctions not men-
tioned here, please contact your autho-
rized Customer Service.
Decreasing suction power
The accessories, suction hose or suc-
tion pipes are clogged.
Remove the blockage with a suit-
able tool.
The filter bag is full
Replace the filter bag.
The flat pleated filter is dirty.
Clean the flat pleated filter (see
chapter Clean the filter cartridge /
flat pleated filter).
The flat pleated filter is damaged.
Replace the flat pleated filter. For re-
placement flat pleated filters, please
order at Karcher.com/US or give us
a call at 800-537-4129 and we can
place an order for you.

Español 15
INSTRUCCIONES DE
OPERACIÓN, ASPIRADORA
HÚMEDA / SECA
Índice de contenidos
INSTRUCCIONES
DE SEGURIDAD
IMPORTANTES
Al utilizar este producto, tome siempre
las precauciones básicas, incluidas las
siguientes:
LEA TODAS LAS
INSTRUCCIONES
ANTES DE
UTILIZAR ESTA
MÁQUINA
Este equipo está destinado exclusiva-
mente al uso privado en el hogar.
몇ADVERTENCIA
●Leer todas las instrucciones. Si no se
respetan las instrucciones, existe un
riesgo de descargas eléctricas, de
incendio y/o de graves heridas.
Para reducir el riesgo de fuegos, des-
carga eléctrico o lesiones:
●No deje el equipo sin supervisión
mientras esté enchufado. Mientras
no esté utilizando el dispositivo o
antes de los trabajos de manteni-
miento, extraiga el conector de la to-
ma de corriente.
●Apagar los mandos de control antes
de desenchufar.
●Desenchufe antes de conectar el
accesorio.
●Compruebe que la tensión de red
coincida con los datos de la placa de
características.
●Utilice únicamente el accesorio re-
comendado por el fabricante.
●Use y almacene el equipo única-
mente en espacios interiores secos
con temperaturas ambientes de
más de 32 °F (0 °C). Proteja el equi-
po de la humedad.
●Almacene el equipo solo en salas
cerradas.
●Para evitar tropiezos, guarde el
equipo después de utilizarlo.
●No utilice el equipo al aire libre o so-
bre superficies húmedas.
●No exponga la herramienta a la llu-
via.
●Solo el personal cualificado puede
realizar los trabajos de reparación.
Asegúrese de que se montan única-
mente piezas de recambio idénti-
cas.
●Sustituya inmediatamente un cable
de red dañado por un componente
original.
●Si se producen daños en el cable de
red porque el equipo se haya caído,
se haya olvidado fuera o se haya
sumergido en agua, el servicio de
postventa debe realizar
INSTRUCCIONES DE OPERACIÓN,
ASPIRADORA HÚMEDA / SECA....... 15
INSTRUCCIONES DE SEGURIDAD
IMPORTANTES.................................. 15
INSTRUCCIONES DE PUESTA A
TIERRA.................................................... 16
Servicio al cliente ............................... 18
Datos técnicos ................................... 19
Protección del medioambiente........... 17
Accesorios y recambios ..................... 17
Descripción del equipo....................... 20
Montaje de los rodillos de dirección y
de la sujeción para el alojamiento de
accesorios .......................................... 21
Puesta en funcionamiento ................. 22
Funcionamiento ................................. 23
Cuidado y mantenimiento .................. 27
Ayuda en caso de fallos..................... 29

16 Español
comprobaciones en el equipo antes
de utilizarlo.
●Nunca toque el equipo, los conecto-
res de red ni los enchufes con las
manos húmedas.
●No transporte el equipo tirando del
cable de red.
●Proteja el cable de red del calor, los
bordes afilados, el aceite y los com-
ponentes del equipo en movimiento.
●Para desconectar el equipo de la
red eléctrica, tire solo del conector y
no del cable de red.
●No utilice el equipo con un cable de
prolongación.
●No utilice el equipo sin el depósito
de polvo y/o filtro.
●No aspire ningún líquido inflamable
o combustible; por ejemplo, gasoli-
na. No utilice el equipo en entornos
en los que haya líquidos inflamables
ocombustibles.
●No aspire objetos en llamas o incan-
descentes, como por ejemplo ciga-
rrillos, cerillas o cenizas calientes.
●Utilice el equipo solo para su uso
previsto.
●El equipo no es un juguete. Es nece-
sario prestar especial atención si uti-
liza el equipo en presencia de niños.
●Evite recoger objetos duros o afila-
dos con el equipo. El filtro y el propio
equipo podrían resultar dañados.
●El equipo debe estar colocado hori-
zontalmente y apoyado sobre el
suelo durante su uso.
●Arranque involuntario del equipo.
Asegúrese de que el equipo está
desconectado antes de elevarlo o
transportarlo.
●Tenga cuidado al utilizar el equipo
en escaleras.
●No obstruya los orificios del equipo
con objetos. No utilice el equipo si
los orificios están obstruidos.
●Mantenga el equipo limpio de sus-
tancias que puedan disminuir el flujo
de aire, como polvo, pelusas o pelo.
●Riesgo de aspiración. No acerque el
pelo, la ropa suelta, los dedos o par-
tes del cuerpo a los orificios y partes
móviles del equipo.
●No aspire ninguna sustancia vene-
nosa, como lejía de cloro para blan-
quear, amoniaco o desatascadores.
●Conéctelo únicamente a un tomaco-
rriente debidamente conectado a
tierra. Consulte las instrucciones de
puesta a tierra.
GUARDAR
ESTAS
INSTRUCCIONES
INSTRUCCIONES
DE PUESTA
A TIERRA
●Este dispositivo debe estar puesto a
tierra. En caso de un fallo de funcio-
namiento o avería, la conexión a tie-
rra proporciona un camino de menor
resistencia para que la corriente
eléctrica reduzca el peligro de cho-
que eléctrico.
●Este dispositivo está equipado con
un cable que tiene un conductor de
puesta a tierra y un conector de
puesta a tierra.
●El conector debe estar conectado a
una toma de tierra adecuada que
esté instalada y puesta a tierra co-
rrectamente conforme a todas las
normativas locales.
ADVERTENCIA:
●Una conexión indebida del conduc-
tor de tierra del equipo puede provo-
car peligro de choques eléctricos.

Español 17
●Ponerse en contacto con un electri-
cista o un representante del servicio
de postventa si hay dudas sobre co-
mo poner a tierra correctamente la
toma de corriente.
●No modifique el enchufe suministra-
do del aparato.
●Si el conector no coincide con la to-
ma de corriente, el electricista debe
instalar una toma de corriente ade-
cuada.
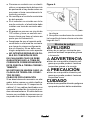
●El aparato se usa con un circuito de
120 voltios y tiene un enchufe con
toma a tierra que tiene el mismo as-
pecto que la ilustración A.
●Asegúrese de que el aparato está
conectado a una toma de corriente
que tenga la misma configuración
que el conector. No se debe usar
ningún adaptador con este aparato.
●NO INTENTAR REPARAR UN CA-
BLE DE CONEXIÓN DE RED.
EN CUALQUIER CASO SE DEBE
GARANTIZAR QUE LA TOMA DE
CORRIENTE CORRESPONDIENTE
ESTÁ PUESTA A TIERRA CORREC-
TAMENTE.
NO RETIRAR EN NINGÚN CASO LA
CLAVIJA DE TIERRA DEL CONEC-
TOR DE RED.
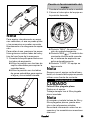
CABLE DE PROLONGACIÓN
Si es absolutamente necesario un alar-
gador, debe usarse un cable clasifica-
do con un mínimo de 15 amperios de
calibre 14. Los cables clasificados con
menos intensidad de la corriente pue-
den sobrecalentarse. El cable debe co-
locarse con cuidado de manera que no
se pueda tirar de él ni tropezar con él.
Figura A
1 Caja de toma de corriente con pues-
ta a tierra
2 Horquillas conductoras de corriente
La horquilla de toma a tierra es la más
larga de las 3.
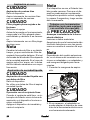
Niveles de peligro
PELIGRO
●Aviso de un peligro inminente que
produce lesiones corporales graves
o la muerte.
몇ADVERTENCIA
●Aviso de una posible situación peli-
grosa que puede producir lesiones
corporales graves o la muerte.
몇PRECAUCIÓN
●Aviso de una posible situación peli-
grosa que puede producir lesiones
corporales leves.
CUIDADO
●Aviso de una posible situación peligrosa
que puede producir daños materiales.

18 Español
Uso previsto
Utilice el dispositivo solo en hogares
privados.
De acuerdo con las descripciones y la
información de seguridad de estas ins-
trucciones de funcionamiento, el dis-
positivo está diseñado para su uso
como aspirador en seco y húmedo.
Las cenizas frías solo se pueden aspi-
rar con los accesorios adecuados.
Proteja el dispositivo contra la lluvia y
no lo guarde al aire libre.
Nota
El fabricante no se hace responsable
por los posibles daños causados por
un uso inadecuado o un funcionamien-
to incorrecto.
Responsabilidad del usuario/
propietario
Antes de utilizar el equipo, debe leer y
entender el manual de instrucciones y
las instrucciones de seguridad.
Asegúrese de que los operarios que
no hablen inglés con fluidez dispongan
del manual de instrucciones y las ins-
trucciones de seguridad en su idioma
materno y de que lo hayan entendido.
Asegúrese de que el manual de ins-
trucciones y las instrucciones de segu-
ridad estén siempre disponibles para
consultas posteriores.
Servicio al cliente
Registro
Debe registrar su dispositivo para po-
der recibir ayuda con cualquier pre-
gunta o problema que tenga. Puede
registrar su dispositivo en
www.karcher-register.com si se en-
cuentra en los EE. UU.,
www.karcher/ca si se encuentra en
Canadá, o
www.karcher.com/mx si se encuen-
tra en México.
Garantía
Si tiene una reclamación de garantía,
puede contactar al servicio de atención
al cliente. Consulte la información de
contacto que se indica a continuación
para EE.UU., Canadá o México. DEBE
proporcionar su comprobante de com-
pra para presentar una reclamación de
garantía por correo electrónico, teléfo-
no o fax.
Servicio al cliente en EE.UU.
Puede comunicarse con nuestro de-
partamento de Atención al Cliente por
teléfono al 1-800-537-4129 o en la pá-
gina web www.karcher-help.com.
Servicio al cliente en México
Puede comunicarse con nuestro de-
partamento de Atención al Cliente por
teléfono al 01-800-024-13-13 o en la
página web www.karcher.com/mx.
Atención al cliente en Canadá
Puede comunicarse con nuestro de-
partamento de Atención al Cliente por
teléfono al 1-800-465-4980 o en la pá-
gina web www.karcher.com/ca.
Cobertura de la entrega
La cobertura de la entrega del aparato
se indica en el embalaje. Al desempa-
quetarlo, compruebe que el contenido
esté completo. Si falta algún accesorio
o si se produce algún daño durante el
transporte, notifique a nuestro departa-
mento de Atención al Cliente tal como
se ha indicado anteriormente por telé-
fono o en la página web.

Español 19
Datos técnicos
Reservado el derecho a realizar modi-
ficaciones.
Conexión eléctrica
Tensión V 120
Frecuencia Hz 60
Consumo de corriente A 11
Potencia máx. de cone-
xión al enchufe
A6
N.º del cable de red 3xAWG14SJTW
Datos de potencia del equipo
Contenido del recipien-
te
gal
(l)
7.9
(30)
Toma de agua con asa gal
(l)
5,0
(19)
Toma de agua con bo-
quilla para suelos
gal
(l)
4.7
(18)
Nivel de presión
acústica (EN 60704-2-1)
dB(A) 74
Peso
Peso (sin accesorios) lbs
(kg)
21,8
(9.9)
Referencia 1.628-375.0

20 Español
Descripción del equipo
Según el modelo seleccionado, existen diferencias en el equipamiento.
El equipamiento específico se describe en el embalaje del equipo.
La page est en cours de chargement...
La page est en cours de chargement...
La page est en cours de chargement...
La page est en cours de chargement...
La page est en cours de chargement...
La page est en cours de chargement...
La page est en cours de chargement...
La page est en cours de chargement...
La page est en cours de chargement...
La page est en cours de chargement...
La page est en cours de chargement...
La page est en cours de chargement...
La page est en cours de chargement...
La page est en cours de chargement...
La page est en cours de chargement...
La page est en cours de chargement...
La page est en cours de chargement...
La page est en cours de chargement...
La page est en cours de chargement...
La page est en cours de chargement...
La page est en cours de chargement...
La page est en cours de chargement...
La page est en cours de chargement...
La page est en cours de chargement...
La page est en cours de chargement...
La page est en cours de chargement...
La page est en cours de chargement...
La page est en cours de chargement...
-
 1
1
-
 2
2
-
 3
3
-
 4
4
-
 5
5
-
 6
6
-
 7
7
-
 8
8
-
 9
9
-
 10
10
-
 11
11
-
 12
12
-
 13
13
-
 14
14
-
 15
15
-
 16
16
-
 17
17
-
 18
18
-
 19
19
-
 20
20
-
 21
21
-
 22
22
-
 23
23
-
 24
24
-
 25
25
-
 26
26
-
 27
27
-
 28
28
-
 29
29
-
 30
30
-
 31
31
-
 32
32
-
 33
33
-
 34
34
-
 35
35
-
 36
36
-
 37
37
-
 38
38
-
 39
39
-
 40
40
-
 41
41
-
 42
42
-
 43
43
-
 44
44
-
 45
45
-
 46
46
-
 47
47
-
 48
48


kaercher 6 P S Wet And Dry Vacuum Cleaner Manuel utilisateur
- Catégorie
- Aspirateurs
- Taper
- Manuel utilisateur
dans d''autres langues
Autres documents
-
Kärcher WD 5P Manuel utilisateur
-
Kärcher KWD 1 Manuel utilisateur
-
Kärcher NT 40/1 Tact Te Instructions Manual
-
-
K RCHER NT 30 Dry Vacuum Cleaner Manuel utilisateur
-
-
-
-
-
DeWalt D27905H Manuel utilisateur