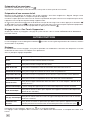
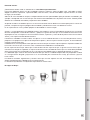
Krups EA891C50 Manuel utilisateur
- Catégorie
- Accessoires de préparation de café
- Taper
- Manuel utilisateur

www.krups.com
EN US KRUPS ELITE SERVICE HOTLINE: 800-526-5377
FR LIGNE SANS FRAIS: 1 800 418 3325
ES HOTLINE: (01800) 112 8325
8020005298 - 06.2020- Réalisation : Espace graphique
www.krups.com
SUPER AUTOMATIC
SERIES EA89
ENFRES
A
I
B
C
E
D
H
F
1
2
1
L
K
2
J
M
O
O
8020005298
N
G
G1
G2

h
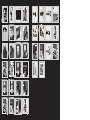
25 26 27
28
29 30 31
32
34 35 36
37
33
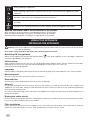
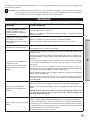
HOW TO CLEAN THE MILK SYSTEM
8020005298
Lorem ipsum
600 ml
MACCHIATOMACCHIATO
21 22 24
17 18 19 20
13 14 15 16
9 10 11 12
5 6 7 8
1 2 3 4
23

1
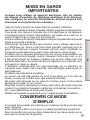
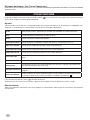
IMPORTANT SAFEGUARDS
When using electrical appliances, basic safety precautions
should always be followed to reduce the risk of fire, electric
shock, and/or injury to persons including the following:
Read all instructions.
Do not touch hot surfaces. Use handles or knobs.
To protect against re, electric shock and injury to persons, do not
immerse cord, plugs or machine in water or other liquid.
Close supervision is necessary when any appliance is used by or
near children.
Unplug from outlet when either the appliance or display clock is not
in use, and before
cleaning. Allow to cool before putting on or taking off parts, and
before cleaning the appliance
Do not operate any appliance with a damaged cord or plug or after
the appliance malfunctions, or has been damaged in any manner.
Return appliance to the nearest authorized service facility for
examination, repair or adjustment.
The use of accessory attachments not recommended by the
appliance manufacturer may result in re, electric shock or injury to
persons.
Do not use outdoors.
Do not let cord hang over edge of table or counter, or touch hot
surfaces.
Do not place on or near a hot gas or electric burner, or in a heated
oven.
Always attach plug to appliance rst, then plug cord into the wall
outlet. To disconnect, turn any control to the “off” position, then
remove plug from wall outlet.
Do not use appliance for other than intended use.
SAVE THESE INSTRUCTIONS
Children should be supervised to ensure that they do not play with
the appliance.
Your appliance is designed for domestic use only.
It is not intended to be used in the following applications, and the
guarantee will not apply for: staff kitchen areas in shops, ofces
and other working environments; farm houses; by clients in hotels,
EN

motels and other residential type environments; bed and breakfast
type environments.
This appliance is not intended for use by persons (including children)
with reduced physical, sensory or mental capabilities, or lack of
experience and knowledge, unless they have been given supervision
or instruction concerning use of the appliance by a person responsible
for their safety.
The appliance shall not be placed in a cabinet when in use.
Scalding may occur if the lid is removed during the brewing cycles.
CAUTION
This machine is intended for household use only. Any servicing other than cleaning and user
maintenance should be performed by the nearest authorized Krups Service Center. Visit
our website at www.krupsusa.com in the USA or www.krups.ca in Canada or contact your
respective country’s Consumer Service department for the service center nearest to you, or
contact your respective country’s Consumer Service department. To reduce the risk of re
or electric shock, do not attempt to disassemble the machine.
Repair should be done by an authorized Krups Service Center only.
SHORT CORD INSTRUCTIONS
A. A short power cord or a detachable power cord is provided to reduce the risks of
becoming entangled in or tripping over a longer cord accidentally.
B. Longer detachable power cords or extension cords are available and may be used if
care is exercised in their use.
C. If a long detachable power cord or an extension cord is used:
1) the marked electrical rating of the detachable power cord or extension cord
should be at least as great as the electrical rating of the appliance.
2) If the appliance is of the grounded type, the extension cord should be a
grounding type 3-wire cord.
3) the longer cord should be arranged so that it will not drape over the counter
where it can be pulled on by children or tripped over accidentally. The
appliance may have a polarized plug (one blade is wider than the other). To
reduce the risk of electric shock, this plug is intended to t into a polarized
outlet only one way. If the plug does not t fully into the outlet, reverse the
plug. If it still does not t, contact a qualied electrician. Do not attempt to
modify the plug in anyway.
2

3
Dear Customer,
Congratulations! You are now the proud owner of your Super Automatic EA89 Series.
This new product offers more than 14 hot drinks: espresso, double espresso, coffee, double coffee, ristretto, doppio,
Americano, cappuccino, double cappuccino, latte, double latte, frothy milk, green tea, black tea and herbal tea.
In addition to this very large choice, the machine offers many opportunities for customizing drinks, for example, you
can use a function that will increase the intensity of your coffee, if you prefer a more full-bodied drink. You can also
set the amount, strength and temperature of your drinks.
The most frequently consumed drinks are accessible with one simple touch on the main interface. As for the screen,
it allows you to follow the progress of your drinks and provides easy access to the different menus.
Most drinks can be prepared in batches of two to save time.
Thanks to its KRUPS Quattro force technology, including a Compact Thermoblock System with built-in percolation
chamber, its 15 bar pump, and because it uses coffee beans which have been freshly ground just before making the
coffee, your machine will serve you hot ristrettos, espressos and coffees from the rst cup with maximum aroma and
a creamy golden-brown froth.
To give the drink maximum avor, an espresso is traditionally served in a small, ared porcelain cup. For an optimum
temperature espresso and a dense creamy froth, we recommend that you pre-heat your cup.
You will probably need to try several types of coffee before you nd the one that suits you. By experimenting with the
blend and/or roast, you will eventually arrive at the ideal result.
Espresso coffee has a richer aroma than classic lter coffee. Despite its stronger taste, which remains longer on the
palate, an espresso contains less caffeine than lter coffee (around 60 to 80 mg per cup compared to 80 to 100 mg
per cup) due to its shorter percolation period.
The quality of water used is another determining factor which affects the overall quality of the brewed coffee. You
should ideally use water which is fresh from the tap (so that it has not had time to stagnate due to air contact), which
is cold and which does not smell of chlorine.
The tactile, ergonomic and comfortable buttons make it easy for you to browse the menu. You will be guided through
each step, from preparing your drink to servicing your machine.
We wish you many years of enjoyment with your Krups machine.
The Krups team
EN

To get the most out of your machine and obtain good quality coffee, here is some advice:
• The quality of your water signicantly inuences the quality of the avors. Limescale and chlorine can
alter the taste of your coffee. We recommend that you use the Claris Aqua Filter System cartridge or low
mineral-content water to preserve all of the avors of your coffee.
• When preparing exclusively coffee recipes, we recommend that you use tulip-shaped porcelain cups,
preheated beforehand (by running them under hot water, for instance), and of a size appropriate to the
quantity you want to make. For your milk-based preparations, we recommend that you use thick glass
cups for an appetizing result.
• Roasted coffee beans can lose their avor if they are not protected. We recommended that you use the
amount of beans required for your consumption for the next 4-5 days. Although the quality of coffee
beans is subjective and varied, we do recommend that you use arabica rather than robusta.
• Lastly, please remember that oily and caramelized coffee beans must be avoided, as they can damage
your machine.
• The quality and neness of the grinding determine the strength of the avors and the quality of the cream.
The ner the beans are ground, the richer the cream. Indeed, grinding should be adapted to the drink
desired: ne for ristretto and espresso, coarser for coffee.
• You can use pasteurised or UHT, skimmed, semi-skimmed or whole milk, straight from the refrigerator
(44.6°F). Using special milks (microltered, raw, fermented, enriched, etc.) or vegetable milks (rice,
almond milk, etc.) can produce less satisfactory results especially when it comes to the quantity and
quality of the froth.
4

5
CONTENTS
IMPORTANT INFORMATION CONCERNING THE APPLIANCE AND INSTRUCTIONS ........p. 6
TECHNICAL DATA
...........................................................p. 6
APPLIANCE DESCRIPTION
...................................................p. 7
OVERALL VIEW
.............................................................p. 7
USING YOUR APPLIANCE
INSTALLING THE APPLIANCE
................................................p. 8
BEFORE PREPARING DRINKS
IMPORTANT INFORMATION
..................................................p. 9
PREPARING COFFEE DRINKS VIA DIRECT ACCESS
............................p. 10
PREPARING MILK BASED DRINKS VIA DIRECT ACCESS
........................p. 10
PREPARING TEAS
...........................................................p. 11
PREPARING OTHER DRINKS: RISTRETTO, DOPPIO, AMERICANO OR FROTHY MILK ......p. 11
OTHER FUNCTIONS
.........................................................p. 12
GENERAL MAINTENANCE
....................................................p. 13
TROUBLESHOOTING
........................................................p. 15
EN

IMPORTANT INFORMATION CONCERNING THE APPLIANCE AND INSTRUCTIONS
In this manual you will nd all of the important information concerning the preparation, use and maintenance of your
machine.
Read the instructions carefully before using your appliance for the rst time and keep them for future reference: KRUPS
may not be held liable in the event of any use that does not comply with the instructions.
GUIDE TO THE SYMBOLS USED IN THE INSTRUCTIONS
Warning: Risk of serious injury or death. The lightning bolt symbol warns against electrical dangers.
Warning: Risk of possible malfunction, damage, or destruction of the appliance.
!
Warning: General or important note concerning the operation of the appliance.
Products included with your machine
Check the products included with your machine. If any parts are missing, contact your hotline (see p. 22: Initial settings).
Parts supplied:
- Super Automatic Series EA89
- 2 cleaning tablets
- 1 descaling sachet
- Milk conduit adaptable to the “One Touch Cappuccino” block
- Dismantling key for cleaning the steam circuit
- Safety instructions booklet
- Claris – Aqua Filter System cartridge with tting accessory
- 1 stick for testing water hardness
- Instructions
- List of approved Krups service centers
- Guarantee documents
TECHNICAL DATA
Appliance Super Automatic Series EA89
Power supply 120 V - / 60 Hz
Pump pressure 15 bars
Coffee bean container 250 g
Power consumption During operation: 1,450 W
Water tank 2.3 L
First use and storage Indoors, in a dry place (protected from frost).
Dimensions (mm) H x L x D 367 x 240 x 380
Weight EA89 (kg) 8.4
Subject to technical adaptations.
6

7
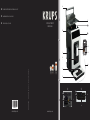
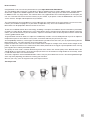
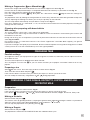
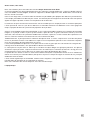
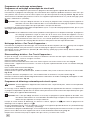
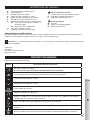
APPLIANCE DESCRIPTION
A Water tank lid handle
B Water tank
C Coffee grounds collector
D Height-adjustable coffee outlets
E Grid and removable drip tray
F Coffee bean container lid
G One Touch Cappuccino removable block
G1 Dismantling key for cleaning the steam
circuit
G2 One touch cappuccino block
H Milk tube and connector
I Water level oat
1
Coffee bean container
J Grinding neness adjustment dial
K Cleaning tablet funnel
L Metal grinding mill
2
Display panel
M Display
N “On-off” button
O Selector buttons
Specific information about:
The drip tray: it allows you to collect water or coffee that might ow out of the appliance during and after preparation.
It is important to always leave it in place and to empty it regularly.
!
Important : Read these instructions carefully and keep them for future reference. Please follow the safety guidelines.
Manufacturer:
SAS GSM
Rue Saint-Léonard F-53104 Mayenne
France
OVERALL VIEW
Explanation of the different buttons
Button Description / General functions
Switching the machine on and off.
It is necessary to press and hold the button to start the machine.
Allows you to return to the previous screen or stop a recipe in progress.
Browse upwards in the menu
Browse downwards in the menu
Conrmation of selection.
Function for increasing the strength of the coffee.
Function for adding a strong espresso to the recipe selected.
Accessible with the main recipes (espresso, long coffee, cappuccino, Macchiato, tea) according
to model.
Starts preparing an espresso.
Starts preparing a Coffee.
EN

Starts preparing a Cappuccino
MACCHIATO
Starts preparing a Macchiato (a large measure of milk, a shot of Espresso, topped with frothy
milk foam).
Provides access to the menu for preparing a tea or a herbal tea.
Provides access to additional preparations: Ristretto, Frothy milk, Doppio, Americano, (according
to model).
Provides access to the general menu (machine settings, cleaning and product information).
Specific information about the illumination of the buttons
When a button is not illuminated, the corresponding function is inaccessible.
When it is slightly illuminated, the function is available and can be selected.
While the function requested is in progress, the light becomes very bright.
USING YOUR APPLIANCE
INSTALLING THE APPLIANCE
Warning: Connect the appliance to an grounded 230 V outlet. Failure to do so means that you run the risk of fatal
injury due to electricity!
Respect the safety guidelines indicated in the “Safety guidelines” booklet.
Switching ON the appliance
Switch on the appliance by pressing the ON/OFF button until “Hello” appears on the screen Fig. 1. Follow the
instructions provided by your appliance.
Initial settings
When using the machine for the rst time, you will be prompted to congure various settings. Follow the instructions
displayed on the screen. The aim of the following paragraphs is to give you a few visual cues.
Here are the rst settings required:
Language
Select a display language by pressing the arrows until the language of your choice appears. Press “OK” to conrm.
Measuring unit
You can set the unit of measurement for volume to ml or oz.
Date and time
To set the time, press the desired time format (24 hours or AM/PM).
Auto-off
It is possible to program the time at which you want your machine to switch on automatically. This setting can be
adapted as you wish: daily, weekly or weekend. Select the time at which you want it to start automatically following
the time format selected earlier.
You can also select the length of time after which your appliance will switch off automatically in order to optimize your
energy consumption.
Rinsing the coffee circuit
You can choose to activate it or not when switching on the machine. This allows you to ensure the quality of the coffee
in the cup in order to avoid the presence of residue.
Filter installation
When switching on for the rst time, the appliance asks if you want to install the lter. If you wish to do so, and if the
hardness of your water requires it, select “YES” and follow the instructions on the screen.
8

9
Installing the cartridge in the appliance: Screw the lter cartridge into the bottom of the water tank using the
accessory supplied with the cartridge. Fig. 4
Set the month when the cartridge is installed (position 1 on the illustration, left side gure in the opening) by turning
the grey ring located on the upper end of the lter. The month when the cartridge should be replaced is indicated in
position 2 on the illustration. Fig. 5.
Put a container of 0.6 L under the steam exit. Fig. 6.
The machine must be primed whether the lter has been installed or not. This means that the water circuits have to
be lled. To do this, follow the instructions provided on the screen. The machine will begin by lling the water circuits,
preheating the circuits and then it will complete an automatic rinse.
The screen will inform you when installation is complete.
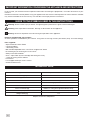
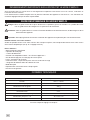
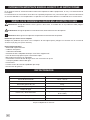
Water hardness
You must set your machine depending on the hardness of your water, from 0 to 4. To do this, follow these instructions:
Before using the appliance for the rst time, check the hardness of your water so that you can set the appliance
accordingly. This operation should also be carried out when you use your machine in a place where the hardness of
the water is different or if you notice a difference in the hardness of the water. To check the water hardness, use the
test strip supplied with your machine or contact your local water authority.
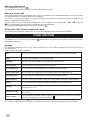
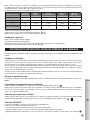
The details of the classes are given in the table below:
Degree of hardness
Class 0
Very soft
Class 1
Soft
Class 2
Average hardness
Class 3
Hard
Class 4
Very hard
° dH < 3° > 4° > 7° > 14° > 21°
° e < 3,75° > 5° > 8,75° > 17,5° > 26,25°
° f < 5,4° > 7,2° > 12,6° > 25,2° > 37,8°
Appliance setting 0 1 2 3 4
Fill a glass of water and insert a strip. Fig. 2
After 1 minute read the level of water hardness. Fig. 3
Indicate the number of red zones when conguring the appliance.
Preparing the appliance
Remove and ll the water tank. Fig. 7.
Replace the water tank. Fig. 8.
Remove the lid of the coffee bean container and add coffee beans (max. 250 g). Fig. 9.
Replace the lid of the coffee bean container. Fig. 10.
BEFORE PREPARING DRINKS
IMPORTANT INFORMATION
Depending on the drinks chosen, your Espresso Automatic EA89 will automatically adjust the quantity of ground
coffee.
Preparing the grinder
You can adjust the strength of your coffee by adjusting how nely the coffee beans are ground. In general, the ner
the coffee is ground, the stronger and creamier the coffee will be. It may also vary according to the type of coffee
used. We recommend a ne setting for espressos and a coarser setting for coffees.
Adjust the neness of grinding by turning the coffee grounds neness adjustment knob (J) which is located in the
coffee bean container. This setting should be applied during grinding notch by notch. After 3 rounds, you will notice
a pronounced difference in taste.
Setting the neness of grinding is useful when you change the type of coffee or if you want to make coffee that is
more or less strong. However, it is not advised to use this setting systematically.
Adjusting the coffee outlet
For all the drinks available, you can lower or raise the coffee outlets according to the size of your cup or glass. Fig.11
EN

Stopping a drink during preparation
You can stop the preparation at any time by pressing the return button .
Caution, pressing this button causes the machine to update which may last up to 30 seconds. This phase is normal.
When a cycle is interrupted, it does not stop immediately. The machine will nish its cycle and the preparation will be
cancelled.
“Double” preparation function
You can prepare two cups simultaneously with your appliance. The double preparation function can be accessed simply
by pressing the selection twice and is valid for all drinks (except and ).
DARK function
The “DARK” function allows you to increase the intensity of the coffee (its strength).
You can activate or deactivate it in various ways:
- Before selecting the chosen drink just press DARK.
- While preparing the drink, and until the end of grinding: you can press DARK.
- By choosing the “DARK” parameter in the Settings menu. To do this, access the Settings menu with the button
, then Settings drink settings Dark. The function will be activated for all “coffee” drinks: , , , .
You can do the same to deactivate it.
EXTRA SHOT function
The “extra shot” function allows you to add an espresso at the end of the selected drink.
You can activate or deactivate it in various ways:
- Before selecting the chosen drink: just press EXTRA SHOT.
- While making the drink,
- By choosing the “EXTRA SHOT” parameter in the Settings menu. To do this, access the Settings menu with the button
, then Settings drink settings EXTRA SHOT. Therefore, the function will be activated for all preparations
, , , , .
You can do the same to deactivate it.
PREPARING COFFEE DRINKS VIA DIRECT ACCESS
N.B.: Every time the drink is launched, the machine will remember the last drink prepared, including the settings that
were selected.
Preparation
Place the cup(s) under the coffee nozzles. Fig.12
Press the button for the desired drink.
If the machine detects a lack of water when you request this preparation, it will ask you to ll the tank.
Possible settings
It is possible to increase the strength of the coffee by pressing and/or adding a coffee preparation by pressing .
You can prepare one or two cups with your appliance.
The machine starts by grinding the beans, tamping the ground coffee and nally brewing the coffee. It is possible to
adjust the volume of the coffee being prepared by using the buttons: and .
You can stop the preparation at any time by pressing .
!
Important: Automatic rinsing of the coffee outlets: according to the type of preparation, the machine may
complete an automatic rinse program when it switches off. The cycle lasts only a few seconds
and stops automatically.
PREPARING MILK BASED DRINKS VIA DIRECT ACCESS
Possible settings
It is possible to increase the strength of the coffee by pressing and/or adding a coffee preparation by pressing .
The steam is used to froth the milk. As a higher temperature is required when producing steam, the appliance will run
an additional pre-heating phase.
10

11
Making a Cappuccino or a Macchiato
Connect the straight side of the milk tube to the “One Touch Cappuccino” block Fig. 13.
Immerse the other end (bevelled side) in a receptacle lled with milk or directly in your bottle of milk Fig. 14.
Place the cup(s) under the coffee/milk nozzles. Fig.15.
Press the “Cappuccino” button Fig. 16 or press the « Macchiato » button Fig. 18. All of the settings can
be modied.
The preparation starts by frothing the milk (possible to set the time), and then the coffee ow (possible to adjust the
volume). Adjusting the frothing time allows you to vary the quantity of milk and froth.
The next steps follow automatically and your drink is ready to taste Fig.17.
Every time “Cappuccino” or « Macchiato » is run, the machine will remember the last drink prepared, including the
settings that were selected.
Cleaning after preparing milk based drinks
Milk rinsing
The screen indicates “Rinse milk?” at the end of each preparation.
It is advised to rinse after using the milk function in order to ensure the cleanliness of the frothing accessories and
the frothiness of the milk.
During milk rinsing, you are required to systematically dismantle and clean the milk tube and connector with hot
water. Fig. 21 and 25.
For the best results, it is advised to clean the “One Touch Cappuccino” removable block regularly (see general
maintenance chapter).
If you note a change in the quality of your milk froth, do not hesitate to repeat the rinsing and cleaning process: indeed
a milk system that is not well maintained may cause this type of problem.
PREPARING TEAS
Possible settings
Your appliance allows you to prepare three types of tea (green tea, black tea, herbal tea). You can adjust the volume
of the drink to taste.
The hot water temperature is adapted to the drink selected.
You can program an extra shot in your tea which will allow you to prepare “tea/coffee” drinks that are very
popular.
Preparing a tea
Select on the screen. Place the cup(s) under the coffee nozzles. Fig.12
Then select the chosen drink and press .
If the machine detects no water when you submit your request, it will ask you to ll the tank.
You can modify the volume by using buttons or during preparation.
PREPARING OTHER DRINKS: RISTRETTO, DOPPIO, AMERICANO
OR FROTHY MILK
Preparation
Place the cup(s) under the coffee nozzles. Fig.12
If the machine detects no water when you submit your request, it will ask you to ll the tank.
Press button : with buttons and , select the desired drink: Ristretto, Doppio, Americano, Frothy milk.
Making a Ristretto
Select Ristretto and press .
The machine starts by grinding the beans, tamping the ground coffee and nally brewing the coffee. It is possible to
adjust the volume of the coffee being prepared by using the buttons: and .
You can stop the preparation at any time by pressing .
Making a Doppio
Select DOPPIO and press .
The preparation is identical to the RISTRETTO but with a double coffee cycle.
EN

Making an Americano
Select AMERICANO and press .
The preparation is identical to the DOPPIO, but is followed by hot water.
Making a Frothy milk
Connect the straight side of the milk tube to the “One Touch Cappuccino” removable block Fig. 13. Immerse the other
end (bevelled side) in a receptacle lled with milk. Fig.14
The steam is used to froth the milk. As a higher temperature is required when producing steam, the appliance will
launch an additional pre-heating phase.
A menu will allow you to customize the frothing time. You can modify it by pressing buttons or . Then press
. The last frothing time used will be memorized for the next preparation.
You can download the preparation at any time by pressing .
Rinsing the “One Touch Cappuccino” block
Please refer to the paragraph “Milk rinsing” in the section PREPARING ONE TOUCH MILK DRINKS.
OTHER FUNCTIONS
The Settings menu can be accessed via button which leads to the general menu (machine settings maintenance
and product information).
Settings
By selecting the Settings menu, you can make the changes you want in order to optimize your ease of use and suit
your preferences.
Below are the main settings available.
Date You must set the date, particularly when you are using an anti-limescale cartridge.
Clock You can select to display a 12 or 24-hour clock.
Language You can select the language of your choice from those offered.
Measuring unit You can set the unit of measurement to be ml or oz.
Screen brightness You can adjust the screen brightness according to your preferences.
Coffee temperature You can adjust the temperature of your coffee drinks to three different levels
Tea temperature You can adjust the temperature of your teas to three different levels
Water hardness You can set your water hardness from 0 to 4. See chapter “Measuring water hardness”.
Auto-on You can automatically start pre-heating of the appliance at a selected time.
Auto-off
You can choose the duration after which your appliance will switch off automatically
(duration of non use).
Automatic rinsing
You can choose to activate automatic rinsing of the coffee outlet or not when starting
the machine.
Drinks settings
You can restore the default settings. You can also permanently activate the Dark and
Extra Shot function for all your drinks (except ).
To quit the settings menu, press or the Settings button.
The settings will be stored in the memory if you unplug your machine, with the exception of the date and time.
12

13
Maintenance
All of these options allow you to run the selected programs. You should then follow the on-screen instructions.
Cleaning milk
Provides access to cleaning the machine’s one touch cappuccino block, which is essential
for ensuring good quality milk frothing.
Milk rinsing
Provides access to rinsing the machine’s one touch cappuccino block, which is essential for
ensuring good quality milk frothing.
Coffee rinsing
Provides access to rinsing the machine’s coffee circuit, which ensures the optimum taste
of coffee.
Coffee cleaning
Provides access to cleaning the machine’s coffee circuit (using a cleaning tablet), which
ensures the optimum taste of coffee.
Descaling
Provides access to descaling which is essential for the durability of your machine. When the
number of drinks is not high enough for descaling to be necessary, the function is not active.
Filter
Provides access to the lter mode, useful if the water is very hard, in order to ensure the best
taste and the health of your machine.
To quit the Cleaning menu, press or the Settings button.
Info
The “Info” menu provides access to information about your use and about certain stages in the life of your machine. It
also informs you about its upkeep. Below are the main details available.
Drinks prepared Displays the number of drinks prepared
Coffee circuit cleaning Indicates that is needs to be completed within x number of cycles.
Descaling Indicates that is needs to be completed within x number of cycles.
Filter Indicates that it will need to be changed in x days or x liters.
To quit the Info menu, press or the Settings button.
GENERAL MAINTENANCE
Emptying the coffee grounds collector and the drip tray
After a certain number of drinks, the machine will ask you to empty the coffee grounds collector and the drip tray. Not
following these instructions can damage your machine.
The drip tray collects used water and the coffee grounds collector collects used ground coffee.
If the message “Please empty the two trays” is displayed, remove, empty and clean the drip collector tray. Remove,
empty and clean the coffee grounds collector (C). Fig. 19.
Replace the coffee grounds collector. Fig. 20
The drip tray is equipped with a oat to indicate when it needs emptying. However, the machine is also programmed to
ask for the drip collector tray to be emptied after a certain number of drinks, in addition to any intermediate emptying
operations that you may complete.
Rinsing the circuits:
You can start rinsing at any time by pressing and selecting Maintenance.
According to the type of recipe prepared, the machine may complete an automatic rinsing when it is turned off.
It is also possible to set an automatic rinse program when it is switched on (see “Settings” section p.22).
Automatic cleaning programs
Automatic cleaning program of the coffee circuit
A message on the screen will indicate when a cleaning program needs to be run for the appliance.
To run this cleaning program, you will need a container which holds at least 0.6 L, and which should be placed beneath
the coffee outlets and the steam nozzle, and a KRUPS cleaning tablet. Fig. 37. Carefully follow the instructions given
on the screen. It is also possible to run a cleaning cycle via the Maintenance menu.
EN

!
Important: You do not have to run the cleaning program as soon as the appliance requests it, but it must be done
reasonably soon after. If cleaning is postponed, the alert message will remain illuminated until the
process is completed.
The automatic cleaning program comprises two phases: a cleaning cycle and a rinsing cycle, and lasts about 13
minutes.
!
Important: If you unplug your machine during the cleaning cycle, or if there is a power failure, the cleaning program
will continue from the current phase when the power is returned. It is not possible to postpone this
process. This is essential to ensure that the water circuit has been correctly rinsed. In this case, a new
cleaning tablet may be necessary. Complete the full cleaning program in order to remove all of the
cleaning product which is harmful to health.
Cleaning the “One Touch Cappuccino” block
To complete a cleaning program, you will require two containers (minimum 0.6 L) and KRUPS cleaning liquid.
You can start the cleaning cycle by pressing button .
Then selecting “Maintenance” “Milk Cleaning”. Follow the instructions on the screen.
Dismantling the “One Touch Cappuccino” block
In addition to rinsing, it is necessary to clean the different elements of the block every time after using. To dismantle
the block, follow the following instructions:
Remove the milk tube, Fig. 21.
Remove the front lid of the coffee milk nozzles. Slide it downwards and pull it towards you. Fig. 22.
Remove the “One Touch Cappuccino” block by pulling the upper part of the block and pull the orange cleaning tool.
Fig. 23.
Completely dismantle the block. Fig. 24.
Remove the milk tube connector Fig. 27.
Clean all of the dismantled parts (block, connector and milk tube) with soapy water. Then rinse them in hot water.
Fig. 28-30.
Once the elements are clean and dry, assemble the block and return them to their original position. Fig. 33.
Replace the font lid of the block. Fig. 34. Replace the connector in the milk tube Fig. 35 (opposite side of the bevelled
side) and plug in the block. Fig. 36.
Automatic descaling program of the steam circuit
Warning: if your appliance is tted with our Claris - Aqua Filter System cartridge, remove the cartridge before
descaling.
A message on the screen will indicate when a descaling program needs to be run for the appliance. The frequency of
this program depends on the quality of the water used and on whether a Claris Aqua Filter System lter is used or not
(the harder the water, the more often the appliance has to be descaled).
!
Important: You are not obliged to carry out this program immediately the appliance requests it, but it must be
carried out reasonably soon afterwards. If descaling is postponed, the alert message will continue to
be displayed until the process is completed.
When the descaling alert level is reached and displayed, press to run the descaling program. To delay it, press .
Once the procedure has been launched, follow the instructions provided on the screen. It is also possible to run a
descaling cycle via the “Maintenance” menu “Descaling”.
To carry out a descaling program, you will require a container with a capacity of at least 0.6 L which should be placed
beneath the One Touch Cappuccino block and a KRUPS descaling sachet (40 g). Fig. 37.
Fill the water tank up to the CALC mark then pour in the contents of one sachet of descaler.
The descaling program contains three cycles: a descaling cycle and two rinsing cycles. The program lasts approximately
20 minutes.
!
Important: If there is a power failure or if you unplug your machine, the cycle will continue from the current phase
when the power is returned. It will not be possible to cancel this operation. Complete the full cycle in
order to remove all of the descaling product which is harmful to health.
14

15
TROUBLESHOOTING
If one of the problems described in the table persists, contact KRUPS customer service.
PROBLEM CORRECTIVE ACTION
The machine displays a failure,
the software freezes or your
machine has a malfunction.
Switch off and unplug the appliance, remove the lter cartridge, wait for one
minute and start the appliance again.
Press and hold the on/off button for at least 3 seconds before starting.
The appliance does not switch
on when the ON/OFF button is
pressed (for at least 3 seconds).
Check your fuses and outlets.
Check that the two power plugs are correctly inserted into the socket.
The coffee grinder makes a
strange noise.
There is a foreign body in the grinder.
Contact the KRUPS Customer Service team.
The One Touch Cappuccino
block does not suck the milk.
The One Touch Cappuccino
blocks produces little or no froth.
Check that the block is assembled correctly (in particular the connector in the
milk tube).
Ensure that the steam nozzle is not blocked. If this is the case, see below “The
steam nozzle on your machine seems to be partially or completely blocked”.
Check that the connector is not blocked or dirty; soak it in a mixture of hot water
and dishwashing liquid, then rinse and dry before reassembling.
Ensure that the exible pipe is not blocked or twisted and that it is properly inserted
into the One Touch Cappuccino block in order to avoid any air leaks. Check that
it is fully immersed in the milk.
Rinse and clean the block (see chapters concerning rinsing and cleaning the One
Touch Cappuccino block).
For milk drinks, we recommend that you use fresh, pasteurised or UHT milk which
has been recently opened. It is also advisable to use a cold container.
The steam nozzle on your
machine seems to be partially or
completely blocked.
Dismantle the nozzle from its support using the dismantling key. Fig. 25.
Start the rinse cycle for the One Touch Cappuccino block to remove any
remaining deposits.
Clean the steam nozzle and ensure that the opening of the nozzle is not
obstructed by the remains of milk or limescale. Use the cleaning needle if
necessary. Fig. 26.
No steam comes out of the
steam nozzle.
Ensure that the steam nozzle is not blocked. See “The steam nozzle on your
machine seems to be partially or completely blocked.”
If this does not work, empty the water tank and remove the Claris cartridge
temporarily. Fill the water tank with mineral water with high calcium content
(>100 mg/l) and run steam cycles (5 to 10) consecutively into a container until
you obtain a continuous jet of steam.
Put the cartridge back in the tank.
Steam is leaking from the drip
tray grid.
Depending on the type of preparation, steam may escape from the drip tray
grid.
The machine asks for the drip
tray to be emptied although it is
not full.
The machine is programmed to ask for the drip tray to be emptied after a certain
number of coffees despite any intermediate emptying operations that you may
complete.
EN

The appliance asks to be
unplugged and plugged back in
again.
Unplug the appliance for 20 seconds, remove the Claris Aqua Filter System
cartridge if necessary, then plug it back in again.
If the error continues, contact the KRUPS Customer Service team.
The machine does not request
descaling.
The descaling cycle is requested after the steam circuit has been used a
signicant number of times.
Some ground coffee has found
its way into the drip tray.
A small amount of ground coffee may settle in the drip tray. The machine is
designed to evacuate any excess ground coffee so that the percolation zone
remains clean.
The milk or water is not owing
correctly into the cup(s).
Check that the One Touch Cappuccino block is correctly positioned.
There are traces of milk in an
Americano or a Hot water.
Complete a milk rinsing cycle or dismantle and clean the one touch cappuccino
accessory before running the preparation.
There is water underneath the
appliance.
Before removing the water tank, wait for 15 seconds after the coffee has nished
owing so that the appliance nishes its cycle properly. Check that the drip tray
is correctly positioned on the machine; it should always be in place, even when
the appliance is not in use. Check that the drip tray is not full.
The drip tray should not be removed during a cycle.
When you turn off the appliance,
warm water ows out of the
coffee outlets and the One Touch
Cappuccino block.
According to the type of recipe prepared, the machine may run an automatic
rinsing cycle when it is turned off. This cycle lasts only a few seconds and stops
automatically.
After emptying the coffee
grounds collector, the warning
message is still displayed on the
screen.
Correctly replace the coffee grounds collector and follow the instructions on
the screen.
Wait at least 5 seconds before replacing them.
The coffee dispenses too slowly.
Turn the ‘neness of grind’ adjustment dial to the right to make the ground
coffee coarser (according to the type of coffee used).
Run one or several rinsing cycles.
Run a machine clean (see “Automatic machine cleaning programs p.28).
Change the Claris Aqua Filter System cartridge (see “Installing the lter”) p. 23).
The water tank has been lled,
but the warning message is still
displayed on the screen.
Check that the tank is installed correctly on the device.
The oat at the bottom of the tank should move freely. Check and unblock the
oat if necessary.
The coffee neness knob is
difcult to turn.
Only change the grinder setting when it is running.
The espresso or coffee is not hot
enough.
Run a coffee circuit rinsing cycle before preparing your coffee.
Increase the coffee temperature in the Settings menu. Warm the cup by rinsing
it with hot water before making the drink.
The coffee is too lightly colored
or too weak.
Avoid using oily, caramelized or avored coffee beans. Check that the coffee
bean container has coffee in it and that is it dispensing correctly.
Decrease the volume of the preparation and increase the strength of your drink
by using the Dark function.
Turn the grinding neness adjustment dial to the left to make the grounds ner.
Make the drink in two cycles by using the 2 cups function.
16

17
The appliance is not producing
coffee.
A problem has been detected during preparation of the drink.
The appliance has restarted automatically and is ready for a new cycle.
A power failure occurs during a
cycle.
The appliance will automatically restart when the power is switched back on.
Your tea is not hot enough or
too hot.
Increase or reduce the hot water temperature in the Settings menu.
You have used ground coffee
instead of coffee beans.
Use your vacuum cleaner to remove the ground coffee from the coffee bean
container.
Appearance of steam under the
lid of the grain tray.
Close the cleaning tablet chute beneath the cover.
After preparing a drink, if you ask
for an extra shot the machine
tells you that this is not possible.
The coffee grounds collector is full and the extra shot function is not available.
Once your drink has been made, you can prepare an espresso after emptying
the coffee grounds collector.
Danger : Only a qualied technician is authorised to carry out repairs on electrical wiring and carry out work on
the electrical grid. If you do not follow these instructions, you risk death by electrocution. Do not use
an appliance that is visibly damaged!
KRUPS INTERNATIONAL LIMITED GUARANTEE
: www.krups.com
This product is repairable by KRUPS during and after the guarantee period.
Accessories, consumables and end-user replaceable parts can be purchased, if locally
available, as described on the KRUPS internet site www.krups.com
The Guarantee:
This product is guaranteed by KRUPS (company address and details included in the country list of the KRUPS
International Guarantee) against any manufacturing defect in materials or workmanship for a period of 2 years starting
from the initial date of purchase or delivery date.
The international manufacturer’s guarantee by KRUPS is an extra benet which does not affect consumer’s Statutory
Rights.
The international manufacturer’s guarantee covers all costs related to restoring the proven defective product so that it
conforms to its original specications, through the repair or replacement of any defective part and the necessary labour.
At KRUPS’s choice, an equivalent or superior replacement product may be provided instead of repairing a defective
product. KRUPS’s sole obligation and your exclusive resolution under this guarantee are limited to such repair or
replacement.
Conditions & Exclusions:
The international KRUPS guarantee only applies within the guarantee period and for those countries listed in the country
list attached and is valid only on presentation of a proof of purchase. The product can be taken directly in person to an
authorised service centre or must be adequately packaged and returned, by recorded delivery (or equivalent method of
postage), to a KRUPS authorised service centre. Full address details for each country’s authorised service centres are
listed on KRUPS website (www.krups.com) or by calling the appropriate telephone number as set out in the country list
to request the appropriate postal address.
KRUPS shall not be obliged to repair or replace any product which is not accompanied by a valid proof of purchase.
This guarantee will not cover any damage which occurs as a result of misuse, negligence, failure to follow KRUPS
instructions, use on current or voltage other than as stamped on the product, or a modication or unauthorised repair
of the product. It also does not cover normal wear and tear, maintenance or replacement of consumable parts, or the
following:
- using the wrong type of water or consumable
- ingress of water, dust or insects into the product (excluding appliances with features specically designed for
insects)
- damage as a result of lightning or power surges
EN

- mechanical damages, overloading
- scaling (any de-scaling must be carried out according to the instructions for use)
- accidents including re, ood, thunderbolt, etc
- damages or poor results due to wrong voltage or frequency
- damage to any glass or porcelain ware in the product
- professional or commercial use
This guarantee does not apply to any product that has been tampered with, or to damages incurred through improper use
and care, faulty packaging by the owner or mishandling by any carrier.
In order to offer the best possible after-sales service and constantly improve customer satisfaction, KRUPS may send a
satisfaction survey to all customers who have had their product repaired or exchanged in a KRUPS authorised service
centre.
The international KRUPS guarantee applies only for products purchased in one of the countries listed, and used for
domestic purposes only in one of the countries listed on the Country List. Where a product purchased in one listed country
and then used in another listed country:
a) The international KRUPS guarantee does not apply in case of non conformity of the purchased product with the
local standards, such as voltage, frequency, power plugs, or non conformity with other local legal requirements or
other local technical specications.
b) The repair process for products purchased outside the country of use may require a longer time if the product is
not locally sold by KRUPS
c) In cases where the product is not repairable in the new country, the international KRUPS guarantee is limited to a
replacement by a similar product or an alternative product at similar cost, where possible.
Consumer Statutory Rights:
This international KRUPS guarantee does not affect the statutory rights a consumer may have or those rights that cannot
be excluded or limited, nor rights against the retailer from which the consumer purchased the product. This guarantee
gives a consumer specic legal rights, and the consumer may also have other legal rights which vary from State to State
or Country to Country. The consumer may assert any such rights at his sole discretion.
For Australia only: Our goods come with guarantees that cannot be excluded under the Australian Consumer Law. You
are entitled to a replacement or refund for a major failure and compensation for any other reasonably foreseeable loss or
damage. You are also entitled to have the goods repaired or replaced if the goods fail to be of acceptable quality and the
failure does not amount to a major failure.
*** Please keep this document for your reference should you wish to make a claim under the guarantee
18
La page charge ...
La page charge ...
La page charge ...
La page charge ...
La page charge ...
La page charge ...
La page charge ...
La page charge ...
La page charge ...
La page charge ...
La page charge ...
La page charge ...
La page charge ...
La page charge ...
La page charge ...
La page charge ...
La page charge ...
La page charge ...
La page charge ...
La page charge ...
La page charge ...
La page charge ...
La page charge ...
La page charge ...
La page charge ...
La page charge ...
La page charge ...
La page charge ...
La page charge ...
La page charge ...
La page charge ...
La page charge ...
La page charge ...
La page charge ...
La page charge ...
La page charge ...
-
 1
1
-
 2
2
-
 3
3
-
 4
4
-
 5
5
-
 6
6
-
 7
7
-
 8
8
-
 9
9
-
 10
10
-
 11
11
-
 12
12
-
 13
13
-
 14
14
-
 15
15
-
 16
16
-
 17
17
-
 18
18
-
 19
19
-
 20
20
-
 21
21
-
 22
22
-
 23
23
-
 24
24
-
 25
25
-
 26
26
-
 27
27
-
 28
28
-
 29
29
-
 30
30
-
 31
31
-
 32
32
-
 33
33
-
 34
34
-
 35
35
-
 36
36
-
 37
37
-
 38
38
-
 39
39
-
 40
40
-
 41
41
-
 42
42
-
 43
43
-
 44
44
-
 45
45
-
 46
46
-
 47
47
-
 48
48
-
 49
49
-
 50
50
-
 51
51
-
 52
52
-
 53
53
-
 54
54
-
 55
55
-
 56
56


Krups EA891C50 Manuel utilisateur
- Catégorie
- Accessoires de préparation de café
- Taper
- Manuel utilisateur
dans d''autres langues
- English: Krups EA891C50 User manual
- español: Krups EA891C50 Manual de usuario
Documents connexes
-
Krups EA891C50 Manuel utilisateur
-
-
-
-
-
-
-
-
Krups Evidence EA891D Manuel utilisateur
-