ZyXEL NWA-3160 Guide de démarrage rapide
- Catégorie
- Composants de dispositif de sécurité
- Taper
- Guide de démarrage rapide

Copyright © 2008. All rights reserved.
NWA-3160
802.11a/b/g Business WLAN Access Point
NWA-3163
802.11b/g Business WLAN Access Point
NWA-3165
Wireless N Business WLAN Access Point
Quick Start Guide
Version 3.60
05/2008
Edition 2
DEFAULT LOGIN
IP Address http://192.168.1.2
Password 1234
Table of Contents
ENGLISH 3
DEUTSCH 17
ESPAÑOL 35
FRANÇAIS 49
ITALIANO 65
РУССКИЙ 81
SVENSKA 95
简体中文
109
繁體中文 121

2

ENGLISH
3
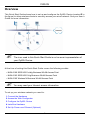
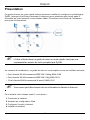
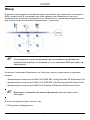
Overview
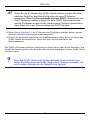
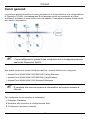
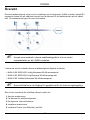
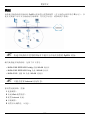
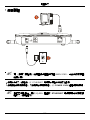
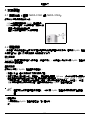
This Quick Start Guide shows how to set up and configure the ZyXEL Device (marked Z in
the figure) to allow wireless clients to securely access your wired network. See your User’s
Guide for more information.
" The icon used in this Quick Start Guide is not an exact representation of
your ZyXEL Device.
At the time of writing this Quick Start Guide covers the following models:
• NWA-3160 IEEE 802.11a/b/g Business WLAN Access Point
• NWA-3163 IEEE 802.11b/g Business WLAN Access Point
• NWA-3165 Wireless N Business WLAN Access Point
" You may need your Internet access information.
To set up your wireless network you need to:
1 Connect the Hardware
2 Access the Web Configurator
3 Configure the ZyXEL Device
4 Install the Hardware
5 Set Up Power over Ethernet (Optional)
ENGLISH

ENGLISH
4
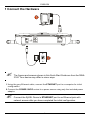
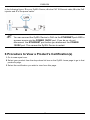
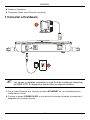
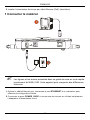
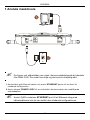
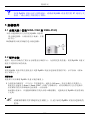
1 Connect the Hardware
" The figures and screens shown in this Quick Start Guide are from the NWA-
3160. Your device may differ in minor ways.
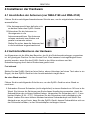
1 Using the grey Ethernet cable, connect the ETHERNET port to a computer for initial
configuration.
2 Connect the POWER 12VDC socket to a power source using only the included power
adaptor.
" Connect the ZyXEL Device’s ETHERNET port to an Ethernet jack with
network access after you have completed the initial configuration.

ENGLISH
5
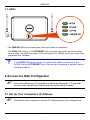
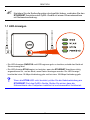
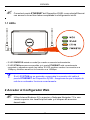
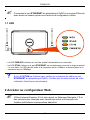
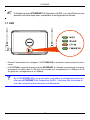
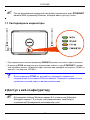
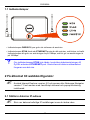
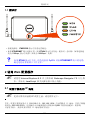
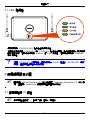
1.1 LEDs
•The PWR/SYS LED turns steady green when the power is connected.
•The ETHN LED turns on if the ETHERNET port is properly connected, and blinks when
there is traffic. The LED turns green if the connection is at 10Mbps, and turns yellow if the
connection is at 100Mbps.
V If the ETHN LED does not turn on, check the cable connection to the
ZyXEL Device’s ETHERNET port. Ensure your computer’s network card is
working properly.
2 Access the Web Configurator
" Use Internet Explorer 6.0 and later or Netscape Navigator 7.0 and later
versions with JavaScript enabled and pop-up blocking disabled.
2.1 Set Up Your Computer’s IP Address
" Note down your computer’s current IP settings before you change them.

ENGLISH
6
First, set your computer to use a static IP address in the 192.168.1.3 - 192.168.1.254
range with a subnet mask of 255.255.255.0. This ensures that your computer can
communicate with your ZyXEL Device. See your User’s Guide for information on setting up
your computer’s IP address.
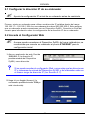
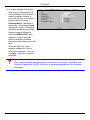
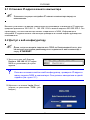
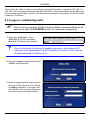
2.2 Log Into the Web Configurator
" Even though you can connect to the ZyXEL Device wirelessly, it is
recommended that you connect your computer to the ETHERNET port for
initial configuration.
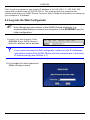
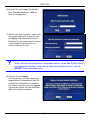
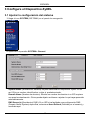
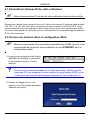
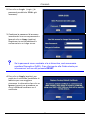
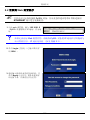
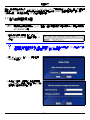
1 Launch your web browser. Enter
192.168.1.2 (the ZyXEL Device’s
default IP address) as the address.
V If you cannot access the Web configurator, make sure the IP addresses
and subnet masks of the ZyXEL Device and the computer are in the same
IP address range (see Section 2.1).
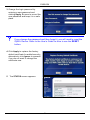
2 Click Login (the default password
1234 is already entered).

ENGLISH
7
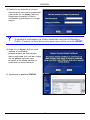
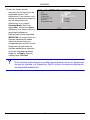
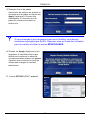
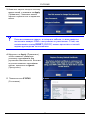
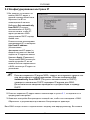
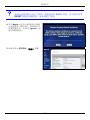
3 Change the login password by
entering a new password and
clicking Apply. Be sure to record the
new password and keep it in a safe
place.
V If you change the password and then forget it, you will need to reset the
ZyXEL Device. Refer to the User’s Guide for how to use the RESET
button.
4 Click Apply to replace the factory
default certificate for added security;
alternatively click Ignore to proceed
if you do not want to change the
certificate now.
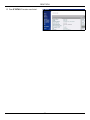
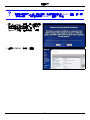
5 The STATUS screen appears.

ENGLISH
8
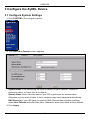
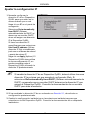
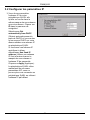
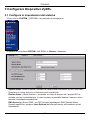
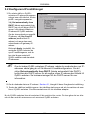
3 Configure the ZyXEL Device
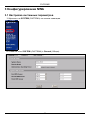
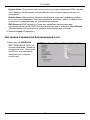
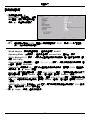
3.1 Configure System Settings
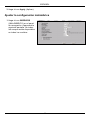
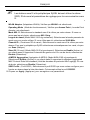
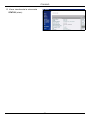
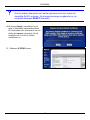
1 Click SYSTEM in the navigation panel.
2 The SYSTEM > General screen appears.
System Name is for identifying the ZyXEL Device on your network. Choose a
distinctive name, or leave this at its default.
Domain Name: Enter a domain name if your ISP requires one for authentication.
Otherwise you can leave it blank or set to whatever may have displayed automatically.
DNS Server(s): if your ISP gave you specific DNS (Domain Name System) settings,
select User-Defined and enter them here. Otherwise, leave these fields at their defaults.
3 Click Apply.

ENGLISH
9
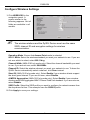
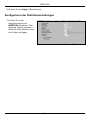
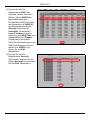
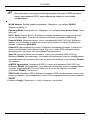
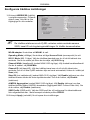
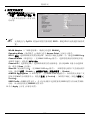
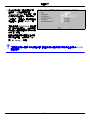
Configure Wireless Settings
1 Click WIRELESS in the
navigation panel. A
screen similar to the
following appears. Not all
fields are available in all
models.
" The wireless stations and the ZyXEL Device must use the same
SSID, channel ID and encryption settings for wireless
communication.
Operating Mode: Ensure that Access Point mode is selected.
802.11 Mode: Select the wireless standard you want your network to use. If you are
not sure which to select, select 802.11b+g.
Channel Width (NWA-3165 n/g mode only): Select the channel bandwidth you want
to use. If you are not sure, select 20/40 MHz.
Channel ID: Select the wireless channel you want your network to use. To have the
ZyXEL Device automatically select a channel, click Scan instead.
Short GI (NWA-3165 n/g mode only): Select Enable if your wireless clients support
the short guard interval. If you are not sure, select Disable.
A-MPDU Aggregation (NWA-3165 n/g mode only): Select Enable if your wireless
clients support the Aggregated MAC Protocol Data Unit standard. If you are not sure,
select Disable.
SSID Profile: Select the SSID profile you want to configure for network access from
the drop-down list box. This example uses the SSID03 profile.
2 Click Apply to save your settings.

ENGLISH
10
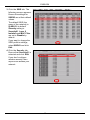
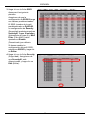
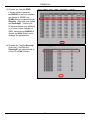
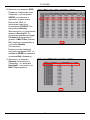
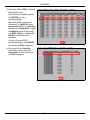
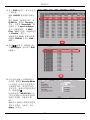
3 Click the SSID tab. The
following screen appears.
Ensure the settings for
SSID03 are at their default
values.
The default SSID (the
name of the network) is
ZyXEL03, its default
Security setting is
Security01. Layer 2
Isolation and MAC Filter
are set to Disable by
default.
If you want to change the
SSID profile’s settings,
select SSID03 and click
Edit.
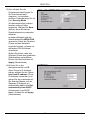
4 Click the Security tab.
Ensure that Security01 is
selected and click Edit.
If you don’t configure
wireless security, then
anyone can access your
network.

ENGLISH
11
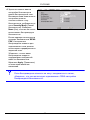
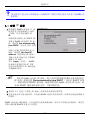
5 This is where you can
enter the security settings
for your wireless network.
The fields you fill in differ
according to the type of
security you select in the
Security Mode field.
Select None if you do not
wish to use wireless
security.
This example uses WPA2-
PSK security, in which all
wireless clients must use
the same pre-shared key
to join the network.
Ensure that all your
wireless clients support the
type of security you set.
Click Apply when you
have finished.
V If the wireless clients cannot communicate with the network, ensure
that the clients and the ZyXEL Device are using the same wireless
security settings.

ENGLISH
12
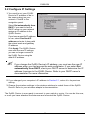
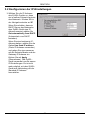
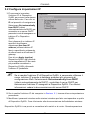
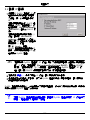
3.2 Configure IP Settings
The ZyXEL Device is now ready to connect to your switch or router. You can do this now,
or once you have attached the antennas and mounted the ZyXEL Device.
1 You need to set your ZyXEL
Device’s IP address to be in
the same subnet as your
network. Click IP in the
navigation panel.
Select Get automatically from
DHCP if you want to have a
DHCP server on your network
assign an IP address to the
ZyXEL Device.
If you have a specific IP address
to use, select Use fixed IP
address and enter it along with
the subnet mask and gateway
IP address.
Click Apply. The ZyXEL Device
now uses the new IP settings;
you can no longer connect to
the ZyXEL Device using the
default IP address.
" If you change the ZyXEL Device’s IP address, you must use the new IP
address when you next access the web configurator. If you select Get
automatically from DHCP, check your DHCP server to determine the IP
address it assigns to the ZyXEL Device. Refer to your DHCP server’s
documentation for more information.
2 If you changed your computer’s IP address in Section 2.1, return it to its previous
setting.
3 Change the wireless settings in the wireless stations to match those of the ZyXEL
Device. Refer to your wireless adapter’s documentation.

ENGLISH
13
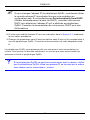
V If the ZyXEL Device cannot communicate with the network, ensure that the
ZyXEL Device is using an IP address on the same subnet as the switch /
router.
4 Install the Hardware
Figures in this section use generic icons. The ZyXEL Device in the picture is not an exact
representation of your device.
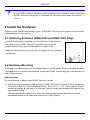
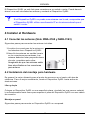
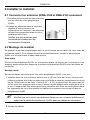
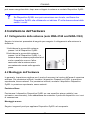
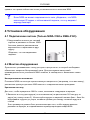
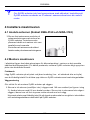
4.1 Attaching Antennas (NWA-3160 and NWA-3163 Only)
4.2 Hardware Mounting
In general, the best location for the access point is at the center of your intended wireless
coverage area. For better performance, mount the ZyXEL Device high up in an area that is
free of obstructions.
Wall-mounting
Do the following to attach your ZyXEL Device to a wall.
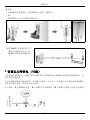
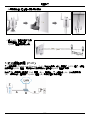
1 Screw the two screws provided with your ZyXEL Device into the wall 140mm apart (see
the figure in step 3). Use screws with 6mm ~ 8mm (0.24" ~ 0.31") wide heads. Do not
screw the screws all the way in to the wall; leave a small gap between the head of the
screw and the wall.
The gap must be big enough for the screw heads to slide into the screw slots and the
connection cables to run down the back of the ZyXEL Device.
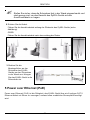
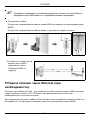
Screw the antennas clockwise onto the antenna connectors on
the sides of your ZyXEL Device. The antennas should be
perpendicular to the ground and parallel to each other.
Make sure the antennas are securely screwed onto the antenna
connectors.

ENGLISH
14
" Make sure the screws are securely fixed to the wall and strong enough to
hold the weight of the ZyXEL Device with the connection cables.
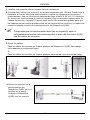
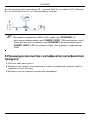
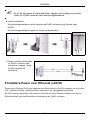
2 Adjust the cables.
Run the connection cables down the back of the ZyXEL Device as shown in the following
figure.
OR:
Run the connection cables upward and along the edge of the ceiling.
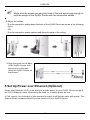
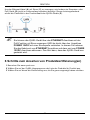
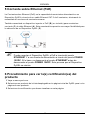
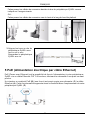
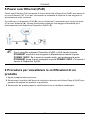
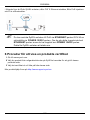
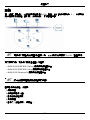
5 Set Up Power over Ethernet (Optional)
Power over Ethernet (PoE) is the ability to provide power to your ZyXEL Device via an 8-
pin CAT 5 Ethernet cable, eliminating the need for a nearby power source.
A PoE injector (not included) is also needed to supply the Ethernet cable with power. This
feature allows increased flexibility in the location of your ZyXEL Device.
3 Align the holes on the back
of the ZyXEL Device with
the screws on the wall.
Hang the ZyXEL Device on
the screws.
1
4
0
m
m

ENGLISH
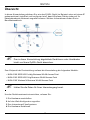
15
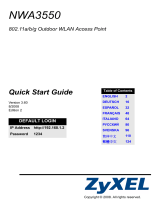
In the following figure, Z is your ZyXEL Device, A is the CAT 5 Ethernet cable, B is the PoE
injector and C is the power cable.
" You can connect the ZyXEL Device to PoE via the ETHERNET port AND to
a power source via the POWER 12VDC port. If you do so, do not
disconnect the ETHERNET port before you disconnect the POWER
12VDC port. This causes the ZyXEL Device to restart.
6 Procedure to View a Product’s Certification(s)
1 Go to www.zyxel.com.
2 Select your product from the drop-down list box on the ZyXEL home page to go to that
product's page.
3 Select the certification you wish to view from this page.

ENGLISH
16

DEUTSCH
17
Übersicht
In dieser Kurzanleitung erfahren Sie, wie das ZyXEL-Gerät (im Beispiel unten mit einem Z
gekennzeichnet) installiert und konfiguriert wird, damit Wireless-Clients sicher auf Ihr
kabelgebundenes Netzwerk zugreifen können. Weitere Informationen finden Sie im
Benutzerhandbuch.
" Das in dieser Kurzanleitung abgebildete Gerät kann unter Umständen
leicht von Ihrem ZyXEL-Gerät abweichen.
Zum Zeitpunkt der Druckstellung umfasst die Kurzanleitung die folgenden Modelle:
• NWA-3160 IEEE 802.11a/b/g Business WLAN Access Point
• NWA-3163 IEEE 802.11b/g Business WLAN Access Point
• NWA-3165 Wireless N Business WLAN Access Point
" Halten Sie die Daten für Ihren Internetzugang bereit.
Um das Drahtlosnetzwerk einzurichten, müssen Sie:
1 Die Hardware anschließen.
2 Auf den Web-Konfigurator zugreifen.
3 Den Internetzugriff konfigurieren.
4 Die Hardware installieren.
DEUTSCH

DEUTSCH
18
5 Power-over-Ethernet einrichten (optional).
1 Anschließen der Hardware
" Das in dieser Kurzanleitung abgebildete Gerät ist der NWA-3160. Die
Bildschirmdarstellungen sind ebenfalls von diesem Gerät entlehnt. Ihr
Gerät kann von diesen Abbildungen leicht abweichen.
1 Verbinden Sie für die Erstkonfiguration den ETHERNET-Anschluss mit dem grauen
Ethernet-Kabel mit dem Computer.
2 Verbinden Sie die 12VDC-Netzanschlussbuchse POWER des Geräts mit dem
mitgelieferten Netzadapter mit dem Stromnetz.

DEUTSCH
19
" Nachdem Sie die Erstkonfiguration durchgeführt haben, verbinden Sie den
ETHERNET-Anschluss des ZyXEL-Geräts mit einem Ethernetanschluss
mit Netzwerkverbindung.
1.1 LED-Anzeigen
• Die LED-Anzeigen PWR/SYS und LED beginnen grün zu leuchten, sobald das Gerät mit
Strom versorgt wird.
• Die LED-Anzeige ETHN beginnt zu leuchten, wenn der ETHERNET-Anschluss richtig
angeschlossen ist, und sie blinkt, wenn Daten übertragen werden. Die LED-Anzeige
leuchtet bei einer 10-Mbps-Verbindung grün und bei einer 100-Mbps-Verbindung gelb.
V Wenn die ETHN-LED nicht leuchtet, prüfen Sie die Kabelverbindung am
ETHERNET-Port des ZyXEL-Geräts. Stellen Sie sicher, dass die
Netzwerkkarte des Computers installiert ist und einwandfrei funktioniert.

DEUTSCH
20
2 Zugreifen auf den Web-Konfigurator
" Verwenden Sie den Internet Explorer 6.0 oder den Netscape Navigator 7.0
und neuere Versionen davon mit aktiviertem JavaScript und aktivierter Pop-
up-Funktion.
2.1 Einrichten der IP-Adresse des Computers
" Notieren Sie sich die aktuellen IP-Einstellungen des Computers, bevor Sie
sie ändern.
Richten Sie den Computer zunächst so ein, dass er eine statische Adresse im Bereich
192.168.1.3 bis 192.168.1.254 mit der Subnetz-Maske 255.255.255.0 verwendet. Nur auf
diese Weise kann Ihr Computer mit dem ZyXEL-Gerät kommunizieren. Informationen zum
Einrichten der IP-Adresse des Computers finden Sie im Benutzerhandbuch.
2.2 Anmelden beim Web-Konfigurator
" Auch wenn Sie eine drahtlose Verbindung zum ZyXEL-Gerät herstellen
können, wird empfohlen, das Gerät für die Erstkonfiguration über den
ETHERNET-Anschluss an den Computer anzuschließen.
1 Starten Sie Ihren Webbrowser.
Geben Sie als Adresse 192.168.1.2
(die Standard-IP-Adresse des
ZyXEL-Geräts) ein.
V Wenn Sie nicht auf den Web-Konfigurator zugreifen können, prüfen Sie,
ob die IP-Adressen und Subnetz-Masken des ZyXEL-Geräts und des
Computers im selben IP-Adressbereich liegen (siehe Abschnitt 2.1).
La page est en cours de chargement...
La page est en cours de chargement...
La page est en cours de chargement...
La page est en cours de chargement...
La page est en cours de chargement...
La page est en cours de chargement...
La page est en cours de chargement...
La page est en cours de chargement...
La page est en cours de chargement...
La page est en cours de chargement...
La page est en cours de chargement...
La page est en cours de chargement...
La page est en cours de chargement...
La page est en cours de chargement...
La page est en cours de chargement...
La page est en cours de chargement...
La page est en cours de chargement...
La page est en cours de chargement...
La page est en cours de chargement...
La page est en cours de chargement...
La page est en cours de chargement...
La page est en cours de chargement...
La page est en cours de chargement...
La page est en cours de chargement...
La page est en cours de chargement...
La page est en cours de chargement...
La page est en cours de chargement...
La page est en cours de chargement...
La page est en cours de chargement...
La page est en cours de chargement...
La page est en cours de chargement...
La page est en cours de chargement...
La page est en cours de chargement...
La page est en cours de chargement...
La page est en cours de chargement...
La page est en cours de chargement...
La page est en cours de chargement...
La page est en cours de chargement...
La page est en cours de chargement...
La page est en cours de chargement...
La page est en cours de chargement...
La page est en cours de chargement...
La page est en cours de chargement...
La page est en cours de chargement...
La page est en cours de chargement...
La page est en cours de chargement...
La page est en cours de chargement...
La page est en cours de chargement...
La page est en cours de chargement...
La page est en cours de chargement...
La page est en cours de chargement...
La page est en cours de chargement...
La page est en cours de chargement...
La page est en cours de chargement...
La page est en cours de chargement...
La page est en cours de chargement...
La page est en cours de chargement...
La page est en cours de chargement...
La page est en cours de chargement...
La page est en cours de chargement...
La page est en cours de chargement...
La page est en cours de chargement...
La page est en cours de chargement...
La page est en cours de chargement...
La page est en cours de chargement...
La page est en cours de chargement...
La page est en cours de chargement...
La page est en cours de chargement...
La page est en cours de chargement...
La page est en cours de chargement...
La page est en cours de chargement...
La page est en cours de chargement...
La page est en cours de chargement...
La page est en cours de chargement...
La page est en cours de chargement...
La page est en cours de chargement...
La page est en cours de chargement...
La page est en cours de chargement...
La page est en cours de chargement...
La page est en cours de chargement...
La page est en cours de chargement...
La page est en cours de chargement...
La page est en cours de chargement...
La page est en cours de chargement...
La page est en cours de chargement...
La page est en cours de chargement...
La page est en cours de chargement...
La page est en cours de chargement...
La page est en cours de chargement...
La page est en cours de chargement...
La page est en cours de chargement...
La page est en cours de chargement...
La page est en cours de chargement...
La page est en cours de chargement...
La page est en cours de chargement...
La page est en cours de chargement...
La page est en cours de chargement...
La page est en cours de chargement...
La page est en cours de chargement...
La page est en cours de chargement...
La page est en cours de chargement...
La page est en cours de chargement...
La page est en cours de chargement...
La page est en cours de chargement...
La page est en cours de chargement...
La page est en cours de chargement...
La page est en cours de chargement...
La page est en cours de chargement...
La page est en cours de chargement...
La page est en cours de chargement...
La page est en cours de chargement...
La page est en cours de chargement...
La page est en cours de chargement...
-
 1
1
-
 2
2
-
 3
3
-
 4
4
-
 5
5
-
 6
6
-
 7
7
-
 8
8
-
 9
9
-
 10
10
-
 11
11
-
 12
12
-
 13
13
-
 14
14
-
 15
15
-
 16
16
-
 17
17
-
 18
18
-
 19
19
-
 20
20
-
 21
21
-
 22
22
-
 23
23
-
 24
24
-
 25
25
-
 26
26
-
 27
27
-
 28
28
-
 29
29
-
 30
30
-
 31
31
-
 32
32
-
 33
33
-
 34
34
-
 35
35
-
 36
36
-
 37
37
-
 38
38
-
 39
39
-
 40
40
-
 41
41
-
 42
42
-
 43
43
-
 44
44
-
 45
45
-
 46
46
-
 47
47
-
 48
48
-
 49
49
-
 50
50
-
 51
51
-
 52
52
-
 53
53
-
 54
54
-
 55
55
-
 56
56
-
 57
57
-
 58
58
-
 59
59
-
 60
60
-
 61
61
-
 62
62
-
 63
63
-
 64
64
-
 65
65
-
 66
66
-
 67
67
-
 68
68
-
 69
69
-
 70
70
-
 71
71
-
 72
72
-
 73
73
-
 74
74
-
 75
75
-
 76
76
-
 77
77
-
 78
78
-
 79
79
-
 80
80
-
 81
81
-
 82
82
-
 83
83
-
 84
84
-
 85
85
-
 86
86
-
 87
87
-
 88
88
-
 89
89
-
 90
90
-
 91
91
-
 92
92
-
 93
93
-
 94
94
-
 95
95
-
 96
96
-
 97
97
-
 98
98
-
 99
99
-
 100
100
-
 101
101
-
 102
102
-
 103
103
-
 104
104
-
 105
105
-
 106
106
-
 107
107
-
 108
108
-
 109
109
-
 110
110
-
 111
111
-
 112
112
-
 113
113
-
 114
114
-
 115
115
-
 116
116
-
 117
117
-
 118
118
-
 119
119
-
 120
120
-
 121
121
-
 122
122
-
 123
123
-
 124
124
-
 125
125
-
 126
126
-
 127
127
-
 128
128
-
 129
129
-
 130
130
-
 131
131
-
 132
132
-
 133
133


ZyXEL NWA-3160 Guide de démarrage rapide
- Catégorie
- Composants de dispositif de sécurité
- Taper
- Guide de démarrage rapide
dans d''autres langues
- italiano: ZyXEL NWA-3160 Guida Rapida
- español: ZyXEL NWA-3160 Guía de inicio rápido
Documents connexes
-
ZyXEL NWA-3166 Guide de démarrage rapide
-
 ZyXEL Communications NWA-3550 Le manuel du propriétaire
-
ZyXEL Communications NWA-3500 Manuel utilisateur
-
-
-
 ZyXEL Communications NWA-3100 Manuel utilisateur
-
-
ZyXEL NWA3550-N Guide de démarrage rapide
-
 ZyXEL Communications Webcam NWA1120 Manuel utilisateur
-
ZyXEL PoE12-HP Le manuel du propriétaire


