ZyXEL NWA3550-N Guide de démarrage rapide
- Catégorie
- Points d'accès WLAN
- Taper
- Guide de démarrage rapide

NWA3000-N Series Quick Start Guide
Firmware Version 2.23
Edition 1, 11/2010
Copyright 2010 ZyXEL Communications Corp.
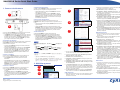
1. Connect the Hardware
Connect the NWA’s ETHERNET port to an Ethernet jack with network
access after you have completed the initial configuration.
• The PWR/SYS LED turns steady green when the power is connected.
• The ETHN LED turns on if the ETHERNET port is properly connected,
and blinks when there is traffic. If the ETHN LED does not turn on,
check the cable connection to the NWA’s ETHERNET port. Ensure
your computer’s network card is working properly.
Anschließen der Hardware
Nachdem Sie die Erstkonfiguration durchgeführt haben, verbinden Sie
den ETHERNET-Anschluss des NWAs mit dem ETHERNET-
Anschlusses Ihres Computers.
• Die LED-Anzeige PWR/SYS beginnt grün zu leuchten, sobald das
Gerät mit Strom versorgt wird.
• Die LED-Anzeige ETHN beginnt zu leuchten, wenn der ETHERNET-
Anschluss richtig angeschlossen ist, und sie blinkt, wenn Daten
übertragen werden. Wenn die ETHN-LED nicht leuchtet, prüfen Sie
die Kabelverbindung am ETHERNET-Port des NWAs. Stellen Sie
sicher, dass die Netzwerkkarte des Computers installiert ist und
einwandfrei funktioniert.
Conectar el hardware
Conecte el puerto ETHERNET del NWA a una clavija Ethernet con
acceso a la red tras haber completado la configuración inicial.
•El LED PWR/SYS estará en verde fijo cuando se conecte la
alimentación.
•El LED ETHN permanece encendido si el puerto ETHERNET está
correctamente conectado y parpadea cuando hay tráfico. Si el LED
ETHN no se enciende, compruebe la conexión del cable al puerto
ETHERNET del NWA. Asegúrese de que la tarjeta de red de su
ordenador funciona correctamente.
Connecter le matériel
Connectez le port ETHERNET du NWA à une prise Ethernet avec
accès au réseau après avoir terminé la configuration initiale.
•La LED PWR/SYS s’allume en vert fixe quand l’alimentation est
connectée.
•La LED ETHN s’allume si le port ETHERNET est correctement
connecté et clignote quand il y a du trafic. Si la LED ETHN ne s'allume
pas, vérifiez la connexion du câble au port ETHERNET du NWA.
Vérifiez que la carte réseau de votre ordinateur fonctionne
correctement.
2
1
Collegamento dell'hardware
Collegare la porta ETHERNET di NWA a un jack Ethernet con accesso
alla rete dopo aver completato la configurazione iniziale.
• Quando l'alimentazione è collegata, il LED PWR/SYS si accende e
resta acceso di colore verde.
•Il LED ETHN si accende quando la porta ETHERNET è collegata
correttamente e lampeggia quando c'è traffico dati. Se il LED ETHN
LED non si accende, controllare il collegamento del cavo alla porta
ETHERNET del NWA. Verificare che la scheda di rete del computer
sia funzionante correttamente.
Подключение оборудования
После выполнения начальной настройки подключите порт
ETHERNET вашего NWA к разъему Ethernet, который имеет доступ
к сети.
• При подключении питания индикатор PWR/SYS должен постоянно
гореть зеленым.
• Индикатор ETHN включается при подключении кабеля к порту
ETHERNET и мигает при передаче данных. Если индикатор ETHN
не загорается, проверьте надежность подключений и состояние
Ethernet-кабеля.
Проверьте правильность установки сетевой
карты в вашем компьютере.
Ansluta maskinvara
Anslut NWAs ETHERNET-port till ett Ethernet-uttag med
nätverksåtkomst när du har slutfört den inledande konfigurationen.
• Indikatorlampan PWR/SYS lyser grön när strömmen är ansluten.
• Indikatorlampan ETHN tänds när ETHERNET-porten är rätt ansluten,
och blinkar vid trafik. Om indikatorlampan ETHN inte tänds, kontrollera
kabelanslutningen till NWAs ETHERNET-port. Kontrollera att datorns
nätverkskort fungerar som det ska.
连接硬件
在完成网络访问的初始配置之后,请将 NWA 的 ETHERNET 端口连接至以太
网插座。
• 接通电源时, PWR/SYS 指示灯呈稳定的绿色。
• 如果 ETHERNET 端口连接正常,则 ETHN 指示灯会亮起,通信时,会
闪烁。如果 ETHN 指示灯不亮 , 检查连接到 NWA ETHERNET 端口的电
缆。确定您的计算机网卡工作正常。
連接硬體
完成初步設定後,再將 NWA 的 ETHERNET 埠連接到可以接取網路的乙
太網路插孔。
• 連接電源時,PWR/SYS LED 指示燈會持續亮綠燈。
• 如果已經正確連接 ETHERNET 埠,ETHN LED 指示燈會亮起,指示
燈閃爍則代表正在傳輸或接收資料。如果 ETHN LED 沒有亮燈,請檢查
連至 NWA 上 ETHERNET 埠的電纜。確認電腦網路卡運作正常。
2. NWA Management
2
3
4
1. Set your computer to use a static IP address in the 192.168.1.3 -
192.168.1.254 range with a subnet mask of 255.255.255.0.
2.
Launch your web browser. Enter 192.168.1.2 (the NWA’s
default IP address) as the address.
3. User Name (admin) and Password (1234).
4. Configuration > System > Hostname to change the system name.
Click OK to save your settings.
5. Configuration > LAN to change the IP address and VLAN settings.
6. Configuration > Object > AP Profile > SSID > Security List. Double-
click the default profile.
7. In the Edit Security Profile screen, select a Security Mode and
then configure it appropriately. (For details on the different security
modes, see the included User’s Guide). All wireless clients will then
need to use the same security mode and pre-shared key (if any) as
the APs on your wireless network.
8. The default Security Profile object is linked to the default SSID
object, which in turn is linked to the default Radio Profile object.
NWA Verwaltung
1. Stellen Sie Ihren Computer so ein, dass er eine statische IP-Adresse
im Bereich 192.168.1.3 - 192.168.1.254 und die Subnetz-Maske
255.255.255.0 verwendet.
5
8
6
7
2. Starten Sie Ihren Webbrowser. Geben Sie als Adresse 192.168.1.2
(die Standard-IP-Adresse des NWAs) ein.
3. Benutzernamen (admin) und Kennwort (1234).
4. Configuration > System > Hostname (Konfiguration > System >
Hostname) um den Systemnamen zu ändern. Klicken Sie auf OK,
um die Änderungen zu speichern.
5. Configuration > LAN (Konfiguration> LAN ) um die IP-Adresse und
die VLAN-Einstellungen zu ändern.
6. Configuration > Object > AP Profile > SSID > Security List.
(Konfiguration > Objekt > AP-Profil > SSID > Sicherheitsliste)
Klicken Sie doppelt auf das Default (Standardprofil).
7. Wählen Sie im Fenster Edit Security Profile (Sicherheitsprofil
bearbeiten) einen Security Mode (Sicherheitsmodus) aus, und
konfigurieren Sie ihn. (Informationen zu den verschiedenen
Sicherheitsmodi finden Sie im mitgelieferten Benutzerhandbuch).
Alle drahtlosen Clients müssen denselben Sicherheitsmodus und
(sofern festgelegt) Pre-shared-Key verwenden wie die APs im
Drahtlosnetzwerk.
8. Das Objekt default Security Profile (Sicherheitsprofil Standard) ist
mit dem Objekt default SSID (SSID Standard) verknüpft, das
wiederum mit dem Objekt default Radio Profile (Radio-Profil
Standard) verknüpft ist.
NWA Administración
1. Ajuste el ordenador para usar una dirección IP estática en el rango
192.168.1.3 - 192.168.1.254 con la máscara de subred
255.255.255.0.
2. Abra su explorador de web. Escriba 192.168.1.1 (la dirección IP
predeterminada del NWA) como dirección.
3. User Name (admin) y la Password (1234).
4. Configuration > System > Hostname (Configuración > Sistema >
Nombre host) para cambiar el nombre del sistema. Haga clic en OK
(Aceptar) para guardar sus cambios.
5. Configuration > LAN (Configuración > LAN) para cambiar la
configuración de dirección IP y VLAN.
6. Configuration > Object > AP Profile > SSID > Security List
(Configuración > Objeto > Perfil AP > SSID > Lista de seguridad)
Haga doble clic en el perfil default (predeterminado).
7. En la pantalla Edit Security Profile (Editar perfil de seguridad),
seleccione un Security Mode (Modo de seguridad) y configúrelo
correctamente. (Para detalles sobre los diferentes modos de
seguridad, consulte la Guía del usuario incluida). Todos los clientes
inalámbricos necesitarán utilizar el mismo modo de seguridad y la
clave pre-compartida (si hay) como los PA de su red inalámbrica.
8. El objeto default Security Profile (Perfil de seguridad
predeterminado) está vinculado al objeto default SSID (SSID
predeterminada), que a su vez está vinculado a default Radio
Profile (Perfil de Radio predeterminado).
NWA Gestion
1. Configurez votre ordinateur pour utiliser une adresse IP statique
dans la plage 192.168.1.3 - 192.168.1.254 avec un masque de sous-
réseau 255.255.255.0.
2. Lancez votre navigateur web. Entrez 192.168.1.2 (l'adresse IP par
défaut du NWA) comme adresse.
3. Nom d'utilisateur (admin) et le Mot de passe (1234).
4. Configuration > System > Hostname (Configuration > Système>
Nom d'hôte) pour changer le nom du système. Cliquez sur OK pour
enregistrer vos paramètres.
5. Configuration > LAN (Configuration > LAN) pour changer l'adresse
IP et les paramètres VLAN.

NWA3000-N Series Quick Start Guide
Firmware Version 2.23
Edition 1, 11/2010
Copyright 2010 ZyXEL Communications Corp.
6. Configuration > Object > AP Profile > SSID > Security List.
(Configuration > Objet> Profil AP > SSID > Liste de sécurité).
Double-cliquez sur le profil par Default (défaut).
7. Dans l'écran Edit Security Profile (Editer le profil de sécurité),
sélectionnez Security Mode (Mode de sécurité) puis configurez-le
de façon appropriée. (Pour plus d'informations concernant les
différents modes de sécurité, consultez le manuel de l'utilisateur).
Tous les clients WiFi devront alors utilisés le même mode de
sécurité et la même clé prépartagée (le cas échéant) que les PA de
votre réseau WiFi.
8. L'objet default Security Profile (Profil de sécurité par défaut) est
associé à l'objet default SSID (SSID par défaut), qui en retour est
associé à l'objet default Radio Profile (Profil radio par défaut).
NWA Gestione
1. Configurare il computer a utilizzare un indirizzo IP statico
nell'intervallo 192.168.1.3 - 192.168.1.254 con una subnet mask
uguale a 255.255.255.0.
2. Avviare il browser. Immettere 192.168.1.2 (l'indirizzo IP predefinito
di NWA) nella barra dell'indirizzo.
3. User Name (nome utente) predefinito (admin) e la Password
predefinita (1234).
4. Configuration > System > Hostname (configurazione > sistema >
nome host) per cambiare il nome del sistema. Fare clic su OK per
salvare le impostazioni.
5. Configuration > LAN (configurazione > LAN) per cambiare
l'indirizzo IP e le impostazioni della VLAN.
6. Configuration > Object > AP Profile > SSID > Security List
(configurazione > oggetto > profilo AP > SSID > elenco di
sicurezza). Fare doppio clic sul profilo default (predefinito).
7. Nella schermata Edit Security Profile (modifica profilo di
sicurezza), selezionare una Security Mode (modalità di sicurezza) e
configurarla in modo appropriato (per i dettagli relativi alle diverse
modalità di sicurezza, consultare la Guida per l'utente fornita a
corredo). Tutti i client wireless dovranno quindi utilizzare la stessa
modalità di sicurezza e chiave pre-shared (se esistente) degli AP
sulla rete wireless.
8. L'oggetto default Security Profile (profilo di sicurezza predefiniti)
viene collegato all'oggetto default SSID (SSID predefinito), che a
sua volta viene collegato all'oggetto default Radio Profile (profilo
radio predefinito).
NWA Управление
1. Установите на вашем компьютере использование статического
IP-адреса в диапазоне 192.168.1.3 - 192.168.1.254 с маской
подсети 255.255.255.0.
2. Запустите ваш веб-браузер. Введите 192.168.1.2 (IP-адрес NWA
по умолчанию) в строке адреса.
3. Введите имя пользователя (admin) и пароль (1234) по
умолчанию.
4. Configuration > System > Hostname (Конфигурация > Система >
Имя xocra) для изменения системного имени. Щелкните на
кнопке OK для сохранения настройки.
5. Configuration > LAN (Конфигурация > LAN) для
изменения IP-
адреса и настроек VLAN.
6. Configuration > Object > AP Profile > SSID > Security List
(Конфигурация > Объект > Профиль АР > SSID > Список
безопасности. Дважды щелкните на профиле default (по
умолчанию).
7. В окне Edit Security Profile (Правка безопасности профиля)
выберите пункт Security Mode (Режим безопасности) и
настройте необходимые параметры. (Подробности настройки
различных режимов безопасности смотрите в руководстве
пользователя). После этого все беспроводные клиенты должны
использовать тот
же режим безопасности и предварительно
заданный ключ, что и точки доступа в беспроводной сети.
8. Объект default Security Profile (Профиль безопасности по
умолчанию) будет связан с объектом default SSID (SSID по
умолчанию), который в свою очередь связан с объектом default
Radio Profile (Профиль радио по умолчанию).
NWA 管理
1. 将您的计算机设置为使用 192.168.1.3 - 192.168.1.254 范围内的
静态 IP 地址,子网掩码为 255.255.255.0
2. 启动 web 浏览器。输入 192.168.1.2 (NWA 的默认 IP 地址)作为
地址。
3. 输入默认的 User Name ( 用户名 ) (即 admin)和 Password ( 密码
) (即 1234).
4. Configuration > System > Hostname ( 配置 > 系统 > 主机名称 )
以更改系统名称 单击 OK ( 应用 ) 以保存设置。
5. Configuration > LAN ( 配置 > LAN) 以更改 IP 地址和 VLAN 设置。
6. Configuration > Object > AP Profile > SSID > Security List (配
置 > 对象 > AP 配置文件 > SSID > 安全性列表 )。双击 default (
默认 ) 配置文件。
7. 在 Edit Security Profile ( 编辑安全性配置文件 ) 屏幕中,选择
Security Mode ( 安全性模式 ),然后进行适当的配置。(有关各种安
全性模式的详细信息,请参阅随附的 《用户指南》。) 所有的无线客
户端都将使用与您网路上 AP 相同的安全性模式和预共享密钥。
8. 此 default Security Profile ( 默认安全性配置文件) 对象链接到
default SSID ( 默认 SSID) 对象,后者则链接到 default Radio
Profile ( 默认无线设备配置文件 ) 对象。
NWA 管理
1. 設定電腦使用範圍在 192.168.1.3 - 192.168.1.254 靜態的 IP 位
址,子網路遮罩為 255.255.255.0。
2. 啟動您的網頁瀏覽器 輸入位址 192.168.1.2 (NWA 的預設 IP 位址
)。
3. 輸入預設的 使用者名稱 (admin) 與 密碼 (1234)。
4. 點選 Configuration > System > Hostname ( 設定 > 系統 > 主機名稱
) 變更系統名稱。按一下 OK ( 確定 ) 儲存設定。
5. 點選 Configuration > LAN ( 設定 > 區域網路 ) 變更 IP 位址和
VLAN 設定。
6. 點選 Configuration > Object > AP Profile > SSID > Security List
( 設定 > 物件 > 基地站設定組合 > SSID > 安全性清單 )。按兩下
default ( 預設 ) 設定組合。
7. 在 Edit Security Profile ( 編輯安全組合 ) 畫面中,選擇一個
Security Mode ( 安全模式 ) ,然後作適當的設定。 ( 有關不同安全
模式的細節,請見所附的使用手冊 ) 。所有無線客戶端必須使用與您
的無線網路中的基地站相同的安全模式與預設定的共享金鑰 ( 如有的
話) 。
8. default Security Profile ( 預設安全組合 ) 物件連結到 default
SSID ( 預設 SSID) 物件,這個物件再連結到 default Radio
Profile ( 預設無線電組合 ) 物件。
For More Information
You can learn more about the NWA in the included documentation.The
User’s Guide contains details on every aspect of the NWA, from
hardware installation to the Web Configurator screens and fields. It is
located as a PDF file on the included product disc. You will also find it
contains tutorials and device application examples.
Every Web Configurator screen has its own help page that provides
extensives details about the available fields and options. To view it,
simply click the help icon in the Web Configurator’s task bar.
Wenn Sie weitere Informationen benötigen
Weitere Informationen über den NWA finden Sie in der Dokumentation.
Das Benutzerhandbuch enthält ausführliche Informationen über jeden
Aspekt des NWA, von der Hardwareinstallation bis hin zu den Web-
Konfigurator-Fenstern und den Eingabefeldern. Es befindet sich als
PDF-Datei auf der enthaltenen Disc. Es enthält zudem Lernprogramme
und Beispiele für Geräteanwendungen.
Jede Seite des Web-Konfigurators verfügt über eine eigene Hilfe-Seite,
die ausführliche Informationen über die verfügbaren Felder und
Optionen enthält. Rufen Sie sie auf, indem Sie auf das Hilfe-Symbol
der Taskleiste des Web-Konfigurators klicken.
Para más información
Puede saber más sobre el NWA en la documentación incluida. La Guía
del usuario contiene detalles sobre cada aspecto del NWA, desde la
instalación del hardware hasta las pantallas y campos del Configurador
Web. Está en formato PDF en el disco incluido con el producto.
También puede encontrar tutoriales y ejemplos de aplicaciones del
dispositivo.
Cada pantalla del Configurador Web tiene su propia página de ayuda
que ofrece detalles amplios sobre los campos y opciones disponibles.
Para verla, simplemente haga clic en el icono de ayuda en la barra de
tareas del Configurador Web.
Pour plus d'informations
Pour en apprendre plus à propos du NWA , consultez la documentation
fournie.Le manuel de l'utilisateur contient des informations concernant
tous les aspects du NWA, de l'installation du matériel aux écrans/
champs du configurateur Web. Il se trouve sous la forme d'un fichier
PDF sur le disque fourni avec le produit. Vous verrez également qu'il
contient des tutoriaux et des exemples d'application.
Chaque écran du configurateur Web a sa propre page d'aide qui donne
des informations détaillées sur les champs et les options disponibles.
Pour l'afficher, cliquez simplement sur l'icône d'aide dans la barre des
tâches du configurateur Web.
Per ulteriori informazioni
Nella documentazione fornita in dotazione sono contenute altre
informazioni sull'NWA. La Guida dell'utente contiene i dettagli su
ciascun aspetto dell'NWA, dall'installazione hardware alle schermate e
ai campi dello Strumento di configurazione Web. La guida è disponibile
in forma di file PDF memorizzato sul disco fornito a corredo con il
prodotto. Esso contiene anche tutorial ed esempi di applicazione del
dispositivo.
In ogni schermata dello Strumento di configurazione Web è presente
una pagina di guida corrispondente che contiene dettagli esaurienti sui
campi e sulle opzioni disponibili. Per aprirla è sufficiente fare clic
sull'icona della guida nella barra delle attività dello Strumento di
configurazione Web.
Дополнительная информация
Вы можете получить дополнительную информацию о NWA в
прилагаемой к нему документации. Руководство пользователя
содержит подробную информацию обо всех аспектах
использования NWA: от подключения оборудования до окон и
полей Web Configurator. Оно находится в PDF файле на компакт-
диске из комплекта поставки. На нем же вы сможете найти
обучающие курсы и примеры использования устройства.
Каждое окно
Web Configurator имеет собственную страницу
справки, на которой приводится подробная информация о полях и
опциях. Для ее просмотра просто щелкните на значке справки на
панели задач Web Configurator.
更多信息
您可从随附的文档中了解更多有关 NWA 的信息。《用户指南》中详细阐
述了硬件安装到 Web 配置程序屏幕和栏位等 NWA 各个方面的信息。它以
PDF 文件形式存储在随附的产品光盘中。其中也包含了教程和设备应用示
例。每个 Web 配置程序屏幕都有其帮助页面,其中有可用栏位和选项的
详细信息。要查看联机帮助,仅需单击 Web 配置程序任务栏中的帮助按
钮即可。
詳細資訊
您可由包含的文件中學習更多有關 NWA 的資訊。使用手冊包含 NWA 各種
層面的詳細資訊,由硬體安裝到網頁設置器的畫面與欄位。這個文件是在
所附的產品碟片上的一個 PDF 檔案。裏面也包含指導文件與裝置應用的
範例。每一個網頁設置器的畫面都有自己的輔助頁,提供所有欄位與選項
的詳細說明。要檢視這些說明,只要在網頁設置器的工作列上點下輔助小
圖像即可。
ENGLISH DEUTSCH ESPAÑOL
Viewing a Product's
Certifications
• Go to www.zyxel.com.
• Select your product from the drop-
down list box on the ZyXEL home page
to go to that product's page.
• Select the certification you wish to
view from this page.
Vorgehensweise zum
Aufrufen einer
Produktzertifizierung
• Gehen Sie auf www.zyxel.com.
• Wählen Sie Ihr Produkt aus der
Auswahlliste auf der ZyXEL Homepage
aus, um die Seite des entsprechenden
Produkts aufzurufen.
• Wählen Sie die Zertifizierung, die Sie
von dieser Seite aus aufrufen möchten.
Procedimiento para ver las
certificaciones de un
producto
• Vaya a www.zyxel.com.
• Seleccione el producto que desea en
el cuadro de lista desplegable que se
encuentra en la página principal de
ZyXEL para obtener acceso a la página
de dicho producto.
• Seleccione la certificación que desea
ver en esta página.
FRANÇAIS ITALIANO SVENSKA
Procédure permettant de
consulter une(les)
Certification(s) du Produit
• Connectez vous sur www.zyxel.com.
• Sélectionnez votre produit dans la
liste déroulante se trouvant sur la page
d'accueil ZyXEL pour accéder à la
page du produit concerné.
• Sélectionnez sur cette page la
certification que vous voulez consulter.
Procedura per visualizzare le
certificazioni di un prodotto
• Andare alla pagina www.zyxel.com
• Nel sito ZyXEL, selezionare il proprio
prodotto dall’elenco a discesa per
andare alla pagina di quel prodotto.
• Da questa pagina selezionare la
certificazione che si vuole vedere.
Procedur för att visa en
produkts certifikat
• Gå till www.zyxel.com
• Välj din produkt från
rullgardinslistrutan på ZyXEL:s
hemsida för att gå till denna produkts
sida.
• Välj det certifikat du vill titta på från
denna sida.
简体中文 繁體中文
查看产品证书
1. 先访问 www.zyxel.com。
2. 在 ZyXEL 主页的下拉列表框
中选择产品,以进入产品页
面。
3. 在该页中选择要查看的证
书。
檢視產品的認證
1. 前往 www.zyxel.com。
2. 在 ZyXEL 首頁的下拉式清單
方塊中選擇您所購買的產品
以前往產品的相關網頁。
3. 由此網頁選擇您想要檢視的
認證。
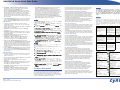
ENGLISH
Green Product Declaration
RoHS Directive 2002/95/EC
DEUTSCH
Green Product Declaration
RoHS Directive 2002/95/EC
WEEE Directive 2002/96/EC
(WEEE: Waste Electrical and Electronic
Equipment)
2003/108/EC
WEEE Directive 2002/96/EC
(WEEE: Waste Electrical and Electronic
Equipment)
2003/108/EC
Declaration Signature:
Name/Title: Alan Cho /
Quality Assurance Director
Date (yyyy/mm/dd): 2009/03/24
Unterschrift des Erklärenden:
Name/Titel: Alan Cho /
Quality Assurance Director
Datum (JJJJ/MM/TT): 2009/03/24
ESPAÑOL
Declaración de Producto Ecológico
Directiva RoHS 2002/95/EC
FRANÇAIS
Déclaration de Produit Green
Directive RoHS 2002/95/EC
Directiva REEE 2002/96/EC
(REEE : Residuos de Equipos Eléctricos y
Electrónicos)
2003/108/EC
Directive DEEE 2002/96/EC
(DEEE : Déchets des Equipements
Electriques et Electroniques)
2003/108/EC
Firma de declaración:
Nombre/Título: Alan Cho /
Quality Assurance Director
Fecha (aaaa/mm/dd): 2009/03/24
Signature de la déclaration :
Nom/Titre : Alan Cho /
Quality Assurance Director
Date (aaaa/mm/jj) : 2009/03/24
ITALIANO
Dichiarazione Green Product
Direttiva RoHS 2002/95/CE
SVENSKA
Miljödeklaration
RoHS Direktiv 2002/95/EC
Direttiva RAEE 2002/96/CE
(RAEE: Rifiuti di Apparecchiature Elettriche
ed Elettroniche)
2003/108/CE
WEEE Direktiv 2002/96/EC
(WEEE: hantering av elektriskt och
elektroniskt avfall)
2003/108/EC
Firma dichiarazione:
Nome/titolo: Alan Cho /
Quality Assurance Director
Data (aaaa/mm/gg): 2009/03/24
Deklaration undertecknad av:
Namn/Titel: Alan Cho /
Quality Assurance Director
Datum (åååå/mm/dd): 2009/03/24

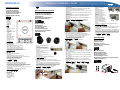
Package Contents
Packungsinhalt
Contenido del paquete
Contenu de l'emballage
Contenuto della confezione
Содержимое упаковки
Förpackningens innehåll
包装内容
包裝內容
1. Device
Gerät
Dispositivo
Appareil
Dispositivo
Устройство
Enhet
设备
裝置
2. Waterproofing Kit and
Tape
Dichtzubehör
und -band
Kit resistente al agua
y cinta
Kit et bande
d'étanchéité
Kit e nastro
impermeabilizzante
Водозащитный
комплект и лента
Vattentätande sats
och tejp
防水套件和胶带
防水套件與膠帶
3. Pole Mounting and
Wall Mounting Kits
Mastmontage- und Wandmontagezubehör
Kits de montaje en poste y pared
Kits de fixation au mât et de fixation murale
Kit montaggio su rack e montaggio a parete
Комплект крепления на кронштейне и на стене
Stolpmonterings- och väggmonteringssatser
支柱安装和墙面安装套件
柱掛和壁掛安裝套件
4. Power over Ethernet (PoE) Adaptor
PoE-Adapter
Adaptador de corriente sobre Ethernet (PoE)
Adaptateur PoE (Alimentation électrique par câble Ethernet)
Adattatore Power over Ethernet (PoE)
Адаптер питания через Ethernet (PoE)
PoE-adapter (Power over Ethernet)
以太网供电 (PoE) 适配器
乙太網路供電 (PoE) 配接器
5. Quick Start Guide and Hardware Installation Guide
Kurzanleitung und Hardware-Installationsanleitung
Guía de instalación rápida y Guía de instalación del hardware
Guide de mise en route rapide et guide d'installation matérielle
Guida rapida e guida installazione hardware
Руководство по быстрому запуску и руководство по установке
оборудования
Snabbstartguide och maskinvaruinstallationsguide
《快速入门指南》和 《硬件安装指南》
快速入門手冊和硬體安裝指引
6. Warranty Card
Garantiekarte
Tarjeta de garantía
Carte de garantie
Scheda di garanzia
Гарантийный талон
Garantikort
保修卡
保固卡
Ethernet Cable Connection
Ethernet-Kabelverbindung
Conexión del cable Ethernet
Connexion par câble Ethernet
Cavo Ethernet
Подключение кабеля Ethernet
Ethernet-sladdanslutning
以太网连接
乙太網路線連接
Waterproofing Kit.
Dichtzubehör.
Kit resistente al agua.
Kit d'étanchéité.
Kit impermeabilizzante
Водозащитный комплект.
Vattentätande sats
防水套件。
防水套件。
1. Put one end of the cable through
the nut (C).
Führen Sie das eine Ende des
Kabels durch die Dichtmutter (C).
Pase un extremo del cable por la
tuerca (C).
Mettez une extrémité du câble à
travers l'écrou (C).
Inserire una estremità del cavo
nel dado (C).
Пропустите один конец кабеля
через гайку (C).
För in ena änden av sladden genom muttern (C).
将线缆的一端穿过螺帽 (C)。
將纜線一端穿過螺帽 (C)。
2. Open the claw (B) then close it tightly around the cable.
Öffnen Sie die Klemme (B), und führen Sie sorgfältig das Kabel
hindurch.
Abra la garra (B) y ciérrela con firmeza alrededor del cable.
Ouvrez la griffe (B) puis refermez-la étroitement autour du câble.
Aprire la griffa (B) poi chiudere ermeticamente attorno al cavo.
Раскройте зажим (B) и плотно сомкните его вокруг кабеля.
Öppna klon (B) och slut den sedan tätt runt sladden.
打开螺爪 (B),然后将它闭合使其紧紧围绕线缆。
打開夾緊爪 (B),套入纜線後收攏迫緊。
3. Put the body (A) over the cable then connect the end of the cable to
the NWA3550-N.
Setzen Sie den Körper (A) über das Kabel, und schließen Sie das
andere Ende des Kabels an den NWA3550-N an.
Coloque el cuerpo (A) sobre el cable y conecte el extremo del cable al
NWA3550-N.
Mettez le corps (A) sur le câble, puis connectez l'extrémité du câble
au NWA3550-N.
Posizionare il corpo (A) sul cavo quindi collegare l'estremità del cavo
a NWA3550-N.
Наденьте крышку (A) на кабель, а затем подключите его к
NWA3550-N.
För stommen (A) över sladden och anslut sedan sladdänden till
NWA3550-N.
将螺身 (A) 放在线缆上,再将线缆末端连接到 NWA3550-N。
將主體螺絲 (A) 套入纜線,再將纜線端連接至 NWA3550-N。
4. Gently twist the body (A) into the NWA3550-N.
Drehen Sie den Körper (A) vorsichtig in den NWA3550-N.
Gire con cuidado el cuerpo (A) introduciéndolo en el NWA3550-N.
Tournez délicatement le corps (A) dans le NWA3550-N.
Ruotare delicatamente il corpo (A) in NWA3550-N.
Осторожно вкрутите крышку (A) в NWA3550-N.
Vrid varligt in stommen (A) i NWA3550-N.
将螺身 (A) 轻轻拧入 NWA3550-N。
輕輕旋轉主體螺絲 (A)
,使其旋入 NWA3550-N。
5. Tightly secure the cable connector, the body (A) and claw (B) with the
nut (C).
Befestigen Sie den Kabelstecker, den Körper (A) und die Klemme (B)
und die Dichtmutter (C).
Fije con firmeza el conector del cable, el cuerpo (A) y la garra (B) con
la tuerca (C).
Fixez étroitement le connecteur du câble, le corps (A) et la griffe (B)
avec l'écrou (C).
Fissare strettamente il connettore del cavo, il corpo (A) e la griffa (B)
con il dado (C).
Плотно закрепите разъем кабеля, крышку (A) и зажим (B) с
помощью гайки (C).
Spänn sladdanslutningen, stommen (A) och klon (B) ordentligt med
muttern (C).
将线缆接头、螺身 (A) 和螺爪 (B) 牢牢固定到螺帽 (C) 上。
將纜線連接器、主體螺絲 (A)、夾緊爪 (B) 與螺帽 (C) 鎖緊固定。
6. Apply the water-proofing tape
properly for enhanced
protection.
Kleben Sie für einen
zusätzlichen Schutz das
Dichtungsband auf.
Aplique cinta resistente al
agua para una mayor
protección.
Appliquez correctement la
bande d'étanchéité pour une
protection renforcée.
Applicare correttamente il
nastro impermeabilizzante
per una maggiore protezione.
Нанесите водозащитную
ленту для дополнительной
защиты.
Applicera den vattentäta tejpen omsorgsfullt för ökat skydd.
贴好防水胶带,增强保护。
以防水膠帶妥善包覆,加強保護。
7. Connect the other end of the Ethernet cable to the PoE Adaptor.
Schließen Sie das andere Ende des Ethernetkabels an den
PoE-Adapter an.
Conecte el otro extremo del cable Ethernet en el adaptador PoE.
Branchez l'autre extrémité du câble Ethernet à l'adaptateur PoE.
Collegare l'altra estremità del cavo Ethernet all'adattatore PoE.
Подсоедините другой конец кабеля Ethernet к адаптеру PoE.
Anslut den andra änden av Ethernet-sladden till PoE-adaptern.
将以太网线另一端连接到 PoE 适配器。
將乙太網路線另一端連接至 PoE 配接器。
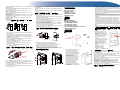
Pole Mounting
Mastmontage
Montaje en poste
Fixation au mât
Montaggio su rack
Крепление на кронштейне
Stolpmontering
支柱安装
柱掛安裝
Pole Mounting Kit
Mastmontagezubehör
Kit de montaje en poste
Kit de fixation au mât
Kit di montaggio su rack
Комплект для крепления на кронштейне
Stolpmonteringssats
支柱安装套件
柱掛安裝套件
WLAN2
WLAN1
WLAN1
WLAN2
A
C
B
U Bolt
Pole Bracket
M6 Nuts
NWA3550-N
Hardware-Installationsanleitung / Guía de instalación del hardware /
Guide d'installation matérielle/Guida installazione hardware / Руководство по
установке оборудования / Maskinvaruinstallationsguide /
硬件安装指南
/
硬體安裝指引
Hardware Installation Guide

Install the NWA3550-N vertically with a +15, 0, or -15 degree angle
relative to the pole..
Installieren Sie den NWA3550-N vertikal mit einem Winkel von +15°, 0°
oder -15° relativ zum Mast.
Instale el NWA3550-N verticalmente con un ángulo de +15, 0, o -15
grados en relación al poste.
Installez le NWA3550-N verticalement avec un angle de +15, 0, ou -15
degrés par rapport au mât.
Installare il NWA3550-N verticalmente con un angolo di +15, 0, -15 gradi
rispetto al track.
Установите NWA3550-N вертикально, под углом +15, 0 или -15 по
отношению к кронштейну.
Installera NWA3550-N vertikalt med +15, 0 eller -15 graders vinkel
relativt till stolpen.
将 NWA3550-N 与支柱垂直安装,或呈 +15、 0 或 -15 度角安装。
將 NWA3550-N 垂直安裝至立柱上,機身可傾斜 +15、0 或 -15 度角。
1. For +15° and 0° angle installations, position the bracket with the +15°
mark on the top.
Bei der Installation mit einem Winkel von +15° und 0° muss die
Halterung mit der +15°-Markierung nach oben zeigend positioniert
werden.
Para instalaciones a ángulos de +15° y 0°, coloque el soporte con la
marca +15° en la parte superior.
Pour les installations à des angles de +15° et 0°, positionnez le
support avec la marque +15° au sommet.
Per angoli di installazione di +15° e 0°, posizionare la staffa con il
simbolo +15° sulla parte superiore.
При установке под углом +15° и 0° расположите кронштейн
отметкой +15° вверх.
För +15° och 0° vinkelinstallationer, positionera fästet med
+15°-markeringen överst.
对于 +15° 和 0° 角度的安装,托架放置方向为 +15° 标记位于上方。
如果採 +15° 角和 0° 角安裝,則請將支架上標有 +15° 記號的一端朝上。
For -15° installation, position the bracket so the -15° mark is on top.
Bei der Installation mit einem Winkel von -15° muss die Halterung mit der
-15°-Markierung nach oben zeigend positioniert werden.
Para una instalación a -15°, coloque el soporte de manera que la marca -
15° esté en la parte superior.
Pour l'installation à -15°, positionnez le support de sorte que la marque
de -15° soit au sommet.
Per un'installazione di -15°, posizionare la staffa con il simbolo -15° sulla
parte superiore.
При установке под углом -15°
расположите кронштейн отметкой -15°
вверх.
För -15°-installation, positionera fästet så att -15°-markeringen befinner
sig överst.
对于 -15° 安装,托架放置方向为 -15° 标记位于上方。
如果採 -15° 角安裝,則請將支架上標有 -15° 記號的一端朝上。
2. This is a 0° angle installion example. Use a wrench to tighten the nuts
onto the U bolt.
Das Beispiel zeigt die Installation mit einem Winkel von 0°. Ziehen Sie
die Muttern auf dem Bügel fest.
Éste es un ejemplo de instalación a un ángulo de 0°. Utilice una llave
para apretar las tuercas en el perno en U.
Ceci est un exemple d'installation avec un angle de 0°. Utilisez une
clé pour serrer les écrous sur le boulon en U.
Questo è un esempio di installazione con angolo 0° Utilizzare una
chiave per serrare i dadi sul bullone U.
На иллюстрации показана установка под углом 0°. С помощью
ключа затяните гайки на U-образном болте.
Detta är ett exempel på en 0°-vinkelinstallion. Använd en skiftnyckel
för att spänna muttrarna på U-bulten.
如下为 0° 角度的安装示例。用扳手将螺母固定在 U 螺柱上。
下圖為 0° 角安裝範例。使用扳手將螺帽旋緊至 U 型螺栓上。
3. Use a wrench to tighten the four nuts onto the screws.
Ziehen Sie die vier Muttern auf den Schrauben fest.
Utilice una llave para apretar las cuatro tuercas en los tornillos.
Utilisez une clé pour serrer les quatre écrous sur les vis.
Utilizzare una chiave per serrare i quattro dadi sulle viti.
С помощью ключа затяните четыре гайки на винтах.
Använd en skiftnyckel för att spänna de fyra muttrarna på skruvarna.
用扳手将四颗螺母固定在螺丝上。
使用扳手將四個螺帽旋緊至螺絲上。
Wall Mounting
Wandmontage
Montaje en pared
Fixation murale
Montaggio a parete
Крепление к стене
Väggmontering
墙面安装
壁掛安裝
Wall Mounting Kit
Wandmontagezubehör
Kit de montaje en pared
Kit de fixation murale
Kit montaggio a parete
Комплект для крепления на стене
Väggmonteringssats
墙面安装套件
壁掛安裝套件
1. Place the bracket where you want it
on the wall (W) and mark the
position of the outer holes with a
pencil. Remove the bracket and drill
the holes where marked. Insert the
anchors in the holes. Screw the
bracket to the wall.
Halten Sie die Halterung an die
gewünschte Position an der Wand
(W), und kennzeichnen Sie die
Position der äußeren Löcher mit
einem Bleistift. Entfernen Sie die
Halterung, und bohren Sie die
Löcher entsprechend den
gekennzeichneten Positionen.
Führen Sie die Dübel in die Löcher
ein. Schrauben Sie die Halterung an
der Wand fest.
Coloque el soporte donde lo desee en la pared (W) y marque la
posición de los agujeros externos con un lápiz. Quite el soporte y
perfore los agujeros por las marcas. Inserte los tacos en los agujeros.
Atornille el soporte en la pared.
Placez le support où vous le souhaitez sur le mur (W) et marquez la
position des trous extérieurs avec un crayon. Retirez le support et
percez les trous aux endroits marqués. Insérer les chevilles dans les
trous. Vissez le support au mur.
Posizionare la staffa nel punto desiderato sulla parete (W) e segnare
la posizione dei fori esterni con una matita. Rimuovere la staffa e
praticare i fori dove segnato. Inserire i ganci nei fori. Avvitare la staffa
nella parete.
Приложите кронштейн к требуемому месту на стене (W) и
отметьте карандашом положение отверстий. Снимите кронштейн
и просверлите отверстия в отмеченных местах. Вставьте в
отверстия анкерные болты. Прикрутите кронштейн к стене.
Placera fästet på önskad plats på väggen (W) och markera positionen
för de yttre hålen med en penna. Ta bort fästet och borra hålen på de
markerade punkterna. För in ankarna i hålen. Skruva fast fästet vid
väggen.
将托架置于墙面 (W) 上所需的位置,然后用铅笔标记外侧螺孔。取下托
架,然后在标记的位置钻孔。将膨胀螺丝插入孔中。用螺丝将托架装于
墙面上。
將支架置於您希望安裝的牆面位置 (W),再用鉛筆標記外洞的位置。移
開支架,並在標記的位置鑽洞。將錨栓插入孔內。使用螺絲將支架固定
在牆上。
2. Use the nuts and a wrench to
attach the NWA3550-N to the
bracket.
Befestigen Sie den NWA3550-N
mit den Muttern an der Halterung.
Utilice las tuercas y una llave
para unir el NWA3550-N al
soporte.
Utilisez les écrous et une clé pour
fixer le NWA3550-N au support.
Usare i dadi e una chiave per
collegare il NWA3550-N alla
staffa.
Прикрепите NWA3550-N к
кронштейну с помощью гаек и
ключа.
Använd muttrarna och en
skiftnyckel för att fästa
NWA3550-N vid fästet.
用螺帽和扳手将 NWA3550-N 连
在托架上。
使用螺帽和扳手,將 NWA3550-N 固定至支架上。
Although this is an IP66-certified product, we recommend you deploy it in
a dry, sheltered place.
Auch wenn dieses Gerät gemäß IP66 zertifiziert ist, sollte es möglichst
an einem trockenen, geschützten Ort eingesetzt werden.
Aunque este producto está certificado con IP66, le recomendados usarlo
en un lugar seco y protegido.
Bien que ce soit un produit certifié IP66, nous vous recommandons de le
déployer dans un endroit sec et abrité.
Nonostrante si tratti di un prodotto certificato IP66, si consiglia di
l'installazzione in un luogo asciutto e riparato.
Несмотря на то, что этот продукт имеет сертификатIP66 мы
рекомендуем устанавливать его в сухом защищенном месте.
Trots att detta är en IP66-certifierad produkt, rekommenderar vi att du
använder den på en torr och skyddad plats.
尽管此为 IP66 认证产品,我们建议您将它部署在干燥有遮蔽的位置上。
本產品經 IP66 認證,但仍建議安裝於乾燥有遮蔽之處。
+15
o
0
o
-15
o
Down Down Top
15
o
0
o
Bracket
M6 Screws
M6 Nuts
Anchors
-
 1
1
-
 2
2
-
 3
3
-
 4
4


ZyXEL NWA3550-N Guide de démarrage rapide
- Catégorie
- Points d'accès WLAN
- Taper
- Guide de démarrage rapide
dans d''autres langues
- italiano: ZyXEL NWA3550-N Guida Rapida
- English: ZyXEL NWA3550-N Quick start guide
- español: ZyXEL NWA3550-N Guía de inicio rápido
- Deutsch: ZyXEL NWA3550-N Schnellstartanleitung
Documents connexes
-
ZyXEL NWA-3166 Guide de démarrage rapide
-
-
 ZyXEL Communications NWA-3100 Manuel utilisateur
-
ZyXEL Communications NWA-3163 Manuel utilisateur
-
-
-
-
ZyXEL Communications NWA-3500 Manuel utilisateur
-
 ZyXEL Communications NWA1100 Guide de démarrage rapide
-

