Panasonic PV-C2023K Le manuel du propriétaire
- Catégorie
- Lecteurs de cassettes
- Taper
- Le manuel du propriétaire
Ce manuel convient également à

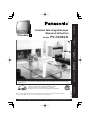
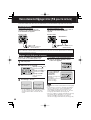
• Initial Setup and Connection Procedures are on pages 8 and 9.
Please read these instructions carefully before attempting to connect,
operate, or adjust this product. Please save this manual.
Model No.
PV-C2023-K
LSQT0716A
Basic Operation
Initial Setup
TV Operation
Timer Operation
Advanced Operation
For Your Information
As an ENERGY STAR
®
Participant, Panasonic has
determined that this product or product model meets the
ENERGY STAR
®
guidelines for energy effi ciency.
Combination VCR
Operating Instructions
For assistance, please call : 1-800-561-5505 or visit us at www.panasonic.ca

2
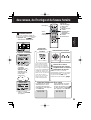
Important Safeguards and Pre cau tions
OUTDOOR ANTENNA INSTALLATION
USING THE UNIT
INSTALLATION
1 POWER SOURCE CAUTION
Operate only from power source indicated on unit or
in this manual. If uncertain, have your Electric Utility
Service Company or Video Products Dealer verify
your home power source.
2 POWER CORD PLUG
For safety, this unit has a polarized type plug (one
wide blade), or a three-wire grounding type plug.
Always hold the plug fi rmly and make sure your hands
are dry when plugging in or unplugging the AC power
cord. Regularly remove dust, dirt, etc. on the plug.
POLARIZED PLUG CAUTION:
The plug fi ts into outlet one way. If it cannot be fully
inserted, try reversing it. If it still will not fi t, have an
electrician install the proper wall outlet. Do not tamper
with the plug.
GROUNDING PLUG CAUTION:
The plug requires a three-hole grounding outlet.
If necessary, have an electrician install the proper outlet.
Do not tamper with the plug.
3 POWER CORD
To avoid unit malfunction, and to protect against
electrical shock, fi re or personal injury:
- Keep power cord away from heating appliances and
walking traffi c. Do not rest heavy objects on, or roll
such objects over the power cord.
- Do not tamper with the cord in any way.
- An extension cord should have the same type plug
(polarized or grounding) and must be securely
connected.
- Overloaded wall outlets or extension cords are fi re
hazards.
- Frayed cords, damaged plugs, and damaged or
cracked wire insulation are hazardous and should
be replaced by a qualifi ed electrician.
4 DO NOT BLOCK VENTILATION HOLES
Ventilation openings in the cabinet release heat
generated during operation. If blocked, heat
build-up may result in a fi re hazard or heat damage to
cassettes.
For your protection:
a. Never cover ventilation slots while unit is ON, or
operate unit while placed on a bed, sofa, rug, or
other soft surface.
b. Avoid built-in installation, such as a book case or
rack, unless properly ventilated.
5 AVOID EXTREMELY HOT LOCATIONS OR
SUDDEN TEMPERATURE CHANG ES
Do not place unit over or near a heater or ra di a tor, in
di rect sunlight, etc. If unit is sud den ly moved from a
cold place to a warm place, mois ture may condense in
unit and on the tape caus ing damage.
6 TO AVOID PERSONAL INJURY
• Never place unit on support or
stand that is not fi rm, level, and adequately strong.
The unit could fall causing serious injury to a child or
adult and damage to the unit.
• Move any appliance and
cart combination with care.
Quick stops, excessive
force, and uneven
surfaces may cause objects to
overturn.
• Carefully follow all operating
instructions.
Before unit is brought out of storage or moved to a new location,
refer again to the INSTALLATION section of these safe guards.
1 KEEP UNIT WELL AWAY FROM WATER OR MOISTURE,
such as vases, sinks, tubs, etc.
2 IF EXPOSED TO RAIN, MOISTURE, OR STRONG IMPACT,
unplug unit and have it inspected by a qualifi ed service
technician before use.
3 ELECTRICAL STORMS
During a lightning storm, or before leaving unit unused for
extended periods of time, disconnect all equipment from the
power source as well as the antenna and cable system.
4 WHEN UNIT IS PLUGGED IN
• DO NOT OPERATE IF:
- liquid has spilled into unit.
- unit was dropped or otherwise damaged.
- unit emits smoke, malodors, or noises.
Immediately unplug unit, and have it inspected by a service
technician to avoid potential fi re and shock hazards.
• Never drop or push any object through openings in unit.
Touching internal parts may cause electric shock or fi re
hazard.
• Keep magnetic objects, such as speakers, away from unit to
avoid electrical interference.
5 USING ACCESSORIES
Use only accessories recommended by the manufacturer to
avoid risk of fi re, shock, or other hazards.
6 CLEANING UNIT
Unplug unit. Use a clean, dry, chemically untreated cloth to
gently remove dust or debris. DO NOT USE cleaning fl uids,
aerosols, or forced air that could over-spray, or seep into unit
and cause electrical shock. Any substance, such as wax,
adhesive tape, etc. may mar the cabinet surface. Exposure to
greasy, humid, or dusty areas may adversely affect internal
parts.
READ AND RETAIN ALL SAFETY AND
OPERATING INSTRUCTIONS. HEED ALL
WARNINGS IN THE MANUAL AND ON UNIT
SERVICE
1 DO NOT SERVICE PRODUCT YOURSELF
If, after carefully following detailed operating in struc tions, the
unit does not operate properly, do not attempt to open or remove
covers, or make any adjustments not described in the manual.
Unplug unit and contact a qualifi ed service tech ni cian.
2 REPLACEMENT OF PARTS
Make sure the service technician uses only parts specifi ed by
the manufacturer, or have equal safety char ac ter is tics as original
parts. The use of unauthorized substitutes may result in fi re,
electric shock, or other hazards.
3 SAFETY CHECK AFTER SERVICING
After unit is serviced or repaired, request that a through safety
check be done as described in the manufacturer’s service
literature to ensure video unit is in safe operating condition.
GROUND
CLAMP
ELECTRIC
SERVICE
EQUIPMENT
ANTENNA LEAD
IN WIRE
ANTENNA
DISCHARGE UNIT
(NEC SECTION 810-20)
GROUNDING
CONDUCTORS
(NEC SECTION 810-21)
GROUND CLAMPS
POWER SERVICE
GROUNDING
ELECTRODE SYSTEM
(NEC ART 250, PART H)
NEC - NATIONAL
ELECTRICAL CODE
1 SAFE ANTENNA AND CABLE CONNECTION
An outside antenna or cable system must be properly grounded to
provide some protection against built up static charges and voltage.
Section 810 of the National Electrical Code, ANSI/NFPA 70 (in Canada,
part 1 of the Canadian Electrical
Code) provides information
regarding proper grounding of
the mast and supporting
structure, grounding of the
lead-in wire to an antenna
discharge unit, size of grounding
conductors, location of antenna
discharge unit, con nec tion to
grounding electrodes, and
requirements for the grounding electrode.
2 KEEP ANTENNA CLEAR OF HIGH VOLTAGE POWER LINES OR
CIRCUITS
Locate an outside antenna system well away from power lines and
electric light or power circuits so it will never touch these power sources
should it ever fall. When installing antenna, absolutely never touch power
lines, circuits or other power sources as this could be fatal.

3
Safety Precautions
Date of Purchase
Dealer Purchased From
Dealer Address
Dealer Phone No.
Model No.
PV-C2023-K
Serial No.
This product utilizes both a Cathode Ray Tube (CRT) and other components that contain lead. Disposal
of these materials may be regulated in your community due to environmental considerations. For
disposal or recycling information please contact your local authorities, or the Electronics Industries
Alliance: <http://www.eiae.org.
>
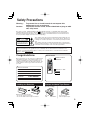
Warning : To prevent fi re or shock hazard, do not expose this
equipment to rain or moisture.
Caution : To prevent electric shock, match wide blade of plug to wide
slot, fully insert.
This symbol warns the user that uninsulated voltage within the unit
may have suffi cient magnitude to cause electric shock. Therefore, it
is dangerous to make any kind of contact with any inside part of this
unit.
This symbol alerts the user that important literature concerning the
operation and main te nance of this unit has been included. Therefore,
it should be read carefully in order to avoid any problems.
CAUTION: TO REDUCE THE RISK
OF ELECTRIC SHOCK, DO NOT
REMOVE COVER (OR BACK)
NO USER-SERVICEABLE PARTS
INSIDE REFER SERVICING TO
QUALIFIED SERVICE PERSONNEL
RISK OF ELECTRIC SHOCK
DO NOT OPEN
CAUTION
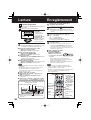
Congratulations
Accessories
Battery replacement caution
• Do not mix old and new batteries.
• Do not mix alkaline with manganese batteries.
Break off the tab to
prevent recording.
Record
Tab
Screwdriver
To record again.
Cover the hole
with cellophane tape.
Loading the Batteries Prevent Accidental Tape Erasure
Remote Control
Batteries 2 “AA”
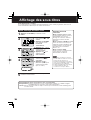
This video recorder, equipped with the HQ (High Quality) System, is compatible with existing VHS
equipment. Only use those tapes with the
mark. It is recommended that only cassette tapes that
have been tested and inspected for use in 2, 4, 6, and 8 hour VCR machines be used. This television
receiver provides display of television closed captioning.
On your purchase of one of the most sophisticated
and reliable products on the market today. Used
properly, it will bring you and your family years of
enjoyment. Please fi ll in the information below. The
serial number is on the tag located on the back of
your unit.
LSSQ0380

44
Unit Information
Playing older or damaged tapes may eventually
cause video heads to become clogged.
Specifi cations
• Designs and spec i fi ca tions are sub ject to change
without no tice.
V
I
DE
O
HEADS
M
AY
NEED C
LEA
N
I
N
G
P
L
EASE
I
NSERT
HEAD
C
LEA
N
I
N
G
CASSETTE
OR
REFER
T
O
M
A
NU
AL
END
:
P
L
AY
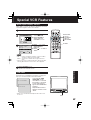
Head Cleaning
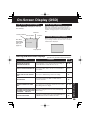
Record/Playback Time
Only use tapes with the mark in this unit.
Unit auto adjusts clock for DST (Daylight Saving
Time.)
DST (Daylight Saving Time)
Digital Auto Tracking
Continuously analyzes the signal and adjusts for
optimum picture quality.
Manual Tracking Control (to reduce picture noise)
Use during Playback and Slow Motion mode to
reduce picture noise. Press the 3 or 6 number key
on the remote control or CH on the unit until
the picture clears up. To return to Auto Tracking,
press POWER off, then on again a few seconds
later.
Features for a Quality Picture
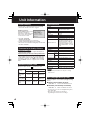
Tape Speed
Setting
Type of Video Cassette
T60 T120 T160
SP
(Standard
Play)
1 Hour 2 Hours
2 Hours
40 Minutes
LP
(Long Play)
2 Hours 4 Hours
5 Hours
20 Minutes
SLP
(Super Long
Play)
3 Hours 6 Hours 8 Hours
Display
Picture Tube
20 inch measured diagonal 90°
defl ection Picture Tube
VCR
Video Recording
System
2 rotary heads helical scanning
system
Audio Track 1 track
Tuner
Broad cast Channels VHF 2 ~ 13, UHF 14 ~ 69
CA BLE Channels
Midband A through I (14 ~ 22)
Superband J through W (23 ~
36) Hyperband AA ~ EEE (37
~ 64) Lowband A-5 ~ A-1 (95
~ 99) Spe cial CABLE chan nel
5A(01) Ultraband 65 ~ 94, 100
~ 125
FM Radio
Band Range 87.5 MHz ~ 108.1 MHz
General
Power Source 120 V AC, 60 Hz
Power
Consumption
Power
On
Approx. 110 W
Power
Off
Approx. 2.5 W
Television System EIA Standard NTSC colour
Speak er 1 pieces 1.5 W
Op er at ing
Temperature
5 °C ~ 40 °C (41 °F ~ 104 °F)
Op er at ing Humidity 10 % ~ 75 %
Weight 23 K
g
(50.6 lbs.)
Di men sions
(W X H X D)
515 mm X 505 mm X 474 mm
20-5/16″ X 19-7/8″ X 18-11/16″
Head Clog Sensor
During playback this screen
appears if clogging is
detected. To clear message
from screen, press PLAY
on the remote or unit.
• Use “dry” type head
cleaning cassette only.
(Part No. NV-TCL30PT is recommended.)
• Follow cleaning tape directions carefully.
Excessive use of head cleaning tape can shorten
the video head life.
Note
■ Spring (First Sunday in April)
DST: ON
➞
Sets clock ahead one hour.
■ Autumn (Last Sunday in October)
DST: ON
➞
Turns clock back one hour.
• If your area does not observe Daylight Saving Time,
select DST: OFF.
• Keep these time changes in mind when
programming the unit for timer recordings.

55
Initial Setup
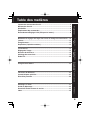
Table of Contents
Basic Operation
TV Operation
Advanced Operation
For Your Information
Initial Setup
Timer Operation
Important Safeguards and Precautions ................................................ 2
Safety Precautions .................................................................................. 3
Unit Information....................................................................................... 4
Location of Controls ............................................................................... 6
Connections/Initial Setup (Ready to Play) ............................................ 8
Reset Language, Channels, Clock, Time Zone Adjust....................... 10
Playback a Tape..................................................................................... 12
Record On a Tape.................................................................................. 12
Copy Your Tapes (Dubbing)................................................................. 13
TV Operation.......................................................................................... 14
Picture Adjustment................................................................................ 15
TV Timer Features ................................................................................. 16
Closed Caption System ........................................................................ 18
FM Radio ................................................................................................ 20
Timer Recording.................................................................................... 22
Tape Operation ...................................................................................... 24
Special VCR Features ........................................................................... 27
V-Chip Control Feature ......................................................................... 28
On-Screen Display (OSD) ..................................................................... 33
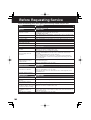
Before Requesting Service................................................................... 34
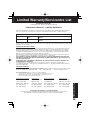
Limited Warranty/Servicentre List ....................................................... 35
Index ....................................................................................................... 36

66
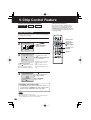
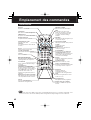
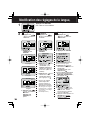
Location of Controls
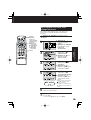
Remote Control Buttons
• When EJECT is pressed, the tape is ejected from Cassette Compartment.
If EJECT is pressed during recording, the unit will not respond to the command.
Note
COUNTER RESET
Resets to “0:00:00” at the desired
position.
PAUSE/SLOW
Pauses and slow motion
and frame advance picture.
EJECT
Ejects tape.
MUTE
Mutes the sound instantly.
CHANNEL UP/DOWN
Selects a channel.
SELECT UP/DOWN
Controls navigation around
on-screen menu.
ACTION
Displays Main Menu.
NUMBER Keys
Selects a channel directly.
PLAY
Begins playback.
REWIND/SEARCH
Rewinds tape, and
searches reverse scene.
CM SKIP/ZERO SEARCH
In Stop mode, goes to the
counter “0:00:00.” In Play
mode, skips over 1 to 3
minutes of tape.
SPEED
Selects recording speed.
POWER
Turns unit on or off.
FM/TV
Receives FM radio signal.
STOP
Stops recording or playback.
TAPE POSITION
Finds out present tape
position and amount of tape
remaining.
SLEEP
Turns off the unit au to mat i cal ly.
NIGHT
Colour and picture intensity level
are adjusted during night time use.
DISPLAY
Displays the VCR status and clock.
RAPID TUNE
Displays the last channel you were
watching.
VOLUME UP/DOWN
Adjusts volume.
SET/BACK SPACE
Sets a selected menu, or goes
back to correct.
PROGRAM
Displays SET PRO GRAM screen.
You can set Timer Program and
On-Timer.
TRACKING UP/DOWN
Reduces picture noise during
Playback and Slow Motion.
ADD/DELETE
Adds or deletes a channel.
FAST FORWARD/SEARCH
Fast forwards tape, and searches
forward scene.
SEARCH
Goes directly to the desired
re cord ing. Locates end point of
recording.
REC
Records the program.

77
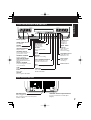
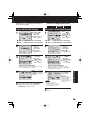
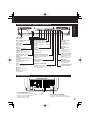
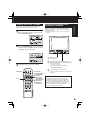
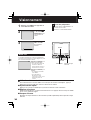
Initial Setup
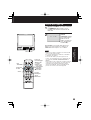
Front View of the Unit and Indicators
Rear View of the Unit
VIDEO IN AUDIO IN
POWER VOL CH
STOP/EJECT REW/
PLAY/REPEAT
FF/ REC TIMER/FM
ACTION
RE C ON TIMER
PROG TIMER
VHF/UHF
AC Power Plug
When plugged into an AC outlet, the
unit consumes 2.5 W of electric power
in OFF condition.
VHF/UHF Antenna Input Terminal
In from your Antenna or Cable (See
page 8).
TIMER/FM
Sets a timer alarm up 60 min.
Enables FM Radio.
STOP
Stops recording or playback.
EJECT
Ejects tape.
ACTION
Press together with REW.
CHANNEL UP/DOWN
Selects a channel.
TRACKING UP/DOWN
Reduces picture noise
during Playback and Slow
Motion.
SELECT UP/DOWN
Controls navigation around
on-screen menu.
VOLUME UP/DOWN
Adjusts volume.
SET/BACK SPACE
Sets a selected menu, or
goes back to correct.
POWER
Turns unit on or off.
AUDIO VIDEO IN Jack
For dubbing.
Built-In Speaker
REC
Records the program.
FAST FORWARD/SEARCH
Fast forwards tape, and
searches forward scene.
PLAY
Begins playback.
REPEAT
Repeats a recording.
REWIND/SEARCH
Rewinds tape,
and searches
reverse scene.
ACTION
Press together with
STOP.
Remote Sensor
REC Indicator
Lights during
recording.
ON TIMER Indicator
Lights when the
On-Timer is set.
PROG TIMER
Indicator
Lights when the
unit is set for
Timer Recording.
PHONES Jack
Connect an
earphone or
headphones.

88
VHF/UHF
VHF/UHF
VHF/UHF
VHF/UHF
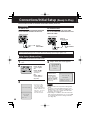
Initial Setup (Ready to Play)
For ANT./Cable
Connect the cable from Antenna/Cable
to the VHF/UHF terminal on the unit.
IN from
ANT./CABLE
VHF/UHF
WARNING:
Overtightening “Nut type” RF coaxial cables may damage jacks. Finger tighten only.
Please make all cable or antenna connections before power on.
Cable TV
Converter Box
Connecting
IN from
ANT./CABLE
UNIT (rear view)
UNIT (rear view)
For DSS/Cable Box
Connect the OUT jack on your cable
box to the VHF/UHF terminal on the unit
with a RF cable.
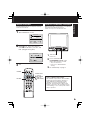
Connections/Initial Setup (Ready to Play)
VHF/UHF
2
/
6
/
2003
THU
12
:
00
P
M
DST
:
O
N
A
UTO
C
L
OCK SET
CO
M
P
L
ETED
SETT
I
N
G
:
CH
1
0
If AUTO
CLOCK SET IS
INCOMPLETE
screen appears,
set the clock using
MANUAL CLOCK
SET procedure on
next page.
A
UTO
C
L
OCK SET
IS INCO
M
P
L
ETE
PLEASE SET CLOCK BY
PRESSING ACTION KEY
1
Plug the unit power cord into AC wall
outlet.
• If you use a cable
box, turn it on and
set it to the Public
Broadcasting Service
(PBS) channel in your
time zone. If you use
a DSS receiver, it
must be turned off.
Settings are made automatically. When
setup is done, this screen appears.
CH AUTO SET PROCEEDING
PROCEEDING
AUTO CLOCK SET
CANCEL : STOP
4
Press COMBO on the remote for Combo mode.
Press POWER on the remote or unit.
2
• Function buttons are inoperative during Initial
Setup.
• To remove a cassette during Auto Set, press
EJECT twice on the remote or STOP twice on
the unit. In this case, settings must be made
manually. (See page 10.)
• Depending on conditions, Auto Clock Set may
take longer than 30 minutes. If so, press STOP
to stop setup and perform settings manually.
(See page 10.)
Notes
Auto channel and clock set starts.
3
Press CH to
select English.
OR
Press CH
to
select French
(Français).
OR
Press VOL+ to
select Spanish
(Español).

99
Initial Setup
VIDEO IN AUDIO IN
POWER VOL CH
STOP/EJECT REW/
PLAY/REPEAT
FF/ REC TIMER/FM
ACTION
REC ON TIMER
PROG TIMER
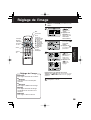
Reset all unit Memory Functions
When moving unit to a new location, or if a mistake
was made in the Initial Setup section.
• Make sure a tape is not inserted in the unit.
Manual Clock Set
If AUTO CLOCK SET was incomplete, manually
set the clock as follows.
SET
C
L
OC
K
DST
:
O
N
1 / /
:
SELE
C
T
:
SET
:
END
:
ACT
I
O
N
1
2
Press ACTION on the remote to display
SET CLOCK Menu screen.
Press to select the month and
press
to set. In the same manner,
select and set the date, year, time, and
DST. (Daylight Saving Time)
SET
C
L
OC
K
DST
:
O
N
SE
T
COMPLETED
2 / 6 /
:
2003
THU
12
00
PM
SET
:
START
:
ACT
I
O
N
3
Press ACTION twice to start CLOCK and
exit.
3
1
2
Turn the unit
Power on.
Note to CABLE System Installer
This reminder is provided to call the CABLE
(Cable TV) System Installers attention to
Article 820-40 of the NEC that provides
guidelines for proper grounding and, in
par tic u lar, specifi es that the cable ground
shall be con nect ed to the grounding system
of the building, as close to the point of cable
entry as practical.
Press and hold both
PLAY/REPEAT and FF on the
unit for more than 5 sec onds.
• The power will shut off.
• Please ignore “NO CASSETTE”
warning.
Do “Initial Setup” on page 8.
POWER
ACTION
SELECT/SET
:CH UP
:CH DOWN
:VOL UP
:VOL DOWN

1010
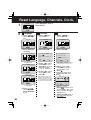
Reset Language, Channels, Clock,
4)Press and
press to select and
set the month, date, year,
time, and DST (Daylight
Saving Time).
5) Press ACTION twice to
start the clock and exit
this mode.
3) Press to select
“ANTENNA,” then
press to set your
antenna system
(“TV” or “CABLE”).
4) Press to select
“AUTO SET,” then
press .
• After Channel Auto Set is
fi nished, Clock Auto Set
will be performed. (If clock
is set manually, Clock Auto
Set will not be performed.)
(“TIME ZONE ADJUST” appears
only when auto clock is set.)
M
A
I
N
M
EN
U
LANGUAGE
SET
:
ACT
I
O
N
SE
L
E
C
T
:
T
V
EX I T
C
L
OC
K
C
H
LOCK
IDIOMA
T
V
MENU
PR
I
NC
I
PAL
C
A
N
A
L
R
E
L
O
J
SA
L
I
R
H
O
L
A
F
I
J
AR
:
ACT
I
O
N
E
L
E
G
I
R
:
BLOQUEO
BONJOUR
LAN
GU
E
M
EN
U
TELE
SORT I E
HORLOGECANAL
REGLER
:
ACT
I
O
N
SEL.
:
BLOCAGE
1) Press to
select language
icon.
2) Press ACTION
repeatedly.
For English
M
A
I
N
M
EN
U
H
ELL
O
LANGUAGE
SET
:
ACT
I
O
N
SE
L
E
C
T
:
T
V
EX I T
C
L
OC
K
C
H
LOCK
For Spanish
For French
Language
M
A
I
N
M
EN
U
EX I T
C
L
OC
K
C
H
LANGUAGE
SET
:
ACT
I
O
N
SE
L
E
C
T
:
LOCK
T
V
Channels
Clock
Press ACTION
to display
MAIN MENU.
3) Press
to select “EXIT.”
Press ACTION
to exit.
1) Press to
select “CH.”
M
A
I
N
M
EN
U
C
L
OC
K
C
H
SET
:
ACT
I
O
N
SE
L
E
C
T
:
T
V
EX I T
LANGUAGE
LOCK
ANT
ENN
A
:
C
ABLE
A
U
T
O
S
E
T
W
EAK S
I
GNAL
D
I
SPLAY
:
OFF
SET UP
CH
A
NNE
L
SELE
C
T
:
SET
:
END
:
ACT
I
O
N
2) Press ACTION.
M
A
I
N
M
EN
U
C
L
OC
K
SET
:
ACT
I
O
N
SE
L
E
C
T
:
T
V
EX I T
C
H
LANGUAGE
LOCK
1) Press to
select “CLOCK.”
AUT
O
C
L
OC
K SET
M
A
NU
AL
T
I
M
E
ZO
N
E
A
D
JUS
T
:
0
SET
C
L
OC
K
SELE
C
T
:
SET
:
END
:
ACT
I
O
N
2) Press ACTION.
1
2
3)Press to select
“MANUAL” or “AUTO
CLOCK SET” and
press .
• For Auto Clock Set, select
“AUTO CLOCK SET,” then
press .
SET
C
L
OC
K
DST
:
O
N
2 / 6/
:
2003
THU
12
00
PM
SELE
C
T
:
SET
:
START
:
ACT
I
O
N

1111
Basic Operation
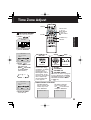
Time Zone Adjust
3)Press to
select TIME ZONE
ADJUST and
press repeatedly
to select mode.
(See below.)
4)Press ACTION
twice to exit.
(Only when Auto Clock is set.)
Add or Delete a Channel
Time Zone Adjust
1) Press to
select “CLOCK.”
M
A
I
N
M
EN
U
C
L
OC
K
SET
:
ACT
I
O
N
SE
L
E
C
T
:
T
V
EX I T
C
H
LANGUAGE
LOCK
2) Press ACTION.
AUT
O
C
L
OC
K SET
M
A
NU
AL
T
I
M
E
ZO
N
E
A
D
JUS
T
:
0
SET
C
L
OC
K
SELE
C
T
:
SET
:
END
:
ACT
I
O
N
AUT
O
C
L
OC
K SET
M
A
NU
AL
T
I
M
E
ZO
N
E
A
D
JUS
T
:
+1
SET
C
L
OC
K
SELE
C
T
:
SET
:
END
:
ACT
I
O
N
C
HANNEL
08
ADDED
To add channel:
Select channel with
number keys and
press ADD/DLT.
C
HANNEL
08
DE
L
E
T
ED
To delete channel:
Select channel with
CH
or number keys
and press ADD/DLT.
ACTION key on
the unit
Using keys
: CH UP
: CH DOWN
: VOLUME UP
: VOLUME DOWN
Whenever the menu or program
screen is displayed, CHANNEL
UP/DOWN function as
and
VOLUME UP/DOWN function
as
only.
On Remote
On Unit
On Unit
You can operate the
menu screen using
unit buttons. To display
the menu, press
STOP/EJECT and
REW together with no
tape inserted. To exit
the menu, repeat above
with or without tape
inserted until normal
screen appears.
0
+1
-1
POWER
ACTION
ADD/DLT
NUMBER Keys
SELECT/SET
:CH UP
:CH DOWN
:VOL UP
:VOL DOWN
STOP/EJECT REW/
ACTION
VOL CH

1212
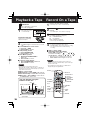
Check List
Cable or antenna is connected.
Power cord is plugged in.
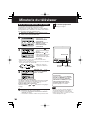
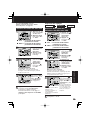
Record On a Tape
Playback a Tape
1
Insert a cassette.
• The unit power comes
on automatically.
Press PLAY.
• Playback begins if cassette has no record
tab.
2
To prevent tape jam,
Record tab
■
Stop
➞
Press STOP
■
Rewind tape
➞
Press REW in Stop mode
■
Fast forward tape
➞
Press FF in Stop mode
■
Eject tape
➞
Press EJECT on the remote
or STOP/EJECT on the unit
Press CH or number keys to select a
channel.
• For “LINE” input, see bottom of next page.
2
3
4
• After the unit has been in Rec Pause mode for 5
minutes, it will stop automatically to protect the tape
and the video head.
• The remaining recording time of an OTR can be
displayed by pressing DISPLAY.
■
Stop
➞
Press STOP
■
One Touch Recording (OTR)
Press REC repeatedly
to set the recording
length (30 min. - 4 hours).
• The unit stops recording at a preset time.
• PROG TIMER indicator lights on the unit.
1
Insert a cassette with record tab
• The unit power comes on automatically.
remove loose or peeling
labels from tapes.
■
Forward/ Reverse scene search
➞
Press FF or REW
➞
Press PLAY to release.
■
Still (Freeze) picture
➞
Press PAUSE/SLOW
➞
Press PLAY to release.
■
Slow Motion picture
➞
Hold down PAUSE/SLOW in
Still mode
➞
Press PLAY to release.
■
Frame by Frame picture
➞
Press PAUSE/SLOW in Still mode
➞
Press PLAY to release.
Press SPEED to select
recording speed (see page 4).
SP = Standard Play
LP = Long Play
SLP = Super Long Play
• Selected speed is displayed.
Press REC to start recording.
• To edit out unwanted portions, press
PAUSE/SLOW to pause and resume recording.
• You cannot view another channel during
recording.
You can operate using the
buttons on the unit
• These features work best in SLP mode.
• After the unit is in Still or Slow mode for 3 minutes, it
will switch to Stop mode automatically to protect the
tape and the video head.
Normal Rec
0:30 1:00
1:302:003:004:00
VIDEO IN AUDIO IN
POWER VOL CH
STOP/EJECT REW/
PLAY/REPEAT
FF/ REC TIMER/FM
ACTION
REC ON TIMER
PROG TIMER
REC Indicator
Insert a cassette.
CH
■
Press to stop and/or
eject tape.
PLAY
REC
Notes
Notes
DISPLAY
ACTION
ADD/DLT
NUMBER
Keys
EJECT
PLAY
STOP
REC
REW
PAUSE/
SLOW
FF
SPEED
SELECT/SET
:CH UP
:CH DOWN
:VOL UP
:VOL DOWN
TRACKING

1313
Basic Operation
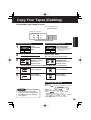
e
• Unauthorized exchanging
and/or copying of copyrighted
recordings may be copyright
infringement.
Connections you’ll need to make.
Playback (Source)
1
Recording (Editing) unit
Insert
pre-recorded
tape.
Insert blank tape
with record tab.
• Dubbing tapes protected with
Copy Guard will have poor
quality results.
2
3
4
5
Press PLAY then
PAUSE at starting
point to put in
Standby mode.
Press PLAY
to start dubbing.
Press STOP
to stop dubbing.
Select “LINE” mode.
See “Selecting Input Mode” below.
Press REC, then
PAUSE/SLOW
immediately to put in
Standby mode.
Press PAUSE/SLOW
to start dubbing.
Press STOP
to stop dubbing.
Selecting Input Mode
Method 1:
Press CH . The display will change as follows.
Method 2:
a Press ACTION for MAIN MENU.
b Press
to select “TV”, then press
ACTION for SET UP TV screen.
c Press
to select “INPUT SELECT,” and then
press to select “TUNER” or “LINE.”
d Press ACTION twice to exit this mode.
Caution
(Perform operation of steps 4 and 5 on both units at same time.)
STOP
1
2
3
125LINE
(CABLE)
69
(TV)
or
Recording (Editing) unit
OUT
IN
AUDIO
AUDIO IN
VIDEO IN
VID EO
Playing (Source) VCR
Copy Your Tapes (Dubbing)

1414
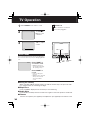
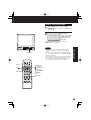
1
Press POWER on the remote or unit.
■
Using the 100 key
When selecting CABLE channels 100 to 125 with the number keys, fi rst press the 100
key, and then enter the remaining two digits.
■
Rapid Tune
Press R-TUNE to display the last channel you were watching.
■
Audio Mute
Press MUTE to instantly mute the sound. Press again to restore the previous sound level.
■
Phones
Connect an earphone (not supplied) or headphones (not supplied) to the Phones Jack.
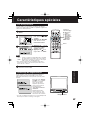
NIGHT Mode
Colour and picture intensity levels are adjusted so
the screen is easier on your eyes during night time
use.
Press NIGHT to
set NIGHT mode.
• NIGHT mode may be
selected when watching
TV or playing a tape.
Press NIGHT to
cancel.
• Previous settings are
restored.
• NIGHT mode is cancelled
when power is turned
off or power failure
occurs.
NIGHT
Check List
Cable or antenna is connected.
Power cord is plugged in.
Use CH
or number
keys to select
a channel.
2
CH 08
3
Press VOL + or
VOL - to adjust
volume.
24
TV Operation
VIDEO IN AUDIO IN
POWER VOL CH
STOP/EJECT REW/
PLAY/REPEAT
FF/ REC TIMER/FM
ACTION
REC ON TIMER
PROG TIMER
PHONES
Jack
POWER
VOL + / VOL
-
CH

1515
TV Operation
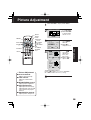
Picture Adjustment
1
Press ACTION to display MAIN MENU.
1) Press
to select “TV.”
2) Press ACTION
to display SET
UP TV screen.
3
1) Press to
select VIDEO
ADJUST.
2) Press
to
display screen.
4
1) Press to
select an
adjustment
item. (See
below left.)
2) Press
to
adjust.
To Reset Picture Controls,
press
and to select and set “NORMAL.”
All controls return to their factory settings.
Press ACTION three times to exit.
M
A
I
N
M
EN
U
EX I T
C
L
OC
K
C
H
LANGUAGE
SET
:
ACT
I
O
N
SE
L
E
C
T
:
LOCK
T
V
CO
L
OR
T
I
NT
B
R
I
GH
T
N
E
SS
P
I
C
T
UR
E
SH
A
R
P
N
E
SS
NOR
M
AL
END
:
ACT
I
O
N
SE
L
E
C
T
:
ADJUST
:
CO
L
OR
T
I
NT
B
R
I
GH
T
N
E
SS
P
I
C
T
UR
E
SH
A
R
P
N
E
SS
NOR
M
AL
SELE
C
T
:
SET
:
END
:
ACT
I
O
N
5
2
Picture Adjustment
■
COLOR Control
Adjust colour intensity.
■
TINT Control
Adjust for natural fl esh
tones.
■
BRIGHTNESS Control
Adjust picture brightness.
■
PICTURE Control
Adjust picture intensity by
adjusting both contrast and
colour level in the proper
balance.
■
SHARPNESS Control
Adjust picture sharpness.
CA
PT
I
O
N
I
NP
U
T
SELE
C
T
:
T
UNER
V
I
D
E
O
A
D
J
U
ST
FM ANTENNA : EXT
SET
UP TV
SELE
C
T
:
SET
:
END
:
ACT
I
O
N
SELECT/SET
:CH UP
:CH DOWN
:VOL UP
:VOL DOWN
ACTION
POWER
MUTE
CH
VOL
UP/DOWN
100 Key
NIGHT
RAPID
TUNE
NUMBER
Keys

1616
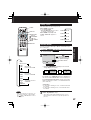
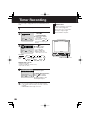
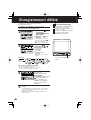
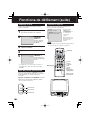
Press PROG to set ON TIMER.
• “ON TIMER SET” is displayed.
• ON TIMER Indicator lights on the unit.
Press to select
ALARM “ON” or “OFF.”
1
ON-TIMER with Alarm
Check List
The clock is set to the correct time.
This unit can be set to automatically power on in one of 3
modes (TV, Playback, or FM radio).
You can also combine the On-Timer with a one minute
alarm that gradually increases in volume.
• If no button on the remote or unit
(including a button used to turn
off the alarm) is pressed within 60
minutes after unit turns itself on,
it will turn itself back off.
Press PROG to display SET PROGRAM screen.
2
3
1) Press to select
desired settings.
2) Press
to set the
ON-TIMER TIME or
ON-TIMER mode.
• Make sure a tape is inserted if Playback mode is selected.
• See “FM Radio” on pages 20 and 21 for instructions on how to
preset FM stations.
• ON-TIMER mode
selection order
4
When “ON” is selected, an alarm will gradually increase
in volume for one minute or until cancelled by pressing any
button (including VOL + -).
To Make Corrections, use
and to move back
and correct.
5
To Cancel ON-TIMER,
Repeat steps 1 and 2. Then, press ADD/DLT to clear the
time in step 3. Now, press PROG to end.
“ON TIMER END” briefl y appears on-screen.
1) Press to select “ON
TIMER.”
2) Press
to display ON
TIMER screen.
ON TIMER
SET PROGRAM
T I MER PR
OGRAMMING
SELE
C
T
:
SET
:
END
:
PROG
O
N T
I
M
E
R
6
:--
AM CH
--
ALAR
M
:
O
N
SELE
C
T
:
SET
:
END
:
PROG
C
H
01
C
H
125
C
H
02
C
H
03
FM
1
FM
9
FM
8
VCR
O
N T
I
M
E
R
6
:
00
AM
CH
08
ALAR
M
:
O
N
C
ANCEL
:
ADD / DLT
SELE
C
T
:
SET
:
END
:
PROG
TV Timer Features
Note
VIDEO IN AUDIO IN
POWER VOL CH
STOP/EJECT REW/
PLAY/REPEAT
FF/ REC TIMER/FM
ACTION
REC ON TIMER
PROG TIMER
ON TIMER
indicator
CH
TIMER/FM

1717
TV Operation
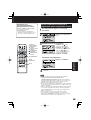
Alarm will sound at 0:00.
Press any button to stop.
• The volume of the alarm gradually increases for one
minute and then continues to beep until any button is
pressed.
Press CH on the
unit with CANCEL/SET
screen displayed to set
alarm.
(Time changes
in the order shown
left.)
Press SLEEP repeatedly
to set SLEEP TIMER.
• Pressing DISPLAY with sleep timer
set displays remaining time.
Press SLEEP repeatedly until
“SLEEP TIMER 00” appears to
cancel.
Sleep Timer
This unit can be set for auto power off.
SLEEP TIMER 30
SLEEP TIMER 60
SLEEP TIMER 90
SLEEP TIMER 00
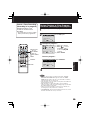
Instant Alarm
You can set a timer alarm up to 60 min. Useful when you
are cooking, etc.
1
2
3
To cancel, press TIMER/FM then press ADD/DLT on
the remote while CANCEL/SET screen is displayed.
To increase timer in progress, repeat step 2. Time
will be rounded up to next 1, 5, or 10 minute interval.
(See chart left.)
<Example>
• If current time remaining is 12:15, countdown will restart
from 15:00.
• If current time remaining is 9:15, countdown will restart
from 10:00.
• Pressing TIMER/FM repeatedly on the unit will
change display as follows.
Press TIMER/FM on the unit to display the instant
alarm CANCEL/SET screen.
• While timer function is in progress, you
can change channels on the unit with
CH
while “CANCEL/SET” screen is
not displayed.
1:00
(one minute)
00:00
2:00
3:00
9:00
10:00
15:00
20:00
25:00
30:00
40:00
50:00
60:00 (Max)
One-minute
increase until 10:00
Five-minute
increase until 30:00
Ten-minute increase
until 60:00
TV
(or LINE)
INSTANT ALARM
Screen Display
TV(or LINE)
INSTANT ALARM
Screen Display
FM
FM
5
:
20
PM
CANCEL : ADD
/
DLT
02
:
00
SET
:
CH
KEY ON UN
I
T
Remaining Time
Note
SELECT/SET
:CH UP
:CH DOWN
:VOL UP
:VOL DOWN
DISPLAY
SLEEP
ADD/DLT
PROG

1818
OFF
CAP C1
TEXT C1
CAP C2
TEXT C2
M
A
I
N
M
EN
U
EX I T
C
L
OC
K
C
H
LANGUAGE
SET
:
ACT
I
O
N
SE
L
E
C
T
:
LOCK
T
V
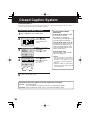
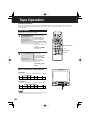
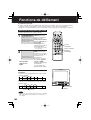
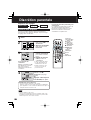
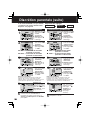
Closed Caption Mode Feature
1
2
3
4
5
Closed Caption is ...
This multi-use system not only allows the hearing impaired to enjoy selected programs, but also makes
useful information from TV stations available to everyone.
Press ACTION to display MAIN MENU.
1) Press to
select “TV.”
2) Press ACTION to
display SET UP TV
screen.
1) Press to select
“
CAPTION.”
2) Press
to display
CAPTION screen.
Press ACTION three times to
return to the normal screen.
1) Press to select
CAPTION MODE.
2) Press
repeatedly
to select mode.
(See left.)
CAPT
I
ON
CA
PT
I
O
N
MODE
:
CAP C1
CC ON MUTE
:
CAP C1
SELE
C
T
:
SET
:
END
:
ACT
I
O
N
Closed Caption Mode
Selections
Caption Mode: CAP C1 or C2
A narration of selected
TV programs is displayed.
Check TV program listings for CC
(Closed Caption) broadcasts.
Caption Mode: TEXT C1 or C2
The lower half of the screen will
be blocked out. When the TV
station broadcasts information,
such as program listings, it will
appear in this space.
Caption Mode: OFF
Closed Caption / Text narration
will not be displayed.
NOTES :
• The closed caption or text signal
may be broadcast over C1, C2, or
both. Also, text contents can vary
so you may wish to try different
settings.
• While recording one station and
watching another, Captioning will
not be displayed.
Recording and Playing Back a Closed Caption/Text Program
Record: Record normally.
Closed Caption/ Text signal, if present, is recorded automatically.
Playback: Start playback. Do above steps to select desired caption mode.
Closed Caption System
CA
PT
I
O
N
I
NP
U
T
SELE
C
T
:
T
UNER
V
I
D
E
O
A
D
J
U
ST
FM ANTENNA : EXT
SET
UP TV
SELE
C
T
:
SET
:
END
:
ACT
I
O
N

1919
TV Operation
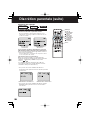
5
1) Press to select
CC ON MUTE.
2) Press repeatedly to
select desired mode.
• Each press of will change
the display as shown left.
• The caption may be broadcast
over CAP C1 or C2.
1
2
4
6
3
7
Press ACTION three times to
return to the normal screen.
NO
CAP C1
CAP C2
SELE
C
T
:
SET
:
END
:
ACT
I
O
N
M
A
I
N
M
EN
U
EX I T
C
L
OC
K
C
H
LANGUAGE
SET
:
ACT
I
O
N
SE
L
E
C
T
:
LOCK
T
V
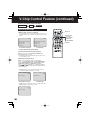
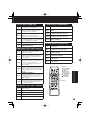
Caption On Mute Feature
Closed Caption narration, if available, is displayed when
MUTE button is pressed for silence.
Press ACTION to display MAIN MENU.
1) Press to
select “TV.”
2) Press ACTION to
display SET UP TV
screen.
1) Press to select
“CAPTION.”
2) Press
to display
CAPTION screen.
1) Press to select
CAPTION MODE.
2) Press
repeatedly to
select “OFF.”
Press MUTE to mute the sound and display
closed captioning.
• To cancel, press MUTE again.
CAPT
I
ON
CA
PT
I
O
N
MODE
:
OFF
CC ON MUTE
:
CAP C1
SELE
C
T
:
SET
:
END
:
ACT
I
O
N
CA
PT
I
O
N
I
NP
U
T
SELE
C
T
:
T
UNER
V
I
D
E
O
A
D
J
U
ST
FM ANTENNA : EXT
SET
UP TV
SELE
C
T
:
SET
:
END
:
ACT
I
O
N
SELECT/SET
:CH UP
:CH DOWN
:VOL UP
:VOL DOWN
MUTE
ACTION

2020
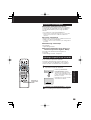
2
Press a number
key (1~9) to select
the FM number.
1
To Make Corrections,
select station with a number key,
then do step 3 again.
To exit FM mode,
press FM/TV on the remote or
TIMER/FM twice on the unit.
1) Press CH to
select the desired
radio station.
(Each press
changes frequency
0.2 MHz.)
2)
Press ADD/DLT
to set the radio
station.
3
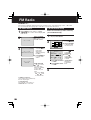
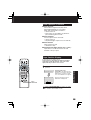
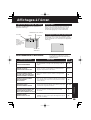
FM Radio Setup
3
4
1) Press to
select FM
ANTENNA.
2) Press
to
select “INT
(INTERNAL)”
or “EXT
(EXTERNAL)”
whichever
sounds the
best.
■
For cable TV users
➞
“INT”
■
For antenna users
➞
“EXT”
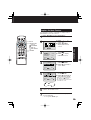
Press FM/TV on the remote or press
TIMER/FM twice on the unit to display FM
radio mode.
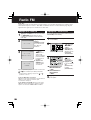
FM Radio is ...
This unit has an FM radio with built-in antenna, 9 station preset, and a band range of 87.5 ~ 108.1 MHz.
You can set the On-Timer (page 16) to wake up to your favourite radio station.
FM ANTENNA Setup
1
2
Make sure FM tuning is done correctly
(see FM Radio Setup).
Press ACTION
to display MAIN MENU.
1) Press
to select “TV.”
2) Press ACTION
to display SET
UP TV screen.
Press ACTION twice to end setup.
F
M
1 87. 5
M
Hz
1
2
:
0
0
P
M
F
M
1 8
7.
7
M
Hz
MEM
O
RY
:
PRESS
ADD
/
DLT
KEY
1
2
:
0
0
P
M
F
M
1 8
7.
7
M
Hz
MEM
O
R
I
ZED
1
2
:
0
0
P
M
M
A
I
N
M
EN
U
EX I T
C
L
OC
K
C
H
LANGUAGE
SET
:
ACT
I
O
N
SE
L
E
C
T
:
LOCK
T
V
Hold down CH
or for a few
seconds, then
release to quickly
scan for FM
stations in your
area.
• To cancel, press
CH
or while
in search mode.
FM Radio
CA
PT
I
O
N
INPUT SELECT : TUNER
V
I
D
E
O
A
D
J
U
ST
F
M
ANTENNA
:
I
NT
SET
UP TV
SELE
C
T
:
SET
:
END
:
ACT
I
O
N
La page est en cours de chargement...
La page est en cours de chargement...
La page est en cours de chargement...
La page est en cours de chargement...
La page est en cours de chargement...
La page est en cours de chargement...
La page est en cours de chargement...
La page est en cours de chargement...
La page est en cours de chargement...
La page est en cours de chargement...
La page est en cours de chargement...
La page est en cours de chargement...
La page est en cours de chargement...
La page est en cours de chargement...
La page est en cours de chargement...
La page est en cours de chargement...
La page est en cours de chargement...
La page est en cours de chargement...
La page est en cours de chargement...
La page est en cours de chargement...
La page est en cours de chargement...
La page est en cours de chargement...
La page est en cours de chargement...
La page est en cours de chargement...
La page est en cours de chargement...
La page est en cours de chargement...
La page est en cours de chargement...
La page est en cours de chargement...
La page est en cours de chargement...
La page est en cours de chargement...
La page est en cours de chargement...
La page est en cours de chargement...
La page est en cours de chargement...
La page est en cours de chargement...
La page est en cours de chargement...
La page est en cours de chargement...
La page est en cours de chargement...
La page est en cours de chargement...
La page est en cours de chargement...
La page est en cours de chargement...
La page est en cours de chargement...
La page est en cours de chargement...
La page est en cours de chargement...
La page est en cours de chargement...
La page est en cours de chargement...
La page est en cours de chargement...
La page est en cours de chargement...
La page est en cours de chargement...
La page est en cours de chargement...
La page est en cours de chargement...
La page est en cours de chargement...
La page est en cours de chargement...
-
 1
1
-
 2
2
-
 3
3
-
 4
4
-
 5
5
-
 6
6
-
 7
7
-
 8
8
-
 9
9
-
 10
10
-
 11
11
-
 12
12
-
 13
13
-
 14
14
-
 15
15
-
 16
16
-
 17
17
-
 18
18
-
 19
19
-
 20
20
-
 21
21
-
 22
22
-
 23
23
-
 24
24
-
 25
25
-
 26
26
-
 27
27
-
 28
28
-
 29
29
-
 30
30
-
 31
31
-
 32
32
-
 33
33
-
 34
34
-
 35
35
-
 36
36
-
 37
37
-
 38
38
-
 39
39
-
 40
40
-
 41
41
-
 42
42
-
 43
43
-
 44
44
-
 45
45
-
 46
46
-
 47
47
-
 48
48
-
 49
49
-
 50
50
-
 51
51
-
 52
52
-
 53
53
-
 54
54
-
 55
55
-
 56
56
-
 57
57
-
 58
58
-
 59
59
-
 60
60
-
 61
61
-
 62
62
-
 63
63
-
 64
64
-
 65
65
-
 66
66
-
 67
67
-
 68
68
-
 69
69
-
 70
70
-
 71
71
-
 72
72


Panasonic PV-C2023K Le manuel du propriétaire
- Catégorie
- Lecteurs de cassettes
- Taper
- Le manuel du propriétaire
- Ce manuel convient également à
dans d''autres langues
- English: Panasonic PV-C2023K Owner's manual
Documents connexes
-
Panasonic PVC1333WK Mode d'emploi
-
-
-
-
-
-
-
-
-