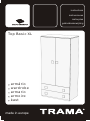
Bebecar Top Basic XL Le manuel du propriétaire
- Taper
- Le manuel du propriétaire

instructions
instrucciones
instruções
gebruiksaanwijzing
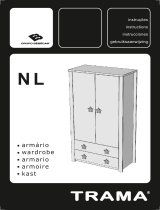
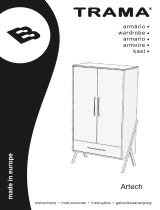
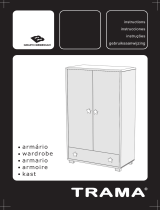
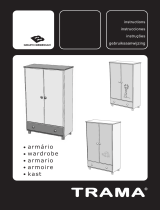
armário
wardrobe
armario
armoire
kast
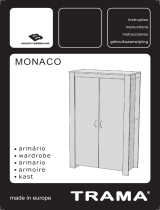
Top Basic XL
made in europe

?
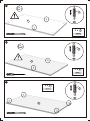
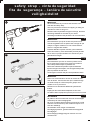
To be assembled by the purchaser
Para montar por el consumidor
A montar pelo cliente
À monter soi-même
In Kit
BOX
CAIXAS 1
2
4
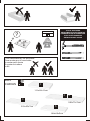
HERRAMIENTAS NECESARIAS
FERRAMENTAS NECESSARIAS
OUTILS NÉCESSAIRES
GEREEDSCHAP NODIG
TOOLS REQUIRED
3
5
111x80x11cm
203x63x7cm
248x71x7cm
168x69x9cm

95,7 x 56,5 cm
E
D
A2
A1236 x 57 cm
1
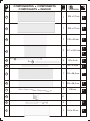
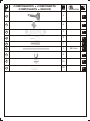
COMPONENTES COMPONENTS
COMPOSANTS INHOUD
1
1100 x 59 cm
B
3
C
195,7 x 4 cm
4
D2
D1
2 x
2 x 40 x 4 cm
6
G
H4
236 x 57 cm
1
J155 x 56 cm
2
3
1
1
5
5
1
5
5
F1
F2
I
1233 x 38,5 cm
1233 x 58,8 cm
1230 cm
2
3
2

T
54 x 36,5 cm
3
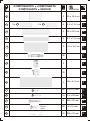
COMPONENTES COMPONENTS
COMPOSANTS INHOUD
K
LL1L2
2 x2 x 440,5 x 13,5 cm
299 x 20,5 cm
M
289,7 x 13,5 cm
N
291,5 x 39,5 cm
O
38
P
2
Q
38
R
S
3,5 x 16 mm
60
14 3,5 x 20 mm
U
6M4 x 25 mm
20
W
Ø8 x 35 mm
V
X
Branco
White 28 4 x 16 mm
4
190 x 49,3 cm
5
5
1
1
5
5
5
5
4
5
5
5
5
5

COMPONENTES COMPONENTS
COMPOSANTS INHOUD
6
6
1
1
2
Y
Z
£
#
&
@1
2
%
§12
56,3 cm
5
5
5
5
5
5
5
5
!12 5

10 c0 m
62 cm
238 cm
B
SS
G G
A1
GG
G
G
M
M
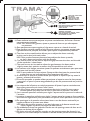
Matéria-Prima:
Acabamento do Produto:
Revestido a papel melaminico (não toxico)
Raw Material: Particle Board
Finished Product Coated With:
Melaminic Coated Paper (
Materia Prima: Aglomerado de partículas
Producto terminado acabado de:
Recubierto con papel melaminico
MAggloméré
Enduit de Papier Melamine
Basismateriaal: Spaanderplaat
Afgewerkt Produkt behandeld met:
Melaminepapier (niet toxisch)
Aglomerado de Particulas
(no tóxicos)
non-toxic)
atière Première:
Produit Fini enduit de:
(non toxique)
Dimensões Exteriores
External Dimensions
Dimensiones externas
Dimensions extérieures
Extern Afmetingen
Z
Z
Z
%@
B
I
F1F2
K
K
K
JA1
A2
C
C
C
E
D2
H

W
X
03
02
01
A1A2
A
x
4
XX
A1A2
12 x
A
Z
P
P
x
14
A1
A2
W

U
T
04
05
A1
A2
D1
D1
D2
D2
A
D
TTT
T
16 x
A
H
A2
A1
H
H
H
H
12 x
U
U
U

W
06
07
08
4 x
A2
J
J
A2
%
XX
X
x
4
J
J
XX
X
x
12
C
C
W
W

10
09
P
P
x
2
C
P
P
x
2
C
11
P
P
x
4
B
C1
C2

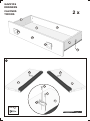
12
13
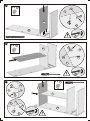
IMPORTANT: Tighten Completely
IMPORTANTE: Apriete Completamente
IMPORTANTE: Apertar Completamente
IMPORTANT: Fixer Completement
BELANGRIJK: Draai Volledig Vast
R
R
P
14
R
2 x
C
A2
C
A2
R
P
A2
E
C
R
P
R
1 x
A2
C
E
R

15
C2
A2
R
P
C2
A2
R
2 x
16
17
R
2 x
C2
J
J
C2
P
R
J
C1
A2
C1
A2
R
P
P
R
C1
J
R
4 x
R
R
R

T
18
A1
C
C1
C2
C
A1
R
7 x
R
P
19
B
A1
A2
R
4 x
B
P
R
A
20
A1
C
A2
R
R
E
E
F1
F2
I
36 x
F2
F1
I
FT

21
U
2 x
U
I
I
F2
F1
F
22
!
12 x
!
A1
A1
A2A2
J
J

23
§
§A1
J
12 x
A1J
24
25
K
K
KA1
J
A1J
K
§
A2
J
@
JA2
%

W
V
28
26
27
12 x
SS
Y
S
x
2
SG
G
S
S
S
Y
Y
Z
Z
V
W

PT
GB
ES
FR
NL
a
c
b
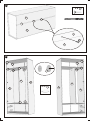
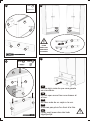
PARA CIMA / PARA BAIXO
UP / DOWN
PARA BAJAR / SUBIR
VERS LE HAUT / BAS
OMHOOG / OMLAAG
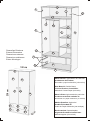
a) Estas ranhuras servem para ajustar as portas verticalmente, de forma a ficarem
correctamente niveladas.
Nota: Se o móvel tiver gavetas, ajuste as portas de forma a que não toquem
nas mesmas.
b) Este parafuso serve para regular a folga entre a porta e o lateral do móvel.
c) Este parafuso permite regular a folga entre as portas e ao mesmo tempo rodar
ligeiramente a sua posição, de forma a que fiquem completamente paralelas.
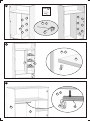
PARA ESQUERDA / PARA DIREITA
LEFT / RIGHT
PARA AJUSTAR HACÍA LA DERECHA / IZQUIERDA
VERS LA GAUCHE / DROITE
LINKS / RECHTS
PARA DENTRO / PARA FORA
INWARDS / OUTWARDS
PARA AJUSTAR HACÍA DENTRO / FUERA
VERS L’INTERIEUR / L’EXTERIEUR
NAAR BINNEN / BUITEN
a) The slots on the metal bracket allows you to adjust the doors vertically,
so they can be level with each other.
NB: If this product features drawers always adjust the doors upwards,
so that it does not interfere with the drawer.
b) The centre screw can be used to adjust the gap between the door and the side
of the wardrobe / chest frame.
c) The small screw can be used to adjust the gap between the doors and to
slightly rotate their position to ensure they are parallel to each other.
a) De openingen in de metalen scharnieren laten u toe de deuren verticaal bij te
regelen zodat ze in lijn staan met elkaar.
NB: Indien dit product voorzien is van een lade,moet u de deuren steeds naar
boven regelen zo dat ze niet tegen de lade schuren.
b) De middelste schroef kan gebruikt worden om de opening tussen de deur en de
zijkant van de kast bij te regelen.
c) De kleine schroef kan gebruikt worden om de opening tussen de deuren bij te
regelen en hun stand lichtjes te draaien zo dat de deuren paralel met elkaar staan.
a) Les rainures de la fixation en métal permettent d’ajuster la porte verticalement,
donc elles peuvent être à niveau l’une l’autre.
NB: Afin d’éviter que les portes ne touchent les tiroirs lorsqu’ils sont ouverts,
veuillez ajuster les portes vers le haut à l’aide des vis prévues à cet effet.
b) La vis centrale peut-être utilisée pour régler l’espace entre la porte et le cadre de
l’armoire.
c) La petite vis peut-être utilisée pour régler l’espace entre les portes et il est possible
de la tourner légèrement pour permettre aux portes d’être parallèles l’une et l’autre.
a) Las ranuras en la bisagra permiten ajustar las puertas verticalmente para que esten
al mismo nivel las dos puertas.
NB: Si este producto incluye cajones. Siempre debe de ajustar las puertas hacía
arriba para que no interrumpen el funcionamiento del cajón.
b) El tornillo en el centro se puede utilizar para ajustar el espacio que hay entre la
puerta y el lateral del armario.
c) El tornillo pequeño se puede utilizar para ajustar el espacio entre las dos puertas
y para girar un poco la puerta asegurándose que las dos puertas estén en posición
paralela.

T
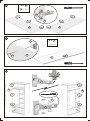
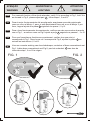
GAVETAS
DRAWERS
CAJONES
TIROIRS 2 x
29
L1L2
L
L1
L2
M
N
O
G
G
Q
8 x
Q
Q
Q
T
T

30
L2
L1
L
P
P
R
R
N
N
31 32
IMPORTANT: Tighten Completely
IMPORTANTE: Apriete Completamente
IMPORTANTE: Apertar Completamente
IMPORTANT: Fixer Completement
BELANGRIJK: Draai Volledig Vast
R
P
R
L1
L2
O
N
P
x
8 R
8 x
R

V
36
Nunca abrir mais do que uma gaveta
em simultânio.
Do not open more than one drawer at
a time.
No abre más de un cajón a la vez.
N'ouvrez pas plus d'un tiroir à la fois.
Open nooit meer dan één lade
tegelijkertijd.
PT
GB
ES
FR
NL
33
M
35
L1
M
L2
34
x
4
M
P
x
8 R
8 x
M
PP
R
O
L
G
G
G
PUSH
EMPUJAR
EMPURRE
POUSSER
H
H
V
La page est en cours de chargement...
La page est en cours de chargement...
La page est en cours de chargement...
La page est en cours de chargement...
La page est en cours de chargement...
La page est en cours de chargement...
La page est en cours de chargement...
La page est en cours de chargement...
-
 1
1
-
 2
2
-
 3
3
-
 4
4
-
 5
5
-
 6
6
-
 7
7
-
 8
8
-
 9
9
-
 10
10
-
 11
11
-
 12
12
-
 13
13
-
 14
14
-
 15
15
-
 16
16
-
 17
17
-
 18
18
-
 19
19
-
 20
20
-
 21
21
-
 22
22
-
 23
23
-
 24
24
-
 25
25
-
 26
26
-
 27
27
-
 28
28


Bebecar Top Basic XL Le manuel du propriétaire
- Taper
- Le manuel du propriétaire
dans d''autres langues
- English: Bebecar Top Basic XL Owner's manual
- español: Bebecar Top Basic XL El manual del propietario
- Nederlands: Bebecar Top Basic XL de handleiding
- português: Bebecar Top Basic XL Manual do proprietário
Documents connexes
-
 Bebecar NL Le manuel du propriétaire
-
 Bebecar Petite Maison Le manuel du propriétaire
-
 Bebecar Hada Le manuel du propriétaire
-
 Bebecar Monaco Le manuel du propriétaire
-
 Bebecar Artech Le manuel du propriétaire
-
 Bebecar Gamma Le manuel du propriétaire
-
 Bebecar Advance Le manuel du propriétaire
-
 Bebecar L Decor Le manuel du propriétaire
-
 Bebecar Chocolate Le manuel du propriétaire
-
 Bebecar DESIGN Le manuel du propriétaire


