
Need help? Visit Sauder.com to view video assembly tips or chat with a live rep.
Prefer the phone? Call 1-800-523-3987.
Share your journey!
sauder.com
NOTE: THIS INSTRUCTION
BOOKLET CONTAINS IMPORTANT
SAFETY INFORMATION.
PLEASE READ AND KEEP FOR
FUTURE REFERENCE.
English pg 1-20
Français pg 21-23
Español pg 24-26
Lot # 386915 12/16/15
Purchased: __________________
Be sure to give us a ring before
making any returns. 1-800-523-3987
How else are you
gonna know which
end is up?
Twin Headboard
Shoal Creek Collection | Model 412091

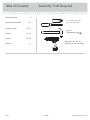
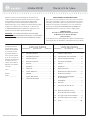
Table of Contents Assembly Tools Required
Hammer
Not actual size
No. 2 Phillips Screwdriver
Tip Shown Actual Size
Part Identifi cation
Hardware Identifi cation
Assembly Steps
Français
Español
Warranty
3
4-5
6-20
21-23
24-26
27
Electric dril with 1/4" bit
(Use only in indicated step)
412091 www.sauder.com/servicesPage 2

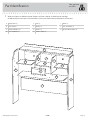
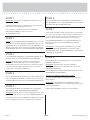
Part Identifi cation
å While not all parts are labeled, some of the parts will have a label or an inked letter on the edge
to help distinguish similar parts from each other. Use this part identifi cation to help identify similar parts.
Now you know
our ABCs.
A RIGHT END (1)
B LEFT END (1)
C RIGHT UPRIGHT (1)
D LEFT UPRIGHT (1)
E TOP (1)
F PANEL (1)
G SHELF (1)
H SMALL SHELF (1)
I BACK (1)
J FLIP-UP DOOR (1)
K ADJUSTABLE SHELF (2)
A
B
C
D
E
F
G
H
I
J
K
K
412091www.sauder.com/services
Page 3

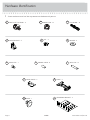
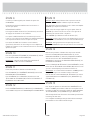
Hardware Identifi cation
å Screws are shown actual size. You may receive extra hardware with your unit.
NUT - 4
P
WASHER - 4
Q
ANGLE BRACKET - 3
O
DOOR STOP - 1
R
L
TWIST-LOCK
®
FASTENER - 4
METAL PIN - 12
T
U
HINGE SPACER - 2
KNOB - 1
W
HIDDEN CAM - 14
M2
CAM DOWEL - 14
N2
RUBBER SLEEVE - 8
S
V
HINGE - 2
HEADBOARD BRACKET - 2
X
412091 www.sauder.com/servicesPage 4

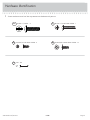
Hardware Identifi cation
å Screws are shown actual size. You may receive extra hardware with your unit.
BLACK 1-1/8" MACHINE SCREW - 1
Z
BLACK 9/16" LARGE HEAD SCREW - 14
BB
SILVER 5/8" FLAT HEAD SCREW - 4
AA
NAIL - 30
CC
412091www.sauder.com/services
Page 5
SILVER 1-1/4" BOLT - 4
117S

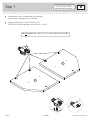
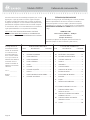
Step 1
Look for this icon. It means a
video assembly tip is available at
www.sauder.com/services/tips
å
Assemble your unit on a carpeted fl oor or on the empty
carton to avoid scratching your unit or the fl oor.
å
To begin assembly, push a SAUDER TWIST-LOCK®
FASTENER (L) into the large holes in the UPRIGHTS (C and D).
L
Do not tighten the TWIST-LOCK® FASTENERS in this step.
C
D
412091 www.sauder.com/servicesPage 6

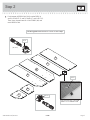
Step 2
å
Push fourteen HIDDEN CAMS (M2) into the ENDS (A
and B), UPRIGHTS (C and D), PANEL (F), and SHELF (G).
Then, insert the metal end of a CAM DOWEL (N2) into
each HIDDEN CAM.
A
B
F
G
C
D
Arrow
M2
N2
(14 used)
Arrow
M2
N2
Do not tighten the HIDDEN CAMS in this step.
Insert the metal end of the CAM
DOWEL into the HIDDEN CAM.
Arrow
412091www.sauder.com/services
Page 7

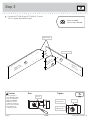
Step 3
å
Fasten the LEFT END (B) and LEFT UPRIGHT (D) to the
TOP (E). Tighten three HIDDEN CAMS.
Angled edge
Finished edge
Surface with
HIDDEN CAM
Surface with
HIDDEN CAMS
B
D
E
Surface
with holes
Start Tighten
Arrow
Minimum
190 degrees
Caution
Risk of damage or
injury. HIDDEN CAMS
must be completely
tightened. HIDDEN
CAMS that are not
completely tightened
may loosen, and parts
may separate. To
completely tighten:
Arrow
Maximum
210 degrees
412091 www.sauder.com/servicesPage 8
Some assembly
(and snacks) required.

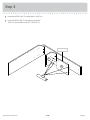
å
Insert four METAL PINS (T) into the SMALL SHELF (H).
å
Insert the METAL PINS (T) in one end of the SMALL
SHELF (H) into the holes in the LEFT UPRIGHT (D).
Step 4
Finished edge
D
H
T
412091www.sauder.com/services
Page 9

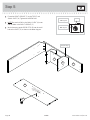
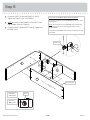
Step 5
å
Fasten the RIGHT UPRIGHT (C) to the TOP (E) and
SMALL SHELF (H). Tighten the HIDDEN CAM.
å
NOTE: Be sure the PINS in the SMALL SHELF (H) insert
into the holes in the RIGHT UPRIGHT (C).
å
With a hammer, tap the DOOR STOP (R) into the small
hole in the SHELF (G) as shown in the lower diagram.
C
G
H
E
R
Surface without
HIDDEN CAMS
Angled edge
412091 www.sauder.com/servicesPage 10
Arrow
Minimum
190 degrees
Maximum
210 degrees

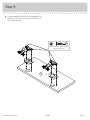
Step 6
å
Fasten two HINGE SPACERS (U) and two HINGES (V)
to the FLIP-UP DOOR (J). Use four SILVER 5/8" FLAT
HEAD SCREWS (AA).
J
SILVER 5/8" FLAT HEAD SCREW
(4 used in this step)
AA
U
U
V
V
412091www.sauder.com/services
Page 11

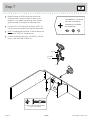
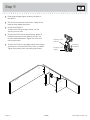
Step 7
å
Before fastening the DOOR to your unit, be sure the
mounting screw is against the stops as shown in the
diagram. If it isn't, loosen the mounting screw to slide it
against the stops. Then tighten the mounting screw.
å
Fasten the FLIP-UP DOOR (J) to the SMALL SHELF (H).
Use the screws in the HINGE. See step 9 for adjustments.
å
NOTE: The top edge of the DOOR (J) and the top surface
of the SMALL SHELF (H) should be even.
å
Fasten the KNOB (W) to the FLIP-UP DOOR (J). Use the
BLACK 1-1/8" MACHINE SCREWS (Z).
W
BLACK 1-1/8" MACHINE SCREW
(1 used for the KNOB)
Z
H
J
412091 www.sauder.com/servicesPage 12
Mounting
screw
Stop
Hinge
Want options? Customize
your item with add-on
hardware kits available
on sauder.com.

Step 8
412091www.sauder.com/services
Page 13
å
Fasten the SHELF (G) to the UPRIGHTS (C and D).
Tighten four TWIST-LOCK® FASTENERS.
å
NOTE: Be sure the CAM DOWELS in the SHELF insert
into the holes in the LEFT END (B).
å
Fasten the SHELF (G) to the LEFT END (B). Tighten two
HIDDEN CAMS.
B
C
D
G
Surface with HIDDEN CAMS
Rounded edge
How to use the SAUDER TWIST-LOCK
®
FASTENER
1. Insert the dowel end of the FASTENER into the hole of the
adjoining part.
NOTE: The dowel end of the FASTENER must remain fully
inserted in the hole of the adjoining part while locking
the FASTENER.
2. Tighten the FASTENER with a Phillips screwdriver as tight
as possible.
Dowel end
Arrow
Minimum
190 degrees
Maximum
210 degrees

Step 9
412091 www.sauder.com/servicesPage 14
Mounting screw
(depth)
Adjusting screw
(vertical)
Horizontal
adjustment
å
Refer to the enlarged diagram to identify the parts on
the HINGES.
å
The DOOR may need some adjustments. Follow the text
below to make needed adjustments.
å
DOOR ADJUSTMENTS:
To adjust the DOOR up or down (vertical) turn the
adjusting screw in or out.
å
To adjust the DOOR side to side (horizontal), loosen all
horizontal adjustment screws. Move the DOORS side
to side to the desired location. Tighten the screws after
making adjustments.
å
To adjust the DOOR in or out (depth), loosen the mounting
screw one turn and move the DOOR in or out, as needed.
Tighten the mounting screw after making adjustments.

å
Fasten three ANGLE BRACKETS (O) to the PANEL (F).
Use three BLACK 9/16" LARGE HEAD SCREWS (BB).
å
NOTE: Be sure the edges of the ANGLE BRACKETS are
even with the edge of the PANEL.
Step 10
Surface with HIDDEN CAMS
O
BLACK 9/16" LARGE HEAD SCREW
(3 used in this step)
BB
F
412091www.sauder.com/services
Page 15
Now might be a
good time to refresh
your drink.

å
Carefully stand your unit on its TOP (E).
å
Fasten the PANEL (F) to the LEFT END (B). Tighten two
HIDDEN CAMS.
å
Fasten the PANEL (F) to the SHELF (G). Use three BLACK
9/16" LARGE HEAD SCREWS (BB) through the ANGLE
BRACKETS and into the SHELF.
Step 11
Surface with
HIDDEN CAMS
B
E
F
G
Arrow
Minimum
190 degrees
Maximum
210 degrees
BLACK 9/16" LARGE HEAD SCREW
(3 used in this step)
BB
412091 www.sauder.com/servicesPage 16

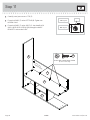
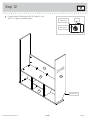
å
Fasten the RIGHT END (A) to the TOP (E), PANEL (F), and
SHELF (G). Tighten six HIDDEN CAMS.
Step 12
A
E
F
G
Angled edge
Surface without
HIDDEN CAMS
412091www.sauder.com/services
Page 17
Arrow
Minimum
190 degrees
Maximum
210 degrees

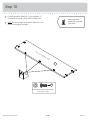
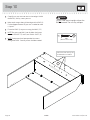
å
Carefully turn your unit over onto its front edges. Unfold
the BACK (I) and lay it over your unit.
å
Make equal margins along all four edges of the BACK (I).
Push on opposite corners of your unit if needed to make
it "square".
å
Fasten the BACK (I) to your unit using the NAILS (CC).
å
NOTE: Be sure to tap NAILS into the holes that line up
over the UPRIGHTS (C and D) and SMALL SHELF (H).
å
NOTE: Perforations have been provided for access
through the BACK. Carefully cut out the holes needed.
Step 13
Do not stand the unit upright without the
BACK fastened. The unit may collapse.
Caution
Unfi nished surface
These holes must line up over
the UPRIGHTS and SHELF.
NAIL
(30 used in this step)
CC
I
412091 www.sauder.com/servicesPage 18

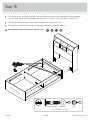
å
Carefully stand your unit upright.
å
Push the RUBBER SLEEVES (S) over the METAL PINS (T). Insert
the METAL PINS into the hole locations of your choice in the
ENDS (A and B) and UPRIGHTS (C and D). Set the ADJUSTABLE
SHELVES (K) onto the METAL PINS.
å
Fasten the HEADBOARD BRACKETS (X) to the ENDS (A and B).
Use eight BLACK 9/16" LARGE HEAD SCREWS (BB). Use the
holes that are best suited for the height of your bedframe.
å
NOTE: If you purchased the Mates Bed #412093 go to the next
step on how to fasten it to this unit.
å
Fasten the bedframe to the HEADBOARD BRACKETS (X). Use
four SILVER 1-1/4" BOLTS (117S), WASHERS (Q), and NUTS (P).
Step 14
BLACK 9/16" LARGE HEAD SCREW
(8 used for the HEADBOARD BRACKETS)
BB
If you purchased the 412093
Mates Bed, use the lower four
holes to fasten the HEADBOARD
BRACKETS to the ENDS.
S
T
A
B
C
D
K
K
X
X
10 lbs.
25 lbs.
total
5 lbs.
5 lbs.
5 lbs.
(8 used)
412091www.sauder.com/services
Page 19
SILVER 1-1/4" BOLT WASHER NUT
(4 of each used in this step)
PQ
117S
Want options? Customize
your item with add-on
shelf kits available on
sauder.com.

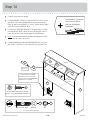
å
Finish drilling out four 1/4" holes in the END of the #412093 Mates Bed that will get fastened to the Twin Headboard.
Fasten the Mates Bed to the Twin Headboard with four SILVER 1-1/4" BOLTS (117S), WASHERS (Q), and NUTS (P).
å
Go to step 15 of the Mates Bed instruction book to complete the assembly of that unit.
å
This completes assembly. Clean with your favorite furniture polish or a damp cloth. Wipe dry.
Step 15
412091 www.sauder.com/servicesPage 20
Mates Bed #412093
SILVER 1-1/4" BOLT WASHER NUT
(4 of each used in this step)
PQ
117S
And to celebrate, why not share your success story?
La page charge ...
La page charge ...
La page charge ...
La page charge ...
La page charge ...
La page charge ...
La page charge ...
La page charge ...
-
 1
1
-
 2
2
-
 3
3
-
 4
4
-
 5
5
-
 6
6
-
 7
7
-
 8
8
-
 9
9
-
 10
10
-
 11
11
-
 12
12
-
 13
13
-
 14
14
-
 15
15
-
 16
16
-
 17
17
-
 18
18
-
 19
19
-
 20
20
-
 21
21
-
 22
22
-
 23
23
-
 24
24
-
 25
25
-
 26
26
-
 27
27
-
 28
28


dans d''autres langues
- English: Sauder 412091 Operating instructions
- español: Sauder 412091 Instrucciones de operación
Documents connexes
-
Sauder 418630 Manuel utilisateur
-
-
-
-
-
-
-
-
-