Hunter Fan 28463 Le manuel du propriétaire
- Catégorie
- Ventilateurs ménagers
- Taper
- Le manuel du propriétaire

42742 04/11/2007
ENGLISH
See page 2
ESPAÑOL
Vea la página 9
FRANÇAIS
Consulter la page 17
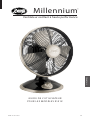
OWNER’S G U I D E
FOR MODELS 9101X
Millennium
High Performance Oscillating Fan
™
®

2 42742-01 04/11/2007
ENGLISH
IMPORTANT SAFETY INFORMATION
Read & Save These Instructions
WARNING
To reduce the risk of re or electrical
shock, DO NOT use this fan with any
solid-state speed control device.
CAUTION
When using electrical appliances, basic
precautions should always be taken to
reduce the risk of re, electric shock
and personal injury:
1. Read all instructions before using
this fan.
2. Improper installation may result
in the risk of re, electric shock
or personal injury.
3. To prevent the risk of re and
electric shock, DO NOT use the
unit near windows. Rain and
moisture may create an electrical
hazard.
4. The power plug must be removed
from the power socket when not
in use, before cleaning, servicing,
maintenance and before moving
to another location.
5. DO NOT put fan in a damp place
or where humidity is high-such as
a bathroom.
6. The fan should be placed on a
at, stable surface or tabletop
to avoid overturning.
7. Use fan only for intended use,
as described in this instruction
manual.
8. To protect against electrical
shock, DO NOT immerse unit,
plug or cord in water or spray
with liquids.
9. Close supervision is necessary
when any appliance is used by
or near children.
10. NEVER insert ngers, pencils or
any other objects through the
grill when the fan is running.
11. DO NOT operate any appliance
with a damaged cord or plug, af-
ter the appliance malfunctions or
has been dropped or damaged in
any manner.
12. To disconnect, grip plug and pull
from wall outlet. NEVER yank on
cord.
13. ALWAYS use on a dry surface.
14. This product is intended for
household use only and not for
commercial or industrial use.
15. DO NOT operate fan in the pres-
ence of explosive and/or am-
mable fumes.
16. DO NOT place fan or any parts
near an open ame, cooking or
any other heating appliances.
17. DO NOT use near curtains, plants,
window treatments, etc.
18. This appliance has a grounded
three-prong plug and is suitable
for grounded receptacle use
only. An adapter is available for
connecting three-blade ground-
ing-type plugs to two-slot re-
ceptacles. The adapter must
be properly grounded. DO NOT
attempt to defeat the purpose
of this safely feature.
19. The rubber feet on this product
may interact with wood and
cause damage to furniture. Do
not place on ne wood furniture.

42742-01 04/11/2007 3
ENGLISH
Please attach your
receipt or a copy of your
receipt to this manual
for future reference.
WELCOME UNPACKING
Thank you for choosing the Hunter
Millennium™ Table Fan. This manual
gives you complete instructions for
using your fan. Here are some the fea-
tures you will enjoy with your fan:
• An attractive design that enhances
any decor
• A powerful Hunter motor for max-
imum air ow
• Three speeds to adjust your com-
fort level
Before installing your fan, record the
following information for your re-
cords and for warranty assistance.
Model Name ____________________
Date Code ______________________
Date Purchased _________________
Where Purchased ________________
_______________________________
As you unpack the fan, save the
carton and packing materials in case
you want to move or ship the unit in
the future.
Carefully remove all items from the
box.
NOTE: It is best to have someone
hold the box while you lift the fan
and the protective packaging out of
the carton.
Make sure all shipping materials are
removed from fan before operating.

4 42742-01 04/11/2007
ENGLISH
This appliance is for household use
only and may be plugged into any
120-volt AC electrical outlet (or-
dinary household current). DO NOT
use any other type of outlet.
WARNING
This unit is suitable for grounded
receptacle use only.
The cord has a grounded plug as
shown in Figure 1. An adapter, as
shown in Figure 2, is available for
connecting three-blade grounding-
type plugs to two-slot receptacles.
The green grounding lug extending
from the adapter must be con-
nected to a permanent ground such
as a property grounded outlet box.
The adapter should not be used if
a three-slot grounded receptacle is
available.
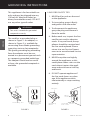
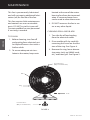
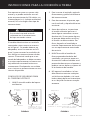
GROUNDING INSTRUCTIONS
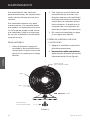
FIGURE 1 FIGURE 2
Grounded Outlet
Box Cover
Metal
Screw
Adapter
Grounding
Means
LINE CORD SAFETY TIPS
1. NEVER pull or yank on the cord
or the appliance.
2. To insert plug, grasp it rmly
and guide it into the outlet.
3. To disconnect the appliance,
grasp the plug and remove it
from the outlet.
4. Before each use, inspect the line
cord for cuts and/or abrasion
marks. If any are found, the ap-
pliance should be serviced and
the line cord replaced. Please
return it to our Service Depart-
ment or to an authorized service
representative.
5. NEVER wrap the cord tightly
around the appliance, as this
could place undue stress on the
cord where it enters the appli-
ance and could cause it to fray
and break.
6. DO NOT operate appliance if
the line cord shows any dam-
age, if the appliance works
intermittently or stops working
entirely.
Grounded
Plug
Grounding Pin
Grounded Outlet
Box Cover

42742-01 04/11/2007 5
ENGLISH
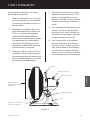
OPERATION
FIGURE 3
This appliance is for household
use only.
1. Place the fan on a dry, safe, at
surface where it cannot fall or
be pulled by the cord.
2. Plug the fan into a grounded
120-volt AC electrical outlet (or-
dinary household current).
DO NOT use any other type of
outlet. Make sure that the rated
voltage of the fan is the same as
the power source before plug-
ging it into the power source.
3. Turn the fan “ON” or “OFF” by
turning the Power/Speed Con-
trol knob. The power should al-
ways be OFF before unplugging
the fan.
4. To select the speed, turn the
Power/Speed Control knob from
OFF to the desired speed set-
ting: O (o), I (low), II (medium),
III (High).
5. To control the upward and
downward direction of airow,
loosen the screw on the side of
the fan housing neck. Adjust to
the desired angle and tighten
the screw.
6. To make the fan oscillate, push
the oscillation knob down. To
stop oscillating, pull the oscil-
lation knob up. The oscillation
knob is located on the top of the
fan housing, near the handle.
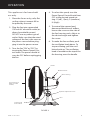
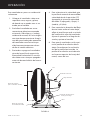
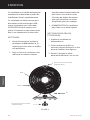
Handle
Oscillation Knob
Power/Speed
Control Knob
Motor Housing
Up/Down Adjustment Screw
Base
Decorative Pieces
(Only on 9004X
models)

6 42742-01 04/11/2007
ENGLISH
MAINTENANCE
This fan is permanently lubricated
and will not require additional lubri-
cation (oil) for the life of the fan.
This fan requires little maintenance
and contains no user serviceable
parts. DO NOT try to x it yourself.
Contact qualied service personnel
if servicing is needed.
TO CLEAN:
1. Before cleaning, turn fan o
and unplug from electrical out-
let. Wipe o excess dust with a
lintfree cloth.
2. To ensure adequate air circu-
lation to the motor, keep vents
located at the rear of the motor
housing free from dust accumul-
ation. A vacuum cleaner hose
can be used to clean these vents.
3. DO NOT immerse the fan in wa-
ter or any other liquid.
CLEANING GRILL AND BLADE:
1. Turn the fan o and unplug
from the electrical outlet.
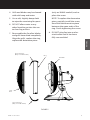
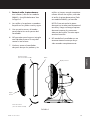
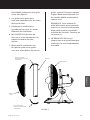
2. Disassemble grills by carefully
removing the screw on the bot-
tom of the ring. See Figure 4.
3. Remove the ring, lower decora-
tive peice (only on 9004X mod-
els), and front grill. See Figure 5.
FIGURE 4
Screw
Decorative Piece
(Only on 9004X models)
Ring
Grill
Decorative Piece
(Only on 9004X models)

42742-01 04/11/2007 7
ENGLISH
4. Grills and blades may be cleaned
with mild soap and water.
5. Use a soft, slightly damp cloth
to wipe the remaining fan parts.
6. DO NOT allow water or any
other liquid to get into the mo-
tor housing or base.
7. Reassemble the fan after blades
and grills have dried completely.
Align the grills, replace the ring,
replace the decorative piece
(only on 9004X models) and re-
place the screw.
NOTE: To replace the decorative
piece, partially install the screw,
then hold the decorative piece
between the open ends of the
ring. Finish tightening the screw.
8. DO NOT plug fan into an elec-
trical outlet until it has been
fully reassembled.
FIGURE 5
Ring
Front
Grill
Back Grill
Decorative Piece
(Only on 9004X models)
Decorative Piece
(Only on 9004X models)

8 42742-01 04/11/2007
ENGLISH
STORAGE
®
HUNTER FAN COMPANY
2 5 0 0 F R I S C O AV E N U E
MEMPHIS, TN 38114, USA
Tr
TROUBLESHOOTING
1. Disassemble and clean fan be-
fore storing.
2. Keep the original packaging for
the purpose of storing the fan.
3. ALWAYS store the fan in a dry
place.
4. NEVER store the fan while it is
still plugged in.
5. NEVER wrap the cord tightly
around the fan.
6. DO NOT put any stress on the
cord where it enters the fan, as
it could cause the cord to break.
PROBLEM
• Fan will not oscillate.
SOLUTION
• Push down on knob on top of mo-
tor housing to activate oscillation.
PROBLEM
• Can not adjust the
angle of the fan.
SOLUTION
• Loosen the screw on the side of
the fan neck. Adjust to the desired
angle and tighten the screw.
If you have tried these trouble-
shooting solutions and still have
trouble, call 1-888-830-1326
(For CAN: 1-866-268-1936)
or visit our Web site at http://
www.hunterfan.com.
Printed in China

42742-02 04/11/2007 9
ESPAÑOL
MA N UA L DEL PROPIE TARIO
PARA LOS MODELOS 9101X 9101X
Millennium
Ventilador de oscilación de alto rendimiento
™
®

10 42742-02 04/11/2007
ESPAÑOL
IMPORTANTE INFORMACIÓN DE SEGURIDAD
Lea y guarde estas instrucciones
ADVERTENCIA
Para reducir el riesgo de fuego o choque
eléctrico, NO use este ventilador con
ningún tipo de dispositivo de control de
velocidad de estado sólido.
PRECAUCIÓN
Cuando se usan aparatos eléctricos, se
deben tomar siempre ciertas precau-
ciones para reducir el riesgo de fuego,
choque eléctrico y lesiones personales.
1. Lea todas las instrucciones antes de
usar este ventilador.
2. Una instalación incorrecta podrá
resultar en un riesgo de fuego, cho-
que eléctrico o lesiones personales.
3. Para evitar el riesgo de fuego y cho-
que eléctrico, NO use la unidad cerca
de ventanas. La lluvia y la humedad
pueden crear un peligro eléctrico.
4. El enchufe eléctrico se debe retirar
del tomacorriente de la pared cuando
no se use el ventilador, antes de lim-
piarlo, darle servicio o mantenimiento
y antes de moverlo a otro lugar.
5. NO coloque el ventilador en un
lugar mojado ni donde la humedad
sea alta, como en un baño.
6. El ventilador se debe colocar sobre
una supercie o mesa plana y es-
table, para evitar que se caiga o se
vuelque.
7. Use el ventilador solamente para
el n con el que ha sido diseñado,
como se describe en este manual
de instrucciones.
8. Para protección contra un choque
eléctrico, NO sumerja esta unidad,
el enchufe o el cordón eléctrico en
agua ni lo rocíe con líquidos.
9. Una supervisión cercana es nece-
saria cuando cualquier aparato es
usado por niños o cerca de ellos.
10. NUNCA inserte sus dedos, lápices o
cualquier otro objeto a través de la
rejilla cuando el ventilador está en
operación.
11. NO opere un aparato eléctrico que
tenga un cordón o enchufe eléctrico
dañado, después de que haya teni-
do algún problema de operación,
se haya caído o se haya dañado de
cualquier manera.
12. Para desconectar el ventilador,
agarre el enchufe y sáquelo del
tomacorriente de la pared. NUNCA
tire del cordón.
13. SIEMPRE use el ventilador sobre un
supercie seca.
14. Este producto ha sido diseñado
para uso residencial solamente y no
para uso comercial ni industrial.
15. NO opere el ventilador en la pre-
sencia de explosivos ni de vapores
inamables.
16. NO coloque el ventilador ni ninguna
pieza cerca de una llama abierta,
cocina o cualquier otro aparato que
produzca calor.
17. NO use el ventilador cerca de cor-
tinas, plantas, tratamientos para
ventanas, etc.
18. Este aparato tiene un enchufe de
tres clavijas para conexión a tierra
y sólo se puede usar en un tomaco-
rriente conectado a tierra. Existen
adaptadores disponibles para co-
nectar un enchufe de tres clavijas
a un tomacorriente de dos ranuras.
Estos adaptadores deben estar
conectados a tierra correctamente.
NO trate de usar un adaptador que
elimine la seguridad de una buena
conexión a tierra.
19. La base de caucho de este producto
puede interactuar con madera y
causar daños a muebles. No lo colo-
que sobre muebles de madera na.

42742-02 04/11/2007 11
ESPAÑOL
BIENVENIDO DESEMPAQUE DEL
Por favor, je su recibo
o una copia de su recibo
a este manual para
referencia futura.
Gracias por elegir el ventilador de mesa
Millennium™ de Hunter. Este manual le
proporciona instrucciones completas
para el uso de su ventilador. Esas son
algunas de las características que usted
disfrutará con su ventilador:
• Diseño atractivo que realiza la deco-
ración de cualquier lugar.
• Poderoso motor Hunter para un
máximo ujo de aire.
• Tres velocidades para ajustar el ujo
de aire a un nivel confortable para
usted.
Antes de instalar su ventilador, anote
la información siguiente para sus ré-
cords y para asistencia con la garantía.
Nombre del modelo ________________
Código de fecha ___________________
Fecha de compra __________________
Lugar donde lo compró _____________
_________________________________
Cuando desempaque el ventilador,
guarde la caja y los materiales pro-
tectores de empaque, en caso de que
quiera mover o embarcar la unidad en
el futuro.
Saque todas las partes de la caja con
mucho cuidado.
NOTA: Es mejor que alguien sostenga
la caja mientras usted levanta el venti-
lador y los materiales protectores fuera
de la caja.
Asegúrese de que todos los materiales
protectores hayan sido retirados del
ventilador antes de ponerlo en funcio-
namiento.

12 42742-02 04/11/2007
ESPAÑOL
Este aparato es para uso casero sola-
mente y se puede enchufar en cual-
quier tomacorriente de 120 voltios, co-
rriente alterna (c.a.) (voltaje residencial
normal). NO use ningún otro tipo de
tomacorriente.
Esta unidad se puede enchufar
solamente en un tomacorriente
del tipo conectado a tierra.
El cordón eléctrico tiene un enchufe
conectado a tierra como se muestra
en la Figura 1. Se puede obtener un
adaptador, como se muestra en la Fi-
gura 2, para conectar los enchufes de
tres clavijas en tomacorrientes de dos
ranuras. El terminal verde que se ex-
tiende del adaptador se debe conectar
a una tierra permanente, tal como una
caja eléctrica conectada a tierra co-
rrectamente. El adaptador no se debe
usar si existe un tomacorriente con tres
ranuras disponible.
CONSEJOS DE SEGURIDAD PARA
EL CORDÓN ELÉCTRICO
1. NUNCA tire del cordón del apara-
to eléctrico.
FIGURA 2FIGURA 1
INSTRUCCIONES PARA LA CONEXIÓN A TIERRA
ADVERTENCIA
2. Para insertar el enchufe, agárrelo
rmemente y guíelo hacia dentro
del tomacorriente.
3. Para desconectar el aparato, aga-
rre el enchufe y sáquelo del toma-
corriente.
4. Antes de cada uso, inspeccione
el cordón eléctrico para ver si
tiene alguna cortadura o marca
de abrasión. Si encuentra alguna,
el aparato debe recibir servicio y
el cordón se debe cambiar. Por
favor, devuelva el ventilador a
nuestro Departamento de Servicio
o a un representante autorizado
de servicio.
5. NUNCA enrolle el cordón de
forma apretada alrededor del
ventilador, ya que eso pone mu-
cha tensión sobre el cordón en el
punto donde entra en el aparato y
pudiera causar daños o ruptura en
el aislamiento del cordón.
6. NO opere el ventilador si el cor-
dón eléctrico muestra cualquier
señal de estar dañado, si el venti-
lador trabaja de forma intermiten-
te o si deja de funcionar comple-
tamente.
FIGURA 2FIGURA 1
Cubierta de la caja
conectada a tierra
del tomacorriente
Tornillo
de metal
Adaptador
Terminal para
conexión a tierra
Enchufe conectado
a tierra
Asta Tierra
Cubierta de la caja
conectada a tierra
del tomacorriente

42742-02 04/11/2007 13
ESPAÑOL
OPERACIÓN
Este ventilador es para uso residencial
solamente.
1. Coloque el ventilador sobre una
supercie seca, segura y plana,
de donde no se pueda caer ni ser
tirado por el cordón.
2. Enchufe el ventilador en un to-
macorriente eléctrico conectado
a tierra de 120 voltios c.a. (voltaje
residencial normal). NO use ningún
otro tipo de tomacorriente. Asegú-
rese de que el voltaje de operación
del ventilador sea el mismo que
el del tomacorriente antes de en-
chufar el cordón eléctrico.
3. Encienda o apague el ventilador
girando la perilla de control de
encendido/velocidad. El ventila-
dor debe estar siempre apagado
antes de desenchufarlo del toma-
corriente.
4. Para seleccionar la velocidad, gire
la perilla de control de encendido/
velocidad desde la posición OFF
(apagado) al ajuste de velocidad
deseada: O (apagado), I (baja), II
(media) y III (alta).
5. Para controlar la dirección del ujo
de aire hacia arriba o hacia abajo,
aoje el tornillo que está a un lado
del cuello de la caja del ventilador.
Ajuste el aparato en el ángulo de-
seado y apriete el tornillo.
6. Para que el ventilador oscile, opri-
ma la perilla de oscilación hacia
abajo. Para detener la oscilación,
tire de la perilla hacia arriba. La
perilla de oscilación está ubicada
en la parte superior de la caja del
motor, cerca del asa.
FIGURA 3
Asa
Perilla de oscilación
Perilla de control de
encendido/velocidad
Caja del motor
Tornillo de ajuste hacia
arriba y haci abajo
Base
Piezas decorativas
(Solo en modelo 9004X)

14 42742-02 04/11/2007
ESPAÑOL
MANTENIMIENTO
Este ventilador ha sido lubricado
permanentemente y no requiere lubri-
cación (aceite) durante el resto de su
vida útil.
Este ventilador requiere muy poco
mantenimiento y no contiene piezas
que puedan ser reparadas por el usua-
rio. NO trate de arreglar usted mismo
este ventilador. Llame a una persona
de servicio cualicada si el ventilador
necesita servicio.
PARA LIMPIARLO:
1. Antes de limpiarlo, apague el
ventilador y desconéctelo del to-
macorriente. Limpie el exceso de
polvo con un paño que no tenga
hilachas.
2. Para asegurar una circulación de
aire adecuada en el motor, man-
tenga las aberturas de ventilación
en la parte posterior de la caja del
motor libres de cualquier acumu-
lación de polvo. Se puede usar la
manguera de una aspiradora de
polvo para limpiar estas aberturas.
3. NO sumerja el ventilador en agua
ni en ningún otro líquido.
FORMA DE LIMPIAR LA REJILLA
Y LAS PALETAS:
1. Apague el ventilador y desenchú-
felo del tomacorriente.
2. Desmonte las rejillas retirando cui-Desmonte las rejillas retirando cui-
dadosamente el tornillo en la parte
inferior del anillo. Vea la Figura 4.
FIGURA 4
Tornillo
Pieza decorativa
(Solo en modelo 9004X)
Anillo
Rejilla
Pieza decorativa
(Solo en modelos 9004X)

42742-02 04/11/2007 15
ESPAÑOL
3. Retire el anillo, la pieza decora-Retire el anillo, la pieza decora-
tiva inferior (solo en los modelo
9004X) y la rejilla delantera. Vea
la Figura 5.
4. Las rejillas y las paletas se pueden
limpiar con un jabón suave y agua.
5. Use un paño suave y húmedo
para limpiar las otras partes del
ventilador.
6. NO permita que el agua ni ningún
otro líquido entre en la caja del
motor ni en la base.
7. Vuelva a armar el ventilador
después de que las paletas y las
rejillas se hayan secado completa-
mente. Alinee las rejillas, reinstale
el anillo, la pieza decorativa (Solo
en modelo 9004X) y el tornillo.
NOTA: Para reinstalar la pieza
decorativa, instale parcialmente el
tornillo y luego sostenga la pieza
decorativa entre los extremos
abiertos del anillo. Termine apre-
tando el tornillo.
8. NO enchufe el ventilador en un
tomacorriente hasta que haya
sido armado completamente.
FIGURA 5
Anillo
Rejilla
frontal
Rejilla posterior
Pieza decorativa
(Solo en modelo 9004X)
Pieza decorativa
(Solo en modelo 9004X)

16 42742-02 04/11/2007
ESPAÑOL
1. Desarme y limpie el ventilador an-
tes de guardarlo.
2. No bote la caja original y los ma-
teriales de empaque, porque los
puede usar para guardar el venti-
lador.
3. SIEMPRE guarde el ventilador en
un lugar seco.
4. NUNCA guarde el ventilador
mientras está enchufado todavía.
5. NUNCA enrolle el cordón apreta-
damente alrededor del ventilador.
6. NO aplique ninguna tensión sobre
el cordón en el punto donde entra
en el ventilador, ya que pudiera
causar su ruptura.
PROBLEMA
• El ventilador no oscila.
SOLUCIÓN
• Oprima la perilla de la parte superior
de la caja del motor para activar la
oscilación.
PROBLEMA
• No puede ajustar el ángulo
del ventilador.
SOLUCIÓN
• Aoje el tornillo que está a un lado
del cuello del ventilador. Ajuste el
ventilador en el ángulo deseado y
vuelva a apretar el tornillo.
Si ha tratado todas estas soluciones de
fallas y todavía tiene un problema, lla-
me al teléfono 1-888-830-1326 (Para
CAN: 1-866-268-1936) o visite nuestro
sitio en la Internet, usando la dirección
http://www.hunterfan.com.
ALMACENAMIENTO
LOCALIZACIÓN DE FALLAS
®
HUNTER FAN COMPANY
2 5 0 0 F R I S C O AV E N U E
MEMPHIS, TN 38114, USA
Impreso en China

42742-05 04/11/2007 17
FRANÇAIS
Millennium
Ventilateur oscillant à haute performance
™
GUIDE DE L’U T I L I S ATE U R
POUR LES M O D È L E S 9101X
®

18 42742-05 04/11/2007
FRANÇAIS
INFORMATIONS DE SÉCURITÉ IMPORTANTES
Lisez et conservez ces instructions
MISE EN GARDE
Pour réduire le risque d’incendie ou de
secousse électrique, N’EMPLOYEZ PAS
ce ventilateur avec une commande de
vitesse transistorisée.
ATTENTION
Quand vous employez un appareil élec-
trique, il faut toujours prendre des pré-
cautions de base pour réduire le risque
d’incendie, de secousse électrique et de
blessure personnelle.
1. Lisez toutes les instructions avant
d’employer ce ventilateur.
2. Une installation incorrecte peut
provoquer un incendie, une se-
cousse électrique ou des blessures
personnelles :.
3. Pour éviter le risque d’incendie
et de secousse électrique, N’EM-
PLOYEZ PAS cet appareil près d’une
fenêtre. La pluie et l’humidité peu-
vent créer un danger électrique.
4. La che doit être retirée de la prise
électrique quand l’appareil n’est
pas employé, avant de le nettoyer
ou de faire l’entretien et avant de
le déplacer
5. NE PLACEZ PAS le ventilateur dans
un endroit humide—tel une salle
de bain.
6. Le ventilateur doit être placé sur
une surface plat, stable ou sur une
table pour éviter qu’il ne se ren-
verse.
7. N’employez le ventilateur que pour
son usage prévu, comme décrit
dans ce guide d’utilisation.
8. Pour vous protéger contre les se-
cousses électriques, NE PLONGEZ
PAS cet appareil, la che ou le cor-
don dans l’eau et ne l’aspergez pas
avec un liquide.
9. Une surveillance attentive est
nécessaire quand un appareil élec-
trique est utilisé par des enfants ou
près d’eux.
10. N’INSÉREZ JAMAIS vos doigts, des
crayons, ni aucun autre objet à
travers la grille quand le ventilateur
est en marche.
11. NE FAITES PAS fonctionner un
appareil électrique dont le cordon
ou la che est endommagée, après
une panne ou après qu’il est tombé
ou a été endommagé d’une quel-
conque façon.
12. Pour le débrancher, prenez la che
en main et retirez-la de la prise mu-
rale. NE TIREZ JAMAIS
sur le cordon.
13. Employez-le TOUJOURS sur une sur-
face sèche.
14. Ce produit est conçu pour un em-
ploi domestique et non pour un
usage commercial ou industriel.
15. NE FAITES PAS fonctionner le ven-
tilateur en présence de fumées
explosives et/ou inammables.
16. NE PLACEZ PAS le ventilateur près
d’une amme nue, ou d’un appareil
de cuisson ou de chauage.
17. NE L’EMPLOYEZ PAS à proximité de
tentures, plantes, rideaux, etc.
18. Cet appareil a une che à trois bro-
ches avec mise à la terre et ne con-
vient que pour une prise avec mise à
la terre. Vous pouvez vous procurer
un adaptateur pour connecter les
ches à trois broches dans des pri-
ses à deux trous. L’adaptateur doit
être mis à la terre. IL NE FAUT PAS
essayer de contourner cette sécurité.
19. Le pied en caoutchouc de ce pro-
duit peut interagir avec le bois et
entraîner des dommages au mobi-
lier. Ne pas le poser sur un meuble
be bois n.

42742-05 04/11/2007 19
FRANÇAIS
Veuillez inclure le reçu
ou une copie de votre
reçu dans ce guide pour
référence future.
BIENVENUE DÉBALLAGE
Nous vous remercions d’avoir choisi
le ventilateur de table Hunter Millen-
nium™ Ce manuel contient toutes les
instructions pour l’utilisation du ven-
tilateur. Vous proterez de quelques-
unes des caractéristiques suivantes
de votre ventilateur :
• Un style attrayant qui enrichit tous
les décors
• Un moteur Hunter puissant pour
un courant d’air maximum
• Trois vitesses pour régler le niveau
de confort
Avant d’installer le ventilateur, enre-
gistrez les renseignements suivants
pour assistance de garantie.
Nom de modèle : ________________
Date d’achat : ___________________
Code de date : ___________________
Place d’achat : ___________________
_______________________________
Quand vous déballez le ventilateur,
conservez le carton et l’emballage
pour un déménagement ou une
expédition future.
Retirez soigneusement tous les arti-
cles du carton.
REMARQUE : Le mieux est que
quelqu’un tienne le carton pendant
que vous enlevez le ventilateur et
l’emballage de protection.
Veillez à enlever tous les matériaux
d’expédition du ventilateur avant de
la mettre en marche.

20 42742-05 04/11/2007
FRANÇAIS
INSTRUCTIONS DE MISE À LA TERRE
FIGURE 2FIGURE 1
Cet appareil est destiné à un usage
domestique seulement et peut être
branché dans n’importe quelle prise de
courant de 120 V c.a (courant domes-
tique normal). NE LE BRANCHEZ PAS
dans un autre type de prise.
Cet appareil ne doit être branché
que dans une prise avec terre.
Le cordon a une che avec terre com-
me montré à la gure 1. Vous pouvez
vous procurer un adaptateur, référez-
vous à la gure 2, pour connecter les
ches à trois broches dans des prises à
deux trous. La languette de mise à la
terre verte de l’adapteur doit être con-
nectée une mise à la terre permanente
comme une boîte de raccordement
mise à la terre. N’employez l’adapta-
teur que si vous ne disposez pas d’une
prise à trois trous.
MISE EN GARDE
Fiche avec mise
à la terre
Broche de mise
à la terre
Couvercle de prise
avec mise à la terre
CONSEILS DE SÉCURITÉ POUR
LE CORDON ÉLECTRIQUE
1. Ne tirez JAMAIS brusquement sur
le cordon ou l’appareil.
2. Pour insérer la che, prenez-la bien
en main et placez-la dans la prise.
3. Pour débrancher l’appareil, prenez
la che en main et retirez-la de la
prise.
4. Avant chaque usage, inspectez
le cordon électrique et vériez
qu’il n’y a pas de coupures et/ou
de marques d’abrasion. S’il y en
a, l’appareil doit être réparé et le
cordon remplacé. Veuillez le ren-
voyer à notre service technique ou
à un représentant autorisé.
5. N’ENROULEZ JAMAIS le cordon
très serré autour de l’appareil, car
cela apporte une tension excessive
à l’entrée du cordon dans l’ap-
pareil et pourrait provoquer un
elochage ou une cassure.
6. NE FAITES PAS FONCTIONNER
l’appareil si le cordon est endom-
magé de quelque façon, si l’appa-
reil fonctionne par intermittence
ou s’arrête complètement.
Adaptateur
Moyen de mise
à la terre
Vis métal-
lique
Couvercle de prise
avec mise à la terre
La page est en cours de chargement...
La page est en cours de chargement...
La page est en cours de chargement...
La page est en cours de chargement...
-
 1
1
-
 2
2
-
 3
3
-
 4
4
-
 5
5
-
 6
6
-
 7
7
-
 8
8
-
 9
9
-
 10
10
-
 11
11
-
 12
12
-
 13
13
-
 14
14
-
 15
15
-
 16
16
-
 17
17
-
 18
18
-
 19
19
-
 20
20
-
 21
21
-
 22
22
-
 23
23
-
 24
24


Hunter Fan 28463 Le manuel du propriétaire
- Catégorie
- Ventilateurs ménagers
- Taper
- Le manuel du propriétaire
dans d''autres langues
- English: Hunter Fan 28463 Owner's manual
- español: Hunter Fan 28463 El manual del propietario


