GE GVS04BDWSS Le manuel du propriétaire
- Catégorie
- Cave à vin
- Taper
- Le manuel du propriétaire

Write the model and serial
numbers here:
Model # _________________
Serial # _________________
Find these numbers inside the
beverage center/wine chiller
on the left side.
GE is a trademark of the General Electric Company. Manufactured under trademark license.
OWNER’S MANUAL
& INSTALLATION
INSTRUCTIONS
WINE CENTER/BEVERAGE
AND WINE CENTER
49-1000352 Rev. 2 03-19 GEA
SAFETY INFORMATION .........3
USING THE APPLIANCE
Controls ..............................5
GVS04 Beverage and Wine Center .......6
GWS04 Wine Center ...................7
CARE AND CLEANING .............8
Replacing the Light Bulb ...............9
INSTALLATION INSTRUCTIONS . . 10
GVS04BD Models Only ................ 11
TROUBLESHOOTING TIPS ......12
LIMITED WARRANTY ...........15
CONSUMER SUPPORT ..........16
GWS04 Wine Center
GVS04 Beverage
and Wine Center
ENGLISH / FRANÇAIS /
ESPAÑOL

2 49-1000352 Rev. 2
THANK YOU FOR MAKING GE APPLIANCES A PART OF YOUR HOME.
Whether you grew up with GE Appliances, or this is your first, we’re happy to have you in the family.
We take pride in the craftsmanship, innovation and design that goes into every GE Appliances
product, and we think you will too. Among other things, registration of your appliance ensures that we
can deliver important product information and warranty details when you need them.
Register your GE appliance now online. Helpful websites and phone numbers are available in the
Consumer Support section of this Owner’s Manual. You may also mail in the pre-printed registration
card included in the packing material.

49-1000352 Rev. 2 3
READ AND SAVE THESE INSTRUCTIONS
IMPORTANT SAFETY INFORMATION
READ ALL INSTRUCTIONS BEFORE USING THE APPLIANCE
SAFETY INFORMATION
CAUTION
To reduce the risk of injury when using your refrigerator, follow these basic safety
precautions.
Ŷ 'RQRWFOHDQJODVVVKHOYHVRUFRYHUVZLWKZDUP
water when they are cold. Glass shelves and
covers may break if exposed to sudden temperature
changes or impact, such as bumping or dropping.
Tempered glass is designed to shatter into many
small pieces if it breaks.
Ŷ .HHSILQJHUVRXWRIWKH³SLQFKSRLQW´DUHDV
clearances between the doors and between the
doors and cabinet are necessarily small. Be careful
closing doors when children are in the area.
WARNING
To reduce the risk of fire, explosion, electric shock, or injury when using your
refrigerator, follow these basic safety precautions:
Ŷ 7KLVUHIULJHUDWRUPXVWEHSURSHUO\LQVWDOOHG
and located in accordance with the Installation
Instructions before it is used.
Ŷ 8QSOXJWKHUHIULJHUDWRUEHIRUHPDNLQJUHSDLUV
replacing a light bulb, or cleaning.
NOTE: Power to the refrigerator cannot be
disconnected by any setting on the control panel.
NOTE: Repairs must be performed by a qualified
Service Professional.
Ŷ 5HSODFHDOOSDUWVDQGSDQHOVEHIRUHRSHUDWLQJ
Ŷ 'RQRWVWRUHRUXVHJDVROLQHRURWKHUIODPPDEOH
vapors and liquids in the vicinity of this or any other
appliance.
Ŷ 'RQRWVWRUHH[SORVLYHVXEVWDQFHVVXFKDVDHURVRO
cans with a flammable propellant in this appliance.
Ŷ 'RQRWXVHDQH[WHQVLRQFRUG
Ŷ 7RSUHYHQWVXIIRFDWLRQDQGHQWUDSPHQWKD]DUGV
WRFKLOGUHQUHPRYHWKHIUHVKIRRGDQGIUHH]HU
doors from any refrigerator before disposing of it or
discontinuing its use.
Ŷ 7RDYRLGVHULRXVLQMXU\RUGHDWKFKLOGUHQVKRXOGQRW
stand on, or play in or with the appliance.
Ŷ &KLOGUHQDQGSHUVRQVZLWKUHGXFHGSK\VLFDOVHQVRU\
or mental capabilities or lack of experience and
knowledge can use this appliance only if they are
supervised or have been given instructions on safe
XVHDQGXQGHUVWDQGWKHKD]DUGVLQYROYHG
Ŷ 7KLVDSSOLDQFHLVLQWHQGHGWREHXVHGLQKRXVHKROG
and similar applications such as: staff kitchen areas
LQVKRSVRIILFHVDQGRWKHUZRUNLQJHQYLURQPHQWV
IDUPKRXVHVE\FOLHQWVLQKRWHOVPRWHOVEHG
EUHDNIDVWDQGRWKHUUHVLGHQWLDOHQYLURQPHQWV
catering and similar non-retail applications.
Ŷ 'RQRWDSSO\KDUVKFOHDQHUVWRWKHUHIULJHUDWRU
Certain cleaners will damage plastic which may
cause parts such as the door or door handles to
detach unexpectedly. See the Care and Cleaning
section for detailed instructions.
WARNING
EXPLOSION HAZARD Flammable Refrigerant
This appliance contains isobutane refrigerant,
R600a, a natural gas with high environmental
compatibility. However, it is also combustible.
Adhere to the warnings below to reduce the risk of
injury or property damage.
1. When handling, installing and operating the
appliance, care should be taken to avoid damage to
the refrigerant tubing.
2. 6HUYLFHVKDOORQO\EHSHUIRUPHGE\DXWKRUL]HG
VHUYLFHSHUVRQQHO8VHRQO\PDQXIDFWXUHUDXWKRUL]HG
service parts.
3. 'LVSRVHRIUHIULJHUDWRULQDFFRUGDQFHZLWK)HGHUDO
DQG/RFDO5HJXODWLRQV)ODPPDEOHUHIULJHUDQWDQG
insulation material used require special disposal
procedures. Contact your local authorities for the
environmentally safe disposal of your refrigerator.
4. .HHSYHQWLODWLRQRSHQLQJVLQWKHDSSOLDQFH
enclosures or in the built-in structure clear of
obstruction.
5. 'RQRWXVHPHFKDQLFDOGHYLFHVRURWKHUPHDQVWR
accelerate the defrosting process.
6. 'RQRWGDPDJHUHIULJHUDQWFLUFXLW
7. 'RQRWXVHHOHFWULFDODSSOLDQFHVLQVLGHWKHIRRG
storage compartment of the appliance.

4 49-1000352 Rev. 2
SAFETY INFORMATION
IMPORTANT SAFETY INFORMATION
READ ALL INSTRUCTIONS BEFORE USING THE APPLIANCE
READ AND SAVE THESE INSTRUCTIONS
WARNING
SUFFOCATION AND ENTRAPMENT HAZARD
)DLOXUHWRIROORZWKHVHGLVSRVDOLQVWUXFWLRQVFDQUHVXOWLQGHDWKRUVHULRXVLQMXU\
IMPORTANT: Child entrapment and suffocation
are not problems of the past. Junked or abandoned
UHIULJHUDWRUVRUIUHH]HUVDUHVWLOOGDQJHURXVHYHQLIWKH\
ZLOOVLWIRU³MXVWDIHZGD\V´,I\RXDUHJHWWLQJULGRI\RXU
ROGUHIULJHUDWRURUIUHH]HUSOHDVHIROORZWKHLQVWUXFWLRQV
below to help prevent accidents.
Before You Throw Away Your Old Appliance
Ŷ7DNHRIIWKHIUHVKIRRGDQGIUHH]HUGRRUV
Ŷ Leave the shelves in place so that children may not
easily climb inside.
PROPER DISPOSAL OF YOUR OLD REFRIGERATOR
Do not, under any circumstances, cut or remove the third (ground) prong from the power cord. For
personal safety, this appliance must be properly grounded.
The power cord of this appliance is equipped with a
3-prong (grounding) plug which mates with a standard
SURQJJURXQGLQJZDOORXWOHWWRPLQLPL]HWKH
SRVVLELOLW\RIHOHFWULFVKRFNKD]DUGIURPWKLVDSSOLDQFH
Have the wall outlet and circuit checked by a qualified
electrician to make sure the outlet is properly
grounded.
Where a standard 2-prong wall outlet is encountered, it
is your personal responsibility and obligation to have it
replaced with a properly grounded 3-prong wall outlet.
'RQRWXVHDQDGDSWHU
The refrigerator should always be plugged into its own
individual electrical outlet which has a voltage rating
that matches the rating plate.
$9ROW$&+]RUDPSIXVHGJURXQGHG
electrical supply is required. This provides the best
performance and also prevents overloading house
ZLULQJFLUFXLWVZKLFKFRXOGFDXVHDILUHKD]DUGIURP
overheated wires.
Never unplug your refrigerator by pulling on the power
cord. Always grip plug firmly and pull straight out from
the outlet.
Immediately discontinue use of a damaged supply
cord. If the supply cord is damaged, it must be
replaced by a qualified service professional with an
DXWKRUL]HGVHUYLFHSDUWIURPWKHPDQXIDFWXUHU
When moving the refrigerator away from the wall, be
careful not to roll over or damage the power cord.
CONNECTING ELECTRICITY
WARNING
ELECTRICAL SHOCK HAZARD
Plug into a grounded 3-prong outlet
'RQRWUHPRYHWKHJURXQGSURQJ
'RQRWXVHDQDGDSWHU
'RQRWXVHDQH[WHQVLRQFRUG
)DLOXUHWRIROORZWKHVHLQVWUXFWLRQVFDQUHVXOWLQGHDWKILUHRUHOHFWULFDOVKRFN
Refrigerant and Foam Disposal:
'LVSRVHRIUHIULJHUDWRULQDFFRUGDQFHZLWK)HGHUDODQG/RFDO5HJXODWLRQV)ODPPDEOHUHIULJHUDQWDQGLQVXODWLRQ
material used require special disposal procedures. Contact your local authorities for the environmentally safe
disposal of your refrigerator.
INSTALLATION
WARNING
EXPLOSION HAZARD
.HHSIODPPDEOHPDWHULDOVDQGYDSRUVVXFKDVJDVROLQHDZD\IURPUHIULJHUDWRU)DLOXUHWRGRVRFDQUHVXOWLQILUH
explosion, or death.

49-1000352 Rev. 2 5
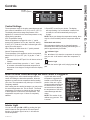
Control Settings
The temperature range of the wine center/beverage and
ZLQHFHQWHULVLQWHQGHGIRU)&WR)&
The display shows the average temperature of the
appliance. It is normal for the actual temperature to vary
slightly during operation.
Auto Temperature Setting
:KHQWKHDSSOLDQFHLVSOXJJHGLQRUWKH³´SDGLV
SUHVVHGWKHDSSOLDQFHUXQVRQWKH³$XWR%HY´VHWWLQJ
RI)&DQGWKH³$XWR%HY´LQGLFDWRUOLJKWLQWKH
upper left corner stays lit.
1RWH'LVSOD\ZLOOIODVKZKHQWKH³´SDGLVSUHVVHG
Normal Temperature Setting
The temperature of the appliance can be set anywhere
EHWZHHQ)&WR)&E\WKH³´DQG³±´
pads.
1. Press and hold the SET pad. You will hear a series of
2 beeps.
$IWHUWKHVHFRQGEHHSSUHVVWKH³´DQG³±´SDGV
to increase or decrease the desired temperature in
LQFUHPHQWVRIRQHGHJUHH'XULQJWKLVWLPHWKHGLVSOD\
will flash.
3. Press SET to confirm your choice. The display
will stop flashing. If no confirmation is made in ten
seconds, the unit will automatically accept your
change.
NOTE: When you change the temperature setting, there
may be a 5-minute delay until the compressor starts to
run.
Fahrenheit and Celsius
The temperature display can be changed between
)DKUHQKHLWDQG&HOVLXVE\SUHVVLQJDQGKROGLQJWKH³´
pad for approximately 5 seconds.
Indicator Light
The indicator is lit when the compressor is running to
cool your unit. It will not be lit when the compressor is
idle.
Interior Light
To switch the interior light on/off, simply press the
pad.
When the Wine Center/Beverage and Wine Center is Plugged In
After plugging in the wine center/beverage and wine
center and setting the desired temperature, allow the
appliance to reach the set temperature before loading
your wine. The temperature may take up to 12 hours to
FRPSOHWHO\VWDELOL]H
After loading the wine and/or beverages, you may notice
the actual temperature rise. This is normal. The actual
temperature will continue to change as the wine and/
or beverages are cooled to the set temperature. The
temperature may take up to 12 hours to completely
VWDELOL]H
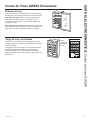
A guide with wine serving
temperature suggestions is
located on the inside right
portion of the unit. It gives
recommended temperatures
for different wines, as well
as instructions on adjusting
the temperature of the wine
center/beverage and wine
center
NOTE: The exterior of the
cabinet may get warm. This
is normal.
Interior Light
You can turn the light ON or OFF by pushing the light
switch located on the right side of the control panel
housing. If the interior light is left on, it will raise the
inside temperature.
Controls
USING THE APPLIANCE: Controls
Auto Bev
Indicator Light

6 49-1000352 Rev. 2
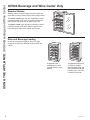
GVS04 Beverage and Wine Center Only
USING THE APPLIANCE: GVS04 Beverage and Wine Center
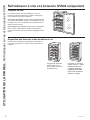
Wooden Shelves
Wooden shelves in the beverage and wine center are
removable for easy cleaning and for storing larger items.
To remove a shelf, open the door completely to avoid
potential damage to the shelf. Lift slightly and pull the
shelf forward. The shelf may fit tightly in the track.
To replace a shelf, open the door completely to avoid
potential damage to the shelf. Slide the shelf into the
tracks along the sides of the cabinet until it stops.
Wine and Beverage Loading
As with any refrigeration product, there is a slight
temperature variance at different locations within the
cabinet.
Suggested bottle
DUUDQJHPHQWIRUZLQH±
full load (holds 31 wine
bottles)
Suggested arrangement
IRURWKHUEHYHUDJHV±
standard load (holds 109
cans). Additional storage
possible (up to 125 cans
if a shelf is removed).

49-1000352 Rev. 2
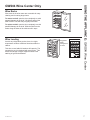
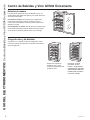
Wine Racks
Wine racks in the wine center are removable for easy
cleaning and for storing larger items.
To remove a shelf, open the door completely to avoid
potential damage to the shelf. Lift slightly and pull the
shelf forward. The shelf may fit tightly in the track.
To replace a shelf, open the door completely to avoid
potential damage to the shelf. Slide the shelf into the
tracks along the sides of the cabinet until it stops.
Wine Loading
As with any refrigeration product, there is a slight
temperature variance at different locations within the
cabinet.
This wine center holds 30 bottles at full capacity. The
second wine rack is designed with extra height. This
allows the storage of larger magnum bottles or the
VWDFNLQJRIW\SLFDOVL]HGERWWOHV
GWS04 Wine Center Only
USING THE APPLIANCE: GWS04 Wine Center
Suggested
bottle
arrangement
for wine.

8 49-1000352 Rev. 2
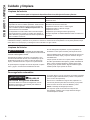
Care and Cleaning
Cleaning the Outside
Cleaning the Inside
WARNING
Beverage Center must be unplugged
WRDYRLGHOHFWULFDOKD]DUGIURPSRZHUVRXUFHZKHQ
defrosting unit.
To clean the inner liner and racks, use a warm water
and baking soda solution—about one tablespoon (15
ml) of baking soda to a quart (1 liter) of water. This both
FOHDQVDQGQHXWUDOL]HVRGRUV&OHDQZLWKDGDPSFORWK
The vinyl door gasket may be cleaned with mild soap
and water or a baking soda solution.
'RQRWXVHGHWHUJHQWVVFRXULQJSRZGHUVVSUD\
cleaners or other harsh chemicals to clean the interior.
For GVS04 Models: To avoid water stains on the wood
shelves, clean up and dry any liquid spills immediately.
:LSHWKHFRQWUROSDQHOZLWKDGDPSFORWK'U\
WKRURXJKO\'RQRWXVHFOHDQLQJVSUD\VODUJHDPRXQWV
of soap and water, abrasives or sharp objects on the
panel—they can damage it. Some paper towels can also
scratch the control panel.
Automatic Defrosting
The model uses the compressor on/off cycling to defrost
automatically (compressor stop, temperature rises).
Never use a heater of any kind, scraper or sharp
instrument to remove frost as it may damage the wine
center/beverage and wine center.
NOTE: The drain pan above the compressor may be
full following defrost. Check to make sure no water spills
when moving the unit.
CARE AND CLEANING
WARNING
EXPLOSION HAZARD
Flammable Refrigerant
7RDYRLGGDPDJHWRWKHUHIULJHUDWLRQFLUFXLW'R1RWXVH
mechanical devices or other means to accelerate the
defrosting process.
Directions for Cleaning Outside Surfaces, Door Handles, and Trim
DO USE DO NOT USE
Soft, clean cloth or sponge Abrasive cloths, scrubbing sponges, scouring or steel
wool pads
Mild detergent mixed with warm water
$SSURYHGVWDLQOHVVVWHHOFOHDQHUV9LVLWWKH&DIp
Appliances parts store for approved stainless steel
cleaners: geapplianceparts.com RUFDOO
&OHDQHUVZLWKR[DOLFDFLGVXFKDV%DU.HHSHUV)ULHQG6RIW
Cleanser™ can be used to remove surface rust, tarnish
and small blemishes on stainless steel surfaces only.
Abrasive powders or sprays
Window Sprays or Ammonia
Citrus or plant oil-based cleaners
Acidic or vinegar-based cleaners
Oven cleaners
Cleaners containing acetone (propanone)
Any cleaner with WARNING about plastic contact
NOTE: DO NOT allow stainless steel cleaner to come in contact with any plastic parts such as trim pieces, handle
hardware and liners. If unintentional contact of cleaners with plastic parts does occur, clean plastic part with a
sponge and mild detergent mixed with warm water.

49-1000352 Rev. 2 9
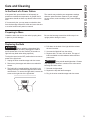
In the Event of a Power Failure
If the power fails, open the door as infrequently as
possible to maintain the temperature. A gradual rise in
temperature should not have any adverse effect on the
wine.
If it is extremely hot, you may want to unload the wine
from the beverage center/wine chiller and move the wine
to a cooler location until power is restored.
The controls may maintain your temperature settings
when the power has been restored. If your settings
are not correct, reset according to the Control Settings
section.
Preparing to Move
8QORDGWKHZLQHWKHQVHFXUHWKHUDFNVE\WDSLQJWKHP
in place to prevent damage.
Be sure the beverage center/wine chiller stays in an
upright position during the move.
CARE AND CLEANING
Care and Cleaning
Replacing the Bulb
WARNING
Before replacing a burned-out light
bulb, the refrigerator should be unplugged in order to
avoid contact with a live wire filament. (A burned-out
light bulb may break when being replaced.)
7XUQLQJWKHFRQWUROWRWKH2))SRVLWLRQGRHVQRWUHPRYH
power to the light circuit.
8QSOXJWKHZLQHFHQWHUEHYHUDJHDQGZLQHFHQWHU
2. Remove any beverages and shelves as needed for
access.
3. The light bulb is located behind a light shield in the
ceiling of the wine center/beverage and wine center
near the back. To remove the light shield, remove the
screw on the right side of the light shield.
4. Pull down on the back of the light shield to release
the two front tabs.
8QVFUHZWKHOLJKWEXOEIURPWKHVRFNHW
6. Replace with a 15 watt, 120 volt bulb. This type of
bulb is available at most hardware and automotive
parts stores.
WARNING
8VLQJDEXOEUDWHGKLJKHUWKDQZDWWV
may damage the electronic controls on the wine center/
beverage and wine center.
5HLQVWDOOWKHOLJKWVKLHOG
8. Replace the top shelf and beverages.
9. Plug in the wine center/beverage and wine center
Light Shield
Screw

10 49-1000352 Rev. 2
Installation
Instructions
Models GVS04 and GWS04
Questions? Call 800.GE.CARES (800.432.2737) or visit our Website at: GEAppliances.com
In Canada, call 1.800.561.3344 or visit our Website at: geappliances.ca
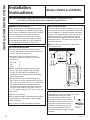
REMOVING THE PACKAGING
Before using the Wine Center/Beverage and Wine
Center, be sure all packing materials and tape have
been removed, including the protective film covering
the control and any film protecting the cabinet.
If you are discarding an old refrigeration product,
remove the doors to reduce the danger of children
EHLQJWUDSSHGLQVLGH5HIHUWR3URSHU'LVSRVDORI
Your Old Refrigerator section for instructions.
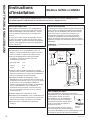
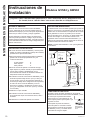
LEVELING LEGS
Adjustable legs at the front corners of the Wine
Center/Beverage and Wine Center
should be set so the Wine Center/
Beverage and Wine Center is firmly
SRVLWLRQHGRQWKHIORRUZLWKD´WLOW
to the back to help the door closure.
To adjust the leveling legs, turn the
legs counterclockwise to raise the
beverage center/wine chiller, clockwise
to lower it.
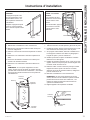
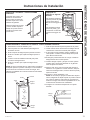
BUILT-IN INSTALLATION
The cutout dimension shown, allows for door swing
and access to the pull-out shelves when installed as
a built-in appliance. If installing between frameless
FDELQHWVDò´ZLGHILOOHUVWULSRUVLGHSDQHOPD\EH
needed on hinge side. The filler strip will act as a
spacer between the appliance case and adjacent
cabinet door swing. The width of the opening must
include the filler strip.
NOTE: 7KHGRRUVKRXOGSURWUXGH´EH\RQGWKH
surrounding cabints.
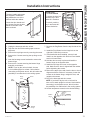
INSTALLATION GUIDELINES
Ŷ7KH:LQH&HQWHU%HYHUDJHDQG:LQH&HQWHUU
can be freestanding or can be installed under the
counter, with proper clearances.
Ŷ$OORZWKHIROORZLQJFOHDUDQFHVIRUHDVHRI
installation, proper air circulation and electrical
connections:
(DFKVLGH ´
7RS ´
%DFN ´
Ŷ%HIRUHFRQQHFWLQJWKHDSSOLDQFHWRWKHSRZHU
source, let it stand upright for approximately
2 hours. This will reduce the possibility of a
malfunction in the cooling system from handling
during transportation.
Ŷ'RQRWLQVWDOOWKH:LQH&HQWHU%HYHUDJHDQG
Wine Center where the temperature will go below
)&RUDERYH)&,IWKHURRP
temperature is below the temperature setting,
the Wine Center/Beverage and Wine Center will
QRWRSHUDWHIRULQVWDQFHLIWKHURRPLVDW)
&DQGWKHVHWWLQJLV)&WKHXQLW
will not run).
Ŷ,QVWDOOLWRQDOHYHOIORRU
Ŷ'RQRWLQVWDOOWKH:LQH&HQWHU%HYHUDJHDQG:LQH
Center where it will be subject to direct sunlight,
heat or moisture.
Ŷ'RQRWVWRUHRULQVWDOOWKLVDSSOLDQFHRXWGRRUV
19"
482.6 mm19-1/2" Min.
495.3 mm Min.
22-1/2"
569 mm
including door
19"
495.3 mm
6" Max.
152 mm Max.
33-1/2" Min.
851 mm Min.
23-1/2" Min
597mm Min.
33"
838 mm
Locate Outlet
To raise the
appliance
INSTALLATION INSTRUCTIONS

49-1000352 Rev. 2 11
INSTALLATION INSTRUCTIONS
Installation Instructions
DOOR HANDLE - GVS04BD model only
The door handle and screws
are shipped in a hardware
bag attached to one of the
shelves inside the cabinet.
Locate the door handle and
two screws. Secure the door
handle to the side of the
door as shown.
REVERSING THE DOOR - GVS04BD model only
8QSOXJWKHEHYHUDJHDQGZLQHFHQWHU
2. Tape the door shut with masking tape to secure
alignment.
3. Remove the top hinge cover by removing the screw.
4. Remove the 2 screws securing the top hinge to the
frame.
5. Lean the beverage center backward to access the
bottom hinge.
6. Remove the 2 screws securing the bottom hinge
assembly to the frame.
NOTE: If you lay the unit on its back, be sure
to let it stand upright for at least 2 hours before
FRQQHFWLQJWRWKHSRZHUVRXUFHWKLVZLOOUHGXFHWKH
possibility of a malfunction in the cooling system.
5HPRYHWKH3OXJ%XWWRQIURPWKHWRSOHIWVLGHRIWKH
door.
8. Install the Plug Button into the hinge hole on the
right side. Press firmly to secure.
9. If the handle has been installed, remove it and
LQVWDOOLWRQWKHRSSRVLWHVLGH5HIHUWR'RRU+DQGOH
section for instructions.
10. Hold the door securely in place and install the
bottom hinge on the opposite side.
11. Install the top hinge and cover on the opposite
side. Make sure the door is aligned with the cabinet
before tightening the screws.
12. Remove the tape. Open and close the door to check
alignment with the cabinet. If necessary, loosen the
screws on the bottom hinge, realign the door, and
retighten the screws.
13. Plug in the beverage and wine center.
NOTE: If you had to lay the unit on its back, be
sure to let it stand upright for at least 2 hours before
FRQQHFWLQJLWWRWKHSRZHUVRXUFHWKLVZLOOUHGXFH
the possibility of a malfunction in the cooling system.
14. Set the temperature controls to the desired setting.
DOOR LOCK
- on some models
To secure the door lock,
push the key in and
rotate 90° clockwise.
To unlock, push the
key in and rotate 90°
counter-clockwise.
Screw
'RRU
Handle
.H\
Lock
Hinge
cover
Top
Hinge
Bottom
Hinge
Plug
Button
Screw
Bottom
Hinge
Leveling Leg

12 49-1000352 Rev. 2
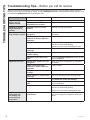
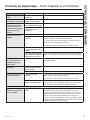
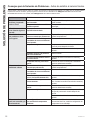
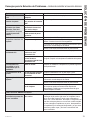
Troubleshooting Tips... Before you call for service
Save time and money! Review the charts on the following pages first and you may not need to call for service. If
needed, service can be scheduled by visiting us online GEAppliances.comRUFDOOLQJ*(&$5(6
In Canada visit GEAppliances.ca or call 800.561.3344.
Problem Possible Causes What to Do
Appliance does not
operate and the
display is blank
Appliance is unplugged. Push the plug completely into the outlet.
The home circuit breaker is
tripped/the fuse is blown.
Replace fuse or reset the breaker.
Vibration or rattling
(slight vibration is
normal)
Appliance is on an uneven
surface.
See the Leveling Legs section.
Motor operates for
long periods or cycles
Normal when appliance is first
plugged in.
Wait 12 hours for the appliance to completely
cool down.
Often occurs when large
amounts of wine are placed in
appliance.
This is normal.
Door left open. 'RRULVQRWVHOIFORVLQJ$OZD\VPDNHVXUHWKDW
the door is closed after opening.
Check to see if a bottle is holding door open.
Hot weather or frequent door
openings.
This is normal.
Temperature control set at the
coldest setting.
See About the control and settings.
Appliance is too close to the
wall.
See the Installation Guidelines section for the
correct clearances.
Appliance too warm Normal when appliance is first
plugged in.
Wait 12 hours for the appliance to completely
cool down.
Often occurs when large
amounts of wine are placed in
appliance.
This is normal.
Temperature control not set cold
enough.
See About the control and settings.
Warm weather or frequent door
openings.
Set the temperature control one step colder.
See About the control and settings.
Appliance is too close to the
wall.
See the Installation Guidelines section for the
correct clearances.
Door left open. 'RRULVQRWVHOIFORVLQJ$OZD\VPDNHVXUHWKDW
the door is closed after opening.
Check to see if a bottle is holding door open.
Appliance does
not operate, but
the display is lit
and functioning
temperature.
Setting is above room
temperature.
This is normal. If wine and/or beverages are
too warm, change the temperature setting to a
lower.
TROUBLESHOOTING TIPS

49-1000352 Rev. 2 13
TROUBLESHOOTING TIPS
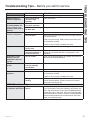
Troubleshooting Tips... Before you call for service
Problem Possible Causes What To Do
Appliance has odor Interior needs cleaning. See Care and cleaning.
Moisture forms on
outside of appliance
Not unusual during
periods of high
humidity.
Wipe surface dry.
Moisture collects inside
(in humid weather, air
carries moisture into
appliance when door is
opened)
Too frequent or too
long door openings.
Wine bottles touching
the back wall.
Reposition bottles.
Frost forms on interior
surfaces of appliance
This is normal. See the Defrosting section.
Door left open. Excessive frost may form if the door is left open. See the
Defrosting section.
'RRULVQRWVHOIFORVLQJ$OZD\VPDNHVXUHWKDWWKHGRRU
is closed after opening.
Check to see if a bottle is holding door open.
Appliance too cold Temperature control is
set too cold.
See About the control and settings.
The room temperature
wherethe appliance is
located is too cold.
)RUSURSHURSHUDWLRQWKHURRPWHPSHUDWXUHVKRXOG
be equal to or greater than the set temperature of the
appliance.
Temperature in the
display is not the
temperature that was
just set.
This is normal. After you set the temperature, the display will go back to
showing the actual temperature.
Condensation on front
of door
Appliance is located
in a high humidity
environment.
Wipe off the condensation with a clean, dry cloth.
Locate the appliance in a lower humidity environment.
Water on floor behind
appliance
Door left open. 'RRULVQRWVHOIFORVLQJ$OZD\VPDNHVXUHWKDWWKHGRRU
is closed after opening.
Check to see if a bottle is holding door open.
Tilting unit when
moving.
This is normal. The drain pan above the compressor may
be full following defrost. Check to make sure no water
spills when moving the unit.
GWS04 Wine Center Only
Rust, tarnish, or grime
on stainless steel doors
Moist environment or
salt air.
Clean stainless steel with cleaners containing oxalic acid
HJ%DU.HHSHUV)ULHQG6RIW&OHDQVHUZLOOUHPRYHUXVW
lime, DQGRWKHUWDUQLVK'RQRWZLSHWKHappliance with a
VRLOHGGLVKFORWKRUZHWWRZHO'RQRWXVHVFRXULQJSDGV
powdered cleaners, bleach or cleaners containing bleach
because these products can scratch and ruin the brush
¿QLVKRIWKHVWDLQOHVVVWHHO

14 49-1000352 Rev. 2
Notes
NOTES

49-1000352 Rev. 2 15
LIMITED WARRANTY
Staple your receipt here. Proof of the original purchase
date is needed to obtain service under the warranty.
Wine Center/Beverage and Wine Center Limited Warranty
For US Customers, DOOZDUUDQW\VHUYLFHSURYLGHGE\RXU)DFWRU\6HUYLFH&HQWHUVRUDQDXWKRUL]HG&XVWRPHU&DUH
®
technician. To schedule service, on-line, 24 hours a day, visit us at GEAppliances.com, or call 800.GE.CARES
3OHDVHKDYHVHULDOQXPEHUDQGPRGHOQXPEHUDYDLODEOHZKHQFDOOLQJIRUVHUYLFH
In Canada, call 800.561.3344.
Ŷ Service trips to your home to teach you how to
use the product.
Ŷ Improper installation, delivery or maintenance.
Ŷ Failure of the product if it is abused, misused, or
used for other than the intended purpose or used
commercially.
Ŷ Loss of food due to spoilage.
Ŷ Replacement of house fuses or resetting of circuit
breakers.
Ŷ Damage caused after delivery.
Ŷ Replacement of the water filter cartridge, if
included, due to water pressure that is outside
the specified operating range or due to excessive
sediment in the water supply.
Ŷ Replacement of the light bulbs, if included, or
water filter cartridge, if included, other than as
noted above.
Ŷ Damage to the product caused by accident, fire,
floods or acts of God.
Ŷ Incidental or consequential damage caused by
possible defects with this appliance.
Ŷ Product not accessible to provide required service.
Ŷ Damage to finish, such as surface rust, tarnish, or
small blemishes not reported within 48 hours of
delivery.
Ŷ Products which are not defective, broken, or which
are working as described in the owner’s manual.
What is Not Covered:
For US Customers: This limited warranty is extended to the original purchaser and any succeeding owner for
SURGXFWVSXUFKDVHGIRUKRPHXVHZLWKLQWKH86$,IWKHSURGXFWLVORFDWHGLQDQDUHDZKHUHVHUYLFHE\D*(
$SSOLDQFHV$XWKRUL]HG6HUYLFHULVQRWDYDLODEOH\RXPD\EHUHVSRQVLEOHIRUDWULSFKDUJHRU\RXPD\EHUHTXLUHG
WREULQJWKHSURGXFWWRDQ$XWKRUL]HG*($SSOLDQFHV6HUYLFHORFDWLRQIRUVHUYLFH,Q$ODVNDWKHOLPLWHGZDUUDQW\
excludes the cost of shipping or service calls to your home.
Some states do not allow the exclusion or limitation of incidental or consequential damages. This limited warranty
gives you specific legal rights, and you may also have other rights which vary from state to state. To know what your
legal rights are, consult your local or state consumer affairs office or your state’s Attorney General.
Warrantor US: GE Appliances, a Haier company
Louisville, KY 40225
EXCLUSION OF IMPLIED WARRANTIES—Your sole and exclusive remedy is product repair
as provided in this Limited Warranty. Any implied warranties, including the implied warranties
of merchantability or fitness for a particular purpose, are limited to one year or the shortest
period allowed by law.
For the Period of: GE Appliances Will Replace
One Year
)URPWKHGDWHRIWKH
original purchase
Any part of the refrigerator which fails due to a defect in materials or workmanship.
'XULQJWKHlimited one-year warranty, GE Appliances will also provide, free of
charge, all labor and related service to replace the defective part.
For Customers in Canada: This limited warranty is extended to the original purchaser and any succeeding owner
for products purchased in Canada for home use within Canada. In-home warrant service will be provided in areas
where it is available and deemed reasonable by Mabe to provide.
Warrantor Canada: MC Commercial, Burlington, Ontario, L7R 5B6
Servicing your refrigerator may require the use of the onboard data port for diagnostics. This gives a GE Appliances
)DFWRU\6HUYLFHWHFKQLFLDQWKHDELOLW\WRTXLFNO\GLDJQRVHDQ\LVVXHVZLWK\RXUDSSOLDQFHDQGKHOSVLPSURYHLWV
products by providing information on your appliance. If you do not want your appliance data to be sent to GE
Appliances, please advise your technician NOT to submit the data at the time of service.

16 49-1000352 Rev. 2
GE Appliances Website
Have a question or need assistance with your appliance? Try the GE Appliances Website 24 hours a day, any day
of the year! You can also shop for more great GE Appliances products and take advantage of all our on-line support
VHUYLFHVGHVLJQHGIRU\RXUFRQYHQLHQFH,QWKH86GEAppliances.com In Canada: GEAppliances.ca
Register Your Appliance
Register your new appliance on-line at your convenience! Timely product registration will allow for enhanced
communication and prompt service under the terms of your warranty, should the need arise. You may also mail in
the pre-printed registration card included in the packing material.
,QWKH86GEAppliances.com/register
In Canada: Prodsupport.mabe.ca/crm/Products/ProductRegistration.aspx
Schedule Service
Expert GE Appliances repair service is only one step away from your door. Get on-line and schedule your service at
\RXUFRQYHQLHQFHDQ\GD\RIWKH\HDU,QWKH86GEAppliances.com/service RUFDOOGXULQJQRUPDO
business hours.
In Canada: GEAppliances.ca/en/support/service-request or call 800.561.3344
Extended Warranties
Purchase a GE Appliances extended warranty and learn about special discounts that are available while your
warranty is still in effect. You can purchase it on-line anytime. GE Appliances Services will still be there after your
warranty expires.
,QWKH86GEAppliances.com/extended-warranty or call 800.626.2224 during normal business hours.
In Canada: GEAppliances.ca/en/support/purchase-extended-warranty or call 800.290.9029
Remote Connectivity
)RUDVVLVWDQFHZLWKZLUHOHVVQHWZRUNFRQQHFWLYLW\IRUPRGHOVZLWKUHPRWHHQDEOH
visit our website at GEAppliances.com/connectRUFDOOLQWKH86RQO\
Parts and Accessories
Individuals qualified to service their own appliances can have parts or accessories sent directly to their homes
9,6$0DVWHU&DUGDQG'LVFRYHUFDUGVDUHDFFHSWHG2UGHURQOLQHWRGD\KRXUVHYHU\GD\
,QWKH86GEApplianceparts.comRUE\SKRQHDWGXULQJQRUPDOEXVLQHVVKRXUV
Instructions contained in this manual cover procedures to be performed by any user. Other servicing
generally should be referred to qualified service personnel. Caution must be exercised, since improper
servicing may cause unsafe operation.
Customers in Canada should consult the yellow pages for the nearest Mabe service center, visit our website at
GEAppliances.ca/en/products/parts-filters-accessories or call 800.661.1616.
Contact Us
If you are not satisfied with the service you receive from GE Appliances, contact us on our Website with all the
details including your phone number, or write to:
,QWKH86*HQHUDO0DQDJHU&XVWRPHU5HODWLRQV_*($SSOLDQFHV$SSOLDQFH3DUN_/RXLVYLOOH.<
GEAppliances.com/contact
,Q&DQDGD'LUHFWRU&RQVXPHU5HODWLRQV0DEH&DQDGD,QF_6XLWH)DFWRU\/DQH_0RQFWRQ1%(&0
GEAppliances.ca/en/contact-us
CONSUMER SUPPORT
Consumer Support
Printed in China

Notez ici les numéros de modèle et
de série :
Numéro de modèle : ___________
Numéro de série : _____________
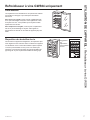
Vous trouverez ces numéros à
l'intérieur du refroidisseur à vins/à
boissons sur le côté gauche.
GE est une marque déposée de General Electric Company. Fabriqué sous licence de marque.
MANUEL
D’UTILISATION ET
D’INSTALLATION
REFROIDISSEUR À VINS /
REFROIDISSEUR À VINS ET À
BOISSONS
49-1000352 Rev. 2 03-19 GEA
CONSIGNES DE SÉCURITÉ ......3
UTILISATION DE L’APPAREIL
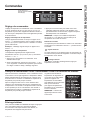
Commandes ..........................5
Refroidisseur à vins et à boissons
GVS04 ...........................6
Refroidisseur à vins GWS04 .............7
ENTRETIEN ET NETTOYAGE. . . . . . .8
Entretien et nettoyage .................9
INSTRUCTIONS
D’INSTALLATION .............10
Modèles GVS04BD uniquement. . . . . . . . . 11
CONSEILS DE DÉPANNAGE ...12
GARANTIE LIMITÉE .............15
SOUTIEN
AU CONSOMMATEUR ......16
Refroidisseur à vins GWS04
Refroidisseur à vins et à boissons
GVS04
FRANÇAIS
.

2 49-1000352 Rev. 2
NOUS VOUS REMERCIONS D’ACCUEILLIR GE APPLIANCES CHEZ VOUS
Que vous ayez grandi avec GE Appliances ou qu’il s’agisse de votre première acquisition, nous
sommes heureux de vous accueillir dans notre famille.
Nous sommes fiers du savoir-faire, de l’innovation et de l’esthétique qui composent chaque appareil
GE Appliances, et nous pensons que vous le serez aussi. Dans cette optique, nous vous rappelons
que l’enregistrement de votre électroménager vous assure la communication de renseignements
importants sur le produit et la garantie lorsque vous en avez besoin.
Enregistrez votre électroménager GE en ligne dès maintenant. Des sites Web et des numéros de
téléphone utiles figurent dans la section Soutien au consommateur de ce manuel d’utilisation.
Vous pouvez aussi poster la fiche de garantie pré-imprimée incluse dans l’emballage.

49-1000352 Rev. 2 3
LISEZ ET CONSERVEZ CES INSTRUCTIONS
IMPORTANTES CONSIGNES DE SÉCURITÉ
LISEZ TOUTES LES CONSIGNES AVANT D’UTILISER CET APPAREIL
SAFETY INFORMATION
ATTENTION
Pour réduire le risque de blessures lorsque vous utilisez votre réfrigérateur, veuillez suivre ces consignes
de sécurité.
Ŷ 1HQHWWR\H]SDVOHVWDEOHWWHVRXOHVFRXYHUFOHVHQYHUUH
avec de l’eau tiède quand ceux-ci sont froids. Les tablettes
et couvercles en verre peuvent se casser s’ils sont exposés
à des changements soudains de température ou si vous
les cognez ou les faites tomber. Le verre trempé est conçu
pour se briser en petits morceaux en cas de casse
Ŷ eORLJQH]OHVGRLJWVGHVSDUWLHVGXFRQJpODWHXURO¶RQ
peut facilement se pincer : les espaces entre les portes,
et entre les portes et les placards sont toujours étroits.
Soyez prudent lorsque vous fermez les portes en présence
d’enfants.
AVERTISSEMENT
Pour réduire le risque d’incendie, d’explosion, de choc électrique ou de blessures lorsque vous
utilisez votre réfrigérateur, veuillez suivre ces consignes de sécurité :
Ŷ &HUpIULJpUDWHXUGRLWrWUHFRUUHFWHPHQWLQVWDOOp
conformément aux instructions d'installation avant toute
utilisation.
Ŷ 'pEUDQFKH]OHUpIULJpUDWHXUDYDQWG¶HIIHFWXHUXQH
réparation, de remplacer une ampoule ou de le nettoyer.
Remarque :/¶DOLPHQWDWLRQGXUpIULJpUDWHXUQHSHXWrWUH
déconnectée par aucune des fonctions sur le panneau de
commande.
Remarque /HVUpSDUDWLRQVGRLYHQWrWUHHIIHFWXpHVSDU
un professionnel qualifié.
Ŷ 5HPHWWH]WRXWHVOHVSLqFHVHWSDQQHDX[HQSODFHDYDQW
d’utiliser l’appareil.
Ŷ $EVWHQH]YRXVG¶HQWUHSRVHURXG¶XWLOLVHUGHO¶HVVHQFHRX
d’autres vapeurs et liquides inflammables aux alentours de
cet électroménager ou d’autres appareils.
Ŷ 1¶HQWUHSRVH]SDVGDQVFHWpOHFWURPpQDJHUGHV
substances explosives telles que des bombes aérosols qui
contiennent un gaz propulseur.
Ŷ
N’utilisez pas un cordon de rallonge.
Ŷ $ILQGHSUpYHQLUOHVULVTXHVG¶DVSK\[LHHWG¶HQIHUPHPHQW
des enfants, enlevez les portes des compartiments
réfrigérateur et congélateur avant de mettre le réfrigérateur
au rebut ou d’en cesser l’usage.
Ŷ Afin de prévenir les accidents graves ou la mort, les
enfants ne doivent pas se tenir ni jouer dans ou sur
l’électroménager.
Ŷ /HVHQIDQWVHWOHVSHUVRQQHVGRQWOHVFDSDFLWpVVRQWUpGXLWHV
sur le plan physique, sensoriel ou mental, ou qui manquent
d’expérience ou de connaissances, peuvent utiliser cet
électroménager seulement si elles sont surveillées ou ont
reçues des consignes de sécurité sur son usage et les risques
y sont associés.
Ŷ &HWpOHFWURPpQDJHUHVWFRQoXSRXUXQHXWLOLVDWLRQGRPHVWLTXH
et applications similaires : salle du personnel dans une usine,
un bureau ou d’autres lieux de travail; maison de ferme;
clients dans un hôtel, un motel, un gîte touristique et d’autres
lieux résidentiels; approvisionnement et applications similaires
non reliées au commerce de détail.
Ŷ 1¶DSSOLTXH]SDVGHQHWWR\DQWVFRUURVLIVVXUOHUpIULJpUDWHXU
Certains nettoyants endommagent le plastique et peuvent
ainsi causer le détachement inopiné de pièces telles que
porte ou poignées de porte. Voyez la section Entretien et
nettoyage pour des instructions détaillées.
AVERTISSEMENT
RISQUE D’EXPLOSION Fluide frigorigène inflammable
Cet électroménager contient le réfrigérant isobutane,
R600a, un gaz naturel à compatibilité élevée avec
l’environnement. Il s’agit cependant d’un combustible.
Observez les consignes de sécurité ci-dessous afin
de réduire le risque de blessure ou de dommage à la
propriété.
1. Lors de la manipulation, de l’installation et de l’utilisation de
cet appareil, prenez soin de ne pas endommager les tubes
de circulation du fluide frigorigène.
2. /¶HQWUHWLHQRXODUpSDUDWLRQGRLYHQWrWUHHIIHFWXpVSDUXQ
personnel de service autorisé. Utilisez seulement des
pièces de rechange autorisées par le fabricant.
3. Mettez le réfrigérateur au rebut conformément aux
réglementations fédérales et locales. Le fluide frigorigène
inflammable et le matériel isolant utilisés nécessitent des
procédures de mise au rebut spéciales. Communiquez
avec les autorités locales compétentes pour la mise
au rebut de votre réfrigérateur sans danger pour
l’environnement.
4. N’obstruez pas les évents dans l’enceinte prévue pour
l’appareil.
5. N’utilisez pas d’appareils ou autres moyens mécaniques
pour accélérer le processus de dégivrage.
6. N’endommagez pas le circuit du fluide frigorigène.
7. N’utilisez pas d’appareils électriques dans le compartiment
réfrigérateur de cet appareil.

4 49-1000352 Rev. 2
CONSIGNES DE SÉCURITÉ
LISEZ ET CONSERVEZ CES INSTRUCTIONS
IMPORTANTES CONSIGNES DE SÉCURITÉ
LISEZ TOUTES LES CONSIGNES AVANT D’UTILISER CET APPAREIL
Ne coupez pas ou n’enlevez pas, sous aucun prétexte, la troisième broche de mise à la terre du cordon
d’alimentation. Pour des raisons de sécurité, cet appareil doit être correctement mis à la terre.
Le cordon d’alimentation de cet appareil est équipé d’une
fiche à trois broches (pour une mise à la terre) qui s’adapte à
la prise de courant standard à 3 broches (pour une mise à la
terre) pour minimiser les risques de chocs électriques par cet
appareil.
Faites vérifier la prise murale et le circuit électrique par
un électricien qualifié pour s’assurer que le système est
correctement mis à la terre.
Dans le cas d’une prise biphasée, l’installateur a la
responsabilité et l’obligation de la remplacer par une prise
triphasée correctement mise à la terre. N’utilisez pas
d’adaptateur.
/HUpIULJpUDWHXUGRLWWRXMRXUVrWUHEUDQFKpjVDSURSUHSULVH
électrique d’une tension nominale correspondant à celle
indiquée sur sa plaque signalétique.
Une alimentation électrique à 115 volts CA, 60 Hz, avec
un fusible de 15 ou 20 ampères et une mise à la terre est
nécessaire. Ceci permet d’obtenir un meilleur rendement et
évite de surcharger les circuits électriques du domicile qui
risque d’occasionner un incendie en surchauffant.
Ne débranchez jamais le réfrigérateur en tirant sur le cordon
d’alimentation. Prenez toujours fermement la fiche en main et
tirez pour la sortir de la prise.
Cessez immédiatement d’utiliser un cordon électrique
endommagé. Si le cordon électrique est endommagé,
VRQUHPSODFHPHQWGRLWrWUHHIIHFWXpSDUXQWHFKQLFLHQHQ
réparation qualifié au moyen d’un cordon de rechange
autorisé par le fabricant.
Lorsque vous éloignez votre réfrigérateur du mur, faites
attention à ne pas le faire rouler sur le cordon d’alimentation
afin de ne pas l’endommager.
BRANCHEMENTS ÉLECTRIQUES
AVERTISSEMENT
RISQUE DE CHOC ÉLECTRIQUE
Branchez l’appareil dans une prise triple avec terre.
Ne retirez pas la broche de terre.
N’utilisez pas d’adaptateur.
N’utilisez pas un cordon de rallonge.
Le non-respect de ces instructions peut entraîner des risques d’incendies, des chocs électriques ou la mort.
MISE AU REBUT APPROPRIÉE DE VOTRE ANCIEN RÉFRIGÉRATEUR
AVERTISSEMENT
RISQUE DE SUFFOQUER OU D’Y ÊTRE EMPRISONNÉ
Le non-respect de ces instructions d'élimination peut entraîner la mort ou des blessures graves.
IMPORTANT: Les enfants pris au piège ou morts d’asphyxie
sont toujours d’actualité. Les réfrigérateurs et congélateurs
DEDQGRQQpVVRQWWRXMRXUVDXVVLGDQJHUHX[PrPHVLRQ
n’attend que «quelques jours» pour s’en débarrasser. Si vous
ne gardez pas votre ancien réfrigérateur ou congélateur,
veuillez suivre les directives ci-dessous afin de prévenir les
accidents.
Avant de vous débarrasser de votre ancien appareil :
Ŷ'pPRQWH]OHVSRUWHVGXFRPSDUWLPHQWGHUpIULJpUDWLRQHWGX
compartiment de congélation.
Ŷ/DLVVH]OHVFOD\HWWHVHQSODFHDILQG¶HPSrFKHUOHVHQIDQWV
de grimper à l’intérieur.
Mise au rebut des produits réfrigérants et en mousse
Mettez l’électroménager au rebut conformément à la réglementation fédérale et locale. Le fluide frigorigène inflammable et le
matériel isolant utilisés nécessitent des procédures de mise au rebut spéciales. Communiquez avec les autorités locales pour
connaître la façon de mettre votre électroménager au rebut qui soit respectueuse de l’environnement.
INSTALLATION
AVERTISSEMENT
RISQUE D’EXPLOSION
Conservez les matériaux et vapeurs inflammables tels que l’essence à l’écart de votre réfrigérateur. Une explosion, un
incendie voire la mort pourrait en résulter.
La page charge ...
La page charge ...
La page charge ...
La page charge ...
La page charge ...
La page charge ...
La page charge ...
La page charge ...
La page charge ...
La page charge ...
La page charge ...
La page charge ...
La page charge ...
La page charge ...
La page charge ...
La page charge ...
La page charge ...
La page charge ...
La page charge ...
La page charge ...
La page charge ...
La page charge ...
La page charge ...
La page charge ...
La page charge ...
La page charge ...
La page charge ...
La page charge ...
-
 1
1
-
 2
2
-
 3
3
-
 4
4
-
 5
5
-
 6
6
-
 7
7
-
 8
8
-
 9
9
-
 10
10
-
 11
11
-
 12
12
-
 13
13
-
 14
14
-
 15
15
-
 16
16
-
 17
17
-
 18
18
-
 19
19
-
 20
20
-
 21
21
-
 22
22
-
 23
23
-
 24
24
-
 25
25
-
 26
26
-
 27
27
-
 28
28
-
 29
29
-
 30
30
-
 31
31
-
 32
32
-
 33
33
-
 34
34
-
 35
35
-
 36
36
-
 37
37
-
 38
38
-
 39
39
-
 40
40
-
 41
41
-
 42
42
-
 43
43
-
 44
44
-
 45
45
-
 46
46
-
 47
47
-
 48
48


GE GVS04BDWSS Le manuel du propriétaire
- Catégorie
- Cave à vin
- Taper
- Le manuel du propriétaire
dans d''autres langues
- English: GE GVS04BDWSS Owner's manual
- español: GE GVS04BDWSS El manual del propietario
Documents connexes
-
GE GWS04HAESS Le manuel du propriétaire
-
-
 GE Profile Series PWS06DSPSS Le manuel du propriétaire
-
GE PCR06BATSS Le manuel du propriétaire
-
-
GE Cafe Series PSE25KBLTS Le manuel du propriétaire
-
-
GE GSE25HEMDS Le manuel du propriétaire
-
 GE Profile Series PSE25KBLTS Le manuel du propriétaire

