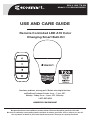
EcoSmart 1006 778 604 Remote Controlled LED A19 Color Changing Smart Bulb Kit Mode d'emploi
- Taper
- Mode d'emploi

Remote Controlled LED A19 Color
Changing Smart Bulb Kit
THANK YOU
We appreciate the trust and confidence you have placed in EcoSmart through the purchase of this bulb.
We strive to continually create quality products designed to enhance your home. Visit us online to see our full
line of products available for your home improvement needs. Thank you for choosing EcoSmart!
USE AND CARE GUIDE
SKU # 1006 778 604
Model # 11A19060WRGBW01
1-877-527-0313
HOMEDEPOT.COM/ECOSMART
Questions, problems, missing parts? Before returning to the store,
call EcoSmart Customer Service 8 a.m. - 7 p.m., EST,
Monday - Friday, 9 a.m. - 6 p.m., EST, Saturday

2
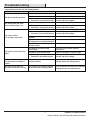
Table of Contents
Safety Information ................................... 2
Wireless Protocol..................................... 2
Warranty ..................................................2
Pre-Installation.........................................
Compatible Bluetooth Bulb Specication...
3
3
Quick Start Guide by Remote ................. 4
Operation ................................................. 4
Factory Default ....................................... 6
FCC Regulation ....................................... 6
Troubleshooting ...................................... 7
Safety Information
CAUTION:
Risk of Shock-Turn off power before
inspection, installation, or removal. Do not open.
There are no user serviceable parts inside.
WARNING: Only use the control provided with
lamp. This lamp will not operate properly when
connected to a standard (incandescent) dimmer
or dimming control.
WARNING: Not for use in totally enclosed
WARNING:
This equipment complies with FCC
radiation exposure limits set forth for an
uncontrolled environment.
WARNING:
This equipment should be installed
and operated with minimum distance of 20 cm
between the radiator and your body.
WARNING: For indoor use only. Do not use
where directly exposed to water.
WARNING: This device is not intended for use
with emergency exits.
Warranty
Wireless Protocol
Bulb is guaranteed to last 10 years based on 3 hours use per day, 7 days per week. The remote is guaranteed to
last 3 years based on 100 times use per day, 7days per week. The remote guarantee does not include normal wear
and tear and batteries. If this product does not last 3 years after date of purchase (based on above using condition)
due to a defect in materials or workmanship, please bring the defective product and a receipt indicating proof of
purchase to any Home Depot store. The Home Depot will provide a replacement or, at our discretion, a store credit
for the value of the original purchase price. This warranty will be voided for misuse of product per the caution
statement. Some states do not allow the exclusion of limitation or consequential damages, so the above exclusion
may not apply to you. This warranty gives you special legal rights and you may also have other rights that vary from
state to state and province to province. Please see a store for more details.
The Bluetooth word mark and logos are registered trademarks owned by Bluetooth SIG, Inc. and any use of such
marks by The Home Depot is under license. Other trademarks and trade names are those of their respective owners.
LIMITED WARRANTY

3 HOMEDEPOT.COM/ECOSMART
Please contact 1-877-527-0313 for further assistance.
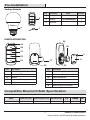
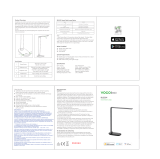
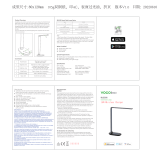
Pre-Installation
Package Contents
Part Quantity
1
RemoteB
A
1
Reset PinC 1
A
AA
BB
CC
DD
EE
II
JJ
GG
KK
HH
FF
GG
REMOTE INTRODUCTION
B
C
Part Description
AA Indicator Light
BB Remote ON/OFF
CC Dimmer
DD Customize White Light
EE Change Colors
Part Description
FF Plastic Battery Strip
GG Reset Button (Pinhole)
HH Battery CR2450 3V
II Screw
JJ Battery Cover
KK Groove to pry out the battery
A19 LED Bulb 11A19060WRGBW21
11A19060WRGBWR1
Description
Model Input Volts (AC) Input Frequency (Hz) Input Watts (W)
11A19060WRGBW21 120 9
Lumens
(LM) (LM/W)
800 88
CRI
9060
Model
Compatible Bluetooth Bulb Specication

4
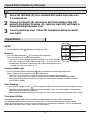
Quick Start Guide by Remote
Operation
NOTE: LED Bulb (A) and the remote (B) in the pack are already paired at the factory.
1
Press the Customize White Light button (DD) to customize your white light temperature.
There are two ways to change the white light temperature:
Short presses on the button change the white light temperature incrementally.
There are 5 color temperature options to choose from: 2700K-3500K-4500K-5500K-6500K.
Holding down the button continuously changes the color temperature with a smooth transition
from 2700K to 6500K.
□
□
□
□
□
□
□
Compatible Bluetooth bulbs can be purchased on Homedepot.com under SKU # 1006828294.
If a compatible bulb has been paired to a remote before, it must be unpaired from original remote
before it can be paired to a new one. See instructions for "Unpairing the LED bulb". To pair an additional
compatible LED bulb to your remote, follow the steps below.
□
□
□
Press the ON/OFF button (BB) to turn the light ON or OFF.
Press the dimming button(CC) to change the brightness.
There are two ways to change the brightness:
Short presses on the button change the brightness in a step manner.
There are 5 brightness levels to dim the light: 100% -75%-50%-25%-3%.
Holding down the button continuously will change the brightness with
a smooth transition from 100% to 3%.
ON/OFF
Dimming
Customize White Light
Remote On/Off
Dimmer
Change Colors
Customize White Light
One Remote Controls
up to 20 Lights
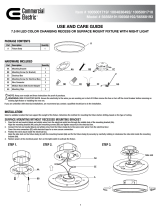
Pairing the LED Bulb
Screw the LED Bulb (A) into a standard E26 socket and make sure
it is powered on.
2Prepare the Remote (B) and remove the Plastic Battery Strip (FF)
beneath the Battery Covering (JJ), Indicator Light (AA) will begin to
blink indicating the power is on.
3You are good to go now! Follow the instructions below to control
your lights.
Short presses on the button change the color incrementally. There are 6 colors options to choose from:
Red-Yellow-Green-Cyan-Blue-Magenta.
Holding down the button continuously changes the color with a smooth transition from color to color.
Press the Color changes button (EE) to change the colors. There are two ways to change the colors:
Color Changing

5HOMEDEPOT.COM/ECOSMART
Please contact 1-877-527-0313 for further assistance.
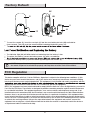
Unpairing the LED Bulb
Position the remote (B) within 2 inches of the LED Bulb.
Operation (continued)
□Turn the bulb on and hold the remote within 2 inches of the LED bulb.
□
□
□
□
□
until the LED Bulb (A) is detected.
NOTE: 1. The existing linked LED bulb may blink. If this occurs, press any button on the remote to stop
the blinking. Then proceed with repeating the linking process.
2. One remote controls up to 20 LED bulbs.
Press and hold the ON/OFF button (BB) and Dimming button (CC) at the same time for 3 seconds.
(B) will remain on for 3 seconds. This indicates that the LED bulb (A) and remote (B)
have been successfully linked.
AA
BB
CC
DD
EE
NOTE: Only one LED Bulb will be unpaired at a time. To unpair all the LED Bulbs simultaneously, reset all
the LED Bulb and remote by following the instructions in the factory default section of the instructions.
To unpair the LED Bulb with the remote, hold down the ON/OFF button (BB) and the Customize White Light
underway.
If you want to unpair a LED Bulb that was already paired with a remote,
you need to proceed to Step “Unpairing the LED Bulb” with original remote
and then proceed to Step “Pairing the LED Bulb” to pair it with the preferred
remote.
one
Reset to Factory Setting
□ Using the wall switch, physically switch ON and OFF 6 times within 5 seconds.
The LED bulb will show Red-Green-Blue gradient color and then ash twice after a successful reset.
□

6
II
JJ
GG
KK
HH
FF
B
GG
□
□
□
□
□
□
Factory Default
To reset the remote (B), insert the reset pin (C) into the reset button pin hole (GG) and hold for
three seconds. This will reset the remote without removing the battery cover (JJ).
The indicator light (AA) will blink twice fast indicating that the battery is low.
To replace the battery, remove the battery cover (JJ) with a screwdriver.
Replace the battery cover (JJ) on the remote (B) and tighten the screws (II).
FCC Regulation
This device complies with Part 15 of the FCC Rules. Operation is subject to the following two conditions: (1) this
device may not cause harmful interference, and (2) this device must accept any interference received, including
interference that may cause undesired operation. This equipment, if not installed and used in accordance with the
approved by the manufacturer could void the user's authority to operate the equipment.
NOTE: This equipment has been tested and found to comply with the limits for a Class B digital device, pursuant to
Part 15 of the FCC Rules. These limits are designed to provide reasonable protection against harmful interference
in a residential installation. This equipment generates, uses and can radiate radio frequency energy and, if not
installed and used in accordance with the instructions, may cause harmful interference to radio communications.
However, there is no guarantee that interference will not occur in a particular installation. If this equipment does
cause harmful interference to radio or television reception, which can be determined by turning the equipment off
and on, the user is encouraged to try to correct the interference by one or more of the following measures: reorient
or relocate the receiving antenna; increase the separation between the equipment and receiver; connect the
equipment into an outlet on a circuit different from that to which the receiver is connected; consult the dealer or
an experienced radio/TV technician for help.
NOTE:
Battery will weaken with age and should be replaced before leaking takes place as this will damage
the remote. Dispose of used batteries properly and keep them out of the reach of the children.

Troubleshooting
Troubleshooting: Control The LED Bulb by Remote
Problem Possible cause Solutions
The light cannot be turned on.
The power is off. Ensure the power supply is on.
The circuit breaker is off.
Ensure the circuit breaker is in the on position.
The remotedoes not work
and no indicator light is on.
Plastic battery strip (FF) is not removed.
□
□
Remove plastic strip (FF).
The battery power is off.
The battery is not installed correctly.
Make sure the battery CR2450 is installed
correctly and still has power.
The remote cannot
pair the light successfully.
Plastic battery strip (FF) isnotremoved.
Remove plastic battery strip (FF).
□
□
The battery power is off.
The battery is not installed correctly.
Make sure the battery CR2450 is installed
correctly and still has power.
The devices need more time to
respond. Wait a second and try again.
Remote has been linked with 20
LED Bulb and has reached the max limit.
The LED Bulb has been linked with
another remote.
Reset light to factory default.
The remote cannot control the
lights.
LED Bulb has not been linked
successfully.
Please refer to the solutions above for
pairing issues.
The light is out of control range. Make sure the light is in control range.
The indicator is blinking
constantly after resetting the
remote.
The remote has been reset
to factory default.
Press any button to stop the indicator from
blinking. Repeat the linking process.
The remote fails to unpair the
light when the indicator is blinking.
The devices have failed to respond
to the steps of the unpairing process.
Press any button to interrupt the indicator
blinking and retry the unpair process.
Reset the remote and try again.
7
The light cannot be turned on.□
□
The battery power is off.
The battery is not installed correctly.
Make sure the battery CR2450 is installed
correctly and still has power.
□
□
The battery power is off.
The battery is not installed correctly.
Make sure the battery CR2450 is installed
correctly and still has power.
HOMEDEPOT.COM/ECOSMART
Please contact 1-877-527-0313 for further assistance.

Questions, problems, missing parts? Before returning to the store,
call EcoSmart Customer Service 8 a.m. - 7 p.m., EST,
Monday - Friday, 9 a.m. - 6 p.m., EST, Saturday
1-877-527-0313
HOMEDEPOT.COM/ECOSMART
Retain this manual for future use.

This device contains licence-exempt transmitter(s)/receiver(s) that comply with
Innovation, Science and Economic Development Canada’s licence-exempt RSS(s).
Operation is subject to the following two conditions:
(1) This device may not cause interference.
(2) This device must accept any interference, including interference that may cause
undesired operation of the device.
L'émetteur/récepteur exempt de licence contenu dans le présent appareil est
conforme aux
CNR d'Innovation, Sciences et Développement économique Canada applicables
aux appareils radio exempts de licence. L'exploitation est autorisée aux deux
conditions suivantes :
1)L'appareil ne doit pas produire de brouillage;
2)L'appareil doit accepter tout brouillage radioélectrique subi, même si le brouillage
est susceptible d'en compromettre le fonctionnement.
The portable device is designed to meet the requirements for exposure to radio
waves established by the ISED. These requirements set a SAR limit of 1.6 W/kg
averaged over one gram of tissue. The highest SAR value reported under this
standard during product certification for use when properly worn on the body.
L'appareil portable est conçu pour répondre aux exigences relatives à l'exposition
aux ondes radio électriques établies par l'ISED.Ces exigences fixent une limite de
SAR de 1,6 W/kg moyenne de plus d'un gram de tissu.La valeur SAR la plus élevée
signalée en vertu de cette norme pendant la certification du produit à utiliser
lorsqu'elle est correctement portée sur le corps.
-
 1
1
-
 2
2
-
 3
3
-
 4
4
-
 5
5
-
 6
6
-
 7
7
-
 8
8
-
 9
9


EcoSmart 1006 778 604 Remote Controlled LED A19 Color Changing Smart Bulb Kit Mode d'emploi
- Taper
- Mode d'emploi
dans d''autres langues
Autres documents
-
LEEDARSON 11PR38120RGBW Manuel utilisateur
-
 VOCOlinc DL2201 Manuel utilisateur
-
 VOCOlinc DL2202 Manuel utilisateur
-
Lutron Caseta Wireless In-Wall Dimmer Guide de démarrage rapide
-
Caseta Wireless In Wall Dimmer Mode d'emploi
-
 Commercial Electric 56568192-4PK Guide d'installation
-
Commercial Electric WRAP2C840IRMM Mode d'emploi
-
Targus AKB868 Mode d'emploi
-
Targus AKB873 Mode d'emploi
-
Home Decorators Collection 257-188-213-Y Manuel utilisateur


