Creative Blaster Modem Manuel utilisateur
- Catégorie
- Équipement musical supplémentaire
- Taper
- Manuel utilisateur
Ce manuel convient également à

Sound Blaster
®
Wireless Receiver
User’s Guide

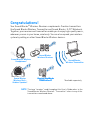
Congratulations!
Your Sound Blaster
®
Wireless Receiver complements Creative transmitters
like Sound Blaster Wireless Transmitter and Sound Blaster X-Fi™ Notebook.
Together, your receiver and transmitter enable you to enjoy high-quality music,
wherever you are in your home, wirelessly. You can also expand your wireless
system by adding on other Sound Blaster Wireless devices.
NOTE
The term “receiver” used throughout this User’s Guide refers to the
Sound Blaster Wireless Receiver. “Transmitter” refers to any of the
transmitters mentioned above.
B
A
S
S
T
R
E
B
L
E
O
F
F
A
U
X
I
N
M
A
X
V
O
L
U
M
E
Sound Blaster
Wireless Rock -
Outdoor Speaker*
Sound Blaster Wireless
Headphones*
Creative GigaWorks
T20W Series II*
Sound Blaster
Wireless Transmitter
Sound Blaster
Wireless Receiver
*Available separately
Creative GigaWorks
T20W Series II*

About Your Receiver 2
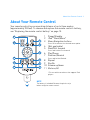
About Your Receiver
LINE
OUT
5V
DC
LINK /
CONNECT
7
6
8
9
4
5
1
2
3
1 Power/Standby and
Play/Pause button
Press to turn on.
Press and hold to enable Standby
mode.
2 Next/Fast forward button
Press and hold to Fast forward.
3 Previous/Rewind button
Press and hold to Rewind.
4 Infrared receiver
5 Power LED
See “Understanding the Power
LED” on page 14.
6 Line Out jack
7 RCA Audio Line Out jacks
8 [Link/Connect] LED
button
See “Understanding the Link LED”
on page 14.
9 5V DC In jack

About Your Remote Control 3
About Your Remote Control
Your remote control has an operating distance of up to three meters
(approximately 9.8 feet). To remove and replace the remote control’s battery,
see “Replacing the remote control battery” on page 15.
RM-820
1
2
4
5
6
7
8
9
11
10
3
1 Power/Standby
2iPod
®
Back/Menu*
3 Menu Navigation buttons
Press OK to execute the selected menu option.
4 (Not applicable)
5Next/Fast forward
Press and hold to Fast forward.
6 Play/Pause
7 Previous/Rewind
Press and hold to Rewind.
8 Repeat
9 Shuffle
10 Volume up/down
11 Mute on/off
* For use with transmitters that support iPod
players.
NOTE
The battery is included. Remove the plastic strip
before using the remote control.

Setting Up Your Receiver 4
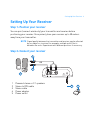
Setting Up Your Receiver
Step 1: Position your receiver
You can pair (connect wirelessly) your transmitter and receiver before
positioning your receiver. Once paired, place your receiver up to 30 meters
away from your transmitter.
Step 2: Connect your receiver
NOTE
Signal quality between the transmitter and receiver may be affected
by any object or structure (for example, multiple walls) that is
between the units. Experiment with different positions if necessary.
LINK/
CONNECT
5v DC
LINE
OUT
OR
4 5
2
3
1
1 Powered stereo or 2.1 speakers
2 Stereo to RCA cable
3 Stereo cable
4 Power adapter
5 Power outlet

Enable wireless control for your transmitter 5
Step 3: Enable wireless control for your transmitter
For Sound Blaster Wireless Transmitter
The device’s wireless features are enabled by default. If not, refer to its
documentation to enable it.
For Sound Blaster X-Fi Notebook
Follow these steps to enable the device’s wireless features:
1 Launch Entertainment Mode. To do this, click Start -> Programs ->
Creative -> Sound Blaster X-Fi Notebook -> Creative Console Launcher.
2 Click the Wireless Music Control button.
3 Select the Enable Wireless Music Control check box.
The device’s Link LED lights up green.
1
2 3
CONNE
CT
POWER

Turn on your receiver and Auto Pair 6
Step 4: Turn on your receiver and Auto Pair
Your transmitter and receiver pair (connect wirelessly) automatically when
turned on. The Link LED, at the back of the receiver, flashes and then lights up
green when pairing is successful.
NOTE
If your transmitter and receiver do not pair, simply reset them. On
one unit at a time, press and hold the Connect button for five
seconds.
5V
DC
LINK /
CONNECT
5V
DC
LINK /
CONNECT
RM-820

Play and stream music from transmitter 7
Step 5: Play and stream music from transmitter
Play music on your transmitter and broadcast music to your receiver.
Setting Up Two or More Receivers
Repeat Steps 1 to 2 in “Setting Up Your Receiver” on page 4. In Step 4, turn on
all your receivers. Your receivers pair automatically with your transmitter, and
you can start playing music on all your receivers.
B
A
S
S
T
R
E
B
L
E
O
F
F
A
U
X
I
N
M
A
X
V
O
L
U
M
E
C
O
N
N
E
C
T
P
O
W
E
R
OR

Manual Pairing 8
Manual Pairing
This section shows you how to pair your transmitter manually with two to four
receivers. If you wish to use zone control, you must pair your units manually.
For more information about broadcasting and zone control, see “Using Your
Wireless Features” on page 11.
Only the first four manually paired receivers will be assigned to a wireless
zone. Each manually paired receiver will be assigned to the next available zone.
Step 1: Press the Connect button on your transmitter
With your transmitter and receivers turned on, press the Connect button on
your transmitter. Alternatively, you can click the Connect button in the
transmitter software installed. The transmitter’s Link LED flashes.
CONNECT
P
O
W
E
R
C
O
N
N
E
C
T
P
O
W
E
R
CONNECT
P
O
W
E
R
OR
CONNECT
Sound Blaster
X-Fi Notebook
Sound Blaster
Wireless
Transmitter

Press the Connect button on your first receiver 9
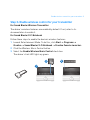
Step 2: Press the Connect button on your first receiver
This must be done within three minutes after pressing the Connect button on
the transmitter (Step 1). Once the transmitter and receiver are paired
successfully, the Link LED on both units light up green and remain on. The first
receiver to be paired will be assigned to Zone 1.
IMPORTANT
DO NOT press the Connect button repeatedly on your transmitter
or receiver before a pairing process is complete or else you may
not be able to perform the correct zone assignment for your
receivers.
5V DC
LINK /
CONNECT
5V DC
LINK /
CONNECT

Press the Connect button on your transmitter again 10
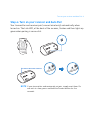
Step 3: Press the Connect button on your transmitter again
The transmitter’s Link LED flashes. Refer to the diagram in Step 1.
Step 4: Press the Connect button on your second receiver
Refer to the diagram in Step 2. Once the transmitter and receiver are paired
successfully, the Link LED on both units light up green and remain on. Repeat
the steps to pair your third and fourth receivers (if applicable) manually.
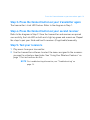
Step 5: Test your receivers
1 Play music from your transmitter.
2 Use the transmitter software to select the zones assigned to the receivers
you want to activate or deactivate. See “Using Your Wireless Features” on
page 11 for instructions do this.
NOTE
For troubleshooting information, see “Troubleshooting” on
page 16.

Using Your Wireless Features 11
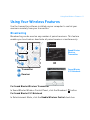
Using Your Wireless Features
Use the transmitter software installed on your computer to control your
receivers remotely from your transmitter.
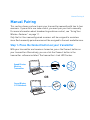
Broadcasting
Broadcasting can be used on any number of paired receivers. This feature
enables you to activate or deactivate all paired receivers simultaneously.
For Sound Blaster Wireless Transmitter
In Sound Blaster Wireless Control Panel, click the Broadcast button.
For Sound Blaster X-Fi Notebook
In Entertainment Mode, click the Enable Wireless Control check box.
R
R
R
R
T
T
R
OR
Transmitter
Receiver
Sound Blaster
X-Fi Notebook
Sound Blaster
Wireless
Transmitter

Using Your Wireless Features 12
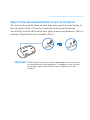
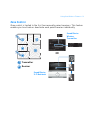
Zone Control
Zone control is limited to the first four manually paired receivers. This feature
enables you to activate or deactivate each paired receiver individually.
OR
R1
R2
R3
R4
T
T
R
Transmitter
Receiver
Sound Blaster
X-Fi Notebook
Sound Blaster
Wireless
Transmitter

Using Your Wireless Features 13
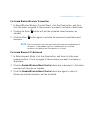
For Sound Blaster Wireless Transmitter
1 In Sound Blaster Wireless Control Panel, click the Zone button, and then
click the zones assigned to the receivers you want to activate or deactivate.
2 Clicking the Zone button will put the activated zones/receivers on
standby.
3 Click the Zone button again to activate the previously selected zones/
receivers.
For Sound Blaster X-Fi Notebook
1 In Entertainment Mode, click the Zone button, and then click the zone
number buttons (1 to 4) assigned to the receivers you want to activate or
deactivate.
2 Click the Enable Wireless Music Control check box to deselect it. Activated
receivers will then be on standby.
3 Click the Enable Wireless Music Control check box again to select it.
Previously selected receivers will be activated.
NOTE
Your transmitter can only save and reactivate one combination of
receivers. It remembers the last combination of activated
receivers just before the Zone button is clicked.

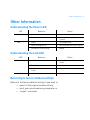
Other Information 14
Other Information
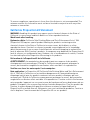
Understanding the Power LED
Understanding the Link LED
Returning to factory default settings
Return to the factory default settings if you want to
• revert to the original volume setting,
• reset your zone numbering sequence, or
• “unpair” a receiver.
LED Behavior Status
White Stable Turned on and ready for use
Continuous slow flashing Not detecting any signal or signal
is weak
Red Stable In Standby mode
Quick flashing (twice) Receiving remote control signals
Continuous slow flashing Muted
LED Behavior Status
Green Stable Paired (Turned on / In Standby
mode)
Flashing Pairing in progress
Quick flashing (twice) -> Not lit ->
Stable
Wireless reset
Not lit – Connection lost

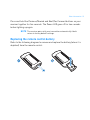
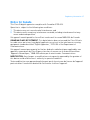
Other Information 15
Press and hold the Previous/Rewind and Next/Fast forward buttons on your
receiver together for five seconds. The Power LED goes off for two seconds
before lighting up again.
Replacing the remote control battery
Refer to the following diagram to remove and replace the battery (when it is
depleted) from the remote control.
NOTE
The receiver pairs with your transmitter automatically if both
return to factory default settings.
1
2

Troubleshooting 16
Troubleshooting
Here are some tips if you encounter these problems.
There is no sound from the speakers that are connected to the
receiver.
Check the following:
• The Connect LEDs are lit up. Else see the following troubleshooting tip.
• The receiver is connected to the power outlet and turned on.
• The speaker system’s power is turned on.
• You have connected the speakers to your receiver correctly.
• The receiver volume is not muted.
The wireless connection does not seem to work.
The Connect LEDs do not light up.
The signal from the transmitter may be weak or the receiver has lost its
connection with the transmitter.
Try the following:
• Move your transmitter and receiver closer to each other.
• Reposition your transmitter or receiver so that there are fewer objects (for
example, multiple walls or large metal structures) between them.
• Make sure your transmitter and receiver are not placed on metal surfaces.
• Reset the wireless connection. Press and hold the receiver’s Connect button
for five seconds.
• Disconnect the transmitter and receiver from the power source. Then
reconnect them again and reset the wireless connection.

Troubleshooting 17
My receiver seems to be picking up extra noise, or there are
intermittent pauses.
The position of your Sound Blaster Wireless devices as well as signals from
other wireless routers or Bluetooth equipment may affect the quality of the
transmissions.
Try the following:
• In Sound Blaster Wireless Control Panel, change the RF Channel from Auto
to either Ch 1, 2 or 3.
• Place your transmitter and receivers closer to each other.
• Place your transmitter away from other devices that transmit wireless
signals, and away from large metal surfaces.
• Reposition your devices so that there are fewer objects (for example,
multiple walls or large metal structures) between them.
• Set your wireless LAN router's channel to Auto, 1 or 11. To do this, refer to
your router's user documentation.
• Refrain from doing large file transfers via the wireless internet or Bluetooth
connection while you are streaming music. Alternatively, stop streaming
music during intensive file transfers.
I have two Sound Blaster Wireless transmitters. My receiver is
receiving the incorrect transmission.
Your receiver may be alternating transmissions between the transmitters.
Manually pair your receivers. See “Manual Pairing” on page 8.

Troubleshooting 18
My remote control is not responding.
• Your remote control’s battery may have depleted. To remove and replace the
battery, see “Replacing the remote control battery” on page 15.
Also check the following:
• You have installed the transmitter software.
•In the Remote Control Settings application, ensure that the Enable control
of Windows Application check box is selected. To launch this application,
click Start -> All Programs -> Creative -> Remote Control Settings.
• The media player that you are using must be the highlighted window for the
playback functions to work.
I need to change the wireless zone numbers of my receivers.
Do the following:
i. Return the receivers to factory default settings. See “Returning to
factory default settings” on page 14.
ii. Manually pair the receivers. Follow the steps in “Manual Pairing” on
page 8.
All kinds of sounds from my computer are transmitted to the
receiver.
Your transmitter streams all sounds from your computer to the receiver,
including sounds from other programs, as well as system sounds and alerts.
Disable these sounds, or close programs that generate unwanted sounds.

Troubleshooting 19
(For Sound Blaster X-Fi Notebook only)
When I switch my recording source from Mic In to Line In in
Entertainment Mode, the wireless connection is lost.
When the recording source is changed to Mic In, wireless music control is
automatically disabled so that input from the microphone (for example, a
private internet voice conversation) will not be unintentionally streamed to all
paired receivers. After changing the recording source back to Line In, you must
enable the wireless features again in Entertainment Mode.
La page est en cours de chargement...
La page est en cours de chargement...
La page est en cours de chargement...
La page est en cours de chargement...
La page est en cours de chargement...
La page est en cours de chargement...
La page est en cours de chargement...
La page est en cours de chargement...
La page est en cours de chargement...
-
 1
1
-
 2
2
-
 3
3
-
 4
4
-
 5
5
-
 6
6
-
 7
7
-
 8
8
-
 9
9
-
 10
10
-
 11
11
-
 12
12
-
 13
13
-
 14
14
-
 15
15
-
 16
16
-
 17
17
-
 18
18
-
 19
19
-
 20
20
-
 21
21
-
 22
22
-
 23
23
-
 24
24
-
 25
25
-
 26
26
-
 27
27
-
 28
28
-
 29
29


Creative Blaster Modem Manuel utilisateur
- Catégorie
- Équipement musical supplémentaire
- Taper
- Manuel utilisateur
- Ce manuel convient également à
dans d''autres langues
- English: Creative Blaster Modem User manual
Documents connexes
-
Creative Blaster Modem Manuel utilisateur
-
Creative Labs SOUND BLASTER WORLD OF WARCRAFT HEADSET - Manuel utilisateur
-
-
-
-
-
Creative Labs BLASTER TRANSMITTER Manuel utilisateur
-
-
-
