Orbit B-hyve Manuel utilisateur
- Catégorie
- Minuteries électriques
- Taper
- Manuel utilisateur
Ce manuel convient également à

Welcome to
SMART WIFI
INDOOR SPRINKLER TIMER
Scan for more
information
bhyve.orbitonline.com
Quick
Start
Guide
Compatible with other B-hyve products
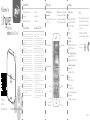
Contents in the Box The B-hyve™ App Specifications
FCC and ICStatement Déclaration de FCC et l’IC
This device complies with Part of the FCC Rules and Industry Canada
license exempt RSS standards. Operation is subject to the following two
conditions: () This device may not cause harmful interference, and () this
device must accept any interference received, including interference that
may cause undesired operation.
FCC Warning: Any changes or modifications not expressly approved by
the party responsible for compliance could void the user’s authority to
operate this equipment.
Note: This equipment has been tested and found to comply with the
limits for a Class B digital device, pursuant to Part of the FCC Rules.
These limits are designed to provide reasonable protection against
harmful interference in a residential installation. This equipment
generates, uses, and can radiate radio frequency energy and, if not
installed and used in accordance with the instructions, may cause
harmful interference to radio communications. However, there is no
guarantee that interference will not occur in a particular installation. If
this equipment does cause harmful interference to radio or television
reception, which can be determined by turning the equipment off and on,
the user is encouraged to try to correct the interference by one of the
following measures:
• Reorient or relocate the receiving antenna.
• Increase the separation between the equipment and the receiver.
• Connect the equipment into an outlet on a circuit different from that to
which the receiver is connected.
• Consult the dealer or an experienced radio⁄TV technician for help
This device meets the FCC and IC requirements for RF exposure in
public or controlled environments. The end user is advised to maintain
a distance of cm from the controller and any personnel to ensure
compliance with RF exposure regulations.
This Class B digital apparatus complies with Canadian ICES-
Cet appareil est conforme à la section de la Règlementation de la FCC
et la norme RSS d’Industry Canada.
Son fonctionnement est soumis aux deux conditions suivantes: () cet
appareil ne doit pas causer d’interférences nuisibles, et () cet appareil
doit tolérer toutes les interférences, dont les interférences pouvant
causer un fonctionnement non désiré. Cet appareil numérique de classe
B est conforme à la norme canadienne ICES-.
Remarque: cet appareil été testé et déclaré conforme aux limites
d’exposition pour les appareils numériques de classe B, selon la section
de la Règlementation de la FCC. Ces limites sont conçus pour fournir
une protection raisonnable contre les interférences nuisibles dans une
installation résidentielle. Cet appareil produit, utilise et peut émettre
de l’énergie radio fréquence et, si elle n’est pas installée et utilisée
conformément aux instructions, peut causer des interférences nuisibles
aux communications radio. Cependant, il n’est pas garantie que des
interférences ne se produisent pas dans une installation particulière.
Si cet appareil cause des interférences gênantes à la réception d’un
signal radio ou de télévision, ce qui peut être déterminé en allumant et
en éteignant l’appareil, l’utilisateur peut corriger les interférences en
suivants une des mesures suivantes :
• Réorientez ou repositionnez l’antenne de réception.
• Augmentez la distance entre l’appareil et le récepteur.
• Branchez l’appareil dans une prise sur un circuit différent du circuit sur
lequel le récepteur est branché.
• Consulter le revendeur ou un technicien radio⁄TV expérimenté pour
obtenir de l’aide.
Cet appareil est conforme aux exigences de la FCC et de l’IC concernant
l’exposition aux ondes dans un environnement public ou contrôlé. Il
est conseillé à l’utilisateur final de maintenir une distance de cm du
contrôleur pour assurer la conformité aux réglementations d’exposition
RF. Information de conformité pour le Canada
Install the B-hyve™ app on
your smart device
You will need a smart device to connect the
timer to Wi-Fi.
Note: The app will guide you through initial
set up of your sprinkler timer. In addition,
there are help icons throughout the app
with more information and useful tips.
Wi-Fi Indoor Sprinkler Timer
Screwdriver
Mounting Screws and Anchors
Transformer
Quick Start Guide
Conduit Cover
Timer Connected Symbol
Rain Delay
Calendar
Programs
Remote Control
or Home Button
Zone List
- rC
Settings
Next Zone
Stop Watering
Running Status⁄Messaging
Weather⁄Temp.
Transformer ratings:
Input:
Australia—V AC ⁄Hz W
Europe—V AC ⁄Hz W
USA—V AC Hz W
Output:
V mA
Timer ratings:
Input/Output:
AUS & EU—V AC mA ⁄ Cycle
USA—V AC mA Hz
Timer Temperature Operating Range:
Operating: -° F (–° C)
Storage & transport: -–° F (-–° C)
Timer Humidity Operating Range:
Operating: –%
Storage & transport: –%
Altitude:
,' (, meters)
Installation Class II
Over Voltage Category II
This timer works with any standard V
irrigation solenoid.
The internal fuse is non-replaceable.
Help
If the app and the website don’t have what
you’re looking for, please call our technical
support line before returning this sprinkler
timer to the store.
--- or ---
www.orbitonline.com | bhyve.orbitonline.com
Acts as a hub for other
B-hyve™ products

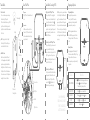
Timer Installation Connect Valve Wires
Select a location
Choose a location near power and away
from direct sunlight, if possible.
This location should also have a good Wi-Fi
signal. You can check this using a smart
phone. (Find a location that has a minimum
of two bars)
Note: If replacing a timer, it is helpful
to take a photo of the wires before you
remove them from the old timer.
Mount the timer
Install a screw (included) into the wall.
Use the expanding anchors (included) for
plaster, masonry or drywall installations.
Hang the timer on the installed screw using
the keyhole slot. Level the timer and use
the second screw in one of the preformed
mounting holes to secure the timer.
Prepare wire
Strip ⁄" ( mm) of insulation from each
wire.
Connect wires
Attach one wire from each valve to a
“Common” (COM) wire and the other
wires to a numbered terminal (only one
wire per terminal.)
Minimum Signal
Keyhole
Pre-formed
Mounting Holes
Loosen Screw
Strip Wire
Push In
Tighten Screw
⁄" ( mm)
No. Screw
Wall
FOR OPTIMUM TIMER
PERFORMANCE, CONNECT
TO WIFI TO RECEIVE THE
LATEST TIMER UPDATES.
Timer Installation–Connecting to Wi-Fi Programming and Operation
Plug in your Orbit® B-hyve™ timer
Once your B-hyve™ timer is plugged into
the power source, it will automatically look
to pair with your smart device. The
will begin to blink blue. This indicates that
your timer is ready to pair with your smart
device. Ensure that your smart device has
Bluetooth® turned on.
Connect to your Orbit® B-hyve™ timer
Open your B-hyve™ app, create an account
or login, and follow the step-by-step
process to add and set up your device. The
B-hyve™ app will connect to your device
and you will, then, be guided to connect to
your home Wi-Fi network.
Connect to your Wi-Fi network
Select your network from the list and enter
the password for the network to connect
your timer to your Wi-Fi signal. When
connected, the will illuminate solid
white indicating a successful pairing.
Programming the timer
The app has help screens and video
to assist you with Wi-Fi connections,
programming, smart watering and other
general questions you may have.
Note: Your programmed schedules are
stored both in the app and on the timer.
Watering will continue, if Wi-Fi connection
is lost.
Manual Operation
All programming and full functionality of
the timer are available in the B-hyve™ app.
If you have the need, there are some
basic operations you can perform directly
at your timer.
Note: If you do not see your network name
in the list, tap the refresh button in the
app. If your network name still does not
appear, tap “Advanced” in the app and
enter your network name and password.
This device will only connect through 2.4
GHz Wi-Fi networks. 5.0 GHz networks
are not supported and will not appear in
your app.
Function Button Press
MANUAL WATERING
Hold until (water ALL stations) appears, then release.
Quickly press again until desired station appears.
Default watering is 10 min. per station.
CANCEL STATION Press
once to cancel current station.
RAIN DELAY
Set in app;
blinks yellow and appears.
ON/OFF Hold
for 10 sec. until turns white.
HARD RESET Quickly press
5 times.
-
 1
1
-
 2
2


Orbit B-hyve Manuel utilisateur
- Catégorie
- Minuteries électriques
- Taper
- Manuel utilisateur
- Ce manuel convient également à
dans d''autres langues
- English: Orbit B-hyve User manual
Documents connexes
-
Orbit B-hyve Guide de démarrage rapide
-
-
Orbit 21004 Mode d'emploi
-
Orbit 21005 Bluetooth Hose Faucet Timer Mode d'emploi
-
Orbit 57985 Mode d'emploi
-
-
-
-
Orbit 61015 Mode d'emploi
-