
GUIDE D’UTILISATION/ USER GUIDE
GEBRUIKSGIDS /
ﻝﺎﻤﻌﺘﺳﻹﺍ ﻞﻴﻟﺩ
BBP200 FR

BBP200 FR
BeeWi SmartPad application:

User’s guide
4
9
14
20
FRANCAIS
ENGLISH
NEDERLANDS
ﺔﻴﺑﺮﻌﻟﺍ

4
FRANÇAIS
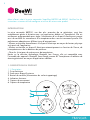
INTRODUCTION
La prise connectée BBP200, une des plus avancées de sa génération, peut être
complètement gérée à distance avec une application dédiée sur Smartphone. Elle est
entièrement programmable pour régler l’alimentation d’un dispositif électrique et permet
aussi de contrôler les mouvements et la température dans son environnement proche. Elle
parfaitement adaptée pour différent types d’automatismes :
- Allumer ou éteindre manuellement un dispositif électrique au moyen du bouton physique
ou à partir de l’application
- Allumer ou éteindre un dispositif électrique automatiquement en fonction de l’heure, de
la température ou de la détection de présence
- Gérer les historiques de présence ou de température
Basée sur la dernière technologie Bluetooth Low Energy, elle est compatible avec
l’ensemble des appareils Bluetooth Smart Ready comme les Smartphones et tablettes de
récente génération au moyen d’applications dédiées.
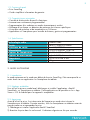
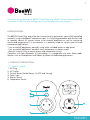
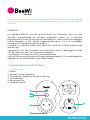
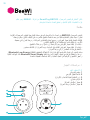
1. DESCRIPTION DU PRODUIT
1.1. Description
1. Prise électrique
2. Socle pour dispositif externe
3. Bouton de contrôle (Alimentation du socle et appairage)
4. Indicateur lumineux
5. Capteur de mouvement
6. Capteur de température
Merci d’avoir choisi la prise connectée SmartPlug BBP200 de BEEWI. Veuillez lire les
instructions suivantes afin de configurer et utiliser au mieux votre produit.
1
5
2
6
4
3

5
FRANÇAIS
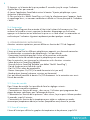
1.2. Contenu du pack
• Prise SmartPlug
• Guide simplifié et information de garantie
1.3. Caractéristiques principales
• Contrôle à distance des dispositifs électriques
• Automatismes entièrement programmables
• Programmation d’un radiateur en modes économique et confort
• Allumage d’une lampe sur détection de présence ou à heures spécifiques
• Historiques de présence et de température sur 24 heures
• Application sur Smartphone pour contrôle à distance, gestion et programmation
1.4. Spécifications
2. MODE AUTONOME
2.1. Introduction
Le mode autonome est le mode par défaut de la prise SmartPlug. Cela correspond à un
accès local via une application sur Smartphone ou tablette.
2.2. Réglages préalables
Pour utiliser la prise en mode local, télécharger et installer l’application « BeeWi
SmartPad » sur Smartphone ou tablette. Cette application est disponible sur les « App
Stores » iOS & Android pour les appareils compatibles.
2.3. Appairage
Avant d’utiliser la prise, il est nécessaire de l’apparier en mode sécurisé avec le
Smartphone ou la tablette. De cette manière, seuls les Smartphones ou tablettes autorisés
pourront adresser et commander la prise.
1) Télécharger et installer l’application BeeWi SmartPad
2) Brancher la prise dans le socle mural. L’indicateur clignote une fois par seconde.
Technologie radio Bluetooth Smart
Portée Classe 2, jusqu’à 30 mètres
Puissance de sortie Max 16A, 3600 W
Alimentation 100-250V Alternatif, 50-60 Hz
Capteur de température +/- 1°C de -25° à +85°C
Capteur de mouvement Angle de 100°, distance 5 mètres
Dimensions L124 x l76 x H36.5 mm
Poids 170 g

6
FRANÇAIS
3) Appuyer sur le bouton de la prise pendant 2 secondes jusqu’à ce que l’indicateur
clignote deux fois par seconde..
4) Lancer l’application SmartPad et activer le bouton “Ajouter périphérique » pour
rechercher le périphérique.
5) Dès que la prise « BeeWi SmartPlug » est listée, la sélectionner pour l’apparier. Après
un appairage réussi, un nouveau cartouche est affiché sur l’écran principal et l’indicateur
s’éteint.
2.4. Restauration
La prise SmartPlug peut être restaurée à l’état initial incluant le firmware usine. Pour
restaurer le firmware usine et supprimer les données d’appairage ou d’utilisation,
appuyer sur le bouton tout en branchant la prise sur un socle mural. La restauration est
confirmée par l’indicateur clignotant rapidement pendant quelques seconds.
3. UTILISATION DE L’APPLICATION
Attention: certaines opérations peuvent différer en fonction de l’OS de l’appareil.
3.1. Ecran principal
L’écran principal liste les différents périphériques appariés sous forme de cartouches.
En sélectionnant un cartouche de périphérique, il est possible de :
- Reconnecter le périphérique dans le cas où la connexion a été perdue
- Accéder à l’écran de contrôle lorsque le périphérique est connecté
Dans le cartouche, vous trouverez les informations et les fonctions suivantes:
- Icône de la prise SmartPlug (éditable)
- Nom de la prise SmartPlug (éditable, par défaut “BeeWi SmartPlug”)
- Etat de la connexion et barre de signal
- Etat On/Off et valeur de température
- Bouton interrupteur On/Off (si le mode thermostat n’est pas actif)
- Mode présent (manuel, présence, minuteur ou thermostat)
Il est possible de contrôler le bouton On/Off directement sur le cartouche sans ouvrir
l’écran de contrôle.
3.2. Ecran de contrôle
Dans l’écran de contrôle il est possible de faire les réglages suivants :
- Commutation manuelle uniquement
- Commutation en fonction du temps : dans ce cas, l’utilisateur peut programmer des
plages de temps spécifiques pour l’allumage de la prise.
- Commutation en fonction de la présence : dans ce cas, la prise peut s’allumer pendant
5 secondes jusqu’à 5 minutes.
- Commutation en fonction de la température pour régler un radiateur en modes
économique (température réduite) et confort (température max) durant la journée.
3.3. Ecran d’historiques
L’écran d’historiques affiche les graphes de température et de présence jusqu’à 24

7
FRANÇAIS
heures. Les graphes peuvent être ajustés sur différente périodes en cliquant dessus :
- Température : 24, 12 ou 6 H
- Présence : 24, 12, 6, 3 ou 1H
Noter que la température est affichée avec une précision de 1°C et la présence par
plage de 10 minutes.
3.4. Ecran d’édition
L’écran d’édition permet l’édition de certains détails de la prise SmartPlug tels que
le nom ou l’icône. Cet écran inclus aussi d’autres réglages tells que les fonctions
d’enregistrement de la présence.
L’écran d’édition inclus aussi l’information de version du firmware et un bouton de mise
à jour qui apparait dans le cas où un nouveau firmware est disponible. Pour mettre à
jour le firmware, presser simplement le bouton “Mise à jour” puis confirmer l’action et
attendre environ 6 minutes la fin de la mise à jour.
4. MODE DISTANT
4.1. Introduction
La prise SmartPlug peut aussi être contrôlée à distance en utilisant une passerelle internet
dédiée. Pour plus de renseignements consultez notre site web : www.bee-wi.com.
Dans ce cas, il est nécessaire d’utiliser une application web différente comme décrit dans
le manuel de la passerelle BeeWi.
4.2. Appairage
Pour enregistrer la prise sur le réseau HomeBee, il est nécessaire de l’appairer de manière
sécurisée à la passerelle. Pour ce faire, suivre les étapes suivantes:
1) Brancher la prise dans le socle mural. L’indicateur clignote une fois par seconde.
2) Appuyer sur le bouton de la prise pendant 2 secondes jusqu’à ce que l’indicateur
clignote deux fois par seconde.
3) Appuyer sur le bouton de la passerelle pendant 1 seconde jusqu’à ce que l’indicateur
clignote deux fois par seconde pour initier l’appairage.
4) Dès que la prise est appariée avec succès à la passerelle, l’indicateur clignote une fois
par secondes et le nouveau périphérique s’affiche sur l’écran de l’application web.
4.3. Serveur Web
Aller sur le portail HomeBee en utilisant un navigateur internet ou l’application Web sur
Smartphone et tablette pour accéder au périphérique.
En utilisant le portail avec votre compte utilisateur, il est possible d’accéder à la plupart
des fonctions disponibles sur l’application SmartPad :
- Etats de la prise SmartPlug : On/Off, valeur de température et mode programmé.
- Réglages des actions: activation de la prise manuellement ou selon les heures
programmées.
- Réglages des alertes : envoi d’une alerte par email en cas de présence détectée ou de
niveau spécifique de température.
- Visualisation des graphes d’historique de présence ou de température.

8
FRANÇAIS
5. PRECAUTIONS ET EXCLUSIONS DE GARANTIE
5.1. Entretien du produit
• Utiliser le produit en intérieur uniquement.
• Eviter d’exposer le produit à des températures extrêmes, au-delà de 45°C ou en-deçà
de -10°C pour conserver un fonctionnement et des performances optimales.
• Ne pas exposer le produit à l’humidité ou la moisissure.
• En cas de non utilisation prolongée, entreposer le produit dans un endroit sûr.
5.2. Dommages non couverts par la garantie standard
• Dommages causés par une utilisation inadéquate du produit, notamment choc, chute,
exposition à des températures extrêmes, à la poussière ou l’humidité ou autres causes.
• Dommages résultant du non-respect des instructions du constructeur.
• Dommages cosmétiques tels que, éraflures, traces de colles ou autres changement fait
au produit.
• Dommages consécutifs au démontage du produit ou à une tentative de réparation par
du personnel non autorisé.
Copyright et autres informations
BEEWI est une marque déposée. Les autres marques mentionnées ci-après appartiennent
à leurs propriétaires. Les autres noms de produit ou de service utilisés sont la propriété de
leurs détenteurs respectifs.
L’utilisation d’appareils sans fil et de ses accessoires peuvent être interdite dans certains
endroits. Toujours respecter les réglementations et lois en vigueur.
Ce produit est couvert par une garantie de deux ans s’appliquant à compter de la date
d’achat du matériel. Les utilisateurs n’ont pas l’autorisation de faire quelque changement
ou modification que ce soit. Tout changement ou modification non expressément approuvé
annule la garantie.
Veuillez visiter notre site web www.bee-wi.com pour plus d’information.
Support technique: suppor[email protected].
© OTIO, 2016.
OTIO - SAS, 719 rue Albert Camus - 31190 Auteriv France

9
ENGLISH
INTRODUCTION
The BBP200 Smart Plug, one of the most innovative of its generation, can be fully controlled
remotely using a dedicated Smartphone app. It is fully programmable and can be used
to remotely control AC power source to an external appliance as well as monitoring
motion and temperature in its environment. It is perfectly suited for various types of home
automation applications:
- Turn on and off appliances manually using either included button or app button
- Turn on and off appliances based on time, temperature or motion events
- Monitor histories such as motion events and temperature curves
Compliant with latest Bluetooth 4.0 technology, it is compatible with other Smart ready
devices such as Smartphones and Tablets by means of dedicated applications.
1. PRODUCT DESCRIPTION
1.1. Product Outlook
1. AC Plug
2. AC Socket
3. Control Button (Socket Power On/Off and Pairing)
4. Status Light
5. Motion Sensor
6. Temperature Sensor
Thank you for purchasing the BBP200 SmartPlug from BEEWI. Please read the following
instructions to learn how to configure and use more effectively your product
1
5
2
6
4
3

10
ENGLISH
1.2. Package Content
• SmartPlug
• Quick Start Guide and other info
1.3. Main features
• Remote control your electric appliances
• Fully programmable
• Program your heater to get comfort temperature when you are present
• Switch on a light when you come through or at specific hours
• Get the history of presence and temperature
• Smartphone App support for remote control, monitoring and programming features
1.4. Specifications
2. STANDALONE MODE
2.1. Introduction
The standalone mode is the default mode for SmartPlug. This corresponds to the local
access via a Smartphone or Tablet app.
2.2. Initial Settings
To use SmartPlug in standalone mode, first download and install the “BeeWi SmartPad”
application on Smartphone or Tablet devices. This app is available on the app stores for
compatible iOS and Android devices.
2.3. Pairing
Before using SmartPlug, it is necessary to securely pair the Smartphone and SmartPlug.
This way, only authorized Smartphone or Table will be able to access the Plug.
1) Download the BeeWi SmartPad app.
2) Plug SmartPlug into a wall socket. The LED will flash once by second.
3) Press SmartPlug button for 2 seconds until the LED flashes twice per second.
Radio technology Bluetooth Smart
Range Class 2, up to 30 meter typical
Output Power Ratings 16A max, up to 3600 W
Power Ratings Input : AC 100-250V, 50-60 Hz
Temperature sensor +/- 1° C from -25° to +85°C
Motion sensor 100° radius, up to 5 meters
Dimensions L124 x W76 x H36.5 mm
Weight 170 g

11
ENGLISH
4) Open the app and press “Add Peripheral” to look for your peripheral and initiate
pairing.
5) Once “BeeWi SmartPlug” is listed, select it to pair it. After successful pairing, a new box
is showing in the app home screen and the LED will turn off.
2.3. Restauration
SmartPlug can be restored in factory preset state including factory firmware version. To
restore the firmware and delete all pairing or status user data, just press the button whilst
plugging SmartPlug into a wall socket.
Restoration is confirmed by means of the Led indicator blinking quickly for a few seconds.
3. USING THE APP
3.1. Home Screen
The home screen is listing all the peripherals paired and connected to the device.
By selecting the peripheral box, it is possible to:
- Reconnect the peripheral in case the connection has been lost
- Access the Control screen when the peripheral is connected
- Drag and move the box when holding the finger on the box
In the peripheral box, you will find the following information and function:
- SmartPlug picture (user defined)
- SmartPlug name (user defined, “BeeWi SmartPlug” by default)
- Connection status and signal strength bar
- Power switch and temperature status
- Manual power switch button (if not in thermostat mode)
- Current mode (manual, presence, timer or thermostat)
It is possible to control the power switch directly from the SmartPlug box without opening
the Control screen.
3.2. Control Screen
In the Control screen, it is possible to program specific behaviors such as:
- Manual switch only.
- Switch power on/off depending on the time: in that case, the user can set up a specific
time slots for power on.
- Switch power on/off depending on presence: in that case the power on switch can be
timed from 5 seconds to 5 minutes.
- Switch power on/off depending on actual temperature to set up eco and comfort
temperature period during the day.
3.3. History Screen
The history screen provides up to 24H history graphs for both temperature and presence.
Both graphs can be set for different period of times, by clicking on them.
- Temperature: 24, 12, and 6H

12
ENGLISH
- Presence: 24, 12, 6, 3 and 1H
Note the temperature is shown in steps of 1° C and presence in slots of 10 minutes
3.4. Edition Screen
The edition screen allows for editing SmartPlug details such as name and picture and
other settings such as presence recording.
The edition screen also includes a button to update SmartPlug with the latest firmware or
to switch it in remote mode. To update the firmware, just press the “Update peripheral”
button in Edition screen, then confirm action and wait for about 6 minutes for the
firmware update to be confirmed.
4. GATEWAY MODE
4.1. Introduction
SmartPlug can also be controlled remotely via the internet using a specific internet
gateway. For more information, see our web site www.bee-wi.com.
In that case, it is necessary to use a different web application as described in the BeeWi
Gateway manual.
4.2. Pairing
In order to list your SmartPlug as part of the HomeBee network, it is necessary to pair it
securely with the Master Gateway. To do this, follow these steps:
1) Fit SmartPlug into a wall socket. The LED will flash once per second
2) Press the SmartPlug button for 2 seconds until the LED flashes twice per second.
3) Press the Gateway button for 1 second until the LED flashes twice per second to
initiate pairing.
4) Once SmartPlug has been successfully paired with the Gateway, the LED will revert
to the connected state flashing once par second and the new peripheral will show in the
web app home screen.
4.3. Web server
Go to the HomeBee portal using a web browser or the web app to access your peripheral.
Using the portal under your own account, it will be possible to access the same functions
supported by the SmartPad app:
- SmartPlug status: On/Off, temperature and current mode.
- Action settings: switch the SmartPlug On and Off manually or depending on time, pres-
ence or temperature.
- Alert settings: send an alert email in case of presence detection or specific temperature
level.
- View history graphs for presence and temperature.

13
ENGLISH
5. CAUTION & WARRANTY EXCEPTIONS
5.1. Taking care of your product
• Use the product indoor only.
• Avoid storage at extreme temperatures, above 45°C (including direct sunlight) or
below -10°C.
• Do not expose the product to rain or moisture.
• When not in use, always store the product in a safe place.
5.2. Damages not covered by standard Warranty
• Damages caused by an improper use of the product such as shocks, drops, exposition
to extreme temperatures, dust, or humidity, or any other cause.
• Damages resulting from any non-respect of manufacturer instructions.
• Cosmetic damages such as scratches, paint, glue or any other alteration made to the
product.
• Damages to the product after an repair or disassembly from non authorized personal.
Copyright and other legal information
BEEWI is a registered trademark. Other trademarks mentioned herewith are owned by
their proprietors. All other product or service names are the property of their respective
owners.
The use of wireless devices and their accessories may be prohibited or restricted in certain
areas. Always obey the laws and regulations on the use of these products.
This product is covered by a 2-year product warranty which is valid from the date of
purchase. Users are not permitted to make changes or modify the device in any way.
Changes or modifications not expressly approved by the party responsible for compliance
will void the user’s warranty.
Please visit our website www.bee-wi.com for more information.
Technical support: [email protected].
© OTIO, 2016.
OTIO - SAS, 719 rue Albert Camus - 31190 Auteriv France

14
NEDERLANDS
INLEIDING
Die Steckdose BBP200, eine der fortschrittlichsten ihrer Generation, kann mit einer
speziellen Smartphone-App voll und ganz ferngesteuert werden. Sie ist umfassend
programmierbar, um die Versorgung eines Elektrogeräts zu steuern und kann Bewegungen
und die Temperatur in ihrer näheren Umgebung überwachen. Sie ist für verschiedene
automatische Steuerungsarten perfekt geeignet:
- manuelles Ein- oder Ausschalten eines elektrischen Geräts mit Hilfe des Schalters oder
über die App,
- automatisches Ein- oder Ausschalten eines elektrischen Geräts in Abhängigkeit von der
Zeit, der Temperatur oder nach Anwesenheitsdetektion,
- Verwaltung von Anwesenheits- bzw. Temperaturberichten.
Da sie auf der neuesten Bluetooth Low Energy-Technologie basiert, ist sie anhand spezieller
Applikationen mit allen Bluetooth Smart Ready-Geräten
1. BESCHRIJVING VAN HET PRODUCT
1.1. Beschrijving
1. Stekker
2. Voet voor externe apparatuur
3. Controleknop (Voeding van de voet en pairing)
4. Controlelampje
5. Bewegingssensor
6. Temperatuursensor
Wij danken u voor uw keuze van de SmartPlug BBP200 van BEEWI. Gelieve de volgende
instructies door te lezen, om uw product zo goed mogelijk te kunnen configureren en
gebruiken.
1
5
2
6
4
3

15
NEDERLANDS
1.2. Inhoud van de verpakking
- SmartPlug
- Vereenvoudigde gids en informatie over de garantie
1.3. Hoofdkenmerken
- Afstandsbediening van elektrische apparatuur
- Volledig programmeerbare gestuurde processen
- Programmering van een radiator in de nacht- en dagmodus
- Inschakeling van een lamp na aanwezigheidsdetectie of op vastgestelde tijden
- Aanwezigheids- en temperatuuroverzichten over 24 uur
- Applicatie op Smartphone voor afstandscontrole, beheer en programmering
1.4. Specificaties
N.b.: er bestaan 3 verschillende versies, naargelang het stopcontact: Frankrijk, Europa,
VS
2. AUTONOME MODUS
2.1. Inleiding
De autonome modus is de standaard modus van de SmartPlug. Deze komt overeen met
een complete toegang via een applicatie op een Smartphone of een tablet.
2.2. Voorafgaande instellingen
Om de SmartPlug in lokale modus te gebruiken, moet u de applicatie « BeeWi SmartPad
» downloaden en op uw Smartphone of tablet installeren. Deze applicatie is verkrijgbaar
op de “App Stores” iOS en Android voor de compatibele apparaten.
2.3. Pairing
Alvorens de SmartPlug te gebruiken is een pairing met de Smartphone of de tablet in de
beveiligde modus nodig. Op deze manier kunnen alleen de hiertoe bevoegde Smartphones
of tablets de SmartPlug bereiken en bedienen.
Radio technologie Bluetooth Smart
Bereik Klasse 2, tot 30 meter
Uitgangsvermogen Max 16A, 3600 W
Voeding 100-250V Wisselspanning, 50-60 Hz
Temperatuursensor +/- 1°C tussen -25° en +85°C
Bewegingssensor Hoek van 100°, afstand 5 meter
Afmetingen L124 x Br76 x H36.5 mm
Gewicht 170 g

16
NEDERLANDS
1) Download en installeer de applicatie BeeWi SmartPad
2) Steek de stekker in het wandstopcontact. Het controlelampje knippert een keer per
seconde.
3) Houd de knop van de stekker 2 seconden ingedrukt, totdat het controlelampje twee keer
per seconde knippert.
4) Start de applicatie SmartPad op en druk op de knop “Randapparatuur toevoegen” om
de randapparatuur te zoeken.
5) Selecteer de « BeeWi SmartPlug » zodra deze op de lijst verschijnt, om deze te pairen.
Als de pairing gelukt is, verschijnt er een nieuwe patroon op het hoofdscherm en dooft
het controlelampje.
2.4. Reset
De SmartPlug kan in de oorspronkelijke staat worden teruggezet, inclusief de standaard
firmware. Om de standaard firmware terug te krijgen en de pairing- of gebruiksgegevens
te verwijderen, drukt u op de knop, terwijl de stekker in een wandstopcontact gestoken
wordt. De reset wordt bevestigd door het controlelampje dat gedurende enkele seconden
snel knippert.
3. GEBRUIK VAN DE APPLICATIE
Let op: sommige handelingen kunnen anders zijn aan de hand van de OS van het
apparaat.
3.1. Hoofdscherm
Het hoofdscherm geeft de lijst met alle gepairde randapparatuur in de vorm van patronen.
Door een randapparatuurpatroon te selecteren, kunt u:
- De randapparatuur opnieuw aansluiten, indien de aansluiting mislukt is
- Naar het controlescherm wanneer de randapparatuur is aangesloten
In de patroon vindt u de volgende informatie en functies:
- Icoon van de SmartPlug (te bewerken)
- Naam van de SmartPlug (te bewerken, standaard is dat “BeeWi SmartPlug”)
- Toestand van de aansluiting en signaalbalk
- On/Off status en temperatuurwaarde
- On/Off schakelaarknop (als de thermostaatmodus niet actief is)
- Aanwezigheidsmodus (handmatig, aanwezigheid, tijdklok of thermostaat)
Het is mogelijk de knop On/Off rechtstreeks te controleren op de patroon, zonder het
controlescherm te openen.
3.2. Controlescherm
Op het controlescherm kan men de volgende instellingen uitvoeren:
- Uitsluitend handmatige omschakeling
- Omschakeling naargelang de tijd: in dit geval kan de gebruiker de specifieke tijdsverlopen
programmeren voor het inschakelen van de SmartPlug.

17
NEDERLANDS
- Omschakeling naargelang de aanwezigheid: in dit geval kan de SmartPlug tussen 5
seconden en 5 minuten ingeschakeld worden.
- Omschakeling naargelang de temperatuur om een radiator in de nachtmodus (lage
temperatuur) of overdag in de dagmodus (max. temperatuur) te zetten.
3.3. Overzichtsscherm
Het overzichtsscherm geeft de temperatuur- en aanwezigheidsgrafieken tot 24 uur weer.
De grafieken kunnen over verschillende periodes aangepast worden door hier op te
klikken:
- Temperatuur: 24, 12 of 6 uur
- Aanwezigheid: 24, 12, 6, 3 of 1 uur
Wij wijzen er op dat de temperatuur wordt weergegeven met een precisie van 1°C en de
aanwezigheid per periode van 10 minuten.
3.4. Bewerkingsscherm
Met het bewerkingsscherm kan men sommige details van de SmartPlug bewerken, zoals
de naam of de icoon. Dit scherm omvat tevens andere instellingen, zoals de registratie
van de aanwezigheid.
Het bewerkscherm omvat ook de informatie over de versie van de firmware en een
updateknop die verschijnt wanneer er een nieuwe firmware beschikbaar is. Om de
firmware te updaten, hoeft u alleen maar op de knop “Update” te drukken en vervolgens
de actie te bevestigen en ca. 6 minuten te wachten tot het einde van de update.
4. AFSTANDSMODUS
4.1. Inleiding
De SmartPlug kan ook op afstand gecontroleerd worden met behulp van een speciale
internetgateway. Ga voor meer informatie naar onze website: www.bee-wi.com
In dat geval moet u een andere webapplicatie gebruiken dan beschreven in de handleiding
van de gateway BeeWi.
4.2. Pairing
Om de SmartPlug op het netwerk HomeBee te pairen, moet deze op beveiligde wijze aan
de gateway gekoppeld worden. Volg daarvoor de volgende stappen:
1) Steek de stekker in het wandstopcontact. Het controlelampje knippert een keer per
seconde.
2) Houd de knop van de stekker 2 seconden ingedrukt, totdat het controlelampje twee keer
per seconde knippert.
3) Houd de knop van de gateway 1 second ingedrukt, totdat het controlelampje twee keer
per seconde knippert, om met het pairen te beginnen.
4) Zodra de SmartPlug met succes met de gateway gepaird is, knippert het controlelampje
een keer per seconde en wordt de nieuwe randapparatuur op het scherm van de
webapplicatie weergegeven.

18
NEDERLANDS
4.4. Webserver
Ga naar het portaal HomeBee met behulp van een internetbrowser of de webapplicatie
op de Smartphone of tablet voor toegang tot de randapparatuur.
Door het portaal met uw gebruikersaccount te gebruiken, heeft u toegang tot de meeste
functies van de applicatie SmartPad:
- Staat van de SmartPlug: On/Off, temperatuurwaarde en geprogrammeerde modus.
- Instellingen van de handelingen: inschakeling van de SmartPlug met de hand of volgens
de geprogrammeerde tijden.
- Instellingen van de alarmen: verzending van een alarm per e-mail in geval van een
gedetecteerde aanwezigheid of een specifiek temperatuurniveau.
- Visualisering van de overzichtsgrafieken van aanwezigheid of temperatuur.
5. VOORZORGSMAATREGELEN EN GARANTIE-UITSLUITINGEN
5.1. Onderhoud van het product
• Gebruik het product uitsluitend binnenshuis.
• Vermijd blootstelling van het product aan extreem hoge en lage temperaturen, boven
45°C en onder -10°C om de werking en de prestaties optimaal te houden.
• Het product niet blootstellen aan vocht of schimmel.
• Berg het product op een beschutte plaats op wanneer u het lange tijd niet zult gebruiken.
5.2. Schade die niet gedekt wordt door de standaardgarantie
• Schade veroorzaakt door een onjuist gebruik van het product, met name schokken,
vallen, blootstelling aan extreem hoge of lage temperaturen, aan stof of vocht of andere
oorzaken.
• Schade voortvloeiend uit het niet in acht nemen van de instructies van de fabrikant.
• Cosmetische schade, zoals krassen, lijmsporen of aan het product aangebrachte
wijzigingen.
• Schade als gevolg van het demonteren van het product of van een poging tot reparatie
door onbevoegd personeel.

19
NEDERLANDS
Copyright en andere informatie
BEEWI is een gedeponeerd merk. De andere, hierna vermelde merken zijn eigendom van
hun eigenaren. De andere gebruikte product- of dienstennamen zijn het eigendom van hun
respectievelijke houders.
Op sommige plaatsen kan het gebruik van draadloze apparaten en hun accessoires
verboden zijn. Neem altijd de geldende regelgevingen en wetten in acht.
Dit product heeft een garantie van twee jaar vanaf de datum van aankoop van het
materiaal. De gebruikers hebben geen toestemming om veranderingen of wijzigingen
aan te brengen. Een verandering of wijziging waarvoor niet uitdrukkelijk toestemming
werd gegeven, annuleert de garantie.
Bezoek onze website www.bee-wi.com voor meer informatie.
Technische hulpdienst: suppor[email protected].
© OTIO, 2016
OTIO - SAS, 719 rue Albert Camus - 31190 Auteriv Frankrijk

20
ﺔﻴﺑﺮﻌﻟﺍ
ﺔﻣﺪﻘﻣ
ﺎﻫﺮﺜﻛﺃﻭ ﺔﻟﻮﺻﻮﻤﻟﺍ ﺲﺑﺎﻘﻤﻟﺍ ﺎﻴﺟﻮﻟﻮﻨﻜﺗ ﻝﺎﺠﻣ ﻲﻓ ﻪﻴﻟﺇ ﻞﺻﻮﺘﻟﺍ ﻢﺗ ﺎﻣ ﺙﺪﺣﺃ ﻦﻣ BBP200 ﻝﻮﺻﻮﻤﻟﺍ ﺲﺒﻘﻤﻟﺍ
ﻪﺘﺠﻣﺮﺑ ﻦﻜﻤﻳ .ﻲﻛﺬﻟﺍ ﻒﺗﺎﻬﻟﺍ ﻰﻠﻋ ﻪﺑ ﺹﺎﺧ ﻖﻴﺒﻄﺗ ﻝﺎﻤﻌﺘﺳﺎﺑ ﺪﻌﺑ ﻦﻋ ﺎﻴﻠﻛ ﻪﻴﻓ ﻢﻜﺤﺘﻟﺍ ﻦﻜﻤﻳ ﺚﻴﺣ ،ﺍﺭﻮﻄﺗ
ﻪﻄﻴﺤﻣ ﻲﻓ ﺓﺭﺍﺮﺤﻟﺍ ﺔﺟﺭﺩ ﻭ ﺕﺎﻛﺮﺤﻟﺍ ﻲﻓ ﻢﻜﺤﺘﻟﺎﺑ ﺎﻀﻳﺃ ﺢﻤﺴﻳ ﻭ ،ﻲﺋﺎﺑﺮﻬﻛ ﺯﺎﻬﺟ ﺔﻳﺬﻐﺗ ﻞﻳﺪﻌﺘﻟ ﻞﻣﺎﻜﻟﺎﺑ
:ﻲﺋﺎﻘﻠﺘﻟﺍ ﻞﻴﻐﺸﺘﻟﺍ ﻉﺍﻮﻧﺃ ﻒﻠﺘﺨﻣ ﻊﻣ ﺎﻣﺎﻤﺗ ﻢﻠﻗﺄﺘﻳ ﻪﻧﺇ .ﺏﺮﻗﻷﺍ
ﻖﻴﺒﻄﺘﻟﺍ ﻝﻼﺧ ﻦﻣ ﻭﺃ ﻱﺩﺎﻣ ﺭﺯ ﺔﻄﺳﺍﻮﺑ ﺎﻳﻭﺪﻳ ﻲﺋﺎﺑﺮﻬﻛ ﺯﺎﻬﺟ ءﺎﻔﻃﺇ ﻭﺃ ﺓءﺎﺿﺇ -
.ﺭﻮﻀﺣ ﻑﺎﺸﺘﻛﺍ ﻭﺃ ﺓﺭﺍﺮﺤﻟﺍ ﺔﺟﺭﺩ ،ﺔﻋﺎﺴﻟﺍ ﻖﻓﻭ ﺎﻴﺋﺎﻘﻠﺗ ﻲﺋﺎﺑﺮﻬﻛ ﺯﺎﻬﺟ ءﺎﻔﻃﺇ ﻭﺃ ﺓءﺎﺿﺇ -
.ﺓﺭﺍﺮﺤﻟﺍ ﺔﺟﺭﺩ ﻲﻓ ﻭﺃ ﺭﻮﻀﺤﻟﺍ ﺕﺎﻧﺎﻴﺑ ﻲﻓ ﻢﻜﺤﺘﻟﺍ -
(Bluetooth Low Energy) ﺔﻗﺎﻄﻠﻟ ﺾﻔﺨﻨﻤﻟﺍ ﻙﻼﻬﺘﺳﻻﺍ ﺕﺍﺫ ﺙﻮﺗﻮﻠﺒﻟﺍ ﺎﻴﺟﻮﻟﻮﻨﻜﺗ ﺙﺪﺣﺃ ﻰﻟﺇ ﺲﺒﻘﻤﻟﺍ ﺪﻨﺘﺴﻳ
ﺔﻴﻛﺬﻟﺍ ﻒﺗﺍﻮﻬﻟﺍ ﻞﺜﻣ Bluetooth Smart Ready ﺔﻴﻨﻘﺘﺑ ﺓﺩﻭﺰﻤﻟﺍ ﺓﺰﻬﺟﻷﺍ ﻞﻤﺠﻣ ﻊﻣ ﻖﻓﺍﻮﺘﻳ ﻪﻠﻌﺠﻳ ﺎﻣ ﺍﺬﻫ ﻭ ،
.ﺔﺻﺎﺧ ﺕﺎﻘﻴﺒﻄﺗ ﻝﺎﻤﻌﺘﺳﺎﺑ ﻚﻟﺫ ﻭ ﺚﻳﺪﺤﻟﺍ ﻞﻴﺠﻟﺍ ﻦﻣ ﺔﻴﺣﻮﻠﻟﺍ ﺮﺗﻮﻴﺒﻤﻜﻟﺍ ﺓﺰﻬﺟﺃ ﻭ
ﺯﺎﻬﺠﻟﺍ ﺕﺎﻔﺻﺍﻮﻣ .1
ﻡﺎﻌﻟﺍ ﺮﻬﻈﻤﻟﺍ 1.1
ﻲﺋﺎﺑﺮﻬﻛ ﺲﺒﻘﻣ .1
ﻲﺟﺭﺎﺧ ﺯﺎﻬﺠﻟ ﺓﺪﻋﺎﻗ .2
(ﻥﺍﺮﻗﻹﺍ ﻭ ﺓﺪﻋﺎﻘﻟﺍ ﺔﻳﺬﻐﺗ) ﻢﻜﺤﺘﻟﺍ ﺭﺯ .3
ﻲﺋﻮﺿ ﺮﺷﺆﻣ .4
ﺔﻛﺮﺤﻟﺍ ﺭﺎﻌﺸﺘﺳﺍ ﺯﺎﻬﺟ .5
ﺓﺭﺍﺮﺤﻟﺍ ﺔﺟﺭﺩ ﺭﺎﻌﺸﺘﺳﺍ ﺯﺎﻬﺟ .6
ﻢﻜﻨﻣ ﻮﺟﺮﻧ BEEWI . ﺔﻛﺮﺷ ﻦﻣ SmartPlug BBP200 ﻝﻮﺻﻮﻤﻟﺍ ﺲﺒﻘﻤﻟﺍ ﻢﻛﺭﺎﻴﺘﺧﻻ ﺍﺮﻜﺷ
. ﻢﻜﺟﻮﺘﻤﻟ ﻝﺎﻤﻌﺘﺳﺍ ﻞﻀﻓﺃ ﻖﻴﻘﺤﺗ ﻭ ﻞﻴﻐﺸﺘﻟ ﺔﻴﻟﺎﺘﻟﺍ ﺕﺎﻤﻴﻠﻌﺘﻟﺍ ﺓءﺍﺮﻗ
1
5
2
6
4
3
La page est en cours de chargement...
La page est en cours de chargement...
La page est en cours de chargement...
La page est en cours de chargement...
La page est en cours de chargement...
-
 1
1
-
 2
2
-
 3
3
-
 4
4
-
 5
5
-
 6
6
-
 7
7
-
 8
8
-
 9
9
-
 10
10
-
 11
11
-
 12
12
-
 13
13
-
 14
14
-
 15
15
-
 16
16
-
 17
17
-
 18
18
-
 19
19
-
 20
20
-
 21
21
-
 22
22
-
 23
23
-
 24
24
-
 25
25


dans d''autres langues
- English: BeeWi BBP200-A1 User manual
- Nederlands: BeeWi BBP200-A1 Handleiding
Documents connexes
-
BeeWi BBP200-A1 Manuel utilisateur
-
-
-
-
-
-
-

