Whirlpool ACMK 6123/WH Mode d'emploi
- Catégorie
- Fours
- Taper
- Mode d'emploi

ACMK 6123/WH ACMK 6123/WH ACMK 6123/WH ACMK 6123/WH

English
GB
Operating Instructions
COOKER AND OVEN
Contents
Operating Instructions,1
Safety ,3
Description of the appliance-Overall view,13
Description of the appliance-Control Panel,13
Installation,14
Start-up and use,18
Cooking modes,19
Using the hob,18
Care and maintenance,22
FR
Français
Mode d’emploi
CUISINIERE ET FOUR
Sommaire
Mode d’emploi,1
Consignes de s'ecurit'e ,8
Description de l’appareil-Vue d’ensemble, 13
Description de l’appareil-Tableau de bord, 13
Installation,24
Mise en marche et utilisation,28
Utilisation du plan de cuisson,28
Nettoyage et entretien,32
EnglishEnglish
Programmes du four,29
2

3
SAFETY INSTRUCTIONS
These instructions shall also be available on website: www.whirlpool.eu
YOUR SAFETY AND
This manual and the appliance itself provide important safety warnings, to be read and observed at all times.
Indicates a hazardous situation which, if not avoided, will cause serious injury.
Indicates a hazardous situation which, if not avoided, could cause serious injury.
DANGER
WARNING
Before using the appliance carefully read Health and Safety and Use and Care guides.
Keep these instructions close at hand for future reference.
This is the safety alert symbol.
This symbol alerts you to potential hazards that can kill or hurt you and others.
All safety messages will follow the safety alert symbol or the word “DANGER” or “WARNING.” These words
mean:
IMPORTANT TO BE RED AND OBSERVED
SAFETY OF OTHERS IS VERY IMPORTANT
GB
All safety warnings give specific details of the potential risk presented and indicate how to reduce risk of
injury, damage and electric shock resulting from improper use of the appliance. Carefully observe the
following instructions.
Failure to observe these instructions may lead to risks. The Manufacturer declines any liability for injury to
persons or animals or damage to property if these advices and precautions are not respected.
-
Very young (0-3 years) and young children (3-8 years) shall be kept away unless continuously
supervised.
-
Children from 8 years old and above and persons with reduced physical, sensory or mental
capabilities or lack of experience and knowledge can use this appliance only if they are supervised
or have been given instructions on safe appliance use and if they understand the hazards involved.
Children shall not play with the appliance. Cleaning and user maintenance shall not be made by
childern without supervision.
-
The appliance and its accessible parts become hot during use, young children should be kept
away. Do not allow the appliance to come into contact with cloths or other flammable materials
until all the components have cooled down completely.
-
During and after use, do not touch the heating elements or interior surface of the appliance - risk of
burns.
-
Overheated oils and fats catch fire easily. Always remain vigilant when cooking foods rich in fat, oil
or alcohol (e.g. rum, cognac, wine).
-
Never leave the appliance unattended during food drying.
-
WARNING : Do not heat or cook with sealed jars or containers in the appliance.
-
The pressure that builds up inside might cause them to explode, damaging the appliance.
-
If alcoholic beverages are used when cooking foods (e.g. rum, cognac, wine), remember that
alcohol evaporates at high temperatures. As a result, there is a risk that vapours released by the
alcohol catch fire if coming in contact with the electrical heating element.
-
If the appliance is suitable for probe usage, Only use the temperature probe recommended for this
oven.
-
DANGER OF FIRE : Do not store items on the cooking surfaces since they can catch fire.
-
CAUTION : In case of hotplate glass breakage:-shut immediately off all burners and any electrical
heating element and isolate the appliance from the power supply; - do not touch the appliance
surface; -do not use the appliance
-
These instructions are valid if the country symbol appears on the appliance. If the symbol doesn't
appear on the appliance, it is necessary to refer to the technical instructions which will provide the
necessary instructions concerning modification of the appliance to the conditions of use of the
country
-
The glass lid can break in if it is heated up. Turn off all the burners and the electric plates before
closing the lid. Do not shout down lid when burner alight
-
If the information in this manual is not followed exactly, a fire or explosion , may result causing
property damage or injury.

INTENDED USE OF THE PRODUCT
-
This appliance is designed solely for domestic usage. No other use is permitted (e.g. heating
rooms). To aim the appliance as professional use is forbidden. The manufacturer declines all
responsibility for innapropriate
use or incorrect setting of the controls.
-
This appliance is intended to be used in household and similar applications such as :
-
Staff kitchen areas in shops, offices and other working environments;
-
Farm houses;
-
By clients in hotels, motels and other residential environments;
-
Bed and breakfast type environments.
-
CAUTION : The appliance is not intended to be operated by means of an external timer or separate
remote controlled supply system.
-
Do not use the appliance outdoors.
-
Do not store explosive or flammable substances such as aerosol cans and do not place or use
gasoline or other flammable materials in or near the appliance: a fire may break out if the
appliance is inadvertently switched on.
INSTALLATION
-
Installation and repairs must be carried out by a qualified technician, in compliance with the
manufacturer's instructions and local safety regulations. Do not repair or replace any part of the
appliance unless specifically stated in the user manual.
-
The electrical and gas connections must comply with local regulation.
-
Children should not perform installation operations. Keep children away during installation of the
appliance. Keep the packaging materials (plastic bags, polystyrene parts, etc.) out of reach of
children, during and after the installation of the appliance.
WARNING : Modification of the appliance and its method of installation are essential in order to use the
appliance safely and correctly in all the additional countries
-
Use protective gloves to perform all unpacking and installation operations.
-
After unpacking the appliance, make sure that the appliance door closes properly. In the event of
problems, contact the dealer or your nearest After-sales Service. To prevent any damage, only
remove the oven from its polystyrene foam base at the time of installation.
-
The appliance must be handled and installed by two or more persons.
-
The appliance must be disconnected from the power supply before carrying out any installation
operation.
-
During installation, make sure the appliance does not damage the power cable.
-
Only activate the appliance when the installation procedure has been completed.
-
Kitchen units in contact with the appliance must be heat resistant (min 90°C).
GAS CONNECTION
WARNING : Prior to installation, ensure that the local gas delivery conditions (nature or pressure) are
compatible with the setting of the hob (see the rating plate and injector table).
-
Use pressure regulators suitable for the gas pressure indicated in the instruction.
-
WARNING : The adjustment condictions for this appliance are stated on the lable (or data plate).
-
WARNING : This appliance is not connected to a combustion products evacuation device. It shall be
installed and connected in accordance with current installation regulations. Particulat attention shall
be given to the relevant requirements regarding ventilation.
4
GB

-
WARNING : These operations must be perfomed by a qualified technician.
-
If the appliances is connected to liquid gas, the regulation screw must be fastned as tightly as
possible.
-
When gas cylinder is adopted, the gas cylinder or gas container must be properly settled (vertical
orientation).
-
Use only flexible or rigid metal hose for gas connection.
-
IMPORTANT : If a staineless steel hose is used, it must be installed so as not touch any mobile part
of the furniture (e.g.drawer). It must pass thorugh an area where there are no obstructions and where
it is possible to inspect it on all its length.
-
After connection to the gas supply, check for leaks with soapy water. Light up the burners and turn
the knobs from max position 1* to minimum position 2* to check flame stability.
ELECTRICAL WARNINGS
-
Make sure the voltage specified on the rating plate corresponds to that of your home.
-
For installation to comply with current safety regulations, an omnipolar switch with minimum contact
gap of 3mm is required.
-
Regulation require that the appliance is earthed.
-
For appliances with fitted plug, if the plug is not suitable for you socket outlet, contact a qualified
technician.
-
Do not use extension leads, multiple sockets or adapters. Do not connect the appliance to a socket
which can be operated by remote control.
-
The power cable must be long enough for connecting the appliance, once fitted in its housing, to the
main power supply.
-
Do not pull the power supply cable.
-
If the power cable is damaged it must be replaced with an identical one. The power cable must only
be replaced by a qualified technician in compliance with the manufacturer instruction and current
safety regulations. Contact an authorized service center.
-
Do not operate this appliance if it has a damaged mains cord or plug, if it is not working properly, or if
it has been damaged or dropped. Do not immerse the mains cord or plug in water. Keep the cord
away from hot surfaces.
-
The electrical components must not be accessible to the user after installation.
-
Do not touch the appliance with any wet part of the body and do not operate it when barefoot.
-
It must be possible to disconnect the appliance from the power supply by unplugging it if plug is
accessible, or by means of an accessible multi-pole switch installed upstream of the socket in
conformity with national electrical safety standards.
-
The rating plate is on the front edge of the oven (visible when the door is open).
CORRECT USE
CAUTION : The cooking process has to be supervised. A short cooking process has to be
supervised continuously.
-
Do not use the hob as a work surface or support.
WARNING : Unattended cooking on a hob with fat or oil can be dangerous and may result in fire.
Never try to extinguish a fire with water, but switch off the appliance and then cover flame e.g. with a
lid or a fire blanket.
-
Use oven gloves to remove pans and accessories, taking care not to touch the heating elements.
-
IMPORTANT : Should you experience difficulty in turning the burners knobs, please contact After
Sales Service for replacement of the burner tap if found to be faulty.
-
The openings use for the ventilation and dispersion of heat must never be covered.
-
Use pots and pans with bottoms the same width as that of the burners or slightly larger (see specific
table). Make sure pots on the grates do not protrude beyond the edge of the hob.
-
WARNING : Do not let the burner flame extend beyond the edge of the pan
-
IMPORTANT : Improper use of the grids can result in damage to the hob: do not position the grids
upside down or slide them across the hob.
-
Do not use : Cast iron griddles, ollar stones, terracotta pots and pans.
-
Heat diffusers such as metal mesh, or any other types.
GB
5

-
Note : should particular local conditions of the delivered gas make the ignition of burner difficult, it is
advisable to repeat the operation with the knob turned to small flame setting.
-
Note : In case of installation of a hood above the cooktop, please refer to the hood instructions for the
correct distance.
-
WARNING : The protective rubber feet on the grids represent a chocking hazard for young children.
After removing the grids, please ensure that all the feet are correctly fitted.
-
Remove any liquid from the lid before opening it
CLEANING AND MAINTANCE
-
The appliance must be disconnected from the power supply before carrying out any cleaning or
maintenance operation.
-
Never use steam cleaning equipment.
-
Ensure that the appliance is switched off before replacing the lamp to avoid the possibility of electric
shock.
-
Do not use harsh abrasive cleaners or sharp metal scrapers to clean the appliance door glass since
they can scratch the surface, which may result in shattering of the glass.
-
Do not use abrasive or corrosive products, chlorine-based cleaners or pan scourers.
-
To avoid damaging the electric ignition device, do not use it when the burners are not in their
housing.
SAFEGUARDING THE ENVIRONMENT
DISPOSAL OF PACKAGING MATERIALS
- The packaging material is 100% recyclable and is marked with the recycle symbol . The various
parts of the packaging must therefore be disposed of responsibility and in full compliance with local
authority regulations governing waste disposal.
SCRAPPING OF HOUSEHOLD APPLIANCES
-
When scrapping the appliance, make it unusable by cutting off the power cable and removing the
doors and shelves (if present) so that children cannot easily climb inside and become trapped.
-
This appliance is manufactured with recyclable or reusable materials. Dispose of it in accordance
with local waste disposal regulations.
-
For further information on the treatment, recovery and recycling of household electrical appliances,
contact your competent local authority, the collection service for household waste or the store where
you purchase the appliance.
-
This appliance is marked in compliance with European Directive 2012/19/EU, Waste Electrical and
Electronic Equipment (WEEE).
-
By ensuring this product is disposed of correctly, you will help prevent potential negative
consequences for the environment and human health, which could otherwise be caused by
inappropriate
waste
handling
of
this
product.
-
The symbol
on the product or on the accompanying documentation indicates that it should not be
treated as domestic waste but must be taken to an appropriate collection center for the recycling of
electrical and electronic equipment.
-
Only preheat the oven if specified in the cooking table or your recipe.
-
Use dark lacquered or enamelled baking moduls as they absorb heat far better.
-
Switch the oven off 10/15 minutes before the set cooking time. Food requiring prolonged cooking will
continue to cook even once the oven is switched off."
ENERGY SAVING TIPS
6
GB

-
This appliance meets the Eco Design requirements of European Regulations n. 65/2014, and n.
66/2014 in conformity to the European standard EN 60350-1.
DECLARATION OF CONFORMITY
AFTER-SALES SERVICE
Before calling the After-Sales Service
1. See if you can eliminate the problem on your own (see “Troubleshooting Guide”).
2. Switch the appliance off and on again to see if the problem persists.
If the fault persists after the above checks, contact your nearest After-Sales Service.
Specify: the type of fault;
• exact type and model of oven;
• the After-Sales Service number (the number given after the word “Service” on the dataplate) located inside
the storage compartment flap. The service number is also given in the warranty booklet;
• your full address;
• your telephone number.
For repairs, contact an Authorised After-Sales Service, indicated in the warranty.
If any work is carried out by technicians not belonging to the Manufacturer's authorised After-Sales Service
centres, request a receipt specifying the work performed and make sure the replacement parts are original.
Failure to comply with these instructions can compromise the safety and quality of the product.
7
Data plate, is located inside the flap or, after the oven
compartment has been opened, on the left-hand wall
inside the oven.
GB
59l

CONSIGNES DE SÉCURITÉ
FR
INSTRUCTIONS IMPORTANTES À LIRE ET À RESPECTER
Avant d'utiliser l'appareil, lisez attentivement les guides de sécurité, d'utilisation et d'entretien. Gardez ces
documents à portée de main pour toute référence future.
Ces instructions sont également disponibles sur le site Web : www.whirlpool.eu
VOTRE SÉCURITÉ ET CELLE D'AUTRUI EST TRÈS IMPORTANTE
Ce manuel et l'appareil lui-même fournissent des avertissements de sécurité importants, à lire et à respecter en tout temps.
Ceci est le symbole d'alerte de sécurité.
Ce symbole vous avertit des risques potentiels de blessures graves ou même de mort qui peuvent survenir pour vous et toute autre personne.
Tous les messages concernant la sécurité seront précédés du symbole d'alerte de sécurité et du mot « DANGER » ou « AVERTISSEMENT ».
Ces mots signifient :
AVERTISSEMENT
AVERTISSEMENT
Indique une situation dangereuse qui, si elle n'est pas évitée, provoque des blessures graves.
Indique une situation risqu
é
e qui, si elle n'est pas
é
vit
é
e, pourrait entra
î
ner des blessures graves.
Tous les messages de sécurité donnent des détails spécifiques du risque potentiel présenté et indiquent comment réduire le
risque de lésion, de dommage et de choc électrique résultant d'une mauvaise utilisation de l'appareil. Observez minutieusement
les instructions suivantes.
Le non-respect de ces instructions peut entraîner des risques. Le fabricant décline toute responsabilité en cas de blessure
causée à des personnes ou des animaux et en cas de dommage matériel résultant du non-respect de ces consignes et
précautions.
-
Les bébés (0-3 ans) et les jeunes enfants (3-8 ans) doivent être tenus à l'écart de l'appareil à moins d'être surveillés
en permanence.
-
Cet appareil peut être utilisé par des enfants de 8 ans et plus et par des personnes dont les capacités physiques,
sensorielles ou mentales sont réduites ou n'ayant pas suffisamment d'expérience ou de connaissances uniquement si
elles sont supervisées ou ont reçu des instructions relatives à l'utilisation de l'appareil en toute sécurité et si elles
comprennent les risques encourus. Les enfants ne doivent pas jouer avec l'appareil. Le nettoyage et l'entretien par
l'utilisateur ne doivent pas être effectués par les enfants sans surveillance.
-
L'appareil et ses parties accessibles deviennent chauds pendant l'utilisation. Par conséquent, les jeunes enfants
doivent être tenus à l'écart. Ne laissez l'appareil entrer en contact avec des tissus ou d'autres matériaux inflammables
que lorsque tous les composants ont complètement refroidi.
-
Pendant et après l'utilisation, ne touchez pas aux éléments chauffants ou à la surface intérieure de l'appareil, afin d'éviter
tout risque de brûlures.
-
Les huiles et graisses surchauffées prennent feu facilement. Vous devez toujours rester vigilant lors de la cuisson des
aliments riches en graisse, en huile ou en alcool (par exemple, rhum, cognac, vin).
-
Ne laissez jamais l'appareil sans surveillance pendant le séchage des aliments.
-
AVERTISSEMENT : Évitez de cuisiner ou de chauffer les aliments sur l'appareil avec les brocs ou récipients fermés.
-
La pression qui monte à l'intérieur pourrait les faire exploser et endommager l'appareil.
-
Si les boissons alcoolisées sont utilisées lors de la cuisson des aliments (par exemple, le rhum, le cognac, le vin),
rappelez-vous que l'alcool s'évapore à des températures élevées. En conséquence, il existe un risque que les vapeurs
dégagées par l'alcool prennent feu en cas de contact avec l'élément de chauffage électrique.
-
Si l'appareil est adapté pour l'utilisation de la sonde, utilisez seulement la sonde de température recommandée pour ce four.
-
RISQUE D'INCENDIE : N'entreposez pas d'éléments sur les surfaces de cuisson puisqu'elles sont inflammables.
-
ATTENTION : En cas de cassure du verre de la plaque chauffante : éteignez immédiatement tous les brûleurs et tout
élément chauffant électrique puis débranchez l'appareil ; ne touchez pas la surface de l'appareil ; - n'utilisez pas l'appareil
-
Ces instructions sont valables si le symbole du pays s'affiche sur l'appareil. Si le symbole ne s'affiche pas sur l'appareil, il est
recommandé de se référer aux instructions techniques qui fourniront les consignes nécessaires relatives à l'adaptation de
l'appareil aux conditions d'utilisation du pays.
-
Le couvercle en vitre peut se briser s'il est chauffé. Éteignez les brûleurs et les plaques électriques avant de fermer le
couvercle. Ne refermez pas le couvercle lorsque le brûleur est allumé
-
Si les informations contenues dans ce manuel ne sont pas respectées à la lettre, un incendie ou une explosion
pourraient survenir et causer des dégâts matériels ou des blessures.
8

FR
USAGE PRÉVU DE L'APPAREIL
-
Le présent appareil a été conçu à des fins domestiques uniquement. Toute utilisation à des fins autres que celles
prévues est interdite (chauffage de pièces par exemple) Tout usage à des fins professionnelles est interdit. Le
fabricant décline toute responsabilité pour un usage inapproprié ou un réglage incorrect des commandes.
-
Cet appareil est destiné à un usage domestique et dans des endroits similaires, tels que :
-
les espaces cuisine dans les boutiques, les bureaux et autres environnements de travail ;
-
les maisons de campagne ;
-
les cuisines pour clients dans les hôtels, motels et autres lieux d'habitation ; et
-
les chambres d'hôtes.
-
ATTENTION : Cet appareil n'est pas conçu pour être utilisé au moyen d'une minuterie externe ou d'une télécommande
séparée.
-
N'utilisez pas cet appareil à l'extérieur.
-
Ne stockez pas des substances explosives ou inflammables telles que les aérosols et ne posez pas ni utilisez
l'essence ou d'autres matériaux inflammables dans ou près de l'appareil. Autrement, cela pourra entraîner un
incendie si l'appareil est mis sous tension par inadvertance.
INSTALLATION
-
L'installation et les réparations doivent être effectuées par un technicien qualifié, en conformité avec les instructions
du fabricant et les réglementations de sécurité locales. Évitez de réparer ou de remplacer toute pièce de l'appareil
sauf indication contraire dans le mode d'emploi.
-
Les connexions électriques et de gaz doivent être conformes aux réglementations locales.
-
Les enfants ne doivent pas effectuer des opérations d'installation. Éloignez les enfants lors de l'installation de
l'appareil. Conservez les matériaux d'emballage (sacs en plastique, éléments en polystyrène, etc.) hors de portée des
enfants, pendant et après l'installation de l'appareil.
AVERTISSEMENT : Toute modification de l'appareil et sa méthode d'installation sont cruciales pour une utilisation correcte et en toute
sécurité de l'appareil dans les autres pays
-
Utilisez des gants de protection pour effectuer toutes les opérations de déballage et d'installation.
-
Après avoir déballé l'appareil, assurez-vous que la porte se ferme bien. En cas de problème, contactez votre
revendeur ou le service après-vente le plus proche. Pour éviter tout dommage, retirez le four de son socle en mousse
de polystyrène seulement au moment de l'installation.
-
L'appareil doit être manipulé et installé par deux personnes ou plus.
-
Avant d'effectuer toute opération d'installation, assurez-vous de débrancher l'appareil du secteur.
-
Lors de l'installation, assurez-vous que l'appareil n'endommage pas le câble d'alimentation.
-
Allumez l'appareil uniquement lorsque la procédure d'installation a été achevée.
-
Les unités de cuisine en contact avec l'appareil doivent être résistantes à la chaleur (min 90 °C).
CONNEXION DE GAZ
AVERTISSEMENT : Avant l'installation, assurez-vous que les conditions locales de distribution de gaz (nature ou pression) sont
compatibles avec le réglage de la plaque de cuisson (voir la plaque signalétique et le tableau d'injection).
-
Utilisez des régulateurs de pression adaptés à la pression de gaz indiquée dans les instructions.
-
AVERTISSEMENT : Les conditions de réglage de cet appareil sont marquées sur l'étiquette (ou la plaque signalétique).
-
AVERTISSEMENT : Cet appareil n'est pas relié à un dispositif d'évacuation des produits de combustion. Il doit être installé et
relié conformément aux réglementations d'installation en vigueur. Une attention particulière doit être accordée aux exigences
pertinentes concernant la ventilation.
9
-
AVERTISSEMENT : Ces opérations doivent être réalisées par un technicien qualifié.
-
Si l'appareil est relié au gaz liquéfié, la vis de régulation doit être serrée correctement.
-
Lorsque la bouteille de gaz est adoptée, la bouteille ou le conteneur de gaz doit être correctement positionné(e) (position
verticale).
-
Utilisez uniquement un tuyau métallique flexible ou rigide pour la connexion de gaz.
-
IMPORTANT : Si un tuyau en acier est utilisé, il doit être installé de manière à ne toucher aucune partie mobile des meubles
(par exemple le tiroir). Il doit passer à travers une zone exempte d'obstructions et permettant une inspection sur toute sa
longueur.
-
Après la connexion à l'alimentation en gaz, vérifiez les fuites avec de l'eau savonneuse. Allumez les brûleurs et tournez

-
La plaque signalétique se trouve sur le bord avant du four (visible lorsque la porte est ouverte).
AVERTISSEMENTS RELATIFS À L'ÉLECTRICITÉ
-
Assurez-vous que la tension indiquée sur la plaque signalétique correspond à celle de votre maison.
-
Pour que l'installation soit conforme aux réglementations de sécurité en vigueur, un interrupteur omnipolaire avec
ouverture de contact minimale de 3 mm est nécessaire.
-
Le règlement exige que l'appareil soit relié à la terre.
-
Pour les appareils avec prise intégrée, si la fiche ne convient pas à votre prise de courant, contactez un technicien
qualifié.
-
N'utilisez pas de rallonges, de multiprises ou d'adaptateurs. Ne branchez pas l'appareil à une prise qui peut être
actionnée par télécommande.
-
Le câble d'alimentation doit être suffisamment long pour relier l'appareil, une fois monté dans son logement, à
l'alimentation principale.
-
Évitez de tirer sur le câble d'alimentation.
-
S'il venait à être endommagé, remplacez-le par un câble identique. Le câble d'alimentation doit être remplacé uniquement
par un technicien qualifié, en conformité avec les instructions du fabricant et les normes de sécurité en vigueur. Contactez
un centre de service agréé.
-
N'utilisez pas cet appareil si le cordon d'alimentation ou la fiche est endommagé, s'il ne fonctionne pas correctement, s'il est
endommagé ou s'il est tombé. Ne plongez pas le cordon d'alimentation ou la fiche dans de l'eau. Éloignez le cordon des
surfaces chaudes.
-
Les composants électriques ne doivent pas être accessibles à l'utilisateur après l'installation.
-
Ne touchez pas l'appareil avec une partie du corps mouillée et ne l'utilisez pas pieds nus.
-
Il est possible de déconnecter l'appareil de l'alimentation électrique en le débranchant si la prise est accessible, ou au
moyen d'un commutateur multipolaire accessible installé en amont de la prise en conformité avec les normes de
sécurité électriques nationales.
UTILISATION APPROPRIÉE
ATTENTION : Le processus de cuisson doit être supervisé. Une cuisson de courte durée doit être surveillée en permanence.
-
N'utilisez pas la table de cuisson comme surface de travail ou appui.
AVERTISSEMENT : Une cuisson sans surveillance sur une plaque de cuisson avec de la graisse ou de l'huile peut être
dangereuse et peut causer un incendie. N'essayez jamais d'éteindre un incendie avec de l'eau. Arrêtez plutôt l'appareil et
ensuite couvrez les flammes par exemple avec un couvercle ou une couverture anti-feu.
-
Utilisez des gants de cuisine pour sortir les casseroles et les accessoires, en prenant soin de ne pas toucher les éléments chauffants.
-
IMPORTANT : S'il vous est difficile de tourner les boutons du brûleur, veuillez contacter le service après-vente pour le
remplacement du brûleur en cas de défaillance.
-
Les orifices utilisés pour la ventilation et la dispersion de la chaleur ne doivent jamais être obstrués.
-
Utilisez des marmites et des casseroles dont la largeur est égale ou légèrement supérieure à celle des brûleurs (voir le
tableau spécifique). Assurez-vous que les marmites sur les grillages ne dépassent pas les limites de la plaque de cuisson.
-
AVERTISSEMENT : Ne laissez pas la flamme du brûleur dépasser le bord de la casserole
-
IMPORTANT : Un usage inapproprié des grilles peut endommager la plaque de cuisson : ne posez pas les grilles à
l'envers ou ne les faites pas glisser sur la plaque de cuisson.
-
N'utilisez pas : de plaques de gril en fonte, de pierres ollaires, de marmites et de casseroles en terre cuite ;
-
des diffuseurs de chaleur tels que les grillages métalliques, ou tout autre type ;
10
FR
-
Remarque : lorsque les conditions locales particulières du gaz distribué rendent l'allumage du brûleur difficile, il est
recommandé de répéter l'opération avec le bouton tourné à la position de réglage de petite flamme.
-
Remarque : En cas d'installation d'une hotte au-dessus de la table de cuisson, referez-vous aux instructions de la hotte pour la
distance adéquate.
-
AVERTISSEMENT : Les pieds de protection en caoutchouc sur les grilles représentent un danger pour les jeunes enfants.
Après le retrait des grilles, assurez-vous que tous les pieds sont correctement fixés.
-
Essuyez tout liquide sur le couvercle avant de l'ouvrir.

.
FR
NETTOYAGE ET ENTRETIEN
-
Avant d'effectuer toute opération de nettoyage ou d'entretien, assurez-vous de débrancher l'appareil du secteur.
-
N'utilisez jamais un équipement de nettoyage à vapeur.
-
Assurez-vous de débrancher l'appareil avant de remplacer l'ampoule pour éviter tout risque de choc électrique.
-
N'utilisez jamais de produits abrasifs ou les grattoirs métalliques pour nettoyer la porte de l'appareil, ils pourraient enrayer
la vitre et elle pourrait se briser.
-
N'utilisez pas de produits abrasifs ou corrosifs, de produits à base de chlore ou de tampons à récurer.
-
Pour éviter tout dommage du dispositif d'allumage électrique, ne l'utilisez pas lorsque les brûleurs ne sont pas dans
leur logement.
PROTECTION DE L'ENVIRONNEMENT
ÉLIMINATION DES MATÉRIAUX D'EMBALLAGE
- Le matériau d'emballage est 100 % recyclable et est marqué du symbole de recyclage Les différentes parties de
l'emballage doivent donc être éliminées en toute responsabilité et en pleine conformité avec
la réglementation de l'autorité locale sur l'élimination des déchets
MISE AU REBUT DES APPAREILS ÉLECTROMÉNAGERS
-
Lors de la mise au rebut de l'appareil, rendez-le inutilisable en coupant le câble d'alimentation et en démontant les
portes et les grilles (si présente) afin que les enfants ne puissent y grimper facilement et se coincer à l'intérieur.
-
Cet appareil est fabriqué à partir des matériaux recyclables ou réutilisables. Mettez-le au rebut conformément à la
réglementation d'élimination des déchets locaux.
-
Pour de plus amples renseignements sur le traitement, la récupération et le recyclage des appareils électroménagers,
contactez votre autorité locale compétente, le service de collecte des déchets ménagers ou le magasin où vous achetez
l'appareil.
-
Cet appareil est marqué conformément à la Directive 2012/19/CE du Parlement européen relative aux déchets
d’équipements électriques et électroniques.
-
En assurant la bonne évacuation de ce produit vous pourrez éviter tous risques de conséquences négatives
pour l'environnement et la santé humaine causées par l'élimination incorrecte de ce produit.
-
Le symbole sur le produit ou sur la documentation d'accompagnement indique qu'il ne doit pas être
traité comme des ordures ménagères mais plutôt emmené à un centre spécialisé de collecte d'ordure pour le recyclage des
équipements électriques et électroniques.
CONSEILS POUR ÉCONOMISER DE L'ÉNERGIE
-
Ne préchauffez le four que cela est spécifié dans la table de cuisson ou votre recette.
-
Utilisez des modules de cuisson laqués ou émaillés sombres étant donné qu'ils absorbent beaucoup mieux la chaleur.
-
Éteignez le four 10/15 minutes avant le temps de cuisson défini. Les aliments nécessitant une cuisson prolongée continue
de cuire à même lorsque que le four est éteint.
11
FR

DÉCLARATION DE CONFIRMITÉ
FR
-
Cet appareil répond aux exigences d'éco-conception de la directive européenne n
o
65/2014, et n
o
66/2014 en conformité avec la norme européenne EN 60350-1
La plaque signalétique est située à l'intérieur du rabat ou, après
l'ouverture du compartiment du four, sur le mur gauche à
l'intérieur du four.
SERVICE APRÈS-VENTE
Avant d'appeler le service après-vente
1.
Voyez si vous pouvez résoudre le problème par vous-même (voir « Guide de dépannage »).
2. Éteignez l'appareil et rallumez-le pour voir si le problème persiste.
Si le défaut persiste après les vérifications ci-dessus, contactez votre service après-vente le plus proche.
Précisez : le type d'anomalie ;
•
le type et le modèle exacts du four ;
•
le numéro du service après-vente (le numéro indiqué après le mot « service » sur la plaque signalétique) situé à l'intérieur du rabat
du compartiment de rangement. Le numéro du service est également mentionné dans le livret de garantie ;
•
votre adresse complète ;
•
votre numéro de téléphone.
Pour les réparations, contactez un
Service après-vente agréé
, indiqué dans la garantie.
Si des travaux sont effectués par des techniciens ne relevant pas des centres de service après-vente autorisés du fabricant,
demandez un reçu précisant le travail effectué et assurez-vous que les pièces de rechange sont d'origine.
Le non-respect de ces
instructions peut compromettre la sécurité et la qualité du produit.
12
59l

13
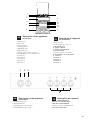
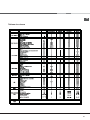
1 Hob burner
2 Hob Grid
3.Control panel
4.Sliding grill rack
5.DRIPPING pan
6.Adjustable foot
7.Containment surface for spills
8.GUIDE RAILS for the sliding racks
9.position 5
10.position 4
11.position 3
12.position 2
13.position 1
Description of the appliance
Overall view
GB
1
2
4
5
6
7
9
10
11
12
13
8
3
6
1.Brûleur à gaz
2.Grille du plan de cuisson
3.Tableau de bord
4. Support GRILLE
5. Support LECHEFRITE
6.Pied de réglage
7.Plateau du plan de cuisson
8. GLISSIERES de coulissement
9. niveau 5
10.niveau 4
11.niveau 3
12.niveau 2
13.niveau 1
Description de l’appareil
Vue d’ensemble
FR
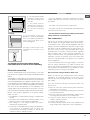
Description of the appliance
Control panel
GB
3.THERMOSTAT knob
1.SELECTOR knob
2.THERMOSTAT Indicator light
4.Hob BURNER control knob
Description de l’appareil
Tableau de bord
FR
3.Manette du THERMOSTAT
2.Voyant lumineux THERMOSTAT
1.Manette PROGRAMMES
4.Manette BRULEURS
4
1
2
3

14
GB
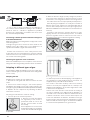
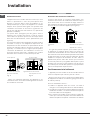
Room ventilation
The appliance may only be installed in permanently-
ventilated rooms, in accordance with current national
legislation. The room in which the appliance is installed
must be ventilated adequately so as to provide as much
air as is needed by the normal gas combustion process
(the flow of air must not be lower than 2 m
3
/h per kW of
installed power).
The air inlets, protected by grilles, should have a duct
with an inner cross section of at least 100 cm
2
and should
be positioned so that they are not liable to even partial
obstruction (see gure A).
These inlets should be enlarged by 100% - with a
minimum of 200 cm
2
- whenever the surface of the hob
is not equipped with a flame failure safety device. When
the flow of air is provided in an indirect manner from
adjacent rooms (see gure B), provided that these are
not communal parts of a building, areas with increased
fire hazards or bedrooms, the inlets should be fitted with
a ventilation duct leading outside as described above.
Adjacent room Room requiring ventilation
A B
Ventilation opening Increase in the gap
between
for comburent air the door and the
flooring
Disposing of combustion fumes
The disposal of combustion fumes should be guaranteed
using a hood connected to a safe and efficient natural
suction chimney, or using an electric fan that begins
to operate automatically every time the appliance is
switched on (see gure).
Fumes channelled Fumes channelled through
Installation
A
After prolonged use of the appliance, it is advisable to
open a window or increase the speed of any fans used.
straight outside a chimney or a branched
flue system (reserved for
cooking appliances)
The liquefied petroleum gases are heavier than air and
collect by the floor, therefore all rooms containing LPG
cylinders must have openings leading outside so that
any leaked gas can escape easily.
LPG cylinders, therefore, whether partially or completely
full, must not be installed or stored in rooms or storage
areas that are below ground level (cellars, etc.). Only
the cylinder being used should be stored in the room;
this should also be kept well away from sources of
heat (ovens, chimneys, stoves) that may cause the
temperature of the cylinder to rise above 50°C.
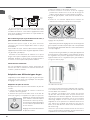
Positioning and levelling
It is possible to install the appliance alongside
cupboards whose height does not exceed that of the
hob surface.
Make sure that the wall in contact with the back of the
appliance is made from a non-flammable, heat-resistant
material (T 90°C).
To install the appliance correctly:
• Place it in the kitchen, the dining room or the bed-sit
(not in the bathroom).
• If the top of the hob is higher than the cupboards, the
appliance must be installed at least 600 mm away from
them.
• If the cooker is installed underneath a wall cabinet,
there must be a minimum distance of 420 mm between
this cabinet and the top of the hob.
This distance should be increased to 700 mm if the wall
cabinets are flammable (see gure).

15
GB
• Do not position blinds
behind the cooker or less
than 200 mm away from
its sides.
• Any hoods must be
installed according to
the instructions listed in
the relevant operating
manual.
Levelling
If it is necessary to level the
appliance, screw the adjustable
feet into the places provided on
each corner of the base of the
cooker (see gure).
The legs* fit into the slots on the
underside of the base of the
cooker.
Electrical connection
Install a standardised plug corresponding to the load
indicated on the appliance data plate (see Technical data
table).
The appliance must be directly connected to the mains using
an omnipolar circuit-breaker with a minimum contact opening
of 3 mm installed between the appliance and the mains. The
circuit-breaker must be suitable for the charge indicated and
must comply with current electrical regulations (the earthing
wire must not be interrupted by the circuit-breaker). The
supply cable must be positioned so that it does not come
into contact with temperatures higher than 50°C at any point.
Before connecting the appliance to the power supply,
make sure that:
• The appliance is earthed and the plug is compliant with
the law.
• The socket can withstand the maximum power of the
appliance, which is indicated by the data plate.
• The voltage is in the range between the values
indicated on the data plate.
• The socket is compatible with the plug of the appliance.
If the socket is incompatible with the plug, ask
an authorised technician to replace it. Do not use
extension cords or multiple sockets.
HOOD
420
Min.
min.
650
mm. with hood
min.
700
mm. without hood
mm.
600
Min. mm.
420
Min. mm.
Once the appliance has been installed, the power
supply cable and the electrical socket must be easily
accessible.
The cable must not be bent or compressed.
The cable must be checked regularly and replaced by
authorised technicians only.
The manufacturer declines any liability should these
safety measures not be observed.
Gas connection
Connection to the gas network or to the gas cylinder
may be carried out using a flexible rubber or steel hose,
in accordance with current national legislation and after
making sure that the appliance is suited to the type of gas
with which it will be supplied (see the rating sticker on
the cover: if this is not the case see below). When using
liquid gas from a cylinder, install a pressure regulator
which complies with current national regulations. To
make connection easier, the gas supply may be turned
sideways*: reverse the position of the hose holder with
that of the cap and replace the gasket that is supplied
with the appliance.
Check that the pressure of the gas supply is consistent
with the values indicated in the Table of burner and
nozzle specifications (see below). This will ensure the
safe operation and durability of your appliance while
maintaining efficient energy consumption.
Gas connection using a flexible rubber hose
Make sure that the hose complies with current national
legislation. The internal diameter of the hose must
measure: 8 mm for liquid gas supply; 13 mm for methane
gas supply.
Once the connection has been performed, make sure
that the hose:
• Does not come into contact with any parts that reach
temperatures of over 50°C.
• Is not subject to any pulling or twisting forces and that
it is not kinked or bent.
• Does not come into contact with blades, sharp corners
or moving parts and that it is not compressed.
• Is easy to inspect along its whole length so that its
condition may be checked.
• Is shorter than 1500 mm.
• Fits firmly into place at both ends, where it will be fixed
using clamps that comply with current regulations.
The appliance must not be installed behind
a decorative door in order to avoid overheating

16
GB
If one or more of these conditions is not fulfilled or if
the cooker must be installed according to the conditions
listed for class 2 - subclass 1 appliances (installed
between two cupboards), the flexible steel hose must
be used instead (see below).
Connecting a flexible jointless stainless steel pipe to
a threaded attachment
Make sure that the hose and gaskets comply with current
national legislation.
To begin using the hose, remove the hose holder on the
appliance (the gas supply inlet on the appliance is a
cylindrical threaded 1/2 gas male attachment).
Perform the connection in such a way that the hose
length does not exceed a maximum of 2 metres, making
sure that the hose is not compressed and does not come
into contact with moving parts.
Checking the tightness of the connection
When the installation process is complete, check the hose
fittings for leaks using a soapy solution. Never use a flame.
Adapting to different types of gas
It is possible to adapt the appliance to a type of gas other
than the default type (this is indicated on the rating label
on the cover).
3. While the burner is alight, quickly change the position
of the knob from minimum to maximum and vice versa
several times, checking that the flame is not extinguished.
The hob burners do not require primary air adjustment.
After adjusting the appliance so it may be used with a
different type of gas, replace the old rating label with a
new one that corresponds to the new type of gas (these
labels are available from Authorised Technical Assistance
Centres).
Should the gas pressure used be different (or vary
slightly) from the recommended pressure, a suitable
pressure regulator must be fitted to the inlet hose in
accordance with current national regulations relating
Adapting the hob
Replacing the nozzles for the hob burners:
1. Remove the hob grids and slide the burners off their
seats.
2. Unscrew the nozzles using a 7 mm socket spanner
(see gure), and replace them with nozzles suited to the
new type of gas (see Burner and nozzle speci cations table).
3. Replace all the components by following the above
instructions in reverse.
Adjusting the hob burners’ minimum setting:
1. Turn the tap to the minimum position.
2. Remove the knob and adjust
the regulatory screw, which is
positioned inside or next to the
tap pin, until the flame is small
but steady.
! If the appliance is connected to
a liquid gas supply, the regulatory
screw must be fastened as tightly
as possible:
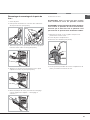
Safety Chain
! In order to prevent accidental tipping of the appliance,
for example by a child climbing onto the oven door, the
supplied safety chain MUST be installed!
The cooker is fitted with a safety chain to be fixed by
means of a screw (not supplied with the cooker) to the
wall behind the appliance, at the same height as the chain
is attached to the appliance.
Choose the screw and the screw anchor according to
the type of material of the wall behind the appliance. If
the head of the screw has a diameter smaller than 9mm,
a washer should be used. Concrete wall requires the
screw of at least 8mm of diameter, and 60mm of length.
Ensure that the chain is fixed to the rear wall of the cooker
and to the wall, as shown in figure, so that after installation
it is tensioned and parallel to the ground level.

17
GB
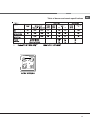
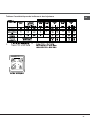
Table of burner and nozzle specifications
87
69
50
128
104
78
51
S
S
R
A
ACMK 6123/WHACMK 6123/WHACMK 6123/WH

18
GB
Start-up and use
*
Only available in certain models.
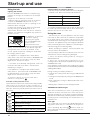
Practical advice on using the burners
For the burners to work in the most efficient way possible
and to save on the amount of gas consumed, it is
recommended that only pans that have a lid and a flat
base are used. They should also be suited to the size of
the burner:
To identify the type of burner, please refer to the diagrams
contained in the “Burner and nozzle specifications”.
For models equipped with a reducer grid, the latter must
be used only for the auxiliary burner, when pans with a
diameter of less than 12 cm are used.
Using the oven
The first time you use your appliance, heat the empty
oven with its door closed at its maximum temperature
for at least half an hour. Ensure that the room is well
ventilated before switching the oven off and opening the
oven door. The appliance may emit a slightly unpleasant
odour caused by protective substances used during the
manufacturing process burning away.
Before operating the product, remove all plastic film
from the sides of the appliance.
Never put objects directly on the bottom of the oven; this
will avoid the enamel coating being damaged.
1. Select the desired cooking mode by turning the
SELECTOR knob.
2. Select the recommended temperature for the
cooking mode or the desired temperature by turning the
THERMOSTAT knob.
A list detailing cooking modes and suggested cooking
temperatures can be found in the relevant table (see Oven
cooking advice table).
During cooking it is always possible to:
• Change the cooking mode by turning the SELECTOR
knob.
• Change the temperature by turning the THERMOSTAT
knob.
Burner Cookware Diameter (cm)
Fast (R) 24 - 26
Semi Fast (S) 16 - 20
Auxiliary (A) 10 - 14
Ideal for gentle cooking (e.g: rice, sauces, roasts, fish) with
liquids (water, wine, broth, milk)
Ideal for stewing ( for a long period of time) and thickening.
Creaming pasta,
Ideal for sautéing.
Cooking on a high flame and browning (roast, steaks,
escalopes, fish fillets, fried eggs.)
Ideal for grilling and browning, starting to cook, frying deep
frozen products.
Ideal for rapidly increasing the temperature of food to fast
boiling in the case of water or rapidly heating cooking liquids.
Using the hob
Lighting the burners
For each BURNER knob there is a complete ring
showing the strength of the flame for the relevant
burner.
To light one of the burners on the hob:
1. Bring a flame or gas lighter close to the burner.
2. Press the BURNER knob and turn it in an
anticlockwise direction so that it is pointing to the
maximum flame setting E.
3. Adjust the intensity of the flame to the desired
level by turning the BURNER knob in an
anticlockwise direction. This may be the minimum
setting C, the maximum setting E or any position in
between the two.
If the appliance is fitted with
an electronic lighting
device*(C) (
see figure
),
press the BURNER knob
and turn it in an
anticlockwise direction,
towards the minimum flame
setting, until the burner is lit. The burner might be
extinguished when the knob is released. If this
occurs, repeat the process, holding the knob down
for a longer period of time.
f the appliance is equipped with a flame failure
safety device (X), press and hold the BURNER knob
for approximately 3-7 seconds to keep the flame
alight and to activate the device.
If the flame is accidentally extinguished, switch off
the burner and wait for at least 1 minute before
attempting to relight it.
If the appliance is equipped with a flame failure
safety device*, press and hold the BURNER knob
for approximately 2-3 seconds to keep the flame
alight and to activate the device.
To switch the burner off, turn the knob until it
reaches the stop position .
X
C
• Stop cooking by turning the SELECTOR knob to the
“0” position.
Always place cookware on the rack(s) provided.
THERMOSTAT indicator light
When this is illuminated, the oven is generating heat.
It switches off when the inside of the oven reaches the
selected temperature. At this point the light illuminates
and switches off alternately, indicating that the thermostat
is working and is maintaining the temperature at a
constant level.
Oven light
This is switched on by turning the SELECTOR knob to
any position other than “0”. It remains lit as long as the
oven is operating. By selecting
with the knob, the
light is switched on without any of the heating elements
being activated.
Assisted cooking mode 6th sense

19
GB
Cooking modes
A temperature value can be set for all cooking modes
between 60°C and Max, except for the following modes
• GRILL (recommended: set only to MAX power level)
• GRATIN (recommended: do not exceed 200°C).
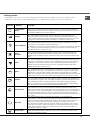
Function Function Function
TRADITIONAL
OVEN
Both the top and bottom heating elements will come on. When using this traditional
cooking mode, it is best to use one cooking rack only. If more than one rack is used, the
heat will be distributed in an uneven manner.
BAKING
The rear heating element and the fan are switched on, thus guaranteeing the
distribution of heat in a delicate and uniform manner throughout the entire oven. This
mode is ideal for baking and cooking temperature sensitive foods (such as cakes that
need to rise) and for the preparation of pastries on 3 shelves simultaneously.
FAST COOKING
The heating elements and the fan come on, guaranteeing the distribution of heat
consistently and uniformly throughout the oven.
Preheating is not necessary for this cooking mode. This
mode is particularly suitable
for cooking pre-packed
food quickly (frozen or pre-cooked). The best results are
achieved using one cooking rack only.
MULTI-
COOKING
All the heating elements (top, bottom and circular) switch on and the fan begins to
operate. Since the heat remains constant throughout the oven, the air cooks and
browns food in a uniform manner. A maximum of two racks may be used at the same
time.
PIZZA
The circular heating elements and the elements at the bottom of the oven are
switched on and the fan is activated. This combination heats the oven rapidly by
producing a considerable amount of heat, particularly from the element at the
bottom. If you use more than one rack at a time, switch the position of the dishes
halfway through the cooking process.
GRILL
The central part of the top heating element is switched on. The high and direct
temperature of the grill is recommended for food that requires a high surface
temperature (veal and beef steaks, fillet steak and entrecôte). This cooking
mode uses a limited amount of energy and is ideal for grilling small dishes. Place the food
in the centre of the rack, as it will not be cooked properly if it is placed in the corners.
GRATIN
The top heating element and the rotisserie (where present) are activated and
the fan begins to operate. This combination of features increases the effectiveness of
the unidirectional thermal radiation provided by the heating elements through
forced circulation of the air throughout the oven. This helps prevent food from burning
on the surface and allows the heat to penetrate right into the food.
DEFROSTING
The fan located on the bottom of the oven makes the air circulate at room temperature
around the food. This is recommended for the defrosting of all types of food, but in
particular for delicate types of food which do not require heat, such as for example: ice
cream cakes, cream or custard desserts, fruit cakes. By using the fan, the defrosting
time is approximately halved. In the case of meat, fish and bread, it is possible to
accelerate the process using the “multi-cooking” mode and setting the temperature to
80° - 100°C
BOTTOM
The lower heating element is activated. This position is recommended for
perfecting the cooking of dishes (in baking trays) which are already cooked on the
surface but require further cooking in the centre, or for desserts with a covering of
fruit or jam, which only require moderate colouring on the surface. It should
be noted that this function does not allow the maximum temperature to be reached
inside the oven (250°C) and it is therefore not recommended that foods are cooked
using only this setting, unless you are baking cakes (which should be baked at a
temperature of 180°C or lower).
BOTTOM
VENTILATED
The bottom heating element and the fan is activated, which allows for the heat
distribution within the whole cavity of the oven. This combination is useful for light
cooking of vegetables and fish

20
GB
Practical cooking advice
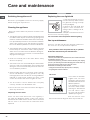
! In the GRILL cooking mode, place the dripping pan in
position 1 to collect cooking residues (fat and/or grease).
GRILL
• Insert the rack in position 3 or 4. Place the food in the
centre of the rack.
• We recommend that the power level is set to maximum.
The top heating element is regulated by a thermostat
and may not always operate constantly.
PIZZA
• Use a light aluminium pizza pan. Place it on the rack
provided.
For a crispy crust, do not use the dripping pan as it
prevents the crust from forming by extending the total
cooking time.
• If the pizza has a lot of toppings, we recommend
adding the mozzarella cheese on top of the pizza
halfway through the cooking process.
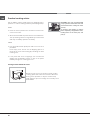
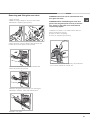
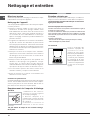
WARNING! The oven is provided with
a stop system to extract the racks and
prevent them from coming out of the
oven.(1)
As shown in the drawing, to extract
them completely, simply lift the racks,
holding them on the front part, and
pull (2).
Storage recess below the oven*
Below the oven a recess can be used to contain
cooking pans and cooker accessories. Moreover,
during oven operation, it may be used to keep
food warm.To open the storage is necessary turn it
downwards.
La page est en cours de chargement...
La page est en cours de chargement...
La page est en cours de chargement...
La page est en cours de chargement...
La page est en cours de chargement...
La page est en cours de chargement...
La page est en cours de chargement...
La page est en cours de chargement...
La page est en cours de chargement...
La page est en cours de chargement...
La page est en cours de chargement...
La page est en cours de chargement...
La page est en cours de chargement...
La page est en cours de chargement...
La page est en cours de chargement...
La page est en cours de chargement...
-
 1
1
-
 2
2
-
 3
3
-
 4
4
-
 5
5
-
 6
6
-
 7
7
-
 8
8
-
 9
9
-
 10
10
-
 11
11
-
 12
12
-
 13
13
-
 14
14
-
 15
15
-
 16
16
-
 17
17
-
 18
18
-
 19
19
-
 20
20
-
 21
21
-
 22
22
-
 23
23
-
 24
24
-
 25
25
-
 26
26
-
 27
27
-
 28
28
-
 29
29
-
 30
30
-
 31
31
-
 32
32
-
 33
33
-
 34
34
-
 35
35
-
 36
36


Whirlpool ACMK 6123/WH Mode d'emploi
- Catégorie
- Fours
- Taper
- Mode d'emploi
dans d''autres langues
- English: Whirlpool ACMK 6123/WH User guide
Documents connexes
-
Whirlpool ACMK 6123/WH Mode d'emploi
-
Whirlpool AXMT 6434/WH Mode d'emploi
-
-
-
-
-
Whirlpool WS5G1PMW/MEA Mode d'emploi
-
IKEA HB 510 S Le manuel du propriétaire
-
-
Whirlpool ACMK 6110 / WH / 3 Mode d'emploi