Yamaha DVD-S2500 Le manuel du propriétaire
- Catégorie
- Lecteurs DVD
- Taper
- Le manuel du propriétaire

YAMAHA ELECTRONICS CORPORATION, USA
6660 ORANGETHORPE AVE., BUENA PARK, CALIF. 90620, U.S.A.
YAMAHA CANADA MUSIC LTD.
135 MILNER AVE., SCARBOROUGH, ONTARIO M1S 3R1, CANADA
YAMAHA ELECTRONIK EUROPA G.m.b.H.
SIEMENSSTR. 22-34, 25462 RELLINGEN BEI HAMBURG, F.R. OF GERMANY
YAMAHA ELECTRONIQUE FRANCE S.A.
RUE AMBROISE CROIZAT BP70 CROISSY-BEAUBOURG 77312 MARNE-LA-VALLEE CEDEX02, FRANCE
YAMAHA ELECTRONICS (UK) LTD.
YAMAHA HOUSE, 200 RICKMANSWORTH ROAD WATFORD, HERTS WD18 7GQ, ENGLAND
YAMAHA SCANDINAVIA A.B.
J A WETTERGRENS GATA 1, BOX 30053, 400 43 VÄSTRA FRÖLUNDA, SWEDEN
YAMAHA MUSIC AUSTRALIA PTY, LTD.
17-33 MARKET ST., SOUTH MELBOURNE, 3205 VIC., AUSTRALIA
©
2004 All rights reserved.
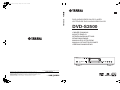
DVD AUDIO/VIDEO SA-CD PLAYER
LECTEUR DE DVD AUDIO/VIDEO SA-CD
DVD-S2500
OWNER’S MANUAL
MODE D’EMPLOI
BEDIENUNGSANLEITUNG
BRUKSANVISNING
MANUALE DI ISTRUZIONI
MANUAL DE INSTRUCCIONES
GEBRUIKSAANWIJZING
G
Printed in China 3139 246 13401
DVD-S2500
DVD-S2500_G-cv.fm Page 1 Friday, October 22, 2004 1:56 PM

i
Important Note
DK
Advarsel:
Laserrudstråling ved åbning når sikkerhesafbrydere er ude
af funktion. Undgå u tsættelse for stråling.
Bemærk:
Netafbryderen STANDBY/ON er sekundært indkoblet og
afbryder ikke strømmen fra nette. Den indbyggede netdel er
derfor tilsluttet til lysnettet så længe netstikket sidder i
stikkontakten.
N
Observer:
Nettbryteren STANDBY/ON er sekundert innkoplet. Den
innebygdenetdelen er derfor ikke frakoplet nettet så lenge
apparatet er tilsluttet nettkontakten.
S
Klass 1 laserapparat
Varning!
Om apparaten används på annat sätt än i denna
bruksanvisning specificerats, kann användaren utsättas för
laserstrålning, som översjruder gränsen för läserklass 1.
Observera!
Strömbrytaren STANDBY/ON är sekundärt kopplad och
inte bryter strömmen fråan nätet Den inbyggda nätdelen är
därför ansluten till elnätet så länge stickproppen sitter i v
ägguttaget.
SF
Luokan 1 laserlaite + Klass 1 laserapparat
Varoitus!
Laitteen käyttäminen muulla kuin tässä käyttöohjeessa
mainitulla tavalla saattaa altistaa käyttäjän
turvallisuusluokan 1 ylittävälle lasersäleilille.
Huom.
Toiminnanvalitsin STANDBY/ON on kytketty
toisiopuolelle, eikä se kytke laitetta irti sähköverkosta.
Sisäänrakennettu verkko-osa on kytkettynä sähköverkkoon
aina silloin, kun pistoke on pistorasiassa.
Important Note for Users in the UK
Mains plug
This apparatus is fitted with an approved 13 Amp plug.To
change a fuse in this type of plug proceed as follows:
1 Remove fuse cover and fuse.
2 Fix new fuse which should be a BS1362 5 Amp,
A.S.T.A. or BSI approved type.
3 Refit the fuse cover.
If the fitted plug is not suitable for your socket outlets, it
should be cut off and an appropriate plug fitted in its place.
If the mains plug contains a fuse, this should have a value of
5 Amp. If a plug without a fuse is used, the fuse at the
distribution board should not be greater than 5 Amp.
Note:The severed plug must be disposed of to avoid a
possible shock hazard should it be inserted into a 13 Amp
socket elsewhere.
How to connect a plug
The wires in the mains lead are coloured with the following
code: blue = neutral (N), brown = live (L).
As these colours may not correspond with the colour
markings identifying the terminals in your plug, proceed as
follows:
• Connect the blue wire to the terminal marked N or
coloured black.
• Connect the brown wire to the terminal marked L or
coloured red.
• Do not connect either wire to the earth terminal in the
plug, marked E (or e) or coloured green (or green and
yellow).
Before replacing the plug cover, make certain that the cord
grip is clamped over the sheath of the lead - not simply over
the two wires.
Copyright in the U.K.
Recording and playback of material may require
consent. See Copyright Act 1956 and The Performer’s
Protection Acts 1958 to 1972.
VARO!
AVATTAESSA JA SUOJALUKITUS OHITETTAESSA OLET
ALTTIINA NÄKYMÄTTÖMÄLLE LASERSÄTEILYLLE. ÄLÄ KATSO
SÄTEESEEN.
VARNING!
OSYNLIG LASERSTRÅLNING NÄR DENNA DEL ÄR ÖPPNAD OCH
SPÄRREN ÄR URKOPPLAD.
BETRAKTA EJ STRÅLEN.

ii
General information
CAUTION
Use of controls or adjustments or performance of procedures
other than those specified herein may result in hazardous
radiation exposure.
ATTENTION
L’emploi de commandes, de réglages ou un choix de
procédures différents des spécifications de cette brochure
peut entraîner une exposition à d’éventuelles radiations
pouvant être dangereses.
ACHTUNG
Die Verwendung von Bedienungselementen oder
Einstellungen oder die Durchführung von
Bedienungsvorgängen, die nicht in dieser Anleitung
aufgeführt sind, kann zu einem Kontakt mit gefährlichen
Laserstrahlen führen.
OBSERVERA
Användning av kontroller och justeringar eller genomförande
av procedurer andra än de som specificeras i denna bok kan
resultera i att du utsätter dig för farlig strålning.
ATTENZIONE
Uso di controlli o regolazioni o procedure non specificamente
descritte può causare l’esposizione a radiazioni di livello
pericoloso.
PRECAUCIÓN
El uso de los controles o los procedimientos de ajuste o
utilización diferentes de los especificados en este manual
pueden causar una exposición peligrosa a la radiación.
VOORZICHTIG
Gebruik van bedieningsorganen of instellingen, of uitvoeren
van handelingen anders dan staan beschreven in deze
handleiding kunnen leiden tot blootstelling aan gevaarlijke
stralen.
le laser
CAUTION
- Visible and invisib
radiation when open. Avoid exposure to beam.
The unit is not disconnected from the AC power source as long
as it is connected to the wall outlet,even if this unit itself is
turned off.This state is called the standby mode.In this state,this
unit is designed to consume a very small quantity of power.
L ’appareil n ’est pas isolé de la source d ’alimentation aussi
longtemps qu ’il reste branché sur une prise murale,même
lorsqu ’il est éteint.Il est alors dit en mode «Veille ».Dans ce
mode, l ’appareil consomme très peu de courant.
Das Gerät ist nicht vom Netz getrennt, solange der Netzstecker
noch mit der Wandsteckdose verbunden ist, selbst wenn das
Gerät ausgeschaltet wurde. Dieser Betriebszustand wird als
Bereitschaftsmodus bezeichnet. In diesem Zustand nimmt das
Gerät eine sehr geringe Menge Strom auf.
Enheten är inte urkopplad från nätet så länge som den är
ansluten till vägguttaget även om enheten i sig självt är
avstängd. Detta kallas för beredskapsläge och i detta tillstånd
konsumerar apparaten minimalt med ström.
L’unità non è scollegata dall’impianto elettrico di casa sintanto
che rimane collegata ad una presa di corrente anche se è spenta.
Questo modo viene chiamato “modo di attesa”. In esso, l’unità
consuma una quantità molto bassa di energia per mantenere in
memoria le impostazioni da voi fatte.
Aunque el propio aparato se encuentre apagado, éste no se
desconectará de la fuente de CA siempre que se mantenga
enchufado a la toma de corriente. Este estado recibe el nombre
de “modo de espera”. En este estado, este aparato ha sido
diseñado para consumir una cantidad muy pequeña de energía.
De stroomtoevoer naar het toestel is niet afgesloten zolang de
stekker nog in het stopcontact zit, zelfs niet als het toestel zelf
uitgeschakeld is. Deze toestand wordt “standby” (waak- of
paraatstand) genoemd. Het toestel is ontworpen om in deze
toestand
CAUTION
VISIBLE AND INVISIBLE LASER RADIATION
WHEN OPEN. AVOID EXPOSURE TO BEAM.
ADVARSEL
SYNLIG OG USYNLIG LASERSTRÅLING
VED ÅBNING. UNDGÅ UDSÆTTELSE FOR STRÅLING.
ADVARSEL
SYNLIG OG USYNLIG LASERSTRÅLING
NÅR DEKSEL ÅPNES. UNNGÅ EKSPONERING FOR
STRÅLEN.
VARNING
SYNLIG OCH OSYNLIG LASERSTRÅLNING
NÄR DENNA DEL ÄR ÖPPNAD. BETRAKTA EJ
STRÅLEN.
VARO!
AVATTAESSA OLET ALTTIINA NÄKYVÄLLE
JA NÄKYMÄTT ÖMÄLLE LASER SÄTEILYLLE. ÄLÄ
KATSO SÄTEESEEN..
VORSICHT
SICHTBARE UND UNSICHTBARE
LASERSTRAHLUNG WENN ABDECKUNG GEÖFFNET..
NICHT DEM STRAHL AUSSETSEN.
DANGER
VISIBLE AND INVISIBLE LASER RADIATION
WHEN OPEN. AVOID DIRECT EXPOSURE TO BEAM.
ATTENTION
RAYONNEMENT LASER VISIBLE ET
INVISIBLE EN CAS D’OUVERTURE. EXPOSITION
DANGEREUSE AU FAISCEAU.

iii
CAUTION: READ THIS BEFORE OPERATING YOUR UNIT
1 To assure the finest performance, please read this
manual carefully. Keep it in a safe place for future
reference.
2 Install this sound system in a well ventilated, cool, dry,
clean place — away from direct sunlight, heat sources,
vibration, dust, moisture, or cold. In a cabinet, allow
about 2.5cm (1 inch) of free space all around this unit
for adequate ventilation.
3 Locate this unit away from other electrical appliances,
motors, or transformers to avoid humming sounds.
4 Do not expose this unit to sudden temperature changes
from cold to hot, nor locate this unit in an environment
with high humidity (i.e., a room with a humidifier) to
prevent condensation inside this unit, which may cause
an electrical shock, fire, damage to this unit, and/or
personal injury.
5 Avoid installing this unit in a location where foreign
objects may fall onto this unit or where this unit may be
exposed to liquid dripping or splashing. On the top of
this unit, do not place:
– Other components, as they may cause damage and/or
discoloration on the surface of this unit.
– Burning objects (i.e., candles), as they may cause
fire, damage to this unit, and/or personal injury.
– Containers with liquid in them, as they may fall,
spilling the liquid and causing an electrical shock to
the user and/or damage to this unit.
6 Do not cover this unit with a newspaper, tablecloth,
curtain, etc. in order not to obstruct heat radiation. If
the temperature inside this unit rises, it may cause fire,
damage to this unit, and/or personal injury.
7 Do not plug in this unit to a wall outlet until all
connections are complete.
8 Do not operate this unit upside-down. It may overheat,
possibly causing damage.
9
Do not use excessive force on switches, knobs and/or cords.
10 When disconnecting the power cord from the wall
outlet, grasp the plug; do not pull the cord.
11 Do not clean this unit with chemical solvents; this
might damage the finish. Use a clean, dry cloth.
12 Use only the voltage specified on this unit. Using this
unit with a higher voltage than specified is dangerous
and may cause fire, damage to this unit, and/or
personal injury. YAMAHA will not be held responsible
for any damage resulting from use of this unit with a
voltage other than as specified.
13 To prevent damage by lightning, disconnect the power
cord from the wall outlet during an electrical storm.
14 Do not attempt to modify or fix this unit. Contact
qualified YAMAHA service personnel when any
service is needed. The cabinet should never be opened
for any reason.
15 When not planning to use this unit for long periods of
time (i.e., vacation), disconnect the AC power plug
from the wall outlet.
16 Be sure to read the “TROUBLESHOOTING” section
on common operating errors before concluding that
this unit is faulty.
17 Before moving this unit, press STANDBY/ON to set
the unit in standby mode, then disconnect the AC
power plug from the wall outlet.
18 Place this unit on a flat, hard and stable surface.
19 There must be sufficient room in front of the player for
the disc tray to be opened.
20 The mechanical parts of the set contain self-lubricating
bearings and must not be oiled or lubricated.
NOTE:
Pictures shown maybe different between countries.
Never make or change connections with the power switched
on.
When playing DTS encoded CDs, excessive noise will be
heard from the analog stereo outputs. To avoid possible
damage to the audio system, the consumer should take
proper precautions when the analog stereo outputs of the
player are connected to an amplification system. To enjoy
DTS Digital Surround™ playback, an external 5.1-channel
DTS Digital Surround™ decoder system must be connected
to the digital output of the player.
LASER SAFETY
This unit employs a laser. Due to possible eye injury, only
a qualified service person should remove the cover or
attempt to service this device.
CAUTION
VISIBLE AND INVISIBLE LASER RADIATION WHEN
OPEN. AVOID EXPOSURE TO BEAM.
DANGER
This unit emits visible laser radiation when open. Avoid
direct eye exposure to beam.
When this unit is plugged into a wall outlet, do not place
your eyes close to the opening of the disc tray and other
openings or look inside.
The unit is not disconnected from the AC power source
as long as it is connected to the wall outlet, even if this
unit itself is turned off. This state is called the standby
mode. In this state, this unit is designed to consume a
very small quantity of power.
WARNING
TO REDUCE THE RISK OF FIRE OR ELECTRIC
SHOCK, DO NOT EXPOSE THIS UNIT TO RAIN OR
MOISTURE.
LASER DIODE PROPERTIES
Type Semiconductor laser GaAlAs
Wave length 650 nm (DVD/SA-CD)
790 nm (VCD/CD)
Output Power 7 mW (DVD/SA-CD/VCD/CD)

1
English
Patent information............................................................2
Playable disc formats .......................................................2
Region management information.....................................3
Supplied accessories ........................................................3
Installing batteries in the remote control .........................3
Using the remote control..................................................4
Maintenance.....................................................................4
Front panel .......................................................................5
Rear panel ........................................................................6
Remote control.................................................................7
Audio connection.............................................................8
Digital audio connections .................................................8
i.LINK components connections ......................................8
Analog audio (6CH DISCRETE) connection...................8
Analog audio (MIXED 2CH) connection.........................9
Video connections............................................................9
HDMI component connections.........................................9
Switching on ..................................................................10
Setups before the initial playback..................................10
General operation...........................................................12
Preferences.....................................................................12
Features...........................................................................12
Adv.Picture .....................................................................12
Picture .............................................................................13
Sound ..............................................................................13
Toolbar...........................................................................14
Program...........................................................................14
View................................................................................14
Play option ...................................................................... 14
Search..............................................................................14
Slide Show ......................................................................15
Setup ..............................................................................15
Access .............................................................................15
Features...........................................................................15
TV ...................................................................................15
Audio Menu ....................................................................16
Language.........................................................................17
Speakers ..........................................................................17
DVD/CD Mode...............................................................18
SA-CD Mode ..................................................................18
i.LINK.............................................................................18
Basic playback ...............................................................20
DVD-Video and DVD-Audio ........................................20
Playing a disc..................................................................20
Smart Resume.................................................................20
DVD features................................................................. 21
Menu............................................................................... 21
Camera angle .................................................................. 21
Changing the audio language and format....................... 21
Subtitle language ............................................................ 21
DVD-Audio features .....................................................21
Changing pages .............................................................. 21
Playing bonus groups ..................................................... 21
DVD Video Mode .......................................................... 21
SA-CD (Super Audio CD)............................................. 22
Playing a disc.................................................................. 22
Sound mode – SA-CD playback..................................... 22
Audio CD....................................................................... 23
Playing a disc.................................................................. 23
Video CD and Super Video CD ....................................23
Playing a disc.................................................................. 23
Playback Control (PBC) ................................................. 23
MP3 ............................................................................... 24
MP3 disc features ........................................................... 24
Playing a disc.................................................................. 24
Choosing an Album/Track to playback.......................... 24
MP3 text ......................................................................... 24
JPEG ..............................................................................25
JPEG disc features.......................................................... 25
Playing a disc.................................................................. 25
Slide show setting........................................................... 25
Rotating the image.......................................................... 25
General features.............................................................26
Moving to another segment............................................ 26
Search ............................................................................. 26
Slow motion.................................................................... 26
Still picture and frame-by-frame playback..................... 26
Time search .................................................................... 26
Repeat ............................................................................. 27
Repeat A-B .................................................................... 27
Shuffle ............................................................................ 27
Scan ............................................................................... 27
Zoom .............................................................................. 27
FTS video/audio program............................................... 28
Activating/deactivating the FTS program ...................... 28
Erasing a track/chapter/index from the FTS list............. 28
Erasing all tracks/chapters/indexes from the FTS list .... 28
Disc lock .......................................................................28
Activating/deactivating Disc lock .................................. 28
Authorizing discs............................................................ 28
Deauthorizing discs ........................................................ 29
Parental Control ............................................................29
Activating/deactivating Parental Control ....................... 29
Country ........................................................................... 29
Changing the four-digit PIN..........................................29
If you forget your four-digit code................................... 29
Introduction 2
Functional Overview 5
Preparation 8
On-screen menu 12
Operation 20
Troubleshooting 30
Specifications 31
Table of Contents

2
Introduction
Thank you for purchasing the YAMAHA DVD
AUDIO/VIDEO SA-CD player. This Owner’s Manual
explains its basic operations.
Manufactured under license from
Dolby Laboratories.
“Dolby”, “Pro Logic”, and the
double-D symbol are trademarks of
Dolby Laboratories.
“DTS” and “DTS Digital Surround”
are registered trademarks of Digital
Theater Systems, Inc.
“DCDi” is a trademark of Faroudja, a
division of Genesis Microchip, Inc.
HDMI, the HDMI logo and High-
Definition Multimedia Interface are
trademarks or registered trademark of
HDMI Licensing LLC.
This product incorporates copyright protection
technology that is protected by method claims of certain
U.S. patents and other intellectual property rights owned
by Macrovision Corporation and other rights owners.
Use of this copyright protection technology must be
authorized by Macrovision Corporation, and is intended
for home and other limited viewing uses only unless
otherwise authorized by Macrovision Corporation.
Reverse engineering or disassembly is prohibited.
“i.LINK” and the “i.LINK” logo are trademarks of
Sony Corporation.
This product complies with the following i.LINK
interface specifications:
1. IEEE Std 1394a-2000, Standard for a High
Performance Serial Bus
2. Audio and Music Data Transmission Protocol 2.1
Following the standard for AM824 sequence adaptation
layers, the product is compatible with IEC60958
bitstream, DVD-A and SA-CD media.
This unit can play the disc types associated with the
logos shown below. (Do not attempt to load any other
type of disc into the unit, or the unit may be damaged.)
This manual refers to disc types using the following
symbols:
*1 icon includes Super Video CD.
Notes:
–
This unit is designed for use with SA-CD, DVD-Video,
DVD-Audio, Video CD, Super Video CD, Audio CD,
CD-R and CD-RW (MP3 and JPEG supported),
DVD+R and DVD+RW, DVD-R and DVD-RW.
– CD-R and CD-RW discs cannot be played unless they
have been finalized.
– DVD+R and DVD+RW discs cannot be played
unless they have been finalized.
– DVD-R and DVD-RW discs must be recorded in
Video format and must be finalized.
– Some discs cannot be played depending on disc
characteristics or recording conditions.
– Be sure to use only CD-R and CD-RW discs from
reliable manufacturers.
– Dolby Digital, DTS Digital Surround, and MPEG
digital audio are supported.
– PAL and NTSC are supported.
– This unit features the PAL and NTSC video system
converting function to allow you watching the
different types of video discs on one TV (see “TV
System (NTSC/PAL conversion)” on page 15).
–
Do not use any non-standard shaped discs (heart, etc.).
– Do not use discs that have tape, scales, or paste on
them or damage to the unit may result.
– Do not use discs with surfaces printed by a
commercial label printer.
– Some DVD discs require specific features or allow
only limited function during playback.
– Prohibited mark may appear on the TV screen to
indicate that a function is unavailable.
– Photo CD, CD-ROM, DVD-ROM, DVD-RAM, CDV
and nonstandard CD discs cannot be played on this
unit.
Patent information
Playable disc formats
DI
G
I
T
A
L
VIDE
O
SUPER VIDE
O
DVD-Audio DVD-Video Video CD
*1
SA-CD
(Super Audio CD)
Audio CD MP3
DVD-A
DVD-V
VCD
SA-CD
CD
MP3
VCD

3
English
Introduction
The unit is designed to support the Region Management
System. Check the regional code number on the disc
package. If the number does not match the unit’s region
number (see table below, or see back of unit), the unit
may be unable to play the disc.
Check your package to make sure it contains the
following items:
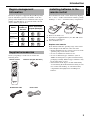
Insert the batteries in the correct direction by aligning
the “+” and “–” marks on the batteries with the polarity
markings “+” and “–” inside the battery compartment.
1 Remove the back cover.
2 Insert the two supplied batteries (AA, R6, UM-3) into
the battery compartment.
3 Close the back cover.
Replace worn batteries
Worn batteries limit the operating range of the remote
control. Replace both batteries at the same time.
• Replace both batteries if you notice a decrease in the
operating range of the remote control.
• Do not use old batteries with new ones.
• Do not use different types of batteries (such as
alkaline and manganese) together. Read the battery
packaging carefully. Different types of batteries may
be the same shape or color.
• If the batteries leak, dispose of them immediately.
Avoid touching the leaked material or letting it come
into contact with clothing, etc. Clean the battery
compartment thoroughly before installing new
batteries.
Region management
information
Model
Region
number of
the unit
Discs that can be
played (Example)
U.S.A. model
U.K. and
Europe models
Australia
model
Supplied accessories
1 1
ALL
2 2
ALL
4
ALL
4
Remote control Batteries (x2) (AA, R6, UM-3)
Audio/Video cable Power cable
Installing batteries in the
remote control

4
Introduction
Handling the remote control
• Do not spill water or other liquids on the remote
control.
• Do not drop the remote control.
• Do not leave or store the remote control in the
following types of conditions:
– high humidity such as near a bath
– high temperature such as near a heater or stove
– extremely low temperature
– dusty places
Cleaning the cabinet
• Use a soft cloth slightly moistened with a mild detergent
solution. Do not use a solution that contains alcohol,
spirits, ammonia or abrasives.
Cleaning discs
• When a disc becomes dirty, clean it with a cleaning
cloth. Wipe the disc from the center out. Do not wipe in
a circular motion.
• Do not use solvents such as benzene, thinner,
commercial cleaners, or anti-static spray designed for
analog records.
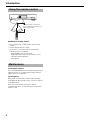
Using the remote control
Maintenance
30
30
Point the remote control at the
sensor, within approximately 6 m
(20 feet) of the unit.
Remote control
sensor

5
English
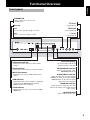
Functional Overview
Front panel
STANDBY/ON
–turns on this unit or sets it to the
standby mode
Disc tray
b
–moves to the previous chapter or track
a
–moves to the next chapter or track
s STOP
– stops playback
e PAUSE
– pauses playback
h PLAY
– starts playback
DVD-AUDIO indicator
–lights up when the unit detects DVD-Audio
signals
SA-CD indicator
–lights up when the unit detects SA-CD signals
MULTI CH indicator
–lights up when you play multi-channel audio
source
HDMI indicator
–lights up when the unit is capable of outputting
signals from the HDMI (High Definition
Multimedia Interface) terminal
i.LINK indicator
–lights up when an AV receiver selects i.LINK
(IEEE1394)
Front panel display
– shows information about the
operational status of the unit
PROGRESSIVE indicator
– lights up when the unit enters
PROGRESSIVE mode
AUDIO DIRECT indicator
– lights up when you enter the AUDIO
DIRECT mode by pressing the AUDIO
DIRECT button on the remote control
during audio disc playback
DOWN MIX indicator
– lights up when you play the discs that
allow down mixing of the multi-channel
audio sources
OPEN/CLOSE
– opens or closes the disc tray

6
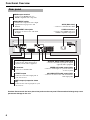
Functional Overview
Caution: Do not touch the inner pins of the jacks on the rear panel. Electrostatic discharge may cause
permanent damage to the unit.
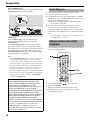
Rear panel
HDMI output terminal
–connect to the HDMI jack on a
HDMI-compatible AV component
SCAN MODE switch
–switches the component video output
signals between progressive and
interlace
COMPONENT video jacks
–connect to an AV receiver with Y P
B
P
R inputs
AC IN (Main-inlet)
– connect to a standard AC outlet
i.LINK connectors
– connect to the i.LINK jack on an
i.LINK-compatible component
COAXIAL digital audio output
–connect to the audio input jack on
digital (coaxial) audio equipment
AV terminal
–connect to a SCART cable
S VIDEO output
–connect to an S-Video input jack on
your AV receiver
VIDEO output (composite video
out)
–connect to the video input jack on your
AV receiver
OPTICAL digital audio output jack
– connect to the audio input jack on digital
(optical) audio equipment
MIXED 2CH audio output jacks
– connect to audio inputs on your AV receiver
or stereo system
6CH DISCRETE audio output jacks
– connect to an AV receiver with 6-ch discrete
audio input jacks

7
English
Functional Overview
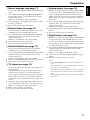
* Press and hold button for about two seconds.
Remote control
– turns the power of this unit ON or
enters standby mode
0-9 numeric buttons
SUBTITLE
– selects subtitle languages
AUDIO
– selects audio languages and formats
ANGLE
– selects DVD camera angles
ZOOM
– enlarges video images
RETURN/RESUME
– displays the previous menu or
resumes playback
k n l h
– (left/right/up/down) selects an item
in the menu
ENTER/OK
– acknowledges menu selection
MENU
– accesses the menu of a DVD disc
b
– searches backward*/accesses a
previous chapter or track
a
– searches forward*/accesses the
next chapter or track
DIMMER
–adjusts the display brightness
AUDIO DIRECT
–switches video output on and off
during audio disc playback
SOUND MODE
–selects the required sound mode
• for SA-CD: CD, Stereo, or Multi-
channel (if available)
• for DVD/VCD: Stereo, Dolby
Surround compatible, 3D sound, or
Multi-channel
PAGE
–turns pages of the DVD-Audio still
pictures
TITLE/CHAP
–selects title or chapter
STATUS
– displays current playback information
on the front panel display and on the
status window on screen
ON SCREEN
–accesses or removes the player’s On-
screen menu
STOP (s)
–stops playback
PLAY (h)
–starts playback
PAUSE (e)
–pauses playback temporarily/
frame-by-frame playback
MUTE
–disables or enables sound output
REPEAT
–repeats chapter, track, title, disc, etc.
A-B
–repeats a specific segment
SHUFFLE
–plays tracks/chapter in random order
SCAN
–plays the first 10 seconds of each
track/chapter within a disc

8
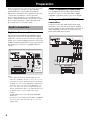
Preparation
• There are various ways to connect the player, depending
on the equipment you wish to use. The following
drawings illustrate some possible configurations.
• Please refer to manuals for other equipment as necessary
to ensure that you make the correct connections.
• Do not connect the player via your VCR. The video
quality could be distorted by the copy protection system.
• Do not connect the player’s audio output jack to the
phono input jack on your audio system.
Digital audio connections
This unit features COAXIAL and OPTICAL digital
output jacks. Connect one or both of them to digital
input jacks of an AV receiver. You can also enjoy high-
quality stereo sound at sampling frequencies of 88.2 and
96 kHz, assuming the material is not copy-protected and
the equipment you connect is compatible with these
signals.
Notes:
– If the audio format of the digital output does not
match the capabilities of your receiver, the receiver
will produce a strong, distorted sound or no sound at
all. Make sure to select the appropriate audio format
on the disc menu screen. Pressing AUDIO once or
more may change not only the audio language but
also the audio format. The selected format name will
be displayed for several seconds in the status
window.
– SA-CD audio signal is not output from DIGITAL
OUT jacks.
– If you wish to enjoy Dolby Digital, DTS, and MPEG
you must connect this unit to the AV receiver that
support those.
i.LINK components connections
Use an i.LINK connection cable of approximately
3m (10 feet) or less to connect this unit to i.LINK-
compatible components (refer to page 18 for details).
Analog audio (6CH DISCRETE)
connection
Connect a receiver with multi-channel audio input
terminals to enjoy surround sound with no sampling
frequency limitation. We recommend this connection to
obtain maximum performance of SA-CD discs and
DVD-Audio multi-channel sound.
Audio connection
COAXIAL
IN
OPTICAL
IN
AV receiver
Insert
fully, with
this side
facing up.
RL
FRONT
RL
SURROUND
CENTER
SUBWOOFER
AV receiver

9
English
Preparation
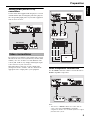
Analog audio (MIXED 2CH)
connection
Use the audio cable supplied with the player to connect
AUDIO OUT L (left) and R (right) jacks of the player to
the corresponding input jacks on your audio equipment,
such as an AV receiver.
If your AV receiver features video output jacks, connect
this unit to the AV receiver (and then to your TV). This
enables you to use one TV for several different video
sources (LD, VCR etc.) by simply switching the input
source selector on your AV receiver.
This unit features four types of video output jacks
(Component, Video, S-Video, and AV). Connect the
appropriate video output jack to your equipment.
HDMI component connections
Use the HDMI connection cable to connect this unit to
HDMI-compatible components.
Note:
– You can use a HDMI to DVI conversion cable to
connect this unit to DVI/HDCP compatible
components. In this case, no audio signals are output
from this unit’s jacks.
Video connections
DVD/CD
R L
AV receiver
COMPONENT IN
S VIDEO
IN
VIDEO
IN
YPB/CB PR/CR
VIDEO
OUT
VIDEO
IN
S VIDEO OUT
S VIDEO
IN
COMPONENT IN
COMPONENT OUT
Y
P
B/CB PR/CR
Y
P
B/CB
PR/CR
AV receiver
TV
S VIDEO
IN
VIDEO
IN
COMPONENT IN
SUB
Projector

10
Preparation
SCAN MODE selector
This selector switches the type of output signal from the
COMPONENT video jacks on this unit.
INTERLACE:
Select INTERLACE if you are connecting the
component to a standard (interlace format) TV.
PROGRESSIVE:
Select PROGRESSIVE if your TV accepts NTSC
progressive or PAL progressive signals. This setting
will enable you to enjoy accurate color reproduction and
high quality images. This unit features DCDi circuit.
The PROGRESSIVE indicator on the front panel lights
up during progressive playback.
Notes:
– In the PROGRESSIVE mode, 4:3 aspect images are
stretched horizontally on the wide screen TV. We
recommend to change the TV screen’s aspect ratio
settings for progressive signals if you wish to watch
the original aspect ratio images without distortion.
You can also change the aspect ratio settings in the
[4:3 Aspect] parameter in the On-screen menu.
– Some TVs and projectors are not compatible with this
unit. If you notice picture distortion when outputting
the progressive signals, switch the SCAN MODE
selector to INTERLACE.
1 Connect the AC power cord to the power outlet.
2 Switch on the TV and this unit.
3 Set the TV to the correct Video IN channel. (e.g. EXT1,
EXT2, AV1, AV2, AUDIO/VIDEO, etc. Refer to your
TV owner’s manual for detail.)
➜ The front panel display lights up and the default
screen appears on the TV.
4 If you are using an external equipment (e.g. audio
system or receiver), turn them on and select the
appropriate input source that was used to connect to this
unit. Refer to the equipment owner’s manual for detail.
Note:
– If you do not have a proper picture or sound, refer to
“Troubleshooting” section.
We recommend to setup some of the basic menu items
before the initial playback.
1 Press STANDBY/ON to turn on the unit.
2 Press ON SCREEN.
➜ On-screen menu is displayed on the screen.
3 Follow the procedure described below to set the
following menu items.
CONSUMERS SHOULD NOTE THAT NOT ALL
HIGH DEFINITION TELEVISION SETS ARE
FULLY COMPATIBLE WITH THIS PRODUCT
AND MAY CAUSE ARTIFACTS TO BE
DISPLAYED IN THE PICTURE. IN CASE OF 525
OR 625 PROGRESSIVE SCAN PICTURE
PROBLEMS, IT IS RECOMMENDED THAT THE
USER SWITCH THE CONNECTION TO THE
“STANDARD DEFINITION” OUTPUT. IF THERE
ARE QUESTIONS REGARDING OUR VIDEO
MONITOR COMPATIBILITY WITH THIS
MODEL 525P AND 625P DVD PLAYER, PLEASE
CONTACT OUR CUSTOMER SERVICE CENTER.
This unit is compatible with the complete line of
YAMAHA products, including the projectors
DPX-1000, DPX-1100, LPX-500, LPX-510 and the
plasma monitor PDM-4210.
Switching on
Setups before the initial
playback
ON SCREEN

11
English
Preparation
1Menu Language (see page 17)
You can select the language displayed in the On-screen
menu.
1 Go to [Menu Language] (Setup ➔ Language ➔ Menu
Language) by using k n l h buttons on the remote
control, then press h.
➜ Choices are displayed on the right column.
2 Select a language to be displayed in the On-screen menu
by using k n buttons.
3 Press l to return to the previous menu.
2Default Audio (see page 17)
You can select the audio language spoken in video discs.
Available choices are determined by the disc.
1 Go to [Default Audio] (Setup ➔ Language ➔ Default
Audio) by using k n l h buttons on the remote
control, then press h.
➜ Choices are displayed on the right column.
2 Select a language by using k n buttons.
3 Press l to return to the previous menu.
3Default Subtitle (see page 17)
You can select the subtitle language set as default.
Available choices are determined by the disc.
1 Go to [Default subtitle] (Setup ➔ Language ➔ Default
subtitle) by using k n l h buttons on the remote
control, then press h.
➜ Choices are displayed on the right column.
2 Select a default subtitle language by using k n buttons.
3 Press l to return to the previous menu.
4TV shape (see page 15)
You can select the aspect ratio of the video displayed on
the TV monitor.
Select [Widescreen] if you connect to a wide-screen
monitor. If you connect to a conventional monitor,
select [4:3 panscan] (the left and right sides are trimmed
when you play 16:9 video) or [4:3 letterbox] (black
areas appear at the top and bottom when you play 16:9
video).
1 Go to [TV shape] (Setup ➔ TV ➔ TV shape) by using
k n l h buttons on the remote control, then press h.
➜ Choices are displayed on the right column.
2 Make a choice by using k n buttons.
3 Press l to return to the previous menu.
5Analog output (see page 16)
Enables you to specify the type of analog output suitable
for your AV receiver. Select [Multi-channel] if you are
using a multi-channel AV receiver with 6-ch discrete
inputs. If your AV receiver does not have 6-ch discrete
inputs, select one of [Stereo], [Dolby Surr Compat], or
[3D sound].
1 Go to [Analog output] (Setup ➔ Audio Menu ➔ Analog
output) by using k n l h buttons on the remote
control, then press h.
➜ Choices are displayed on the right column.
2 Select an item for the analog output signal by using k n
buttons.
3 Press l to return to the previous menu.
6Digital output (see page 16)
Enables you to specify the type of digital output suitable
for your AV receiver. Select [PCM only] if your AV
receiver is not capable of decoding multi-channel audio.
Select [All] if you connected this unit’s digital out jacks
to a multi-channel AV receiver.
1 Go to [Digital output] (Setup ➔ Audio Menu ➔ Digital
output) by using k n l h buttons on the remote
control, then press h.
➜ Choices are displayed on the right column.
2 Select an item for the digital output signal by using k n
buttons.
3 Press l to return to the previous menu.
Notes:
– Press ON SCREEN again to exit from the On-screen
menu.
– You can find the selection of the helpful menu items
in [Preference] and [Setup].
Go to [Preference] if you want to customize this unit
for your personal requirement such as the Wake-up
timer.
Go to [Setup] if you want to set the operational status
of this unit.

12
On-screen menu
The On-screen menu enables you to customize this unit
to suit your requirements.
1 Press ON SCREEN on the remote control.
➜ The On-screen menu appears on the screen.
2 Press k n l h to navigate the On-screen menu and to
change the settings.
3 Press ON SCREEN to exit from the On-screen menu.
Features
Dimmer
Adjusts the brightness of the front panel display.
You can use this function if the brightness of the front
panel display disturbs your enjoyment of the home
theater.
Choices: Low, Medium, Normal
Initial setting: Normal
Wake up timer
Turns on the player from standby mode after a preset
amount of time. The timer is then reset to zero. You can
set the timer for up to 600 minutes.
Choices: 0 to 600 minutes
Initial setting: 0
Status window
Displays the current status of the player. Select [Off] to
suppress display of the Status window.
Choices: On, Off
Initial setting: On
Adv.Picture
Allows you to fine-tune the following video parameters.
4:3 Aspect
You can adjust the aspect ratio of the projected images
on the screen. This function is only available for
progressive scan and HDMI video output.
Select [NL_Stretch] for display of 4:3 image on the 16:9
screen with non-linear stretching (Center position of
screen is stretch less than the side).
Select [4:3 PillarBox] to display 4:3 image on the 16:9
screen without stretching.
No aspect ratio adjustment is made when [Auto] is
selected.
We recommend setting the aspect ratio on your TV if the
function is available.
Choices: 4:3 PillarBox, NL_Stretch, Auto
Initial setting: Auto
TrueLife
Produces more dynamic picture by increasing the
picture contrast and the color intensity. This function is
available for progressive scan output only.
Choices: 0 to +7
Initial setting: 0
DCDi
DCDi (Directional Correction Deinterlacing) computes
and tracks the angle of the screen edge to fill in the
missing pixel on the TV screen. DCDi will optimize the
image quality significantly, especially during the slow
motion playback. This function is available for
progressive scan output only.
Choices: On, Off
Initial setting: On
Chroma Delay
The chroma (color) and luminance (brightness) signals
are not synchronized. The Chroma Delay setting allows
you to adjust the advance delay of the chroma signal to
yield a perfectly clear picture. This function is available
for signals output from COMPONENT video jacks
only.
Choices: –3 to +3
Initial setting: 0
Gamma
Enables you to adjust the intensity of the picture non-
linearly. A positive value enables you to bring out low
level detail in dark scenes, while a negative value
emphasizes contrast. This function is available for
signals output from COMPONENT video jacks only.
Choices: –7 to +7
Initial setting: 0
General operation
Preferences
Preferences
Toolbar
Setup
Toolbar
Program
View
Play Option
Search
Slide Show

13
English
On-screen menu
HDMI Video
Enables you to adjust the resolution depending on the
monitor you are using. You can use this function only
when the HDMI output terminal is connected to a
HDMI-compatible component.
Choices: 480p, 576p, 720p, 1080i, Auto
Initial setting: 480p (U.S.A. model)
576p (U.K., Europe and Australia
models)
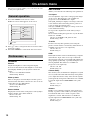
Setting Examples
*: Depending on the monitor you are using, the monitor
setting names may differ from those shown above.
*1: If the monitor you are using has an aspect ratio of 4:3
and is only capable of either 480p or 576p resolution,
select [4:3 panscan] or [4:3 letterbox].
*2: Depending on the monitor you are using, this setting
may appear as “Squeeze” or “Full”.
*3: If the aspect ratio you desire is not available, select
the most suitable setting from: [Auto], [4:3 PillarBox]
and [NL_Stretch].
Notes:
– While HDMI video signals are being output,
component video is muted.
– For settings other than [Auto], HDMI video output
may not display properly if a resolution output setting
not supported by the HDMI-compatible monitor you
are using is set.
To return to the initial setting, press “PLAY” ➔
“0” ➔ “2” ➔ “9” ➔ “STOP” on the remote control.
Do not perform this operation while playing back a
disc on this unit.
Picture
Video shift
Adjusts the position of the image on the screen by
scrolling it to the left or right.
Choices: +1 to +7
Initial setting: +4
Saturation
Adjusts the video color saturation. This function is not
available for signals output from COMPONENT video
jacks and HDMI video signals.
Choices: –7 to +7
Initial setting: 0
Contrast
Accentuates bright and dark parts of the video. This
function is not available for signals output from
COMPONENT video jacks and HDMI video signals.
Choices: –7 to +7
Initial setting: 0
Picture Mode
Adjusts the color tone to suit your preference and the
playing source. [Personal] will be chosen automatically
when you change the value in the following menus:
[Saturation], [Contrast], [Brightness], and [Sharpness].
This function is not available for signals output from
COMPONENT video jacks and HDMI video signals.
Choices: Rich, Natural, Soft, Animation, Personal
Initial setting: Natural
Brightness
Adjusts the overall brightness of the picture. This
function is not available for signals output from
COMPONENT video jacks and HDMI video signals.
Choices: –7 to +7
Initial setting: 0
Sharpness
Adjusts the sharpness of the video.
Choices: 0 to +7
Initial setting: 0
Sound
Karaoke vocal
Enables you to play multi-channel karaoke DVDs. The
karaoke channels on the disc will be mixed into normal
stereo when you choose [On].
Choices: On, Off
Initial setting: Off
ClearVoice
Increases the relative volume of dialog for easy listening
at night. This function is available for only certain multi-
channel discs.
Choices: On, Off
Initial setting: Off
Playback disc
Squeezed
16:9 video
4:3 video
HDMI
Video
TV
shape
Monitor
settings
4:3 Aspect
Monitor
settings
480p
Widescreen *1
Squeeze
Full
Through
Squeeze
Auto *3
Normal *2
Through
Dot by Dot
4:3
Through
Squeeze
576p
720p
Widescreen
Normal *2
Through
Dot by Dot
4:3 PillarBox *3
1080i
Auto
The resolution is automatically selected to match the
monitor you are using. Set [TV shape], [4:3 Aspect]
and your monitor setting to match the selected
resolution.

14
On-screen menu
Night mode
When set to [On], the dynamics of the sound output is
optimized. High volume output is softened, enabling
you to watch your favorite action movie without
disturbing others.
Choices: On, Off
Initial setting: Off
Program
You can create your own playlist using this menu. First,
go to [Tracks], then select the tracks/chapters, etc. to
include in your playlist. The programmed playlist will
be activated when you choose [On] in the [Program]
menu.
Clear all
Deletes all Programmed contents.
Program
Set the FTS program playback on or off.
Choices: On, Off
Initial setting: Off
Tracks
Selects tracks and chapters for your FTS list.
Playlist
Shows the programmed FTS list.
Note:
– For details about FTS and the settings of [Program]
menu items, see the descriptions followed by “FTS
video/audio program” on page 28.
View
Rotate
Rotates a JPEG image.
Choices: –180°, –90°, 0, +90°, +180°
Initial setting: 0
Zoom
Activates the zoom function. A cursor will be displayed
on screen. Move the cursor using the k n l h buttons,
then select a size by pressing the ENTER button
repeatedly. To exit zoom mode, press RETURN/
RESUME repeatedly until the cursor disappears from
the screen.
Chapter preview
Plays the first 10 seconds of each chapter/track on the
disc. Pressing SCAN on the remote control performs the
same function as well.
Choices: On, Off
Initial setting: Off
Angle
Some DVD discs feature a multiple angle function,
enabling you to watch certain scenes from various
angles. Function availability and the number of camera
angles vary according to the disc.
Page
Turns pages of DVD-Audio still images.
Play option
DVD Video Mode
Some DVD-Audio discs include DVD-Video contents
that can be played on conventional DVD-Video players.
To play such contents, select [On]. The setting returns to
[Off] when you eject a disc or turn the unit to standby
mode.
Choices: On, Off
Initial setting: Off
Audio
Selects the sound format and audio language. Available
choices are determined by the disc.
Disc Navigation
You can direct to a track, etc. by using this menu.
Subtitle
Selects the subtitle language. Available choices are
determined by the disc.
Search
Frame by Frame
Advances or reverses one frame at a time. This function
is available for video discs only. Previous frame is not
available for VCD and SVCD.
Fast
Selects a speed for fast forward or fast reverse playback.
Choices: –32, –8, –4, +1, +4, +8, +32
Initial setting: +1
Time
You can move to a certain spot by indicating the elapsed
time.
Slow
Selects a speed for the slow forward or slow reverse
playback.
Choices: –1, –1/2, –1/4, –1/8, 0, +1/8, +1/4, +1/2, +1
Initial setting: 0
Toolbar

15
English
On-screen menu
Slide Show
Use this feature for JPEG slide show playback.
Picture time
Sets the duration for each image.
Choices: Slow, Medium, Fast
Initial setting: Medium
Access
Disc lock
This function enables you to restrict others from
accessing certain discs.
If this setting is on, you need to enter the four-digit PIN
to modify the [Access] menu settings before you can
play the disc.
Choices: On, Off
Initial setting: Off
Change PIN
Enables you to change the four-digit PIN.
To change the four-digit PIN, enter the current PIN first,
then enter the new four-digit PIN.
Enter PIN
Enter the four-digit PIN to unlock the disc or to display
the [Access] menu.
Parental level
DVD movies may contain scenes that are unsuitable for
children. Therefore, some discs contain parental control
information that may apply to the entire disc or to
certain scenes. Ratings are country-specific. You can
specify a country code in the On-screen menu (Setup ➔
Language ➔ Country). See “Country” on page 29.
Choices: 0 to 8
Initial setting: 0
Country
Selects a country to apply its rating system to Parental
Level control.
Features
PBC
A VCD menu screen is displayed when this setting is on.
Choices: On, Off
Initial setting: On
Sleeptimer
Places this unit in standby mode when playback is
stopped and this unit is not operate for 20 minutes.
Choices: On, Off
Initial setting: Off
TV
TV shape
If you connect to a conventional 4:3 aspect TV, select
[4:3 panscan] (the left and right sides are trimmed when
you play 16:9 video) or [4:3 letterbox] (black areas
appear at the top and bottom when you play 16:9 video).
Select [Widescreen] if you connect to a Wide-Screen
TV.
Choices: 4:3 panscan, 4:3 letterbox, Widescreen
Initial setting: 4:3 panscan
TV System (NTSC/PAL conversion)
Allows you to select [PAL], [NTSC] or [Auto] mode to
match your TV system. You can play PAL discs on
NTSC monitor, and NTSC discs on PAL monitor. The
initial setting is [NTSC] (U.S.A. model), [PAL] (U.K.,
Europe and Australia models).
Choices: PAL, NTSC, Auto
The following conversions are supported.
Notes:
– In progressive scan mode, the output signals from the
VIDEO and S VIDEO jacks are same as the format of
the disc you play.
– Some image distortion occurs when switching the
NTSC and PAL mode.
– If your TV does not accept the selected mode while
you change the [TV System] setting, the screen will
be distorted so that you cannot recognize the On-
screen menu. When it occurs, you can change the
[TV System] settings by the remote control
operations. Follow the procedures below.
• Choosing [PAL]:
Press “PLAY” ➔ “2” ➔ “5” ➔ “6” ➔ “PLAY”
on the remote control.
• Choosing [NTSC]:
Press “PLAY” ➔ “2” ➔ “5” ➔ “7” ➔ “PLAY”
on the remote control.
Do not perform this operation while playing back a
disc on this unit.
Setup
Disc
Format
Output format
Selected mode
NTSC PAL AUTO
NTSC NTSC PAL NTSC
PAL NTSC PAL PAL
Widescreen
4:3 letterbox
4:3 panscan

16
On-screen menu
Audio Menu
Digital output
Enables you to specify the type of digital output that best
suits your AV receiver or HDMI monitor/receiver.
Select [PCM only] if your receiver or HDMI monitor/
receiver is not capable of decoding multi-channel audio.
Select [All] if you connected this unit’s digital out jacks
to a multi-channel decoder/receiver.
Choices: Off, PCM only, All
Initial setting: All
Note:
– SA-CD audio signal is not output from DIGITAL
OUT jacks.
Analogue output
Enables you to specify the type of analog output suitable
for your AV receiver.
Choices: Stereo, Dolby Surr Compat, 3D sound,
Multi-channel
Initial setting: Multi-channel
Stereo:
In this setting, the multi-channel audio is down-
mixed to a stereo signal. Select this setting when
connecting to a TV, stereo amplifier/receiver, etc.
Dolby Surr Compat:
Select this setting when using
equipment with a Dolby Surround Pro Logic decoder. In
this setting, the multi-channel audio (Dolby Digital,
MPEG-2, DTS) is downmixed to a Dolby Surround
compatible 2-ch output. SA-CD and PCM signals with
a sampling frequency of over 88.2 kHz are downmixed
to normal stereo.
3D sound:
In a setup without rear speakers (analogue
stereo output), 3D Sound remixes the six channels of
digital surround (except for SA-CD and PCM signals
with a sampling frequency of over 88.2 kHz) into a two
speaker output while retaining all of the original audio
information. The result is the sensation of being
surrounded by multiple speakers.
Multi-channel:
Select this setting when using a multi-
channel AV receiver with 6-ch discrete inputs. The
multi-channel audio signals those of like DVD-Audio,
DVD-Video, and SA-CD are output from the respective
6-ch discrete output jacks. In this mode, this unit will
perform DTS decoding, Dolby Digital 5.1-channel
decoding, or MPEG Multichannel decoding when
applicable, and Dolby Pro Logic II decoding on 2-ch
sound tracks except for SA-CD and PCM signals with a
sampling frequency of over 88.2 kHz.
PCM output
Enables you to select PCM digital output at 48 kHz or
96 kHz. If you select [48 KHz], PCM data will be
converted to 2-ch 48 kHz or less. Select [48 KHz] if the
connected equipment cannot process signals with a
sampling frequency of 96 kHz or 88.2 kHz.
Choices: 96 KHz, 48 KHz
Initial setting: 96 KHz
Notes:
– Signals are converted to either 48 kHz or 44.1 kHz
despite the above settings if the disc has copy
protection.
– If you select [96 KHz], signals with a sampling
frequency of over 96 kHz are converted to 2-ch
88.2 kHz or 96 kHz.
SA-CD Direct
Enables you (with a suitable speaker system) to bypass
the bass management system for multi-channel SA-CD
playback, so you can enjoy the pure SA-CD quality.
Choices: On, Off
Initial setting: Off
Note:
– When [SA-CD Direct] is [On], the speaker settings
will not be applied during SA-CD playback.
HDMI Audio
If you are not using HDMI audio output, you should set
this to [Off].
If the monitor/receiver connected to this unit using
HDMI does not support HDMI audio signal input, set
this to [Off].
Choices: On, Off
Initial setting: Off
Notes:
– Super Audio CD signals cannot be output using
HDMI.
– This unit can output the following audio signals using
HDMI: 32/44.1/48 kHz, 2-ch PCM signals and
bitstream signals (Dolby Digital, DTS and MPEG).
PCM signals with a sampling frequency of over
88.2 kHz are converted to 2-ch 48 kHz or 44.1 kHz.
– When audio signals are being output by a HDMI-
component, digital output signals are muted.
La page charge ...
La page charge ...
La page charge ...
La page charge ...
La page charge ...
La page charge ...
La page charge ...
La page charge ...
La page charge ...
La page charge ...
La page charge ...
La page charge ...
La page charge ...
La page charge ...
La page charge ...
-
 1
1
-
 2
2
-
 3
3
-
 4
4
-
 5
5
-
 6
6
-
 7
7
-
 8
8
-
 9
9
-
 10
10
-
 11
11
-
 12
12
-
 13
13
-
 14
14
-
 15
15
-
 16
16
-
 17
17
-
 18
18
-
 19
19
-
 20
20
-
 21
21
-
 22
22
-
 23
23
-
 24
24
-
 25
25
-
 26
26
-
 27
27
-
 28
28
-
 29
29
-
 30
30
-
 31
31
-
 32
32
-
 33
33
-
 34
34
-
 35
35


Yamaha DVD-S2500 Le manuel du propriétaire
- Catégorie
- Lecteurs DVD
- Taper
- Le manuel du propriétaire
dans d''autres langues
- italiano: Yamaha DVD-S2500 Manuale del proprietario
- English: Yamaha DVD-S2500 Owner's manual
- Deutsch: Yamaha DVD-S2500 Bedienungsanleitung
- Nederlands: Yamaha DVD-S2500 de handleiding
- dansk: Yamaha DVD-S2500 Brugervejledning
- svenska: Yamaha DVD-S2500 Bruksanvisning
- Türkçe: Yamaha DVD-S2500 El kitabı
- română: Yamaha DVD-S2500 Manualul proprietarului
Documents connexes
-
Yamaha DVD-S2500 Le manuel du propriétaire
-
-
Yamaha DVD-S510 Le manuel du propriétaire
-
-
-
-
-
-
-
Autres documents
-
LG DV286-NM Le manuel du propriétaire
-
Sony DAV-FR10W Manuel utilisateur
-
Sony AVD-S50ES Manuel utilisateur
-
-
-
Panasonic WJ-SW208E Le manuel du propriétaire
-
-
-
-
Esoteric D00918300B Manuel utilisateur