Coby CWBR-110 Manuel utilisateur
- Catégorie
- Réveils
- Taper
- Manuel utilisateur

Instruction Manual
Bluetooth Clock Radio Speaker
With Wireless Charger
MODEL#: CWBR-110

2
Read Me
Important Safety Instructions
1) Read these instructions.
2) Keep these instructions.
3) Heed all warnings.
4) Follow all instructions.
5) Do not use this apparatus near water.
6) Clean only with dry cloth.
7) Do not block any ventilation openings. Install in accordance with the manufacturer’s
instructions.
8) Do not install near any heat sources such as radiators, heat registers, stoves, or other
apparatus (including amplifiers) that produce heat.
9) Protect the power cord from being walked on or pinched particularly at plugs,
convenience receptacles, and the point where they exit from the apparatus.
10) Only use attachments/accessories specified by the manufacturer.
11) Use only with the cart, stand, tripod, bracket, or table specified by the manufacturer,
or sold with the apparatus. When a cart is used, use caution when moving the cart/
apparatus combination to avoid injury from tip-over.
12) Unplug this apparatus during lightning storms or when unused for long periods of time.
13) Refer all servicing to qualified service personnel. Servicing is required when the
apparatus has been damaged in any way, such as power-supply cord or plug is damaged,
liquid has been spilled or objects have fallen into the apparatus, the apparatus has been
exposed to rain or moisture, does not operate normally, or has been dropped.
FCC NOTICE TO USERS:
FCC ID: 2AJVKCWBR-110
Caution: Changes or modifications not expressly approved by the Party responsible for
compliance could void the user’s authority to operate the equipment.
Note: This equipment has been tested and found to comply with the limits for a Class B
digital device, pursuant to part 15 of the FCC Rules. These limits are designed to provide
reasonable protection Against harmful interference in a residential installation. This
equipment generates, uses and can radiate radio frequency energy and, if not installed
and used in accordance with the instructions, may cause harmful interference to radio
communications, however there is no guarantee that interference will not occur in a
particular installation. If this equipment does cause harmful interference to radio or
television reception, which can be determined by turning the equipment off and on, the
user is encouraged to try to correct the interference by one or more of the following
measures:
- Reorient or relocate the receiving antenna.
- Increase the separation between the equipment and receiver.
- Connect the equipment into an outlet on a circuit different from that to which the
receiver is connected.
- Consult the dealer or an experienced radio/TV technician for Help.
The device complies with part 15 of the FCC Rules. Operation is subject to the following
two conditions: (1) this device may not cause harmful interference, and (2) this device must
accept any interference received, including interference that may cause undesired operation.
The Bluetooth® word mark and logos are registered trademarks owned by Bluetooth SIG, Inc.
and any use of such marks by Summit Electronics LLC is under license. Other trademarks and
trade names are those of their respective owners.

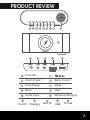
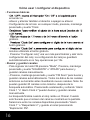
PRODUCT REVIEW
ON/OFF IN AUX USB/OUT
TF CARD
9
Alarm Clock 2
Mode
c
Play/Pause
Back
Alarm Clock 1
Next
Rotary Nob
Wireless Charging
9 10
Clock Set
11 12 13 14 15
On/Off
AUX IN
USB
TF card
11 12 13 14 15
10
Charging
3

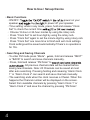
How to Use / Set-up Device
• Basic Functions
◦ ON/OFF:
to power on your
speaker
to to power off your speaker.
◦ Time setting: while in any mode, press, hold and release “Clock
Set” to check the current time
.
◦ Choose 12-hour or 24-hour modes by using the rotary nob.
◦ Press “Clock Set” to set hour digit by using the rotary nob.
◦ Press “Clock Set” again to set the minute digit by using rotary nob.
◦ Press “Clock Set” one more time to finish and exit clock settings.
Clock settings will be saved automatically if there’s no operations
for 10s.
• Searching and Saving Channels
◦ To enter FM mode press “Mode”.
ress, hold and release “NEXT”
or “BACK” to search and save channels manually.
◦ Press, hold and release “FM Scan” to
. All previous channels data will be cleared before
saving new channels. Note: 20 Channels can be saved at most
after auto searching. Pressing holding and releasing “Alarm Clock
1” or “Alarm Clock 2” can search and save channels manually.
◦ The searching ends when the clock receives a Chanel. When this
happens the Channel number will be displayed on the screen.
Select from available channels by pressing “Alarm Clock 1” or
“Alarm Clock 2” and save the channel by pressing “FM Scan”.
4

Alarm Clock Settings
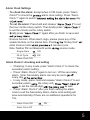
◦ To check the alarm: Except when in FM mode, press “Alarm
Clock1” to check the
alarm clock setting. Press “Alarm
Clock 1” again to switch
day
”
◦ To set the alarm: Press hold and release “
” to set
the hour via the rotary switch. Then briefly press “
”
to set the minute via the rotary switch.
◦
riefly press “ ” again after you finish to save and
◦ Snooze function: When alarm rings, please press any of the
smaller buttons on the alarms face. Press
“Rotary Nob”
enter snooze mode 9 minutes cycle.
Note: Neither FM nor Bluetooth works
snooze mode.
▪ Checking: In any mode, press “Alarm Clock 2” to check the
secondary alarm setting.
▪ Press “Alarm Clock 2” again to turn on / off the secondary
alarm. Note: Secondary alarm can only be set to
every day .
▪ In any mode, press, hold and release “Alarm Clock 2” to set
secondary alarm
the rotary nob
to set the minute digit
as well.
▪ Press “Alarm Clock 2” after you finish setting the alarm
clock to exit the Secondary Alarm. Alarm clock setting will
save automatically if there are no additional operations for
10s.
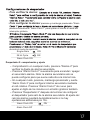
Single Alarm
24 Hr Cycle
Alarm Clock ON
ON
ON
ON
Alarm Clock ON
Alarm Clock Off
Alarm Clock 2: checking and setting
5

• Play / Pause Button
◦ Briefly press to answer an incoming call.
◦ Press and hold to reject a call.
◦ Double click to resume playing from the connected Bluetooth®
device.
◦ Briefly press to play/pause.
◦ Press and hold to cancel a Bluetooth® pairing or disconnect from
Bluetooth®.
• Volume control: Adjust the volume by rotating the rotary switch.
There are 16 volume grades and the volume will be displayed on the
switch while you adjust.
• Screen brightness: Adjust brightness of screen by pressing and
rotating the rotary knob between the 3 levels of brightness (High, Low,
and off).
• Low voltage alarm: A glowing red light indicates low power. It will
light up when the remaining capacity is below 10%. The speaker will
turn off automatically when the remaining capacity is below 3%.
• Battery level: Green light (sufficient charge) / orange light (medium
charge) / red light (low charge). The speaker will turn off automatically
when the remaining capacity is below 3%.
• Charging mode: The red and green lights will flash when the
speaker is charging. The capacity icon will glow green when the
speaker is fully charged.
• Connecting to Bluetooth®
◦ The below steps are only necessary the first time a device is
connected to the speaker. The speaker will connect to previously
used devices automatically after initial use.
◦ Turn the speaker on and the device display will immediately show
“----”. Bluetooth® mode will turn on after about 2 seconds and the
Bluetooth® icon will flash.
6

◦ Turn on the Bluetooth® device and search for CWBR-110.
Connect it to your device.
◦ Input “0000” if you are prompted to provide a password, then
press confirm.
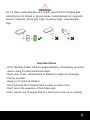
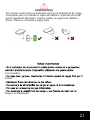
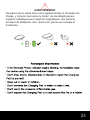
Wirelessly Charging your Mobile Device
Note: Wireless Charging only works when plugged in.
• Place your phone with its back against the Charging Pad. Check to
see if your phone lights up/ indicates that it is charging properly.
• If the Wireless Power Indicator begins blinking, there is an issue with
the device’s voltage, current, or temperature. To resolve the issue,
remove your device from the charger, restart the device, and repeat
the setup process.
Charging Your Device via USB
• Plug your device’s charging cable into the charging pad’s USB port
and connect it to your mobile device’s charging port.
• If the Wireless Power Indicator begins blinking, there is an issue with
the device’s voltage, current, or temperature. To resolve the issue,
remove your device from the charger, restart the device, and repeat
the setup process.
7

Specifications
• Dimensions: 8’ x 5’ x 2’
• Speaker: 5 Watts x 2
• Input: 5/2A-9V/4.5A
• Wireless power: 10W
• USB output: 5V/2.1A
• Bluetooth® distance: 30ft
• Supports up to 32gb TF card
• TF card slot
• 3.5mm AUX input
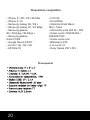
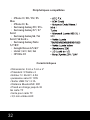
Compatible Devices
• iPhone X / XR / XS / XS Max
• iPhone 8 / 8+
• Samsung Galaxy S9 / S9+
• Samsung Galaxy S7 / S7 Edge
• Samsung Galaxy
S6 / S6 Edge / S6 Edge+
• Samsung Galaxy
Note 5 / 7 / 8 / 9
• Google Nexus 4 / 5 / 6 / 7
• LG G2 / G3 / G4 / G6
• HP Elite X3
• HTC 8X
• Droid DNA
• Motorola Droid Maxx /
Mini / Turbo
• Microsoft Lumia 950 XL / 950
• Nokia Lumia 735 / 830 / 920 /
928 / 930 / 1520
• Nokia Lumia Icon
• Blackberry Z30
• LG Lucid 1 / 2
• Sony Xperia Z3V /
Z4V
8

• If the Wireless Power Indicator begins blinking, immediately reset the
device using the aforementioned steps.
• Don't drop, knock, disassemble or attempt to repair the Charging
Pad by yourself.
• Keep out of reach of children.
• Don't immerse the Charging Pad in water or make it wet.
• Don't use in the presence of flammable gas.
• Don't expose the Charging Pad to a heat source like fire or a heater.
Important Notes
WARNING
Do not place metal between your mobile device & the charging pad,
including but not limited to: phone cases, metal brackets for magnetic
mounts, magnets, phone grip rings, keys/ key rings, coins & paper
clips.
9

SUMMIT ELECTRONICS LLC ONE YEAR LIMITED WARRANTY
SUMMIT ELECTRONICS LLC LIMITED WARRANTY (“Warranty”) ― For Product
Categories Listed in Chart Below (as applicable, “Product”) Before returning
your Product for service under this Warranty, please (i) read the instruction
manual carefully. If you are still having trouble with your Product, please contact
Technical Support at [email protected]
Warning: Some Products may contain components that are small enough to be
swallowed. Please keep out of reach of children.
Subject to the terms and conditions herein, SUMMIT ELECTRONICS LLC
(hereinafter called “SUMMIT ELECTRONICS LLC”) warrants to the original
purchaser of the Product (“Customer”) that for the applicable Warranty Period listed
below, the Product will be free from defects in material or workmanship under
normal, non-commercial use (“Defects”). Warranty Period encompasses, as listed
below, separate “Coverage Periods” for Parts and Labor, each Coverage Period
for one year, to begin from the original date of Customer purchase. If Customer
returns a defective Product (or any component thereof) during the applicable
Warranty Period, SUMMIT ELECTRONICS LLC will, at its option, during the
specified Coverage Periods for Parts and Labor (as applicable) either: (i) repair
Product (or, as applicable, any component thereof) or (ii) replace the Product
(or, as applicable, any component thereof) with a new or refurbished Product
(or, as applicable, any component thereof), in either case free of charge to
Customer for Parts and/or Labor (as applicable) during the specified Coverage
Period only, and excluding applicable shipping charges (noted below), for which
the Customer is responsible. The foregoing states the Customer’s exclusive
remedy and SUMMIT ELECTRONICS LLC’s sole liability for breach of the limited
warranty contained herein.
This Warranty specifically excludes any Product (or, as applicable, any
component thereof) that has been subject to or Defects resulting from: (a) any
neglect or misuse by a Customer, an accident, improper application, violation
of operating instructions for the Product, any other Customer-induced damage,
or the alteration or removal of any Product serial number: (b) any modification
or repair to Product (or, as applicable, any component thereof) by any party
other than SUMMIT ELECTRONICS LLC or a party authorized in writing by SUMMIT
ELECTRONICS LLC; (c) any damage to Product (or, as applicable, any component
thereof) due to power surges, incorrect electrical voltage, misconnection to any
device, or malfunction of any device used with the Product (or, as applicable,
any component thereof); (d) cosmetic damage to the Product (or, as applicable,
any component thereof) caused by normal wear and tear; (e) shipping damage
that occurs while the Product is in transit; (f) damage caused by heat sources,
10

sunlight, electromagnetic conditions, or other climatic conditions; or (g) any acts
of God. Product is sold to Customer for personal, non-commercial use only.
Product is not warranted for Customer’s commercial or rental use.
In addition, Product is not warranted against failure, and should not be used by
Customer for any application where (i) there is a risk that any data stored on
Product will be breached or otherwise compromised, or (ii) the data stored on
Product is relied upon for medical or lifesaving applications.
SUMMIT ELECTRONICS LLC disclaims any Warranty for any of the foregoing uses
to the fullest extent permitted by law. Customer assumes any and all risks
associated with such uses of Product, and agrees to indemnify SUMMIT ELECTR-
ONICS LLC for any damages claimed against SUMMIT ELECTRONICS LLC for such
uses. EXCEPT FOR EXPRESS WARRANTIES STATED ABOVE AND TO THE
MAXIMUM EXTENT PERMITTED BY LAW, THE PRODUCTS ARE PROVIDED
“AS IS”, AND SUMMIT ELECTRONICS LLC DISCLAIMS ALL OTHER WARRANTIES,
INCLUDING WITHOUT LIMITATION ANY IMPLIED WARRANTY (I) OF
MERCHANTABILITY, (II) OF FITNESS FOR A PARTICULAR PURPOSE,
OR (III) OF NON-INFRINGEMENT OF THIRD PARTY RIGHTS. TO THE
MAXIMUM EXTENT PERMITTED BY APPLICABLE LAW, IN NO EVENT
WILL SUMMIT ELECTRONICS LLC BE LIABLE TO CUSTOMER OR ANY THIRD
PARTY FOR ANY INDIRECT, SPECIAL, INCIDENTAL, CONSEQUENTIAL,
EXEMPLARY OR PUNITIVE DAMAGES, INCLUDING, WITHOUT LIMITATION,
ANY LOST PROFITS OR REVENUES, LOSS OR INACCURACY OF ANY
DATA OR COST OF SUBSTITUTE GOODS, REGARDLESS OF THE THEORY
OF LIABILITY (INCLUDING NEGLIGENCE) AND EVEN IF SUMMIT ELECTRONICS
LLC HAS BEEN ADV ISED OF THE POSSIBILITY OF SUCH DAMAGES,
SUMMIT ELECTRONICS LLC’S AGGREGATE LIABILITY TO CUSTOMER FOR
ACTUAL DIRECT DAMAGES FOR ANY CAUSE WHATSOEVER SHALL
BE LIMITED TO THE CUMULATIVE PRODUCT FEES PAID BY THAT
CUSTOMER FOR THE PRODUCT CAUSING THE DAMAGES, IF ANY. This
Warranty gives Customer specifics rights, and Customer may also have other
rights that vary from jurisdiction to jurisdiction. To obtain Warranty service,
Customer must email SUMMIT ELECTRONICS LLC Technical Support prior to making
a Product return. Customer must include with Product return the following items
(failure to enclose any of these items may result in a delay in the processing
of your Warranty claim): (i) a dated sales receipt that indicates the place of
purchase, model number of Product, and amount paid; (ii) a detailed description
of Customer’s problem with Product; (iii) Customer’s full name, phone number,
and return address, and; (iv) a money order made out to SUMMIT ELECTRONICS LLC
Electronics Corporation to cover return shipping charges to US destinations
only, for the applicable dollar amount shown for the Product in the table above.
SUMMIT ELECTRONICS LLC will not make return shipments to a P.O. Box. For
shipping to international addresses, actual freight will be charged to Customer.
Return your Product freight-prepaid in its original packaging, or packaging
that affords an equal measure of protection. Please allow 4 to 6 weeks for the
11

processing of your claim (6 to 8 weeks from November to February).
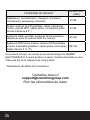
PRODUCT CATEGORY
SHIPPING*
(USD)
Adapters, Converters, Chargers, Headphones,
Microphones, Cellular Accessories
$7.99
Alarm Clocks, Portable CD Players, Radios, Corded
Telephones, MP3 Players, Digital Photo Frames
(screen size less than 5”)
$7.99
Portable Stereo Systems, Speaker Systems,
Cordless Telephones, Home DVD Players
$14.99
Home Theater DVD Systems, Portable DVD
Players, Portable Media Players, Digital Photo
Frames (screen sizes 5” to 11”)
$21.99
You must email SUMMIT ELECTRONICS LLC Technical Support prior to making a
return. Please ask if you are unsure of which category your product falls under
*US destinations only.
Contact Us at
For Return Information
12

Manual de instrucciones
Altavoz Bluetooth
MODEL#: CWBR-110

14
Léeme
Instrucciones de seguridad importantes
1) Lea estas instrucciones.
2) Guarde estas instrucciones.
3) Presta atención a todas las advertencias.
4) Sigue todas las instrucciones
5) No use este aparato cerca del agua.
6) Limpie solo con un paño seco.
7) No bloquee las aberturas de ventilación. Haga la instalación conforme a las instrucciones
del fabricante.
8) No instale cerca de fuentes de calor como radiadores, registros de calor, estufas u otros
aparatos (incluidos amplificadores) que produzcan calor.
9) Proteja el cable de alimentación de ser pisado o pellizcado particularmente en los
enchufes, receptáculos de conveniencia y el punto donde salen del aparato.
10) Utilice únicamente accesorios / accesorios especificados por el fabricante.
11) Úselo únicamente con el carrito, el soporte, el trípode, el soporte o la mesa
especificados
por el fabricante o vendidos con el aparato. Cuando se usa un carro, tenga
cuidado al mover la combinación del carro / aparato para evitar lesiones por vuelco.
12) Desenchufe este aparato durante tormentas eléctricas o cuando no se use durante
largos períodos de tiempo.
13) Remita todos los servicios a personal de servicio calificado. Se requiere servicio
cuando el aparato ha sido dañado de alguna manera, como el cable de alimentación o el
enchufe está dañado, se ha derramado líquido o han caído objetos en el aparato, el aparato
ha estado expuesto a la lluvia o la humedad, no funciona normalmente , o ha sido eliminado.
AVISO DE LA FCC A LOS USUARIOS:
ID DE LA FCC: 2AJVKCWBR-110
Precaución: Los cambios o modificaciones no aprobados expresamente por la Parte
responsable del cumplimiento pueden anular la autoridad del usuario para operar el equipo.
Nota: Este equipo ha sido probado y cumple con los límites para un dispositivo digital de
Clase B, de conformidad con la parte 15 de las Reglas de la FCC. Estos límites están
diseñados para proporcionar una protección razonable contra interferencias perjudiciales en
una instalación residencial. Este equipo genera, usa y puede irradiar energía de
radiofrecuencia y, si no se instala y usa de acuerdo con las instrucciones, puede causar
interferencia dañina a las comunicaciones de radio, sin embargo, no hay garantía de que no
se producirán interferencias en una instalación en particular. Si este equipo causa
interferencia dañina a la recepción de radio o televisión, lo que puede determinarse
apagando y encendiendo el equipo, se recomienda al usuario que intente corregir la
interferencia mediante una o más de las siguientes medidas:
Reorientar o reubicar la antena receptora.
Aumente la separación entre el equipo y el receptor.
Conecte el equipo a una toma de corriente en un circuito diferente al que
el receptor está conectado.
Consulte al distribuidor o a un técnico experimentado en radio / TV para obtener ayuda.
El dispositivo cumple con la parte 15 de las Reglas de la FCC. La operación está sujeta a las
siguientes dos condiciones:
- Reorientar o reubicar la antena receptora.
- Aumente la separación entre el equipo y el receptor.
- Conecte el equipo a una toma de corriente en un circuito diferente al que
el receptor está conectado.
- Consulte al distribuidor o a un técnico experimentado en radio / TV para obtener ayuda.
El dispositivo cumple con la parte 15 de las Reglas de la FCC. El funcionamiento está
sujeto a las siguientes dos condiciones: (1) este dispositivo no puede causar interferencias
perjudiciales, y (2) este dispositivo debe aceptar cualquier interferencia recibida, incluidas
las interferencias que puedan causar un funcionamiento no deseado.
La palabra y los logotipos de Bluetooth® son marcas registradas propiedad de Bluetooth
SIG, Inc. y el uso de dichas marcas por parte de Summit Electronics LLC se realiza bajo
licencia. Otras marcas comerciales y nombres comerciales son los de sus respectivos
dueños.

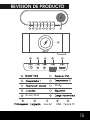
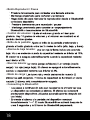
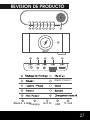
REVISION DE PRODUCTO
15
ON/OFF IN AUX USB/OUT TF CARD
9
Mod
Rotary Nob
9 10
11 12
13 14 15
Aux En USB Tarjeta TF
11 12 13 14 15
10
C
15

16
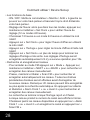
Cómo usar / configurar el dispositivo
• Funciones básicas
◦
encender su
◦ altavoz y alternar también el derecho a apagar su altavoz
◦ Configuración de la hora: en cualquier modo, presione, mantenga
presionado y suelte "Clock
◦
◦
giratorio.
◦
botón giratorio.
◦
minutos utilizando el botón giratorio.
◦ Presione “Configurar reloj” una vez más para finalizar y salir de la
configuración del reloj. La configuración del reloj se guardará
automáticamente si no hay operaciones por 10s.
• Buscar y guardar canales
◦ Para ingresar al modo FM presione "Modo". Presione, mantenga
presionado y suelte "SIGUIENTE" o "ATRÁS" para buscar y
guardar canales manualmente.
◦ -Presione, mantenga presionado y suelte "FM Scan" para buscar y
guardar canales automáticamente. Todos los datos de los canales
anteriores se borrarán antes Guardando nuevos canales. Nota: Se
pueden guardar 20 canales como máximo. después de la
búsqueda automática. Presionando sosteniendo y soltando “Alarm
Clock 1 ”o“ Alarm Clock 2 ”pueden buscar y guardar canales
manualmente.
◦ La búsqueda finaliza cuando el reloj recibe un Chanel. Cuando
esto Sucede que el número del canal se mostrará en la pantalla.
Seleccione entre los canales disponibles presionando “Alarm
Clock 1” o “Despertador 2” y guarde el canal presionando
“Exploración FM”.

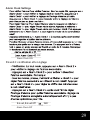
◦ Para verificar la alarma:
◦ Para configurar la alarma: presione y mantenga presionado "Alarm
presione brevemente "Alarm Clock 1" para ajustar el minuto a través del
interruptor giratorio.
◦
◦ S
durante el modo de repetición.
▪ Comprobación: en cualquier modo, presione "Alarma 2" para
verificar la Ajuste de alarma secundaria.
▪ Presione "Alarm Clock 2" nuevamente para encender / apagar
el secundario alarma. Nota: la alarma secundaria solo se
puede configurar para que suene cada dia a la misma hora.
▪ En cualquier modo, presione, mantenga presionado y suelte
“Alarm Clock 2” para configurar Alarma secundaria mediante
el nob rotativo. Presione "Alarm Clock 2" de nuevo para
ajustar el dígito de los minutos con el botón giratorio también.
▪ Presione “Despertador 2” después de terminar de configurar
el despertador para salir de la alarma secundaria. El ajuste del
reloj de alarma guardará Automáticamente si no hay
operaciones adicionales por 10s.
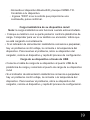
Single Alarm
24 Hr Cycle
Alarm Clock ON
ON
ON
ON
Alarm Clock ON
Alarm Clock Off
Despertador 2: comprobación y ajuste
17

18
• Botón Reproducir / Pausa
◦
◦ .
◦
.
◦
.
◦
• Control de volumen: A
• Brillo de la pantalla:
• Alarma de baja tensión:
• Nivel de batería:
• Modo de carga:
• Connecting to Bluetooth®
◦
◦

19
◦ Encienda el dispositivo Bluetooth® y busque CWBR-110.
Conéctalo a tu dispositivo.
◦ Ingrese “0000” si se le solicita que proporcione una
contraseña, pulse confirmar.
Carga inalámbrica de su dispositivo móvil
Nota: la carga inalámbrica solo funciona cuando está enchufado.
• Coloque su teléfono con su parte posterior contra la plataforma de
carga. Comprobar para ver si su teléfono se enciende / indica que
se está cargando correctamente.
• Si el indicador de alimentación inalámbrica comienza a parpadear,
hay un problema con El voltaje, la corriente o la temperatura del
dispositivo. Para resolver el problema, retire su dispositivo del
cargador, reinicie el dispositivo y repita El proceso de configuración.
Carga de su dispositivo a través de USB
• Conecte el cable de carga de su dispositivo al puerto USB de la
plataforma de carga y conéctelo al puerto de carga de su dispositivo
móvil
• Si el indicador de alimentación inalámbrica comienza a parpadear,
hay un problema con El voltaje, la corriente o la temperatura del
dispositivo. Para resolver el problema, retire su dispositivo del
cargador, reinicie el dispositivo y repita El proceso de configuración.

20
Presupuesto
Dispositivos compatibles
• iPhone X / XR / XS / XS Max
• iPhone 8 / 8+
• Samsung Galaxy S9 / S9 +
• Samsung Galaxy S7 / S7 Edge
• Samsung galaxia
S6 / S6 Edge / S6 Edge +
• Samsung galaxia
Nota 5/7/8/9
• Google Nexus 4/5/6/7
• LG G2 / G3 / G4 / G6
• HP Elite X3
• HTC 8X
• Droid DNA
• Motorola Droid Maxx /
Mini / Turbo
• Microsoft Lumia 950 XL / 950
• Nokia Lumia 735/830/920 /
928/930/1520
• Nokia Lumia Icon
• Blackberry Z30
• LG Lucid 1/2
• Sony Xperia Z3V / Z4V
La page est en cours de chargement...
La page est en cours de chargement...
La page est en cours de chargement...
La page est en cours de chargement...
La page est en cours de chargement...
La page est en cours de chargement...
La page est en cours de chargement...
La page est en cours de chargement...
La page est en cours de chargement...
La page est en cours de chargement...
La page est en cours de chargement...
La page est en cours de chargement...
La page est en cours de chargement...
La page est en cours de chargement...
La page est en cours de chargement...
La page est en cours de chargement...
-
 1
1
-
 2
2
-
 3
3
-
 4
4
-
 5
5
-
 6
6
-
 7
7
-
 8
8
-
 9
9
-
 10
10
-
 11
11
-
 12
12
-
 13
13
-
 14
14
-
 15
15
-
 16
16
-
 17
17
-
 18
18
-
 19
19
-
 20
20
-
 21
21
-
 22
22
-
 23
23
-
 24
24
-
 25
25
-
 26
26
-
 27
27
-
 28
28
-
 29
29
-
 30
30
-
 31
31
-
 32
32
-
 33
33
-
 34
34
-
 35
35
-
 36
36


Coby CWBR-110 Manuel utilisateur
- Catégorie
- Réveils
- Taper
- Manuel utilisateur
dans d''autres langues
- English: Coby CWBR-110 User manual
- español: Coby CWBR-110 Manual de usuario
Documents connexes

Autres documents
-
 T'nB PFCLUM920 Fiche technique
-
 ubiolabs WCB262 2-in-1 Wireless Charging Stand Le manuel du propriétaire
-
 Seneo Seneo Wireless Charger Manuel utilisateur
-
CJ GLOBAL 246WCP Mode d'emploi
-
Bose Wave SoundTouch system IV Le manuel du propriétaire
-
iLuv MORCAL6Q Manuel utilisateur
-
HoMedics HDS-3000 Le manuel du propriétaire
-
Philips HF3650/60 Manuel utilisateur
-
Acoustic Research ART1 Manuel utilisateur


