Harman DMX PowerPort 375 Manuel utilisateur
- Catégorie
- Stroboscopes
- Taper
- Manuel utilisateur
Ce manuel convient également à

DMX PowerPort 375™
User manual

Dimensions
All measurements are expressed in millimeters
©2019 HARMAN PROFESSIONAL DENMARK ApS. All rights reserved. Features, specifications and appearance are subject to
change without notice. HARMAN PROFESSIONAL DENMARK ApS and all affiliated companies disclaim liability for any injury,
damage, direct or indirect loss, consequential or economic loss or any other loss occasioned by the use of, inability to use or reliance
on the information contained in this document. Martin is a registered trademark of HARMAN PROFESSIONAL DENMARK ApS
registered in the United States and/or other countries.
HARMAN PROFESSIONAL DENMARK ApS
, Olof Palmes Allé 44, 8200 Aarhus N, Denmark
HARMAN PROFESSIONAL SOLUTIONS U.S.
, 8500 Balboa Blvd., Northridge CA 91329, USA
www.martin.com
DMX PowerPort 375 User Guide – Rev. A

Contents
Safety Information . . . . . . . . . . . . . . . . . . . . . . . . . . . . . . . . . . . . . . . . . . . . . . . . . . . . . . . . . . . . . . . . . . . . 4
Introduction . . . . . . . . . . . . . . . . . . . . . . . . . . . . . . . . . . . . . . . . . . . . . . . . . . . . . . . . . . . . . . . . . . . . . . . . . . 7
Unpacking . . . . . . . . . . . . . . . . . . . . . . . . . . . . . . . . . . . . . . . . . . . . . . . . . . . . . . . . . . . . . . . . . . . . . . . . 7
Overview . . . . . . . . . . . . . . . . . . . . . . . . . . . . . . . . . . . . . . . . . . . . . . . . . . . . . . . . . . . . . . . . . . . . . . . . . . . . 8
Physical installation . . . . . . . . . . . . . . . . . . . . . . . . . . . . . . . . . . . . . . . . . . . . . . . . . . . . . . . . . . . . . . . . . . . . 9
Power and data connections . . . . . . . . . . . . . . . . . . . . . . . . . . . . . . . . . . . . . . . . . . . . . . . . . . . . . . . . . . . . 11
Power input . . . . . . . . . . . . . . . . . . . . . . . . . . . . . . . . . . . . . . . . . . . . . . . . . . . . . . . . . . . . . . . . . . . . . . 11
Hybrid power + data output . . . . . . . . . . . . . . . . . . . . . . . . . . . . . . . . . . . . . . . . . . . . . . . . . . . . . . . . . . 12
Using the product . . . . . . . . . . . . . . . . . . . . . . . . . . . . . . . . . . . . . . . . . . . . . . . . . . . . . . . . . . . . . . . . . . . . 13
Applying power . . . . . . . . . . . . . . . . . . . . . . . . . . . . . . . . . . . . . . . . . . . . . . . . . . . . . . . . . . . . . . . . . . . 13
Status LEDs and control button . . . . . . . . . . . . . . . . . . . . . . . . . . . . . . . . . . . . . . . . . . . . . . . . . . . . . . . 13
Handling DMX and RDM . . . . . . . . . . . . . . . . . . . . . . . . . . . . . . . . . . . . . . . . . . . . . . . . . . . . . . . . . . . . 13
Service and maintenance . . . . . . . . . . . . . . . . . . . . . . . . . . . . . . . . . . . . . . . . . . . . . . . . . . . . . . . . . . . . . . 14
Fuse replacement . . . . . . . . . . . . . . . . . . . . . . . . . . . . . . . . . . . . . . . . . . . . . . . . . . . . . . . . . . . . . . . . . 14
Cleaning. . . . . . . . . . . . . . . . . . . . . . . . . . . . . . . . . . . . . . . . . . . . . . . . . . . . . . . . . . . . . . . . . . . . . . . . . 14
Installing new software . . . . . . . . . . . . . . . . . . . . . . . . . . . . . . . . . . . . . . . . . . . . . . . . . . . . . . . . . . . . . 16
Troubleshooting . . . . . . . . . . . . . . . . . . . . . . . . . . . . . . . . . . . . . . . . . . . . . . . . . . . . . . . . . . . . . . . . . . . . . 17
Specifications . . . . . . . . . . . . . . . . . . . . . . . . . . . . . . . . . . . . . . . . . . . . . . . . . . . . . . . . . . . . . . . . . . . . . . . 18

4
DMX PowerPort 375™ User Manual
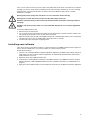
Safety Information
The following symbols are used to identify important safety information on the product and in this document:
Warning! Read this user manual before installing, operating or servicing the DMX PowerPort 375.
Warning! The DMX PowerPort 375 is designed to integrate with other devices in a video display
installation. Follow the safety precautions given not only in this user manual but also in the manuals
of all the devices you connect to it. Observe all warnings given in the manuals and printed on
devices. Install and operate devices only as described in the manuals and only in accordance with
local laws and regulations. Keep this manual for future reference. Manuals are supplied with devices
and also available for download from www.martin.com.
Warning! The Martin® DMX PowerPort 375 is not for household use. It presents risks of severe
injury or death due to fire and burn hazards, electric shock and falls. It must be installed by qualified
technicians only.
Warning! There are no user-serviceable parts inside the DMX PowerPort 375. Refer any operation
not described in this manual to Martin or its authorized service agents.
Attention ! Lisez ce manuel d'utilisation avant d'installer et d'utiliser le DMX PowerPort 375.
Attention ! Le DMX PowerPort 375 est conçu pour être intégré avec d'autres composants dans une
installation de diffusion vidéo. Suivez les précautions d'emploi données dans ce manuel ainsi que
dans les manuels des autres appareils que vous connecterez. Respectez toutes les mises en garde
données dans ce manuel et imprimées sur l'appareil. N'installez et n'utilisez les appareils que
comme cela est décrit dans leur manuel et respectez les normes et réglementations locales.
Conservez ce manuel pour un usage ultérieur. Les manuels fournis avec les produits Martin sont
également disponibles en téléchargement sur www.martin.com.
WARNING!
Read the safety precautions in this section before
installing, powering, operating or servicing this product.
ATTENTION !
Lisez les précautions d'emploi de cette section avant
d'installer, de mettre sous tension ou d'utiliser ce produit
ou bien d'en faire la maintenance.
Warning!
Safety hazard.
Risk of severe
injury or death.
Warning!
Hazardous
voltage. Risk of
severe or lethal
electric shock.
Warning!
Fire hazard.
Warning!
Refer to manual
before installing,
powering or
servicing.
Attention !
Risque pour la
sécurité. Risque
de blessure sévère
voire mortelle.
Attention !
Tension
dangereuse.
Risque
d'électrisation ou
d'électrocution.
Attention !
Risque d'incendie.
Attention !
Reportez-vous au
manuel avant
d'installer, de
mettre sous
tension ou de
commencer la
maintenance.

Safety Information
5
Attention ! Le DMX PowerPort 375 de Martin® n'est pas destiné à un usage domestique. Il présente
des risques de blessure sévère voire mortelle par incendie, brûlure, électrisation et chute. Il ne doit
être installé que par un technicien qualifié.
Attention ! Il n'y a aucun composant réparable par l'utilisateur dans le DMX PowerPort 375. Référez
toute opération non décrite ici à Martin ou à un de ses services techniques agréés.
If you have any questions about how to operate the DMX PowerPort 375 safely, please contact your Martin
supplier or call the Martin 24-hour service hotline on +45 8740 0000, or in the USA on 1-888-tech-180.
PROTECTION FROM ELECTRIC SHOCK
• Do not expose the DMX PowerPort 375 to rain or moisture.
• Connect the DMX PowerPort 375 to AC mains power at 100-240 V (nominal), 50/60 Hz only.
• Ensure that the DMX PowerPort 375 is electrically connected to ground (earth).
• Use only a source of AC mains power that complies with local building and electrical codes and has both
overload and ground-fault (earth-fault) protection.
• The DMX PowerPort 375 can supply maximum DC current as follows:
- DMX PowerPort 375 can supply a safe maximum current of 5.0 A at its power and data output when
powered from 100-120 V mains. Do not connect devices that draw a combined total current of more
than 5.0 A to the DC power and data output when operating on this AC mains voltage range.
- The DMX PowerPort 375 can supply a safe maximum current of 7.5 A at its power and data output
when powered from 173-240 V mains. Do not connect devices that draw a combined total current of
more than 7.5 A to the DC power and data output when operating on this AC mains voltage range.
• The voltage and frequency at the mains power THRU connector are the same as those applied to the
mains power IN connector.
• If you connect DMX PowerPort 375 units to power in a daisy-chain by using 12 AWG / 2.5 mm
2
cable to
connect one unit’s mains power THRU connector to the next unit’s mains power IN connector, you can
link:
- a maximum of three (3) DMX PowerPort 375 units total in one chain at 100-120 V, or
- a maximum of six (6) DMX PowerPort 375 units total in one chain at 173-240 V.
• Check and respect the directions given in the user manuals of all the devices that you intend to connect to
the DMX PowerPort 375, particularly the instructions, warnings and limits that apply to:
- system layout,
- connections to other devices,
- specified cables,
- maximum cable lengths, and
- maximum number of devices that can be connected.
• The DMX PowerPort 375 unit does not have an ON/OFF switch. Make sure that the installation can be
isolated from power quickly and easily if there is an urgent need to shut down power to the unit.
• Provide a means of locking out AC mains power that allows power to the installation to be shut down and
made impossible to reapply, even accidentally, during work on the installation.
• Shut down power to the installation during service and when it is not in use.
• Double-pole/neutral fusing is used. If the installation is not completely disconnected from power, parts
may remain live even if one of the two mains fuses has blown.
• Use only a power input cable that has 12 AWG or 2.5 mm² minimum conductor size and an outer cable
diameter of 8 - 13 mm (0.35 - 0.5 in.). Power cable must be hard usage type (SJT or equivalent) and
heat-resistant to 90° C (194° F) minimum. In the EU the cable must be HAR type.
• Use only the cables specified by Martin for the devices concerned to interconnect them. If the specified
cables are not long enough for an intended cable run, consult Martin for assistance in finding or creating a
safe alternative cable.
• Before applying power to the installation, check that all power distribution equipment and cables are in
perfect condition and rated for the current requirements of all connected devices.
• Isolate the installation from power immediately if the product, power cable or power plug are in any way
damaged or defective, or if they show signs of overheating.

6
DMX PowerPort 375™ User Manual
PROTECTION FROM BURNS AND FIRE
• Do not attempt to bypass fuses.
• Provide free airflow around the device.
• Do not operate the DMX PowerPort 375 if the ambient temperature (Ta) exceeds 45° C (113° F).
• Do not modify the DMX PowerPort 375 in any way not described in this manual or install other than
genuine Martin parts. Use only accessories approved by Martin.
PROTECTION FROM INJURY
• When installing the DMX PowerPort 375 above ground level, ensure that the primary installation hardware
and supporting structure can hold at least 10 times the weight of all the devices they support.
• In an overhead installation or where the DMX PowerPort 375 may cause injury if it falls:
- block access below the work area and work from a stable platform whenever installing, servicing or
moving the DMX PowerPort 375,
- as soon as work is completed, check that all hardware and components are securely in place and that
all installation hardware used is securely fastened.

Introduction
7
Introduction
Thank you for selecting the Martin® DMX PowerPort 375. This compact power supply unit enables Martin
Creative LED Video fixtures to be controlled directly with DMX without needing a Martin P3 System
Controller. The DMX PowerPort 375 fits into the Martin PowerPort range as follows:
• P3 PowerPort 1500 – P3-controlled indoor installations
• P3 PowerPort 1000 IP – P3-controlled outdoor installations
• DMX PowerPort 375 – DMX-controlled indoor installations
• Martin IP66 PSU 240W – DMX-controlled outdoor installations.
The DMX PowerPort 375 and the other PowerPort variants listed above all support the following Martin
Creative LED Video fixtures:
• VDO Sceptron Family
• VDO Fatron Family
• VDO Dotron Family
• VC-Grid Family
• VC-Strip Family
• VC-Dot Family
• Exterior PixLine Family
• Exterior Dot-HP Family
The DMX PowerPort 375 supplies 48 volt DC power and relays DMX and RDM data to the connected
fixtures. A built-in DMX/RDM-compliant splitter distributes the signal to the connected fixtures and the DMX
THRU connector for easy daisy-chaining. It can be rack-mounted as a single unit, two units can be
rack-mounted side-by-side, it can be flown from a truss, or it can be mounted on a flat surface.
For possible system layouts when using the DMX PowerPort 375 with Martin Creative LED Video products,
please see the user documentation for those products. Martin user documentation is supplied with products
and available for download from the Martin website at www.martin.com, where you can also find the latest
specifications, firmware updates and support information for all Martin products.
Please visit www.martin.com and consult the latest PowerPort Capacity document that lists how many
fixtures of each type can be driven from one DMX PowerPort 375.
Either a mains power input cable complete with Neutrik powerCON TRUE1 connector or a separate Neutrik
powerCON TRUE1 power input connector should be ordered separately from Martin (see “Accessories” on
page 18). Connectors and cables for daisy-chaining power are also available from Martin.
The DMX PowerPort 375 is not designed to relay a Martin P3 video signal. To send P3 video data to Martin
Creative Video fixtures, use a unit from the Martin P3 PowerPort range (see “Related Items” on page 19).
Unpacking
The following items are included with the DMX PowerPort 375:
• 2 x short rack / surface mounting brackets
• 1 x long rack mounting bracket
• 1 x coupling bracket
• 1 x safety cable attachment bracket
• 10 x bracket mounting screws
• This user manual.

8
DMX PowerPort 375™ User Manual
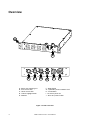
Overview
Figure 1: Product overview
A - Short rack mounting ear
B - Data status LED
C - Power status LED
D - Fixture highlight button
E - DMX IN
F - DMX THRU
G - Hybrid DC power and data OUT
H - Fuseholders
I - AC mains power IN
J - AC mains power THRU
A
E F G I J
H
B
D
C

Physical installation
9
Physical installation
Warning! Read “Safety Information” on page 4 before installing the DMX PowerPort 375.
Attention ! Lisez les précautions d'emploi en page 4 avant d'installer le DMX PowerPort 375.
The DMX PowerPort 375 must be securely anchored to a suitable support. The mounting surface must be
hard, fixed and flat.
The DMX PowerPort 375 unit can be installed in any orientation. Allow free airflow and at least 100 mm
(4 in.) of clearance around the unit.
When mounted in a 19-inch rack, the DMX PowerPort 375 has a height of 1 U.
There are four installation options:
• Single 19-inch rack mounting
• Side-by-side 19-inch rack mounting
• Wall mount
• Flying from rigging truss
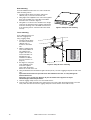
Single 19-inch rack mounting
To install a single DMX PowerPort
375 in a standard 19-inch rack:
1. Using four of the supplied screws,
fasten the supplied long rack
mounting ear to one side of the
DMX PowerPort 375 as shown in
Figure 2.
2. Using four of the supplied screws,
fasten one of the supplied short
rack mounting ears to the other
side of the DMX PowerPort 375
as shown in Figure 2.
3. Fasten the mounting ears of the
DMX PowerPort 375 to the rails in
the rack.
Side-by-side 19-inch rack mounting
To install two DMX PowerPort
375 units side-by-side in a
standard 19-inch rack:
1. Obtain two DMX PowerPort
375 units and combine the
brackets and screws that
are supplied with both units
(you will need 16 x screws,
2 x coupling brackets and 2
x short rack mounting
ears).
2. Place the DMX PowerPort
375 units beside each
other on a flat surface.
3. Using four of the supplied
screws, fasten a coupling bracket to the front surfaces of both units so that they are joined together at
the front as shown in Figure 3.
4. Using four of the supplied screws, fasten a coupling bracket to the rear surfaces of both units so that
they are joined together at the rear.
5. Using eight of the supplied screws, fasten short rack mounting ears to the sides of the pair of units as
shown in Figure 3.
6. Fasten the mounting ears to the rails in the rack.
Figure 2: Setup for single rack mounting
Figure 3: Setup for side-by-side rack mounting

10
DMX PowerPort 375™ User Manual
Wall mounting
To install a DMX PowerPort 375 on a wall or similar flat,
stable mounting surface:
1. Check that there will be free airflow and at least
100 mm (4 in.) of clearance around the unit.
2. Using eight of the supplied screws, fasten the supplied
short rack mounting ears to the sides of the DMX
PowerPort 375 as shown in Figure 4.
3. Using bolts or screws that are suitable for the weight
of the unit, the mounting surface and the environment,
fasten the mounting ears of the DMX PowerPort 375
to the mounting surface. Check that the unit is held
securely.
Truss mounting
To fly a DMX PowerPort 375
unit from a rigging truss
using a rigging clamp:
1. Check that there will be
free airflow and at least
100 mm (4 in.) of
clearance around the
unit.
2. Obtain a rigging clamp
and a safety cable that
are suitable for the
weight of the unit, all
connected cables, etc.
Suitable items are
available from Martin
(see “Accessories” on
page 18).
3. See Figure 5. Using two
of the supplied screws,
fasten the supplied
safety cable attachment
bracket to one side of the unit.
4. Using an M10 bolt with a maximum length of 20 mm (0.8 in.), fasten the rigging clamp into the side of the
unit.
Important! The bolt must not protrude more than 20mm into the unit, or it may damage the
internal electronics.
Important ! La vis ne doit pas dépasser de plus de 20 mm dans l'appareil au risque
d'endommager l'électronique interne.
5. Hook the rigging clamp over the truss chord and fasten it.
6. Loop the safety cable around the truss and fasten it to the safety cable attachment bracket so that the
safety cable will catch the unit if the rigging clamp fails. Check that the unit is held securely.
Figure 4: Setup for wall mounting
Figure 5: Setup for truss mounting

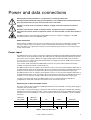
Power and data connections
11
Power and data connections
Warning! Read “Safety Information” on page 4 before connecting to AC power.
Warning! Double-pole/neutral fusing. If the installation is not completely disconnected from power,
parts may remain live even if one of the two mains fuses has blown.
Attention ! Lisez la section "Précautions d'emploi" en page 4 avant de connecter le produit au
secteur.
Attention ! Protection par fusible sur phase et neutre. Si l'appareil n'est pas complètement
déconnecté du secteur, certains composants restent sous tension même si un des deux fusibles a
fondu.
The DMX PowerPort 375’s Neutrik powerCON TRUE1 connectors support hot-plugging, so the DMX
PowerPort 375 does not have an ON/OFF switch.
Power connectors
Before inserting a TRUE1 connector into its receptacle (socket), line up keys and keyways carefully. If the
connector feels too stiff in the receptacle, remove it and check that the keyways are mating correctly.
Excessive stiffness is a sign that the connector is incorrectly lined up. Do not force it, or you may create a
serious safety hazard.
Power input
The DMX PowerPort 375 requires a power input cable with a Neutrik powerCON TRUE1 NAC3FX-W female
cable connector for AC mains power input. The cable must meet the requirements listed under “Protection
from electric shock” on page 5. Martin can supply suitable cables with female TRUE1 input connectors
1.5 m (4.9 ft.) or 5 m (16.4 ft.) long. Alternatively, Martin can supply loose female TRUE1 input connectors
(see “Accessories” on page 34).
If you need to install a Neutrik powerCON TRUE1 connector on a power cable, follow the instructions
available on the Neutrik website at www.neutrik.com.
The DMX PowerPort 375 can supply a safe maximum current of 5.0 A at its power and data output when it
is supplied with AC mains power at 100-120 V. Do not connect devices that draw a combined total current of
more than 5.0 A to the power and data output when using AC mains power within this voltage range.
The DMX PowerPort 375 can supply a safe maximum current of 7.5 A at its power and data output when it
is supplied with AC mains power at 173-240 V. Do not connect devices that draw a combined total current of
more than 7.5 A to the power and data output when using AC mains power within this voltage range.
In regions with 120 V mains power, the DMX PowerPort 375 can be powered using a split-phase
configuration to obtain 208 V and allow more fixtures to be connected to the unit.
Connecting to an AC mains power source
The power cable can be hard-wired to a building installation circuit or fitted with a cord cap (mains plug) for
connection to local power outlets.
If you install a cord cap (mains plug) on the power cable, install a grounding-type (earthed) plug, following
the plug manufacturer’s instructions. Table 1 shows some possible mains power pin identification schemes;
if the pins are not clearly identified, or if you have any doubts about proper installation, consult a qualified
electrician.
Wire Color
(US system)
Wire Color
(EU system) Pin Symbol Screw (US)
black brown live L yellow or brass
white blue neutral N silver
green yellow/green ground (earth) or green
Table 1: Cord cap connections

12
DMX PowerPort 375™ User Manual
Linking DMX PowerPort 375 units to power in a chain
If you obtain a 12 AWG / 2.5 mm
2
power input cable and 12 AWG / 2.5 mm
2
power relay cables from Martin
(see “Accessories” on page 18), you can relay AC mains power from one DMX PowerPort 375 unit to
another by connecting units to power in a linked daisy-chain, MAINS OUT throughput socket to MAINS IN
input socket. If you create a linked daisy-chain like this, you must respect the following safety limits, or you
may create a risk of fire and electric shock:
Using 12 AWG / 2.5 mm
2
cables from Martin, you can link:
• maximum three (3) DMX PowerPort 375 units total in one chain at 100-120 V, or
• maximum six (6) DMX PowerPort 375 units total in one chain at 173-240 V.
Hybrid power + data output
Warning! Before you connect devices to the DMX PowerPort 375’s power + data outputs, visit the
Martin website at www.martin.com and consult the latest PowerPort Capacity document that
explains how many video and/or lighting fixtures of the various types available from Martin can be
driven by one DMX PowerPort 375. Read the devices’ user manuals carefully and respect the system
layout guidelines and limits given in the manuals. User manuals are supplied with products and
available for download from www.martin.com.
Important! Martin VC-Grid, VC-Strip and VC-Dot products are not hot-plugging compatible. Before
you connect these products to or disconnect them from the DMX PowerPort 375, shut down power
to the DMX PowerPort 375 first. This does not apply to VDO Sceptron, VDO Fatron, VDO Dotron,
Exterior PixLine and Exterior Dot-HP; as these products are hot-plugging compatible.
Attention ! Avant de connecter des appareils aux sorties hybrides du DMX PowerPort 375,
connectez-vous au site web de Martin www.martin.com et consultez la dernière version du
document PowerPort Capacity qui détaille combien d'appareils d'éclairage ou vidéo peuvent être
raccordés à un PowerPort 375. Lisez attentivement le manuel d'utilisation de chaque appareil et
respectez les consignes de mise en œuvre et les limites données par les manuels. Les manuels
sont fournis avec les produits et sont disponibles en téléchargement sur www.martin.com
Important ! Les VC-Dot, VC-Grid et VC-Strip ne peuvent pas être câblés à chaud. Avant de les
raccorder au DMX PowerPort 375 ou de les déconnecter, éteignez avant tout le DMX PowerPort 375.
Cette restriction ne s'applique pas aux VDO Sceptron, VDO Fatron, VDO Dotron, Exterior Pixline et
Exterior Dot-HP qui peuvent être connectés à chaud.
The DMX PowerPort 375 supplies DC power at 48 V to Martin Creative Video products over hybrid power +
data cables connected to the power + data output on the rear panel. The output can supply a safe maximum
current of 5 amps when the DMX PowerPort 375 is connected to AC mains power at 100-120 V and 7.5
amps when the DMX PowerPort 375 is connected to AC mains power at 173-240 V.
The output has overload protection. If the output is overloaded or short-circuited, the DMX PowerPort 375 is
immediately shut down. The unit is re-enabled as soon as the overload or short circuit is removed and the
unit has had time to cool down.
Connecting hybrid power + data output
Use only Hybrid power + data cables supplied by Martin to connect Martin fixtures to the DMX PowerPort
375. See ”Accessories” on page 18 for available cables. Do not exceed the maximum lengths for cable runs
specified in user manuals.
To connect the DMX PowerPort 375 to devices:
1. If connecting to VC-Grid, VC-Strip or VC-Dot products, check that the DMX PowerPort 375 is isolated
from AC mains power.
2. Connect Martin hybrid cables with 4-pin male locking XLR connectors to the DMX PowerPort 375’s
power + data output socket on the rear panel (see Figure 1 on page 8).

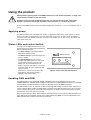
Using the product
13
Using the product
Warning! Before applying power to the DMX PowerPort 375, read “Safety Information” on page 4 and
check that the installation is safe and secure.
Attention ! Avant de mettre le DMX PowerPort 375 sous tension, lisez la section "Précautions
d'emploi" en page 4 et vérifiez que l'installation répond à toutes les conditions de sécurité.
Do not use the DMX PowerPort 375 if the ambient temperature exceeds 45° C (113° F) or falls below -20° C
(-4° F).
Applying power
The DMX PowerPort 375 is intended to be wired to a switched AC mains power circuit. It does not have a
power on/off switch. To apply power to the unit, either apply power to the AC mains circuit to which it is
connected. If the unit’s TRUE1 power input connector is accessible, you can also use it to shut down and
apply power to the unit.
Status LEDs and control button
See Figure 6. The DMX PowerPort 375’s front
panel has two status LEDs and a control button
with the following functions:
• The Data LED lights yellow when DMX or
RDM data is being received.
• The Power LED lights green when AC mains
power is applied.
• The Control button lets you test that
Creative LED Video fixtures are connected
and operating correctly. If you press the
button once, all connected fixtures will
display a constant white pattern. If you press
the button again, all connected fixtures will
return to normal.
Note that you can also test Creative LED
Video fixtures remotely by sending a
highlight command via RDM.
Handling DMX and RDM
The DMX PowerPort 375 will forward all DMX and RDM traffic from the DMX IN connector to the
POWER+DATA OUT and DMX THRU connectors with zero latency. During RDM fixture discovery and RDM
fixture feedback, the DMX PowerPort 375 will route the traffic back to the DMX IN connector.
The DMX PowerPort 375 can itself also be discovered using RDM, letting you retrieve status and firmware
version remotely. When sending an ‘RDM Identify’ command to the DMX PowerPort 375, it will set its Data
LED to a flashing white pattern and set all connected fixtures to display a constant white pattern (as if the
Control button on the unit itself was pressed).
This transparent behavior allows Martin Creative LED Video fixtures connected to the DMX PowerPort 375
to be addressed and configured remotely from a lighting desk using RDM. No manual configuration of the
DMX PowerPort 375 or fixtures themselves is necessary.
Figure 6: Status LEDs and control button
DMX PowerPort 375
Data Power
Push once: activate fixture highlight
Push again: de-activate fixture highlight

14
DMX PowerPort 375™ User Manual
Service and maintenance
Warning! Read “Safety Information” on page 4 before servicing the DMX PowerPort 375.
Warning! Disconnect the DMX PowerPort 375 from AC mains power before servicing.
Warning! Refer any service operation not described in this manual to a qualified service
technician.
Important! Excessive dirt buildup causes overheating and will damage the product. Damage caused
by inadequate cleaning is not covered by the product warranty.
Attention ! Lisez la section "Précautions d'emploi" en page 4 avant de démarrer l'entretien du DMX
PowerPort 375.
Attention ! Déconnectez le DMX PowerPort 375 du secteur avant de commencer l'entretien.
Attention ! Référez toute opération non décrite dans ce manuel à un service technique qualifié.
Important ! Un encrassement excessif peut causer des surchauffes et endommager le produit. Les
dommages causés un nettoyage inadéquat ne sont pas couverts par la garantie du produit.
The user will need to clean the DMX PowerPort 375 periodically, and may replace fuses in the fuseholders
on the rear panel if necessary. All other service operations on the DMX PowerPort 375 must be carried out
by Martin Professional or its approved service agents.
Installation, on-site service and maintenance can be provided worldwide by the Martin Professional Global
Service organization and its approved agents, giving owners access to Martin’s expertise and product
knowledge in a partnership that will ensure the highest level of performance throughout the product’s
lifetime. Please contact your Martin supplier for details.
Fuse replacement
Warning! Replace fuses with fuses of the same type and rating only.
Attention ! Remplacez uniquement les fusibles fondus par des fusibles de même type et de même
valeur.
The DMX PowerPort 375 is protected by two 6.3 amp slow-blow fuses located in fuseholders on the rear
panel (see Figure 1 on page 8). One fuse protects the Live line and one protects the Neutral line – this setup
is necessary to ensure full protection when using a split-phase configuration on 120 V networks to obtain
208 V. If either fuse blows, the DMX PowerPort 375 and all fixtures connected to it will stop working.
If the unit stops working although it is connected to power, the overload protection may have been activated
or a fuse may have blown. If you suspect that a fuse has blown, replace the fuses as follows:
1. Disconnect the DMX PowerPort 375 from power.
2. Using a screwdriver, turn each fuseholder cap counter-clockwise to release it, then remove each fuse.
3. Replace defective fuses with fuses of the same type and rating.
4. Reinstall both fuseholder caps before reapplying power.
Cleaning
Cleaning schedules vary greatly depending on the operating environment. It is therefore impossible to
specify precise cleaning intervals for the DMX PowerPort 375. Cooling fans suck in airborne dust and smoke
particles, and in extreme cases, the product and its air filters may require cleaning after surprisingly few
hours of operation. Environmental factors that may result in a need for frequent cleaning include:
• Use of smoke or fog machines.
• High airflow rates (near air conditioning vents, for example).
• Presence of cigarette smoke.
• Airborne dust (from stage effects, building structures and fittings or the natural environment in outdoor
locations, for example).

Service and maintenance
15
If one or more of these factors is present, inspect units within their first 25 hours of operation to see whether
cleaning is necessary. Check again at frequent intervals. This procedure will allow you to assess cleaning
requirements in your particular situation. If in doubt, consult your Martin™ dealer about a suitable
maintenance schedule.
Warning! Disconnect from power and allow to cool for 10 minutes before cleaning.
Warning! Do not allow the unit to become wet. Wipe with a damp cloth only.
Attention ! Déconnectez le produit et laissez-le refroidir pendant 10 minutes avant de procéder au
nettoyage.
Attention ! Ne laissez pas le produit se couvrir d'humidité. Nettoyez-le avec un chiffon légèrement
humide.
To clean the DMX PowerPort 375:
1. Disconnect the unit from power.
2. Use a vacuum cleaner and soft brush to gently remove dust and loose particles from the outside of the
unit, paying special attention to the air vents in the front panel.
3. Wipe the outside of the unit with a cloth lightly moistened in a mild detergent solution. Do not splash the
unit with water. Do not use any product that contains abrasives or solvents.
4. Check that the unit is dry before reapplying power.
Installing new software
It may be necessary to upload new software (i.e. device firmware) to the DMX PowerPort 375 if it appears to
have a software-related fault or if you want to update to a newer software version.
To upload new software:
1. Connect a PC running the Martin Companion WIndows application (available from the Martin website at
www.martin.com) to the Internet. Allow the application to automatically download all the latest Martin
product firmware to your PC.
2. Shut down power to the DMX PowerPort 375.
3. Connect the PC running Martin Companion to the DMX PowerPort 375’s DMX IN connector using the
Martin Companion Cable USB-DMX hardware interface available from Martin (see “Related Items” on
page 19).
4. Apply power to the DMX PowerPort 375 and follow the instructions in the Martin Companion application.

16
DMX PowerPort 375™ User Manual
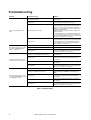
Troubleshooting
Problem Probable cause(s) Remedy
Power status LED does not
light.
No power to product.
Check that AC circuit is switched on. Check cables
and breakers.
Fuse blown.
Disconnect from power. Check both fuses. Replace
as described in this manual if necessary.
Overload protection active.
Output may be overloaded. See ‘PowerPort
Capacity’ guide on www.martin.com. Check that
devices are connected as specified and that the
number of connected devices does not exceed the
maximum permitted limit.
Output may be short-circuited. Check wiring and
rectify any faults.
If overload protection is activated repeatedly and
you cannot find the cause, disconnect the unit from
power and contact Martin Service or an authorized
Martin service partner for assistance.
Internal fault.
Disconnect from power. Lethal current may be
present inside the unit even if one of the two mains
fuses has blown. Do not attempt repairs yourself.
Contact Martin Service or an authorized Martin
service partner for assistance.
Data status LED does not light
even when DMX/RDM input
cable is connected.
Problem on data circuit. Check data cable and connectors
No signal being sent. Check DMX controller.
Internal fault.
Disconnect from power. Do not attempt repairs
yourself. Contact Martin Service or an authorized
Martin service partner for assistance.
Creative Video fixtures do not
respond to Test control button.
Fixtures not receiving 48 volt DC power.
Check locally by pushing test button on each
affected fixture.
Circuit fault.
Check connections and cables. Rectify any faults.
Troubleshoot by substituting cables with known
good cables.
Defective fixture.
Troubleshoot by substituting fixture with a known
good fixture.
Internal fault.
Disconnect from power. Do not attempt repairs
yourself. Contact Martin Service or an authorized
Martin service partner for assistance.
Creative Video fixtures do not
respond to DMX / RDM controls
from lighting controller.
Controller not set up correctly. Check configuration and settings at the controller.
Fixtures not addressed correctly.
Check fixture addressing at the controller. Check
fixture addressing and DMX mode settings via
RDM.
Circuit fault.
Check connections and cables. Rectify any faults.
Troubleshoot by substituting cables with known
good cables.
Defective fixture.
Troubleshoot by substituting fixture with a known
good fixture.
Internal fault.
Disconnect from power. Do not attempt repairs
yourself. Contact Martin Service or an authorized
Martin service partner for assistance.
Table 2: Troubleshooting

Specifications
17
Specifications
Physical
Width (single or double unit 19” rack-mountable with included rackmount ears). . . . . . . . .220 mm (8.7 in.)
Depth . . . . . . . . . . . . . . . . . . . . . . . . . . . . . . . . . . . . . . . . . . . . . . . . . . . . . . . . . . . . . . . . .289 mm (11.4 in.)
Height . . . . . . . . . . . . . . . . . . . . . . . . . . . . . . . . . . . . . . . . . . . . . . . . . . . . . . 44 mm (1.75 in. / 1 Rack Unit)
Weight . . . . . . . . . . . . . . . . . . . . . . . . . . . . . . . . . . . . . . . . . . . . . . . . . . . . . . . . . . . . . . . . 2.33 kg (5.2 lbs.)
Control and Programming
Control protocols . . . . . . . . . . . . . . . . . . . . . . . . . . . . . . . . . . . . . . . . . . . . . . . . . . . . . . . . . . . . .DMX, RDM
Setting and addressing of connected fixtures . . . . . . . . . . . . . . . . . . . . . . . . . . . . . . . . . . . . . . . . . . . .RDM
DMX Compliance. . . . . . . . . . . . . . . . . . . . . . . . . . . . . . . . . . . . . . . . . . . . . . . . . . . . . . . USITT DMX512-A
RDM Compliance. . . . . . . . . . . . . . . . . . . . . . . . . . . . . . . . . . . . . . . . . . . . . . . . . . . . . . . ANSI/ESTA E1.20
DMX/RDM Transceiver IN/THRU . . . . . . . . . . . . . . . . . . . . . . . . . . . . . . . . . . . . . . . . Opto-Isolated RS-485
DMX/RDM Transceiver OUT . . . . . . . . . . . . . . . . . . . . . . . . . . . . . . . . . . . . . . . . . . . Opto-Isolated RS-485
Firmware Update . . . . . . . . . . . . . . . . . . . . . . . . . . . . . . . . . . . . . . Over DMX link using Martin Companion
Control/User Interface
Power output status . . . . . . . . . . . . . . . . . . . . . . . . . . . . . . . . . . . . . . . . . . . . . . . . . . . . . . . . . . .Green LED
Data activity status. . . . . . . . . . . . . . . . . . . . . . . . . . . . . . . . . . . . . . . . . . . . . . . . . . . . . . . . . . . .Yellow LED
Fixture test . . . . . . . . . . . . . . . . . . . . . . . . . . . . . . . . . . . . . . . . . . . . . . . . Pushbutton to call up test pattern
Supported fixtures
Martin VDO Sceptron Family
Martin VDO Fatron Family
Martin VDO Dotron Family
Martin Exterior PixLine Family
Martin Exterior Dot-HP Family
Martin VC-Grid Family
Martin VC-Strip Family
Martin VC-Dot Family via Martin VC-Feeder
See www.martin.com for DMX PowerPort 375 Capacity document listing number of fixtures per PowerPort
unit and for latest information on supported products.
Construction
Color . . . . . . . . . . . . . . . . . . . . . . . . . . . . . . . . . . . . . . . . . . . . . . . . . . . . . . . . . . . . . . . . . . . . . . .Matt black
Housing . . . . . . . . . . . . . . . . . . . . . . . . . . . . . . . . . . . . . . . . . . . . . . . . . . . . . . . . . . . . . . . . . . . . . . . . .Steel
Ingress protection rating . . . . . . . . . . . . . . . . . . . . . . . . . . . . . . . . . . . . . . . . . . . . . . . . . . . . . . . . . . . . IP20
RoHS . . . . . . . . . . . . . . . . . . . . . . . . . . . . . . . . . . . . . . . . . . . . . . . . . . . . . . . . . . . . . . . . . . . . . . .Compliant
REACH . . . . . . . . . . . . . . . . . . . . . . . . . . . . . . . . . . . . . . . . . . . . . . . . . . . . . . . . . . . . . . . . . . . . .Compliant
Installation
Single-unit 19-inch rackmount . . . . . . . . . . . . . . . . . . . . Using supplied short and long rack mounting ears
Dual-unit side-by-side 19-inch rackmount . . .Using supplied coupling plates and short rack mounting ears
Wallmount . . . . . . . . . . . . . . . . . . . . . . . . . . . . . . . . . . . . . . . . . . .Using supplied short rack mounting ears
Trussmount Vertical . . . Using half-coupler clamp in M10 threaded hole, max. bolt length 20 mm (0.75 in.)
Orientation . . . . . . . . . . . . . . . . . . . . . . . . . . . . . . . . . . . . . . . . . . . . . . . . . . . . . . . . . . . . . . . . . . . . . . . Any
Connections
AC mains power IN . . . . . . . . . . . . . . . . . . . . . . . . . . . . . . . . . . . . . . . . . . . . . . Neutrik powerCON TRUE1
AC mains power THRU . . . . . . . . . . . . . . . . . . . . . . . . . . . . . . . . . . . . . . . . . . . Neutrik powerCON TRUE1
DMX/RDM IN . . . . . . . . . . . . . . . . . . . . . . . . . . . . . . . . . . . . . . . . . . . . . . . . Neutrik 5-pin male XLR socket
DMX/RDM THRU. . . . . . . . . . . . . . . . . . . . . . . . . . . . . . . . . . . . . . . . . . . . Neutrik 5-pin female XLR socket
Combined power & data OUT . . . . . . . . . . . . . . . . . . . . . . . . . . . . . . . . . . Neutrik 4-pin female XLR socket

18
DMX PowerPort 375™ User Manual
Electrical
AC mains power input . . . . . . . . . . . . . . . . . . . . . . . . . . . . . . . . . . . . . . . . . 100-240 V (nominal), 50/60 Hz
Power supply unit. . . . . . . . . . . . . . . . . . . . . . . . . . . . . . . . . . . . . . . . . Auto-ranging electronic switch-mode
Maximum permitted total current draw from 48 VDC OUT at 100-120 V mains power . . . . . . . . . . . . . . 5 A
Maximum permitted total current draw from 48 VDC OUT at 173-240 V mains power . . . . . . . . . . . . .7.5 A
Main fuses . . . . . . . . . . . . . . . . . . . . . . . . . . . Double-pole/neutral fusing, 2 x T6.3 A (slow-blow), 250 VAC
Maximum total power consumption . . . . . . . . . . . . . . . . . . 450 W (including full load of connected fixtures)
Typical half-cycle RMS inrush current at 230 V, 50 Hz . . . . . . . . . . . . . . . . . . . . . . . . . . . . . . . . . . . . .9.6 A
Typical earth leakage current. . . . . . . . . . . . . . . . . . . . . . . . . . . . . . . . . . . . . . . . . . . . . . . . . . . . . . . 1.7 mA
Thermal
Maximum ambient temperature (T
a
max.) . . . . . . . . . . . . . . . . . . . . . . . . . . . . . . . . . . . . . . . 45° C (113° F)
Minimum ambient temperature (T
a
min.) . . . . . . . . . . . . . . . . . . . . . . . . . . . . . . . . . . . . . . . . . -20° C (-4° F)
Cooling. . . . . . . . . . . . . . . . . . . . . . . . . . . . . . . . . . . . Filtered forced air (temperature-regulated, low-noise)
Total heat dissipation (calculated +/- 10%) . . . . . . . . . . . . . . . . . . . . 300 BTU/hr. (not including connected
fixtures but with system at full load)
Approvals
EU safety. . . . . . . . . . . . . . . . . . . . . . . . . IEC/EN 60950, IEC/EN 62368-1
EU EMC . . . . . . . . . EN 55032, EN 55035, EN 61000-3-2, EN 61000-3-3
US safety. . . . . . . . . . . . . . . . . . . . . . . . . . . . . . . . . . . . .ANSI/UL 62368-1
US EMC . . . . . . . . . . . . . . . . . . . . . . . . . . . . . . . FCC 47 CFR 15 Class B
Canadian safety. . . . . . . . . . . . . . . . . . . . . . . . . . CSA C22.2 No. 62368-1
Canadian EMC . . . . . . . . . . . . . . . . . . . . . . . . . . . . . . . ICES-003 Class B
Australia/NZ. . . . . . . . . . . . . . . . . . . . . . . . . . . . . . .AS/NZS 62368:1:2018
Included Items
1 x Safety Cable Attachment Eyelet, incl. screws
2 x Short Rack Mounting Ears, incl. screws
1 x Long Rack Mounting Ear, incl. screws
1 x Coupling Plate, incl. screws
User Manual
Please note that a power input cable is not supplied with the product and must be ordered separately (see
below)
Accessories
Power Input Cables
Power Input Cable, H07RN-F, 2.5 mm², bare ends to TRUE1, 1.5 m (4.9 ft.) . . . . . . . . . . . . P/N 91611797
Power Input Cable, H07RN-F, 2.5 mm², bare ends to TRUE1, 5 m (16.4 ft.). . . . . . . . . . . . . P/N 91611786
Power Input Cable, SJOOW, 12 AWG, bare ends to TRUE1, 1.5 m (4.9 ft.) . . . . . . . . . . . . . P/N 91610173
Power Input Cable, SJOOW, 12 AWG, bare ends to TRUE1, 5 m (16.4 ft.) . . . . . . . . . . . . . P/N 91610174
Power Thru Cables
Power Relay Cable, H07RN-F, 2.5 mm², TRUE1 to TRUE1, 0.45 m (1.5 ft.) . . . . . . . . . . . . . P/N 91611784
Power Relay Cable, H07RN-F, 2.5 mm², TRUE1 to TRUE1, 1.2 m (3.9 ft.) . . . . . . . . . . . . . . P/N 91611785
Power Relay Cable, H07RN-F, 2.5 mm², TRUE1 to TRUE1, 2.5 m (8.2 ft.) . . . . . . . . . . . . . . P/N 91611796
Power Relay Cable, SJOOW, 12 AWG, TRUE1 to TRUE1, 0.45 m (1.5 ft.). . . . . . . . . . . . . . P/N 91610170
Power Relay Cable, SJOOW, 12 AWG, TRUE1 to TRUE1, 1.2 m (3.9 ft.). . . . . . . . . . . . . . . P/N 91610171
Power Relay Cable, SJOOW, 12 AWG, TRUE1 to TRUE1, 2.5 m (8.2 ft.). . . . . . . . . . . . . . . P/N 91610172
Power Connectors
Power Connector, Cable Mount, Neutrik TRUE1 NAC3FX-W (female) . . . . . . . . . . . . . . .P/N 91611789HU
Power Connector, Cable Mount, Neutrik TRUE1 NAC3MX-W (male) . . . . . . . . . . . . . . . .P/N 91611788HU
Installation Hardware
Super Lightweight Half Coupler Rigging Clamp, black (suitable for M10 threaded hole). . . . P/N 91602018
Safety Cable, SWL 60 kg, BGV C1 / DGUV 17, black . . . . . . . . . . . . . . . . . . . . . . . . . . . . . . P/N 91604006
Safety Cable, SWL 60 kg, BGV C1 / DGUV 17, silver . . . . . . . . . . . . . . . . . . . . . . . . . . . . . . P/N 91604007

Specifications
19
Related Items
Martin Companion Cable USB-DMX hardware interface. . . . . . . . . . . . . . . . . . . . . . . . . . . . P/N 91616091
Martin Companion Windows application . . . . . . . . . . . . . . . . . . . . . . . . . . Download from www.martin.com
P3 PowerPort 1500 . . . . . . . . . . . . . . . . . . . . . . . . . . . . . . . . . . . . . . . . . . . . . . . . . . . . . . . . P/N 90721040
P3 PowerPort 1000 IP Rental . . . . . . . . . . . . . . . . . . . . . . . . . . . . . . . . . . . . . . . . . . . . . . . . P/N 90721070
P3 PowerPort 1000 IP Install . . . . . . . . . . . . . . . . . . . . . . . . . . . . . . . . . . . . . . . . . . . . . . . . . P/N 90721080
Martin IP66 PSU 240 W. . . . . . . . . . . . . . . . . . . . . . . . . . . . . . . . . . . . . . . . . . . . . . . . . . . . . P/N 90760330
Ordering Information
Martin DMX PowerPort 375 . . . . . . . . . . . . . . . . . . . . . . . . . . . . . . . . . . . . . . . . . . . . . . . . . . P/N 90721094
Specifications subject to change without notice. For the latest product specifications, see www.martin.com
Disposing of this product
Martin products are supplied in compliance with Directive 2012/19/EC of the European Parliament and of the
Council of the European Union on WEEE (Waste Electrical and Electronic Equipment), where applicable.
Help preserve the environment! Ensure that this product is recycled at the end of its life. Your supplier can give
details of local arrangements for the disposal of Martin products.
FCC Compliance
This device complies with Part 15 of the FCC Rules. Operation is subject to the following two conditions: (1) This device may not
cause harmful interference, and (2) this device must accept any interference received, including interference that may cause
undesired operation.
Canadian Interference-Causing Equipment Regulations - Règlement sur le Matériel Brouilleur du Canada
This Class A digital apparatus meets all requirements of the Canadian Interference-Causing Equipment Regulations.
Cet appareil numérique de la classe A respecte toutes les exigences du Règlement sur le Matériel Brouilleur du Canada.

20
DMX PowerPort 375™ User Manual
La page est en cours de chargement...
La page est en cours de chargement...
La page est en cours de chargement...
La page est en cours de chargement...
-
 1
1
-
 2
2
-
 3
3
-
 4
4
-
 5
5
-
 6
6
-
 7
7
-
 8
8
-
 9
9
-
 10
10
-
 11
11
-
 12
12
-
 13
13
-
 14
14
-
 15
15
-
 16
16
-
 17
17
-
 18
18
-
 19
19
-
 20
20
-
 21
21
-
 22
22
-
 23
23
-
 24
24


Harman DMX PowerPort 375 Manuel utilisateur
- Catégorie
- Stroboscopes
- Taper
- Manuel utilisateur
- Ce manuel convient également à
dans d''autres langues
- English: Harman DMX PowerPort 375 User manual
Autres documents
-
Martin DMX PowerPort 375 Manuel utilisateur
-
Martin COMPANION Manuel utilisateur
-
-
Legrand DMX-Splitter Guide d'installation
-
wattstopper DMX Splitter 4 Channel Guide d'installation
-
-
-
Prescolite LITEISTRY DMX Guide d'installation
-
Lenmar PowerPort Boost Mode d'emploi
-
Lenmar PowerPort Slim Mode d'emploi