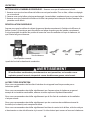
Dyna-Glo DGB390BNP-D Mode d'emploi
- Catégorie
- Barbecues
- Taper
- Mode d'emploi

1
70-10-567 Rev 11/23/15
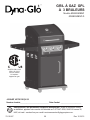
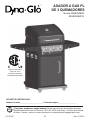
3-BURNER
LP GAS GRILL
Model #DGB390BNP
#DGB390BNP-D
ATTACH YOUR RECEIPT HERE
Serial Number _____________________________ Purchase Date ______________________
Questions, problems, missing parts? Before returning to your retailer, call our customer
service department at 1-877-447-4768, 8:30 a.m. – 4:30 p.m., CST, Monday – Friday
or e-mail us at [email protected].
ANS Z21.58b- 2012
CSA 1.6b- 2012
Outdoor Cooking
Gas Appliances
Français p. XX
Español p. XX
Español p. 57
Francais p. 29

3
Fuels used in gas or oil red appliances and the products of combustion of such fuels contain
chemicals including Benzene known to the State of California to cause cancer, birth defects or other
reproductive harm. This product contains chemicals, including lead and lead compounds, known to
the State of California to cause cancer, birth defects or other reproductive harm. Wash hands
after handling.
CALIFORNIA PROPOSITION 65
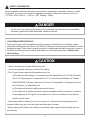
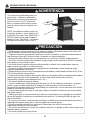
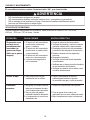
DANGER
CAUTION
• Do not use in an explosive atmosphere. Keep grill area clear and free from combustible
materials, gasoline and other ammable vapors and liquids.
Please read and understand this entire manual before attempting to assemble, operate or install
the product. If you have any questions regarding the product, please call customer service at:
1-877-447-4768, 8:30 a.m. – 4:30 p.m., CST, Monday – Friday.
• Never use charcoal or lighter uid with the grill.
• Do not use gasoline, kerosene or alcohol for lighting.
• The LP gas cylinder used with this appliance must be:
(a) Constructed and marked in accordance with the Specications for LP-Gas Cylinders
of the U.S. Department of Transportation (D.O.T.) or the National Standard of Canada,
CAN/CSA-B339, Cylinders, Spheres and Tubes for Transportation of Dangerous Goods;
and Commision, as applicable; and
(b) Provided with a listed overlling prevention device.
(c) Provided with a cylinder connection device compatible with the connector for outdoor
cooking appliances. This grill is not intended to be used in or installed on recreational
vehicles and/or boats.
• Never keep a lled container in a hot car or car trunk. Heat will cause the gas pressure to
increase, which may open the relief valve and allow gas to escape.
• Always open grill lid slowly and carefully as heat and steam trapped within the grill can burn
you severely.
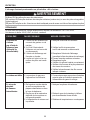
SAFETY INFORMATION

4
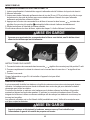
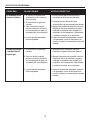
SAFETY INFORMATION
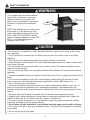
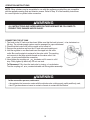
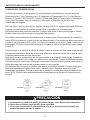
• Do not place the grill under overhead
combustible construction or awnings.
Minimum clearance from sides and
back of unit to combustible construction,
36 inches (914.4mm) from sides and
back.
NOTE: The installation must conform with
local codes or, in the absence of local
codes, with either the National Fuel Gas
Code, ANSI Z223.1/NFPA 54, Natural
Gas and Propane Installation Code, CSA
B149.1, or Propane Storage and
Handling Code, B149.2.
CAUTION
• Do not store or use gasoline or other ammable liquids or vapors in the vicinity of this or any
other appliance.
• An LP cylinder not connected for use shall not be stored in the vicinity of this or any other
appliance.
• This grill is for use with propane gas only (propane cylinder not included).
• Never attempt to attach this grill to the self-contained propane system of a boat, camper trailer,
motor home or house.
• Do not attempt to move the grill while it is lit or when it is hot. The casters should be locked
when not moving the grill.
• Do not use the grill unless it is completely assembled and all parts are securely fastened and
tightened.
• Keep all combustible items and surfaces at least 36 inches (91.44 cm) away from the grill at all
times.
• Do not touch metal parts of grill until it has completely cooled (about 45 minutes) to avoid
burns, unless you are wearing protective gear (pot holders, gloves, BBQ mittens, etc…).
• Do not alter this grill in any manner.
• Clean and inspect the hose before each use. If there is evidence of abrasion, wear, cuts, or
leaks, the hose must be replaced prior to operating the appliance. The replacement hose
assembly will be that which is specied by the manufacturer, listed in the repair parts list in this
manual.
• Move gas hoses as far away as possible from hot surfaces and dripping hot grease.
• Keep the grill’s valve compartment, burners and circulating air passages clean. Inspect the
grill before each use. Do not obstruct the ow of gas or ventilation air.
• The use of alcohol, prescription or non-prescription drugs may impair the operator’s ability
to properly assemble or safely operate the grill.
• Do not leave a lit grill unattended. Keep children and pets away from the grill at all times.
• Do not place this grill on any type of tabletop surface. The grill should be placed on a at and
level surface.
• Do not use the grill in high winds.
WARNING
36in
36in
914.4mm
914.4mm

14
OPERATION INSTRUCTIONS
CHECKING FOR LEAKS
After all connections are made, check all connections and ttings on the LP gas tank valve, gas hose
and regulator for leaks with a water and soap solution.
To prevent re or explosion while testing for a leak:
• Always perform leak test prior to lighting the grill.
• Do not smoke while testing for a leak.
• Always perform leak tests outdoors in a well-ventilated area.
• Do not use any source of ame while testing for leaks.
• Do not use the grill until any and all leaks are corrected.
• If you are unable to correct a leak, disconnect the propane supply and call a gas appliance service
dealer.
PERFORM LEAK TEST
• Prepare leak test solution by combining 1 part liquid dish soap with 3 parts water.
Total solution required is approximately 2 - 3 ounces (70 - 90 ml).
Put leak test solution in a spray bottle.
• Ensure all control knobs are in the O OFF position.
• Connect the gas hose to the gas supply.
• Open the LP gas tank valve.
• Spray leak test solution on all gas carrying connections and ttings. Presence of bubbles at areas
of applied test solution indicates a gas leak. If leaks are detected or you smell or hear gas, shut off the
gas supply valve immediately and repair or replace the defective part. Do not use the grill until
all leaks are corrected.
WARNING
ALL INSTRUCTIONS AND SAFEGUARDS ON THIS PAGE MUST BE FOLLOWED TO
PREVENT FIRE, DAMAGE AND/OR INJURY.
CAUTION
Only use the regulator and hose assembly provided! If a replacement is necessary, please
call our customer service center. Do not use replacement parts that are not intended for this grill.

15
OPERATION INSTRUCTIONS
CONNECTING GAS CYLINDER
The propane gas supply cylinder to be used must be constructed and marked in accordance with the
Specications for LP Gas Cylinders of the U.S. Department of Transportation (D.O.T.) or the National
Standard of Canada, CAN/CSA-B339, Cylinders, Spheres and Tubes for Transportation of Dangerous
Goods; and Commission, as applicable; and Provided with a listed overlling prevention device.
Use only 20-pound cylinders (height: 18.11 inches, tank diameter: 9.84 inches, foot diameter: 8.03 inches)
equipped with a cylinder connection device compatible with the connection for outdoor cooking appli-
ances.
The cylinder must include a collar to protect the cylinder valve. The gas cylinder should not be dropped
or handled roughly!
If the appliance is not in use, the gas cylinder must be disconnected. Storage of an appliance indoors
is permissible ONLY if the cylinder is disconnected and removed from the appliance. Cylinders must
be stored outdoors out of the reach of children and must not be stored in a building, garage or any
other enclosed area. Your cylinder must never be stored where temperatures can reach over 125°F.
Place dust cap on cylinder valve outlet whenever the cylinder is not in use. Only install the type of
dust cap on the cylinder valve outlet that is provided with the cylinder valve. Other types of caps or
plugs may result in leakage of propane.
Before connection, be sure that there is no debris caught in the outlet of the gas cylinder, outlet of the
regulator valve or in the outlet of the burner and burner ports. Connect regulator valve and
hand-tighten rmly. Keep the propane cylinder valve closed and disconnect the propane cylinder from
the regulator valve when the grill is not in use.
DO NOT obstruct the ow of combustion air and ventilation air to the grill. The propane cylinder must
be arranged for vapor withdrawal and equipped with a listed overlling prevention device. Please use
the proper cylinder orientation to provide vapor withdrawal. NOTE: The cylinder must be fully upright
for the cylinder to have vapor withdrawal only.
CAUTION
a. Do not store a spare LP-gas cylinder under or near this appliance.
b. Never ll the cylinder beyond 80 percent full.
c. If the information in (a) and (b) is not followed exactly, a re causing death or serious
injury may occur.

16
OPERATION INSTRUCTIONS
NOTE: Other cylinders may be acceptable for use with this appliance provided they are compatible
with the appliance nesting hole and retention means. Refer to Step 15 of the Assembly Instructions
for correct cylinder to cylinder holder connection.
WARNING
ALL INSTRUCTIONS AND SAFEGUARDS ON THIS PAGE MUST BE FOLLOWED TO
PREVENT FIRE, DAMAGE AND/OR INJURY.
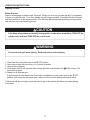
CONNECTING THE LP TANK
1. The knob on the LP tank must be closed. Make sure that the knob is turned clockwise to a
full stop. The cylinder supply system must be arranged for vapor withdrawal.
2. Check that the control knob on the control unit is turned off.
3. Remove the protective cap from the LP tank valve and coupling nut.
4. Hold the regulator in one hand and insert the nipple into the valve
outlet. Be sure the nipple is centered in the valve outlet. The coupling
nut connects to the large outside threads on the valve outlet. Use
care – do not cross thread the connection.
5. Hand-tighten the coupling nut clockwise until it comes to a full
stop. Firmly tighten by hand only. Do not use tools.
To Disconnect: Fully close the tank valve by turning clockwise.
Turn the coupling nut counterclockwise until the regulator assembly detaches.
WARNING
In the connection process, make sure:
• the regulator inlet connector mates with the cylinder valve outlet properly, safely and rmly, and;
• the LP gas hose does not come in contact or remain in contact with the rebox.

17
OPERATION INSTRUCTIONS
Lighting The Grill
Before rst use:
Remove all hangings or plastic straps, if present. Before you cook on your new gas grill, it is important
to clean your grill with heat. To do this, operate the grill for approximately 15 minutes with the lid closed
and the control knob in the highest position. This will clean the internal parts by burning off any residue
and odor from the manufacturing process.
WARNING
Do not lean over grill when lighting. Read instructions before lighting.
CAUTION
If the ame extinguishes accidentally during ignition or operation, immediately TURN OFF the
cylinder valve and then TURN OFF the control knob.
1. Check that the control knobs are in the O OFF position.
2. Open valve at tank fully by turning counter-clockwise.
3. Open lid during lighting.
4. Push igniter down 3 to 4 seconds while turning right side control knob to the HIGH position. The
burner should ignite.
5. Repeat for all other burners.
If ignition does not take place within 5 seconds, immediately turn the control knob to the O OFF
position. Wait 5 minutes and repeat step 4 above or refer to match lighting instructions below.
If the burner still does not light, check that there is gas in the cylinder and follow the match lighting
instructions.

18
OPERATION INSTRUCTIONS
SHUTDOWN INSTRUCTIONS
1. Turn control knobs clockwise to the O OFF position.
2. Close valve at tank fully by turning clockwise.
3. Close lid.
Turn off LP supply at cylinder when appliance is not in use.
LIGHTING THE GRILL WITH A MATCH
1. Open the lid
2. Insert a match in the end of the match holder that is installed on the inside of the cabinet door.
3. Light the match.
4. Immediately place the lit match through the spaces in the grill gates near the ports of the burner
between the heat tents as shown. Make sure the lit match is close to the burner ports.
5. Press in the control knob that operates the burner and rotate counter-clockwise to
High position and burner should light immediately.
6. Repeat 2~5 steps to lighting the remaining burners.
7. Adjust burners to desired cooking settings.
CAUTION
Make sure all burner controls are off, except for the burner being lit and the burners
that have been lit.
CARE AND MAINTENANCE
Cooking Grates
The best time to ‘burn-off’ the cooking grates is after every use (approx. 15 minutes). The grill is already
hot from cooking thus requiring less fuel to obtain necessary temperature for ‘burn-off’.
To ‘burn off’ or heat clean your grill, turn the burners to highest position and run for 15 minutes with the lid
closed. Then turn off the burners and use a wire brush to clean excess food residue from the grates.
The porcelain grates have an enamel nish (similar to glass) and should be handled with care not to chip.
CAUTION
Ensure the grill is cool before cleaning and conducting maintenance and with the gas supply
turned off at the LP-Gas Cylinder.

19
CARE AND MAINTENANCE
Recommended Cleaning Supplies
Mild liquid dish soap, warm water, nylon cleaning pad, wire brush
DO NOT use cleaners that contain acid, mineral spirits or any abrasive substance.
Outside Surfaces
It is recommended to use only mild dish soap and hot water to clean grill and grill parts.
Rinse with warm water.
Inside Bottom Pan of Grill Body
To avoid are-ups, the bottom pan of the cooking box should be kept clean on a regular basis.
Remove residue using a brush, scraper and/or cleaning pad. Wash with mild dish soap and warm
water. Rinse with warm water. Avoid water splashing into venturi tubes of burners.
Heat Tents
Clean residue with wire brush and wash with mild dish soap and warm water. Rinse with warm water.
Grease Cup
Empty the grease cup and clean with mild dish soap and warm water on a regular basis.
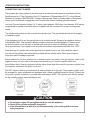
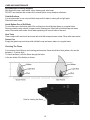
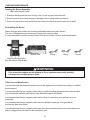
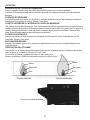
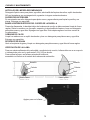
Checking The Flame
For maximum fuel efciency and cooking performance, ame should be a blue-yellow color and be
between 1- 2 inches high.
To check the ame, view the ame through the holes
in the two sides of the rebox as shown.
Hole for viewing the ame

20
CARE AND MAINTENANCE
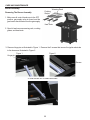
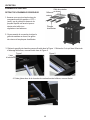
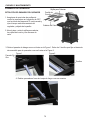
Burner Assembly
Removing The Burner Assembly
1. Make sure all control knobs are in the OFF
position, gas supply valve is closed, and the
gas hose is disconnected from the gas supply.
2. Open lid and remove warming rack, cooking
grates, and heat tents.
4. Slide burners out of rebox as shown.
Warming Rack
Cooking
Grates
Heat Tents
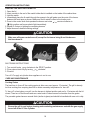
3. Remove hinge pin as illustrated in Figure 1. Remove the 2 screws that secure the igniter electrode
to the burner as illustrated in Figure 2.
Hinge pin
Screws
Figure 1 Figure 2

21
CARE AND MAINTENANCE
WARNING
If the instructions above are not followed, a re or explosion may result, possibly
causing serious bodily injury or death.
Other Care and Maintenance
It is recommended that inspection and service on this appliance be conducted annually by a qualied
service person.
It is recommended that you regularly check that the outdoor cooking appliance area is clear and free
from combustible material, gasoline and other ammable vapors and liquids.
It is recommended that you regularly check that the ow of combustion and ventilation air is not
obstructed.
It is recommended that you regularly check that the ventilation openings of the grill cabinet
are free and clear from debris.
It is recommended that you regularly check and clean the burner/venturi tubes for insects and insect
nests. A clogged tube can lead to a re beneath the grill.
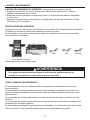
Cleaning the Burner Assembly
– Make sure the grill is cool
1. Ensure all burner ports are clear of clogs. Use of a pin or paper clip works well.
2. Ensure burner is free of any damage. If damage is found, replace with new burner.
3. Ensure the end of the burner and primary air screen are clear from insect nests, dirt or debris.
Re-installing the Burner
Ensure that gas valve orices are correctly positioned inside burner inlet (venturi).
The use of a ashlight may be necessary to ensure the correct position.
It is recommended to view the correct position through the bottom of rebox as illustrated below.
View the correct position
from the bottom of the rebox.
Bottom View
Wrong Wrong Correct

22
CARE AND MAINTENANCE
The electronic ignition requires 1 “AA” alkaline battery, which is included.
WARNING
DO NOT mix old and new batteries.
DO NOT mix alkaline, standard (Carbon-Zinc), or rechargeable (Nickel-Cadmium) batteries.
DO NOT dispose of batteries in re. Improper disposal may cause batteries to leak or explode.
TROUBLESHOOTING
If you have any questions regarding the product, please call customer service at 1-877-447-4768,
8:30 a.m. – 4:30 p.m., CST, Monday – Friday.
PROBLEM POSSIBLE CAUSE CORRECTIVE ACTION
The burner will not
light using the
ignitor procedure
(weak or no spark
being generated).
Low Heat.
Excessive
Flare Ups.
1. The igniter electrode may be
covered with grease or residue.
2. The igniter electrode may
have a loose or disconnected
wire.
3. Cracked or broken ignition
electrode.
4. Dead battery or faulty
battery connection.
1. Insufcient gas pressure to
the unit.
1. Grease and/or residue
build-up on heat tents or in
rebox.
2. Excessive dripping of fat or
marinade from food.
3. Cooking temperature too high.
1. Clean the ignitor electrode.
2. Check the connection and reconnect any
loose or disconnected wires.
3. Replace ignition electrode (see Replace-
ment Parts List).
4. Perform any of the following:
a. Replace battery
b. Check to see if battery is inserted
correctly.
c. Check for any corrosion around battery
terminals.
d. Check wire connections as stated
above
1. Call a qualied service agency to check
the gas supply pressure and correct the
pressure.
1. Clean the grill components.
2. Trim the fat from meat and use non-oil
based marinades.
3. Lower temperature accordingly.

23
TROUBLESHOOTING
PROBLEM POSSIBLE CAUSE CORRECTIVE ACTION
The burner will not
light with a match.
No gas ow or an
obstructed gas ow.
1. Match not reaching burners
(when holding match with
hand).
2. Empty tank.
3. Poor connection between
valve regulator and LP
cylinder coupling.
4. Burner inlet blocked.
1. Tank valve not on or fully
opened.
2. Empty tank.
3. Poor connection between
valve regulator and LP
cylinder coupling.
4. Burner inlet blocked.
1. Use match holder found in
cabinet door.
2. Check fuel level and rell tank if
necessary.
3. Turn off grill knobs, close the LP
cylinder valve at top of cylinder
and check the connection
between the regulator valve
and cylinder coupling.
Disconnect and reconnect, if
necessary.
4. Clean the burner inlet (venturi)
and burner as described by the
Care and Maintenance section
in the manual.
1. Fully open tank valve by turning
counterclockwise.
2. Check fuel level and replace
fuel if necessary.
3. Turn off grill knobs, close the LP
cylinder valve at top of cylinder
and check the connection
between the regulator valve
and cylinder coupling.
Disconnect and reconnect, if
necessary.
4. Clean the burner inlet (venturi)
and burner as described by the
Care and Maintenance section
in the manual.

25
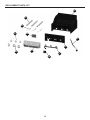
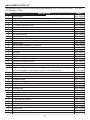
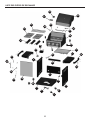
REPLACEMENT PARTS LIST
1
3
6
4
7
16
9
32
22
21
14
12
5
17
15
29
10
31
30
34
23
20
18
11
13
19
8
25
28
33
26
27
24
45

26
REPLACEMENT PARTS LIST
2
41
40
39
37
38
43
36
35
42
44

27
REPLACEMENT PARTS LIST
For replacement parts, call our customer service department at 1-877-447-4768, 8:30 a.m. – 4:30 p.m.,
CST, Monday – Friday.
PART DESCRIPTION PART #
Bottom panel
LP gas hose and regulator assembly
non-locking swivel caster - Includes 4 screws/at washers/spring washers
locking swivel caster - Includes 4 screws/at washers/spring washers
LP cylinder retention screw
Cart side panel-right
Cart rear panel
Door Magnet
Cart side panel-left
Cart front door handle
door handle bezel
door handle sleeve
Match holder
Cart front door assembly - no handle
Hose holder
Cart front upper door brace
Side table
Towel bar
Tool hook
AA battery (1.5V)
Grease pan with heat shield
Grease cup
Side table support
Firebox assembly - Includes burners/LP gas valve & manifold assembly/LP
gas hose& regulator /control panel/ /ignition wire and electrode.
M6 Keps Nut - Secure lid pivot pin
Lid pivot pin
Lid handle
Lid handle bezel
Grill lid assembly-includes lid bumpers
Temp gauge with Nut
Badge
Warming rack
Cooking grate
Heat tent
Firebox assembly - includes lid bumpers
Firebox front outer panel
LP gas valve & manifold
Electronic ignition
Control panel
Control knob bezel
Control knob
Main burner- with cotter pin
Ignition electrode and ignition wire assembly
104 - 04006
104 - 13014
104 - 04017
104 - 04019
104 - 04012
104 - 04010
104 - 04008
104 - 14020
104 - 04009
104 - 14021
104 - 14022
104 - 14023
104 - 14024
70-01-403
104 - 04007
104 - 04011
104 - 04001
104 - 14001
104 - 14002
104 - 05002
104 - 04013
104 - 04014
104 - 04003
70-01-404
70-09-001
104 - 12002
104 - 12003
104 - 12004
70-01-405
104 - 12005
104 - 22006
104 - 13001
104 - 13002
104 - 13003
104 - 13004
104 - 13005
104 - 13006
104 - 13007
70-01-406
104 - 13009
104 - 13010
104 - 13011
104 - 13012
1
2
3
4
5
6
7
8
9
10
11
12
13
14
15
16
17
18
19
20
21
22
23
24
25
26
27
28
29
30
31
32
33
34
35
36
37
38
39
40
41
42
43

28
PART DESCRIPTION PART #
Heat shield for electronic ignition
Single direction caster - includes 4 screws/at washers/spring washers
Hardware Pack
Owner’s/Instruction Manual
44
45
n/a
n/a
REPLACEMENT PARTS LIST
104 - 13013
104 - 04018
104 - 05001
70 - 10 - 567
70-10-567 Printed in China

29
70-10-567 Rev 11/23/15
GRIL À GAZ GPL
À 3 BRULEURS
Modèle #DGB390BNP
#DGB390BNP-D
JOIGNEZ VOTRE REÇU ICI
Numéro de série_____________________________ Date d’achat _____________________
Des questions, des problèmes, des pièces manquantes? Avant de retourner l’article
au détaillant, appelez notre service à la clientèle au 1-877-447-4768, 08:30-16 heures 30,
HNC, du lundi - vendredi ou par e-mail à [email protected].
ANS Z21.58b- 2012
CSA 1.6b- 2012
Pour la cuisson
à l’extérieur
Appareil au gaz

31
CONSIGNES DE SÉCURITÉ
Les combustibles utilisés dans les appareils de chauffage au gaz ou à l’huile, et les produits de
combustion contiennent des produits chimiques reconnus par l’État de la Californie comme étant la
cause de cancers et d’anomalies congénitales et d’autres problèmes liés aux fonctions
reproductrices. Cet appareil contient des produits chimiques, notamment du plomb et des
composés de plomb, reconnus par l’État de la Californie comme étant la cause de cancers,
d’anomalies congénitales et d’autres problèmes liés aux fonctions reproductrices. Lavez-vous les
mains après l’avoir manipulé.
PROPOSITION 65 DE LA CALIFORNIE
DANGER
MISE EN GARDE
N’utilisez pas le barbecue dans un endroit présentant un risque d’explosion. Assurez-
vous que l’espace autour du barbecue est propre et exempt de matériaux combustibles,
d’essence et d’autres vapeurs ou liquides inammables.
Assurez-vous de lire et de comprendre l’intégralité de ce manuel avant de tenter d’assembler,
d’utiliser ou d’installer le produit. Si vous avez des questions concernant ce produit, veuillez
téléphoner au service à la clientèle au 1-877-447-4768, 08:30-16 heures 30, HNC,
du lundi - vendredi.
• N’utilisez jamais de gaz d’allumage pour charbon de bois ou d’essence à briquet avec ce barbecue.
• N’utilisez pas d’essence, de kérosène ni d’alcool pour l’allumage.
• Ce barbecue n’est pas destiné à être utilisé ou installé sur un véhicule récréatif ou un bateau.
• Ouvrez toujours le couvercle du barbecue lentement et avec précaution, car la chaleur et la
vapeur emprisonnées qui s’en échappent peuvent causer des brûlures graves.
• N’essayez jamais de faire fonctionner ce barbecue avec du propane.
• Demandez toujours à un service d’entretien autorisé d’installer toute la tuyauterie
d’alimentation en gaz nécessaire, la vanne d’arrêt manuel et les raccords à branchement
rapide.

32
CONSIGNES DE SÉCURITÉ
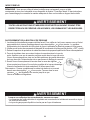
AVERTISSEMENT
• Ne pas utiliser cet appareil sous une surface
combustible ou un auvent. Dégagement minimal
entre les parois latérales et l’arrière de l’appareil
et la construction combustible (914,4 mm (36
po) à partir des parois latérales et 914,4 mm
(36 po) à partir de l’arrière).
REMARQUE : L’installation doit être effectuée
conformément à la réglementation locale ou, en
l’absence d’une telle réglementation, au
National Fuel Gas Code, ANSI Z223.1/NFPA
54, Natural Gas and Propane Installation Code,
CSA B149.1, ou au Propane Storage and Han-
dling Code, B149.2.
• Ne pas entreposer ni utiliser de l’essence ni d’autres vapeurs ou liquides inammables dans le
voisinage de l’appareil, ni de tout autre appareil. Ne rangez aucun produit inammable dans le
chariot du barbecue.
• Une bouteille de propane qui n’est pas raccordée en vue de son utilisation, ne doit pas être
entreposée dans le voisinage de cet appareil ou de tout autre appareil.
• Ce barbecue est conçu pour être alimenté par du gaz naturel seulement.
• Ne tentez jamais de raccorder ce barbecue au système autonome d’alimentation en gaz
propane d’un bateau d’une caravane, d’une autocaravane ou d’une résidence.
• Ne tentez jamais de déplacer le barbecue lorsqu’il est allumé ou toujours chaud. Verrouillez
toujours les roulettes avec frein lorsque vous ne déplacez pas le barbecue.
• N’utilisez pas le barbecue tant qu’il n’est pas complètement assemblé et tant que toutes les
pièces ne sont pas xées et serrées solidement.
• Maintenez tout objet ou toute surface combustible à une distance d’au moins 91,44 cm (36 po)
du barbecue, et ce, en tout temps.
• Ne touchez pas les éléments en métal du barbecue avant que celui-ci ne soit complètement
refroidi (environ 45 minutes) an d’éviter les brûlures, à moins d’utiliser des articles de protection
(poignées, gants, mitaines pour le barbecue, etc.).
• Ne modiez ce barbecue d’aucune façon.
• Nettoyez et inspectez le tuyau avant chaque utilisation. Si vous constatez des signes d’abrasion
ou d’usure, ou s’il est coupé ou qu’il fuit, il est important de le remplacer avant de faire fonction-
ner l’appareil. Vous devez utiliser l’ensemble de tuyau de remplacement précisé par le fabricant,
lequel est indiqué dans la liste des pièces de rechange de ce manuel.
• Éloignez les tuyaux à gaz le plus loin possible des surfaces chaudes ou des débordements de
graisse chaude.
• Assurez-vous que le compartiment du robinet du barbecue, ses brûleurs et les conduits
d’aération sont toujours propres. Inspectez le barbecue avant chaque utilisation. N’entravez pas
le ux de gaz ou d’air de la ventilation.
• L’alcool, les médicaments sous ordonnance et les médicaments vendus sans ordonnance
peuvent affecter les facultés de l’utilisateur, l’empêchant d’assembler ce barbecue correctement
ou de l’utiliser de manière sécuritaire.
• Ne laissez pas un barbecue allumé sans surveillance. Gardez le barbecue hors de la portée
des enfants et des animaux en tout temps.
• Ne le placez pas sur une table. Placez le barbecue sur une surface plane.
• N’utilisez pas ce barbecue dans des conditions de grands vents.
MISE EN GARDE
36in
36in
914.4mm
914.4mm
La page charge ...
La page charge ...
La page charge ...
La page charge ...
La page charge ...
La page charge ...
La page charge ...
La page charge ...
La page charge ...
La page charge ...
La page charge ...
La page charge ...
La page charge ...
La page charge ...
La page charge ...
La page charge ...
La page charge ...
La page charge ...
La page charge ...
La page charge ...
La page charge ...
La page charge ...
La page charge ...
La page charge ...
La page charge ...
La page charge ...
La page charge ...
La page charge ...
La page charge ...
La page charge ...
La page charge ...
-
 1
1
-
 2
2
-
 3
3
-
 4
4
-
 5
5
-
 6
6
-
 7
7
-
 8
8
-
 9
9
-
 10
10
-
 11
11
-
 12
12
-
 13
13
-
 14
14
-
 15
15
-
 16
16
-
 17
17
-
 18
18
-
 19
19
-
 20
20
-
 21
21
-
 22
22
-
 23
23
-
 24
24
-
 25
25
-
 26
26
-
 27
27
-
 28
28
-
 29
29
-
 30
30
-
 31
31
-
 32
32
-
 33
33
-
 34
34
-
 35
35
-
 36
36
-
 37
37
-
 38
38
-
 39
39
-
 40
40
-
 41
41
-
 42
42
-
 43
43
-
 44
44
-
 45
45
-
 46
46
-
 47
47
-
 48
48
-
 49
49
-
 50
50
-
 51
51


Dyna-Glo DGB390BNP-D Mode d'emploi
- Catégorie
- Barbecues
- Taper
- Mode d'emploi
dans d''autres langues
- English: Dyna-Glo DGB390BNP-D User guide
- español: Dyna-Glo DGB390BNP-D Guía del usuario
Documents connexes
-
Dyna-Glo DGF493BNP Manuel utilisateur
-
Dyna-Glo DGB390BNP-D-1 Le manuel du propriétaire
-
-
-
-
-
-
-