Bosch HWD5051UC Mode d'emploi
- Catégorie
- Tiroirs chauffants
- Taper
- Mode d'emploi

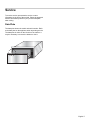
HWD57, HWD50
Warming Drawers

Table of Contents
Questions?
1-800-944-2904
www.bosch-home.com/us
We look forward to hearing from you!
This Bosch Appliance is made by
BSH Home Appliances Corporation
1901 Main Street, Suite 600
Irvine, CA 92614
About This Manual . . . . . . . . . . . . . . . . . . . . . . . . . . . 1
How This manual is Organized . . . . . . . . . . . . . . . . . . . 1
Safety Definitions . . . . . . . . . . . . . . . . . . . . . . . . . . . . . . 1
Safety . . . . . . . . . . . . . . . . . . . . . . . . . . . . . . . . . . . . . . 2
Important Safety Instructions . . . . . . . . . . . . . . . . . . . 2
Getting Started . . . . . . . . . . . . . . . . . . . . . . . . . . . . . . . 4
Parts . . . . . . . . . . . . . . . . . . . . . . . . . . . . . . . . . . . . . . . 4
Warming Drawer . . . . . . . . . . . . . . . . . . . . . . . . . . . . . . 4
Control Panel . . . . . . . . . . . . . . . . . . . . . . . . . . . . . . . . . 4
Operation . . . . . . . . . . . . . . . . . . . . . . . . . . . . . . . . . . . 4
About the Appliance . . . . . . . . . . . . . . . . . . . . . . . . . . 4
Features . . . . . . . . . . . . . . . . . . . . . . . . . . . . . . . . . . . . 4
Warming Timer . . . . . . . . . . . . . . . . . . . . . . . . . . . . . . . 4
Sabbath Mode . . . . . . . . . . . . . . . . . . . . . . . . . . . . . . . . 4
Use of Your Appliance . . . . . . . . . . . . . . . . . . . . . . . . 5
Preheating the Warming Drawer . . . . . . . . . . . . . . . . . . 5
Warming Food . . . . . . . . . . . . . . . . . . . . . . . . . . . . . . . . 5
Warming Plates and Bowls . . . . . . . . . . . . . . . . . . . . . . 5
Proofing . . . . . . . . . . . . . . . . . . . . . . . . . . . . . . . . . . . . . 5
Crisping Stale Items. . . . . . . . . . . . . . . . . . . . . . . . . . . . 5
Getting the Most Out of Your Appliance . . . . . . . . . . 5
Temperature Recommendations . . . . . . . . . . . . . . . . . . 5
Cleaning and Maintenance . . . . . . . . . . . . . . . . . . . . . 6
Cleaning . . . . . . . . . . . . . . . . . . . . . . . . . . . . . . . . . . . . 6
Maintenance . . . . . . . . . . . . . . . . . . . . . . . . . . . . . . . . . 6
Removing the Drawer . . . . . . . . . . . . . . . . . . . . . . . . . . 6
Replacing the Drawer . . . . . . . . . . . . . . . . . . . . . . . . . . 6
Service . . . . . . . . . . . . . . . . . . . . . . . . . . . . . . . . . . . . . 7
Data Plate . . . . . . . . . . . . . . . . . . . . . . . . . . . . . . . . . . . 7
STATEMENT OF LIMITED PRODUCT WARRANTY . . 8

English 1
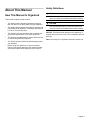
About This Manual
How This Manual Is Organized
This manual contains several sections:
•The Safety section describes important procedures
that can ensure your safety while using the appliance.
•The Getting Started section describes the features and
functionality of the appliance, including a description of
how to set it up and operate it.
•The Operation section describes how to operate and
get the best performance out of each component.
•The Cleaning and Maintenance section describes how
to clean and maintain the appliance.
•The Service section includes troubleshooting tips and
your warranty.
• Before using your appliance, be sure to read this
manual. Pay special attention to the Important Safety
Instructions located at the beginning of the manual.
Safety Definitions
NOTICE: This indicates that damage to the appliance or
property may occur as a result of non-compliance with this
advisory.
Note: This alerts you to important information and/or tips.
9 WARNING
This indicates that death or serious injuries may
occur as a result of non-observance of this warning.
9 CAUTION
This indicates that minor or moderate injuries may
occur as a result of non-observance of this warning.

9 IMPORTANT SAFETY INSTRUCTIONS
READ AND SAVE THESE INSTRUCTIONS
English 2
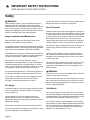
Safety
9 WARNING:
When properly cared for, your new appliance has been
designed to be safe and reliable. Read all instructions
carefully before use. These precautions will reduce the risk
of burns, electric shock, fire and injury to persons. When
using kitchen appliances, basic safety precautions must be
followed, including those in the following pages.
Proper Installation and Maintenance
Have the installer show you the location of the circuit
breaker or fuse. Mark it for easy reference.
This appliance must be properly installed and grounded by
a qualified technician. Connect only to a properly grounded
outlet. Refer to the Installation Instructions for details.
This appliance is intended for normal family household use
only. It is not approved for outdoor use. See the Warranty. If
you have any questions, contact the manufacturer.
Do not store or use corrosive chemicals, vapors,
flammables or nonfood products in or near this appliance. It
is specifically designed for use when heating or cooking
food. The use of corrosive chemicals in heating or cleaning
will damage the appliance and could result in injury.
Do not operate this appliance if it is not working properly, or
if it has been damaged. Contact an authorized servicer.
Do not repair or replace any part of the appliance unless
specifically recommended in this manual. Refer all
servicing to a factory authorized service center.
Fire Safety
If materials inside an oven should ignite, keep door closed.
Turn off the appliance, and disconnect the circuit at the
circuit breaker box.
Use this appliance only for its intended purpose as
described in this manual. For example, never use the
appliance for warming or heating the room. Never use the
appliance for storage.
Always have a working smoke detector near the kitchen.
In the event that personal clothing or hair catches fire, drop
and roll immediately to extinguish flames.
Smother flames from food fires other than grease fires with
baking soda. Never use water on cooking fires.
Burn Prevention
Exercise caution when opening the appliance. Standing to
the side, open the door slowly and slightly to let hot air and/
or steam escape. Keep your face clear of the opening and
make sure there are no children or pets near the unit. After
the release of hot air and/or steam, proceed with your
cooking. Keep doors shut unless necessary for cooking or
cleaning purposes. Do not leave open doors unattended.
Do not heat or warm unopened food containers. Build-up of
pressure may cause the container to burst and cause
injury.
Always use dry potholders. Moist or damp potholders on
hot surfaces may result in burns from steam. Do not let
potholder touch hot heating elements. Do not use a towel
or other bulky cloth.
Do not touch interior surface of the drawer while it is in use.
The interior of the drawer could become hot enough to
cause burns. Allow drawer and rack (if equipped) to cool
before handling.
9 WARNING:
To prevent burns, do not remove drawer while hot. Be sure
drawer is empty before removing.
Secure all loose garments, etc. before beginning. Tie long
hair so that it does not hang loose, and do not wear loose
fitting clothing or hanging garments, such as ties, scarves,
jewelry, or dangling sleeves.
Child Safety
Do not allow anyone to climb, stand, lean, sit, or hang on
any part of an appliance, especially a door, warming drawer
or storage drawer. This can damage the appliance, and the
unit may tip over, potentially causing severe injury.
Do not allow children to use this appliance unless closely
supervised by an adult. Children and pets should not be left
alone or unattended in the area where the appliance is in
use. They should never be allowed to play in its vicinity,
whether or not the appliance is in use.

English 3
9 WARNING:
Items of interest to children should not be stored in an
appliance, in cabinets above an appliance or on the
backsplash. Children climbing on an appliance to reach
items could be seriously injured.
Cookware Safety
NOTICE:
Plastic containers or plastic wrap can melt if in direct
contact with the drawer or a hot utensil. If it melts onto the
drawer, it may not be removable.
Food Safety
9 CAUTION:
To maintain food safety, follow these guidelines:
1. DO NOT use the warming drawer to heat cold food
(exception: it is safe to use the drawer to crisp
crackers, chips, dry cereal or to warm breads or
biscuits, and to warm plates).
2. Be sure to maintain proper food temperature. The
USDA recommends holding hot food at 140°F or
warmer.
3. DO NOT warm food for longer than one hour.
.
IMPORTANT SAFETY NOTICE: The California Safe
Drinking and Toxic Enforcement Act requires the
Governor of California to publish a list of substances
known to the state to cause cancer, birth defects or
other reproductive harm, and requires businesses to
warn customers of potential exposure to such
substances.
9 WARNING
State of California Proposition 65 Warnings:
This product contains chemicals known to the State
of California to cause cancer, birth defects or other
reproductive harm.

English 4
Getting Started
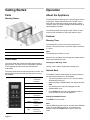
Parts
Warming Drawer
Control Panel
The control panel has several touchpads that respond to
light pressure. Touch the center of a touchpad to activate
it.The temperature pads control the drawer bottom
temperature
The control panel emits a beep when an entry is made. The
warming timer beeps when the specified amount of time
has elapsed..
Operation
About the Appliance
The warming drawer will keep hot, cooked foods at serving
temperature. Always start with hot food. DO NOT use to
heat cold food other than proofing yeast dough, crisping
crackers, chips, dry cereal,warming breads and biscuits, or
warming dishes or plates.
The warming drawer has a push-to-open feature. Push in
on the front of the drawer to cause the drawer to open.
Features
Warming Timer
The warming timer can be set for any increment of 5
minutes. The minimum time is 5 minutes and the maximum
is 5 hours.
Note:
The warming timer default is 1 hour.
When the time is elapsed, the warming timer beeps and the
drawer automatically turns off.
Changing the Warming Timer:
Use the + and - pads to change the warming timer.
Sabbath Mode
The Sabbath Feature enables those of particular faiths to
use their warming drawers on the Sabbath.
• The warming drawer is set to run for 74 hours before
automatically turning off.
• While operating in Sabbath Mode, the display will show
SAb.
• The warming timer cannot be changed once the
Sabbath Mode is set.
• Press ON/OFF at any time during Sabbath mode to
end the mode and turn off the appliance.
Setting the Sabbath Feature
Press MED for five seconds.
Note:
Only the MED temperature can be use while in the Sabbath
mode. Once the Sabbath mode is set, all buttons are
disabled except the On/Off button, used to cancel the
mode.
1 Control Panel
2 Warming Drawer Housing
3Drawer
1
Display Displays the
current drawer
temperature
2
LOW 140° F
3
MED 165° F
4
HIGH 190° F
5
PROOF 100° F
6
- Press to
decrease time
7
+ Press to
increase time
8
ON/OFF Switches
warming drawer
on and off.
9
Signal
Light
Turns on when
the warming
drawer is in use.

English 5
Use of Your Appliance
IMPORTANT:
Plastic containers or plastic wrap can melt if in direct
contact with the drawer or a hot utensil. If it melts onto the
drawer, it may not be removable.
Note:
Use heat-safe dishes only.
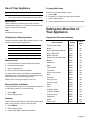
Preheating the Warming Drawer
Preheat the warming drawer when warming food. For best
results, preheat for the following times:
Warming Food
1. Press the pad for the desired temperature setting.
2. Preheat warming drawer.
3. Set the warming timer.
4. Place cooked, hot food in the drawer.
It is okay to leave food in the cookware it was prepared.
Alternatively, you can transfer food to a heat-safe serving
dish before placing it in the warming drawer.
Aluminum foil or lid may be used to cover food.
Warming Plates and Bowls
Use only heat-safe dishes. Place empty dishes or plates in
a cold warming drawer. No need to preheat.
1. Press LOW.
2. Set the warming timer.
Proofing
Place dough in desired dish in a cold warming drawer and
lightly oil top of dough. Loosely cover with cloth.
1. Press PROOF.
2. Set the warming timer.
3. Check dough height. Add time as needed.
Crisping Stale Items
Place food in low sided dishes or pans.
1. Press LOW.
2. Preheat for 5 minutes, then place dish in drawer.
3. Set the warming timer.
4. Check crispness after 45 minutes. Add time as needed.
Getting the Most Out of
Your Appliance
Temperature Recommendations
9 CAUTION
To maintain food safety, do not leave food in the
oven for more than one hour before or after cooking.
Setting Preheat Time
LOW 5 minutes
MED 10 minutes
HIGH 15 minutes
PROOF no preheating necessary
Food/Cookware Setting
Cover
Dish
Proofing yeast dough PROOF Yes
Bacon HIGH No
Beef, medium and well done MED No
Beef, medium rare LOW No
Bread, hard rolls MED No
Bread, soft rolls, coffe cakes MED Yes
Biscuits MED Yes
Casseroles MED Yes
Eggs MED Yes
Fish, seafood MED Yes
Fried foods HIGH No
Gravy, cream sauces MED Yes
Ham MED Yes
Pancakes HIGH Yes
Pies, one crust MED Yes
Pies, two crusts MED No
Pizza HIGH No
Pork MED Yes
Potatoes, baked HIGH Yes
Potatoes, mashed MED Yes
Poultry, roasted MED Yes
Vegetables MED Yes
Plates LOW No
Plate of food MED Yes

English 6
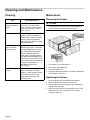
Cleaning and Maintenance
Cleaning Maintenance
Removing the Drawer
1. Pull drawer to fully open position.
2. Press down right drawer clip.
3. Lift up left drawer clip.
4. Firmly pull the drawer straight out. Retract cabinet rails
while drawer is removed.
Replacing the Drawer
1. Be sure cabinet rails are pushed inside cabinet.
2. Align the drawer rails with the cabinet rails.
3. Firmly push the drawer straight into the cabinet until
drawer clicks into place.
4. Open and close drawer to test operation. Note: if the
drawer will not close, verify that the rail clips are
properly positioned.
Part Recommendations
Drawer interior
(polished stainless
steel)
Use dish detergent. Wash, rinse
well and dry. For hard water
spots or scale, use white vinegar.
Apply with a sponge or cloth,
rinse, and dry.
Painted surfaces Use hot soapy water or mild
cleaners such as Fantastik or
Formula 409Wash, rinse well
and dry. Avoid using abrasive
cleaning agents, steel wool pads
and oven cleaners.
Drawer exterior
frame (brushed
stainless steel)
Always wipe or rub in the
direction of the grain. Clean with
a soapy sponge, then rinse and
dry, or wipe with Fantastik® or
Formula 409® sprayed on a
paper towel. Protect and polish
with Stainless Steel Magic® and
a soft cloth. Remove water spots
with a cloth dampened with white
vinegar. Use Bar Keeper's
Friend® to remove heat
discoloration.
Warming Drawer
Control
Clean with hot soapy water or
apply Fantastik® or Formula
409® to a clean sponge or paper
towel and wipe clean. Avoid
using abrasive cleaners and
scrubbing pads.
9 CAUTION
To prevent burns, do not remove drawer while hot.
Be sure drawer is empty before removing.
L
o
w
H
i
g
h
_
M
e
d
P
r
o
o
f
+
O
n
/
O
f
f
B
LOW
HIGH
_
MED
P
R
O
O
F
+
ON/OFF

English 7
Service
To reach a service representative, see the contact
information at the front of the manual. Please be prepared
with the information printed on your product data plate
when calling.
Data Plate
The data plate shows the model and serial number. Refer
to the data plate on the appliance when requesting service.
The data plate is visible on the left side of the cabinet. It
may be necessary to remove the drawer to view it.
L
O
W
H
IG
H
_
M
E
D
PROOF
+
O
N
/OF
F

English 8
STATEMENT OF LIMITED
PRODUCT WARRANTY
What this Warranty Covers & Who it
Applies to
The limited warranty provided by BSH Home Appliances
(“Bosch”) in this Statement of Limited Product Warranty
applies only to the Bosch appliance sold to you, the first
using purchaser, provided that the Product was purchased:
• For your normal, household (non-commercial) use, and
has in fact at all times only been used for normal
household purposes.
• New at retail (not a display, "as is", or previously
returned model), and not for resale, or commercial use.
• Within the United States or Canada, and has at all
times remained within the country of original purchase.
The warranties stated herein apply only to the first
purchaser of the Product and are not transferable.
Please make sure to return your registration card; while not
necessary to effectuate warranty coverage, it is the best
way for Bosch to notify you in the unlikely event of a safety
notice or product recall.
How Long the Warranty Lasts
Bosch warrants that the Product is free from defects in
materials and workmanship for a period of three hundred
and sixty-five days (365) from the date of purchase. The
foregoing timeline begins to run upon the date of purchase,
and shall not be stalled, tolled, extended, or suspended, for
any reason whatsoever.
Repair/Replace as Your Exclusive
Remedy
During this warranty period, Bosch or one of its authorized
service providers will repair your Product without charge to
you (subject to certain limitations stated herein) if your
Product proves to have been manufactured with a defect in
materials or workmanship. If reasonable attempts to repair
the Product have been made without success, then Bosch
will replace your Product (upgraded models may be
available to you, in Bosch's sole discretion, for an
additional charge). All removed parts and components shall
become the property of Bosch at its sole option. All
replaced and/or repaired parts shall assume the identity of
the original part for purposes of this warranty and this
warranty shall not be extended with respect to such parts.
Bosch's sole liability and responsibility hereunder is to
repair manufacturer-defective Product only, using a Bosch-
authorized service provider during normal business hours.
For safety and property damage concerns, Bosch highly
recommends that you do not attempt to repair the Product
yourself, or use an un-authorized servicer; Bosch will have
no responsibility or liability for repairs or work performed by
a non-authorized servicer. If you choose to have someone
other than an authorized service provider work on your
Product, THIS WARRANTY WILL AUTOMATICALLY
BECOME NULL AND VOID. Authorized service providers
are those persons or companies that have been specially
trained on Bosch products, and who possess, in Bosch's
opinion, a superior reputation for customer service and
technical ability (note that they are independent entities
and are not agents, partners, affiliates or representatives of
Bosch). Notwithstanding the foregoing, Bosch will not incur
any liability, or have responsibility, for the Product if it is
located in a remote area (more than 100 miles from an
authorized service provider) or is reasonably inaccessible,
hazardous, threatening, or treacherous locale,
surroundings, or environment; in any such event, if you
request, Bosch would still pay for labor and parts and ship
the parts to the nearest authorized service provider, but you
would still be fully liable and responsible for any travel time
or other special charges by the service company, assuming
they agree to make the service call.
Out of Warranty Product
Bosch is under no obligation, at law or otherwise, to
provide you with any concessions, including repairs, pro-
rates, or Product replacement, once this warranty has
expired.
Warranty Exclusions
The warranty coverage described herein excludes all
defects or damage that are not the direct fault of Bosch,
including without limitation, one or more of the following:
• Use of the Product in anything other than its normal,
customary and intended manner (including without
limitation, any form of commercial use, use or storage
of an indoor product outdoors, use of the Product in
conjunction with air or water-going vessels).
• Any party's willful misconduct, negligence, misuse,
abuse, accidents, neglect, improper operation, failure
to maintain, improper or negligent installation,
tampering, failure to follow operating instructions,
mishandling, unauthorized service (including self-
performed "fixing" or exploration of the appliance's
internal workings).
• Adjustment, alteration or modification of any kind.
• A failure to comply with any applicable state, local, city,
or county electrical, plumbing and/or building codes,
regulations, or laws, including failure to install the
product in strict conformity with local fire and building
codes and regulations.
• Ordinary wear and tear, spills of food, liquid, grease
accumulations, or other substances that accumulate
on, in, or around the Product.

English 9
• Any external, elemental and/or environmental forces
and factors, including without limitation, rain, wind,
sand, floods, fires, mud slides, freezing temperatures,
excessive moisture or extended exposure to humidity,
lightning, power surges, structural failures surrounding
the appliance, and acts of God.
In no event shall Bosch have any liability or responsibility
whatsoever for damage to surrounding property, including
cabinetry, floors, ceilings, and other structures or objects
around the Product. Also excluded from this warranty are
scratches, nicks, minor dents, and cosmetic damages on
external surfaces and exposed parts; Products on which
the serial numbers have been altered, defaced, or
removed; service visits to teach you how to use the
Product, or visits where there is nothing wrong with the
Product; correction of installation problems (you are solely
responsible for any structure and setting for the Product,
including all electrical, plumbing or other connecting
facilities, for proper foundation/flooring, and for any
alterations including without limitation cabinetry, walls,
floors, shelving, etc.); and resetting of breakers or fuses.
TO THE EXTENT ALLOWED BY LAW, THIS WARRANTY
SETS OUT YOUR EXCLUSIVE REMEDIES WITH
RESPECT TO PRODUCT, WHETHER THE CLAIM
ARISES IN CONTRACT OR TORT (INCLUDING STRICT
LIABILITY, OR NEGLIGENCE) OR OTHERWISE. THIS
WARRANTY IS IN LIEU OF ALL OTHER WARRANTIES,
WHETHER EXPRESS OR IMPLIED. ANY WARRANTY
IMPLIED BY LAW, WHETHER FOR MERCHANTABILITY
OR FITNESS FOR A PARTICULAR PURPOSE, OR
OTHERWISE, SHALL BE EFFECTIVE ONLY FOR THE
PERIOD THAT THIS EXPRESS LIMITED WARRANTY IS
EFFECTIVE. IN NO EVENT WILL THE MANUFACTURER
BE LIABLE FOR CONSEQUENTIAL, SPECIAL,
INCIDENTAL, INDIRECT, "BUSINESS LOSS", AND/OR
PUNITIVE DAMAGES, LOSSES, OR EXPENSES,
INCLUDING WITHOUT LIMITATION TIME AWAY FROM
WORK, HOTELS AND/OR RESTAURANT MEALS,
REMODELLING EXPENSES IN EXCESS OF DIRECT
DAMAGES WHICH ARE DEFINITIVELY CAUSED
EXCLUSIVELY BY BOSCH, OR OTHERWISE. SOME
STATES DO NOT ALLOW THE EXCLUSION OR
LIMITATION OF INCIDENTAL OR CONSEQUENTIAL
DAMAGES, AND SOME STATES DO NOT ALLOW
LIMITATIONS ON HOW LONG AN IMPLIED WARRANTY
LASTS, SO THE ABOVE LIMITATIONS MAY NOT APPLY
TO YOU. THIS WARRANTY GIVES YOU SPECIFIC
LEGAL RIGHTS, AND YOU MAY ALSO HAVE OTHER
RIGHTS WHICH VARY FROM STATE TO STATE.
No attempt to alter, modify or amend this warranty shall be
effective unless authorized in writing by an officer of BSH.

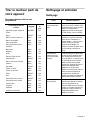
Table des matières
Questions?
1-800-944-2904
www.bosch-home.com/us
Il nous fait toujours plaisir de recevoir vos commentaires!
Cet appareil électroménager Bosch est fabriqué par
BSH Home Appliances, Corporation
1901 Main Street, Suite 600
Irvine, CA 92614
À propos de ce manuel . . . . . . . . . . . . . . . . . . . . . . . . 1
Comment ce manuel est organisé . . . . . . . . . . . . . . . . . 1
Définitions concernant la sécurité. . . . . . . . . . . . . . . . . . 1
Sécurité . . . . . . . . . . . . . . . . . . . . . . . . . . . . . . . . . . . . . 2
Consignes de sécurité importantes . . . . . . . . . . . . . . 2
Démarrage. . . . . . . . . . . . . . . . . . . . . . . . . . . . . . . . . . . 4
Pièces . . . . . . . . . . . . . . . . . . . . . . . . . . . . . . . . . . . . . . 4
Tiroir-réchaud . . . . . . . . . . . . . . . . . . . . . . . . . . . . . . . . . 4
Panneau de commande . . . . . . . . . . . . . . . . . . . . . . . . . 4
Fonctionnement . . . . . . . . . . . . . . . . . . . . . . . . . . . . . . 5
À propos de l'appareil . . . . . . . . . . . . . . . . . . . . . . . . . 5
Fonctions . . . . . . . . . . . . . . . . . . . . . . . . . . . . . . . . . . . . 5
Minuterie de maintien au chaud . . . . . . . . . . . . . . . . . . . 5
Mode Shabbat . . . . . . . . . . . . . . . . . . . . . . . . . . . . . . . . 5
Utilisation de votre appareil . . . . . . . . . . . . . . . . . . . . 6
Préchauffage du tiroir-réchaud. . . . . . . . . . . . . . . . . . . . 6
Maintien au chaud des aliments. . . . . . . . . . . . . . . . . . . 6
Maintien au chaud des assiettes, plats et saladiers. . . . 6
Apprêt. . . . . . . . . . . . . . . . . . . . . . . . . . . . . . . . . . . . . . . 6
Redonner leur aspect croustillant aux aliments rassis. . 6
Tirer le meilleur parti de votre appareil . . . . . . . . . . . 7
Recommandations relatives aux températures . . . . . . . 7
Nettoyage et entretien . . . . . . . . . . . . . . . . . . . . . . . . . 7
Nettoyage . . . . . . . . . . . . . . . . . . . . . . . . . . . . . . . . . . . 7
Entretien . . . . . . . . . . . . . . . . . . . . . . . . . . . . . . . . . . . . 8
Démontage du tiroir . . . . . . . . . . . . . . . . . . . . . . . . . . . . 8
Remise en place du tiroir . . . . . . . . . . . . . . . . . . . . . . . . 8
Réparation . . . . . . . . . . . . . . . . . . . . . . . . . . . . . . . . . . 8
Plaque signalétique . . . . . . . . . . . . . . . . . . . . . . . . . . . . 8
ÉNONCÉ DE GARANTIE LIMITÉE DU PRODUIT . . . . 9

Français 1
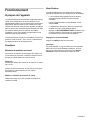
À propos de ce manuel
Comment ce manuel est organisé
Ce manuel contient plusieurs sections :
• La section Sécurité décrit des procédures importantes
qui visent à assurer votre sécurité pendant l'utilisation
de l'appareil.
• La section Démarrage décrit les caractéristiques et
fonctionnalités de l'appareil et comprend une
description de son installation et fonctionnement.
• La section Fonctionnement décrit comment actionner
et obtenir le meilleur rendement de chaque composant.
• La section Nettoyage et entretien décrit la façon de
nettoyer et d'entretenir l'appareil.
• La section Réparation comprend les conseils de
dépannage et la garantie.
• Avant d'utiliser l'appareil, prière de lire attentivement ce
manuel. Prêter une attention toute particulière aux
Importantes consignes de sécurité situées au début du
manuel.
Définitions concernant la sécurité
AVIS : Ceci indique que la non-conformité à cet avis de
sécurité peut entraîner des dégâts à l'appareil ou à la
propriété.
Remarque : Ceci vous avertit que d'importantes
informations et/ou conseils sont fournis.
9 AVERTISSEMENT
Ceci indique que le non respect de cet
avertissement peut entraîner des blessures graves,
voire la mort.
9 ATTENTION
Ceci indique que le non respect de cet
avertissement peut entraîner des blessures légères
ou modérées.

Français 2
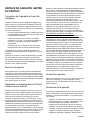
Sécurité
9 AVERTISSEMENT :
Votre nouvel appareil a été conçu pour un fonctionnement
sûr et fiable si vous en prenez bien soin. Lire attentivement
toutes les consignes avant l'emploi. Ces précautions
réduiront les risques de brûlures, de choc électrique,
d'incendie et de lésions corporelles. Lors de l'utilisation
d'appareils de cuisine, il est impératif de respecter les
mesures de sécurité élémentaires, y compris celles figurant
aux pages suivantes.
Installation et entretien corrects
Demander à l'installateur de vous indiquer l'emplacement
du coupe-circuit ou du fusible. Identifier sa position pour
pouvoir le retrouver facilement.
L'installation et la mise à la terre correctes de cet appareil
doivent être effectuées par un technicien qualifié. Brancher
uniquement l'appareil sur une prise correctement reliée à la
terre. Pour plus de renseignements, se reporter à la Notice
d'installation.
Cet appareil est destiné à un usage domestique familial
normal uniquement. Il n'est pas autorisé pour un usage en
extérieur. Voir la Garantie. Pour toute question, contacter le
fabricant.
Ne pas entreposer ni utiliser de produits chimiques
corrosifs, vapeurs, substances inflammables ou produits
non alimentaires à l'intérieur ou à proximité de cet appareil.
Celui-ci a été spécialement conçu pour le chauffage et la
cuisson des aliments. L'emploi de produits chimiques
corrosifs pour chauffer ou nettoyer l'appareil endommagera
ce dernier et peut entraîner des blessures.
Ne pas se servir de cet appareil s'il ne fonctionne pas
correctement ou s'il est endommagé. Communiquer avec
un centre de service autorisé.
Ne pas réparer ni remplacer des pièces de l'appareil à
moins que cela ne soit expressément recommandé dans
ce manuel. Confier l'entretien de l'appareil à un centre de
service autorisé par l'usine.
Sécurité-incendie
Si des matériaux s'enflamment à l'intérieur d'un four, ne
pas ouvrir la porte. Mettre l'appareil hors tension et
débrancher le circuit électrique au boîtier de disjoncteurs.
L'appareil doit être utilisé uniquement pour l'usage auquel il
est destiné comme décrit dans ce manuel. Par exemple, ne
jamais utiliser l'appareil pour réchauffer ou chauffer une
pièce. Ne jamais utiliser l'appareil pour entreposer quoi que
ce soit.
Toujours avoir un détecteur de fumée qui fonctionne près
de la cuisine.
Si vos cheveux ou vêtements s'enflamment, se laisser
tomber au sol et rouler immédiatement sur soi-même pour
éteindre les flammes.
Pour éteindre les flammes d'un incendie provoqué par des
aliments autre qu'un incendie de graisse, utiliser du
bicarbonate de soude. Ne jamais utiliser d'eau sur les
incendies de cuisine.
Prévention des brûlures
Faire attention en ouvrant la porte de l'appareil. Se tenir sur
le côté, ouvrir la porte lentement et légèrement pour laisser
l'air chaud et/ou la vapeur s'échapper. Éloigner le visage de
l'ouverture et s'assurer que les enfants et animaux sont loin
de l'appareil. Une fois la vapeur et l'air chaud échappés,
continuer la cuisson. Garder les portes fermées sauf pour
la cuisson ou le nettoyage. Ne pas laisser les portes
ouvertes sans surveillance.
Ne pas chauffer ou réchauffer des contenants d'aliments
non ouverts. L'accumulation de pression peut faire
exploser le contenant et provoquer des blessures.
Toujours utiliser des poignées isolantes sèches. Des
poignées mouillées ou humides entrant en contact avec les
surfaces chaudes peuvent provoquer des blessures par
dégagement de vapeur. Ne pas laisser les poignées entrer
en contact avec les résistances chaudes. Ne pas utiliser de
serviette ni de chiffon volumineux.
Ne pas toucher la surface intérieure du tiroir lorsque celui-
ci est en fonctionnement. L'intérieur du tiroir peut être
suffisamment chaud pour provoquer des brûlures. Laisser
le tiroir et la grille (si le four en est muni) refroidir avant de
les manipuler.
9 AVERTISSEMENT :
Pour éviter les brûlures, ne pas retirer le tiroir alors qu'il est
encore chaud. S'assurer que le tiroir est vide avant de le
retirer.
Attacher les vêtements lâches, etc. avant de commencer.
Attacher les cheveux longs de façon à ce qu'ils ne pendent
pas et ne pas porter de vêtements lâches ou d'habits ou
objets qui pendillent, tels que cravates, foulards, bijoux ou
manches.

Français 3
Sécurité des enfants
Ne laisser personne grimper, se tenir debout, s'appuyer,
s'asseoir ou se pendre à toute partie de l'appareil, en
particulier la porte, le tiroir-réchaud ou le tiroir de
rangement. Ceci peut endommager l'appareil, le faire
basculer et provoquer potentiellement des blessures
sérieuses.
Ne pas laisser les enfants utiliser cet appareil sans l'étroite
surveillance d'un adulte. Enfants et animaux ne doivent pas
être laissés seuls ou sans surveillance à l'endroit où l'on
utilise l'appareil. Ne pas les laisser jouer à proximité de
l'appareil que celui-ci soit en fonctionnement ou non.
9 AVERTISSEMENT :
Les articles d'intérêt pour les enfants ne doivent pas être
rangés dans un appareil électroménager, dans les
armoires au-dessus de l'appareil ou posés sur le dosseret.
Un enfant qui grimpe sur l'appareil pour prendre ces objets
peut se blesser sérieusement.
Sécurité de la batterie de cuisine
AVI S :
Les récipients en plastique ou le film étirable peuvent se
fondre s'ils sont en contact direct avec le tiroir ou un
ustensile chaud. Si les matières de ces produits fondent à
l'intérieur du tiroir, il peut être impossible de les nettoyer.
Sécurité alimentaire
9 AVERTISSEMENT :
Suivre les règles de sécurité alimentaire suivantes :
1. NE PAS utiliser le tiroir-réchaud pour faire chauffer des
aliments froids (exceptions : vous pouvez utiliser le
tiroir-réchaud en toute sécurité pour réchauffer les
biscuits salés, les chips, les céréales sèches pour leur
redonner leur aspect croustillant ou pour réchauffer les
petits-pains ou les biscotines ainsi que les assiettes).
2. S'assurer de maintenir les aliments à la température
adéquate. L'USDA recommande de conserver les
aliments chauds à 140 °F (60°C) ou plus.
3. NE PAS maintenir des aliments au chaud pendant plus
d'une heure.
.
AVIS DE SÉCURITÉ IMPORTANT : La loi sur les
produits toxiques et la qualité de l'eau potable de
Californie requiert que le gouverneur de la Californie
publie une liste de substances connues de l'état
comme pouvant causer le cancer, des malformations
ou autres problèmes de reproduction et exige que les
compagnies avisent les clients de l'exposition
potentielle à de telles substances.
9 AVERTISSEMENT
Avertissements conformément à la Proposition
65 de l'État de Californie :
Ce produit contient des substances chimiques
reconnues par l'État de Californie comme pouvant
causer le cancer, des malformations congénitales
ou d'autres troubles de la reproduction.

Français 4
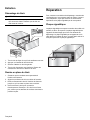
Démarrage
Pièces
Tiroir-réchaud
Panneau de commande
Le panneau de commande comporte plusieurs touches à
effleurement qui sont activées par une légère pression.
Toucher le centre d'une touche pour l'activer. Les pavés de
température contrôlent la température de la sole du four.
Le panneau de commande émet une tonalité lors de la
saisie des données. La sonnerie de la minuterie de
maintien au chaud retentit lorsque la durée spécifiée est
écoulée.
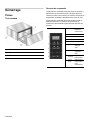
1 Panneau de commande
2 Caisson du tiroir-réchaud
3Tiroir
1
Écran Affiche la
température
actuelle du tiroir
2
BAS 140 °F (60 °C)
3
MOYEN 165 °F (73,8 °C)
4
ÉLEVÉ 190 °F (87,7 °C)
5
APPRÊT 100 °F (37,7 °C)
6
- Appuyer pour
diminuer la
durée
7
+ Appuyer pour
augmenter la
durée
8
ACTIVÉ/
DÉSACTIVÉ
Active/désactive
le tiroir-réchaud.
9
Lampe
témoin
S'allume lorsque
le tiroir-réchaud
est en
fonctionnement.

Français 5
Fonctionnement
À propos de l'appareil
Le tiroir-réchaud permet de maintenir les aliments cuits au
chaud, à une température de service adéquate. Il est
indispensable d'utiliser le tiroir-réchaud avec des aliments
déjà chauds. NE PAS utiliser le tiroir-réchaud pour faire
chauffer des aliments froids sauf pour apprêter les pâtes à
base de levure, pour réchauffer les biscuits salés, les chips,
les céréales sèches pour leur redonner leur aspect
croustillant ou pour faire chauffer les petits-pains ou les
biscotines ainsi que les assiettes.
Le tiroir-réchaud est équipé d'un mécanisme d'ouverture à
pression « push-to-open ». Pour l'ouvrir, il suffit d'exercer
une légère pression sur la façade du tiroir.
Fonctions
Minuterie de maintien au chaud
La minuterie de maintien au chaud peut être réglée pour
tout incrément de 5 minutes. La durée minimum est de 5
minutes et la durée maximum est de 5 heures.
Remarque :
La durée par défaut de la minuterie de maintien au chaud
est 1 heure.
Lorsque la durée est écoulée, la sonnerie de la minuterie
de maintien au chaud retentit et le tiroir s'éteint
automatiquement.
Modifier la minuterie de maintien au chaud :
Utiliser les touches + et - pour modifier la minuterie de
maintien au chaud.
Mode Shabbat
Le mode Shabbat permet aux personnes de religions
spécifiques d'utiliser leur tiroir-réchaud le jour du Shabbat.
• Le tiroir-réchaud est programmé pour fonctionner
automatiquement pendant 74 heures avant de
s'éteindre.
• Lors du fonctionnement en mode Shabbat, l'écran
affichera SAb.
• La minuterie de maintien au chaud ne peut pas être
modifiée une fois le mode Shabbat activé.
• Appuyer sur ACTIVER/DÉSACTIVER à n'importe quel
moment pendant le déroulement du mode Shabbat
pour mettre fin au mode et éteindre l'appareil.
Réglage de la fonction Shabbat
Appuyer sur MED pendant cinq secondes.
Remarque :
En mode Shabbat, on ne peut utiliser que la température
MED. Une fois le mode Shabbat programmé, tous les
boutons sont désactivés mis à part le bouton Activer/
Désactiver, lequel est utilisé pour annuler le mode.

Français 6
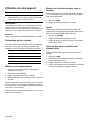
Utilisation de votre appareil
IMPORTANT :
Les récipients en plastique ou le film étirable peuvent se
fondre s'ils sont en contact direct avec le tiroir ou un
ustensile chaud. Si les matières de ces produits fondent à
l'intérieur du tiroir, il peut être impossible de les nettoyer.
Remarque :
Utiliser uniquement de la vaisselle résistante à la chaleur.
Préchauffage du tiroir-réchaud
Faire préchauffer le tiroir-réchaud avant de maintenir des
aliments au chaud. Pour de meilleurs résultats, faire
préchauffer le tiroir-réchaud pour les durées suivantes :
Maintien au chaud des aliments
1. Appuyer sur la touche appropriée pour régler la
température souhaitée.
2. Préchauffer le tiroir-réchaud.
3. Régler la minuterie de maintien au chaud.
4. Mettre les aliments cuits et chauds à l'intérieur du tiroir-
réchaud.
Vous pouvez laisser les aliments dans le plat qui aura servi
pour leur cuisson. Il est également possible de transférer
les aliments dans un plat résistant à la chaleur avant de les
mettre dans le tiroir-réchaud.
Vous pouvez utiliser du papier d'aluminium ou un couvercle
pour couvrir les aliments.
Maintien au chaud des assiettes, plats et
saladiers
Utiliser uniquement de la vaisselle résistante à la chaleur.
Placer les assiettes ou plats vides dans le tiroir-réchaud
froid. Ne pas préchauffer.
1. Appuyer sur BAS.
2. Régler la minuterie de maintien au chaud.
Apprêt
Mettre la pâte dans le plat souhaité puis dans le tiroir-
réchaud froid et arroser légèrement la pâte d'huile d'olive.
Recouvrir de manière lâche la pâte d'un linge.
1. Appuyer sur APPRÊT.
2. Régler la minuterie de maintien au chaud.
3. Vérifier la hauteur de levée de la pâte. Si nécessaire,
augmenter la durée.
Redonner leur aspect croustillant aux
aliments rassis
Mettre les aliments dans des plats ou casseroles peu
profonds.
1. Appuyer sur BAS.
2. Préchauffer le tiroir-réchaud pendant 5 minutes, puis
mettre le plat dans le tiroir.
3. Régler la minuterie de maintien au chaud.
4. Vérifier si les aliments sont croustillants au bout de 45
minutes. Si nécessaire, augmenter la durée.
9 ATTENTION
Pour des raisons de sécurité alimentaire, ne pas
laisser les aliments à l'intérieur du four pendant plus
d'une heure avant ou après la cuisson.
Réglage Temps de préchauffage
BAS 5 minutes
MOYEN 10 minutes
ÉLEVÉ 15 minutes
APPRÊT aucun préchauffage nécessaire

Français 7
Tirer le meilleur parti de
votre appareil
Recommandations relatives aux
températures
Nettoyage et entretien
Nettoyage
Aliments/Utensiles de
cuisson
Réglage
Couvrir
le
plat
Apprêt de la pâte à base de
levure
APPRÊT Oui
Bacon ÉLEVÉ Non
Bœuf, à point et bien cuit MOY Non
Bœuf, mi-saignant BAS Non
Pain, petits pains MOY Non
Pain, petits pains au lait,
brioches
MOY Oui
Biscotines MOY Oui
Ragoûts MOY Oui
Œufs MOY Oui
Poisson, fruits de mer MOY Oui
Aliments frits ÉLEVÉ Non
Sauce, sauces à la crème MOY Oui
Jambon MOY Oui
Pancakes ÉLEVÉ Oui
Tartes, un fond MOY Oui
Tartes, deux fonds MOY Non
Pizza ÉLEVÉ Non
Porc MOY Oui
Pommes de terre, au four ÉLEVÉ Oui
Pommes de terre, purée MOY Oui
Volaille, rôtie MOY Oui
Légumes MOY Oui
Assiettes BAS Non
Assiette de nourriture MOY Oui
Pièce Recommandations
Intérieur du tiroir
(acier inoxydable
poli)
Utiliser un détergent vaisselle.
Laver, bien rincer et sécher. Pour
les taches d'eau dure ou le tartre,
utiliser du vinaigre blanc.
Appliquer à l'aide d'une éponge
ou d'un chiffon, rincer et sécher.
Surfaces peintes Utiliser de l'eau savonneuse
chaude ou un produit nettoyant
doux tels que Fantastik ou
Formula 409. Laver, rincer et
sécher. Éviter les produits
abrasifs de décapage, les
tampons à récurer en paille de fer
et les produits à nettoyer les
fours.
Encadrement
extérieur du four
(acier inoxydable
brossé)
Toujours essuyer ou frotter dans
le sens du grain. Nettoyer avec
une éponge savonneuse puis
rincer et sécher, ou essuyer avec
du Fantastik® ou du Formula
409® vaporisé sur du papier
essuie-tout. Protéger et polir en
utilisant du Stainless Steel
Magic® et un chiffon doux.
Enlever les traces d'eau avec un
chiffon humide imprégné de
vinaigre blanc. Utiliser Bar
Keeper's Friend® pour éliminer la
décoloration due à la chaleur.
Commandes du
tiroir-réchaud
Nettoyer avec de l'eau
savonneuse chaude ou nettoyer
avec du Fantastik® ou du
Formula 409® avec une éponge
propre ou du papier essuie-tout
et essuyer. Éviter d'utiliser les
nettoyants abrasifs et les
tampons à récurer.

Français 8
Entretien
Démontage du tiroir
1. Tirer le tiroir de façon à ce qu'il soit entièrement ouvert.
2. Appuyer sur l'attache du tiroir de droite.
3. Soulever l'attache du tiroir de gauche.
4. Tirer le tiroir fermement vers l'extérieur. Rentrer les
coulisses de l'armoire en l'absence du tiroir.
Remise en place du tiroir
1. S'assurer que les coulisses sont repoussées à
l'intérieur de l'armoire.
2. Aligner les coulisses du tiroir sur celles de l'armoire.
3. Enfoncer fermement le tiroir à l'intérieur de l'armoire
jusqu'à ce qu'il se mette en place avec un déclic.
4. Ouvrir et fermer le tiroir pour en tester le
fonctionnement. Remarque : Si le tiroir ne se ferme
pas, vérifier que les attaches de coulisse sont dans la
position requise.
Réparation
Pour contacter un technicien de dépannage, consultez les
coordonnées sur la couverture avant du manuel. Lorsque
vous téléphonez, soyez prêt à fournir les informations
imprimées sur la plaque signalétique de votre produit.
Plaque signalétique
La plaque signalétique comporte le numéro de modèle et le
numéro de série. Se reporter à la plaque signalétique de
l'appareil électroménager pour faire une demande de
dépannage. La plaque signalétique est apparente sur le
côté gauche du caisson du tiroir. Il pourra falloir enlever le
tiroir pour apercevoir la plaque signalétique.
9 ATTENTION
Pour éviter les brûlures, ne pas retirer le tiroir alors
qu'il est encore chaud. S'assurer que le tiroir est
vide avant de le retirer.
L
o
w
H
i
g
h
_
M
e
d
P
r
o
o
f
+
O
n
/
O
f
f
B
LOW
HIG
H
_
MED
P
R
O
O
F
+
ON/OFF
L
O
W
H
IG
H
_
M
E
D
PROOF
+
O
N
/OF
F
La page charge ...
La page charge ...
La page charge ...
La page charge ...
-
 1
1
-
 2
2
-
 3
3
-
 4
4
-
 5
5
-
 6
6
-
 7
7
-
 8
8
-
 9
9
-
 10
10
-
 11
11
-
 12
12
-
 13
13
-
 14
14
-
 15
15
-
 16
16
-
 17
17
-
 18
18
-
 19
19
-
 20
20
-
 21
21
-
 22
22
-
 23
23
-
 24
24


Bosch HWD5051UC Mode d'emploi
- Catégorie
- Tiroirs chauffants
- Taper
- Mode d'emploi
dans d''autres langues
- English: Bosch HWD5051UC User guide
Documents connexes
-
Bosch HWD5751UC/01 Le manuel du propriétaire
-
Bosch HSD5051UC Manuel utilisateur
-
-
Bosch HWD3050UC Information produit
-
Bosch HWD3060UC/02 Le manuel du propriétaire
-
Bosch HWD5751UC/02 Manuel utilisateur
-
-