PowerBase Light Pole
All-Round & Masthead/
Anchor Lights
LightArmor LED: 5590 & 7800 Series
Installation Instructions 21420 Rev. B 0522
SAVE THESE INSTRUCTIONS
REGULATORY INFORMATION
LightArmor LED All-Round – 5590 Series
• 360° - 2NM (3.7 km) Visibility
• For use on power-driven vessels up to 39.4 feet (12 meters)
• When installed properly, manufactured to meet USCG CFR
183.810, ABYC C-5 & A-16, EN/ISO 19009:2015, 1972
COLREGS and US Inland Navigation Rules
• 3rd Party tested by Imanna Laboratory Inc, January 2022
LightArmor LED Masthead/Anchor – 7800 Series
• 225° - 3NM(5.6 km) Visibility (running)
• 360° - 3NM (5.6 km) Visibility (anchor)
• For use on power-driven vessels up to 65.4 feet (20 meters)
• When installed properly, manufactured to meet USCG CFR
183.810, ABYC C-5 & A-16, EN/ISO 19009:2015, 1972
COLREGS and US Inland Navigation Rules
• 3rd Party tested by Imanna Laboratory Inc, June 2022
Parts not user serviceable - must be replaced if damaged/altered,
or 20 years from installation date. Always replace with a light of at
least the same pole length and rated visibility.
Refer to your local navigation standards for proper navigation
light selection and positioning.
COMPATIBILITY
IMPORTANT: Attwood PowerBase Light poles are compatible
with and solely designed for use with Attwood PowerBase Light
(6100-LT Series). Not for use with any other fixtured products.
Please refer to the user manual included with your PowerBase for
attaching PowerBase to your vessel and proper base wiring.
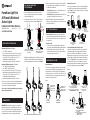
INSTALLING LIGHT POLE
TO POWERBASE
1. Prior to installing the pole to the PowerBase Unit, route
the wires coming from the bottom of the pole through the
PowerBase Break Away hole.
2. Connect the pin connectors to the associated receptacles on
the PowerBase wire harness as shown in Figure C & D.
3. Utilizing the included installation tool to guide the connectors into
the light pole so that the white jacket on the PowerBase wire
harness is approximately an inch into the pole. See Figure E.
4. Remove the installation tool and insert pole into the PowerBase
Unit, aligning the fastener hole within the pole to the fastener
hole within the PowerBase Unit.
• Masthead Light: Align the pole so that the Attwood Shield
faces towards the bow of the vessel.
• All-Round Light: Adjust alignment nut so that Light head is
parallel to the resting float position of the vessel.
5. Apply PTFE waterproof lubricant to included fastner, then
utilizing a non-ferrous bit tighten the screw so that the fastener
head is fully bottomed out.
1. Positional Switch: Activate the deploy state on the switch,
then visually confirm that the PowerBase unit has fully moved
to the deployed state. Repeat this process to return the unit to
the stowed state.
2. PowerBase Light
• Activate the on state from the Navigational Light switch,
then visually confirm that the Navigation Light has turned on.
• With the Positional Switch in the stowed state, confirm
that the LED backlight on the Positional Switch is blinking,
denoting the ready-to-deploy status.
TEST THE POWERBASE
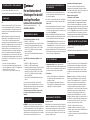
MAINTENANCE & CARE
Annual Maintenance
In order to reduce freeplay and extend the life of your PowerBase
system, it’s important to tighten the breakaway fasteners to the
required torque values shown in Figure F at the beginning and
end of the boating season, or at least once a year. Take care not to
over tighten the fasteners, and to tighten specifically to the value
required for your applicable system.
Manual Position Override
If necessary, your PowerBase’s position can be manually adjusted
to either the stowed or deployed position by following the steps
shown in Figure G. Take care to tighten the fasteners to the torque
values shown in Figure F.
Figure F
Figure G
Figure H
SafeGuard Breakaway Shear Pin Replacement
In the event of an impact your PowerBase unit is equipped with
SafeGuard Breakaway feature, helping minimize the damage
to the Vessel, PowerBase, and Light/Antenna. Once SafeGuard
Breakaway has been engaged, you’ll need to replace the shear pin
with a new Attwood PowerBase Shear Pin (Attwood Part Number:
6001-7). See Figure H for the steps needed to remove and install
your new shear pin. Take care not to discard the cover fastener
during replacement, and always remember to tighten the fasteners
back to the required torque values shown in Figure F.
Figure E - Pole Light Installation/Installation du feu de mât
WHITE WIR
FIL BLANCE
BLACK WIRE
FIL NOIR
BLACK WIRE
FIL NOIR
RED WIRE
TO BE PLUGGED
FIL ROUGE
À BRANCHER
WHITE WIRE
FIL BLANC
RED WIRE
FIL ROUGE
Figure C - All-Around Light
(5590 Series)/ Feu de navigation
(Série 5590)
WHITE WIR
FIL BLANCE
BLACK WIRE
FIL NOIR
BLACK WIRE
FIL NOIR
RED WIRE
TO BE PLUGGED
FIL ROUGE
À BRANCHER
WHITE WIRE
FIL BLANC
RED WIRE
FIL ROUGE
Figure D - Masthead Light
(7800 Series)/ Feu de tête
de mât (Série 7800)
STEP 2: REMOVE SHEAR PIN
STEP 3: LINE UP HOLE WITH
BINDING POST HOLE
STEP 1: REMOVE COVER
STEP 5: REINSTALL COVER
STEP 4: REINSTALL SHEAR PIN
ÉTAPE 2 : RETIRER LA GOUPILLE
DE CISAILLEMENT
ÉTAPE 3 : ALIGNER LE TROU AVEC LE
TROU DE LA BORNE D'ATTACHE
ÉTAPE 1 : RETIRER LE COUVERCLE
ÉTAPE 5 : RÉINSTALLER LE COUVERCLE
ÉTAPE 4 : RÉINSTALLER LA GOUPILLE
DE CISAILLEMENT
STEP 2: LINE UP CENTER HOLE
WITH BINDING POST HOLE
STEP 1: REMOVE COVER, SHEAR PIN AND BINDING POST.
DISCARD BROKEN SHEAR PIN AND BINDING POST.
STEP 3: INSTALL NEW SHEAR PIN AND BINDING POST.
RE-INSTALL COVER.
ÉTAPE 2 : ALIGNER LE TROU CENTRAL
AVEC LE TROU D'ATTACHE
ÉTAPE 1 : RETIRER LE COUVERCLE, LA GOUPILLE DE CISAILLEMENT ET
LA BORNE D'ATTACHE. JETER LA GOUPILLE DE CISAILLEMENT
CASSÉE ET LA BORNE D'ATTACHE
ÉTAPE 3 : INSTALLER UNE NOUVELLE GOUPILLE DE CISAILLEMENT ET
UNE NOUVELLE BORNE D'ATTACHE.
RÉINSTALLER LE COUVERCLE.
TIGHTEN TO 5.2 FT-LBS
TIGHTEN TO 2.2 FT-LBS
LIGHT SYSTEM
TIGHTEN TO 2.2 FT-LBS
TIGHTEN TO 11 FT-LBS
ANTENNA SYSTEM
SERRER À 5.2 PI-LB
SERRER À 2.2 PI-LB
SYSTÈME DE FEU
SERRER À 2.2 PI-LB
SERRER À 11 PI-LB
SYSTÈME D'ANTENNE

See product catalog or AttwoodMarine.com for details.
©2022 Advanced Systems Group by Brunswick, Lowell, MI 49331
COMPLIANCE
FCC
This device complies with part 15 of the FCC Rules. Operation
is subject to the following two conditions: (1) This device may
not cause harmful interference, and (2) this device must accept
any interference received, including interference that may cause
undesired operation.
Note: This equipment has been tested and found to comply
with the limits for a Class B digital device, pursuant to part
15 of the FCC Rules. These limits are designed to provide
reasonable protection against harmful interference in a residential
installation. This equipment generates, uses and can radiate radio
frequency energy and, if not installed and used in accordance
with the instructions, may cause harmful interference to radio
communications. However, there is no guarantee that interference
will not occur in a particular installation. If this equipment does
cause harmful interference to radio or television reception, which
can be determined by turning the equipment off and on, the user is
encouraged to try to correct the interference by one or more of the
following measures:
• Reorient or relocate the receiving antenna.
• Increase the separation between the equipment and receiver.
• Connect the equipment into an outlet on a circuit different from
that to which the receiver is connected.
• Consult the dealer or an experienced radio/TV technician for help.
ATTWOOD LIMITED 5-YEAR WARRANTY
Feu tout horizon de mât
d’éclairage et feu de mât/
mouillage PowerBase
LightArmor LED: Série 5590 & 7800
Directives D’installation Rév. B N° 21421 0522
CONSERVEZ CES DIRECTIVES
CONFORMITÉ AUX NORMES
Feu à LED tout horizon LightArmor – Série 5590
• Visibilité 360° - 2NM (3,7 km)
• Destiné aux bateaux motorisés jusqu’à 39,4 pieds (12 mètres)
• Lorsqu’il est installé correctement, fabrication conforme
aux normes USCG CFR 183.810, ABYC C-5 et A-16, EN/ISO
19009:2015, 1972 COLREGS et aux règles de navigation
intérieure des États-Unis.
• Testé par le laboratoire indépendant Imanna Laboratory Inc,
janvier 2022
Feu à LED de tête de mât/mouillage LightArmor – Série
7800
• Visibilité 225° - 3NM (5,6 km) (en marche)
• Visibilité 360° - 3NM (5,6 km) (au mouillage)
• Destiné aux bateaux motorisés jusqu’à 65,4 pieds (20 mètres)
• Lorsqu’il est installé correctement, fabrication conforme
aux normes USCG CFR 183.810, ABYC C-5 et A-16, EN/ISO
19009:2015, 1972 COLREGS et aux règles de navigation
intérieure des États-Unis.
• Testé par le laboratoire indépendant Imanna Laboratory Inc,
juin 2022
Pièces non réparables par l’utilisateur - elles doivent être
remplacées si elles sont endommagées/altérées, ou 20 après la
date d’installation. Toujours remplacer par un feu ayant la même
longueur de mât et la même visibilité nominale.
Consulter les normes de navigation locales pour assurer
la sélection et le positionnement corrects des feux de
navigation.
COMPATIBILITÉ
IMPORTANT: Les mâts d’éclairage PowerBase Attwood sont
compatibles et sont exclusivement conçus pour être utilisés avec
le feu PowerBase Attwood (Série 6100-LT). Non compatibles avec
d’autres produits fixés sur support. Veuillez consulter le manuel
d’utilisation fourni avec votre PowerBase pour fixer le PowerBase
sur votre bateau et assurer un câblage de base correct.
INSTALLATION DE L’ÉQUIPEMENT SUR
LE POWERBASE
1. Avant d’installer le mât sur l’unité PowerBase, faites passer
les câbles qui sortent de la base du mât à travers le trou de
déconnexion du PowerBase
2. Raccordez les connecteurs mâles aux prises correspondantes
sur le faisceau de câbles PowerBase comme illustré dans les
Figures C et D.
3. Utilisez l’outil d’installation fourni pour guider les connecteurs
dans le mât d’éclairage, de sorte que la gaine blanche du
faisceau de câbles PowerBase soit insérée dans le mât sur un
pouce environ. Voir la Figure E.
4. Retirez l’outil d’installation et introduisez le mât dans l’unité
PowerBase en alignant le trou de fixation à l’intérieur du mât
avec le trou de fixation à l’intérieur de l’unité PowerBase.
• Feu de tête de mât : Alignez le mât de sorte que le carter
de protection Attwood soit dirigé vers la proue du bateau.
• Feu tout horizon : Réglez l’écrou d’alignement de sorte que la tête
du feu soit parallèle à la position de flottaison du bateau au repos.
5. Appliquez du lubrifiant étanche PTFE sur la fixation incluse, puis
utilisez une mèche non ferreuse pour serrer la vis de sorte que
la tête de la vis touche le fond.bottomed out.
1. Interrupteur de position : Activez le déploiement avec
l’interrupteur, puis vérifiez visuellement le mouvement de l’unité
PowerBase en position complètement déployée. Répétez cette
procédure pour ramener l’unité en position rabattue.
2. Feu PowerBase
• Activez la position d’allumage avec l’interrupteur de feu
de navigation, puis vérifiez visuellement que le feu de
navigation s’est allumé.
• Avec l’interrupteur en position rabattue, vérifiez que le
rétroéclairage LED sur l’interrupteur de position clignote,
indiquant que le feu est prêt au déploiement.
TEST DU POWERBASE
MAINTENANCE ET ENTRETIEN
Maintenance annuelle
IAfin de réduire le jeu et de prolonger la durée de vie du système
PowerBase, il est important de serrer les fixations de sécurité aux
couples de serrage requis indiqués dans la Figure F au début et
à la fin de la saison de navigation, ou au moins une fois par an.
Veillez à ne pas trop serrer les fixations et à les serrer au couple
requis pour le système concerné.
Consultez le catalogue de produit ou AttwoodMarine.com
pour plus de détails.
©2022 Advanced Systems Group by Brunswick, Lowell, MI 49331
CONFORMITÉ
FCC
Cet appareil est conforme à l'article 15 de la Réglementation FCC.
Son fonctionnement est soumis aux deux conditions suivantes :
(1) Cet appareil ne peut causer d'interférences nuisibles, et (2)
cet appareil doit accepter toute interférence reçue, y compris
les interférences qui peuvent provoquer un fonctionnement non
désiré.
Remarque : Cet appareil a été testé et déclaré conforme aux
limites des appareils numériques de classe B conformément
à la partie 15 de la réglementation de la FCC. Ces limites sont
destinées à assurer un niveau de protection adéquat contre
les interférences nuisibles dans une installation domestique.
Cet appareil produit, utilise et peut émettre des fréquences
radioélectriques et, s’il n’est pas installé et utilisé conformément
aux instructions, il peut brouiller les communications radio.
Cependant, il n’est pas garanti que des interférences ne se
produiront pas dans une installation donnée. Si cet appareil
provoque des interférences néfastes à la réception de la radio ou
de la télévision, ce qui peut être déterminé en mettant l’appareil
hors tension puis à nouveau sous tension, il est conseillé de
prendre une ou plusieurs des mesures suivantes :
• Réorienter ou déplacer l'antenne de réception.
• Augmenter la distance entre l'appareil et le récepteur.
• Brancher l’appareil à une prise sur un circuit différent de celui
sur lequel le récepteur est branché.
• Consulter le revendeur ou un technicien radio/TV qualifié pour
obtenir de l’aide.
GARANTIE LIMITÉE DE 5 ANS ATTWOOD
Commande de position manuelle temporaire
Si nécessaire, la position du PowerBase peut être réglée
manuellement en position rabattue ou déployée en suivant les
étapes illustrées dans la Figure G. Veillez à serrer les fixations aux
couples de serrage indiqués dans la Figure F.
Remplacement de la goupille de
cisaillement de sécurité SafeGuard
In the event of an impact your PowerBase unit is equipped with
SafeGuard Breakaway feature, helping minimize the damage
to the Vessel, PowerBase, and Light/Antenna. Once SafeGuard
Breakaway has been engaged, you’ll need to replace the shear pin
with a new Attwood PowerBase Shear Pin (Attwood Part Number:
6001-7). See Figure H for the steps needed to remove and install
your new shear pin. Take care not to discard the cover fastener
during replacement, and always remember to tighten the fasteners
back to the required torque values shown in Figure F.
-
 1
1
-
 2
2