
classicaccessories.com
CLASSIC ACCESSORIES, LLC, KENT, WA , USA
CAUTION! If your boat is new, use of this product is
not recommended within the first four weeks of ownership
of the boat. Some compounds used in new boats can release
gases that will cause the dyes in boat covers to transfer to
the boat, potentially staining the boat or its components.
Boat covers can be used safely after this introductory period.
ATTENTION ! Si votre bateau est neuf, il est
déconseillé d’utiliser cet article pendant les quatre premières
semaines après avoir pris possession du bateau. Certains
matériaux utilisés sur les bateaux neufs risquent de libérer
des vapeurs et peuvent transférer les colorants de la housse
au bateau et par conséquent tacher le bateau et ses élé-
ments. Les housses de bateau peuvent être utilisées sans
danger après cette période initiale.
Instructions & Care
Mode d’emploi et entretien
Stellex
™
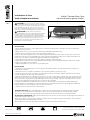
Pontoon Boat Cover
Housse de bateau ponton Stelles
™
cB_
Instructions: Stellex
™
Pontoon Boat Cover
CAUTION
If your boat is new, use of this product
is not recommended within the first
four weeks of ownership of the boat.
Some compounds used in new boats
can release gases that will cause the
dyes in boat covers to transfer to the
boat, potentially staining the boat or its
components. Boat covers can be used
safely after this introductory period.
Installation
1. Cover any sharp points or corners
with a piece of cloth to avoid stressing
or tearing your boat cover when it is
stretched across your boat.
2. Drape the boat cover over your boat,
positioning the adjustable end at
the stern.
3. Pull the boat cover down below the
rub rail around the entire boat.
4. Tie one end of the supplied rope to a
front D‑ring sewn into the bottom hem
of the corner. Pull or toss the rope under
the boat to the corresponding D‑ring
on the opposite side. Allowing enough
rope to make another knot, cut off the
rope. Tie off the rope into the D‑ring.
Repeat with remaining D‑rings.
5. Carefully singe the ends of the
rope with a match or lighter to
prevent fraying.
6. At the stern, use the rope to lace
the adjustable transom flap over the
adjustable side flaps and secure.
Use the bungee cord to gather excess
material.
7. Adjust and tighten as necessary for
your particular boat.
Care
Spot clean with water, a mild soap and
a sponge. Don't use abrasive cleaners
or brushes.
Be sure your cover is dry before
storing it. If you store your cover when
it's wet it can be damaged by mildew.
This cover is designed for use
while storing your boat. Do not use it
for trailer travel or for transportation.
12cB51_15392
20-150-080501-00, 20-151-090501-00
20-170-080501-MFF, 20-171-090501-MFF
CLASSIC ACCESSORIES, INC.
KENT, WA USA 98032
©
2013
classicaccessories.com
INSTALLATION:
. Cover any sharp points or corners with a piece of cloth to avoid stressing or tearing your boat cover when it is
stretched across your boat.
. Drape the boat cover over your boat, positioning the adjustable end at the stern.
. Pull the boat cover down below the rub rail around the entire boat.
. Tie one end of the supplied rope to a front D-ring sewn into the bottom hem of the corner. Pull or toss the rope
under the boat to the corresponding D-ring on the opposite side. Allowing enough rope to make another knot, cut
off the rope. Tie off the rope into the D-ring. Repeat with remaining D-rings.
5. Carefully singe the ends of the rope with a match or lighter to prevent fraying.
6. At the stern, use the rope to lace the adjustable transom flap over the adjustable side flaps and secure. Use the
bungee cord to gather excess material.
7. Adjust and tighten as necessary for your particular boat.
INSTALLATION
. Couvrez tous les endroits et les coins avec du tissu afin d’éviter d’étirer ou de déchirer la housse lorsque vous
l’installez sur le bateau.
.Placez la housse sur le bateau en veillant à ce que la partie réglable se trouve à la poupe.
. Tirez sur la housse jusqu'à ce qu'elle se trouve en dessous de la bordure de protection du bateau qui est sensée
toucher les défenses du quai, tout autour du bateau.
4. Attachez l’extrémité de la corde fournie à une boucle en « D » cousue dans la couture du bas du coin de la housse.
Tirez ou lancez la corde sous le bateau jusqu’à la boucle en « D » correspondante située de l’autre côté de la housse.
Tout en laissant une longueur de corde suffisante pour faire un autre nœud, coupez la corde. Attachez la corde à la
boucle en « D ». Répétez l’opération avec les boucles en « D » restantes.
5. Soigneusement brûler les extrémités de la corde avec une allumette ou un briquet pour éviter l'effilochage.
6. Au niveau de la poupe, utilisez la corde pour attachez le rabat arrière par-dessus les rabats réglables latéraux et
fixez-le. Utilisez le cordon élastique pour ramener la toile en trop.
7. Réglez et serrez si nécessaire selon votre bateau.
CLEANING AND CARE: Spot clean with water, a mild soap and a sponge. Don't use abrasive cleaners or brushes.
Be sure your cover is dry before storing it. If you store your cover when it's wet it can be damaged by mildew.
This cover is designed for use while storing your boat. Do not use it for trailer travel or for transportation.
NETTOYAGE ET ENTRETIEN : Nettoyez les endroits sales avec de l’eau, un savon doux et une éponge. Ne pas utiliser de
nettoyants abrasifs ni de brosses.
Assurez-vous que la housse est sèche avant de la ranger. Si vous la rangez lorsqu'elle est mouillée, de la moisissure
risque d’apparaître et d’endommager la housse.
Ne pas utiliser la housse afin de protéger un bateau lorsqu’il est remorqué ou transporté.
,
MFF, MFF
-
 1
1

Classic Accessories 20-150-080501-00 Manuel utilisateur
- Taper
- Manuel utilisateur
- Ce manuel convient également à
dans d''autres langues
Documents connexes
-
Classic Accessories 20-147-100501-00 Manuel utilisateur
-
Classic Accessories 20-217-010501-00 Mode d'emploi
-
-
-
Classic Accessories 20-139-071001-00 Manuel utilisateur
-
-
-
-
Classic Accessories 88968 Manuel utilisateur
-

