
©
NAVIGLOOPONTOONBOATPONTON2324
SUMMARY:KeyPointsofAssemblyInstructions/RÉSUMÉ:Pointsclésdel’assemblage
RÉSUMÉ
!
POINTSCLÉSDEL’ASSEMBLAGE
NAVIGLOOPONTON2324pi
SUMMARY
!
KEYPOINTSOFASSEMBLY
NAVIGLOOPONTOONBOAT2324ft
THE2VERTICALCONNECTORS
WITHOUTBASE
:front&back
LES2EMBRANCHEMENTSVERTICAUX
SANSBASE
:avant&arrière
[10’’24’’]
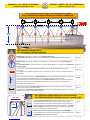
Leavea10to24inchmaximumoverhangpastthe2verticalsupportposts
withbase(front&back)
sothatthehorizontalbeamremainssecure.
Les2embranchementsverticauxsansbase(avant&arrière)doiventêtre
installésàchacunedesextrémitésdel’armatureàunedistancede10à24
poucesmaximumdespoteauxdesoutienavecbase(avantetarrière)afin
d’assurerlastabilitédelapoutrehorizontale.
Page9
Makesurethateachextremity(frontandback)endsata±90°angle
.
Les2embranchementsverticauxsansbase(avantetarrière)doiventformer
unanglede±90°aveclapoutrehorizontale.
Page10
THE5VERTICALSUPPORTPOSTS
LES5POTEAUXDESOUTIENVERTICAUX
Metalpins(K)mustONLYbeinstalledonthe5verticalsupportposts
.
Lesgoupillesdemétal(K)doiventêtreposéesUNIQUEMENTsurles5poteauxdesoutienverticaux.
Pages6,12
Carabiners(G1)ofthestrapsmustONLYbeinstalledontheCCLIPS(C)securingthe5verticalsupport
posts.
Lesmousquetons(G1)dessanglesdoiventêtresinstallésUNIQUEMENTsurlesCCLIPS(C)des5poteauxde
soutienverticaux.
Pages7,13
Itisimportantthatthehorizontalbeambelevelledasmuchaspossible.Adjusttheverticalposts
accordingly.
Ilestimportantquelapoutrehorizontalesoit,lepluspossible,deniveau.Ajusterlespoteauxverticauxen
conséquence.
Pages6,12
78’’
Theverticalsupportpostsrequireaheightof78inches.Itisrecommendedthatthisheightbemaintained
toensuregreaterframestabilityandachievetheproperpitchtoallowsnowtoslideoff.
Lespoteauxdesoutienverticauxdoiventavoirunehauteurde78pouces.Ilestrecommandédemaintenir
cettehauteurafind’assurerunmaximumderobustesseàl’armatureetd’obtenirlameilleurepente
possiblepourquelaneiges’écoule.
Pages6
Thedistancebetweenthe5verticalsupportpostsmustbemoreorlessequalinordertohavegreater
stability(theyarethe5pillarsoftheframe)
.
L’espaceentreles5poteauxdesoutienverticauxdoitêtrelepluséquilibrépossiblepourassurerunebonne
stabilité(puisqu’ils’agitdes5piliersdel’armature).
Pages12
1
2
[
10’’24’’
]
±90°
±
90°
78’’
K K K K
K
THE5VERTICALSUPPORTPOSTS:THEPILLARSOFTHEFRAME
LES5POTEAUXDESOUTIENVERTICAUX:LESPILIERSDEL’ARMATURE
4
5
3
1/3

©
NAVIGLOOPONTOONBOATPONTON2324
SUMMARY:KeyPointsofAssemblyInstructions/RÉSUMÉ:Pointsclésdel’assemblage
RÉSUMÉ
!
POINTSCLÉSDEL’ASSEMBLAGE
NAVIGLOOPONTON2324pi
SUMMARY
!
KEYPOINTSOFASSEMBLY
NAVIGLOOPONTOONBOAT2324ft
THE7SETSOFLATERALCONNECTORS
LES7PAIRESD’EMBRANCHEMENTSLATÉRAUX
THELATERALCONNECTORS:7SETS
LESEMBRANCHEMENTSLATÉRAUX:7PAIRES
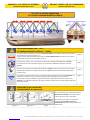
Thespacebetweenthelateralpostsmustbeasequalaspossibletoensuregreaterstabilityandforabetter
weightdistributiononcethetarpaulinison.
L’espaceentrelesembranchementslatérauxdoitêtrelepluséquilibrépossibleafind’assurerunemeilleure
repartitiondeschargeslorsdel’installationdelatoile.
Page16
Foamprotectors(H)mustrestontheedgeofthewatercraftoverhangingtheedgebyabout3inches
.
Lesemboutsdeprotection(H)doivents’appuyersurlereborddel’embarcationetdépasserd’environ
3pouces.
Page17
Foamprotectors(H)mustoverhangtheABpostbyabout2inchesinordertoproperlyprotectthetarpaulin
.
Chaqueemboutdeprotection(H)doitdépasserd’environ2poucesl’embranchementlatéralABpourbien
protégerlatoile.
Page15
Ifallpreviousstepsaretakenintoaccount,theanglefortheslopeshouldbeapproximately50degrees.Itis
preferabletomaintainthisangletohavethebestslopepossibleallowingthesnowtoslideoff.
Enrespectantlesétapesprécédentes,l’angled’inclinaisondesembranchementslatérauxserad’environ
50degrés.Ilestpréférabledemaintenircetangled’inclinaisonafind’assurerlameilleurepentepossiblepour
quelaneiges’écoule.
Page17
OVERLAPINGoftheAandBtubes
CHEVAUCHEMENTdestubesAetB
Foreachofthesesteps,itisimportanttohavea
minimum6inchoverlapoftheAandBtubesin
ordertohavethebestsecuritypossible.
Pourchacunedecesétapes,ilestimportant
d’appliquerunminimumde6poucesde
chevauchementdestubesAetBafind’avoirune
soliditéaccrue.
Pages6,12
Pages10,16 Page9
50°
3’’
K
J
A
A
B
B
J
A
B
2/3
50°
50
°

©
NAVIGLOOPONTOONBOATPONTON2324
SUMMARY:KeyPointsofAssemblyInstructions/RÉSUMÉ:Pointsclésdel’assemblage
RÉSUMÉ
!
POINTSCLÉSDEL’ASSEMBLAGE
NAVIGLOOPONTON2324pi
SUMMARY
!
KEYPOINTSOFASSEMBLY
NAVIGLOOPONTOONBOAT2324ft
EXTRAPROTECTION
PROTECTIONSSUPPLÉMENTAIRES
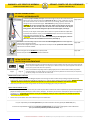
Werecommendusingextraprotectivemeasuresforfragilesurfacesthatmaycomeintocontactwiththe
bases,thepostsand/orthestraps.Forexample:placeaswatchofcarpetandapieceofplywoodunderthebases
(ortheposts)toprotectthewatercraft’supholstery.
Nousrecommandonsdeprotégertoutesurfacefragilequiseraencontactaveclesbases,lespoteaux
et/oulessangles.Parexemple:déposezunmorceaudetapisetuneplanchedeboissouslesbases(oulespoteaux)
afindebienprotégerlerevêtementdevotreembarcation.
Page5
Page11
DURINGINSTALLATIONOFTARPAULIN:
•ItisyourresponsibilitytopreventtheNaviglootarpaulinfromcomingintodirectcontactwithprotrudingcomponentsthatmay
createfriction,whichcouldpotentiallydamageorperforateit.(i.e.snapsforcanvasorBiminitopanchorpoints)*Damagecausedby
unpaddedcomponentsthatwearorperforatethetarpaulinisnotcoveredundertheconditionsofthelimitedwarranty.
•Takeextraprecautionstopreventthegrommetsonthetarpfromdamagingthehullofyourwatercraft.
LORSDEL’INSTALLATIONDELATOILE:
•Ilestdevotreresponsabilitédevousassurerquelatoilenepuisseêtreencontactavectoutecomposantequipourraitendommagerou
perforerlatoileparfrictioncauséeparleventouautre.(Exemples:lesboutonspressiond’unetoilerapide,lespointsd’ancraged’un
toitBimini,etc.)*Lagarantiesurlatoilenecouvrepaslesdommagescauséspartoutecomposantenonprotégéequipourrait
endommagerouperforerlatoile.
•Assurezvousquelesœilletsdelatoilen’abîmerontpasvotreembarcation.
Itisyourresponsibilitytoaddextraprotectiontoyourwatercraftwhennecessary(Example:motorcover,etc.)
_____ ____ ____________________ ____________________ ___ ____________________ _______________________ _______________
Ilestdevotreresponsabilitéd’apporterlesprotectionssupplémentairesquevousjugerezappropriéesàvotreembarcation.
(Exemple:houssedeprotectionpourmoteurhorsbord,etc.)
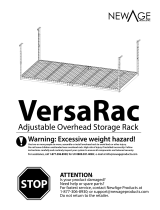
THESELFLOCKINGSTRAPS
LESSANGLESAUTOBLOQUANTES
Toensureproperassemblyofstraps:ThreadG2throughtheclipattheendofG1fromthe
bottom,thenpullhardfrombothends.G2shouldnotslip;ifitdoes,removeG2,turnthe
clipattheendofG1oversothattheteethofthecliparefacingupward,thenthreadG2
thoughtheclipfromthebottomagain.Testresistancebypullingstrapfrombothends.
WARNING:Asyoupullonbothendsof thestrap,makesurethatG2doesnotslip!Ifit
does,removeG2,turntheclipattheendofG1oversothattheteethoftheclipare
facingupward,thenthreadG2throughtheclipfromthebottomagain.(seeStep1)
S’assurerquelessanglessoientenfiléesdanslebonsens:lapartieG2 doitêtreenfiléedans
lapartieG1demanièreàcequ’ilyaitunerésistancelorsquevoustirezsurles2extrémités
delasangle(G1 etpartielibrede G2).
ATTENTION:Sivousn’arrivezpasàavoirunerésistanceetquelasangleglisse,enlevezla
partieG2,retournezlaetrecommencezdenouveau.(voirÉtape1)
Pages4,8,14
Thetensionintheselflockingstrapsoneachsideoftheverticalsupportpostsmustremaintightand
equaltoensuremaximumstability.
Latensiondessanglesdoitêtreajustéeuniformémentdechaquecôtédespoteauxdesoutienverticaux
afind’assurerunebonnestabilité.
Pages8,14
Ensurethatgatesonthecarabinersareproperlyclosed.
Assurezvousquelesmousquetonssoientbienenclenchés.
Pages8,14
G1
G2
3/3
-
 1
1
-
 2
2
-
 3
3


dans d''autres langues
- English: Navigloo 3510
Documents connexes

Autres documents
-
Classic Accessories 69770 Mode d'emploi
-
-
-
Dock Edge DE2055F Mode d'emploi
-
 Croozer Kid / Kid Plus 2016-2017 Le manuel du propriétaire
-
 NewAge Products 40212 Mode d'emploi
-
Pelican EXPLORER 14.6 DLX Le manuel du propriétaire
-
Sea-doo Switch 13 ft Series Le manuel du propriétaire

