
Problem
No picture, no sound
Good picture, but no sound
Good sound but no picture
Cause/Solution
•The correct VIDEO INPUT number is not selected.
n Use the VIDEO INPUT dial to select the correct terminal
number to which the equipment is connected.
•Press (POWER).
Adjust the VOL dial.
•Adjust the screen brightness by using the BRIGHT control dial.
•When using VIDEO INPUT 3, make sure to connect the video
input cable (yellow).
Watching a Video or Playing a
Game
1 Press (POWER).
The POWER indicator lights up.
2Turn the VIDEO INPUT dial to
adjust the VIDEO INPUT number
(1, 2 or 3).
Note
If you use a video player or game equipment, etc. that is not
connected to VIDEO INPUT 1 or 2, connect the video
player or game equipment to the VIDEO INPUT 3 jacks at
the front of the controller.
Turning off the Video
Press (POWER).
The POWER indicator lights off.
Adjusting the Screen Brightness
Depending on the surrounding light, you can
adjust the screen brightness by controlling the
brightness of the fluorescent pipe installed in the
liquid crystal panel.
To adjust the screen brightness, use the BRIGHT
control dial.
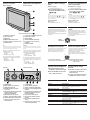
1 POWER (on/off) switch
2 VOL (volume) dial
3 BRIGHT dial
4 DIMMER (HIGH/LOW) selector
5 Speaker (located on the back of unit)
6 POWER indicator
Selecting the Color System
You can watch a video in either the PAL (Phase
Alternation by Line) or NTSC (National
Television System Committee) color system.
Set the TV system selector to your area.
USA and Canada: set to NTSC
Areas except USA and Canada: set to PAL
Listening with the Headphones
1 Plug the headphones into the
headphones output terminal jack.
2 Turn the PHONES volume control
dial to adjust the volume.
Location of Controls
Monitor (XVM-611)
Controller
Darker
Plus foncé
Brighter
Plus clair
1 Touche POWER
2 Molette BRIGHT (luminosité)
3 Molette de sélection VIDEO INPUT
4 Réglage du volume PHONES (casque
d’écoute)
5 Sélecteur PAL (ligne d’alternance de
phase)/NTSC (National Television
System Committee)
6 Borne d’entrée VIDEO (jaune)
7 Borne d’entrée AUDIO-L (gauche)
(blanche)
8 Borne d’entrée AUDIO-R (droite)
(rouge)
9 Prise de borne de sortie du casque
d’écoute (miniprise stéréo)
Visionner un enregistrement ou
jouer à un jeu vidéo
1 Appuyez sur (POWER).
L’indicateur POWER s’allume.
2Tournez le sélecteur VIDEO INPUT
pour régler le numéro VIDEO
INPUT (1, 2 ou 3).
Remarque
Si vous utilisez un lecteur vidéo ou une console de jeux, etc.,
qui n’est pas raccordée à VIDEO INPUT 1 ou 2,
raccordez le lecteur vidéo ou la console de jeux aux prises
VIDEO INPUT 3 à l’avant de l’unité de commande.
Mise hors tension vidéo
Appuyez sur (POWER).
L’indicateur POWER s’éteint.
Réglage de la luminosité de
l’écran
Suivant la luminosité ambiante, vous pouvez
ajuster la luminosité de l’écran en ajustant la
luminosité du tube fluorescent installé dans le
panneau à cristaux liquides.
Pour régler la luminosité de l’écran, utilisez la
molette BRIGHT.
Sélection du système couleur
Vous pouvez visionner un enregistrement vidéo
suivant le système couleur PAL (ligne
d’alternance de phase) or NTSC (National
Television System Committee).
Réglez le sélecteur en fonction du système
couleur utilisé dans votre zone géographique.
USA et Canada: réglez-le sur NTSC
En-dehors des USA et du Canada:
réglez-le sur PAL
Ecoute à l’aide du casque
d’écoute
1 Branchez le casque d’écoute sur la
prise de borne de sortie pour
casque d’écoute.
2 Tournez la commande de volume
PHONES pour ajuster le volume.
Problème
Pas d’image, pas de son
Bonne image, pas de son
Bon son, mais pas d’image
Cause/Solution
•Le numéro VIDEO INPUT correct n’a pas été sélectionné.
n Utilisez la molette VIDEO INPUT pour sélectionner le
numéro de borne auquel l’appareil est raccordé.
•Appuyez sur (POWER).
Réglez la molette VOL.
•Réglez la luminosité de l’écran à l’aide de la molette BRIGHT.
•Si vous utilisez VIDEO INPUT 3, n’oubliez pas de brancher le
câble d’entrée vidéo (jaune).
Note
The POWER switch, VOL dial, and DIMMER selector may
be inaccessible, depending on the mounting position. In this
case, adjust using the controls of the controller.
Before you mount this unit, make sure these
switches are set as below:
— POWER switch: ON
— VOL dial: Max.
— DIMMER selector: HIGH
If you mount this unit to a front seat headrest,
make sure the switches below are as follows:
— VOL dial: Min.
— BRIGHT dial: Min.
— DIMMER selector: HIGH
Remarque
Le commutateur POWER, la molette VOL et le sélecteur
DIMMER peuvent être inaccessibles suivant la position de
montage.
Avant de procéder au montage de cet appareil,
assurez-vous que les commutateurs suivants
sont réglés de la façon prescrite:
— commutateur POWER: ON
— molette VOL: Max.
— sélecteur DIMMER: HIGH
Si vous installez cet appareil sur l’appui-tête de
l’un des sièges avant, assurez-vous que les
commutateurs ci-dessous se présentent comme
suit:
— molette VOL: Min.
— molette BRIGHT: Min.
— sélecteur DIMMER: HIGH
Emplacement des commandes
Moniteur (XVM-611)
Unité de commande
1 POWER button
2 BRIGHT (brightness) control dial
3 VIDEO INPUT select dial
4 PHONES (headphones) volume
control dial
5 PAL (Phase Alternation by Line)/NTSC
(National Television System
Committee) select switch
6 VIDEO input terminal (yellow)
7 AUDIO-L (left) input terminal (white)
8 AUDIO-R (Right) input terminal (red)
9 Headphones output terminal jack
(stereo minijack)
1 Commutateur POWER (marche/arrêt)
2 Molette VOL (volume)
3 Molette BRIGHT
4 Sélecteur DIMMER (HIGH/LOW)
5 Haut-parleur (situé à l’arrière de
l’appareil)
6 Indicateur POWER
POWER
BRIGHT
VIDEO INPUT
PHONES
VIDEO L R
ON/OFF
PAL NTSC
MIN MAX
AUDIO
PAL NTSC
Troubleshooting Guide Guide de dépannage

Mobile Color
Monitor System
Operating Instructions
Mode d’emploi
Sony Corporation 1997 Printed in Japan
XVM-6100
*I-3-861-539-11*(1)
Welcome!
Thank you for purchasing the Sony Mobile
Color Monitor System.
•This unit has three input terminals for
connecting auxiliary equipment such as a
video player or game equipment, etc.
•The low reflection liquid crystal panel reduces
the glare from outside lighting sources.
•You can connect both PAL (Phase Alternation
by Line) and NTSC (National Television
System Committee) video players.
Precautions
If your car was parked in direct sunlight
resulting in a considerable rise in temperature
inside the car, allow the unit to cool off before
operating it.
If you have any questions or problems
concerning your unit that are not covered in this
manual, please consult your nearest Sony dealer.
Additional Information
About the liquid crystal display (LCD)
panel
•Do not press on the LCD panel on the monitor
unit as doing so can distort the picture or cause
a malfunction. The picture may become
unclear or it may damage the LCD panel.
•Notes on cleaning
— Clean the LCD panel with a slightly damp,
soft cloth. Use mild household detergent.
— Do not use solvents such as benzine,
thinner, commercially available cleaners or
antistatic spray.
•Do not use this unit in temperatures under
5 °C (41 °F) or over 45 °C (113 °F).
•If your car was parked in a cold or hot place,
the picture may not be clear. The monitor is
not damaged. The picture will become clear
after the temperature in your car becomes
normal.
Some stationary blue or red dots may appear on
the monitor.
These are called bright spots, and can happen
with any LCD.
The LCD panel is highly sophisticated, and
more than 99.99 % of the segments used in the
panel are flawless. However, there is a
possibility that less than 0.01 % of the segments
are defective and may not light up properly.
However, these segments will not interfere with
your viewing.
Specifications
Monitor (XVM-611)
System Liquid crystal color display
Display Transparent TN LCD panel
Drive system TFT active matrix system
Picture size 6 in.; 121.9 × 89.2 mm (4
7
/8
× 3
5
/8 in.), 151 mm (6 in.)
(w × h, diagonally)
Picture segment 224,640 (w 960 × h 234 )
Speaker type ø 5 cm (ø 2 in.) dynamic
speaker
Power requirements
12 V DC car battery
(negative ground)
Current drain Approx. 0.7 A
Dimensions 162 × 129 × 31 mm (6
1
/2 ×
5
1
/8 × 1
1
/4 in.) (w × h × d)
Operating temperature
+5 °C ~ +45 °C
(41 °F ~ 113 °F)
Mass Approx. 430 g (15.3 oz.)
Controller
Dimensions 178 × 50 × 40 mm (6
1
/2 ×
2 × 1
1
/4 in.) (w × h × d)
Operable range Approx 3 m (118
1
/4 in.)
Mass Approx. 400 g (14.1 oz.)
(including cable)
Supplied accessories
Controller (1)
Monitor cable (1)
Hideaway unit (1)
Design and specifications are subject to change
without notice.
Owner’s Record
The model name and serial number are locatedon :
— the rear of the monitor (XVM-611).
— the rear of the control unit (RM-X6100).
— the bottom of the video selector (XA-601).
Record the serial number in the space provided below. Refer to these numbers
whenever you call upon your Sony dealer regarding this product.
Model No. XVM-611 Serial No.
Model No. RM-X6100 Serial No.
Model No. XA-601 Serial No.
Warning
To prevent fire or shock hazard, do not
expose the unit to rain or moisture.
This symbol is intended to alert
the user to the presence of
uninsulated “dangerous voltage”
within the product’s enclosure
that may be of sufficient
magnitude to constitute a risk of
electric shock to persons.
This symbol is intended to alert
the user to the presence of
important operating and
maintenance (servicing)
instructions in the literature
accompanying the appliance.
WARNING
This equipment has been tested and found to
comply with the limits for a Class B digital
device, pursuant to Part 15 of the FCC Rules.
These limits are designed to provide reasonable
protection against harmful interference in a
residential installation. This equipment
generates, uses, and can radiate radio frequency
energy and, if not installed and used in
accordance with the instructions, may cause
harmful interference to radio communications.
However, there is no guarantee that interference
will not occur in a particular installation. If this
equipment does cause harmful interference to
radio or television reception, which can be
determined by turning the equipment off and
on, the user is encouraged to try to correct the
interference by one or more of the following
measures:
— Reorient or relocate the receiving antenna.
— Increase the separation between the
equipment and receiver.
— Connect the equipment into an outlet on a
circuit different from that to which the
receiver is connected.
— Consult the dealer or an experienced radio/
TV technician for help.
You are cautioned that any changes or
modifications not expressly approved in this
manual could void your authority to operate
this equipment.
Avertissement
Pour prévenir tout risque d’incendie ou
d’électrocution, n’exposez pas l’appareil à la
pluie ou à l’humidité.
Précautions
Si votre voiture est parquée en plein soleil, ce
qui provoque une augmentation considérable de
la température à l’intérieur de l’habitacle, laissez
refroidir l’appareil avant de le faire fonctionner.
Si vous avez des questions ou des problèmes
concernant le fonctionnement de cet appareil qui
ne sont pas abordés dans le présent mode
d’emploi, consultez votre revendeur Sony.
Informations complémentaires
A propos du panneau à cristaux liquides
(LCD)
•N’appuyez pas sur le panneau LCD du
moniteur, car vous risquez sinon de provoquer
des distorsions dans l’image ou de causer un
dysfonctionnement. Il se peut que l’image
s’assombrisse ou que le panneau LCD soit
endommagé.
•Remarques sur l’entretien
— Nettoyez le panneau LCD à l’aide d’un
chiffon doux légèrement humide. Utilisez
un détergent ménager neutre.
— N’utilisez pas de solvants tels que de la
benzine, du diluant, ni de nettoyants ou de
sprays antistatiques vendus dans le
commerce.
•Ne faites pas fonctionner cet appareil sous des
températures inférieures à 5 °C (41 °F) ou
supérieures à 45 °C (113 °F).
•Si votre voiture était parquée dans un endroit
froid ou chaud, il se peut que l’image ne soit
pas claire. L’image retrouvera toute sa clarté
une fois que la température à l’intérieur de
votre voiture sera revenue à la normale.
Il se peut que des points fixes bleus ou rouges
apparaissent sur le moniteur.
On les appelle des spots lumineux et ils peuvent
se produire avec n’importe quel système LCD.
Le panneau LCD est hautement sophistiqué et
plus de 99,99 % des segments utilisés dans le
panneau sont exempts de défauts. Il est
cependant possible que les moins de 0,01 % de
segments restants soient défectueux et ne
s’allument pas correctement. Ces segments ne
causeront cependant aucune interférence durant
le visionnage.
Spécifications
Moniteur (XVM-611)
Système Affichage couleur à cristaux
liquides
Affichage Panneau LCD TN
transparent
Système d’entraînement
Système à matrice active
TFT
Taille de l’image 6 po; 121,9 × 89,2 mm (4
7
/8
× 3
5
/8 po), 151 mm (6 po)
(l × h, diagonale)
Segments d’image 224.640 (960 l × 234 h)
Type de haut-parleur
Haut-parleur dynamique de
ø 5 cm (ø 2 po)
Puissance de raccordement
Batterie de voiture 12 V CC
(masse négative)
Consommation de courant
Approx. 0,7 A
Dimensions 162 × 129 × 31 mm (6
1
/2 ×
5
1
/8 × 1
1
/4 po) (l × h × p)
Température d’utilisation
+5 °C ~ +45 °C
(41 °F ~ 113 °F)
Masse Approx. 430 g (15,3 oz)
Unité de commande
Dimensions 178 × 50 × 40 mm (6
1
/2 ×
2 × 1
1
/4 po) (l × h × p)
Portée efficace Approx 3 m (118
1
/4 po)
Masse Approx. 400 g (14.1 oz.)
(câble compris)
Accessoires fournis
Unité de commande (1)
Câble de moniteur (1)
Modulateur (1)
La conception et les spécifications sont sujettes à
modifications sans préavis.
Félicitations !
Nous vous remercions d’avoir fait l’acquisition
d’un moniteur couleur mobile Sony.
•Cet appareil est doté de trois bornes d’entrée
pour la connexion d’appareils auxiliaires comme
un lecteur vidéo, une console de jeux, etc.
•Le panneau à cristaux liquides à faible indice
de réfraction réduit les réflexions parasites
d’autres sources lumineuses.
•Vous pouvez aussi bien raccorder des lecteurs
vidéo fonctionnant suivant le système PAL
(ligne d’alternance de phase) que suivant le
système NTSC (National Television System
Committee).
-
 1
1
-
 2
2


dans d''autres langues
- English: Sony XVM-6100 Operating instructions
Documents connexes
-
Sony XVM-6100 Guide d'installation
-
Sony XVM-R75 Manuel utilisateur
-
-
-
-
-
-
-
-