
Read all instructions before
assembling and using product.
IMPORTANT - Keep Instructions for
future use. 0722R2-4435
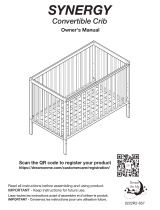
Owner’s Manual
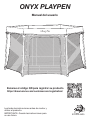
ONYX PLAYPEN
Scan the QR code to register your product
https://dreamonme.com/customercare/registration/

2www.dreamonme.com/help
…. for choosing Dream On Me and congratulations on joining our family;
a family that has been transforming lives for over 30+ years!
We appreciate your feedback and wish you the very best in the
coming years with your new addition. If you have any questions
or concerns please don’t hesitate to reach out to us. One of our
trusted Customer Care representatives will be happy to assist you.
Thank you again for entrusting us to provide you with safe
and affordable baby products and accessories.
THANK YOU...
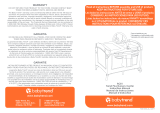
LIMITED WARRANTY:
• Dream On Me warrants its product to be free from defects in material and
workmanship and agrees to remedy any such defect.
• This warranty covers 1 year from the date of original purchase.
• This warranty is valid only upon presentation of proof of purchase.
• This is solely limited to the repair or replacement of defective furniture
components and no assembly labor is included.
• This warranty does not apply to any product which has been improperly
assembled, subjected to misuse or abuse or which has been altered or
repaired in any way.
• This warranty gives you specific legal rights and you may also have other
rights which vary from State to State.

3
www.dreamonme.com/help
WARNINGS
FAILURE TO FOLLOW THESE WARNINGS AND THE INSTRUCTIONS COULD RESULT
IN SERIOUS INJURY OR DEATH.
• NOT INTENDED FOR SLEEPING IN PLAYARD MODE.
• ALWAYS PROVIDE THE SUPERVISION NECESSARY FOR THE CONTINUED SAFETY
OF YOUR CHILD. WHEN USED FOR PLAYING, NEVER LEAVE THE CHILD
UNATTENDED.
• ONLY USE THE PRODUCT WITH ONE CHILD AT A TIME.
• DO NOT MOVE THE PRODUCT WITH THE CHILD INSIDE.
• TO REDUCE THE RISK OF SIDS (SUDDEN INFANT DEATH SYNDROME)
PEDIATRICIANS
• RECOMMEND HEALTHY INFANTS BE PLACED ON THEIR BACK TO SLEEP UNLESS
OTHERWISE ADVISED BY THE PHYSICIAN.
• THE PRODUCT MUST BE FULLY ERECT PRIOR TO USE.
• NEVER LEAVE THE CHILD IN THE PRODUCT WITH ANY SIDES LOWERED. MAKE
SURE THAT ALL SIDES ARE IN A RAISED AND LOCKED POSITION WHENEVER THE
CHILD IS IN THE PRODUCT.
• THE PRODUCT SHOULD NOT BE USED WITHOUT THE MATTRESS PAD PROVIDED
WITH THE PRODUCT.
• DO NOT USE A WATER MATTRESS WITH THIS PRODUCT.
• DO NOT USE A SHEET DESIGNED TO FIT A FULL-SIZED CRIB. IF THE SHEET IS
USED WITH THE PAD, ONLY USE ONE SPECIFICALLY DESIGNED TO FIT THIS
PLAYARD MATTRESS.
• DO NOT USE THE PLAYARD IF YOU CANNOT EXACTLY FOLLOW THESE
INSTRUCTIONS.
• DO NOT MODIFY THE PLAYARD OR ADD ANY ATTACHMENTS THAT ARE NOT
LISTED IN THE INSTRUCTION GUIDE.
• KEEP THE CARRY BAG AWAY FROM THE CHILD.
• THE CHILD CAN BECOME ENTRAPPED AND DIE WHEN IMPROVISED NETTING OR
COVERS ARE PLACED ON TOP OF THE PRODUCT. NEVER ADD SUCH ITEMS TO
CONFINE THE CHILD IN THE PRODUCT.
FALL HAZARD:
• WHEN A CHILD IS ABLE TO PULL TO A STANDING POSITION, REMOVE BUMPER
PADS, LARGE TOYS, AND OTHER OBJECTS THAT COULD SERVE AS STEPS FOR
CLIMBING OUT.
• DISCONTINUE USE OF THE PRODUCT WHEN THE CHILD IS ABLE TO CLIMB OUT
OR REACHES THE HEIGHT OF 35 INCHES (890 MM) OR WEIGHS MORE THAN 30
LBS. (13.6 KG).

4www.dreamonme.com/help
WARNINGS (cont.)
STRANGULATION HAZARD:
• STRINGS CAN CAUSE STRANGULATION. NEVER PLACE ITEMS WITH STRINGS
AROUND A CHILD'S NECK SUCH AS HOOD STRINGS OR PACIFIER CORDS. NEVER
SUSPEND STRINGS
• OVER PRODUCTS OR ATTACH STRINGS TO TOYS.
• NEVER PLACE THE PRODUCT NEAR A WINDOW OR PATIO DOOR WHERE CORDS
FROM BLINDS OR DRAPES CAN STRANGLE A CHILD.
CHOKING HAZARD:
• KEEP MEDICATION AND SMALL ITEMS THAT COULD CHOKE A CHILD AWAY FROM
THE PLAYARD.
SUFFOCATION HAZARD:
• INFANTS HAVE SUFFOCATED ON ADDED PILLOWS, BLANKETS, AND EXTRA
PADDING. ONLY USE THE PAD PROVIDED BY THE MANUFACTURER.
• NEVER PLACE EXTRA PADDING UNDER OR BESIDE THE INFANT.
• NEVER ADD A MATTRESS, PILLOW, COMFORTER, OR PADDING TO THE PRODUCT.
• ALWAYS PLACE THE INFANT ON THE BACK TO SLEEP.
• DO NOT USE THE MATTRESS PAD WITHOUT THE PLAYARD PROPERLY INSTALLED.
• NEVER USE PLASTIC SHIPPING BAGS OR PLASTIC FILM AS MATTRESS COVERS.
THEY ARE NOT SOLD FOR THAT PURPOSE AND CAN CAUSE SUFFOCATION.
IMPORTANT:
• ADULT ASSEMBLY REQUIRED.
• UTMOST CARE SHOULD BE TAKEN IN UNPACKING AND ASSEMBLY.
• EXAMINE PRODUCTS FREQUENTLY FOR DAMAGED, MISSING, OR LOOSE PARTS.
• DO NOT USE IT IF ANY PARTS ARE MISSING, DAMAGED, OR BROKEN.
• CONTACT DREAM ON ME INC. FOR REPLACEMENT PARTS AND INSTRUCTIONS IF
NEEDED. NEVER SUBSTITUTE PARTS.
• CHECK THIS PRODUCT FOR DAMAGED HARDWARE, LOOSE JOINTS, MISSING
PARTS, OR SHARP EDGES BEFORE ASSEMBLY AND PERIODICALLY DURING USE.

5
www.dreamonme.com/help
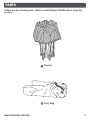
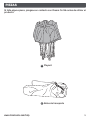
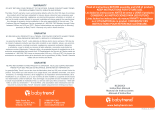
PARTS
If there are any missing parts, please contact Dream On Me before using the
product.
Playard
1
Carry Bag
2

6www.dreamonme.com/help
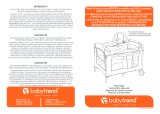
1
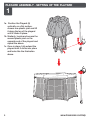
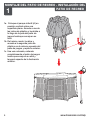
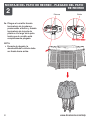
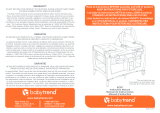
PLAYARD ASSEMBLY - SETTING UP THE PLAYARD
1a. Position the Playard (A)
vertically on a flat surface.
Access one plastic joint and lift
it along the leg of the playard
until it clicks in place.
1b. Similarly, locate and access the
second plastic joint on the
opposite end of the playard and
repeat the above.
1c. Once in place, fully extend the
playard until it clicks into place
and looks like the illustration
above.

7
www.dreamonme.com/help
1
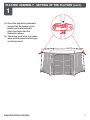
PLAYARD ASSEMBLY - SETTING UP THE PLAYARD (cont.)
1d. Once the playard is extended,
ensure that the levers on the
plastic joints are locked in
place and looks like the
illustration above.
1e. The levers must click into place
when pulled upward before you
use the product.

8www.dreamonme.com/help
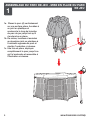
2
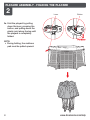
PLAYARD ASSEMBLY - FOLDING THE PLAYARD
2a. Fold the playard by pulling
down the lever, pressing the
button, and pulling down the
plastic joint along the leg until
the playard is completely
folded.
NOTE:
• During folding, the mattress
pad must be pulled upward.
Button
Pull Down
Lever

9
www.dreamonme.com/help
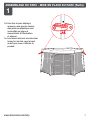
3
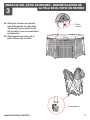
PLAYARD ASSEMBLY - UNSECURING FABRIC ON PLAYARD
3a.Unfasten the snaps respectively
on each side of the playard to
remove the fabric from the
playard as shown in the
illustration.
3b. Unfasten the velcro at the
bottom of the playard.
Snap Button
Adhesive Tape

10 www.dreamonme.com/help
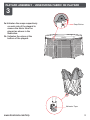
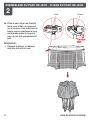
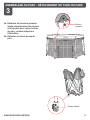
4
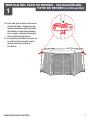
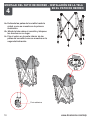
PLAYARD ASSEMBLY - INSTALLING FABRIC ON THE PLAYARD
4a. Expand the legs of the playard halfway
as shown in the first illustration.
4b. Mount the fabric over the playard and
lock the snaps in place.
4c. Attach the velcro securely at the
bottom of the playard's legs as shown
in the second illustration.
Adhesive Tape

11
www.dreamonme.com/help
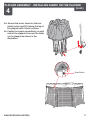
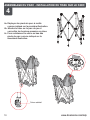
4
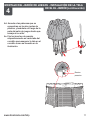
PLAYARD ASSEMBLY - INSTALLING FABRIC ON THE PLAYARD
(cont.)
4d. Access the levers found on the two
plastic joints and lift it along the leg of
the playard until it clicks in place.
4e. Fasten the snaps respectively on each
side of the playard to secure the fabric
on the playard as shown in the
illustration.
Snap Button

12 www.dreamonme.com/help
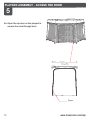
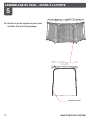
5
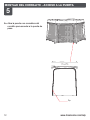
PLAYARD ASSEMBLY - ACCESS THE DOOR
(cont.)
5a. Open the zip door on the playard to
access the crawl through door.
Zipper

13
www.dreamonme.com/help
CARE AND MAINTENANCE
FOLLOW THESE INSTRUCTIONS TO MAKE SURE YOUR PLAYARD LASTS FOR
YEARS.
MAINTENANCE AND CLEANING:
• PERIODICALLY CLEAN THE PLAYARD COMPONENTS WITH A SOFT DAMP
CLOTH.
• WIPE CLEAN WITH A SPONGE AND NEUTRAL EQUIPMENT.
• ALWAYS DRY THE METAL PARTS ON THE PLAYARD TO AVOID THE
FORMATION OF RUST.
• PERIODICALLY CHECK THE PLAYARD FOR SIGNS OF DAMAGE OR WORN
PARTS.
• DO NOT USE SCORING POWERS OR ABRASIVE CLEANERS.
• FABRIC COVER CAN BE ONLY HAND WASHED AND AIR DRIED. DO NOT
MACHINE WASH.
• CHECK FASTENERS PERIODICALLY TO ENSURE PROPER WORKING.
• STORE PLAYARD AWAY IN SHADE, IN A DRY AREA WHERE YOUR CHILD
CANNOT ACCESS THEM IF NOT USED FOR A LONG TIME.
• THE FRAME OF THE PLAYARD CAN BE SPOT CLEANED WITH SPONGE AND
SOAPY WATER.
CARRY BAG:
• MACHINE WASH IN COLD WATER ON A DELICATE CYCLE.
• AIR DRY. NO BLEACH.
• SPOT CLEAN WITH A SOFT CLEAN CLOTH AND MILD SOAP.
YOU DID IT!
Congratulations Mom & Dad!
It's time to create your dream nursery. A fun, safe playard that
will turn your little one's playtimes into memorable events

1532 S. WASHINGTON AVE STE1
PISCATAWAY, NJ 08854-9908
www.dreamonme.com
Follow Us @dreamonmeinc
to get your nursery featured on our social media.
Enter our monthly giveaway!
Scan the QR code to register.
Chat with us!
Scan the QR code to Live Chat.
E-mail: [email protected]

0722R2-4435
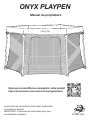
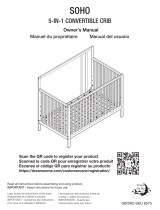
ONYX PLAYPEN
Manuel du propriétaire
Lisez toutes les instructions avant avant d'assembler
et d'utiliser le produit.
IMPORTANT- Conservez les instructions pour pour
une utilisation ultérieure.
Scannez le code QR pour enregistrer votre produit
https://dreamonme.com/customercare/registration/

2www.dreamonme.com/help
... pour avoir choisi Dream On Me et félicitations pour avoir rejoint notre
famille ; une famille qui a transformé des vies depuis plus de 30 ans ! Nous
apprécions vos commentaires et nous vous souhaitons le meilleur dans les
années à venir avec votre nouvelle addition. Si vous avez des questions ou
des préoccupations, n'hésitez pas à nous contacter. L'un de nos
représentants du service clientèle se fera un plaisir de vous aider. Merci
encore de nous avoir fait confiance pour vous fournir des produits et
accessoires pour bébés sûrs et abordables. produits et accessoires pour
bébés sûrs et abordables
MERCI...
GARANTIE LIMITÉE :
• Dream On Me garantit que son produit est exempt de tout défaut de
matériel et de fabrication et s'engage à remédier à tout défaut de ce type.
• Cette garantie couvre 1 an à partir de la date d'achat originale.
• Cette garantie n'est valable que sur présentation d'une preuve d'achat.
• Elle est uniquement limitée à la réparation ou au remplacement des
composants défectueux du meuble et aucune main d'œuvre de montage
n'est incluse.
• Cette garantie ne s'applique pas à un produit qui a été mal assemblé,
soumis à une mauvaise utilisation ou à un abus ou qui a été modifié ou
réparé de quelque façon que ce soit.
• Cette garantie vous donne des droits légaux spécifiques et vous pouvez
également avoir d'autres droits qui varient d'un État à l'autre. droits qui
varient d'un État à l'autre.

3
www.dreamonme.com/help
AVERTISSEMENTS
L'ABSENCE D'AVERTISSEMENT ET D'INSTRUCTION PEUT ENTRAÎNER DES
BLESSURES GRAVES OU LA MORT.
• NE PAS UTILISER POUR DORMIR EN MODE PLAYARD.
• ASSUREZ TOUJOURS LA SURVEILLANCE NÉCESSAIRE POUR ASSURER LA
SÉCURITÉ DE VOTRE ENFANT. LORSQU'IL EST UTILISÉ POUR JOUER, NE LAISSEZ
JAMAIS L'ENFANT SANS SURVEILLANCE.
• N'UTILISEZ LE PRODUIT QU'AVEC UN SEUL ENFANT À LA FOIS.
• NE DÉPLACEZ PAS LE PRODUIT AVEC L'ENFANT À L'INTÉRIEUR.
• POUR RÉDUIRE LE RISQUE DE SIDS (SYNDROME DE MORT SUBITE DU
NOURRISSON) LES PÉDIATRES
• RECOMMANDENT QUE LES NOURRISSONS EN BONNE SANTÉ SOIENT PLACÉS
SUR LE DOS POUR DORMIR, SAUF AVIS CONTRAIRE DU MÉDECIN.
• LE PRODUIT DOIT ÊTRE COMPLÈTEMENT REDRESSÉ AVANT D'ÊTRE UTILISÉ.
• NE JAMAIS LAISSER L'ENFANT DANS LE PRODUIT AVEC L'UN DES CÔTÉS
ABAISSÉS. S'ASSURER QUE TOUS LES CÔTÉS SONT EN POSITION HAUTE ET
VERROUILLÉE LORSQUE L'ENFANT EST DANS LE PRODUIT.
• LE PRODUIT NE DOIT PAS ÊTRE UTILISÉ SANS LE MATELAS FOURNI AVEC LE
PRODUIT.
• N'UTILISEZ PAS DE MATELAS D'EAU AVEC CE PRODUIT.
• N'UTILISEZ PAS UN DRAP CONÇU POUR UN LIT D'ENFANT DE TAILLE NORMALE.
SI UN DRAP EST UTILISÉ AVEC LE MATELAS, N'EN UTILISER QU'UN
SPÉCIALEMENT CONÇU POUR CE MATELAS.
• N'UTILISEZ PAS LE PLAYARD SI VOUS NE POUVEZ PAS SUIVRE EXACTEMENT CES
INSTRUCTIONS.
• NE MODIFIEZ PAS LE PLAYARD ET N'AJOUTEZ PAS D'ACCESSOIRES QUI NE
FIGURENT PAS DANS LE GUIDE D'INSTRUCTIONS.
• GARDEZ LE SAC DE TRANSPORT LOIN DE L'ENFANT.
• L'ENFANT PEUT RESTER COINCÉ ET MOURIR LORSQUE DES FILETS OU DES
COUVERTURES IMPROVISÉS SONT PLACÉS SUR LE PRODUIT. NE JAMAIS
AJOUTER DE TELS ARTICLES POUR CONFINER L'ENFANT DANS LE PRODUIT.
RISQUE DE CHUTE :
• LORSQUE L'ENFANT EST CAPABLE DE SE METTRE DEBOUT, RETIRER LES
PARE-CHOCS, LES GRANDS JOUETS ET AUTRES OBJETS QUI POURRAIENT
SERVIR DE MARCHEPIEDS POUR SORTIR.
• CESSEZ D'UTILISER LE PRODUIT LORSQUE L'ENFANT EST CAPABLE DE GRIMPER
OU ATTEINT UNE HAUTEUR DE 35 POUCES (890 MM) OU PÈSE PLUS DE 30 LBS.
(13,6 KG).

4www.dreamonme.com/help
AVERTISSEMENTS (suite)
RISQUE DE STRANGULATION :
• LES FICELLES PEUVENT PROVOQUER UNE STRANGULATION. NE JAMAIS PLACER
D'ARTICLES MUNIS DE FICELLES AUTOUR DU COU D'UN ENFANT, TELS QUE DES
CORDONS DE CAPUCHE OU DE SUCETTE. NE SUSPENDEZ JAMAIS DE FICELLES
• AU-DESSUS DES PRODUITS OU ATTACHER DES FICELLES AUX JOUETS.
• NE PLACEZ JAMAIS LE PRODUIT PRÈS D'UNE FENÊTRE OU D'UNE PORTE PATIO
OÙ LES CORDONS DES STORES OU DES RIDEAUX PEUVENT ÉTRANGLER UN
ENFANT.
RISQUE D'ÉTOUFFEMENT :
• ÉLOIGNER DE LA POUSSETTE LES MÉDICAMENTS ET LES PETITS OBJETS QUI
POURRAIENT ÉTOUFFER L'ENFANT.
RISQUE DE SUFFOCATION :
• DES NOURRISSONS SE SONT ÉTOUFFÉS SUR DES OREILLERS, DES
COUVERTURES ET DES REMBOURRAGES SUPPLÉMENTAIRES. N'UTILISEZ QUE LE
REMBOURRAGE FOURNI PAR LE FABRICANT.
• NE JAMAIS PLACER DE REMBOURRAGE SUPPLÉMENTAIRE SOUS OU À CÔTÉ DE
L'ENFANT.
• NE JAMAIS AJOUTER DE MATELAS, D'OREILLER, DE COUVERTURE OU DE
REMBOURRAGE AU PRODUIT.
• TOUJOURS PLACER L'ENFANT SUR LE DOS POUR DORMIR.
• NE PAS UTILISER LE MATELAS SANS QUE LE PARC SOIT CORRECTEMENT
INSTALLÉ.
• NE JAMAIS UTILISER DE SACS D'EXPÉDITION EN PLASTIQUE OU DE FILM
PLASTIQUE COMME HOUSSE DE MATELAS. ILS NE SONT PAS VENDUS DANS CE
BUT ET PEUVENT PROVOQUER UNE SUFFOCATION.
IMPORTANT :
• ASSEMBLAGE PAR UN ADULTE REQUIS.
• LE DÉBALLAGE ET L'ASSEMBLAGE DOIVENT ÊTRE EFFECTUÉS AVEC LE PLUS
GRAND SOIN.
• EXAMINEZ FRÉQUEMMENT LES PRODUITS POUR DÉTECTER LES PIÈCES
ENDOMMAGÉES, MANQUANTES OU DESSERRÉES.
• NE L'UTILISEZ PAS SI DES PIÈCES SONT MANQUANTES, ENDOMMAGÉES OU
CASSÉES.
• CONTACTEZ DREAM ON ME INC. POUR OBTENIR DES PIÈCES DE RECHANGE ET
DES INSTRUCTIONS SI NÉCESSAIRE. NE JAMAIS REMPLACER LES PIÈCES.
• VÉRIFIEZ QUE CE PRODUIT N'EST PAS ENDOMMAGÉ, QU'IL N'Y A PAS DE JOINTS
LÂCHES, DE PIÈCES MANQUANTES OU DE BORDS TRANCHANTS AVANT
L'ASSEMBLAGE ET PÉRIODIQUEMENT PENDANT L'UTILISATION.

5
www.dreamonme.com/help
PIÈCES
S'il y a des pièces manquantes, veuillez contacter Dream On Me avant d'utiliser
le produit.
Playard
1
Sac de transport
2

6www.dreamonme.com/help
1
ASSEMBLAGE DU PARC DE JEU - MISE EN PLACE DU PARC
DE JEU
1a. Placez le parc (A) verticalement
sur une surface plane. Accédez à
un joint en plastique et
soulevez-le le long de la jambe
du parc de jeu jusqu'à ce qu'il
s'enclenche en place.
1b. De même, localisez et accédez
au deuxième joint en plastique à
l'extrémité opposée du parc et
répétez l'opération ci-dessus.
1c. Une fois en place, déployez
complètement le parc jusqu'à ce
qu'il s'enclenche et ressemble à
l'illustration ci-dessus.
La page est en cours de chargement...
La page est en cours de chargement...
La page est en cours de chargement...
La page est en cours de chargement...
La page est en cours de chargement...
La page est en cours de chargement...
La page est en cours de chargement...
La page est en cours de chargement...
La page est en cours de chargement...
La page est en cours de chargement...
La page est en cours de chargement...
La page est en cours de chargement...
La page est en cours de chargement...
La page est en cours de chargement...
La page est en cours de chargement...
La page est en cours de chargement...
La page est en cours de chargement...
La page est en cours de chargement...
La page est en cours de chargement...
La page est en cours de chargement...
La page est en cours de chargement...
La page est en cours de chargement...
-
 1
1
-
 2
2
-
 3
3
-
 4
4
-
 5
5
-
 6
6
-
 7
7
-
 8
8
-
 9
9
-
 10
10
-
 11
11
-
 12
12
-
 13
13
-
 14
14
-
 15
15
-
 16
16
-
 17
17
-
 18
18
-
 19
19
-
 20
20
-
 21
21
-
 22
22
-
 23
23
-
 24
24
-
 25
25
-
 26
26
-
 27
27
-
 28
28
-
 29
29
-
 30
30
-
 31
31
-
 32
32
-
 33
33
-
 34
34
-
 35
35
-
 36
36
-
 37
37
-
 38
38
-
 39
39
-
 40
40
-
 41
41
-
 42
42


Dream On Me 4435 Manuel utilisateur
- Catégorie
- Meubles de bébé
- Taper
- Manuel utilisateur
dans d''autres langues
- English: Dream On Me 4435 User manual
- español: Dream On Me 4435 Manual de usuario
Documents connexes
Autres documents
-
 BABYTREND EZRest Nursery Center - Canada Le manuel du propriétaire
-
 BABYTREND Deluxe CLX Nursery Center - Canada Le manuel du propriétaire
-
 BABYTREND rc81xxxa Le manuel du propriétaire
-
 BABYTREND GoLite ELX Nursery Center Le manuel du propriétaire
-
 BABYTREND EZ Rest Deluxe Nursery Center Le manuel du propriétaire
-
 BABYTREND GoLite ELX Nursery Center Le manuel du propriétaire


