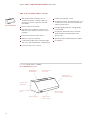
Wolf ICBPL462212 Use & Care Information Manual
- Catégorie
- Hottes
- Taper
- Use & Care Information Manual
Ce manuel convient également à

PRO VENTILATION HOODS
USE & CARE INFORMATION
GUÍA DE USO Y MANTENIMIENTO
GUIDE D’UTILISATION ET D’ENTRETIEN
INFORMAZIONI SU USO E MANUTENZIONE
BEDIENUNGS- UND PFLEGEANLEITUNG


3
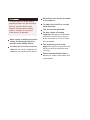
ENGLISH
Wolf Pro Ventilation Hoods 5
Safety Instructions & Precautions 6
Wolf Pro Ventilation Hood Features 10
Wolf Pro Ventilation Hood Use & Care 13
Wolf Troubleshooting Guide 16
Wolf Service Information 17
ESPÃNOL
Campanas extractoras Pro de Wolf 19
Precauciones e instrucciones de seguridad 20
Características de las campanas
extractoras Pro de Wolf 24
Uso y mantenimiento de las campanas
extractoras Pro de Wolf 27
Guía de localización y solución de
problemas de Wolf 30
Información de mantenimiento de Wolf 31
FRANÇAIS
Hottes aspirantes Pro de Wolf 33
Instructions et mesures de sécurité 34
Caractéristiques des hottes aspirantes
Pro de Wolf 38
Utilisation et entretien des hottes
aspirantes Pro de Wolf 41
Guide de dépistage des pannes Wolf 44
Service après-vente Wolf 45
ITALIANO
Cappe di ventilazione Pro Wolf 47
Precauzioni e istruzioni sulla sicurezza 48
Caratteristiche delle cappe di
ventilazione Pro Wolf 52
Uso e manutenzione delle cappe
di ventilazione Pro Wolf 55
Guida alla soluzione dei problemi Wolf 58
Informazioni sull’assistenza Wolf 59
DEUTSCH
Pro-Dunstabzugshauben von Wolf 61
Sicherheitshinweise u. Vorsichtsmaßnahmen 62
Leistungsmerkmale der Pro-
Dunstabzugshauben von Wolf 66
Bedienung und Pflege der Pro-
Dunstabzugshauben von Wolf 69
Anleitung zur Fehlersuche von Wolf 72
Serviceinformationen von Wolf 73

As you read this Use & Care Information,
take particular note of the CAUTION and
WARNING symbols when they appear.
This information is impor tant for safe and
efficient use of the Wolf equipment.
In addition, this Use & Care Information may
signal an IMPORTANT NOTE which highlights
information that is especially important.
signals a situation where minor injury or
product damage may occur if you do not
follow instructions.
states a hazard that may cause serious
injury or death if precautions are not
followed.
WOLF
®
is a registered trademark of Wolf Appliance, Inc.

5
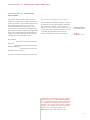
THANK YOU
Your purchase of a Wolf Pro ventilation hood
attests to the importance you place upon the
quality and performance of your cooking
equipment. We understand this importance
and have designed and built your ventilation
hood with quality materials and workmanship
to give you years of dependable service.
We know you are eager to start cooking, but
before you do, please take some time to read
this Use & Care Information. Whether you are
a beginning cook or an expert chef, it will be
to your benefit to familiarize yourself with the
safety practices, features, operation and care
recommendations of the Wolf Pro ventilation
hood.
We appreciate your choice of a Wolf
Appliance product and welcome any sugges-
tions or comments you may have. To share
your opinions with us, contact us at
www.wolfappliance.com.
WOLF
PRO VENTILATION HOODS
CONTACT
INFORMATION
Website:
wolfappliance.com

Installation work and electrical
wiring must be done by qualified
person(s) in accordance with all
applicable codes and standards,
including fire-rated construction
codes and standards.
Sufficient air is needed for proper
combustion and exhausting of gases
through the flue (chimney) of fuel-
burning equipment to prevent
backdrafting.
6
Read this Use & Care Information
carefully before using your new
ventilation unit to reduce the risk of
fire, electrical shock or injury to
persons.
Use this unit only in the manner
intended by Wolf Appliance.
If you have questions, contact us
at www.wolfappliance.com.
Before servicing or cleaning unit,
switch power off at service panel
and lock the service disconnecting
means to prevent power from being
switched on accidentally. When the
service disconnecting means cannot
be locked, securely fasten a
prominent warning device, such as
a tag, to the service panel.
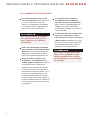
SAFETY INSTRUCTIONS AND PRECAUTIONS
To reduce the risk of electric
shock, this fan should only be
used with the fan speed control
that shipped installed in the unit.
To reduce the risk of fire, electric
shock or injury to persons,
observe the following:
READ AND SAVE THESE INSTRUCTIONS

7
When cutting or drilling into wall or
ceiling, do not damage electrical
wiring or other hidden utilities.
To reduce the risk of fire or electric
shock, do not use this hood with an
additional fan speed control device.
To reduce the risk of fire and to
properly exhaust air, be certain to
duct air outside. Do not vent
exhaust air into spaces within
walls or ceilings or into attics,
crawl spaces or garages.
Ducted fans must always be vented
to the outdoors.
To reduce the risk of fire, use only
metal ductwork.
This unit must be grounded.
For best capture of cooking
impurities, the bottom of the hood
should be a minimum of 762 mm
and a maximum of 914 mm above
the countertop.
This product may have sharp
edges. Be careful to avoid cuts and
abrasions during installation and
cleaning.
Please read specification label on
product for further information and
requirements.

8
SAFETY INSTRUCTIONS AND PRECAUTIONS
TO REDUCE THE RISK OF A COOKTOP
GREASE FIRE:
Never leave surface units
unattended at high settings.
Boilovers cause smoking and greasy
spillovers that may ignite. Heat oils
slowly on low or medium settings.
Always turn hood ON when cooking
at high heat.
Clean ventilation hoods frequently.
Grease should not be allowed to
accumulate on fan or filter.
Use proper pan size. Always use
cookware appropriate for the size of
the surface element.
Never flambé under the range hood.
TO REDUCE THE RISK OF INJURY
TO PERSONS IN THE EVENT OF
A GREASE FIRE, OBSERVE THE
FOLLOWING:
Smother flames with a close-
fitting lid, baking sheet or other
metal tray, then turn off the gas
burner. Be careful to prevent
burns. If the flames do not go out
immediately, evacuate and call
the fire department.
Do not use water, including wet
dishcloths or towels—a violent
steam explosion will result.
Never pick up a flaming pan—
you may be burned.
READ AND SAVE THESE INSTRUCTIONS

USE AN EXTINGUISHER ONLY IF:
The fire is small and contained in
the area where it started.
The fire department is being called.
You can fight the fire with your back
to an exit.
9
To avoid motor bearing damage and
noisy and/or unbalanced impellers,
keep drywall spray, construction
dust, etc., off blower.
Two installers are recommended
because of the large size and weight
of this hood.
Your hood motor has a thermal
overload that will automatically
shut off the motor if it becomes
overheated. The motor will restart
when it cools down. If the motor
continually shuts off and restarts,
contact a Wolf dealer.
Avoid using food products that
produce flames under the wall hood.
Take care when using cleaning
agents or detergents.
For general ventilating use only.
Do not use to exhaust hazardous
or explosive materials and vapors.

10
WOLF PRO VENTILATION HOOD FEATURES
PRO 610 mm DEEP WALL HOODS
610 mm deep wall ventilation hood
available in 762 mm, 914 mm, 1067 mm,
1219 mm, 1372 mm, 1524 mm and 1676
mm widths
Classic stainless steel finish
Optional 152 mm, 305 mm, 457 mm and
610 mm classic stainless steel duct covers
available
Internal and remote blower options
Stainless steel enclosed liner
Continually welded seams, hemmed edges
and sides, and hand-finished craftsmanship
Recessed easy-access controls
Infinite-speed blower control
Heat Sentry feature automatically turns unit
on when heat is sensed and automatically
adjusts blower speed
Halogen lighting with two settings (bulbs
not included)
Removable, dishwasher-safe, restaurant-
grade stainless steel baffle filters and
grease cups
Transition with backdraft damper included
CE Certified
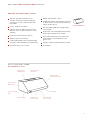
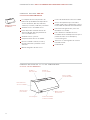
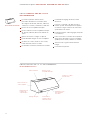
610 mm DEEP WALL HOOD
Model ICBPW482418 shown
610 mm Wall Hood
Classic stainless
steel finish
Stainless steel
baffle filters
Infinite-speed
blower control
Halogen lighting
Hand-finished
craftsmanship
Recessed easy-
access controls
Location of rating
plate
Welded seams
and hemmed edges

11
WOLF PRO VENTILATION HOOD FEATURES
686 mm Wall Hood
PRO 686 mm DEEP WALL HOODS
686 mm deep wall ventilation hood
available in 762 mm, 914 mm, 1067 mm,
1219 mm, 1372 mm, 1524 mm and 1676
mm widths
Classic stainless steel finish
Optional 152 mm, 305 mm, 457 mm and
610 mm classic stainless steel duct covers
available
Internal and remote blower options
Stainless steel enclosed liner
Continually welded seams, hemmed edges
and sides, and hand-finished craftsmanship
Recessed easy-access controls
Infinite-speed blower control
Heat Sentry feature automatically turns unit
on when heat is sensed and automatically
adjusts blower speed
Halogen lighting with two settings (bulbs
not included)
Heat lamps—two R125 250-watt maximum
bulbs required (bulbs not included)
Removable, dishwasher-safe, restaurant-
grade stainless steel baffle filters and
grease cups
Transition with backdraft damper included
CE Certified
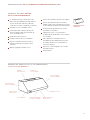
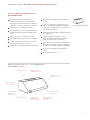
686 mm DEEP WALL HOOD
Model ICBPW482718 shown
Classic stainless
steel finish
Stainless steel
baffle filters
Infinite-speed
blower control
Location of rating
plate
Halogen lighting
Hand-finished
craftsmanship
Recessed easy-
access controls
Heat lamps
Welded seams
and hemmed edges

12
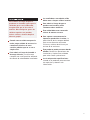
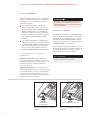
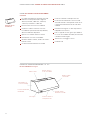
WOLF PRO VENTILATION HOOD FEATURES
PRO HOOD LINERS
Stainless steel enclosed liner with seamed
construction
Available for use with 914 mm, 1219 mm
and 1372 mm custom hoods
Internal and remote blower options
Recessed easy-access controls
Infinite-speed blower control
Heat Sentry feature automatically turns unit
on when heat is sensed and automatically
adjusts blower speed
Halogen lighting with two settings
Removable, dishwasher-safe, restaurant-
grade stainless steel baffle filters
Transition with backdraft damper included
CE Certified
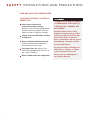
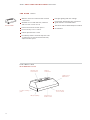
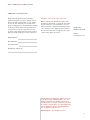
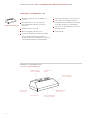
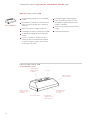
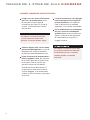
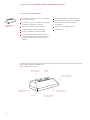
PRO HOOD LINER
Model ICBPL462212 shown
Pro Hood Liner
Seamed
construction
Location of rating
plate
Infinite-speed
blower control
Halogen lighting
Stainless steel
enclosed liner
Recessed easy-
access controls
Stainless steel
baffle filters

13
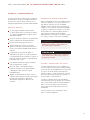
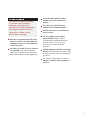
WOLF PRO VENTILATION HOOD USE & CARE
RECESSED CONTROLS
Controls for Pro ventilation hoods and hood
liners are recessed under the front edge of the
hood. Refer to the illustration below.
LIGHT CONTROL
The left rotary switch operates the halogen
lights. There are two settings, and . The
setting can be used as a night-light. From
the position, turn the switch to the desired
light setting, left for and right for light
setting.
HEAT LAMP CONTROL
If your hood is equipped with heat lamps, a
center rotary switch will control the lamps.
Each heat lamp may function independently or
both lamps may be activated simultaneously
from the single switch. From the position,
simply turn the switch to the right to
activate the right heat lamp or to the left to
activate the left lamp. When the switch is in
the vertical position , both heat lamps will
be activated.
BLOWER CONTROL
The right rotary switch that operates the
blower is variable, allowing infinite control of
the blower speed. Rotate the switch fully
counterclockwise to turn the blower off.
HEAT SENTRY FEATURE
Heat Sentry feature turns the ventilation hood
on when heat is sensed and adjusts the blower
speed automatically. The Heat Sentry feature is
activated when the exhaust temperature from
the hood reaches 95˚C and deactivated when
the exhaust temperature decreases to 85˚C.
At 95˚C the blower motor will automatically
adjust to HIGH speed. When the sensor cools
down to 85˚C it adjusts the blower back to the
setting on the blower control. For example, if
blower motor is in LOW speed and threshold
temperature is reached, the blower will
increase to HIGH speed.
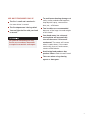
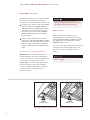
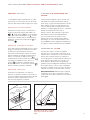
FILTER REMOVAL
To remove the stainless steel filters, push each
filter up at the angle it is placed in and rotate
down. Remove the center filter first. Take out
the grease cups (if applicable) placed on the
bottom edge of the hood coinciding with the
bottom edge of the filters. Gloves should be
worn to provide the proper grip. Reinstall
using the reverse procedure as shown in the
illustration below. Outer filters may need to be
pushed over while the center filter is reinstalled.
IMPORTANT NOTE:
DO NOT operate the
ventilation hood without the filters. This may
cause damage to the blower or other internal
components of the hood.
Grease Cup SIDE VIEW
Filter
Spring
Recessed controls Filter reinstallation—686 mm deep
wall hood shown
Blower
Control
Heat Lamps
Control
(686 mm deep
hoods only)
Halogen
Lights Control

14
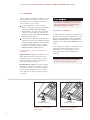
WOLF PRO VENTILATION HOOD USE & CARE
Push
In
Rotate Clockwise
Light bulb installation—hood liners
Rotate Clockwise
Light bulb installation—wall hoods
HALOGEN LIGHTING
All Wolf Pro ventilation hoods and hood liners
have halogen lighting with two settings.
Halogen bulbs are not included with the hood.
Pro wall hoods, 762 mm, 914 mm and 1067
mm wide require two 220-240 V 50/60 Hz,
50W (maximum), E27, PAR20 halogen bulbs.
1219 mm, 1372 mm, 1524 mm and 1676
mm wide hoods require three 220-240 V
50/60 Hz, 50W (maximum), E27, PAR20
halogen bulbs.
Pro hood liners, 864 mm and 1168 mm
wide require two 220-240 V 50/60 Hz, 50W
(maximum), GU10 halogen bulbs. 1321 mm
wide hood liners require three 220-240 V
50/60 Hz, 50W (maximum), GU10 halogen
bulbs.
HALOGEN BULB REPLACEMENT
Wall Hoods:
Turn off the ventilation hood
blower and lights. Once the halogen bulb is
cool, use a soft cloth to unscrew the bulb and
replace. Refer to the illustration below.
Hood Liners:
To insert halogen bulbs, push
bulb into receptacle and rotate clockwise
1
/4 turn. To remove, push bulb in and rotate
counterclockwise
1
/4 turn. Refer to the
illustration below.
Be sure that the bulb is cool before
replacing. Halogen bulbs get hot instantly
and adjacent parts may retain heat.
HEAT LAMPS
Wolf Pro 686 mm deep wall hoods are
equipped with two heat lamp locations that
require 220-240 V 50/60 Hz, 250W (maximum),
E27, R125 bulbs. Heat lamp bulbs are
not
included
with the hood.
To replace, turn off the ventilation hood blower
and lights. Once the heat lamp bulb is cool,
use a soft cloth to unscrew the bulb and
replace.
Be sure that the heat lamp bulb is cool
before touching.

15
WOLF PRO VENTILATION HOOD USE & CARE
STAINLESS STEEL FINISH
Use a soft, nonabrasive stainless steel cleaner
and apply with a soft lint-free cloth. To bring
out the natural luster, lightly wipe the surface
with a water-dampened microfiber cloth,
followed with a dry microfiber cloth. All work
should follow the same grain direction as the
finish. Best results are obtained by keeping the
cloth in continuous contact with the metal.
FILTERS AND GREASE CUPS
The stainless steel baffle filters and grease
cups (if applicable) should be cleaned approxi-
mately every month, depending on use. You
may need to clean the filters more often if your
cooking style generates large amounts of
grease (for example, frying or wok cooking).
The filters are dishwasher safe and are
designed to fit most dishwashers. Wolf
recommends wiping filters and grease cups to
remove any excess grease before placing in
the dishwasher.
For filter removal and reinstallation, refer to
page 13.
CLEANING AND CARE
Most surfaces of your Wolf Pro hood are
stainless steel. Although resistant to most
stains, it is not totally impervious to damage.
GENERAL CLEANING
Salt and some cooking liquids may pit and
stain the surface. Always remove any film
or spills immediately.
Avoid using abrasive cleaners. They will
permanently scratch the surface.
Do not use steel wool pads.
Be careful not to soak the rotary switches.
Although they are sealed, excessive
moisture may cause damage to the
controls.
A spray degreaser will remove fingerprints
and greasy spatters. Spray on a cloth and
wipe surface. Buff dry immediately to avoid
streaking.
Use white vinegar and water to remove
hard water stains.
Use a clean cloth or sponge, wipe with
warm water and mild detergent. Rinse and
dry immediately.
Apply a protective polish to the surface to
maintain luster and protect against food
stains. Apply the polish following the same
grain direction as the finish.
Under no circumstances should you use a
metallic or highly abrasive cleaner or
cloth, as this will damage the finish.
There is a fire risk if cleaning is not
carried out in accordance with these
instructions.

16
WOLF TROUBLESHOOTING GUIDE
TROUBLESHOOTING GUIDE
PROBLEM POSSIBLE SOLUTION
A fuse in your home may be blown or the circuit breaker tripped.
Replace the fuse or reset the circuit breaker.
Electrical connections at the electrical box may be made incorrectly.
Contact your installer.
The bulb may have burned out.
Switch operation may be faulty.
Check to ensure blower is plugged into hood receptacle.
Connect motor directly to a supply cord, bypassing hood. If the motor
runs, contact a Wolf dealer to check switch operation and wiring between
hood and blower.
Check to ensure blower wheel is not hitting side of blower.
Adjust if necessary.
Check blower mounting hardware. Tighten if necessary.
Check for obstructions in damper flap and ductwork.
Check for excessive length of duct run, number of transitions and elbows,
and duct diameter.
Low fan speed adjustment may be needed.
Motor and lights
do not operate
Motor runs but lights
will not operate
Motor does not
function, but lights
are operational
Excessive fan speed
and/or noise

17
WOLF SERVICE INFORMATION
CONTACT
INFORMATION
Website:
wolfappliance.com
SERVICE INFORMATION
When requesting information, literature,
replacement parts or service, always refer to
the model and serial number of your ventila-
tion hood. This information is found on the
product rating plate located inside the left wall
of the hood shell. Refer to the illustration for
your specific model on pages 10–12 for the
location of the rating plate. Record the rating
plate information below for future reference.
Model Number
Serial Number
Installation Date
Wolf Dealer and Phone
BEFORE CALLING FOR SERVICE
Before calling your Wolf dealer, refer to the
Troubleshooting Guide on page 16. Check the
household fuse or circuit breaker to see if it
has been blown or tripped and that the electri-
cal connection to the appliance has not been
disconnected. A power outage may also have
caused a disruption in service.
The information and images in this book are the
copyright property of Wolf Appliance, Inc., an
affiliate of Sub-Zero, Inc. Neither this book nor
any information or images contained herein may
be copied or used in whole or in part without the
express written permission of Wolf Appliance,
Inc., an affiliate of Sub-Zero, Inc.
©Wolf Appliance, Inc. all rights reserved.

Cuando lea esta guía de uso y mantenimiento,
deberá prestar especial atención cuando aparez-
can los símbolos de PRECAUCIÓN y ADVERTEN-
CIA. Esta información es importante para utilizar
de forma segura y eficaz el equipo de Wolf.
Además, esta guía de uso y mantenimiento
puede incluir una NOTA IMPORTANTE para
resaltar información especialmente importante.
indica una situación en la que se pueden
sufrir heridas leves o provocar daños
secundarios al producto si no se siguen
las instrucciones.
indica peligro de que se produzcan heridas
personales graves o incluso puede provocar
la muerte si no se siguen las precauciones
especificadas.
WOLF
®
es una marca comercial registrada de Wolf Appliance, Inc.

19
GRACIAS
La compra de una campana extractora Pro de
Wolf confirma la importancia que usted da a la
calidad y al rendimiento de su equipo de cocina.
Entendemos esta importancia y hemos diseñado
y creado su campana extractora con materiales y
mano de obra de primera calidad para propor-
cionarle un servicio seguro y eficaz durante
muchos años.
Sabemos que está deseando empezar a cocinar
pero, antes de hacerlo, debe leer esta guía de
uso y mantenimiento Tanto si es un cocinero
novato como si es un chef experto, le resultará
útil familiarizarse con las prácticas de seguridad,
las características, el funcionamiento y las
recomendaciones de mantenimiento de la
campana extractora Pro de Wolf.
Apreciamos que haya decidido comprar un
producto de Wolf Appliance y agradecemos
cualquier sugerencia o comentario que desee
realizar. Si desea compartir su opinión, póngase
en contacto con nosotros a través de
www.wolfappliance.com.
CAMPANAS EXTRACTORAS PRO DE WOLF
INFORMACIÓN
DE CONTACTO
Página web:
wolfappliance.com

La instalación de la campana y
del cableado eléctrico deben ser
realizadas por personal cualificado y
deben hacerse siguiendo todos los
códigos y normativas aplicables
incluyendo los códigos y normativas
contra incendios.
Es necesario que haya suficiente aire
para que la combustión se lleve a
cabo de manera correcta y para que la
salida de gases se realice por el tubo
de humos (chimenea) del equipo de
quemado de combustible y de ese
modo evitar la retroventilación.
20
Lea con detenimiento esta guía de
uso y mantenimiento antes de utilizar
la nueva unidad extractora para
reducir el riesgo de que se produzca
un incendio, una descarga eléctrica
o de sufrir lesiones personales.
Utilice esta unidad para la finalidad
para la que ha sido diseñada por Wolf
Appliance. Si tiene alguna pregunta,
póngase en contacto con nosotros
a través de www.wolfappliance.com.
Antes de realizar cualquier tarea
de limpieza o mantenimiento en la
unidad, apague el aparato en el panel
de mantenimiento y bloquee los
medios de desconexión de manteni-
miento para evitar que el aparato se
encienda de manera accidental. En el
caso de que no pueda bloquear los
medios de desconexión de manteni-
miento, coloque de manera segura un
dispositivo de advertencia visible en el
panel de mantenimiento, por ejemplo,
una etiqueta.
PRECAUCIONES E INSTRUCCIONES DE SEGURIDAD
Para reducir el riesgo de descarga
eléctrica, este ventilador se debe
utilizar únicamente con el control
de velocidad que se envía instalado
en la unidad.
Para reducir el riesgo de incendio,
descarga eléctrica o daños perso-
nales, cumpla con las siguientes
instrucciones:
LEA Y CONSERVE ESTAS INSTRUCCIONES
La page est en cours de chargement...
La page est en cours de chargement...
La page est en cours de chargement...
La page est en cours de chargement...
La page est en cours de chargement...
La page est en cours de chargement...
La page est en cours de chargement...
La page est en cours de chargement...
La page est en cours de chargement...
La page est en cours de chargement...
La page est en cours de chargement...
La page est en cours de chargement...
La page est en cours de chargement...
La page est en cours de chargement...
La page est en cours de chargement...
La page est en cours de chargement...
La page est en cours de chargement...
La page est en cours de chargement...
La page est en cours de chargement...
La page est en cours de chargement...
La page est en cours de chargement...
La page est en cours de chargement...
La page est en cours de chargement...
La page est en cours de chargement...
La page est en cours de chargement...
La page est en cours de chargement...
La page est en cours de chargement...
La page est en cours de chargement...
La page est en cours de chargement...
La page est en cours de chargement...
La page est en cours de chargement...
La page est en cours de chargement...
La page est en cours de chargement...
La page est en cours de chargement...
La page est en cours de chargement...
La page est en cours de chargement...
La page est en cours de chargement...
La page est en cours de chargement...
La page est en cours de chargement...
La page est en cours de chargement...
La page est en cours de chargement...
La page est en cours de chargement...
La page est en cours de chargement...
La page est en cours de chargement...
La page est en cours de chargement...
La page est en cours de chargement...
La page est en cours de chargement...
La page est en cours de chargement...
La page est en cours de chargement...
La page est en cours de chargement...
La page est en cours de chargement...
La page est en cours de chargement...
La page est en cours de chargement...
La page est en cours de chargement...
-
 1
1
-
 2
2
-
 3
3
-
 4
4
-
 5
5
-
 6
6
-
 7
7
-
 8
8
-
 9
9
-
 10
10
-
 11
11
-
 12
12
-
 13
13
-
 14
14
-
 15
15
-
 16
16
-
 17
17
-
 18
18
-
 19
19
-
 20
20
-
 21
21
-
 22
22
-
 23
23
-
 24
24
-
 25
25
-
 26
26
-
 27
27
-
 28
28
-
 29
29
-
 30
30
-
 31
31
-
 32
32
-
 33
33
-
 34
34
-
 35
35
-
 36
36
-
 37
37
-
 38
38
-
 39
39
-
 40
40
-
 41
41
-
 42
42
-
 43
43
-
 44
44
-
 45
45
-
 46
46
-
 47
47
-
 48
48
-
 49
49
-
 50
50
-
 51
51
-
 52
52
-
 53
53
-
 54
54
-
 55
55
-
 56
56
-
 57
57
-
 58
58
-
 59
59
-
 60
60
-
 61
61
-
 62
62
-
 63
63
-
 64
64
-
 65
65
-
 66
66
-
 67
67
-
 68
68
-
 69
69
-
 70
70
-
 71
71
-
 72
72
-
 73
73
-
 74
74


Wolf ICBPL462212 Use & Care Information Manual
- Catégorie
- Hottes
- Taper
- Use & Care Information Manual
- Ce manuel convient également à
dans d''autres langues
- italiano: Wolf ICBPL462212
- English: Wolf ICBPL462212
- español: Wolf ICBPL462212
- Deutsch: Wolf ICBPL462212