
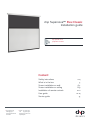
dnp Supernova™ Flex Classic
Installation guide
> dnp denmark as
Skruegangen 2
DK-2690 Karlslunde
Denmark
> Phone +45 4616 5100
Fax +45 4616 5200
www.dnp-screens.com
Content:
Safety instructions 2-4
What is in the box 5
Screen installation on wall 6-7
Screen installation on ceiling 8-9
Installation of remote controls 10-11
User guide 12-14
Service guide 15
dnp optical front
projection screens

Installation guide
2
dnp Supernova™ Flex Classic
Safety instructions
Important Safety Instructions (EN)
> Read the instructions
> Keep the instructions
> Heed all warnings
> Follow all instructions
> Clean only with dry cloth
> Do not block any ventilation openings. Install in accordance with the manufacturer’s instructions
> Do not defeat the safety purpose of the grounding-type plug. A grounding type plug has two blades and a third grounding
prong. The third prong is provided for your safety. If the provided plug does not fit into your outlet, consult an electrician for
replacement of the obsolete outlet
> Protect the power cord from being walked on or pinched particularly at plugs, convenience receptacles and the point where
they exit from the apparatus
> Unplug this apparatus during lightning storms or when unused for long periods of time
> WARNING! To reduce the risk of fire or electric shock, do not expose this apparatus to rain or moisture. Do not operate screen
before it is installed on wall
> The apparatus shall not be exposed to dripping or splashing and no objects filled with liquids, such as vases, shall be placed
on the apparatus
> Follow all installation instructions. Incorrect installation can lead to severe injury and/or permanent product damage and will
invalidate the dnp warranty
> Be sure that the wall studs or other mounting fixtures are suitable for mounting the screen
> Be sure that the screen is mounted correctly and securely to the wall or the dnp warranty will be invalidated
> If the mains plug, extension cord, appliance inlet or power strip is used as the disconnect device, the disconnect device must
remain readily operable
> The screen is a class I construction and shall be connected to a mains socket outlet with protective earthing connection. Do not
install without a ground connection
> Do not pull or tug on screen when mounted on wall
> Do not restrict the screen from moving
> Do not scratch or bend screen material during handling
> Operate within specified temperature and humidity range (see section I)
> Do not attempt to disassemble any part of the screen (electric shock hazard)
> Do not permit children to play with screen controls
> Examine the screen for imbalance or signs of wear during operation. If needed, adjust before operating

Installation guide
3
dnp Supernova™ Flex Classic
Instructions de sécurité importantes (FR)
> Lire ces instructions
> Conserver ces instructions
> Tenir compte de tous les avertissements
> Suivre toutes les instructions
> Nettoyer uniquement avec un chiffon sec.
> Ne bloquer aucune ouverture de ventilation. Installer conformément aux instructions du fabricant
> Ne pas négliger la sécurité que procure une prise avec raccordement à la terre. Une prise avec raccordement à la terre
comporte deux fiches plus une troisième reliée à la terre. Cette troisième fiche est là pour votre sécurité. Si le connecteur
fourni ne s’insère pas dans votre prise de courant, consulter un électricien afin de la remplacer
> Protéger le cordon d’alimentation principale afin qu’il ne soit pas écrasé ou pincé, en particulier au niveau des prises de
courant et au point de sortie de l’appareil
> Débrancher cet appareil en cas d’orage avec risque de foudre ou lorsqu’il n’est pas utilisé pendant des périodes prolongées
> ATTENTION! Pour réduire le risque d’incendie ou de choc électrique, ne pas exposer cet appareil à la pluie ou à l’humidité. Ne
pas faire fonctionner l’écran avant qu’il ne soit installé sur le mur
> L’appareil ne doit pas être exposé à un égouttement ou des éclaboussures et il convient de ne placer aucun objet contenant
un liquide, comme un vase, sur l’appareil
> Suivez toutes les instructions d’installation. Une installation incorrecte peut causer de sévères blessures et/ou des dommages
importants au produit et invalider la garantie du produit
> Assurez-vous que le matériel d’installation correspond bien à la nature du support et des vis de fixation.
> Assurez vous que l’écran est installé correctement et solidement au mur ou la garantie dnp sera invalidée.
> Si la prise secteur, le cordon, l’alimentation de l’appareil ou la barrette d’alimentation sont utilisés comme dispositifs de
déconnexion et doivent être facile à actionner
> L’écran est de classe I et doit être connecté à une prise secteur disposant d’une mise à la terre. Ne pas installer le système en
l’absence de prise de terre
> Ne pas tirer sur l’écran une fois qu’il est monté sur le mur
> Ne pas empêcher l’écran de bouger.
> Ne pas érafler ou courber le matériel de l’écran lors des manipulations
> Utiliser l’écran selon les plages de température et d’humidité spécifiées (cf. section I)
> Ne pas tenter de démonter quelque partie de l’écran que ce soit (danger de choc électrique)
> Ne pas laisser les enfants jouer avec les commandes de l’écran
> Examiner l’écran afin de détecter tout déséquilibre ou signe d’usure pendant le fonctionnement. Si nécessaire, ajuster avant
de faire fonctionner

Installation guide
4
dnp Supernova™ Flex Classic
Battery
Danger of explosion if battery is incorrectly replaced. Replace only with the same or equivalent type.
Do not use re-chargeable batteries. Batteries (battery pack or batteries installed) shall not be exposed to excessive heat
such as sunshine, fire or the like.
Danger d’explosion si la pile n’est pas remplacée correctement.
Ne remplacer que par le même type ou un type équivalent.
Ne pas utiliser de piles rechargeables
Les batteries (bloc de batteries ou batteries installées) ne doivent pas être exposées à une chaleur excessive telle que
celle du soleil, d’un feu ou d’origine similaire.
Caution:
Changes or modifications not expressly approved by dnp denmark as make the product unsafe to use and will void the
dnp denmark as warranty.

Installation guide
5
dnp Supernova™ Flex Classic
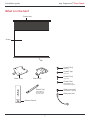
What is in the box?
Plate.C (x4)
(Preinstalled in
the top and side
of screen case)
Plate.B (x2)
Plate.A (x2)
Screw.D (x4)
(4x8 mm)
Screw.E (x4)
(4x5 mm)
(4x30 mm)
(Preinstalled on Plate.C)
Screw.F (x10)
Screw.G (x2)
(Preinstalled in top
Plate.B with washers)
Safety wire (x2)
Safety screw (x4)
Remote Control
Screen case
Screen
Bar

Installation guide
6
dnp Supernova™ Flex Classic
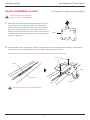
2. Attach Plate.B to Plate.C using Screw.D. Measure the distance between the two Plate.A pieces (installed on the wall in the
previous step) and space the Plate.B pieces the same distance apart then tighten Screw.D.
Note: Plate.C (x2) are not in the parts kit. They are already installed in the groove of screen case.
Plate.C
Screen case
Plate.C
Screw.D
Screw.G
Plate.B
Ensure that all Screw.Ds are tightened securely
Screen installation on wall
Make sure that you are at least two
people to do the screen installation.
1. Attach Plate.A to the wall using appropriate fasteners (Screw.F can
be used). Measure the length of the screen case and install the
plates far enough apart so that the plates will be near the ends of
the screen when it is installed. We recommend that the center of
Plate.A is not further than 200 mm from the end of the screen case.
The plates must be lined up parallel to each other to ensure proper
operation of the screen.
Wall
Safety wire
Safety screw
Screw.E
Wall
Screw.F
Screw.F
Plate.A
Up
Slide
Wall
Screw.G
Screen case
Plate.A
Plate.B
(For installation on ceiling, please go to page 8)

Installation guide
7
dnp Supernova™ Flex Classic
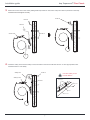
3. Attach the screen case to the wall by sliding Plate.B (mounted on the screen case) onto Plate.A (mounted on the wall).
Install Screw.G and tighten securely.
4. Install two safety wires with the safety screws into Plate.C and into the wall with Screw.F or other appropriate screw.
Install Screw.E for extra safety.
Wall
Safety wire
Safety screw
Screw.E
Wall
Screw.F
Screw.F
Plate.A
Up
Slide
Wall
Screw.G
Screen case
Plate.A
Plate.B
Wall
Safety wire
Safety screw
Screw.E
Wall
Screw.F
Screw.F
Plate.A
Up
Slide
Wall
Screw.G
Screen case
Plate.A
Plate.B
Use other safety screw
to fixate Plate.C.
Plate.C
Screen case
Safety screws
Safety wire

Installation guide
8
dnp Supernova™ Flex Classic
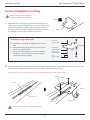
2. Attach Plate.B to Plate.C using Screw.D. Measure the distance between the two Plate.A pieces (installed on the ceiling in the
previous step) and space the Plate.B pieces the same distance apart then tighten Screw.D.
Note: Plate.C (x2) are not in the parts kit. They are already installed in the gutter of screen case.
Plate.C
Screen case
Plate.C
Screw.D
Screw.G
Plate.B
Ensure that all Screw.Ds are tightened securely
Make sure that you are at least two
people to do the screen installation.
Screen installation on ceiling
1. Attach Plate.A to the ceiling using appropriate fasteners (Screw.F
can be used). Measure the length of the screen case and install the
plates far enough apart so that the plates will be near the ends of
the screen when it is installed. The plates must be lined up parallel
to each other to ensure proper operation of the screen.
Front
Plate.A
Screen case
Plate.A
Screw.F
Slide
Plate.B
Safety wire
Ceiling
Ceiling
Screw.G
Safety screw
Screw.F
Installation using anchor bolts
A. Use Plate.A as a template for installation of the anchor
bolts
B. Install a flat washer, spring washer and a nut on each
anchor bolt. Tighten the nuts.
C. Install a second nut (double nut) on each anchor bolt
and tighten. This is to prevent loosening of the first
nut and the screen from falling.
Anchor-bolt
(3/8inch or M10)
Base washer
(3/8inch or M10)
Spring washer
(3/8inch or M10)
Nut
(3/8inch or M10)

Installation guide
9
dnp Supernova™ Flex Classic
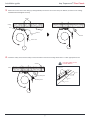
3. Attach the screen case to the ceiling by sliding Plate.B (mounted on the screen case) onto Plate.A (mounted on the ceiling).
Install Screw.G and tighten securely.
4. Install two safety wires with the safety screws into Plate.C and into the ceiling with Screw.F or other appropriate screw.
Front
Plate.A
Screen case
Plate.A
Screw.F
Slide
Plate.B
Safety wire
Ceiling
Ceiling
Screw.G
Safety screw
Screw.F
Front
Plate.A
Screen case
Plate.A
Screw.F
Slide
Plate.B
Safety wire
Ceiling
Ceiling
Screw.G
Safety screw
Screw.F
Use other safety screw
to fixate Plate.C.
Plate.C
Screen case
Safety screws
Safety wire

Installation guide
10
dnp Supernova™ Flex Classic
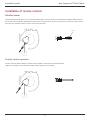
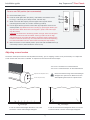
Installation of remote controls
InfraRed sensor
Connect the enclosed IR sensor to any of the two RJ45 sockets. The front socket is recommended to get best visible contact to
the remote control transmitter. Remember to direct the front of the IR sensor to the front of the screen. The front of the IR sensor
has a dnp logo. See later section on how to use the remote control.
Contact closure operation
Use any of the two RJ45 sockets for contact closure operation. See below for RJ45 socket pinout.
Cable is not included. Can be omitted if contact closure operation is not required
Front
Front

Installation guide
11
dnp Supernova™ Flex Classic
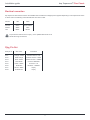
Electrical connection
dnp Supernova Flex Classic Screens are available with two different voltages power supplies depending on the requirement where
it will be used. The following chart indicates the wire colours used.
Version 110V 230V
Ground Green Green/Yellow
Neutral White Blue
Line Black Brown
RJ45 Pin Out
RJ45 pin # Wire Color Connection
Pin 1: Orange / White Contact closure = UP
Pin 2: Solid Orange Contact closure = STOP
Pin 3: Blue / White Contact closure = DOWN
Pin 4: Solid Green Common GROUND
Pin 5: Green / White IR sensor = 5V
Pin 6: Solid Blue IR sensor = SIGNAL
Pin 7: Brown / White Empty
Pin 8: Solid Brown Empty
To prevent the chance of fire or injury, use a qualified technician for all
electrical wiring connections.

Installation guide
12
dnp Supernova™ Flex Classic
User guide
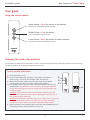
Using the remote control
Changing the screen stop positions
Top and bottom positions are set at the factory. Do NOT change the top position! Risk of damaging screen If not done correctly.
The factory positions can be changed using the remote control.
Upper button = Move the screen to top position
The screen will raise automatically and stop.
Middle button = Stop the screen
Use to immediately stop the screen.
Lower button = Move the screen to bottom position
The screen will lower automatically and stop.
To set a new BOTTOM position:
A. Remove the battery cover
B. Press the small right button (P2) shortly, until LED lits. If the button is
held too long (> 3 seconds), and a beep is heard, redo this step.
C. Within 3 seconds after step B, press the Lower button (2) and release
(This step puts the screen in a mode to set the bottom position)
D. Use the Upper button (3) and/or Lower button (2) to adjust the screen to the
desired position (Tip! When the screen is moving up, press Upper button (3)
to stop the screen. When the screen is moving down, press Lower button (2)
to stop the screen).
CAUTION! Leave at least one revolution of the screen material on the roller -
otherwise there is risk of the screen material separating from the roller. This is
NOT covered by the dnp warranty.
CAUTION! Be careful not to lower the screen too far. If the screen is continuously
lowered it will eventually reverse on the roller. This may lead to permanent
damage of the screen material. This is NOT covered by the dnp warranty.
E. When the screen is in the desired position, press and hold the Middle button (4)
untill a beep is heard. (This indicates the screen is set)
1
2
3
4

Installation guide
13
dnp Supernova™ Flex Classic
To set a new TOP position (not recommended):
A. Remove the battery cover
B. Press the small right button (P2) shortly, until LED lits. If the button is held
too long (> 3 seconds), and a beep is heard, redo this step.
C. Wihtin 3 seconds after step B, press the Upper button (2) and release
(This step puts the screen in a mode to set the top position)
D. Use the Upper button (2) and/or Lower button (3) to adjust the screen to the
desired position (Tip! When the screen is moving up, press Upper button (3) to
stop the screen. When the screen is moving down, press Lower button (2) to
stop the screen).
CAUTION! Be careful not to set the top position too high. There must be space
between the bottom bar and the cabinet. If the top position is set too high,
and the bottom bar is touching the cabinet, permanent stress is applied to the
bottom bar when the screen is up. This may lead to the bottom bar separating
from the screen fabric over time. This is NOT covered by the dnp warranty.
E. When the screen is in the desired position, press and hold the Middle button (4)
untill a beep is heard. (This indicates the screen is set)
Adjusting screen tension
The tension the Supernova Screen was adjusted at the factory, prior to shipping, however it may be necessary to re-adjust the
screen tension after the screen is installed. To adjust the screen tension follow these steps:
waves/bulges
waves/bulges
Adjustment Screw (black colour)
Do not use (silver colour)
waves/bulges
waves/bulges
Adjustment Screw (black colour)
Do not use (silver colour)
In case of veritcal waves/bulges like above, turn screw
“clockwise” until the waves/bulges disappear.
Please note that the range where waves/bulges
disappear are quite narrow. Watch the screen
while adjusting the tension for optimal result
Turn screw “clockwise” for increased tension
Turn screw “counterclockwise” for decreased tension
In case of horisontal waves/bulges like above, turn screw
“counterclockwise” until the waves/bulges disappear.
1
2
3
4

Installation guide
14
dnp Supernova™ Flex Classic
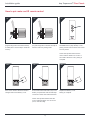
How to pair motor and IR remote control
01 02 03
04 0605
Press the small white motor
programming button until the 3rd beep
is heard (about 10 seconds) to erase the
memory.
Press the small white motor
programming button until the 1st beep is
heard to switch to pairing mode.
Within 5 seconds after step 2: Press
the Middle button (stop button) on the
pairing remote control. Motor and remote
are now paired.
Check with up/down buttons if the
motor rotation direction is correct. If
the rotation direction is OK, pairing is
complete.
If the motor rotation direction needs to
change: Remove the battery cover.
Replace the battery cover.
Pairing is complete.
Press and hold the left button (P1) in the
battery compartment until the 2nd beep
is heard to reverse the rotation direction.
Check with up/down buttons that the
motor rotation direction now is correct.
(if not, redo this step).

Installation guide
15
dnp Supernova™ Flex Classic
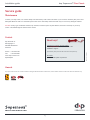
Service guide
Maintenance
To clean your dnp screen, use a clean damp soft cloth and dry with a clean soft cloth. If your screen is extremely dirty use a mild
detergent diluted in water in a clean damp soft cloth. Use a clean damp cloth with water only to remove any detergent residue.
Do NOT use any type of abrasive material, oily cleaners or thinners (such as paint thinner, benzene or acetone) on your dnp
screen. This will damage the surface of the screen.
Contact
dnp denmark as
Skruegangen 2
DK-2690 Karlslunde
Denmark
Phone: +45 4616 5100
Fax: +45 4616 5200
www.dnp-screens.com
dnp@dnp.dk
Awards
dnp optical screens have won numerous awards including the Best Buzz Award at InfoComm, Honoree Awards at CES and the Exc!te award at CEDIA US 2007.
January 2013 - dnp
Need help?
US citizens: Contact dnp US Hotline:
Call (619)-600-2892 for instant service- and
installation support.
Open Monday-Friday from 6:00 AM to 6:00 PM. US requests only.
All others:
Please contact place of purchase
-
 1
1
-
 2
2
-
 3
3
-
 4
4
-
 5
5
-
 6
6
-
 7
7
-
 8
8
-
 9
9
-
 10
10
-
 11
11
-
 12
12
-
 13
13
-
 14
14
-
 15
15


