Orbegozo HCE 60 Le manuel du propriétaire
- Catégorie
- Chauffe-eau
- Taper
- Le manuel du propriétaire
Ce manuel convient également à

ESTUFA CATALÍTICA – MANUAL DE INSTRUCCIONES
CATALYTIC GAS HEATER - INSTRUCTION MANUAL
RADIATEUR CATALYTIQUE - MANUEL D’INSTRUCTIONS
CATALÍTICO - MANUAL DE INSTRUÇÕES
HCE 60 / HCE 62
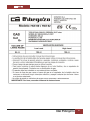
Sonifer,S.A. Avenida de Santiago, 86
30007 Murcia España
E-mail: sonifer@sonifer.es / www.orbegozo.com
MADE IN P.R.C.
Lea atentamente este manual antes de utilizar este aparato y guárdelo para futuras consultas. Sólo así podrá
obtener los mejores resultados y la máxima seguridad de uso.
Read this manual carefully before running this appliance and save it for reference in order to obtain the best results
and ensure safe use.
Veuillez lire attentivement ce manuel avant d’utiliser cet appareil et conservez-le pour toute consultation future.
C’est la seule façon d’obtenir les meilleurs résultats et une sécurité optimale d’utilisation.
Leia este manual cuidadosamente antes de utilizar este aparelho e guarde-o para consulta futura. Só assim, poderá
obter os melhores resultados e a máxima segurança na utilização.
Este producto no es adecuado para calefacción primaria.
This product is not suitable for primary heating purposes.
Ce produit ne peut pas être utilisé comme chauffage principal.
Este produto não é adequado para fins de aquecimento principal.

HCE 60 / 62
2
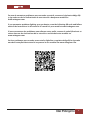
En caso de encontrar problemas para encender su estufa, escanee el siguiente código QR
y siga cada una de las indicaciones de este tutorial o busque su modelo en
www.orbegozo.com.
If you encounter problems lighting your gas heater, scan the following QR code and follow
each of the instructions in this tutorial or search for your model at www.orbegozo.com.
Si vous rencontrez des problèmes pour allumer votre poêle, scannez le code QR suivant et
suivez chacune des instructions de ce tutoriel ou recherchez votre modèle sur
www.orbegozo.com.
Se tiver problemas para acender a sua estufa, digitalize o seguinte código QR e siga cada
uma das instruções deste tutorial ou procure o seu modelo em www.orbegozo.com.

HCE 60 / 62
3
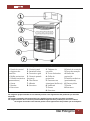
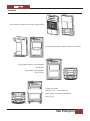
Las imágenes proporcionadas en este manual podrían variar ligeramente del producto que usted ha
adquirido.
The images provided in this manual may vary slightly from the product you have purchased.
Les images fournies dans ce manuel peuvent différer légèrement du produit que vous avez acheté.
As imagens fornecidas neste manual podem variar ligeiramente do produto que você adquiriu.
ESPAÑOL
ENGLISH
FRANÇAIS
PORTUGUÊS
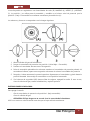
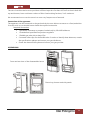
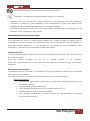
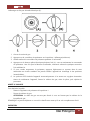
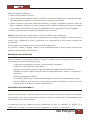
1.
Panel trasero
2. Panel de control
3. Agujeros de
aireación
4. Rejilla protectora
5. Paneles cerámicos
(quemadores)
6. Llama
7. Ruedas
8. Estructura
1.
Rear panel
2. Control panel
3. Aeration holes
4. Protection grid
5. Ceramic panels
(burners)
6. Pilot flame
7. Wheels
8. Structure
1.
Panneau arrière
2. Tableau de
contrôle
3. Trous d'aération
4. Grille de
protection
5. Panneaux en
céramique (brûleurs)
6. Veilleuse
7. Roues
8. Structure
1.
Painel traseiro
2. Painel de controle
3. Furos de aeração
4. Grelha de
protecção
5. Painéis cerâmicos
(queimadores)
6. Chama-piloto
7. Rodas
8. Estrutura

HCE 60 / 62
4
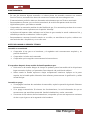
ESPAÑOL
CONSEJOS IMPORTANTES
Lea atentamente las instrucciones antes de usar el aparato. Contiene información importante para el
uso como para su seguridad.
No ponga en marcha un aparato dañado.
El mantenimiento y reparación de este aparato, debe realizarlo un técnico autorizado. Si no se
respetan estas instrucciones, corre el riesgo de perder la garantía.
Este aparato puede ser conectado y puesto en marcha por el propio usuario, siguiendo tanto las
instrucciones de instalación como la Normativa Oficial referente a instalaciones de gas en locales
destinados a uso doméstico. No obstante, para su tranquilidad, recomendamos que esta operación
la encomiende a las manos expertas de un técnico autorizado.
Conserve este libro de instrucciones, puede servirle para recordar consejos e instrucciones, y
eventualmente ser de utilidad a otro usuario. En caso de necesitar una copia del manual de
instrucciones, puede encontrarla en www.orbegozo.com.
INSTRUCCIONES DE SEGURIDAD
- Utilice la estufa únicamente en un lugar bien ventilado.
- No utilice otros gases que no sean los indicados para este producto (G30, Butano)
- Asegúrese de utilizar la estufa sobre una superficie plana.
- Preste especial atención cuando use la estufa en presencia de niños, ancianos, minusválidos o
animales.
- Mantenga siempre una distancia prudencial con la estufa.
- En caso de un mal funcionamiento, consulte siempre a un técnico especializado autorizado.
- No inserte objetos a través de las rejillas de protección.
- No utilice la estufa para secar ropa, tejidos u otros materiales. Además, nunca ponga ninguno de
estos elementos delante de la rejilla de protección.
- No utilice la estufa si alguna de sus partes ha estado en contacto con el agua o en situaciones de
alta humedad. Consulte a un técnico especializado autorizado en este caso.
- No la coloque en rincones. Deje al menos 50 cm libres por los lados y parte trasera y 100 cm por
el frontal.
- El frente de la estufa siempre debe estar orientado hacia el centro de la habitación.
- No situar el aparato próximo a paredes, mobiliario, entelados, cortinas, ropas de cama y otros
materiales inflamables o explosivos ya que hay riesgo de incendio y explosión.
- No mover la estufa sin haber cerrado el gas y sin que se haya enfriado.
- No utilizar en habitaciones con la puerta cerrada para facilitar la ventilación.
- No colocar nunca un recipiente con agua sobre la estufa.

HCE 60 / 62
5
- La rejilla de protección de este aparato está prevista para prevenir los riesgos de incendio, o las
quemaduras, y ninguna parte debería desmontarse de forma permanente. NO PROTEGE
TOTALMENTE A LOS NIÑOS, ENFERMOS O A LOS MINUSVALIDOS.
- No almacene ni utilice materiales ni líquidos inflamables en las proximidades de la estufa.
- En caso de fuga, la alimentación de gas al aparato debe cortarse mediante la válvula de la botella
de gas.
- No exponga la botella a pleno sol en verano, ni muy cerca de un foco de calor. No coloque la
estufa en funcionamiento cerca de cortinas, muebles, paneles de madera o materiales
combustibles que puedan deteriorarse con el calor.
- La estufa no debe utilizarse en viviendas de gran altura, locales sanitarios (cuartos de baño, aseo
o ducha), dormitorios de edificios, sótanos, embarcaciones, caravanas, autocaravanas o vehículos
de recreo.
- No utilizar en dormitorios durante el sueño, ni en ninguna habitación donde alguien esté
durmiendo.
- No exponer a agentes atmosféricos.
- Durante el funcionamiento evite que los niños pequeños puedan acercarse a la estufa. Supervise
que no juegan con ella.
- Preste atención y compruebe que el tubo del gas no se dobla en exceso de forma que evite el
tránsito de gas.
- Cierre el paso del gas siempre que no utilice la estufa.
- Respete cuidadosamente las condiciones de instalación y si percibe olor a gas:
o Cierre el paso del gas en el regulador de la bombona.
o Abra las ventanas.
o No conecte ningún interruptor eléctrico y apague cualquier tipo de llama.
o Avise a un técnico autorizado.
o No sitúe nunca la botella en posición horizontal.
o En caso de escape de gas, cierre la llave de la bombona, apague cualquier fuego que
pueda haber encendido y ventile la habitación.
- Si la estufa se apaga automáticamente, no la encienda inmediatamente. Antes, deje que entre
aire nuevo y fresco en la habitación. Si el problema continua, consulte a un servicio técnico
autorizado.
- No desplace la estufa estando funcionando.
- En caso de que deje de usar la estufa, asegúrese de que la bombona de gas esté bien cerrada.
- No utilice nunca el aspirador sobre el panel catalítico, ni sople sobre él o le arroje líquido alguno.
Cualquier limpieza del panel catalítico o de los componentes de seguridad, ha de ser efectuada
por personal técnico acreditado.
- No utilizar la estufa sin la rejilla de protección.
- Compruebe regularmente el estado del tubo flexible del gas y la fecha de caducidad.
- Nunca utilice tubos o reguladores de gas que no cumplan con la normativa vigente. Contacte un
servicio técnico en caso de duda.

HCE 60 / 62
6
ATENCIÓN: Para evitar sobrecalentamiento, no cubra el calefactor.
¡Precaución! La superficie permanece caliente durante y después de su uso
- El aparato no está destinado para el uso por parte de niños o personas con problemas físicos o
mentales y sin experiencia ni conocimientos, a menos que lo hagan bajo control de un
responsable o profesional para el uso del aparato.
- PRECAUCIÓN: Para la seguridad de sus niños no deje material de embalaje (Bolsas de plástico,
cartón, polietileno etc.) a su alcance.
RECOMENDACIONES PARA LA INSTALACIÓN
Es importante seguir las especificaciones que la normativa legal vigente establece para el
emplazamiento y puesta en marcha de este aparato, por lo que le recomendamos consulte a un
técnico autorizado. No obstante si decide prescindir de dicha consulta, seguidamente le
relacionamos las más importantes.
Condiciones del local
El local donde funcione el aparato debe disponer de una entrada suficiente de aire de al
menos 105 cm2 de sección, tanto en la parte superior como en la inferior.
Tener un volumen mínimo de 84 m3 y el mobiliario existente, 2 m3 como máximo.
Recomendamos no utilizar la estufa en ambientes de uso de aerosoles muy frecuente.
Conexión del aparato
El aparato puede conectarlo a la botella de gas el propio usuario, sin tener que recurrir a un
instalador. Para ello debe proveerse de los complementos necesarios para su funcionamiento.
Complementos necesarios
1 Botella de gas butano de 13kg, envasado únicamente por Distribuidores Oficiales,
según el gas indicado en la Placa de Características.
1 Regulador de presión homologado e indicado en la placa de características.
1 Tubo flexible normalizado para gas de una longitud de 0,5 m.
2 Bridas de tornillo para el tubo flexible.
Para determinar estos complementos, consulte la placa de características y contacte
con su distribuidor de gas.

HCE 60 / 62
7
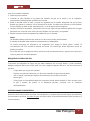
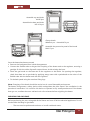
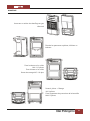
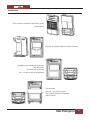
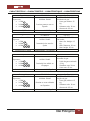
MONTAJE
Vista frontal y trasera de la estufa desmontada
Extienda los paneles superior, inferior y laterales
Fije la parte superior y los laterales
M4*8 2pcs
Fije la base y los laterales
M5*10 4 pcs
Sujete las ruedas
Ruedas 4 pcs + rosca M6 4 pcs
Fije el panel protector de la botella
M4*6 2 pcs

HCE 60 / 62
8
Una vez montado el aparato:
Saque la puerta trasera.
Conectar el tubo flexible en la pipeta de entrada de gas en la estufa y en el regulador,
asegurando la estanqueidad mediante las 2 bridas.
Situar la botella sobre la base y montar el regulador en la botella. Asegúrese de que el tubo
flexible no queda en contacto con el frontal de la estufa. Se debe evitar retorcer el tubo flexible.
El tubo flexible se debe revisar regularmente, y si es necesario debe sustituirse.
Después de abrir el regulador, compruebe que no hay fugas de gas mediante aplicación de agua
jabonosa con un pincel en la unión del tubo flexible con la estufa y el regulador.
Monte la puerta trasera, encajando las patillas de que va dotada.
Notas
Las botellas deben sustituirse de acuerdo con las instrucciones suministradas.
El cambio de botella debe realizarse en ambientes no inflamables.
La estufa incorpora un dispositivo de seguridad que apaga la llama piloto cuando la
concentración de CO2 excede la máxima de norma. Es normal que dicho dispositivo actúe en
locales pequeños.
En el caso de que se apague la llama, ventile el local convenientemente y espere unos minutos a
volver a poner en marcha el aparato.
BÚSQUEDA DE FUGAS DE GAS
El proceso de búsqueda de fugas de gas debe realizarse en un lugar abierto y bien ventilado.
Apague cualquier llama que exista cerca así como cualquier aparato eléctrico. No fume durante el
proceso.
Compruebe que el gas está cerrado.
Prepare una solución jabonosa, con la misma cantidad de agua que de jabón.
Use un pincel o similar para aplicar esta solución a los extremos del tubo.
Abra el gas.
Si hay fugas, se formarán burbujas en los puntos donde estén situadas. Si esto sucede, cierre
el gas y apriete las juntas. Si el problema persiste, contacte con su vendedor
inmediatamente.
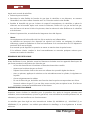
INSTRUCCIONES DE ENCENDIDO
Atención: Antes de proceder al primer uso del aparato y después de periodos largos sin utilización
recomendamos accionar, sin paso de gas, las teclas varias veces alternativamente para favorecer el
funcionamiento.

HCE 60 / 62
9
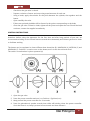
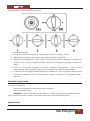
La estufa puede ser regulada en tres intensidades de calor (B): MAXIMO (4), MEDIO (3) y MINIMO
(2). La posición 1 se utiliza para el encendido, y también es el mismo nivel de potencia que la
posición 2, bajo. El encendido es mediante mecanismo piezoeléctrico (A)
Los números y letras se corresponden con la imagen siguiente.
1. Abra la válvula del gas de la bombona.
2. Ponga el controlador de potencia a la posición 1 (Nivel bajo - Encendido).
3. Presione el controlador durante unos 10 segundos.
4. Pulse el encendido piezoeléctrico mientras mantiene el controlador de potencia pulsado. Al
encenderse la llama, espere unos segundos más antes de soltar el controlador de potencia.
5. Después, si desea aumentar la potencia presione ligeramente el controlador y gírelo hasta la
posición deseada. Nunca deje el controlador en una posición intermedia.
6. Si el sistema de seguridad ODS detecta falta de oxígeno, apagará la estufa. Si esto ocurre,
cierre la válvula del gas, ventile la habitación y repita el proceso.
INSTRUCCIONES DE APAGADO
Para apagar la estufa:
- Gire el controlador de potencia a la posición 1 (bajo-encendido)
- Cierre la válvula del gas
- ATENCIÓN: El flujo de gas no se cerrará si no lo corta desde la bombona.
NOTA: no mueva o cubra la estufa antes de que se haya enfriado totalmente.

HCE 60 / 62
10
MANTENIMIENTO
- En caso de observar alguna anomalía o si desea piezas de recambio contacte con nuestro
Servicio Técnico, encontrará los datos de contacto en nuestra web www.orbegozo.com.
- El mantenimiento periódico debe ser efectuado exclusivamente por un Técnico autorizado.
- Recomendamos efectuar, por un técnico autorizado, la revisión del aparato cada dos años.
- Vigile la llama piloto, que debe ser estable.
- Compruebe si es necesario cambiar el tubo flexible de gas. Si es necesario provéase de un nuevo
tubo y conéctelo como explicamos en el capítulo “Montaje”.
- La limpieza del aparato debe realizarse con la llave de gas cerrada, la estufa totalmente fría, y
utilizando productos no abrasivos. Utilice un paño.
- Recomendamos conservar la estufa cuando no se utilice, en atmósferas sin polvo, cubierta con
una funda de tela o de plástico y en un sitio seco.
ANTES DE LLAMAR AL SERVICIO TÉCNICO
La estufa no se enciende
Compruebe si hay gas en a bombona y el regulador está correctamente acoplado y en
posición de abierto.
Compruebe si el tubo está conectado.
Compruebe que ha seguido correctamente las instrucciones.
Si se produce después de un cambio de botella puede ser por:
Existir aire en la botella. Alargue el tiempo de pulsado para el encendido de la chispa hasta
lograr encender el piloto y el quemador. Pase después a la posición de máximo.
Haber estado la botella expuesta a bajas temperaturas exteriores. Aplique en la parte
superior de la botella paños húmedos bien calientes para aumentar la gasificación y salida
normal del gas.
La estufa se apaga
Si se apaga al terminar las maniobras de encendido, repita la operación siguiendo fielmente
las instrucciones.
Si se apaga transcurridos 30 minutos de funcionamiento, le está informando de que se
encuentra en una atmósfera enrarecida. Ventile la habitación y vuelva a encender.
Si es antes de 30 minutos de funcionamiento, compruebe que no está expuesta a corrientes
de aire o que el gas no se ha agotado en la bombona.

HCE 60 / 62
11
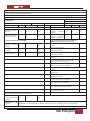
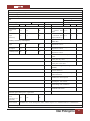
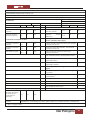
Identificador(es) del modelo: HCE 60 / HCE 62
Funcionalidad de calefacción indirecta: NO
Potencia calorífica directa: 4.2KW
Potencia calorífica indirecta: 0KW
Combustible
Space heating emissions (*)
NOx
Seleccione el tipo de combustible
GASEOSO
48.40 mg/kwh
Partida
Símbolo
Valor
Unidad
Partida
Símbolo
Valor
Unidad
Potencia calorífica
Eficiencia útil (NCV)
Potencia calorífica
nominal Pnom 4,2 kW
Eficiencia útil a
potencia calorífica
nominal
ηth,nom 91 %
Potencia calorífica
mínima (indicativa) Pmin 1,5 kW
Eficiencia útil a
potencia calorífica
mínima (indicativa)
ηth,min 91 %
Consumo auxiliar de electricidad Tipo de control de potencia calorífica de
temperatura interior (seleccione uno)
A potencia calorífica
nominal elmax 0 kW
potencia calorífica de un solo nivel, sin
control
de temperatura interior
A potencia calorífica
nmínima
elmin 0 kW
dos o más niveles manuales, sin control de
temperatura interior
√
En modo de espera elSB 0 kW
con control de temperatura interior mediante
termostato mecánico
con control electrónico de temperatura
interior
con control electrónico de temperatura
interior y temporizador diario
con control electrónico de temperatura
interior y temporizador semanal
Otras opciones de control (pueden seleccionarse
varias)
control de temperatura interior con detección
de presencia
control de temperatura interior con detección
de ventanas abiertas
con opción de control a distancia
con control de inicio adaptado
con limitador de tiempo de trabajo
con bulbo sensor negro
Necesidad de energía del piloto permanente
Necesidad de
energía del piloto (si
procede)
Ppilot 0,15 kW
Información del
contacto SONIFER S.A. Avda Santiago 86, 30007, Murcia. Spain. Tel +34968231600 Fax +34968245362
(*) NOx = nitrogen oxides

HCE 60 / 62
12
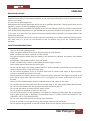
ENGLISH
IMPORTANT ADVICE
Read the instructions in this manual carefully. It has important information both for operational use
and for your safety.
Do not start up faulty apparatus.
Maintenance and repairs should be carried out by a qualified technician. If these instructions are not
abided by, there is a risk of annulling the guarantee.
This apparatus can be installed and started up by the user following both the fitting instructions as
well as the Official Regulations on gas installations in premises designed for domestic use. However,
if you want to be quite sure, we would recommend that this task be placed in the expert hands of an
authorized technician.
Keep this instruction manual as it can be useful for reminding you of advice and instructions and for
any other user. If it is lost, do not hesitate to ask for another copy from our Technical Service
Network.
SAFETY RECOMMENDATIONS
- Use only in a well-ventilated area.
- Never use gases different from those that are indicated (G30 Butane)
- Make sure that the heater is placed on a flat surface.
- Pay special attention when using the heater in the presence of children, the elderly, the disabled
or animals.
- Keep always a reasonable distance from the heater.
- In case of malfunction, contact a specialized technical support centre.
- Never insert objects inside the protection grid.
- Do not use the heater for drying clothes, fabrics or other materials; in particular, do not place any
cloth or object in front of the protection grid.
- Do not use the appliance if any of its parts have been in contact with water or high humidity.
Contact a qualified technician in this case.
- Always position the heater observing the minimum safety distances from objects and walls at all
times: 50 cm on its sides, 100 cm in front of it. Do not place it in comers, to less than 40 cm, from
the wall.
- The front of the heater always must be oriented towards the center of the room.
- Do not place the stove with the front facing curtains, sofa or any other highly flammable material.
- Do not move the heater with the gas open and with the heater still hot.
- Do not use the heater in rooms with the doors closed.
- Do not ever put a container of water on the stove.
- The grid of protection of this apparatus is predicted to prevent the risks with fire, or the burns,
and no part would have to dismount of permanent form. IT TOTALLY DOES NOT PROTECT THE
CHILDREN, OR TO THE HANDICAPPER.
- Do not store flammable liquids or material near the heater
- In case of gas leak, cut the gas sourcing with the gas valve on the gas bottle..
- Do not expose the gas bottle to the full summer heat nor too near any other heat source.

HCE 60 / 62
13
- Do not place a heater in use near curtains, furniture, wood paneling or combustible material
which can deteriorate with heat.
- Do not use in high-floor apartments, in basements, bathrooms or bedrooms, boats or any other
means of transport.
- Never use the heater in bedrooms during the night while sleeping, or in any room where there is
anyone asleep.
- Never expose to atmospheric agents.
- Pay special attention when there are children near the appliance. Never leave them unattended
or let them play near the appliance.
- Be careful so as to avoid twisting the gas hoses.
- Always close the gas tap when the heater is not in use.
- Follow carefully the installation instructions and if there is a smell of gas:
o Close the tap on the gas regulator.
o Open the windows.
o Do not operate any electrical switch and put out any flame.
o Notify an authorised technician.
o Do not place the gas bottle in horizontal position.
o In case of gas leak, close the gas valve, quench any flame and ventilate the room.
- If the heater automatically turns off, do not turn it on immediately. Before that, provide for a
change of air in the rooms. Should the problem continue, please contact one of our technical
support centers.
- Do not move the heater while working.
- Never run the vacuum cleaner over the catalytic panel, blow on it or wet it with any liquid. Only
qualified personnel may clean the catalytic panel and the safety components.
- Do not use the heater without the protective screen guard. Verify that the date o flexible gas tube
has not expired. And avoid twisting the flexible tube while installing.
- Periodically check that the hose and the regulator are in good condition. Check the validity
period for the tube.
- Never replace the hose and the regulator with products that do not comply with the national
regulations. Contact a technical service in case of doubt.
WARNING: In order to avoid overheating, do not cover the heater.
Caution! The surface remains hot during and after its use
- The appliance isn’t destined for the use of children or person with physical or mental problems
and without experience nor knowledge; unless they make it down control of a responsible or
professional for the use of the appliance.
- WARNING: In order to ensure your children‘s safety, please keep all packaging (plastic bags,
boxes, polystyrene etc.) out of their reach.
INSTALATION RECOMENDATIONS
It is important to follow the legal regulations in force the states to the location and operation of this
device, we recommend you consult a qualified technician. But if you decide to do without such
consultation, then you relate the most important.

HCE 60 / 62
14
The site of work the device must provide a sufficient input air of at least 105 cm2 section in both the
top and bottom; have a minimum volume of 84 m3 and existing furniture, 2 m3 maximum.
We recommend not to use the stove in a room very frequent use of aerosols.
Connection of the apparatus
The apparatus can be connected to the gas bottle by the user without recourse to a fitter/technician.
In order to do so you should have at hand the required accessories.
Required accessories:
1 gas bottle of butane or propane, bottled only by Oficial Distributors.
1 standardised specifications pressure regulator.
1 flexible gas tube with at least 0.5m
2 screwed collar-clips for the flexible tube. In order to identify these elements, consult
the specifications plaque and contact your gas distributor.
Check the characteristics plate and contact your gas provider.
ASSEMBLING
Front and rear view of the disassembled stove
Extend top, bottom and side panels

HCE 60 / 62
15
Assemble top and sides
M4*8 2pcs
Assemble the base and sides
M5*10 4 pcs
Clamp wheels
Wheels 4 pcs + thread M6 4 pcs
Assemble the protective panel of the bottle
M4*6 2 pcs
Once the heater has been mounted
Remove the back panel from inside the apparatus.
Connect the flexible tube to the gas inlet coupling of the heater and to the regulator, ensuring a
gastight fit with the collar clips well screwed down. Avoid twisting the hose.
Place the gas bottle on the base and fit the regulator to the bottle. On opening the regulator,
check that there are no gas leaks by applying soapy water with a paintbrush at the union of the
flexible tube with the heater and with the regulator.
Fit the back panel using the attached fixing lugs.
Note
: Changing of the bottle should be carried out in a non-flammable environment.
The heater incorporates a safety device which extinguishes the pilot flame if the ventilation in the
premises is insufficient. It is usual for this device to operate in very small premises and if the heater
does go out, ventilate the room well and wait a few minutes before reigniting the heater.
CHECKING FOR GAS LEAKS
Before performing the test, extinguish all the flames and turn off all the electrical appliances. Do not
smoke while checking for gas leaks.
The test must be performed outdoors or in well ventilated rooms.

HCE 60 / 62
16
Check that the gas valve is closed.
Prepare a solution of water and soap using equal amounts of each one.
Using a brush, apply the solution on the joints between the cylinder, the regulator and the
heater.
Open carefully the valve.
If there are gas leaks, bubbles will be formed in the points corresponding to the leaks.
Close the gas valve. If there is a leak, tighten all the joints and repeat the test. Should the leak
continue, contact the supplier immediately.
IGNITION INSTRUCTIONS
Attention: before using the apparatus for the first time and after long periods of non-use, we
recommend switching on the control buttons several times alternately and without gas flow in order
to facilitate working.
The heater can be regulated to three different heat intensities (B): MAXIMUM (4), MEDIUM (3) and
MINIMUM (2). Position 1 is used to turn on the heater, and it is also the minimum level.
The switch-on mechanism is piezo-operated (A)
1. Open the gas valve.
2. Press the power controller and turn it to Position 1 (Ignition/Low).
3. Keep pressed the power controller for 10 seconds.
4. Press the piezoelectric sparker several times while still holding down the power controller.
Once the flame is on, keep it pressed a few seconds and then release it.

HCE 60 / 62
17
5. Then, if you want to increase the power, press it slightly and turn it anticlockwise to the
desired level. Never use the heater at intermediate positions.
6. The ODS system will automatically turn off the appliance if the content of oxygen go down.
Before restarting the appliance, close the gas valve, ventilate the room and then repeat the
process.
TURNING OFF THE HEATER
To switch the heater off:
- Place the power controller to the position 1.
- Close the gas tap.
- ATTENTION: The gas flow will not be stopped unless you close the valve of the gas bottle.
NOTE: never move or cover the heater before it is completely cold.
MAINTENANCE
- If any anomaly is observed or spare parts are required, contact our Technical Service.
- The periodical maintenance must be carried out by exclusively by an authorized technician.
- We would recommend that you have a service carried out every two years by an authorized
technician.
- Watch the pilot light, which should be stable.
- Check to see if it is necessary to change the flexible gas tube. If it proves necessary, obtain a new
tube and connect it as explained in Apparatus start-up.
- It is recommended that the cleaning of the apparatus be carried out with the gas tap closed, the
heater completely cold and with nonabrasive products.
- We recommend, when the heater is not in use, maintaining it in a dust free atmosphere,
protected with a cloth or plastic cover in a dry place.
BEFORE CALLING IN TECHNICAL SERVICE
The heater doesn’t turn on
Check to see if there is gas in the bottle and that the regulator is correctly coupled in the
open position.
Check to see that the tube is connected.
Check that the instructions have been followed correctly.
If this occurs after changing bottles it may be due to:
There is air in the bottle. Press the ignition button down for a longer period of time until the
pilot flame and burner ignite. Then switch to the maximum position.
The bottle may have been exposed to low exterior temperatures. Apply fairly hot wet cloths
to the upper part of the bottle to increase gasification and the normal exit of gas.
The heater goes out

HCE 60 / 62
18
If it goes out on completing the ignition instructions, repeat the operation, following the
instructions faithfully.
If it goes after 30 minutes, it is signaling that it is operating in a stuffy atmosphere. Ventilate
the room and reignite the heater.
If it goes out before 30 minutes of operation, ensure that it is not exposed to air currents or
that the bottle has not run out of gas.

HCE 60 / 62
19
Model identifier(s) : HCE 60 / HCE 62
Indirect heating functionality: NO
Direct heat output: 4.2KW
Indirect heat output: 0KW
Fuel
Space heating emissions (*)
NOx
Select fuel type
gaseous
specify
48.40 mg/kwh
Item
Symbol
Value
Unit
Item
Symbol
Value
Unit
Heat output
Useful efficiency (NCV)
Nominal heat
output Pnom 4,2 kW
Useful efficiency
at nominal heat
output
ηth,nom 91 %
Minimum heat
output
(indicative)
Pmin 1,5 kW
Useful efficiency
at minimum heat
output (indicative)
ηth,min 91 %
Auxiliary electricity consumption Type of heat output/room temperature control
(select one)
At nominal heat
output elmax 0 kW Single stage heat output, no room
temperature control
At minimum
heat output
elmin 0 kW
two or more manual stages, no room
temperature control
√
In standby mode elSB 0 kW with mechanic thermostat room
temperature control
with electronic room temperature
control
with electronic room temperature
control plus day timer
with electronic room temperature
control plus week timer
Other control options (multiple selections
possible)
room temperature control, with
presence detection
Room temperature control, with open
window detection
with distance control option
with adaptive start control
with working time limitation
with black bulb sensor
Permanent pilot flame power requirement
Pilot flame
power
requirement (if
applicable)
Ppilot 0,15 kW
Contact details SONIFER S.A. Avda Santiago 86, 30007, Murcia. Spain. Tel +34968231600 Fax +34968245362
(*) NOx = nitrogen oxides

HCE 60 / 62
20
FRANÇAIS
CONSELLS IMPORTANTS
Lisez attentivement les instructions de ce manuel. Elles contiennent des informations importantes
pour l'utilisation comme pour votre sécurité.
N'utilisez pas un appareil détérioré.
L'entretien et la réparation de ce calorifère doivent être effectués par un technicien qualifié. Si ces
instructions ne sont pas respectées, vous courrez le risque de perdre la garantie.
Ce calorifère peut être branché et mis en marche par l'utilisateur luimême, en suivant les instructions
et les Normes Officielles relatives à l'installation de gaz dans les lieux d'utilisation domestique.
Néanmoins, pour être tranquille nous recommandons de demander à un technicien de procéder à
cette opération.
Conservez ces instructions, car elles peuvent servirent à vous rappeler les conseils, et éventuellement
être utiles à un autre utilisateur. En cas de perte, n'hésitez pas à demander un nouvel exemplaire à
votre fournisseur.
RECOMMANDATIONS DE SÉCURITÉ
- Utilisez le poêle uniquement dans un endroit bien ventilé.
- Ne pas utiliser d'autres gaz autres que ceux destinés à ce produit (G30, Butane)
- Assurez-vous d'utiliser le poêle sur une surface plane.
- Portez une attention particulière lors de l'utilisation du poêle en présence d'enfants, personnes
âgées, handicapées ou les animaux.
- Toujours garder une distance raisonnable de la poêle
- En cas de dysfonctionnement, toujours consulter un technicien agréé.
- Ne pas insérer d'objets à travers les grilles de protection.
- Ne pas utiliser la poêle pour sécher les vêtements, les tissus ou d'autres matériaux. Aussi, ne
jamais mettre un de ces éléments en face de la grille de protection.
- Ne pas utiliser le poêle si une partie quelconque a été en contact avec d'eau ou dans situations
d'humidité élevée. S'il vous plaît consulter un technicien qualifié spécialisé dans ce cas.
- Ne le placez pas dans les coins. Laissez au moins 50 sans les côtés et à l'arrière cm et 100 cm de
l'avant.
- La partie avant du calorifère doit toujours être orientée vers le centre de la pièce.
- Ne mettez pas le calorifère en marche près de rideaux, meubles, panneaux en bois, ou matériaux
combustibles qui puissent se détériorer avec la chaleur.
- Ne pas déplacer le poêle sans fermer le gaz et sans qu'il ait refroidi.
- Ne le placez pas dans les coins, à moins de 40 cm du mur. Ne pas placer le réchaud à l'avant face
à des rideaux, canapé ou tout autre matériau facilement inflammable.
- Ne pas utiliser dans des chambres avec des portes closes pour la ventilation.
- Ne jamais mettre un récipient contenant de l'eau sur le poêle.
La page est en cours de chargement...
La page est en cours de chargement...
La page est en cours de chargement...
La page est en cours de chargement...
La page est en cours de chargement...
La page est en cours de chargement...
La page est en cours de chargement...
La page est en cours de chargement...
La page est en cours de chargement...
La page est en cours de chargement...
La page est en cours de chargement...
La page est en cours de chargement...
La page est en cours de chargement...
La page est en cours de chargement...
La page est en cours de chargement...
La page est en cours de chargement...
La page est en cours de chargement...
La page est en cours de chargement...
-
 1
1
-
 2
2
-
 3
3
-
 4
4
-
 5
5
-
 6
6
-
 7
7
-
 8
8
-
 9
9
-
 10
10
-
 11
11
-
 12
12
-
 13
13
-
 14
14
-
 15
15
-
 16
16
-
 17
17
-
 18
18
-
 19
19
-
 20
20
-
 21
21
-
 22
22
-
 23
23
-
 24
24
-
 25
25
-
 26
26
-
 27
27
-
 28
28
-
 29
29
-
 30
30
-
 31
31
-
 32
32
-
 33
33
-
 34
34
-
 35
35
-
 36
36
-
 37
37
-
 38
38


Orbegozo HCE 60 Le manuel du propriétaire
- Catégorie
- Chauffe-eau
- Taper
- Le manuel du propriétaire
- Ce manuel convient également à
dans d''autres langues
- English: Orbegozo HCE 60 Owner's manual
- español: Orbegozo HCE 60 El manual del propietario
- português: Orbegozo HCE 60 Manual do proprietário
Autres documents
-
EAS ELECTRIC EHG43 Manuel utilisateur
-
HAEGER GH-42B.005A Manuel utilisateur
-
-
-
QLIMA GH741RM Manuel utilisateur
-
Tectro TGH 242 R Gas Room Heater Manuel utilisateur
-
Tristar KA-5339 Manuel utilisateur
-
Tristar KA-5340 Manuel utilisateur
-
Bimar K84.GR Manuel utilisateur
-