Wisenet PRN-1610B2 Network Video Recorder Mode d'emploi
- Taper
- Mode d'emploi

NETWORK VIDEO RECORDER
Quick Guide
PRN-6410DB4/PRN-6410B4/PRN-3210B4
PRN-3210B2/PRN-1610B2

2
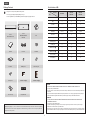
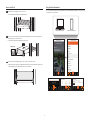
Package Contents
■
The appearance of the components may differ from the image shown.
■
Accessory category and quantity may differ depending on sales region.
■
For some regions, HDD is not pre-installed. HDD Fixing Screw, SATA Cable quantity vary depending on the model.
Recorder
PRN-3210B2/PRN-1610B2
Recorder
PRN-6410DB4/PRN-6410B4
PRN-3210B4
Mouse
Quick Guide Power Cable Terminal block
Bracket Rack HDD Fixing Screw Bracket Fixing Screw
Grounding Screw HDD Number Sticker 1HDD Number Sticker 2
Front Cover Lock Key Anti-slip Rubber Pad
Model without a HDD
Model name
Parts PRN-6410DB4 PRN-6410B4
PRN-3210B4
PRN-3210B2
PRN-1610B2
Recorder OOO
Mouse OOO
Quick Guide OOO
Power Cable O (2 ea) O O
Terminal block O (2 ea) O (2 ea) O (2 ea)
Bracket Rack X X O
HDD Fixing Screw O (64 ea) O (64 ea) O (32 ea)
Bracket Fixing Screw X X O (8 ea)
Grounding screw X X O
HDD Number Sticker 1X X O
HDD Number Sticker 2O O X
Front Cover Lock Key OOO
Anti-slip Rubber Pad O O X
English
CAUTION
● RISK OF EXPLOSION IF BATTERY IS REPLACED BY AN INCORRECT TYPE. DISPOSE OF USED BATTERIES ACCORDING TO THE INSTRUCTIONS.
● Do not ingest battery, Chemical Burn Hazard.
● This product contains a coin / button cell battery. If the coin / button cell battery is swallowed, it can cause severe internal burns in just 2 hours and can
lead to death.
● Keep new and used batteries away from children. If the battery compartment does not close securely, stop using the product and keep it away from
children. If you think batteries might have been swallowed or placed inside any part or the body, seek immediate medical attention.
ATTENTION
● IL Y A RISQUE D'EXPLOSION SI LA BATTERIE EST REMPLACÉE PAR UNE BATTERIE DE TYPE INCORRECT.METTRE AU REBUT LES BATTERIES USAGÉES
CONFORMÉMENT AUX INSTRUCTIONS.
● Ne pas ingérer la pile, risque de brûlure chimique.
● Ce produit contient une pile de type bouton/pièce de monnaie. Si la pile de type bouton/pièce de monnaie est avalée, elle peut causer de graves
brûlures internes en seulement 2 heures et peut entraîner la mort.
● Gardez les piles neuves et usagées hors de portée des enfants. Si le compartiment de la pile ne se ferme pas correctement, cessez d’utiliser le produit et
gardez-le d’atteinte des enfants. Si vous suspectez que des piles ont été avalées ou insérées dans une partie du corps, consultez un médecin sans tarder.
Hanwha Techwin Co., Ltd. is a surveillance camera manufacturer that provides video information equipment
with various functions. Users must comply with local laws when using our devices. Users are solely responsible for
any illegal use of our products.

3
Installing the HDD
■
If you are adding a new or previously used HDD to this product in addition to the HDD(s) originally installed, format the new HDD manually in the
set before use.
■
If you wish to replace or add an HDD, contact your dealer or our customer service first.
PRN-6410DB4/PRN-6410B4/PRN-3210B4
1
Use the front cover lock key to unlock the cover.
Grab the front cover with both hands and pull it
to the left to remove it.
2
Press the orange button on the hard disk bracket
to the left and pull forward to separate the main
body and the hard disk bracket.
3
Mount a HDD in the HDD bracket and screw it in
using the screws provided.
4
Once the HDD is mounted in the bracket, push
the bracket into the main body and close the front
cover.
■
Fit the front cover into the right notch of the main body, then
press and close until you hear a 'click'.
■
Use the front cover lock key to lock the front cover so that it does
not get separated.
PRN-3210B2/PRN-1610B2
1
Use the lock key on the front cover to unlock
it, and press and pull the left notch of the front
cover to separate it.
2
Press the orange button on the hard disk bracket
to the left and pull forward to separate the main
body and the hard disk bracket.
1
2
3
Mount a HDD in the HDD bracket and screw it in
using the screws provided.
4
Once the HDD is mounted in the bracket, push
the bracket into the main body and close the front
cover.
■
Fit the front cover into the bottom notch on the recorder, and then
press and close until you hear a ‘click’.
■
Use the front cover lock key to lock the front cover so that it does
not get separated.
1
2 2 2
111

4
Installing the Rack
PRN-6410DB4/PRN-6410B4/PRN-3210B4
Rack Installation Requirements and Reference Dimensions
Classification Requirements
Rack type 19-inch rack of EIA-310-D standard
POST count 4
POST distance Depth 800 mm
Dimensions of mounting flange
Product
Product
Product width
EIA-310-D standard mounting flange
● Notable dimensions
Index Dimension
A450 mm (17.717 inches) min.
B465 mm (18.307 inches) nominal
C483.4 mm (19.031 inches) min.
● Flange mounting holes (square holes are recommended for PRN-6410 series)
While EIA-310-D standard allows the mounting flange holes to be round, square, or tapped (threaded), the
PRN-6410 series is only designed to work with round or square holes, but not tapped holes.
● Square mounting holes
15.90 mm (0.625 inches)
15.90 mm (0.625 inches)
12.7 mm (0.50 inches)
9.5 mm (0.375 inches) Square
44.45 mm (1.750 inches)
15.90 mm (0.625 inches)
15.90 mm (0.625 inches)
12.7 mm (0.50 inches)
Recommended rack dimensions
Rack front
Rack back
Back mounting flange
Recorder
Front mounting flange
Index Dimension Description
A28 mm Recorder front dimension
B560 mm Recorder product dimension
C51 mm Offset distance between mounting flange and rack front
D617~730 mm Offset distance between mounting flanges
E800 mm Rack depth

5
Precautions when Selecting Shelves
To prevent any problem while installing the recorder, make sure to select a structure where the bottom of the
product is mounted.
For installation stability, fixed shelf dedicated to 19-inch rack that supports the load of at least 30 kg is
recommended.
■
A shelf needs to be secured with at least 4 screws.
Precautions when Using Sliding Shelves
When removing a shelf, fix the rack to the ground
so that it does not get toppled.
Avoid leaning on the installed product or place an
object on it while its shelf is pulled out.
When sliding in/out the shelf, be careful not to drop
the product.
Use a shelf that supports the load of at least 30 kg
while it is pulled out, and ensure that there is no
deformation on the rail part while in use.

6
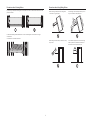
How to Install Rack
1
Mount the fixed or sliding shelf onto the 19-inch rack.
■
See the manual provided by the manufacturer for installing the fixed shelf.
2
Place the recorder on the shelf and push it until the left/right fixing holes of the recorder align with the
mounting flange holes of the 19-inch rack.
■
Cage nuts must be assembled in the mounting flange holes of the 19-inch rack.
Fixing holes
3
Insert the screws in the left/right fixing holes of the recorder to secure the recorder.
■
Fixing nuts and cage nuts for the recorder are not shipped with the product. They are separately sold at the place where you purchased the
shelf or rack. (M6 nuts and cage nuts of head size equal to 12 mm or less are recommended.)
Using Product Information
You can check the product information/manual/firmware information/FAQ/HDD compatibility list on the homepage
or mobile web of your smartphone.
http://hanwha-security.com http://hanwha-security.com

7
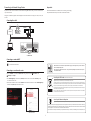
Connecting to a Network Using a Router
If you want to add 1-3 PCs and recorders in an environment using xDSL/Cable modem, you can use the router with
only one Internet line.
This guide is an installation guide for network beginners. Follow the instructions to set up your router, local PC, and
recorder.
Connecting the cable
Internet
Cable/ADSL/VDSL
or
IP Router
Local PC
Recorder
ex.) PRN-6410B4
Connecting a router with PC
■
Refer to the router’s user manual.
Connecting a recorder and a router
Move to <IP & Port> of the Recorder <Network> Setting menu, and set the <IP address> and
<Gateway> in <Setup>.
※The <Default gateway> checked in the [cmd.exe] window of the local PC and the <Gateway> of the
recorder must be the same.
※The first three numbers of the recorder <IP address> should match the first three of the <Default gateway>
checked in the [cmd.exe] window of the local PC.
<cmd screen>
<ex. Recorder screen>
Correct Disposal of This Product (Waste Electrical & Electronic Equipment)
(Applicable in the European Union and other European countries with separate collection systems)
This marking on the product, accessories or literature indicates that the product and its electronic accessories (e.g. charger, headset, USB cable) should not be
disposed of with other household waste at the end of their working life. To prevent possible harm to the environment or human health from uncontrolled waste
disposal, please separate these items from other types of waste and recycle them responsibly to promote the sustainable reuse of material resources.
Household users should contact either the retailer where they purchased this product, or their local government oce, for details of where and how they can
take these items for environmentally safe recycling.
Business users should contact their supplier and check the terms and conditions of the purchase contract. This product and its electronic accessories should not
be mixed with other commercial wastes for disposal.
Correct disposal of batteries in this product
(Applicable in the European Union and other European countries with separate battery return systems.)
This marking on the battery, manual or packaging indicates that the batteries in this product should not be disposed of with other household waste at the end of their working
life. Where marked, the chemical symbols Hg, Cd or Pb indicate that the battery contains mercury, cadmium or lead above the reference levels in EC Directive 2006/66. If batteries
are not properly disposed of, these substances can cause harm to human health or the environment.
To protect natural resources and to promote material reuse, please separate batteries from other types of waste and recycle them through your local, free battery return system.
Hanwha Techwin cares for the environment at all product manufacturing stages, and is taking measures to provide customers with
more environmentally friendly products.
The Eco mark represents Hanwha Techwin's devotion to creating environmentally friendly products, and indicates that the product
satises the EU RoHS Directive.
Important
Please check ‘Manuals’ from our website, before connecting to the Supply,
https://www.hanwha-security.com/en/data-center/download-data/

-
 1
1
-
 2
2
-
 3
3
-
 4
4
-
 5
5
-
 6
6
-
 7
7
-
 8
8


Wisenet PRN-1610B2 Network Video Recorder Mode d'emploi
- Taper
- Mode d'emploi
dans d''autres langues
Autres documents
-
Kimex 031-1025 Guide d'installation
-
Sony UP-2100 Manuel utilisateur
-
-
Eaton SPS-2423 Guide d'installation
-
Panasonic CF-53 Manuel utilisateur
-
-
Amprobe TMA40 Airflow Anemometer Manuel utilisateur
-
-
Amprobe TMA40-A Airflow Anemometer Manuel utilisateur