Sony TC-RX300 Mode d'emploi
- Catégorie
- Lecteurs de cassettes
- Taper
- Mode d'emploi

TC-RX300
3-856-130-11(1)
3-856-130-11(1)
1996 by Sony Corporation
Stereo
Cassette Deck
Operating Instructions EN
Mode d‘emploi F
P

3-856-130-11(1)
Sony Corporation Printed in Malaysia

3-856-130-11(1)
2
EN
WARNING
To prevent fire or shock
hazard, do not expose the unit
to rain or moisture.
To avoid electrical shock, do not
open the cabinet.
Refer servicing to qualified
personnel only.
CAUTION
TO PREVENT ELECTRIC SHOCK, DO
NOT USE THIS POLARIZED AC PLUG
WITH AN EXTENSION CORD,
RECEPTACLE OR OTHER OUTLET
UNLESS THE BLADES CAN BE FULLY
INSERTED TO PREVENT BLADE
EXPOSURE.
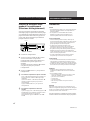
Welcome!
Thank you for purchasing the Sony
Stereo Cassette Deck. Before operating
the unit, please read this manual
thoroughly and retain it for future
reference.
About This Manual
The instructions in this manual are for
model TC-RX300.
Conventions
• Instructions in this manual describe
the controls on the deck.
• The following icon is used in this
manual:
z
Indicates useful information or
tips that make a task easier.

GBGB
3-856-130-11(1)
3
EN
EN
TABLE OF CONTENTS
Getting Started
Unpacking 4
Hooking Up the System 4
Playing a Tape 5
Recording on a Tape 6
Advanced Playback Operations
Locating a Track (Multi-AMS/Auto Play/Memory Play) 8
Advanced Recording Operations
Adjusting Bias and Recording Level Calibration Automatically 9
Inserting a Blank Space During Recording (Record Muting) 10
Additional Information
Precautions 10
Notes on Cassette Tapes 11
Cleaning 11
Troubleshooting 12
Specifications 13
Glossary 14
Index 15

Getting Started
3-856-130-11(1)
4
EN
ç
LINE
L
R
OUTIN
L
R
L
R
Ç
LINE
OUTIN
REC OUT IN
Ç
ç
LINE
OUTIN
TAPE
L
R
L
R
L
R
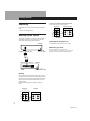
Unpacking
Check that you have received the following supplied
item:
• Audio connecting cords (2)
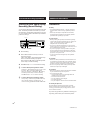
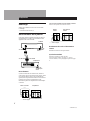
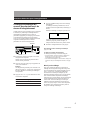
Hooking Up the System
This section describes how to hook up the tape deck to
an amplifier. Be sure to turn off the power of each
component before making the connections.
Tape deck Amplifier
To connect your tape deck to another tape deck
Connect both tape decks as shown below.
Tape deck
Another tape deck
ç :Signal flow
ç :Signal flow
/
/
to LINE OUT
TC-RX300
to LINE IN
to REC OUT to TAPE IN Amplifier
to an AC outlet
to a
wall outlet
Hookups
When connecting an audio connecting cord, be sure to
match the color-coded cord to the appropriate jacks on
the components: Red (right) to Red and White (left) to
White. Be sure to make connections firmly to avoid
hum and noise.
Connect the tape deck to the amplifier as shown
below.
Connecting the AC power cord
Connect the AC power cord to an AC outlet.
Where do I go next?
Now you’re ready to use your tape deck.
For basic operations, go to pages 5 to 7; for advanced
operations, go to the sections starting from page 8.

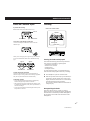
Basic Operations
Basic Operations
3-856-130-11(1)
5
EN
4
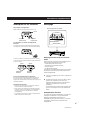
Press ·.
The deck starts playing. Adjust the volume on the amplifier.
Do not press POWER or § EJECT while the tape deck is
operating. If you do so, the tape may be damaged.
To play back Set DIRECTION to
PRr
§
0
)
REC MUTE
PAUSE
RESET
REC
p
ª·
OFF
L R
MPX
FILTER
DOLBY NR BALANCE
AUTO CAL
EJECT
POWER
REC LEVEL
PHONES
0
1
2
3
4
5
6
7
8
9
10
MEMORY
CC
BB
0 AMS )
A
Å
DIRECTION
a
2
34
Playing a Tape
Basic Operations
• See page 4 for hookup
information.
1
Turn on the amplifier and select the tape deck position.
2
Press POWER, and then press § EJECT.
Insert a cassette and close the cassette holder.
The tape type (I, II, or IV) appears in the display.
* Dolby noise reduction
manufactured under license from
Dolby Laboratories Licensing
Corporation.
“DOLBY” and the double-D
symbol a are trademarks of
Dolby Laboratories Licensing
Corporation.
With the side you want to play
facing you
z To play a tape recorded
with the Dolby NR*
system
Turn DOLBY NR clockwise
to the same position that the
tape was recorded in (B or
C).
Please note that the DOLBY
NR settings with MPX
FILTER (counterclockwise)
are used only during
recording.
z You can connect the
headphones to
PHONES.
3
Set DIRECTION.
One side only A
Both sides Å
Both sides continuously* a
* The deck automatically stops after playing back five times.
To
Press
pStop playing
Start playback from the reverse side ª
Pause P PAUSE. Press the button again to
resume play.
Fast-forward or rewind ) or 0 when the deck is stopped
§ EJECT after stopping playingTake out the cassette

3-856-130-11(1)
Basic Operations
6
EN
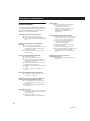
Recording on a Tape
25
36
4
PR
r
§
0
)
REC MUTE
PAUSE
RESET
REC
p
ª·
OFF
L R
MPX
FILTER
DOLBY NR BALANCE
AUTO CAL
EJECT
POWER
REC LEVEL
PHONES
0
1
2
3
4
5
6
7
8
9
10
MEMORY
CC
BB
0 AMS )
A
Å
DIRECTION
a
Set DIRECTION to
To record on
1
Turn on the amplifier and play the program source you want
to record.
2
Press POWER, and then press § EJECT.
Insert a cassette and close the cassette holder.
The tape type (I, II, or IV) appears in the display.
• See page 4 for hookup
information.
With the side you want to record
facing you
* Recording stops when the tape reaches the end of reverse side.
4
Press r REC.
“·” lights up for recording on the side facing you. If it
doesn’t, press · once.
Notes
• Do not press POWER or § EJECT while the tape deck is operating. If
you do so, the tape may be damaged.
• If the cassette tab has been removed to prevent accidental erasure, the
indication will flash only for the side that can be recorded. If both tabs have
been removed, there will be no response even when r REC is pressed.
z To protect recordings
against accidental
erasure
Break out the record-protect
tab(s) (see page 11).
3
Set DIRECTION.
AOnly one side
Both sides*
Å or a

Basic Operations
Basic Operations
3-856-130-11(1)
7
EN
Press
R
L
dB –30 –20 –10 –4 0 +2 +4 +6 +8
–
∞
7
Start playing the program source.
To
p
5
Turn REC LEVEL to adjust the recording level.
The recording level should
not exceed the
recommended level for the
indicated tape type.
After doing the all
adjustments, stop playing
the program source.
6
Press P PAUSE or ·.
Recording starts.
z The Dolby HX PRO*
system automatically
works during recording
* HX Pro headroom extension
originaled by Band & Olufsen and
manufactured under license from
Dolby Laboratories Licensing
Corporation.
“DOLBY, “ the double-D symbol
a and “HX PRO” are trademarks
of Dolby Laboratories Licensing
Corporation.
For details on DOLBY HX PRO,
See “Glossary” on page 14.
For type IV tape
For type I or
type II tape
Stop recording
Take out the cassette
Pause P PAUSE. Press the button again to resume
recording.
§ EJECT after stopping recording
PRr
§
0
)
REC MUTE
PAUSE
RESET
REC
p
ª·
OFF
L R
MPX
FILTER
DOLBY NR BALANCE
AUTO CAL
EJECT
POWER
REC LEVEL
PHONES
0
1
2
3
4
5
6
7
8
9
10
MEMORY
CC
BB
0 AMS )
A
Å
DIRECTION
a
DOLBY NR BALANCE
To adjust the recording balance
Turn BALANCE so that the L (left channel) and R (right channel) peak level
meters in the display are at the levels you want.
To record with the Dolby NR system
Turn DOLBY NR clockwise to the position you want (B or C) before you start
recording.
If you cannot get satisfying results when recording FM
broadcasts with Dolby NR system
Turn DOLBY NR counterclockwise to the position you want (B or C with
MPX FILTER) before you start recording. The filter turns on to make the
Dolby NR system work more effectively. (For details on the MPX filter, see
“Glossary” on page 14.)

3-856-130-11(1)
8
EN
Advanced Playback Operations
PRr
§
0
)
REC MUTE
PAUSE
RESET
REC
p
ª·
OFF
L R
MPX
FILTER
DOLBY NR BALANCE
AUTO CAL
EJECT
POWER
REC LEVEL
PHONES
0
1
2
3
4
5
6
7
8
9
10
MEMORY
CC
BB
0 AMS )
A
Å
DIRECTION
a
M
00 00
RESET MEMORY
0ª / ·)
Locating a Track (Multi-AMS/
Auto Play/Memory Play)
You can locate the following/previous tracks (Multi-
AMS: Automatic Music Sensor) or the beginning of a
tape quickly. You can even locate a specific point
anywhere on a tape.
Note
Check the direction indication of the tape. When you locate
a track on the reverse side (when “ ª” lights up), press the
button(s) in the parentheses.
To locate
the beginning of the next or
succeeding tracks (Multi-
AMS*)
the beginning of the current
track (Multi-AMS*)
the beginning of the
preceding tracks(Multi-
AMS*)
Press
a particular point on a tape
(Memory Play)
the beginning of a tape
(Auto Play)
MEMORY repeatedly until
“M” appears in the display.
Find the point you want, and
press RESET to reset the tape
counter and to memorize the
point.
To locate the memorized
point, press 0(or )) while
holding down ·. (Press 0 or
) only to stop at “00 00.”)
MEMORY repeatedly until
“M” disappears in the
display. Then press 0(or
)) while holding down
·(or ª).
0(or )) as many times as
you want while playing. For
example, to locate 2 tracks
behind, press three times.
0(or )) once while
playing
)(or 0) as many times as
you want while playing.
For example, to locate 2 tracks
ahead, press twice.
*You can use the Multi-AMS to locate up to the 30th track
after or before the current track.
What happens during Multi-AMS operation
When Multi-AMS is operating, “PLAY” appears. And each
time the deck detects a blank space, the indicated number
decreases by one. After locating the beginning of the
specified track, the counter indication appears again and the
deck starts playing the track.
)
[ ][]
0
[ ] [ ]
0)
: Beginning of track
Previous
track
Current
track
Next
track
Notes
•The Multi-AMS function may not work correctly if:
— the blank space between tracks is less than 4 seconds
long.
— the signal strength of the left and right channels are
very different.
—there is a passage of low frequencies or very low
volume within a track.
•Since the counter is not a digital clock, it will differ from
the actual elapsed playback or recording time.
•Even if DIRECTION is set to a, the deck stops when the
current side reaches the end during AMS operation.
Tape direction indicator: ·

GBGB
3-856-130-11(1)
Advanced Recording Operations
9
EN
Adjusting Bias and Recording
Level Calibration
Automatically
Since there are many different types of cassettes on the
market, your tape deck automatically sets the
appropriate equalization characteristics and bias
current for each tape type (ATS: Automatic Tape
Selection). However, you can get better recording
results by doing the automatic bias current and the
recording level calibration.
5 Start the actual recording (see page 6).
To cancel the automatic calibration function
Press p.
If “AUTO CAL” flashes continuously
The automatic calibration procedure has been interrupted
by:
— The end of the tape. Turn the cassette over or rewind the
tape to a new position that allows recording of the test
tone.
— Damaged tape or dirty heads. Change the cassette or
clean and demagnetize the heads (see page 11).
Updating the calibration setting
As long as the tape deck stays on, calibration data are
saved and called up each time you insert a cassette of
the same type (I, II or IV). “AUTO CAL” appears in
the display when you insert a cassette to indicate that
calibration data for that tape type exists. However, we
recommend that you repeat the automatic calibraion
procedure each time you insert a new cassette since
cassettes of the same type also vary in their
characteristics. Before recalibrating, be sure to clear the
existing calibration data by pressing AUTO CAL until
“AUTO CAL” disappears from the display. Then start
from Step 2 of the automatic calibration procedure.
PRr
§
0
)
REC MUTE
PAUSE
RESET
REC
p
ª·
OFF
L R
MPX
FILTER
DOLBY NR BALANCE
AUTO CAL
EJECT
POWER
REC LEVEL
PHONES
0
1
2
3
4
5
6
7
8
9
10
MEMORY
CC
BB
0 AMS )
A
Å
DIRECTION
a
P PAUSE
AUTO CAL
ª / ·
1 Insert the cassette you want to record on.
Make sure the record-protect tabs on the cassette
have not been removed.
2 Press AUTO CAL until “CAL” appears in the
display.
Note
If the record-protect tab for that size has been removed
(see page 11), “AUTO CAL” in the display flashes three
times and automatic calibration cannot be performed.
3 Press · or ª to select the side of the tape to be
recorded.
PressTo select
The front side ·
The reverse side ª
4 Press P PAUSE to start the automatic calibration
procedure.
The automatic calibration procedure starts (i.e.,
recording test tones, rewinding, and playing
back).
During the calibration, the counter changes from
9 to 0.
CA L9
AUTO
CAL
REC
When the automatic calibration procedure ends,
the tape rewinds to the original position, the
counter returns to normal and the tape deck stops.

3-856-130-11(1)
Advanced Recording Operations
10
EN
Inserting a Blank Space During
Recording (Record Muting)
You can insert a blank space of 4 seconds between each
track. The blank spaces between tracks let you locate
the track easily with the Multi-AMS function (see page
8). Also, use this function to eliminate only unwanted
portions on the tape.
PRr
§
0
)
REC MUTE
PAUSE
RESET
REC
p
ª·
OFF
L R
MPX
FILTER
DOLBY NR BALANCE
AUTO CAL
EJECT
POWER
REC LEVEL
PHONES
0
1
2
3
4
5
6
7
8
9
10
MEMORY
CC
BB
0 AMS )
A
Å
DIRECTION
a
ª / ·
P PAUSE R REC MUTE
1 Start recording.
2 Press R REC MUTE once when you want to
insert a blank space.
“REC” in the display starts flashing and the tape
moves on without recording any signals.
After 4 seconds, “P” lights up and the tape deck
is now ready to resume recording.
3 Press P PAUSE, · or ª to resume recording.
z To insert a blank space longer than 4 seconds
Hold down R REC MUTE as long as you want. After
4 seconds, “REC” in the display flashes faster.
When you release the R REC MUTE , “P” lights up
and the tape deck is ready to resume recording.
Press P PAUSE, · or ª to resume recording.
z To insert a blank space of less than 4 seconds
After pressing R REC MUTE, press P PAUSE at any
time. The deck changes to recording pause. To
resume recording, press r REC instead of P PAUSE.
Additional Information
Precautions
On safety
• Do not disassemble the cabinet — this may result in an
electrical shock. Refer servicing to qualified personnel
only.
• Should any solid object or liquid fall into the cabinet,
unplug the tape deck and have it checked by qualified
personnel before operating it any further.
On power sources
• Before operating the tape deck, check that the operating
voltage of the tape deck is identical with your local power
supply. The operating voltage is indicated on the
nameplate at the rear of the tape deck.
• The unit is not disconnected from the AC power source
(mains) as long as it is connected to the wall outlet, even if
the unit itself has been turned off.
• If you are not going to use the tape deck for a long time,
be sure to disconnect the tape deck from the wall outlet.
To disconnect the AC power cord (mains lead), grasp the
plug itself; never pull the cord.
• AC power cord must be changed only at the qualified
service shop.
On operation
• Because of a safety mechanism, the function buttons will
not operate if the cassette holder is not completely closed,
if there is no cassette in the cassette holder, or if a cassette
has been incorrectly inserted into the cassette holder.
• Be sure to stop the tape before turning off the tape deck.
Otherwise, the tape may be damaged.
On placement
• Place the tape deck in a location with adequate ventilation
to prevent heat build-up in the tape deck.
• Do not place the tape deck:
— on a soft surface such as a rug that might block the
ventilation holes on the bottom.
— in a location near heat sources.
— in a place subject to direct sunlight.
— in an inclined position.
— in a place subject to excessive dust or mechanical shock.
On cleaning the tape deck
Clean the cabinet, panel and controls with a soft cloth
slightly moistened with a mild detergent solution. Do not
use any type of abrasive pad, scouring powder or solvent
such as alcohol or benzine.
If you have any questions or problems concerning your
tape deck, please consult your nearest Sony dealer.

3-856-130-11(1)
Additional Information
11
EN
Notes on Cassette Tapes
To protect the recording
Break off the record-protect tab for side A or B.
Side A
Tab for side B
Tab for side A
To record on a tape having a broken tab
Cover the record-protect tab hole for side A or B with
adhesive tape.
When you are using a type II or type IV tape, be careful not
to cover the slots that the deck uses to determine the tape
type.
Type II
Type IV
Detector slots
Detector slots
On tapes longer than 90 minutes
We do not recommend the use of tapes longer than 90
minutes except for a long continuous recording or playback.
They are very thin and tend to be stretched easily.
On handling cassettes
• To prevent the heads and tape path from getting dirty,
avoid touching the tape surface of a cassette.
• Place cassettes away from equipment with magnets, such
as speakers and amplifiers; it may cause tape distortion or
erase the recordings.
• Do not expose cassettes to direct sunlight, extremely cold
temperature or moisture.
Cleaning
§ EJECT
PRr
§
0
)
REC MUTE
PAUSE
RESET
REC
p
ª·
OFF
L R
MPX
FILTER
DOLBY NR BALANCE
AUTO CAL
EJECT
POWER
REC LEVEL
PHONES
0
1
2
3
4
5
6
7
8
9
10
MEMORY
CC
BB
0 AMS )
A
Å
DIRECTION
a
Inside of the cassette holder
Capstans
Erasing head
Playing/Recording
head
Cleaning the heads and tape path
Clean the heads and tape path of the tape deck after
every 10 hours of operation to guard against:
• a decrease in sound level
• excessive wow or flutter
• sound dropout
• incomplete erasure
To ensure better recording, we recommend that you
clean the heads and tape path before every recording.
1 Press § EJECT to open the cassette holder.
2 With the tape deck turned off, wipe the heads, the
pinch roller, and the capstan with a cotton swab
slightly moistened with alcohol or a commercially
available cleaning fluid for tape decks.
Do not insert a cassette until the cleaned areas are
completely dry.
Demagnetizing the heads
After 20 to 30 hours of use, or when you notice a
hissing sound or loss of high frequencies, demagnetize
the heads with a commercially available demagnetizer
for tape decks. Please refer to the instructions of the
demagnetizer.
Pinch rollers

3-856-130-11(1)
12
EN
Additional Information
Troubleshooting
If you’ve experienced any of the following difficulties
while using the tape deck, use this troubleshooting
guide to help you remedy the problem. Should any
problem persist, consult your nearest Sony dealer.
The function buttons do not work.
/
The tape deck has just been turned on and does
not operate for about 3 seconds. Wait until “P”
stops flashing.
/ Check that the cassette is inserted correctly and
the cassette holder is closed completely.
The tape stops before the tape has been fully rewound.
/ The tape is slack. Take up the tape slack.
/ If “M” is shown in the display, press MEMORY
repeatedly until the indication disappears.
/ The cassette shell is bent. Use another cassette.
The tape deck does not play or record.
/
The tape has reeled to the end.
/ The tape is slack. Take up the tape slack.
/ The record-protect tab has been removed from
the cassette. Cover the slot with tape (page 11).
/ Clean the heads and tape path and
demagnetize the heads (page 11).
/ Check that the tape deck is properly connected
(page 4).
/ Make sure the amplifier is correctly set.
There is excessive wow, flutter, or a sound dropout.
/
The capstans and pinch rollers are dirty. Clean
them (see page 11).
There is a decrease in sound level or a sound dropout./
The tape does not erase completely./Noise increases.
/
The heads and tape path are dirty. Clean them
(see page 11).
/ The heads are magnetized. Demagnetize them
(see page 11).
There is hum or noise.
/
The tape deck is placed near a TV or VCR.
Place the tape deck away from the TV or VCR.
/ The tape deck is placed on or under the
amplifier. Place the tape deck away from the
amplifier.
There is an unbalanced tone.
/
Check that the DOLBY NR control is set to the
position where the tape was recorded.
/ The tape deck is placed near a TV or VCR.
Place the tape deck away from the TV or VCR.
The Multi-AMS function does not work properly.
/ One of the tracks contains a long pause, a
passage of low frequencies or very low volume,
or a gradual increase or decreace in volume.
/ The space before a track is less than 4 seconds
long. Insert a blank space of 4 seconds using R
REC MUTE button.
/ The signal strength of the left and right
channels are very different.
/ There is noise in the space before a track.
/ You pressed ) button immediately before the
next track, or 0 button immediately after the
beginning of the current track.
The tape does not automatically reverse direction when
it ends.
/
The DIRECTION switch is set to A.
Set it to a.

GBGB
3-856-130-11(1)
Additional Information
13
EN
Inputs
Line inputs (phono jacks)
Sensitivity: 0.16 V
Input impedance: 47 kilohms
Outputs
Line outputs (phono jacks)
Rated output level: 0.5 V at a load impedance of
47 kilohms
Load impedance: Over 10 kilohms
Headphones (stereo phone jack)
Output level: 0.25 mW at a load impedance of
32 ohms
General
Power requirements
120 V AC, 60 Hz
Power consumption
19 W
Dimensions (approx.) (w/h/d)
430 × 120 × 310 mm (17 × 4
3
/4 × 12
1
/4 inches)
incl. projecting parts and controls
Mass (approx.)
3.5 kg (7 lbs 11 oz)
Supplied accessories
Audio connecting cords (2)
Optional accessory
Remote commander RM-J910
For more information on the availability of the remote
commander, contact your nearest Sony dealer.
Design and specifications are subject to change without
notice.
Specifications
System
Recording system
4-track 2-channel stereo
Fast winding time (approx.)
90 sec. (with Sony C-60 cassette)
Bias
AC bias
Heads
Erasing head × 1 (F&F head)
Playing/Recording head × 1 (SD head)
Motors
Capstan motor × 1 (DC servo motor)
Reel motor × 1 (DC motor)
Signal-to-noise ratio (at peak level, weighted, and with Dolby NR off)
Type I tape, Sony Type I (NORMAL): 55 dB
Type II tape, Sony Type II (HIGH): 57 dB
Type IV tape, Sony Type IV (METAL): 58 dB
S/N ratio improvement (approximate values)
With Dolby B NR on: 5 dB at 1 kHz, 10 dB at 5 kHz
With Dolby C NR on: 15 dB at 500 Hz, 20 dB at 1 kHz
Harmonic distortion
0.4% (with Type I tape, Sony Type I (NORMAL):
160n Wb/m 315 Hz, 3rd H.D.)
1.8% (with Type IV tape, Sony Type IV (METAL):
250n Wb/m 315 Hz, 3rd H.D.)
Frequency response (Dolby NR off)
Type I tape, Sony Type I (NORMAL):
30 - 15,000 Hz (±3 dB, IEC)
20 - 16,000 Hz (±6 dB)
Type II tape, Sony Type II (HIGH):
30 - 16,000 Hz (±3 dB, IEC)
20 - 17,000 Hz (±6 dB)
Type IV tape, Sony Type IV (METAL):
30 - 18,000 Hz (±3 dB, IEC)
30 - 13,000 Hz (±3 dB, –4dB recording)
20 - 19,000 Hz (±6 dB)
Wow and flutter
±0.13% W. Peak (IEC)
0.07% W. RMS (NAB)
±0.18% W. Peak (DIN)

3-856-130-11(1)
14
EN
Additional Information
Glossary
ATS
Automatic Tape Selection. The tape deck automatically sets
the appropriate equalization characteristics and bias current
according to the tape type inserted in the deck.
Automatic calibration
The automatic adjustment of the bias current and recording
level for the inserted tape.
This adjustment works together with the deck’s ATS
(Automatic Tape Selection, see above) to get the best
possible recording results on any tape.
Dolby HX PRO system
Distortion and noise reduction system. The Dolby HX PRO
system reduces distortion and noise in high-frequency
response while recording. A tape recorded with this system
brings the same high-quality sound even when you play the
tape on the other tape decks.
Dolby NR (noise reduction) system
Noise reduction system for eliminating hissing noise. The
Dolby NR system boosts the low-level signals in high
frequency during recording and restores them during
playback.
B and C Dolby systems are available on this tape deck. Of
the two, C provides higher noise reduction than B.
B
C
Hz
dB
1k
5k
100 500 10k
Dolby
NR off noise reduction
Output
level
MPX filter
Multiplex filter. A filter for eliminating the 19-kHz stereo
carrier and the 38-kHz sub-carrier signals that may impair
the Dolby NR system. Usually the tuner has an MPX filter.
If you cannot get a satisfying result when recording FM
broadcasts with Dolby NR system, your tuner does not have
a filter or the filter is not working. In this case, turn the
DOLBY NR switch countercolckwise to the position you
want (B or C with MPX FILTER).
Multi-AMS
Multi-Automatic Music Sensor. A function that locates the
beginning of up to 30 tracks before or after the current track
by detecting a blank space (of over 4 seconds) between
tracks.
Tape counter
A four-digit readout for monitoring elapsed playing or
recording time. Useful for editing tapes. Press RESET to
zero the counter (00 00).
Test tones
15-kHz, 3-kHz and 400-Hz signals produced by the tape
deck when you do the automatic calibration.

Playing CDs
GBGB
Index
15
EN
3-856-130-11(1)
Index
Index
A
Adjusting
bias and recording level
calibration automatically. See
Automatic calibration
recording balance 7
recording level 7
volume 5
ATS 9, 14
Auto play 8
Automatic Music Sensor.
See Multi-AMS
Automatic calibration 9, 14
Automatic Tape Selector. See
ATS
B
Balance 7
C
Cassette. See Tape
Cleaning
cabinet 11
heads and tape path 11
Connecting. See Hookups
Counter. See Tape counter
D, E, F
Demagnetizing the heads 11
Dolby HX PRO system 7, 14
Dolby NR system 5, 7, 14
G
Glossary 14
H
Heads
cleaning 11
demagnetizing 11
Hooking up the system 4
Hookups 4
I, J, K
Insert
blank space 10
cassette 5, 6
L
Locating
beginning of the tape 8
particular point 8
tracks 8
M
Memory play 8
MPX filter. See Multiplex filter
Multi-AMS 8, 14
Multiplex filter 7, 14
N, O
Noise reduction 7, 14
Notes on cassette tapes. See
Tape notes
P, Q
Playing
a tape 5
auto play 8
memory play 8
Precautions 10
R
Recording
on a tape 6
Record muting 10
S
Searching. See Locating
Specifications 13
T
Tape
counter 8, 14
notes 11
path cleaning 11
protect the recording 11
type 5, 6, 11
Test tones 9, 14
Troubleshooting 12
U, V, W, X, Y, Z
Unpacking 4
Names of Controls
Buttons
AUTO CAL 9
MEMORY 8
RESET 8
0/) AMS 8
0 (rewind/fast-foward) 5, 8
·, ª (play) 5 - 10
) (fast-forward/rewind) 5, 8
§ EJECT 5 - 7
p (stop) 5, 7
P PAUSE 5, 7, 9, 10
R REC MUTE (record muting)
10
r REC (recording) 6
Switches
DIRECTION 5, 6
DOLBY NR (noise reduction)
5, 7
POWER 5, 6
Controls
BALANCE 7
REC (recording) LEVEL 7
Jack
PHONES 5
Others
Cassette holder 5, 6

3-856-130-11(1)
2
F
Bienvenue!
Merci pour l’achat de cette platine à
cassette stéréo Sony. Avant de la mettre
en service, veuillez lire attentivement ce
mode d’emploi et le conserver pour
toute référence future.
A propos de ce
manuel
Les instructions de ce mode d’emploi
concernent le modèle TC-RX300.
Conventions
• Les instructions de ce mode d’emploi
décrivent les commandes de la
platine.
• Le symbole ci-dessus est utilisé dans
ce mode d’emploi:
z
Indique des conseils et des
suggestions qui facilitent une
manipulation.
AVERTISSEMENT
Afin d’éviter tout risque
d’incendie ou d’électrocution,
ne pas exposer cet appareil à
la pluie ou à l’humidité.
Afin d’écarter tout risque
d’électrocution, garder le coffret
fermé. Ne confier l’entretien de
l’appareil qu’à un personnel qualifié.
ATTENTION
POUR PREVENIR LES CHOCS
ELECTRIQUES, NE PAS UTILISER
CETTE FICHE POLARISEE AVEC UN
PROLONGATEUR, UNE PRISE DE
COURANT OU UNE AUTRE SORTIE
DE COURANT, SAUF SI LES LAMES
PEUVENT ETRE INSEREES A FOND
SANS EN LAISSER AUCUNE PARTIE
A DECOUVERT.

GBGB
3-856-130-11(1)
3
F
TABLE DES MATIÈRES
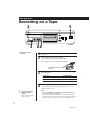
Préparatifs
Déballage 4
Raccordement de la platine 4
Lecture d’une cassette 5
Enregistrement sur une cassette 6
Fonctions élaborées pour la lecture
Localisation d’une plage (Multi-AMS/Lecture automatique/Lecture mémorisée) 8
Fonctions élaborées pour l’enregistrement
Calibrage automatique du courant de polarisation et du niveau d’enregistrement 9
Insertion d’un espace blanc pendant l’enregistrement (Silencieux d’enregistrement) 10
Informations complémentaires
Précautions 10
Remarques sur les cassettes 11
Nettoyage 11
En cas de panne 12
Spécifications 13
Glossaire 14
Index 15
F

3-856-130-11(1)
4
F
Fonctions de base
Préparatifs
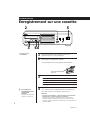
Déballage
Vérifiez que l’élément suivant se trouve bien dans
l’emballage:
• Cordons de liaison audio (2)
Pour raccorder la platine à une autre platine à cassette
Reliez les deux platines de la manière suivante.
Autre platine à
cassette
Platine à
cassette
ç : Flux du signal
Raccordement de la platine
Cette partie explique comment raccorder la platine à
un amplificateur. N’oubliez pas d’éteindre les deux
appareils avant de les raccorder.
TC-RX300
Amplificateur
vers REC OUT
vers TAPE IN
vers LINE OUT
vers une prise
murale
vers une prise
secteur
vers LINE IN
Raccordements
Quand vous branchez un cordon audio, vérifiez la
couleur de la prise et celle de la fiche du cordon: Fiche
rouge (droite) dans la prise rouge et fiche blanche
(gauche) dans la prise blanche. Veillez à bien enfoncer
les fiches pour éviter tout ronflement ou bruit.
Raccordez la platine à l’amplificateur comme indiqué
ci-dessous.
Platine à cassette Amplificateur
ç : Flux du signal
Branchement du cordon d’alimentation
secteur
Branchez le cordon sur une prise secteur.
Que faire ensuite?
Maintenant la platine à cassette est prête.
Pour les fonctions de base, voir pages 5 à 7; pour les
fonctions élaborées, voir les paragraphes à partir de la page
8.
/
/
REC OUT IN
Ç
ç
LINE
OUTIN
TAPE
L
R
L
R
L
R
ç
LINE
L
R
OUTIN
L
R
L
R
Ç
LINE
OUTIN

3-856-130-11(1)
5
F
Fonctions de base
Fonctions de base
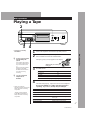
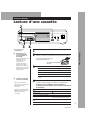
Lecture d’une cassette
Fonctions de base
PRr
§
0
)
REC MUTE
PAUSE
RESET
REC
p
ª·
OFF
L R
MPX
FILTER
DOLBY NR BALANCE
AUTO CAL
EJECT
POWER
REC LEVEL
PHONES
0
1
2
3
4
5
6
7
8
9
10
MEMORY
CC
BB
0 AMS )
A
Å
DIRECTION
a
2
34
4
Appuyez sur ·.
La lecture démarre. Réglez le volume sur l’amplificateur.
N’appuyez pas sur POWER ou § EJECT pendant le
fonctionnement de la platine. Sinon, la bande pourrait être
endommagée.
• Voir page 4 pour le
raccordement.
1
Allumez l’amplificateur et sélectionnez la fonction platine.
2
Appuyez sur POWER, puis sur § EJECT.
Insérez une cassette, puis refermez le logement de la cassette.
Le type de cassette (I, II ou IV)
apparaît dans l’afficheur.
avec la face à lire dirigée
vers vous.
z Pour écouter une
cassette enregistrée
avec le réducteur de
bruit Dolby*
Réglez DOLBY NR au même
système que lors de
l’enregistrement de la
cassette (B ou C).
Notez que les réglages
DOLBY NR avec MPX
FILTER (sens contraire des
aiguilles d’une montre) sont
utilisés seulement pendant
l’enregistrement.
z Vous pouvez brancher
le casque sur PHONES.
* Réduction de bruit Dolby
fabriquée sous licence de Dolby
Laboratories Licensing
Corporation.
DOLBY et le symbole double-D
a sont des marques de Dolby
Laboratories Licensing
Corporation.
Pour lire Réglez DIRECTION à
A
Å
a
* La platine s’arrête automatiquement après avoir lu cinq fois les deux
faces.
Une face seulement
Les deux faces
Les deux faces en continu*
3
Réglez DIRECTION.
Pour
Appuyez sur
p
Arrêter la lecture
ª
P PAUSE. Appuyez une nouvelle fois sur
cette touche pour poursuivre la lecture.
Démarrer la lecture de la face arrière
Avancer rapidement ou rebobiner la
bande
) ou 0 quand la platine est arrêtée.
Sortir la cassette § EJECT après avoir arrêté la lecture.
Interrompre la lecture
La page charge ...
La page charge ...
La page charge ...
La page charge ...
La page charge ...
La page charge ...
La page charge ...
La page charge ...
La page charge ...
La page charge ...
La page charge ...
La page charge ...
-
 1
1
-
 2
2
-
 3
3
-
 4
4
-
 5
5
-
 6
6
-
 7
7
-
 8
8
-
 9
9
-
 10
10
-
 11
11
-
 12
12
-
 13
13
-
 14
14
-
 15
15
-
 16
16
-
 17
17
-
 18
18
-
 19
19
-
 20
20
-
 21
21
-
 22
22
-
 23
23
-
 24
24
-
 25
25
-
 26
26
-
 27
27
-
 28
28
-
 29
29
-
 30
30
-
 31
31
-
 32
32


Sony TC-RX300 Mode d'emploi
- Catégorie
- Lecteurs de cassettes
- Taper
- Mode d'emploi
dans d''autres langues
- English: Sony TC-RX300 Operating instructions
Documents connexes
-
Sony TC-KE600S Mode d'emploi
-
-
-
-
-
-
-
Sony TC-KA6ES Manuel utilisateur
-
-