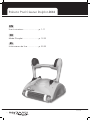
Maytronics DX4 User Instructions
- Catégorie
- Aspirateurs robotiques
- Taper
- User Instructions
Ce manuel convient également à

Robotic Pool Cleaner Dolphin DX4
8151618
by
EN
User Instructions ........................... p. 1-11
FR
Mode D’emploi ............................p. 12-22
ES
Instrucciones de Uso ....................p. 23-33


Contents
1. INTRODUCTION ....................................................................... 2
2. SPECIFICATIONS ...................................................................... 2
3. WARNINGS AND CAUTIONS ................................................... 2
3.1. Warnings ............................................................................ 2
3.2. Cautions ............................................................................. 2
4. POOL CLEANER PARTS ............................................................ 3
5. USING THE POOL CLEANER .................................................... 4
5.1. Setup.................................................................................. 4
5.2. Putting the Pool Cleaner into the pool .............................. 5
5.3. Removing the Pool Cleaner from the pool ........................ 6
6. CLEANING THE FILTER BAG OR CARTRIDGES ....................... 7
6.1. Removing and cleaning the filter bag ................................ 7
6.2. Replacing the filter bag ..................................................... 8
6.3. Cleaning the filter cartridges ............................................. 8
6.4. Cleaning the impeller ........................................................ 10
7. OFFSEASON STORAGE ............................................................ 10
8. TROUBLESHOOTING ................................................................ 11
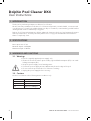
Dolphin Pool Cleaner DX4
User Instructions
EN

2
Robotic Pool Cleaner DX4 | User Instructions
Dolphin Pool Cleaner DX4
User Instructions
1. INTRODUCTION
Thank you for purchasing a Maytronics Robotic Pool Cleaner.
We are sure that your Maytronics Robotic Pool Cleaner will provide you with reliable, convenient and
cost effective pool cleaning. Its reliable filtration in all pool conditions, active brushing, and all-surface
climbing brush enhance maximum pool hygiene.
Robotic Pool Cleaners by Maytronics deliver advanced cleaning technology, long lasting performance
and easy maintenance. You and your family will be free to enjoy your swim with the full confidence
that it is completely clean.
2. SPECIFICATIONS
Motor protection: IP 68
Minimum depth: 2.6ft/0.80m
Maximum depth: 16.4ft/5m
3. WARNINGS AND CAUTIONS
3.1. Warnings
• Use the originally supplied power supply only
• Ensure the electrical outlet is protected by a ground fault interrupter (GFI) or an earth
leakage interrupter (ELI)
• Keep the power supply out of standing water
• Position the power supply at least 10ft/3m away from the edge of the pool
• Do not enter the pool while the Pool Cleaner is working
• Unplug the power supply before servicing
3.2. Cautions
Use the Pool Cleaner in the following water conditions only:
Chlorine Max 4 ppm
pH 7.0 - 7.8
Temperature 43°-93°F / 6°-34°C
NaCl Maximum = 5000 ppm
CAUTION

Robotic Pool Cleaner DX4 | User Instructions
3
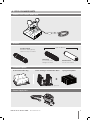
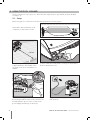
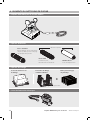
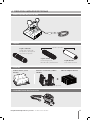
4. POOL CLEANER PARTS
Robotic Pool Cleaner Model DX4
Brushes
Combined Brush
All surface climbing brush,
ideal for most pool surfaces.
PVC Brush
For concrete, PVC,
fiberglass and liner.
Wonder Brush
For smooth ceramics.
Optional Brushes
Filtration Options
Power Supply Unit
Frame Cartridges and 4 ultra-fine filtersBottom lid and filter Bag Spring clean-up filters
Optional
+

4
Robotic Pool Cleaner DX4 | User Instructions
5. USING THE POOL CLEANER
The Pool Cleaner is very easy to use. Just follow the simple steps to get started, and your Dolphin
is ready to go.
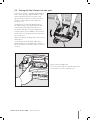
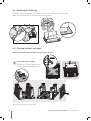
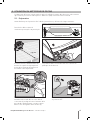
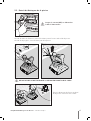
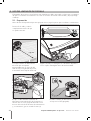
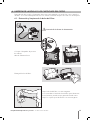
5.1. Setup
Before using the Pool Cleaner for the first time perform the following steps:
Some models arrive with plastic coverings on the brushes.
Remove them before use.
Position the power supply so that it
is approximately in the middle of the
long side of the pool at a distance of
10ft/3m.
1
2
Plug in the power supply and leave it in the
OFF position.
Unwind the cable and stretch it out
completely so that it has no kinks.
Attach the floating cable to the power supply
by inserting it with the notch on the connector (1)
lined up with the groove in the socket on the
power supply and turning clockwise (2).
10ft/3m

Robotic Pool Cleaner DX4 | User Instructions
5
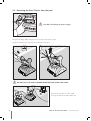
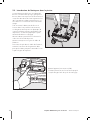
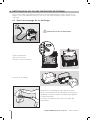
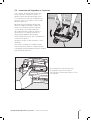
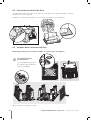
5.2. Putting the Pool Cleaner into the pool
If your Pool Cleaner is equipped with brushes
that contain sponges, dip the brushes in the
water and squeeze them so that they will
absorb water the first time you use the Pool
Cleaner, or if the brushes have dried out
between uses.
Holding the Pool Cleaner upside down in
the water, gently rock it back and forth with
your fingers holding the plastic doors on
the bottom lid open to release trapped air.
Continue until no more bubbles are released.
Release the Pool Cleaner and let it sink to the
floor of the pool.
Make sure that the floating cable is free of any
obstructions.
To avoid kinks in the floating cable, place
approximately enough cable in the water for
the Pool Cleaner to reach the farthest corner of
the pool.
Turn the power supply ON.
The Pool Cleaner will now operate until it has
reached the end of the cleaning cycle.
ON

6
Robotic Pool Cleaner DX4 | User Instructions
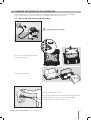
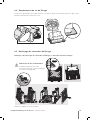
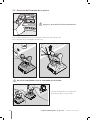
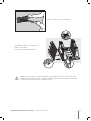
5.3. Removing the Pool Cleaner from the pool
CAUTION
Turn OFF and unplug the power supply.
Using the floating cable, bring the Pool Cleaner to the pool’s edge.
Using the handle, remove the Pool Cleaner from the pool.
CAUTION
DO NOT PULL THE POOL CLEANER FROM THE POOL USING THE CABLE.
Place the Pool Cleaner on the edge
of the pool and let the water drain out.
OFF
4in/10cm
C
B
A

Robotic Pool Cleaner DX4 | User Instructions
7
6. CLEANING THE FILTER BAG OR CARTRIDGES
Depending on the model, your Pool Cleaner may be equipped with a filter bag or cartridges.
It is recommended to clean the filter bag or cartridges after each cleaning cycle.
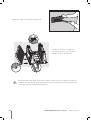
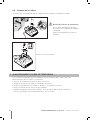
6.1. Removing and cleaning the filter bag
CAUTION
Unplug the power supply.
Turn the Pool Cleaner upside-down.
Open the bottom lid.
Remove the filter bag.
Clean the filter bag with a hose.
We recommend that you periodically wash the filter bag in
a washing machine using the gentle cycle program.
Periodically clean the brushes with a hose.
Click

8
Robotic Pool Cleaner DX4 | User Instructions
6.2. Replacing the filter bag
Put the filter bag over the frame so that the strap is in the middle of the shortest side.
Make sure that filter bag is positioned properly on the frame.
6.3. Cleaning the filter cartridges
Note: Don’t let the filter cartridges dry out before cleaning.
CAUTION
Unplug the power supply.
With the pool cleaner upside down
open the bottom lid and pull it out.
Open the clips and remove the filter.
Click

Robotic Pool Cleaner DX4 | User Instructions
9
Clean the filters with a hose.
Insert the filters with the plastic
backing facing out.
Insert the cartridge unit.
CAUTION
In addition to the standard cartridge filters the Pool Cleaner may be supplied with Spring
clean-up filters which can be used for the first cleaning of the season or when the pool is
unusually dirty.

10
Robotic Pool Cleaner DX4 | User Instructions
6.4. Cleaning the impeller
If you notice debris trapped in the impeller open the impeller and remove the debris.
CAUTION
Unplug the power supply.
Using a screwdriver, remove
the two screws on the impeller
cover and remove it.
Clear any debris that may
be in the impeller.
Replace the screws.
7. OFFSEASON STORAGE
If the Pool Cleaner will not be in use for an extended period, perform the following storage steps:
• Disconnect the Pool Cleaner from mains
• Make sure that no water is left in the Pool Cleaner
• Thoroughly clean the filter bag or cartridges and insert in place
• Roll up the cable so that it has no kinks
• Store the Pool Cleaner up side down, in a protected area out of direct sun / rain / frost at
a temperature of between 41°-113°F / 5°-45°C
A
B
A
B

Robotic Pool Cleaner DX4 | User Instructions
11
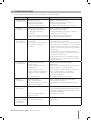
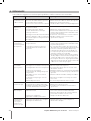
8. TROUBLESHOOTING
If the suggest solutions do not solve the problem contact your dealer
Symptom Possible reason Corrective action
1. Cable twisting
or cable coils up
•Obstructioninpool
•Excesscableinthepool
•Filterbag/cartridgedirty
•Inallabovementionedcases
•Removeobstructioninpool.
•Removeexcesscableoutofthepool.
•Cleanlterbag/cartridge.
•Straightencableandlayinsunperiodically.
2. Dolphin is
moving in circles
•Dirtstuckinmovingparts
•Cloggedlterbag/cartridge
•Powersupplyincorrectly
positioned
•Incorrectmountingofbottomlid
•AlgaeorpoolwaterisoutofSpec
•Removedirtfrommovingparts.
•Cleanlterbag/cartridge.
•Placepowersupplyinapositionsothatthe
Dolphin can reach all walls.
•Lockbottomlidintherightposition.
•Correctpoolandwaterconditions.
3. The Dolphin
does not cover
the entire pool
•Powersupplyincorrectly
positioned
•Thehandleisnotpositioned
in accordance to the pool
conditions
•Placepowersupplyinapositionsothat
the Dolphin can reach all walls.
•Youmayenhancethepoolcoveragebyadjusting
the handle float. For optimal pool coverage the
Dolphin should turn on the floor at 90° angle
(the pool cleaner rotates twice before completing
the 90° turn).
1. If the Dolphin does not complete a 90° turn,
shift the float opposite to the cable’s entry–side
towards the handle center.
2. If the Dolphin turns in an angle wider than 90°,
shift the float on the cable’s entry-side towards
the handle center.
4. Dolphin does
not climb walls
•Filterbag/cartridgeisfull
•Algaeonwalls
•Watertemperaturetoolow
•Brushesworn
•Slipperyceramicwalltiles
•Debriscaughtaroundimpeller
•Dolphintoolight-trappedair
•UnsuitablePHlevel
•Emptyandwashlterbag/cartridge.
•Brushwalls.
•Idealwatertemperaturebetween43°-93°F / 6°-34°C.
•Replacebrushes-contactyourdealer.
•Consultwithyourdealeraboutspecialbrushes.
•Removeimpellertube.Cleanimpeller.
•TurnDolphinupsidedownunderwater
to remove trapped air.
•CheckpHlevelbetween7and7.8.
5. Motors
not working
•Impellerblocked
•Drivesystemblocked
•Electricalproblem-motorunit,
cable or power supply
•Removeimpellertubeandcleanimpeller.
•Cleantracksandwheels.
•ConsultwithyourdealerandServiceCenter.
6. Dolphin
will not sink
•Aircaughtinlterbag/cartridge
•Specialcombinedclimbing
brushes are dry
•TurnDolphinupside-downunderwaterto
remove trapped air. Wash the filter bag/cartridge.
•Opentwoinletapsinthebottomlidtoremove
dirt and/or trapped air.
•Soakbrushesinwater.
7. Power supply
or power supply
switch light is
not working
•Notpluggedproperlyor
non - functioning socket
•Checkpowertothesocketandreconnect
the Dolphin.

Contenu
1. INTRODUCTION ......................................................................... 13
2. SPECIFICATIONS ........................................................................ 13
3. AVERTISSEMENTS ET PRECAUTIONS ........................................ 13
3.1. Avertissements..................................................................... 13
3.2. Précautions .......................................................................... 13
4. ELEMENTS DU NETTOYEUR DE PISCINE .................................. 14
5. UTILISATION DU NETTOYEUR DE PISCINE ............................... 15
5.1. Préparation .......................................................................... 15
5.2. Introduction du Nettoyeur dans la piscine .......................... 16
5.3. Retrait du Nettoyeur de la piscine ....................................... 17
6. NETTOYAGE DU SAC OU DES CARTOUCHES DE FILTRAGE ... 18
6.1. Retrait et nettoyage du sac de filtrage ............................... 18
6.2. Remplacement du sac de filtrage ........................................ 19
6.3. Nettoyage des cartouches de filtrage ................................. 19
6.4. Nettoyage de l’impulseur .................................................... 21
7. STOCKAGE HORS SAISON ........................................................ 21
8. DEPANNAGE............................................................................... 22
Dolphin DX4 Nettoyeur de Piscine
Mode D’emploi
FR

13
Dolphin DX4 Nettoyeur de Piscine | Mode D’emploi
Dolphin DX4 Nettoyeur de Piscine
Mode D’emploi
1. INTRODUCTION
Merci d’avoir acheté ce Robot Nettoyeur de Piscine de chez Maytronics.
Nous sommes convaincus que votre Robot Nettoyeur de Piscine vous assurera un nettoyage crédible,
convenable et rentable de votre piscine. Son filtrage fiable de toutes les piscines, son brossage actif
et sa brosse grimpant sur toutes les surfaces permettent d’assurer l’hygiène maximale de votre piscine.
Les Robots Nettoyeurs de Piscine de Maytronics fournissent une technologie de nettoyage avancée,
une performance de longue durée et une maintenance en toute simplicité. Vous et votre famille
pourrez profiter en toute confiance d’une piscine entièrement propre.
2. SPECIFICATIONS
Protection du moteur: IP 68
Profondeur minimale: 2,6 pieds/0,80m
Profondeur maximale: 16,4 pieds/5m
3. AVERTISSEMENTS ET PRECAUTIONS
3.1. Avertissements
• Utilisez uniquement le bloc d’alimentation électrique qui vous a été fourni à l’origine
• Assurez-vous que la prise électrique est protégée par un disjoncteur de fuite à la terre
• Eloignez le bloc d’alimentation des flaques d’eau
• Positionnez le bloc d’alimentation à au moins 10p/3m du bord de la piscine
• N’entrez pas dans la piscine lorsque le Nettoyeur est en marche
• Débranchez l’alimentation électrique avant tout entretien du robot
3.2. Précautions
N’utilisez le Nettoyeur de Piscine que lorsque les conditions de l’eau sont les suivantes:
Chlore Max 4 ppm
pH 7,0 - 7,8
Température
43°-93°F / 6°-34°C
NaCl Maximum = 5000 ppm
CAUTION

14
Dolphin DX4 Nettoyeur de Piscine | Mode D’emploi
4. ELEMENTS DU NETTOYEUR DE PISCINE
Dolphin DX4 Nettoyeur de Piscine modèle
Options de Brosses
Options de Filtrage
Unité d’alimentation électrique
Cartouches de filtrage
et 4 filtres ultra fins
Couvercle inférieur et sac
de filtrage
Filtres pour nettoyage
de printemps
Optionnelle
+
Brosse PVC
Pour béton, PVC,
fibre de verre et revêtement.
Wonder Brosse
Pour céramiques lisses.
Brosses en option
Brosse Combinée
Brosse adaptée à tous revêtements
de parois, idéale pour le nettoyage
de la plupart des piscines.

15
Dolphin DX4 Nettoyeur de Piscine | Mode D’emploi
5. UTILISATION DU NETTOYEUR DE PISCINE
Le Nettoyeur de Piscine est très simple à utiliser. Il suffit de le mettre dans la piscine et de s’assurer
qu’il soit bien posé au fond de la piscine. Allumez-le (ON) et laissez-le faire son travail.
5.1. Préparation
Avant d’utiliser pour le première fois le Nettoyeur de Piscine, effectuez les étapes suivantes:
Les petits modèles sont fournis avec un couvercle en
plastique sur les brosses.
Positionnez le bloc d’alimentation de
manière à ce qu’il soit à peu près au
milieu de la longueur de la piscine à
une distance de 10 pieds/3m.
1
2
Branchez le bloc d’alimentation et laissez-le
en position OFF.
Déroulez le câble et étirez-le
entièrement pour qu’il n’ait pas de plis.
Branchez le câble flottant à l’alimentation en
introduisez-le à l’aide de l’encoche dans le
connecteur (1) et alignez-le avec la rainure de la
prise du bloc d’alimentation; ensuite, tournez
dans le sens des aiguilles d’une montre (2).
10p/3m

16
Dolphin DX4 Nettoyeur de Piscine | Mode D’emploi
5.2. Introduction du Nettoyeur dans la piscine
Si votre Nettoyeur de Piscine est équipé de
brosses contenant des éponges, plongez les
brosses dans l’eau et pressez-les de manière à
ce qu’elles absorbent de l’eau la première fois
que vous utilisez le Nettoyeur de Piscine, ou
si les brosses se sont desséchées entre deux
usages.
Tout en tenant le Nettoyeur de Piscine à
l’envers dans l’eau, remuez-le doucement,
vos doigts tenant les portes en plastique du
couvercle inférieur ouvertes pour libérer l’air
emprisonné. Continuez jusqu’à que ce plus
aucune bulle d’air ne se dégage.
Libérez le Nettoyeur de Piscine et laissez-le
couler vers le fond de la piscine.
Assurez-vous que rien ne gêne le câble de
flottaison.
Pour éviter les plis dans le câble de flottaison,
mettez à l’eau assez de longueur de câble
pour que le Nettoyeur puisse atteindre le coin
le plus éloigné de la piscine.
Mettez l’appareil sous tension (ON).
Le Nettoyeur de Piscine fonctionnera jusqu’à
ce qu’il atteigne la fin du cycle de nettoyage.
ON

17
Dolphin DX4 Nettoyeur de Piscine | Mode D’emploi
5.3. Retrait du Nettoyeur de la piscine
CAUTION
Coupez le courant (OFF) et débranchez
le bloc d’alimentation.
A l’aide du câble de flottaison, ramenez le Nettoyeur de Piscine au bord de la piscine.
A l’aide de la poignée, sortez le Nettoyeur de la piscine.
CAUTION
NE PAS RETIRER LE NETTOYEUR DE LA PISCINE EN TIRANT SUR LE CABLE.
Placez le Nettoyeur de Piscine au bord
de la piscine et laissez l’eau se vider.
OFF
4in/10cm
C
B
A

18
Dolphin DX4 Nettoyeur de Piscine | Mode D’emploi
6. NETTOYAGE DU SAC OU DES CARTOUCHES DE FILTRAGE
Selon votre modèle, votre Nettoyeur de Piscine peut être équipé d’un sac ou de cartouches de
filtrage. Il est recommandé de nettoyer le sac ou les cartouches de filtrage après chaque cycle de
nettoyage.
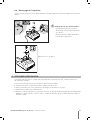
6.1. Retrait et nettoyage du sac de filtrage
CAUTION
Débranchez le bloc d’alimentation.
Tournez le Nettoyeur
de Piscine à l’envers.
Ouvrez le couvercle inférieur.
Sortez le sac de filtrage.
Nettoyez le sac de filtrage à l’aide d’un tuyau d’eau.
Nous recommandons de laver de temps en temps le sac
de filtrage en machine à laver en utilisant le programme
pour tissus délicats.
De temps en temps, rincez les brosses à l’aide d’un
tuyau d’eau.
Click
La page est en cours de chargement...
La page est en cours de chargement...
La page est en cours de chargement...
La page est en cours de chargement...
La page est en cours de chargement...
La page est en cours de chargement...
La page est en cours de chargement...
La page est en cours de chargement...
La page est en cours de chargement...
La page est en cours de chargement...
La page est en cours de chargement...
La page est en cours de chargement...
La page est en cours de chargement...
La page est en cours de chargement...
La page est en cours de chargement...
La page est en cours de chargement...
La page est en cours de chargement...
-
 1
1
-
 2
2
-
 3
3
-
 4
4
-
 5
5
-
 6
6
-
 7
7
-
 8
8
-
 9
9
-
 10
10
-
 11
11
-
 12
12
-
 13
13
-
 14
14
-
 15
15
-
 16
16
-
 17
17
-
 18
18
-
 19
19
-
 20
20
-
 21
21
-
 22
22
-
 23
23
-
 24
24
-
 25
25
-
 26
26
-
 27
27
-
 28
28
-
 29
29
-
 30
30
-
 31
31
-
 32
32
-
 33
33
-
 34
34
-
 35
35
-
 36
36
-
 37
37


Maytronics DX4 User Instructions
- Catégorie
- Aspirateurs robotiques
- Taper
- User Instructions
- Ce manuel convient également à
dans d''autres langues
- English: Maytronics DX4
- español: Maytronics DX4
Documents connexes
-
Maytronics MCC5 User Instructions
-
Maytronics W 20 Mode d'emploi
-
Maytronics S200 Manuel utilisateur
-
-
-
-
Maytronics DOLPHIN OASIS Z5i Manuel utilisateur
-
Dolphin Dolphin Supreme M5 User Instructions
-
-
Autres documents
-
BWT FSA1500 Manuel utilisateur
-
-
BWT ICE1240 Manuel utilisateur
-
BWT 100 Manuel utilisateur
-
-
-
 WaterWay Crystal Water/Aqua Clean Cartridge Filter System Mode d'emploi
-
Smartpool NC71RCEU Mode d'emploi
-
 WaterWay 810-0133-EFS Manuel utilisateur
-

