Sony STR-LSA1 Manuel utilisateur
- Catégorie
- Lecteur CD
- Taper
- Manuel utilisateur

4-227-587- 51(1)
FM Stereo
FM-AM Receiver
2000 Sony Corporation
S200
TM
STR-LSA1
Operating Instructions
Mode d’emploi
GB
FR

2
GB
WARNING
To prevent fire or shock
hazard, do not expose the
unit to rain or moisture.
To avoid electrical shock,
do not open the cabinet.
Refer servicing to qualified
personnel only.
Precautions
On safety
Should any solid object or liquid fall into
the cabinet, unplug the receiver and have it
checked by qualified personnel before
operating it any further.
On power sources
• Before operating the receiver, check that
the operating voltage is identical with
your local power supply. The operating
voltage is indicated on the nameplate at
the bottom of the receiver.
• The unit is not disconnected from the AC
power source (mains) as long as it is
connected to the wall outlet, even if the
unit itself has been turned off.
• If you are not going to use the receiver
for a long time, be sure to disconnect the
receiver from the wall outlet. To
disconnect the AC power cord, grasp the
plug itself; never pull the cord.
• AC power cord must be changed only at
the qualified service shop.
On placement
• Do not install the appliance in a confined
space, such as a bookcase or built-in
cabinet.
• Place the receiver in a location with
adequate ventilation to prevent heat
buildup and prolong the life of the
receiver.
• Do not place the receiver near heat
sources, or in a place subject to direct
sunlight, excessive dust or mechanical
shock.
• The nameplate is located on the bottom
exterior.
On operation
Before connecting other components, be
sure to turn off and unplug the receiver.
On cleaning
Clean the cabinet, panel and controls with
a soft cloth slightly moistened with a mild
detergent solution. Do not use any type of
abrasive pad, scouring powder or solvent
such as alcohol or benzine.
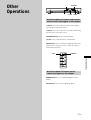
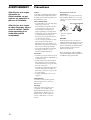
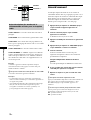
Replacing the battery in the remote
Slide out and remove the battery case, and
insert a new lithium battery CR2025 with
the + side facing up. And then, slide the
battery case back in.
1
2
1 Keep pushing.
2 Pull out.
CAUTION
Danger of explosion if battery is incorrectly
replaced. Replace the battery only with
the same or equivalent type recommended
by the manufacturer. Discard unused
batteries according to the manufacturer’s
instructions.
If you have any question or problem
concerning your receiver, please
consult your nearest Sony dealer.
A lithium
battery
CR2025

3
GB
About This Manual
The instructions in this manual are for the STR-LSA1.
Conventions
• Controls in these instructions are those on the receiver;
these may, however, be substituted by controls on the
supplied remote that are similarly named, or, when
different, appear in the instructions within parentheses.
Example: Rotate VOLUME (or press VOL +/– on the
remote repeatedly).
• The following icons are used in this manual:
Z Indicates a procedure that requires use of the
remote.
z Indicates hints and tips for making the task easier.
TABLE OF CONTENTS
Hooking Up the System 4
Unpacking 4
Antenna Hookups 5
Audio Component Hookups 6
Speaker System Hookup 7
Basic Operation 8
Before You Turn On the Receiver 8
Selecting the Component 8
Location of Parts 10
Front Panel Parts Description 10
Remote Parts Description 12
Adjusting the Sound 14
Setting Sound Parameters 15
Receiving Broadcasts 17
Manual Tuning 18
Automatic Tuning 19
Preset Tuning 19
Other Operations 21
Naming Preset Stations and Program Sources 22
Recording 23
Adjusting the Brightness of the Display 23
Using the Sleep Timer 24
Other Settings Using the Setup Menu 24
About i.LINK 26
Additional Information 28
Troubleshooting 28
Specifications 30
Display Messages 31

4
GB
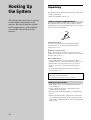
Hooking Up
the System
This chapter describes how to connect
various audio components to the
receiver. Be sure to read the sections
for the components you have before
you actually connect them to the
receiver.
Unpacking
Check that you received the following items with the unit:
• AM loop antenna (1)
• Remote commander (remote) (1)
Before using the supplied remote
The supplied remote already contains a battery. Before
using the remote, pull out the insulating sheet to allow the
power to flow from the battery.
To avoid battery leakage
If you don’t use the remote for an extended period of time,
remove the battery to avoid possible damage from battery
leakage and corrosion.
z
When to replace the battery
Under normal conditions, the battery should last for about 6
months. When the remote no longer operates the receiver, replace
the battery with a new one.
Notes on lithium battery
• Keep the lithium battery out of the reach of the children.
Should the battery be swallowed, immediately consult a doctor.
• Wipe the battery with a dry cloth to assure a good contact.
• Be sure to observe the correct polarity when inserting the
battery.
• Do not hold the battery with metallic tweezers, otherwise a
short-circuit may occur.
WARNING
Battery may explode if mistreated.
Do not recharge, disassemble, or dispose of in fire.
Before you get started
• Turn off the power to all components before making
any connections.
• Do not connect the AC power cords until all of the
connections are completed.
• Be sure to make connections firmly to avoid hum and
noise.
• When connecting an audio cable, be sure to match the
color-coded pins to the appropriate connectors on the
components: white (left, audio) to white; and red (right,
audio) to red.

5
GB
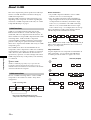
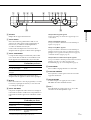
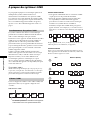
Hooking Up the System
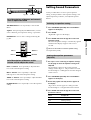
ANTENNA
AM
SPEAKERS
IMPEDANCE
USE 4-16Ω
75
Ω
COAXIAL
FM
ANALOG IN
–
+
–
+
RL
RL
U
i.LINK S200
v v
AM loop antenna
(supplied)
Ground wire
(not supplied)
To ground
Antenna Hookups
Terminals for connecting the antennas
Connect the To the
AM loop antenna AM terminals
FM antenna 75Ω COAXIAL FM terminal
Connecting an FM antenna
Use a 75-ohm coaxial cable (not supplied) to connect the
receiver to an outdoor FM antenna as shown below.
Outdoor FM antenna
ANTENNA
AM
75
Ω
COAXIAL
FM
U
Important
If you connect the receiver to an outdoor antenna, ground
it against lightning. To prevent a gas explosion, do not
connect the ground wire to a gas pipe.
Note on antenna hookups
To prevent noise pickup, keep the AM loop antenna away
from the receiver and other components.
Receiver

6
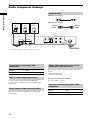
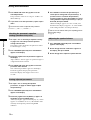
GB
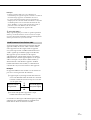
Hooking Up the System
ANTENNA
AM
SPEAKERS
IMPEDANCE
USE 4-16Ω
75
Ω
COAXIAL
FM
ANALOG IN
–
+
–
+
RL
RL
U
i.LINK S200
i.LINKi.LINK
LINE OUT
L
R
v v
i.LINK
LINE OUT
L
R
;
;
L
CD player,
etc.*
Audio Component Hookups
Required cables
i.LINK cables (not supplied)
Audio cables (not supplied)
White (L) White (L)
Red (R) Red (R)
*
You can connect components to either i.LINK S200 connector.
Connectors for connecting i.LINK
components
Connect a To the
MD deck, CD player, etc. i.LINK S200 connector
Note on i.LINK component hookups
If a metal object should fall into the i.LINK S200
connector, short-circuiting may occur and damage the
components.
About optional i.LINK connecting cables
Be sure to use the Sony i.LINK S200 connecting cables
(4 pins-4 pins).
Tape deck,
etc.
About i.LINK components to be used in
combination with the receiver
The following i.LINK components can be used with the
receiver.
• MDS-LSA1 MD Deck
• CDP-LSA1 CD Player
z
For general information about i.LINK
See “About i.LINK” on page 26.
Connectors for connecting other audio
components
Connect a To the
Tape deck, etc. ANALOG IN connectors
MD deck,
etc.*

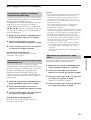
7
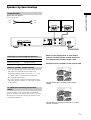
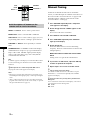
GB
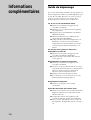
Hooking Up the System
ANTENNA
AM
SPEAKERS
IMPEDANCE
USE 4-16Ω
75
Ω
COAXIAL
FM
ANALOG IN
–
+
–
+
RL
RL
U
i.LINK S200
E
e
E
e
v v
Right speaker (R) Left speaker (L)
Speaker System Hookup
Required cables
Speaker cables (not supplied)
One for each speaker
(+) (+)
(–) (–)
Terminals for connecting the speakers
Connect the To the
Speakers (4 to 16 ohms) SPEAKERS terminals
Notes on speaker system hookup
• Twist the stripped ends of the speaker cables about 10
mm. Be sure to match the speaker cable to the
appropriate terminal on the components: + to + and –
to –. If the cables are reversed, the sound will be
distorted and will lack bass.
• If you use speakers with low maximum input rating,
adjust the volume carefully to avoid excessive output
on the speakers.
To avoid short-circuiting the speaker
cables
A short-circuiting in the speaker cables will mute the
speakers, and may even damage the receiver. To prevent
this, make sure to take the following precautions when
connecting the speakers.
Make sure the stripped ends of each speaker
cable do not touch another speaker terminal or
the stripped end of another speaker cable.
Examples of poor conditions of the speaker cable
Stripped speaker cable is touching another speaker
terminal.
Stripped cables are touching each other due to excessive
removal of insulation.

8
GB
Basic
Operation
This chapter describes basic receiver
operation.
Before You Turn On the
Receiver
Connecting the AC power cord
Before connecting the AC power cord of this receiver to a
wall outlet:
• Connect the speakers to the receiver (see page 7).
Connect the AC power cords of your audio components to
a wall outlet.
Note on the VOLUME control
To avoid damaging your speakers, be sure to rotate the
VOLUME control counterclockwise immediately after you
turn on the receiver.
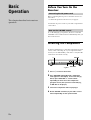
Selecting the Component
Do the procedure below to select the component (program
source). After connecting all of your components to the
receiver, we recommend that you do this to verify that the
connections were made correctly.
?/1
?/1
i
I
VOLUME
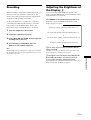
JOG MENU
1 Press ?/1 to turn on the receiver.
2 Press JOG MENU repeatedly until a component
name appears in the display. Then rotate the jog
dial (or press FUNCTION +/– on the remote
repeatedly) to select one of the components
(program sources) that you have connected (e.g.,
an MD deck or CD player).
3 Turn on the component and start playing it.
4 Rotate VOLUME clockwise (or press VOL + on the
remote repeatedly) to turn up the volume.
Jog dial

9
GB
Basic Operation
z
To verify which component is currently selected
Press DISPLAY. If the selected component is the CDP-LSA1 or
MDS-LSA1, “N N n n” appears for a few seconds in the
display of the component.
This function is especially useful for verifying the selected
component when more than one component of the same type
(e.g., two CD players) are connected to the receiver. Note that
this function works with Sony components only. For more
details, see page 24.
z
You can monitor the CD sound while recording from a CD to
an MD (when using the CDP-LSA1 and MDS-LSA1 only)
Switch the program source to the MD deck as you are recording.
However, the sound can’t be monitored during High-speed CD
Synchro-recording.
z
The LINC between the receiver and the program source is
automatically established
The receiver automatically establishes a LINC with a component
when you select it as the program source. The LINC is
automatically canceled when you turn off the receiver or when
you select a non-i.LINK component as the program source. For
details on “Establishing a LINC,” see page 27.
If you don’t obtain normal sound output after performing
the procedure in page 8, look for the reason in the
checklist below and take the appropriate measures to
correct the problem.
There is no sound no matter which component is
selected.
, Check that both the receiver and all components
are turned on.
, Check that the volume level isn’t turned down to –
∞ dB.
, Check that all speaker cables are connected
correctly.
, Press the MUTING button on the remote to turn
off the MUTING indicator on the receiver.
There’s no sound from a specific component.
, Check that the cable(s) used for the connection is
(are) fully inserted into the connectors on both the
receiver and the component.
The program source can’t be selected or changed.
, The selection of a program source is momentarily
disabled after the component hookup has been
changed (“NEW CONNECT” appears in the
display at this time). “FUNC. Locked” appears in
the display of the receiver if you try to select a
program source at this time.
, The program source can’t be changed while a
component is establishing a LINC with the
receiver; e.g., when an MD deck is establishing a
LINC with the receiver in order to record a radio
program on the MD. “FUNC. Locked” appears in
the display of the receiver if you try to select a
program source at this time.
There are other circumstances under which the
program source cannot be selected. In these cases,
note the contents of the error message that appears
in the display and see “Display Messages” on page
31.
No sound is heard from one of the speakers.
, Connect a pair of headphones to the PHONES
connector to verify that sound is output from the
headphones.
If only one channel is output from the headphones,
the component may not be connected to the
receiver correctly. Check that all the cables are
fully inserted into the connectors on both the
receiver and the component.
If both channels are output from the headphones,
the speaker may not be connected to the receiver
correctly. Check the connection of the speaker
which is not outputting any sound.
The left and right speaker output is unbalanced.
, Press the JOG MENU button repeatedly until
“Sound Menu” appears in the display. Then rotate
the jog dial until “SP. Balance” appears in the
display, and then press the ENTER button. Rotate
the jog dial to adjust the speaker balance.
If you encounter a problem that is not included above, see
“Troubleshooting” on page 28.
z
When a message appears in the display
See page 31.

10
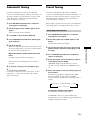
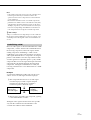
GB
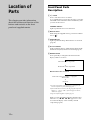
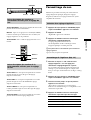
Front Panel Parts
Description
1 ?/1 switch
Press to turn the receiver on and off.
To avoid damaging your speakers, be sure to rotate the
VOLUME control counterclockwise immediately after
you turn on the receiver.
STANDBY indicator
Lights up when the receiver is turned off.
2 Remote sensor
When using the supplied remote, point it towards this
sensor (
).
3 SLEEP indicator
Lights up when the Sleep Timer function is activated
(page 24).
4 H.A.T.S. indicator
Lights up during H.A.T.S. (High-quality digital Audio
Transmission System) function is activated (page 25).
5 DISPLAY button
Press repeatedly to change the information in the
display window as follows:
v
Index name of the component
1)
v
Model name of the component
2)
When the built-in tuner is selected
v
Index name of the preset station
1)
or program
station name
3)
v
Frequency
1) An index name appears only if one has been assigned to the
selected component or preset station (page 22).
2) If the model name isn’t known, the category of the component
appears (e.g., “CD” or “MD”). If the category isn’t known,
“Unknown” appears.
3) Appears only during RDS reception (page 18).
When you press the DISPLAY button while the Ping
function is on, “N N n n” appears for a few
seconds in the display of the currently selected
component (page 25).
Location of
Parts
This chapter provides information
about the location and function of the
buttons and controls on the front
panel and supplied remote.

11
GB
Location of Parts
6 Display
Shows various types of information.
7 BAND/< button
Selects the FM or AM band. If you press this button
while the receiver is turned off, the receiver
automatically turns on and tunes to the station that
was last received.
Use this button to move the cursor when entering an
index name for a component or preset station.
8 TUNE MODE/> button
When the built-in tuner is selected, press to select the
tuning mode. The mode indication appears in the
display as follows:
To select Press TUNE MODE repeatedly
to light up
Manual Tuning MANUAL
Automatic Tuning AUTO
Preset Tuning PRESET
Use this button to move the cursor when entering an
index name for a component or preset station.
9 Jog dial
Rotate to select the program source, tune to stations,
preset the stations, enter index names, or change
settings.
q; JOG MENU button
Press repeatedly to change the jog dial function. The
indication corresponding to the jog dial function
appears in the display as follows:
To Press JOG MENU repeatedly to
display
Select a component A component name
Adjust the sound Sound Menu
Make various settings Setup Menu
Receive broadcasts* Station name or frequency
*
Selectable only when the built-in tuner is selected.
After a component name appears
Rotate the jog dial to select the component you want to use.
After “Sound Menu” appears
You can use the jog dial and ENTER button to adjust the
sound (page 14).
After “Setup Menu” appears
You can use the jog dial and ENTER button to preset radio
stations (page 19), name preset stations or connected
components (page 22), or make other settings (page 24).
After a station name or frequency appears
You can use the jog dial to select a preset station (page 20) or
tune to a radio station either manually (page 18) or
automatically (page 19).
qa ENTER button
Press to enter a setting made with the jog dial.
qs VOLUME control
After turning on the selected component, rotate to
adjust the volume.
qd MUTING indicator
Lights up when the MUTING button on the supplied
remote is pressed.
qf i connector
Connects headphones. When the headphones are
connected, the kutput to the speakers is automatically
cut off.
i
I
BAND
TUNE MODE JOG MENU
ENTER
MUTING
VOLUME
STANDBY SLEEP H.A.T.S
DISPLAY
?/1
A
NM
BECD GFHJKLI

12
GB
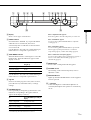
Location of Parts
Remote Parts Description
AQP
H
O
N
M
K
J
L
D
C
B
E
F
GI
PRESET
CD
TUNER
SLEEP
SHIFT
FM MODE
DISPLAY
MD
EQ
DIMMER
FUNCTION
MID
BASS
TREBLE
EQ
BANK
VOL
MUTING
RECEIVER
BAND
?/1
–
–
+
–
+
–
+
–
+
.>
N
.
>
NX x
+
+–
Xx
1 ?/1 switch
Press to turn the receiver on and off. When the
receiver is turned off, the STANDBY indicator on the
receiver turns on.
To avoid damaging your speakers, be sure to rotate the
VOLUME control on the receiver counterclockwise
immediately after you turn on the receiver.
2 FUNCTION +/– buttons
Press these buttons repeatedly to select the component
you want to use.
3 FM MODE button
If “STEREO” flashes in the display and the FM stereo
reception is poor, press this button. “MONO” lights
up in the display and there will be no stereo effect, but
the sound will improve.
4 VOL +/– buttons
Press these buttons repeatedly to adjust the volume.
5 MUTING button
Press to mute the sound output from the receiver.
When the sound is muted, the MUTING indicator on
the receiver lights up.
6 EQ BANK button
Press repeatedly to select a preset equalizer setting.
7 TREBLE +/– buttons
After selecting preset equalizer setting, press
repeatedly to adjust the treble level.
8 MID +/– buttons
After selecting preset equalizer setting, press
repeatedly to adjust the midrange level.
9 BASS +/– buttons
After selecting preset equalizer setting, press
repeatedly to adjust the bass level.

13
GB
Location of Parts
q; MD deck operation buttons
Use these buttons to operate a Sony MD deck.
MD N button
Press to start playback on the MD deck.
MD X button
Press to pause playback on the MD deck.
MD x button
Press to stop playback on the MD deck.
MD ./> buttons
Press to locate a track on the MD deck.
Note
This remote transmits Sony MD1 codes.
qa CD player operation buttons
Use these buttons to operate a Sony CD player.
CD N button
Press to start playback on the CD player.
CD X button
Press to pause playback on the CD player.
CD x button
Press to stop playback on the CD player.
CD ./> buttons
Press to locate a track on the CD player.
Note
This remote transmits Sony CD1 codes.
qs PRESET +/– buttons
Press repeatedly to tune in a preset station.
qd SHIFT button
Changes the memory page containing preset stations.
qf BAND button
Selects the FM or AM band. If you press this button
while the receiver is turned off, the receiver
automatically turns on and tunes to the station that
was last received.
qg SLEEP button
Press to activate the Sleep Timer function. When the
Sleep Timer function is activated, the SLEEP indicator
on the receiver lights up.
qh DIMMER button
Press repeatedly to change the brightness level of the
display.
qj DISPLAY button
Press repeatedly to select the information to be
displayed. This button has the same function as the
DISPLAY button on the receiver (5 in page 10).

14
GB
Adjusting the
Sound
This chapter describes how to use the
Sound Menu to adjust the equalizer
parameters and speaker balance. The
adjusted equalizer parameter can be
stored in the memory of the receiver
for later recall.
All sound adjustments can be made with the Sound
Menu. The Sound Menu contains following submenus:
EQ BANK submenu
Nine preset settings are stored and can be recalled using
this submenu. EQ1 to 5 stores five three-band equalizer
settings; Parametric EQ1 to 3 stores three parametric
equalizer settings; and EQ FLAT stores one flat pattern.
EQ Control submenu
After selecting one of the three-band equalizer settings
stored in EQ1 to 5 through the EQ BANK submenu, you
can change the bass, midrange, and treble parameters of
the selected setting through the EQ Control submenu.
The EQ Control submenu can be accessed only after you
have selected one of the three-band equalizer settings (i.e.,
a setting stored in EQ1 to 5).
EQ Condition submenu
After selecting one of the parametric equalizer settings in
Parametric EQ1 to 3 and EQ FLAT through the EQ BANK
submenu, you can check the level, frequency, and slope of
each band.
The EQ Condition submenu can be accessed only after
you have selected one of the parametric equalizer patterns
(i.e., a setting stored in Parametric EQ1 to 3 and EQ
FLAT).
Note that you can check, but can’t change the parameters
using the receiver. You can change the parametric
equalizer settings only from a personal computer, etc.,
connected through the i.LINK network.
EQ Memory submenu
After adjusting the bass, midrange, or treble parameter of
a three-band equalizer setting, you can store the changed
setting to EQ1 to 5 with the EQ Memory submenu.
SP. Balance submenu
Use this submenu to adjust the speaker balance.
z
What is a three-band equalizer?
It’s a kind of an equalizer that provides separate adjustments of
the bass, midrange, and treble levels.
z
What is a parametric equalizer?
It’s a kind of an equalizer that specifies up to three points as the
center frequencies and selects slope type for each center
frequency.

15
GB
Adjusting the Sound
?/1
i
I
JOG MENU
ENTER
Brief descriptions of buttons and controls
used to adjust the sound
JOG MENU button: Press repeatedly to select Sound
Menu.
Jog dial: After pressing the JOG MENU button, rotate to
select a submenu, preset equalizer setting, or parameter.
ENTER button: Press to enter a setting made using the
jog dial.
EQ BANK
TREBLE +/–
MID +/–
BASS +/–
?/1
–
–
+
–
+
–
+
–
+
.>
N
.
>
NX x
+
+–
Xx
Brief descriptions of buttons on the
remote used to adjust the sound
BASS +/– buttons: Press repeatedly to adjust the bass
level of the selected equalizer setting.
MID +/– buttons: Press repeatedly to adjust the
midrange level of the selected equalizer setting.
TREBLE +/– buttons: Press repeatedly to adjust the treble
level of the selected equalizer setting.
EQ BANK button: Press repeatedly to select the equalizer
setting.
Setting Sound Parameters
Do the procedure below to select a preset equalizer
setting, set the parameters of the equalizer settings, store
adjusted equalizer parameters, and adjust the speaker
balance.
Selecting an equalizer setting
1 Press JOG MENU repeatedly until “Sound Menu”
appears in the display.
2 Press ENTER.
“EQ BANK” appears in the display.
3 Press ENTER and rotate the jog dial to select the
equalizer setting.
The selected equalizer setting is automatically applied
and the normal display reappears after several
seconds.
z
You can use the remote to select the equalizer setting
Press EQ BANK repeatedly.
Setting the equalizer parameters
(EQ1 to 5)
1 Do steps 1 to 3 in “Selecting an equalizer setting”
on this page to select the equalizer setting to be
adjusted.
The parameters can be set only for the equalizer
settings stored in EQ1 to 5. The parameters stored in
Parametric EQ1 to 3 and EQ FLAT cannot be changed
on this receiver.
2 Press JOG MENU repeatedly until “Sound Menu”
appears in the display.
3 Rotate the jog dial until “EQ Control” appears in
the display.
“EQ Control” doesn’t appear if a setting stored in
Parametric EQ1 to 3 or EQ FLAT has been selected.
4 Press ENTER and rotate the jog dial to select the
parameter to be set.
Select To adjust the
BASS Bass setting
MID Midrange setting
TREBLE Treble setting
Jog dial

16
GB
Adjusting the Sound
5 Press ENTER and rotate the jog dial to set the
selected parameter.
Each parameter can be set in a range of –10 dB to +10
dB in 1-dB steps.
6 If you want to set other parameters, repeat steps 4
and 5.
z
You can use the remote to adjust the tone parameters
Press BASS+/–, MID +/–, or TREBLE +/–.
Checking the parametric equalizer
settings (Parametric EQ1 to 3)
1 Do steps 1 to 3 in “Selecting an equalizer setting”
on page 15 to select the parametric equalizer
setting to be checked.
The settings can be checked for the patterns stored in
Parametric EQ1 to 3 only.
2 Press JOG MENU repeatedly until “Sound Menu”
appears in the display.
3 Rotate the jog dial until “EQ Condition” appears in
the display.
“EQ Condition” doesn’t appear if a pattern in EQ1 to 5
or EQ FLAT has been selected.
4 Press ENTER and rotate the jog dial to select the
parameter to be checked.
One of the nine parameters appears in the display.
Rotate the jog dial to display next parameter.
The normal display will reappear after several
seconds.
Storing adjusted parameters
1 Do steps 1 to 6 in “Setting the equalizer
parameters” on page 15 and this page to adjust
the parameter(s).
2 Press JOG MENU repeatedly until “Sound Menu”
appears in the display.
3 Rotate the jog dial until “EQ Memory” appears in
the display, then press ENTER again.
“Memory to EQX?” appears in the display. “X,” which
appears as a number from 1 to 5, is the number of the
currently selected preset pattern in EQ BANK
submenu.
Setting Sound Parameters
4 Press ENTER to overwrite the parameter(s) of
current preset setting with new parameter(s). If
you don’t want to overwrite the parameters,
rotate the jog dial to select the number of a preset
setting where the adjusted parameter(s) is (are) to
be stored, then press ENTER.
“Memorized EQX” appears for a few seconds, and
then the normal display reappears. “X” is the number
of the setting selected to store the parameter(s).
z
You can reset the contents of the preset equalizing patterns
to their factory settings
See page 25.
Adjusting the speaker balance
1 Press JOG MENU repeatedly until “Sound Menu”
appears in the display.
2 Rotate the jog dial until “SP. Balance” appears in
the display, then press ENTER.
3 Rotate the jog dial to adjust the speaker balance.

17
GB
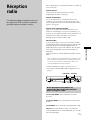
Receiving Broadcasts
Receiving
Broadcasts
This chapter describes how to receive
FM or AM broadcasts and how to
preset selected stations.
You can tune to stations on this receiver in the following
ways:
Manual Tuning
You can rotate the jog dial to tune to the station you want
(see page 18).
Automatic Tuning
If you don’t know the frequency of the station you want,
you can let the receiver scan all available stations in your
area (see page 19).
Preset Tuning
After you have tuned in stations using Manual Tuning or
Automatic Tuning, you can preset them to the receiver
(see page 19). Then you can tune in any of the stations by
rotating the jog dial (see page 20). Up to 30 FM or AM
stations can be preset.
RDS functions
This receiver also allows you to use RDS (Radio Data
System), which enables radio stations to send additional
information along with the regular program signal. With
this receiver, only the display of program station name is
available.
Note that only FM stations provide RDS services.
*
*
Not all FM stations provide RDS service, nor do they provide the
same types of services. If you aren’t familiar with the RDS services
in your area, check with your local radio stations for details.
Before you begin, make sure you have:
• Connected an FM and AM antenna to the receiver (see
page 5).
?/1
i
I
JOG MENUTUNE MODE
BAND
Brief descriptions of buttons and controls
on the receiver used to receive broadcasts
TUNE MODE button: Press to select tuning mode.
JOG MENU button: Press to select the mode of the jog
dial.
BAND button: Press to select the FM or AM band.
Jog dial: Rotate to select tuner, tune to a station manually
or automatically, or tune to a preset station.
Jog dial

18
GB
Receiving Broadcasts
FUNCTION +/–
FM MODESHIFT
BAND
PRESET +/–
?/1
–
–
+
–
+
–
+
–
+
.>
N
.
>
NX x
+
+–
Xx
Brief descriptions of buttons on the
remote used to receive broadcasts
PRESET +/– buttons: Press to select a preset station.
BAND button: Press to select the FM or AM band.
SHIFT button: Press to select a memory page (A, B, or C)
for presetting radio stations or tuning to preset stations.
FUNCTION +/– buttons: Press repeatedly to select the
tuner.
FM MODE button: If “STEREO” flashes in the display
and the FM stereo reception is poor, press this button to
improve the sound. “MONO” lights up in the display
and you will not be able to enjoy stereo effect, but the
sound will be less distorted.
Note
If “MONO” appears in the display even when the FM broadcast
is received normally, press this button to turn off the “MONO”
indication.
z
When you tune to a station that provides RDS services
The program station name appears in the display.
Notes
• RDS may not work properly if the station you tuned to is not
transmitting the RDS signal properly or if the signal strength is
weak.
• After you disconnect the AC power cord of the receiver, RDS
program station names may not be saved correctly. To prevent
this, preset the RDS stations (page 19).
Manual Tuning
For details on the buttons and controls used in this
section, see “Brief descriptions of buttons and controls on
the receiver used to receive broadcasts” on page 17 and
“Brief descriptions of buttons on the remote used to
receive broadcasts” on this page.
1 Press JOG MENU repeatedly until a component
name appears in the display.
2 Rotate the jog dial until “TUNER” appears in the
display.
The last received station is tuned in.
3 Press BAND to select the FM or AM band.
4 Press TUNE MODE repeatedly until “MANUAL”
lights up in the display.
5 Rotate the jog dial.
Rotate the dial clockwise to increase the tuning
frequency. Rotate it counterclockwise to decrease the
tuning frequency.
When the receiver reaches the end of either
band
Tuning starts over again in the same direction.
6 If you tune in an AM station, adjust the AM loop
antenna to optimize the reception.
7 Repeat steps 3 to 6 to tune in another station.
z
You can change to the tuner quickly
Press BAND on either the receiver or the remote. Or press
FUNCTION +/– on the remote repeatedly until “TUNER”
appears in the display.
z
If you try to tune more precisely than is possible for the
tuning scale
You won’t be able to tune in the exact frequency. The receiver
scans frequencies in the following units:
FM: 50 kHz
AM: 9 kHz

19
GB
Receiving Broadcasts
Preset Tuning
For details on the buttons and controls used in this
section, see “Brief descriptions of buttons and controls on
the receiver used to receive broadcasts” on page 17 and
“Brief descriptions of buttons on the remote used to
receive broadcasts” on page 18.
Before tuning to preset stations, be sure to preset them by
performing steps on “Presetting radio stations” below.
Presetting radio stations
1 Press JOG MENU repeatedly until a component
name appears in the display.
2 Rotate the jog dial until “TUNER” appears in the
display.
The last received station is tuned in.
3 Tune in the station that you want to preset using
Manual Tuning or Automatic Tuning (page 18 and
this page).
4 Press JOG MENU repeatedly until “Setup Menu”
appears in the display.
5 Rotate the jog dial until “Preset Memory” appears
in the display, and press ENTER.
“MEMORY” lights up in the display for several
seconds. Do steps 6 and 7 before “MEMORY” turns
off.
6 Rotate the jog dial to select the memory page and
preset number.
The memory page appears and the preset number
flashes. The memory page and preset number
indication changes each time you rotate the jog dial as
follows:
tA1yA2y...yA0yB1yB2y...yB0T
tC0y...yC2yC1T
To select the memory page quickly
Press SHIFT on the remote repeatedly.
If “MEMORY” turns off or preset number stops
flashing before you select the memory page and preset
number, start again from step 4.
Automatic Tuning
For details on the buttons and controls used in this
section, see “Brief descriptions of buttons and controls on
the receiver used to receive broadcasts” on page 17 and
“Brief descriptions of buttons on the remote used to
receive broadcasts” on page 18.
1 Press JOG MENU repeatedly until a component
name appears in the display.
2 Rotate the jog dial until “TUNER” appears in the
display.
The last received station is tuned in.
3 Press BAND to select the FM or AM band.
4 Press TUNE MODE repeatedly until “AUTO” lights
up in the display.
5 Rotate the jog dial.
When you rotate the dial clockwise, the receiver scans
from low to high; when you rotate it counterclockwise,
the receiver scans from high to low.
When the receiver reaches either end of the
band
Scanning is repeated in the same direction.
The receiver stops scanning whenever a station is
received.
6 To continue scanning, rotate the jog dial again.
z
You can select the tuner quickly
Press BAND on either the receiver or on the remote. Or, press
FUNCTION +/– on the remote repeatedly until “TUNER”
appears in the display.

20
GB
Receiving Broadcasts
7 Press ENTER to store the station.
8 Repeat steps 3 to 7 to preset another station.
To change a preset number to another station
Do steps 1 to 7 to preset the new station to the number.
Tuning to preset stations
1 Press JOG MENU repeatedly until a component
name appears in the display.
2 Rotate the jog dial until “TUNER” appears in the
display.
The last received station is tuned in.
3 Press TUNE MODE repeatedly until “PRESET” lights
up in the display.
4 Rotate the jog dial to select the preset station you
want (or press PRESET +/– on the remote
repeatedly).
Each time you rotate the jog dial (or press PRESET +/–
on the remote repeatedly), the receiver tunes in one
preset station at a time, in the corresponding order
and direction as follows:
tA1yA2y...yA0yB1yB2y...yB0T
tC0y...yC2yC1T
To select the memory page quickly
Press SHIFT on the remote repeatedly.
Preset Tuning
La page charge ...
La page charge ...
La page charge ...
La page charge ...
La page charge ...
La page charge ...
La page charge ...
La page charge ...
La page charge ...
La page charge ...
La page charge ...
La page charge ...
La page charge ...
La page charge ...
La page charge ...
La page charge ...
La page charge ...
La page charge ...
La page charge ...
La page charge ...
La page charge ...
La page charge ...
La page charge ...
La page charge ...
La page charge ...
La page charge ...
La page charge ...
La page charge ...
La page charge ...
La page charge ...
La page charge ...
La page charge ...
La page charge ...
La page charge ...
La page charge ...
La page charge ...
La page charge ...
La page charge ...
La page charge ...
La page charge ...
La page charge ...
La page charge ...
La page charge ...
La page charge ...
-
 1
1
-
 2
2
-
 3
3
-
 4
4
-
 5
5
-
 6
6
-
 7
7
-
 8
8
-
 9
9
-
 10
10
-
 11
11
-
 12
12
-
 13
13
-
 14
14
-
 15
15
-
 16
16
-
 17
17
-
 18
18
-
 19
19
-
 20
20
-
 21
21
-
 22
22
-
 23
23
-
 24
24
-
 25
25
-
 26
26
-
 27
27
-
 28
28
-
 29
29
-
 30
30
-
 31
31
-
 32
32
-
 33
33
-
 34
34
-
 35
35
-
 36
36
-
 37
37
-
 38
38
-
 39
39
-
 40
40
-
 41
41
-
 42
42
-
 43
43
-
 44
44
-
 45
45
-
 46
46
-
 47
47
-
 48
48
-
 49
49
-
 50
50
-
 51
51
-
 52
52
-
 53
53
-
 54
54
-
 55
55
-
 56
56
-
 57
57
-
 58
58
-
 59
59
-
 60
60
-
 61
61
-
 62
62
-
 63
63
-
 64
64


Sony STR-LSA1 Manuel utilisateur
- Catégorie
- Lecteur CD
- Taper
- Manuel utilisateur
dans d''autres langues
- English: Sony STR-LSA1 User manual