
W11161586A
30" AND 36" (76.2 CM AND 91.4
CM) TOUCH CONTROL AND KNOB
CONTROL RADIANT COOKTOP
USER INSTRUCTIONS
For questions about features, operation/performance, parts, accessories or service, call: 1-800-422-1230, or visit our website at
www.kitchenaid.com.
In Canada, call: 1-800-807-6777, or visit our website at www.kitchenaid.ca.
In Mexico, call: 01 800 0022 767, or visit our website at www.kitchenaid.mx.
Model Number_________________________________________ Serial Number____________________________________________________
Table of Contents
COOKTOP SAFETY ........................................................................ 2
PARTS AND FEATURES - KNOB CONTROLS.............................4
COOKTOP USE - KNOB CONTROLS ..........................................5
Cooktop Controls ..................................................................................... 5
Even-Heat™ Ultra Power™ Element ...................................................... 5
Even-Heat™ Element ............................................................................... 5
Dual Element ............................................................................................. 5
Melt ........................................................................................................... 5
Ceramic Glass .......................................................................................... 5
PARTS AND FEATURES – ELECTRONIC TOUCH CONTROLS .7
COOKTOP CONTROLS – ELECTRONIC TOUCH CONTROLS..8
Cooktop Controls ..................................................................................... 8
Dual/Triple Element ................................................................................... 9
Control Lock ............................................................................................. 9
Home Canning ........................................................................................ 10
Cookware ................................................................................................ 10
COOKTOP CARE ..........................................................................11
General Cleaning .................................................................................... 11
TROUBLESHOOTING ..................................................................12
ASSISTANCE OR SERVICE .........................................................13
In the U.S.A. ............................................................................................ 13
Accessories............................................................................................. 13
In Canada ................................................................................................ 13
In Mexico ................................................................................................ 13

2
COOKTOP SAFETY
You can be killed or seriously injured if you don't immediately
You
can be killed or seriously injured if you don't
follow
All safety messages will tell you what the potential hazard is, tell you how to reduce the chance of injury, and tell you what can
happen if the instructions are not followed.
Your safety and the safety of others are very important.
We have provided many important safety messages in this manual and on your appliance. Always read and obey all safety
messages.
This is the safety alert symbol.
This symbol alerts you to potential hazards that can kill or hurt you and others.
All safety messages will follow the safety alert symbol and either the word “DANGER” or “WARNING.”
These words mean:
follow instructions.
instructions.
DANGER
WARNING
State of California Proposition 65 Warnings:
WARNING: This product contains one or more chemicals known to the State of California to cause cancer.
WARNING: This product contains one or more chemicals known to the State of California to cause birth defects or other
reproductive harm.

3
SAVE THESE INSTRUCTIONS
IMPORTANT SAFETY INSTRUCTIONS
WARNING:
To reduce the risk of fire, electrical shock,
injury to persons, or damage when using the cooktop, follow
basic precautions, including the following:
CAUTION:
Do not store items of interest to children in
cabinets above a cooktop – Children climbing on the
cooktop to reach items could be seriously injured.
Proper Installation – Be sure your cooktop is properly
installed and grounded by a qualified technician.
Never Use Your Cooktop for Warming or Heating the
Room.
Do Not Leave Children Alone – Children should not be left
alone or unattended in area where cooktop is in use. They
should never be allowed to sit or stand on any part of the
cooktop.
Wear Proper Apparel – Loose-fitting or hanging garments
should never be worn while using the cooktop.
This appliance is not intended for use by people
(including children) whose physical, sensory or mental
capacities are different or impaired or who lack the
necessary experience or knowledge/expertise to do so,
unless such persons are supervised or are trained to
operate the appliance by a person who accepts
responsibility for their safety.
User Servicing – Do not repair or replace any part of the
cooktop unless specifically recommended in the manual. All
other servicing should be referred to a qualified technician.
Storage on Cooktop – Flammable materials should not be
stored near surface units.
Do Not Use Water on Grease Fires – Smother fire or flame
or use dry chemical or foam-type extinguisher.
WARNING:
Failing to supervise an electric grill when
cooking on it with oil or fat is dangerous and constitutes a fire
hazard.
Use Only Dry Potholders – Moist or damp potholders on
hot surfaces may result in burns from steam. Do not let
potholder touch hot heating elements. Do not use a towel
or other bulky cloth.
DO NOT TOUCH SURFACE UNITS OR AREAS NEAR
UNITS – Surface units may be hot even though they are
dark in color. Areas near surface units may become hot
enough to cause burns. During and after use, do not touch,
or let clothing or other flammable materials contact surface
units or areas near units until they have had sufficient time
to cool. Among those areas are the cooktop and surfaces
facing the cooktop.
Use Proper Pan Size – This cooktop is equipped with one
or more surface units of different size. Select utensils
having flat bottoms large enough to cover the surface unit
heating element. The use of undersized utensils will
expose a portion of the heating element to direct contact
and may result in ignition of clothing. Proper relationship of
utensil to burner will also improve efficiency.
Never Leave Surface Units Unattended at High Heat
Settings – Boilover causes smoking and greasy spillovers
that may ignite.
Glazed Cooking Utensils – Only certain types of glass,
glass/ceramic, ceramic, earthenware, or other glazed
utensils are suitable for cooktop service without breaking
due to the sudden change in temperature.
CAUTION: The cooking process should be
supervised. Short cooking periods require constant
supervision.
Utensil Handles Should Be Turned Inward and Not Extend
Over Adjacent Surface Units – To reduce the risk of burns,
ignition of flammable materials, and spillage due to
unintentional contact with the utensil, the handle of a
utensil should be positioned so that it is turned inward, and
does not extend over adjacent surface units.
Do Not Cook on Broken Cooktop – If cooktop should
break, cleaning solutions and spillovers may penetrate the
broken cooktop and create a risk of electric shock. Contact
a qualified technician immediately. Turn off the device to
avoid the possibility of electric shock.
Metal objects, such as knives, forks, spoons and lids
should not be left on the grill’s cooking surface as they may
get hot.
Clean Cooktop With Caution – If a wet sponge or cloth is
used to wipe spills on a hot cooking area, be careful to
avoid steam burn. Some cleaners can produce noxious
fumes if applied to a hot surface.
The device is not designed to be started up by an
external timer or by a separate remote control system.
If the power supply cord gets damaged, have it replaced
by the manufacturer, the latter’s service agent or by
qualified personnel in order to avoid danger.
For units with ventilating hood
–
Clean Ventilating Hoods Frequently – Grease should not
be allowed to accumulate on hood or filter.
When flaming foods under the hood, turn the fan on.
For units with coil elements
–
Make Sure Reflector Pans or Drip Bowls Are in
Place – Absence of these pans or bowls during
cooking may subject wiring or components
underneath to damage.
Protective Liners – Do not use aluminum foil to line surface
unit drip bowls, except as suggested in the manual.
Improper installation of these liners may result in a risk of
electric shock, or fire.
Do Not Soak Removable Heating Elements - Heating
elements should never be immersed in water.

4
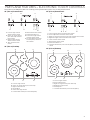
PARTS AND FEATURES - KNOB CONTROLS
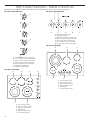
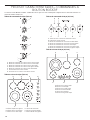
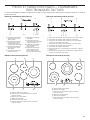
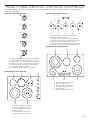
This manual covers different models. The cooktop you have purchased may have some or all of the items listed.
30" (76.2 cm) Control Panel
30" (76.2 cm) Cooktop
36" (91.4 cm) Control Panel
36" (91.4 cm) Cooktop
A
B
C
D
E
F
G
A. Left rear single element control knob
B. Center rear single element control knob
C. Right rear single element control knob
D. Left front dual element control knob
E. Right front dual element control knob
F. Hot Surface indicator light
G. Cooktop On indicator light
ABCD
FE
A. Left rear single element
B. Center rear single element
C. Right rear single element
D. Control panel
E. Right front dual element
F. Left front dual element
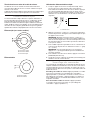
A
CDEFG
B
A. Cooktop On indicator light
B. Hot surface indicator
C. Right front dual element control knob
D. Right rear single element control knob
E. Center single element control knob
F. Left rear triple element control knob
G. Left front single element control knob
ABC
DEF
A. Left rear triple element
B. Center single element
C. Right rear single element
D. Right front dual element
E. Control panel
F. Left front single element

5
COOKTOP USE - KNOB CONTROLS
Cooktop Controls
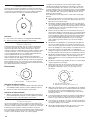
The controls can be set to anywhere between H and L.
To Set:
Push in and turn knob to desired heat setting.
Use the following chart as a guide when setting heat levels.
Setting Recommended Use
H (High)
■ Bring liquid to a boil.
Medium High
(between H and
M)
■ Hold a rapid boil.
■ Quickly brown or sear food.
M (Medium)
■ Maintain a slow boil.
■ Fry or sauté foods.
■ Cook soups, sauces, and gravies.
Medium Low
(between M and
L)
■ Stew or steam food.
■ Simmer.
L (Low)
■ Keep cooked foods warm.
Dual/Triple
Circuit Elements
■ Home canning
■ Large-diameter cookware
■ Large quantities of food
Melt
■ Melt chocolate or butter.
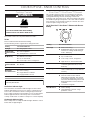
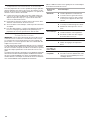
Hot Surface Indicator Light
This unit features a Hot Surface indicator light. The Hot Surface
indicator light will glow as long as any surface cooking area is too
hot to touch, even after the surface cooking area(s) is turned off.
If the cooktop is ON when a power failure occurs, the Hot Surface
indicator light will remain on after the power is restored to the
cooktop. It will remain on until the cooktop has cooled completely.
Cooktop On Indicator Light
Each cooktop has a Cooktop On indicator light. When the control
knob is ON, the light will glow.
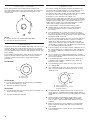
Even-Heat™ Ultra Power™ Element
This versatile element is perfect for everything from high-heat
cooking, like rapid boiling large amounts of liquids and sauces,
searing and browning of meats, and frying; to lower heat
techniques, like simmering sauces and even keeping foods warm.
The double-ring design incorporates a 10" outer element and a 6"
inner element to accommodate a variety of cookware sizes from
small saucepans to large stock pots.
10"/6" Even-Heat™ Ultra Power™ Element with Simmer
Setting:
Setting Recommended Use
Ultra High
■ Start food cooking.
■ Rapid boiling large amounts of liquids
and sauces, searing and browning of
meats, and frying.
Medium Dual
■ Maintain a slow boil.
■ Fry or sauté foods.
■ Cook soups, sauces, and gravies.
■ High simmer or simmer without lids.
Simmer Dual
■ For Simmering when using large
cookware (greater than 6" (15.2 cm)
diameter).
Single High
■ For boiling and high heat cooking with
small cookware (6" (15.2 cm) diameter
and less).
Single Low
■ Keep food warm.
■ For best results use the element
labeled Even-Heat Melt. This element
is specifically designed to reach lower
lows while still maintaining simmer and
boiling performance with small sized
cookware.
■ Low simmer using lids.
Dual Elements
■ Home canning.
■ Large-diameter cookware. Large
quantities of food.
WARNING
Fire Hazard
Turn off all controls when done cooking.
Failure to do so can result in death or fire.
REMEMBER: When cooktop is in use, the entire cooktop
area may become hot.

6
Even-Heat™ Element
This 6" element offers the low temperatures needed to melt
chocolate or butter without scorching or burning. This element is
also ideal for lower heat cooking, like simmering sauces and
warming foods.
To Use:
1. Push in and turn knob toward EVEN-HEAT MELT.
2. Turn knob to OFF when finished.
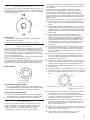
Dual Element
The dual-size element offers flexibility depending on the size of the
cookware. Single size can be used in the same way as a regular
element. The dual size combines the single and outer element and
is recommended for larger cookware, large quantities of food, and
home canning.
For best High heat performance, match burner to cookware size.
For best Low heat or Simmer performance, match cookware
to largest cooking area ring and use single ring for desired
performance.
Dual Element
To Use Single:
1. Push in and turn knob from the OFF position to the SINGLE
zone anywhere between L and H.
2. Turn knob to OFF when finished.
To Use Dual:
1. Push in and turn knob from the OFF position to the DUAL zone
anywhere between L and H.
2. Turn knob to OFF when finished.
Ceramic Glass
The surface cooking area will glow red when an element is ON,
except when Melt or Warming Zone (on some models) are used.
It may cycle on and off to maintain the selected heat level.
It is normal for the surface of light-colored ceramic glass to appear
to change color when surface cooking areas are hot.
As the glass cools, it will return to its original color.
Cleaning off the cooktop before and after each use will help keep
it free from stains and provide the most even heating. On cooktops
with light-colored ceramic glass, soils and stains may be more
visible, and may require more cleaning and attention. Cooktop
cleaner and a cooktop scraper are recommended.
For more information, see the “General Cleaning” section.
■ Avoid storing jars or cans above the cooktop. Dropping
a heavy or hard object onto the cooktop could crack
the cooktop.
■ To avoid damage to the cooktop, do not leave a hot lid on
the cooktop. As the cooktop cools, air can become trapped
between the lid and the cooktop, and the ceramic glass could
break when the lid is removed.
■ For foods containing sugar in any form, clean up all spills and
soils as soon as possible. Allow the cooktop to cool down
slightly. Then, while wearing oven mitts, remove the spills
using a scraper while the surface is still warm. If sugary spills
are allowed to cool down, they can adhere to the cooktop and
can cause pitting and permanent marks.
■ To avoid scratches, do not slide cookware or bakeware across
the cooktop. Aluminum or copper bottoms and rough finishes
on cookware or bakeware could leave scratches or marks on
the cooktop.
■ Do not cook popcorn in prepackaged aluminum containers
on the cooktop. They could leave aluminum marks that cannot
be removed completely.
■ To avoid damage to the cooktop, do not allow objects that
could melt, such as plastic or aluminum foil, to touch any
part of the entire cooktop.
■ To avoid damage to the cooktop, do not use the cooktop
as a cutting board.
■ Use cookware about the same size as the surface cooking
area. Cookware should not extend more than 1/2" (1.3 cm)
outside the area.
■ Use flat-bottomed cookware for best heat conduction and
energy efficiency. Cookware with rounded, warped, ribbed, or
dented bottoms could cause uneven heating and poor cooking
results.
■ Determine flatness by placing the straight edge of a ruler
across the bottom of the cookware. While you rotate the
ruler, no space or light should be visible between it and the
cookware.
■ Make sure the bottoms of pots and pans are clean and dry
before using them. Residue and water can leave deposits
when heated.
■ To avoid damage to the cooktop, do not cook foods directly
on the cooktop.
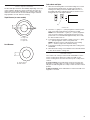
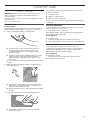
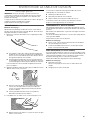
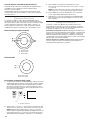
A
B
A. Single element
B. Dual element
A
B
C
A. Surface cooking area
B. Cookware/Canner 1/2" (1.3 cm)
maximum overhang

7
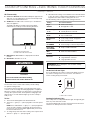
PARTS AND FEATURES – ELECTRONIC TOUCH CONTROLS
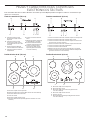
This manual covers different models. The cooktop you have purchased may have some or all of the items listed.
30" (76.2 cm) Control Panel
30" (76.2 cm) Cooktop
36" (91.4 cm) Control Panel
36" (91.4 cm) Cooktop
AB C
D
EFGH
A. Left rear single element
electronic touch control
B. Center rear single element
(even-heat melt) electronic
touch control
C. Right rear dual element
electronic touch control
D. Timer electronic touch
control
E. Wifi electronic touch control
F. Control lock hold 3 sec
G. Center front single element
electronic touch control
H. Left front dual element (even-
heat ultra power) electronic
touch control
FE D
ABC
A. Left rear single element
B. Center rear single element (even-heat melt)
C. Right rear dual element
D. Control panel
E. Center front single element
F. Left front dual element (even-heat ultra power)
A B C
D
EFG
H
A. Left rear single element electronic touch control
B. Center triple element electronic touch control
C. Right rear single element (even-heat melt) electronic touch control
D. Right front single element electronic touch control
E. Timer electronic touch control
F. Wifi electronic touch control
G. Control lock hold 3 sec
H. Left front dual element (even-heat ultra power) electronic touch
control
A B
C
DE
F
A. Left rear single element
B. Center triple element
C. Right rear single element (even-heat melt)
D. Right front single element
E. Control panel
F. Left front dual element (even-heat ultra power)

8
COOKTOP CONTROLS – ELECTRONIC TOUCH CONTROLS
Cooktop Controls
Wi-Fi Connectivity
■ Connect to Network: Download the Whirlpool
®
app from the
app store on your mobile phone. See the Connectivity Setup
sheet for more detailed instructions.
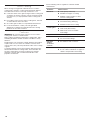
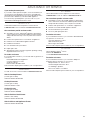
■ SAID Code: The SAID code is used to sync a smart device
with your appliance.
The SAID code plate is located on the metal cabinet
underneath the cooktop. See the following illustration.
■ MAC Address: MAC Address is displayed for the Wi-Fi
module.
■ Wi-Fi Radio: Turn Wi-Fi on or off.
The electronic touch controls offer a variety of heat settings
for optimal cooking results.
For maximum element operation, all cooktop electronic touch
controls can be set to High when bringing liquids to a rapid boil.
When the cooktop is turned on or after power is restored to the
cooktop after a power failure, all temperature setting lights will
glow for 10-15 seconds. After the lights go off, the cooktop is
ready to use.
To Use:
1. Touch the On/Off keypad for the desired element.
2. Touch the “+” (plus) or “-” (minus) keypad to select the power
level.
NOTE: Press and hold the “+” (plus) or “-” (minus) keypad for
a few seconds to quickly scroll through the power level. If a
power level is not selected within approximately 10 seconds,
the element will not turn on.
3. To change the power level while cooking, select a power level
with the “+” (plus) or “-” (minus) keypad.
4. When finished cooking, touch ON/OFF for the desired element
to turn off surface cooking area(s) individually or touch the Off
keypad to turn off all surface cooking areas at once.
Use the following chart as a guide when setting heat levels.
Setting Recommended Use
High
20 BOIL
■ Start food cooking.
■ Bring liquid to a boil.
Medium High
17-19
■ Hold a rapid boil.
■ Quickly brown or sear food.
Medium
10-16
■ Maintain a slow boil.
■ Fry or sauté foods.
Medium Low
04-09
■ Cook soups, sauces, and gravies.
■ Stew or steam food.
Low
03 SIMMER
■ Provide lowest simmer/heat setting.
■ Simmer (range of simmer temperatures).
Keep Warm
02 K. WARM
■ Keep cooked foods warm.
Melt
01 MELT
■ Melt chocolate and butter.
Dual/Triple
Elements
■ Home canning
■ Large-diameter cookware
■ Large quantities of food
Hot Surface Indicator Lights
An “H” will appear in the surface cooking area display as long as
any surface cooking area is too hot to touch, even after the
surface cooking area(s) is turned off.
Cooktop On Indicator Light
The cooktop has a Cooktop ON indicator light. The light will glow
when any of the elements are ON.
The element display will show the current power level when that
element is On and a power level is selected.
AB
A. Model/serial number plate
B. SAID code for Wi-Fi connection
WARNING
Fire Hazard
Turn off all controls when done cooking.
Failure to do so can result in death or fire.
REMEMBER: When cooktop is in use, the entire cooktop
area may become hot.
A. Hot surface indicator

9
Dual/Triple Element
The dual and triple elements offer flexibility depending on the size
of the cookware. Single size can be used in the same way as a
regular element. The dual and triple sizes combine single, dual,
and outer elements and are recommended for larger cookware,
large quantities of food, and home canning.
Triple Element (on some models)
Dual Element
To Use Dual and Triple:
1. When the On/Off keypad is touched, all heating zones for the
selected element will be active. To reduce the number of
heating zones being used, touch ZONE SIZE. One, two, or
three lights will glow to indicate the number of burner zones
being used. One of the lights will blink.
2. Touch the “+” (plus) or “-” (minus) keypad to select the power
level. A tone will sound each time a keypad is touched.
NOTE: Press and hold the “+” (plus) or “-” (minus) keypad for
a few seconds to quickly scroll through the power level. If a
power level is not selected within approximately 10 seconds,
the element will not turn on.
3. To change the power level while cooking, touch the “+” (plus)
or “-” (minus) keypad to select a new power level.
NOTE: If the power level is at the minimum power setting,
press “-” minus to jump to the maximum setting.
4. To change the heating zones being used while cooking, touch
ZONE SIZE.
5. When finished cooking, touch ON/OFF for the desired element
to turn off the surface cooking area.
Control Lock
The Control Lock cooktop control avoids unintended use of the
surface cooking areas. When the cooktop is locked out, the
surface cooking areas cannot be turned on by the cooktop touch
controls.
To Lock Cooktop: Touch and hold the Control Lock Hold 3 Sec
keypad for 3 seconds. After 3 seconds, Control Lock Hold 3 Sec
will glow red, indicating that the cooktop controls are in the lockout
position.
To Unlock Cooktop: Touch and hold the Control Lock Hold 3 Sec
keypad for 3 seconds.
A. Single size
B. Dual size
C. Triple size
A. Single element
B. Dual element
A
A. Zone size

10
Home Canning
When canning for long periods, alternate the use of surface
cooking areas, elements, or surface burners between batches.
This allows time for the most recently used areas to cool.
■ Center the canner on the grate or largest surface cooking area
or element. On electric cooktops, canners should not extend
more than 1/2" (1.3 cm) beyond the surface cooking area or
element.
■ Do not place canner on two surface cooking areas, elements
or surface burners at the same time.
■ On ceramic glass models, use only flat-bottomed canners.
■ For more information, contact your local agricultural
department. Companies that manufacture home canning
products can also offer assistance.
Cookware
IMPORTANT: Do not leave empty cookware on a hot surface
cooking area, element, or surface burner.
Ideal cookware should have a flat bottom, straight sides, and a
well-fitting lid and the material should be of medium-to-heavy
thickness.
Rough finishes may scratch the cooktop. Aluminum and copper
may be used as a core or base in cookware. However, when
used as a base, they can leave permanent marks on the cooktop
or grates.
Cookware material is a factor in how quickly and evenly heat is
transferred which affects cooking results. A nonstick finish has
the same characteristics as its base material. For example,
aluminum cookware with a nonstick finish will take on the
properties of aluminum.
Use the following chart as a guide for cookware material
characteristics.
Cookware Characteristics
Aluminum
■ Heats quickly and evenly.
■ Suitable for all types of cooking
■ Medium or heavy thickness is best
for most cooking tasks.
Cast iron
■ Heats slowly and evenly.
■ Good for browning and frying
■ Maintains heat for slow cooking.
Ceramic or
ceramic glass
■ Follow manufacturer’s instructions.
■ Heats slowly but unevenly.
■ Ideal results on low-to-medium
heat settings
Copper
■ Heats very quickly and evenly.
Earthenware
■ Follow manufacturer’s instructions.
■ Use on low heat settings.
Porcelain
enamel-
on-steel or
cast iron
■ See stainless steel or cast iron.
Stainless steel
■ Heats quickly but unevenly.
■ A core or base of aluminum or copper on
stainless steel provides even heating.

11
COOKTOP CARE
General Cleaning
IMPORTANT: Before cleaning, make sure all controls are off
and the cooktop is cool. Always follow label instructions on
cleaning products.
Soap, water, and a soft cloth or sponge are suggested first, unless
otherwise noted.
Do not use a steam cleaner.
CERAMIC GLASS
Cleaning Method:
To avoid damaging the cooktop, do not use steel wool, abrasive
powder cleansers, chlorine bleach, rust remover, or ammonia.
1. Remove food/residue with the Cooktop Scraper.
■ For best results, use the Cooktop Scraper while the
cooktop is still warm but not hot to the touch. It is
recommended to wear an oven mitt while scraping
thewarm cooktop.
■ Hold the Cooktop Scraper at approximately a 45° angle
against the glass surface and scrape the residue. It
will be necessary to apply pressure in order to remove
theresidue.
Allow the cooktop to cool down completely before proceeding
to Step 2.
2. Apply a few dime-sized drops of affresh
®
Cooktop Cleaner
tothe affected areas.
■ Rub affresh
®
Cooktop Cleaner onto the cooktop surface
with the blue Cooktop Cleaning Pad. Some pressure is
needed to remove stubborn stains.
■ Allow the cleaner to dry to a white haze before proceeding
to Step 3.
3. Polish with a clean, dry cloth or a clean, dry paper towel.
■ Repeat steps 1 through 3 as necessary for stubborn
orburned-on stains.
The Complete Cooktop Cleaner Kit is available for order and
includes the following:
■ Cooktop Scraper
■ Affresh
®
Cooktop Cleaner
■ Blue Cooktop Cleaning Pads
See the “Accessories” section for part numbers and information
on ordering.
COOKTOP CONTROLS
To avoid damage to the cooktop controls, do not use steel wool,
abrasive cleansers, or oven cleaner.
To avoid damage, do not soak knobs.
When replacing knobs, make sure knobs are in the Off position.
Do not remove seals under knobs.
Cleaning Method:
■ Soap and water:
Pull knobs straight away from control panel to remove.
■ When replacing knobs, make sure they are in the Off position.
STAINLESS STEEL (on some models)
To avoid damage to stainless steel surfaces, do not use
soap-lled scouring pads, abrasive cleaners, Cooktop Cleaner,
steelwool pads, gritty washcloths, or abrasive paper towels.
Rub in direction of grain to avoid damaging.
Cleaning Method:
■ All-purpose cleaner:
Rinse with clean water and dry with soft, lint-free cloth.
■ Vinegar for hard water spots.

12
TROUBLESHOOTING
First try the solutions suggested here. If you need further assistance or more recommendations that may help you avoid a service call,
visit https://kitchenaid.custhelp.com. In Canada, visit http://www.kitchenaid.ca. In Mexico, visit https://kitchenaid.mx/servicio.
Contact us by mail with any questions or concerns at the address below.
In the U.S.A.:
KitchenAid Brand Home Appliances
Customer eXperience Center
553 Benson Road
Benton Harbor, MI 49022-2692
In Canada:
KitchenAid Brand Home Appliances
Customer eXperience Centre
200 - 6750 Century Ave.
Mississauga, Ontario L5N 0B7
In Mexico:
Whirlpool México, S. de R.L. de C.V.
Carretera Miguel Alemán Km 16.13, Col.
El Milagro, Apodaca,
Nuevo León, México, C.P. 66634
Please include a daytime phone number in your correspondence.
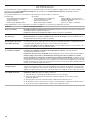
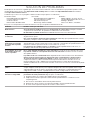
Problem Possible Causes and/or Solutions
Nothing will operate
A household fuse has blown or a circuit breaker has tripped: Replace the fuse or reset
the circuit breaker. If the problem continues, call an electrician.
Cooktop isn’t wired properly: See the Installation Instructions.
Cooktop will not operate
Control knob set incorrectly: Push in knob before turning to a setting.
One or more burners stopped working during use: Allow the cooktop to cool down for 30 minutes,
then turn the burner on again.
Excessive heat around
cookware on cooktop
Cookware is not the proper size: Use cookware about the same size as the surface cooking area,
element, or surface burner. Cookware should not extend more than 1/2" (1.3 cm) outside the cooking
area.
Cooktop surfaces become hot: When cooktop is in use, the entire cooktop area may become hot.
Cooktop cooking results
not what expected
Proper cookware is not being used: See the “Cookware” section.
Control knob is not set to the proper heat level: See the “Cooktop Controls” section.
Cooktop is not level: Level the cooktop. See the Installation Instructions.
Certain power levels seem to take longer to cook food or some power levels do not perform as
well as usual: The cooktop regulates the temperature of the internal components and automatically
reduces the power of all the elements in use without any visual or audible feedback. Allow the cooktop
to cool down for 30 minutes to resume normal cooking performance. See “To Use” in the “Cooktop
Controls” section.
Cooktop is beeping
Key is pressed and held: Remove any object left on the control area, or wipe any debris from the
control panel surface. If the cooktop continues beeping for longer than 15 minutes, the control panel
will lock, and the F1E0 code will appear in the display. See “Cooktop is dispalying F1E0 code” in this
section.
Cooktop is dispalying F1E0
code
Cooktop is dispalying F1E0, indicating that one or more keys are permanently pressed: Follow the
steps below.
1. Make sure the cooktop controls are off.
2. Clean the cooktop touch control panel thoroughly. See the “General Cleaning” section.
3. Disconnect power or unplug the cooktop.
4. After 1 minute, reconnect power or plug in the cooktop.
5. If error returns after 1 minute, call for service.

13
ASSISTANCE OR SERVICE
If you need replacement parts
If you need to order replacement parts, we recommend that you
use only factory specified parts. These factory specified parts
will fit right and work right because they are made with the same
precision used to build every new KitchenAid
®
appliance.
To locate factory specified parts in your area, call us or your
nearest KitchenAid designated service center.
In the U.S.A.
Call the KitchenAid Customer eXperience Center toll-free:
1-800-422-1230 or visit our website at www.kitchenaid.com.
Our consultants provide assistance with:
■ Scheduling of service. KitchenAid
®
appliances designated
service technicians are trained to fulfill the product warranty
and provide after-warranty service anywhere in the United
States.
■ Features and specifications on our full line of appliances.
■ Referrals to local KitchenAid
®
appliance dealers.
■ Installation information.
■ Use and maintenance procedures.
■ Repair parts sales.
■ Specialized customer assistance (Spanish speaking, hearing
impaired, limited vision, etc.).
For further assistance
If you need further assistance, you can write with any questions or
concerns at:
KitchenAid Brand Home Appliances
Customer eXperience Center
553 Benson Road
Benton Harbor, MI 49022-2692
Please include a daytime phone number in your correspondence.
Accessories
To order accessories, visit our website at www.kitchenaid.com.
Affresh
®
Cooktop Cleaner
(ceramic glass models)
Order Part Number W10355051
Cooktop Protectant
(ceramic glass models)
Order Part Number 31463
Cooktop Scraper
(ceramic glass models)
Order Part Number WA906B
Affresh
®
Stainless Steel Cleaner
(stainless steel models)
Order Part Number W10355016
Affresh
®
Kitchen and Appliance Cleaner
Order Part Number W10355010
In Canada
Call the KitchenAid Customer eXperience Center toll-free:
1-800-807-6777 or visit our website at www.kitchenaid.ca.
Our consultants provide assistance with:
■ Scheduling of service. KitchenAid
®
appliances designated
service technicians are trained to fulfill the product warranty
and provide after-warranty service anywhere in Canada.
■ Features and specifications on our full line of appliances.
■ Referrals to local KitchenAid
®
appliance dealers.
■ Use and maintenance procedures.
■ Accessory and repair parts sales.
For further assistance
If you need further assistance, you can write to KitchenAid with
any questions or concerns at:
Customer eXperience Centre
200 - 6750 Century Ave.
Mississauga, ON L5N 0B7
Please include a daytime phone number in your correspondence.
In Mexico
Call the Whirlpool Service
®
Center:
Teléfono: 01 800 0022 76
or visit www.kitchenaid.mx/servicio.
For further assistance
If you need further assistance, you can write to Whirlpool
Properties with any questions or concerns at:
Whirlpool México, S. de R.L. de C.V.
Carretera Miguel Alemán Km 16.13,
Col. El Milagro, Apodaca,
Nuevo León, México, C.P. 66634
Please include a daytime phone number in your correspondence.

GUIDE D’UTILISATION DE LA TABLE DE
CUISSON RADIANTE À COMMANDES
TACTILES ET BOUTONS ROTATIFS DE
30 PO ET 36 PO (76,2 CM ET 91,4 CM)
Pour des questions à propos des éléments suivants : caractéristiques, fonctionnement/rendement, pièces, accessoires ou entretien/
dépannage, composer le : 1 800 422-1230 ou visiter notre site Web au www.kitchenaid.com.
Au Canada, composer le : 1 800 807-6777 ou visiter notre site Web au www.Kitchenaid.ca.
Au Mexique, composer le : 01 800 0022 767 ou visiter notre site Web sur www.kitchenaid.mx.
Numéro de modèle_________________________________________ Numéro de série ____________________________________________
Table des matières
SÉCURITÉ DE LA TABLE DE CUISSON .....................................15
PIÈCES ET CARACTÉRISTIQUES – COMMANDES
À BOUTON ROTATIF ....................................................................17
UTILISATION DE LA TABLE DE CUISSON –
COMMANDES À BOUTONS ROTATIFS .....................................18
Commandes de la table de cuisson ....................................................... 18
Élément Even-Heat™ Ultra Power™ .................................................... 18
Élément Even-Heat™ ............................................................................. 18
Élément double ....................................................................................... 18
Faire fondre ............................................................................................. 19
Vitrocéramique ........................................................................................ 19
PIÈCES ET CARACTÉRISTIQUES – COMMANDES
ÉLECTRONIQUES TACTILES......................................................20
COMMANDES DE LA TABLE DE CUISSON –
COMMANDES ÉLECTRONIQUES TACTILES ...........................21
Commandes de la table de cuisson ....................................................... 21
Éléments double/triple ............................................................................ 22
Verrouillage des commandes ................................................................. 22
Préparation de conserves à la maison ................................................... 23
Ustensile de cuisson ............................................................................... 23
ENTRETIEN DE LA TABLE DE CUISSON ..................................24
Nettoyage général .................................................................................. 24
DÉPANNAGE .................................................................................25
ASSISTANCE OU DÉPANNAGE ..................................................26
Aux É.-U. ................................................................................................. 26
Accessoires ............................................................................................. 26
Au Canada .............................................................................................. 26
Au Mexique ............................................................................................. 26

15
SÉCURITÉ DE LA TABLE DE CUISSON
Risque possible de décès ou de blessure grave si vous ne
suivez pas immédiatement les instructions.
Risque possible de décès ou de blessure grave si vous
ne suivez pas les instructions.
Tous les messages de sécurité vous diront quel est le danger potentiel et vous disent comment réduire le risque de blessure et
ce qui peut se produire en cas de non-respect des instructions.
Votre sécurité et celle des autres est très importante.
Nous donnons de nombreux messages de sécurité importants dans ce manuel et sur votre appareil ménager. Assurez-vous de
toujours lire tous les messages de sécurité et de vous y conformer.
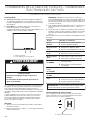
AVERTISSEMENT
DANGER
Voici le symbole d’alerte de sécurité.
Ce symbole d’alerte de sécurité vous signale les dangers potentiels de décès et de blessures graves à vous
et à d’autres.
Tous les messages de sécurité suivront le symbole d’alerte de sécurité et le mot “DANGER” ou
“AVERTISSEMENT”. Ces mots signifient :
Avertissements de la proposition 65 de l'État de Californie :
AVERTISSEMENT : Ce produit contient au moins un produit chimique connu par l’État de Californie pour être à l’origine de
cancers.
AVERTISSEMENT : Ce produit contient au moins un produit chimique connu par l’État de Californie pour être à l’origine de
malformations et autres déficiences de naissance.

16
IMPORTANTES INSTRUCTIONS DE SÉCURITÉ
CONSERVEZ CES INSTRUCTIONS
AVERTISSEMENT : Pour réduire le risque d'incendie, de
choc électrique, de blessures ou de dommages lors de
l'utilisation de la table de cuisson, observer les précautions
élémentaires suivantes, y compris ce qui suit :
■ MISE EN GARDE : Ne pas remiser dans les armoires
au-dessus d'une table de cuisson, des articles que des
enfants pourraient vouloir atteindre. Les enfants pourraient
se brûler ou se blesser en grimpant sur la table de cuisson.
■ Installation appropriée – S’assurer que la table de cuisson
est correctement installée et reliée à la terre par un
technicien qualifié.
■ Ne jamais utiliser la table de cuisson pour réchauffer ou
chauffer la pièce.
■ Ne pas laisser les enfants seuls – Les enfants ne doivent
pas être laissés seuls ou sans surveillance dans la pièce
où la table de cuisson est en service. Ne jamais laisser les
enfants s’asseoir ou se tenir sur une partie quelconque de
la table de cuisson.
■ Cet appareil ne convient pas à une utilisation par des
personnes (y compris des enfants) dont les capacités
physiques, sensorielles ou mentales sont différentes ou
réduites ou qui ne possèdent pas l’expérience, les
connaissances ou l’expertise nécessaire, à moins d’être
supervisées ou d’avoir reçu des instructions concernant
l’utilisation par une personne responsable de leur sécurité.
■ Porter des vêtements appropriés – Des vêtements amples
ou détachés ne doivent jamais être portés pendant
l’utilisation de la table de cuisson.
■ Entretien par l’utilisateur – Ne pas réparer ou remplacer
toute pièce de la table de cuisson si ce n’est pas
spécifiquement recommandé dans le manuel. Toute autre
opération d’entretien ou de réparation doit être confiée à un
technicien qualifié.
■ Remisage sur la table de cuisson – Des matériaux
inflammables ne doivent pas être remisés près des
éléments à la surface.
■ AVERTISSEMENT : Ne pas surveiller le gril électrique
pendant la cuisson d’huile ou de gras est dangereux et
représente un risque d’incendie.
■ Ne pas utiliser d’eau sur un feu de graisse – Étouffer le feu
ou la flamme ou utiliser un extincteur à produits chimiques
secs ou à mousse.
■ N’utiliser que des mitaines de four sèches – Des mitaines
de four mouillées ou humides sur des surfaces chaudes
peuvent provoquer des brûlures provenant de
la vapeur.
Ne pas laisser les mitaines de four toucher les éléments
chauffants. Ne pas utiliser une serviette ou autre tissu
épais.
■ NE PAS TOUCHER LES ÉLÉMENTS À LA SURFACE OU
L’ESPACE PRÈS DES ÉLÉMENTS – Les éléments de
surface peuvent être chauds même lorsqu’ils ont une teinte
foncée. Les endroits près des éléments à la surface
peuvent devenir assez chauds pour provoquer des
brûlures. Pendant et après l’utilisation, ne pas toucher les
éléments chauffants et ne pas laisser les vêtements ou
autres matériaux inflammables entrer en contact avec ces
éléments de surface ou les endroits près des éléments,
avant qu’ils soient suffisamment refroidis. Ces endroits
comprennent la table de cuisson et les surfaces près de la
table de la cuisson.
■ Utiliser des ustensiles de format approprié – La table de
cuisson est munie d’un ou de plusieurs éléments
chauffants de différentes grandeurs. Choisir les ustensiles
qui ont un fond plat assez grand pour couvrir l’élément
chauffant de la surface de cuisson. L’utilisation d’ustensiles
trop petits exposera une partie de l’élément chauffant, ce
qui peut provoquer l’inflammation des vêtements.
L’utilisation d’un récipient de format correct améliore
l’efficacité de la cuisson.
■
Ne jamais laisser les éléments de la table de cuisson sans
surveillance alors qu’ils chauffent à la puissance maximale
– Il pourrait en résulter une ébullition qui cause de la
fumée et des renversements de corps gras qui peuvent
s’enflammer.
■ ATTENTION : La cuisson devrait être supervisée. Les
petites périodes de cuisson requièrent une attention
constante.
■ Ustensiles de cuisson vitrifiés – Seulement certains types
d’ustensiles de verre, vitrocéramique, céramique, faïence
ou autres surfaces vitrifiées conviennent pour le service
sur une table de cuisson, sans bris attribuables aux
changements soudains de température.
■ Les poignées des ustensiles doivent être tournées vers
l’intérieur et non vers le dessus des éléments adjacents –
Pour réduire les risques de brûlures, d’inflammation de
produits combustibles et de renversements dus à
l’entrechoquement non intentionnel des ustensiles, la
poignée d’un ustensile doit être positionnée de sorte
qu’elle est tournée vers l’intérieur et non au-dessus des
éléments de surface adjacents.
■ Les objets de métal comme les couteaux, fourchettes,
cuillères et couvercles ne devraient pas être laissés sur la
surface de cuisson du gril, ils pourraient devenir chauds.
■ Ne pas faire cuire sur une table de cuisson endommagée –
Si
la table de cuisson est brisée, les solutions de nettoyage
et les renversements peuvent pénétrer dans la table brisée
et créer le risque d’un choc électrique. Contacter
immédiatement un technicien qualifié. Éteindre l’appareil
pour éviter le risque d’une décharge électrique.

17
IMPORTANTES INSTRUCTIONS DE SÉCURITÉ
CONSERVEZ CES INSTRUCTIONS
■ Si le cordon d’alimentation est endommagé, le faire
remplacer par le fabricant, l’agent d’entretien de ce dernier
ou par une personne qualifiée pour éviter tout danger.
■ Nettoyer la table de cuisson avec prudence – Si une
éponge ou un chiffon mouillé est utilisé pour essuyer les
renversements sur une surface de cuisson chaude, éviter
les brûlures causées par la vapeur chaude. Certains
nettoyants peuvent produire des émanations désagréables
lorsqu’ils sont utilisés sur une surface chaude.
■ L’appareil n’est pas conçu pour être mis en marche à l’aide
d’une minuterie ou d’un système de commande à distance.
Pour les appareils avec hotte de ventilation –
■ Nettoyer les hottes de ventilation fréquemment – La graisse
ne doit pas s’accumuler sur la hotte ou le filtre.
■ Lorsque vous flambez des aliments sous la hotte, mettre le
ventilateur en marche.
Pour les appareils à éléments en spirale –
■ S’assurer que les cuvettes de propreté sont en place –
L’absence de ces cuvettes au cours de la cuisson peut
causer des dommages aux fils ou aux composants en
dessous des éléments.
■ Garnissages protecteurs – Ne pas recouvrir les cuvettes
de papier d’aluminium sauf tel que suggéré dans le
manuel. L’installation incorrecte de papier d’aluminium ou
autre matériau peut causer un risque de choc électrique ou
d’incendie.
■ Ne pas tremper les éléments de chauffage amovibles –
Les éléments de chauffage ne doivent jamais être
immergés dans l'eau.

18
PIÈCES ET CARACTÉRISTIQUES – COMMANDES À
BOUTON ROTATIF
Ce manuel couvre différents modèles. La table de cuisson que vous avez achetée peut comporter tous les éléments énumérés ou
seulement certains d’entre eux.
Tableau de commande de 30 po (76,2 cm)
Table de cuisson de 30 po (76,2 cm)
Tableau de commande de 36 po (91,4 cm)
Table de cuisson de 36 po (91,4 cm)
A
B
C
D
E
F
G
A. Bouton de commande de l’élément arrière gauche simple
B. Bouton de commande de l’élément arrière central simple
C. Bouton de commande de l’élément arrière droit simple
D. Bouton de commande de l’élément avant gauche double
E. Bouton de commande de l’élément avant droit double
F. Témoin lumineux de surface chaude
G. Témoin de mise en marche de la table de cuisson
ABCD
FE
A. Élément simple arrière gauche
B. Élément arrière central simple
C. Élément arrière droit simple
D. Tableau de commande
E. Élément avant droit double
F. Élément double avant gauche
A
CDEFG
B
A. Témoin de mise en marche de la table de cuisson
B. Indicateur de surface chaude
C. Bouton de commande de l’élément avant droit double
D. Bouton de commande de l’élément arrière droit simple
E. Bouton de commande de l’élément central simple
F. Bouton de commande de l’élément arrière gauche triple
G. Bouton de commande de l’élément avant gauche simple
ABC
DEF
A. Élément arrière gauche triple
B. Élément central simple
C. Élément arrière droit simple
D. Élément avant droit double
E. Tableau de commande
F. Élément avant gauche simple

19
UTILISATION DE LA TABLE DE CUISSON – COMMANDES À
BOUTONS ROTATIFS
Commandes de la table de cuisson
Les commandes peuvent être réglées à n’importe quelle position
entre H (élevé) et L (bas).
Réglage :
Pousser et tourner le bouton au réglage de chaleur désiré.
Utiliser le tableau suivant comme guide lors du réglage des niveaux
de chaleur.
Réglage Utilisation recommandée
H (élevé)
■ Porter un liquide à ébullition.
Moyen élevé
(entre H et M)
■ Maintenir une ébullition rapide.
■ Brunir ou saisir rapidement les aliments.
M (moyenne)
■ Maintenir une ébullition lente.
■ Faire frire ou sauter les aliments.
■ Faire cuire les soupes et les sauces.
Moyen bas (entre
M et L)
■ Faire mijoter ou étuver les aliments.
■ Faire mijoter à feu doux.
L (bas)
■ Pour garder au chaud les aliments cuits.
Éléments à
double/triple
circuit
■ Préparation de conserves à la maison
■ Ustensile de cuisson à grand diamètre
■ Grandes quantités de nourriture
Faire fondre
■ Faire fondre du chocolat ou du beurre.
Témoin lumineux de surface chaude
Cet appareil comporte un témoin lumineux de surface chaude.
Le témoin lumineux de surface chaude reste allumé tant qu’une
surface de cuisson est trop chaude pour être touchée, même
lorsque la ou les surfaces de cuisson sont éteintes.
Si une panne de courant survient alors que la table de cuisson
est allumée, le témoin lumineux de surface chaude restera allumé
après le rétablissement de l’alimentation électrique à la table
de cuisson. Il restera allumé jusqu’à ce que la table de cuisson
refroidisse complètement.
Témoin de mise en marche de la table de cuisson
Toutes les tables de cuisson comportent un témoin lumineux
de mise en marche de la table de cuisson. Lorsque le bouton
de commande est activé, le témoin s’allume.
Élément Even-Heat™ Ultra Power™
Ce pratique élément est parfait pour cuir à température élevée, faire
bouillir une grande quantité de liquide ou de sauce, griller ou brunir
des viandes et frire. Il est aussi parfait pour les techniques à basse
température comme pour laisser mijoter des sauces et même garder
les aliments au chaud. La conception à deux anneaux comprend
un élément externe de 10 po et un élément interne de 6 po qui
permettent d’utiliser des ustensiles de différentes tailles, des petites
casseroles aux grandes marmites.
Élément Even-Heat™ Ultra Power™ de 10 po/ 6 po
(25,4 cm/15,2 cm) avec réglage de mijotage :
Réglage Utilisation recommandée
Ultra-haut
■ Démarrer la cuisson des aliments.
■ Fait rapidement bouillir une grande
quantité de liquide ou de sauce, saisir
ou brunir des viandes et frire.
Moyen double
■ Maintenir une ébullition lente.
■ Faire frire ou sauter les aliments.
■ Faire cuire les soupes et les sauces.
■ Mijotage vif ou mijotage sans
couvercle.
Mijoter double
■ Pour faire mijoter en utilisant un
ustensile de grande taille (plus de 6 po
[15,2 cm] de diamètre).
Élevé simple
■ Pour faire bouillir et cuire à grande
température avec un ustensile de petite
taille (6 po [15,2 cm] de diamètre ou
moins).
Faible simple
■ Garder les aliments au chaud.
■ Pour obtenir les meilleurs résultats,
utiliser l’élément étiqueté chaleur
constante pour faire fondre. Cet
élément est spécialement conçu pour
produire une très faible chaleur tout en
offrant la possibilité de faire mijoter et
bouillir dans un ustensile de petite taille.
■ Mijotage lent avec couvercle.
Éléments doubles
■ Préparation de conserves à la maison.
■ Ustensile de cuisson à grand diamètre.
Grandes quantités de nourriture.
Risque d'incendie
Fermer tous les réglages lorsque la cuisson est
terminée.
Le non-respect de cette instruction peut causer un
décès ou un incendie.
AVERTISSEMENT
N’OUBLIEZ PAS : Lors de l’utilisation de la cuisinière, toute
la surface de la table de cuisson peut devenir chaude.

20
Élément Even-Heat™
L’élément de 6 po permet de produire la chaleur nécessaire pour
faire fondre du chocolat ou du beurre sans les faire roussir ou brûler.
Cet élément est aussi parfait pour la cuisson à faible température
comme faire mijoter une sauce ou réchauffer des aliments.
Utilisation :
1. Pousser et tourner le bouton au réglage EVEN-HEAT MELT.
2. Tourner le bouton à OFF (arrêt) après avoir terminé.
Élément double
L’élément à dimension double offre une souplesse d’utilisation
en fonction de la taille de l’ustensile de cuisson. La dimension
simple peut être utilisée de la même manière qu’un élément
ordinaire. L’élément à double dimension combine l’élément simple
et l’élément externe ; il est recommandé pour les ustensiles de
cuisson de grande dimension, les grandes quantités d’aliments
et pour la préparation de conserves à la maison.
Pour une performance de cuisson idéale à forte température,
utiliser un brûleur de taille adaptée à celle de l’ustensile de cuisson.
Pour une performance idéale de mijotage ou de cuisson à petit feu,
placer le plat de cuisson sur l’anneau de cuisson le plus large qui
lui corresponde et n’utiliser qu’un seul élément circulaire de cuisson
pour obtenir la performance souhaitée.
Élément double
Utilisation de l’élément simple :
1. Appuyer sur le bouton et le tourner de la position OFF (arrêt) à la
zone SINGLE (simple) n’importe où entre L (faible) et H (élevé).
2. Tourner le bouton à OFF (arrêt) après avoir terminé.
Utilisation de l’élément double :
1. Appuyer sur le bouton et le tourner de la position OFF (arrêt) à
la zone DUAL (double) n’importe où entre L (faible) et H (élevé).
2. Tourner le bouton à OFF (arrêt) après avoir terminé.
Vitrocéramique
La zone de la surface de cuisson rougeoie lorsque l’élément est
allumé, sauf lorsque la zone Faire fondre ou la zone de maintien au
chaud (sur certains modèles) est utilisée. Il s’allume et s’éteint par
intermittence pour maintenir le niveau de chaleur sélectionné.
Il est normal que la surface de vitrocéramique claire semble changer
de couleur lorsque les zones de cuisson à la surface sont chaudes.
Lorsque le verre refroidit, il revient à sa couleur originale.
Le fait d’essuyer la table de cuisson avant et après chaque
utilisation permettra d’éviter la présence de taches et d’assurer
une meilleure répartition de la chaleur. Sur les tables de cuisson
en vitrocéramique claire, les salissures et taches sont susceptibles
d’être plus visibles et de nécessiter davantage de nettoyage et de
soins. L’utilisation d’un nettoyant pour table de cuisson et d’un
grattoir est recommandée.
Pour obtenir plus de renseignements, voir la section “Nettoyage
général”.
■ Ne pas ranger de bocaux ou de boîtes de conserve au-dessus
de la table de cuisson. La chute d’un objet lourd ou dur sur la
table de cuisson pourrait la fêler.
■ Afin d’éviter d’endommager la table de cuisson, ne pas laisser
un couvercle chaud sur la table de cuisson. Lorsque la table de
cuisson refroidit, de l’air peut se trouver piégé entre le couvercle
et la table de cuisson et la vitrocéramique pourrait se casser
lorsqu’on enlève le couvercle.
■ Nettoyer dès que possible tous les renversements et toutes les
salissures des aliments contenant du sucre sous n’importe quelle
forme. Laisser la table de cuisson refroidir légèrement. Ensuite,
tout en portant des mitaines de four, nettoyer les renversements
avec un grattoir pendant que la surface est encore tiède. Si on
laisse le sucre refroidir sur la table de cuisson, il se peut que
celui-ci adhère à la surface et laisse un creux et des marques
permanentes.
■ Afin d’éviter toute égratignure, ne pas faire glisser de plats de
cuisson sur la table de cuisson. Les fonds en aluminium ou en
cuivre et les finis rugueux des ustensiles de cuisson pourraient
laisser des égratignures ou des marques sur la table de cuisson.
■ Ne pas faire cuire de maïs soufflé dans son emballage en
aluminium d’origine sur la table de cuisson. Il pourrait rester des
traces d’aluminium qui ne peuvent être complètement enlevées.
■ Afin d’éviter d’endommager la table de cuisson, ne pas laisser
d’objets qui pourraient fondre, comme du plastique ou du
papier d’aluminium, toucher une partie quelconque de la table
de cuisson.
■ Afin d’éviter d’endommager la table de cuisson, ne pas l’utiliser
en guise de planche à découper.
■ Utiliser des ustensiles de cuisson de la même taille environ
que la surface de cuisson. L’ustensile de cuisson ne doit
pas dépasser de plus de 1/2 po (1,3 cm) hors de la zone
de cuisson.
■ Utiliser des ustensiles de cuisson à fond plat pour une meilleure
conduction de la chaleur et une meilleure utilisation de l’énergie.
Les plats de cuisson à fond arrondi, déformé, cannelé ou
bosselé pourraient causer un chauffage inégal et de mauvais
résultats de cuisson.
■ Contrôler la planéité du récipient en plaçant une règle plate en
travers du fond du plat. Lorsqu’on fait tourner la règle, aucun
espace ou jour ne doit être visible entre celle-ci et le plat.
■ S’assurer que les fonds des casseroles et poêles sont propres
et secs avant de les utiliser. Les résidus et l’eau peuvent laisser
des dépôts quand ils sont chauffés.
■ Afin d’éviter d’endommager la table de cuisson, ne pas faire
cuire d’aliments directement sur la table de cuisson.
A
B
A. Élément simple B. Élément double
A
B
C
A. Zone de cuisson à la surface
B. Dépassement maximum de 1/2 po (1,3 cm)
La page est en cours de chargement...
La page est en cours de chargement...
La page est en cours de chargement...
La page est en cours de chargement...
La page est en cours de chargement...
La page est en cours de chargement...
La page est en cours de chargement...
La page est en cours de chargement...
La page est en cours de chargement...
La page est en cours de chargement...
La page est en cours de chargement...
La page est en cours de chargement...
La page est en cours de chargement...
La page est en cours de chargement...
La page est en cours de chargement...
La page est en cours de chargement...
La page est en cours de chargement...
La page est en cours de chargement...
La page est en cours de chargement...
La page est en cours de chargement...
La page est en cours de chargement...
La page est en cours de chargement...
La page est en cours de chargement...
La page est en cours de chargement...
-
 1
1
-
 2
2
-
 3
3
-
 4
4
-
 5
5
-
 6
6
-
 7
7
-
 8
8
-
 9
9
-
 10
10
-
 11
11
-
 12
12
-
 13
13
-
 14
14
-
 15
15
-
 16
16
-
 17
17
-
 18
18
-
 19
19
-
 20
20
-
 21
21
-
 22
22
-
 23
23
-
 24
24
-
 25
25
-
 26
26
-
 27
27
-
 28
28
-
 29
29
-
 30
30
-
 31
31
-
 32
32
-
 33
33
-
 34
34
-
 35
35
-
 36
36
-
 37
37
-
 38
38
-
 39
39
-
 40
40
-
 41
41
-
 42
42
-
 43
43
-
 44
44


