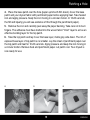
Aqua Lung Fusion AirCore Le manuel du propriétaire
- Taper
- Le manuel du propriétaire

FUSION DRYSUIT
Model: Fusion AirCore
Version: 06/2017

2
ENGLISH
Your drysuit has been designed to provide you with the highest degree of comfort
and convenience. Our suits have been used by professional divers and have a
reputation for performance and durability. Each drysuit is individually inspected and
tank tested before it leaves our factory to ensure the highest quality.
From time to time your suit, including it's valves, zippers and seals, may require
professional service. If you suspect that service is required, or your suit or components
of the suit do not perform as they should, then you should immediately discontinue its
use and have it evaluated and serviced at your authorized dealer.
Components Supplied with your Drysuit: Suspenders, ination hose, zipper
lubricant, and Owner's Manual.
Drysuit Accessories: A full range of accessories are available to add to the comfort
or practicality of using your drysuit. For details, please visit aqualung.com.
Certication: Your drysuit satises the requirements of the manufacturer’s technical
specications (based upon EN14225-2:2005 requirements).
INPP - Notied Body Information
Notied Body Number: 0078
Address: Entree #3 Port de la Pointe Rouge,
BP. 157 13267 Marseille, Cedex 08, France
Manufactured by:
Aqua Lung Canada Ltd
6820 Kirkpatrick Crescent
Saanichton, British Columbia
V8M 1Z9 Canada
tel: 1.800.667.5449 fax: 1.888.667.7247
Congratulations on your Drysuit Purchase

3
ENGLISH
Critical Safety Precautions . . . . . . . . . . . . . . . . . . . . . . . . . . . . . . . . . . . . . . . 4
Guidance & Warnings . . . . . . . . . . . . . . . . . . . . . . . . . . . . . . . . . . . . . . . . . 5 - 6
Exhaust Valve, Low Pressure Hose & Inator Valve . . . . . . . . . . . . .7
Drysuit Care . . . . . . . . . . . . . . . . . . . . . . . . . . . . . . . . . . . . . . . . . . . . . . . . . . . .8 - 9
Donning . . . . . . . . . . . . . . . . . . . . . . . . . . . . . . . . . . . . . . . . . . . . . . . . . . . . . .10 - 12
Dofng . . . . . . . . . . . . . . . . . . . . . . . . . . . . . . . . . . . . . . . . . . . . . . . . . . . . . . . . . . . 12
Finding a Leak . . . . . . . . . . . . . . . . . . . . . . . . . . . . . . . . . . . . . . . . . . . . . . . . . . . 13
Patching a Hole . . . . . . . . . . . . . . . . . . . . . . . . . . . . . . . . . . . . . . . . . . . . . .14 - 15
Size Chart . . . . . . . . . . . . . . . . . . . . . . . . . . . . . . . . . . . . . . . . . . . . . . . . . . . . . . . . 16
Table of Contents

4
ENGLISH
Critical Safety Precautions
This is not a diving instruction manual, nor does it eliminate the necessity for
obtaining professional instruction in the operation of a drysuit or having a diving
certication. The user is therefore advised to obtain such instruction as well as
familiarizing him or herself with the information contained in this manual prior to
operation of any drysuit.
1. Complete a drysuit diving course from an instructor and stay current.
2. Always use a buoyancy compensation device (BCD) when diving with a drysuit.
3. Know your equipment and emergency procedures.
4. Practice your drysuit diving skills under controlled conditions until you are fully
conversant. If diving in open water, consider using a shot line or the boat’s anchor
line to control your ascent.
5. If diving with a buddy ensure that he/she understands your drysuit system.
6. Use the correct amount of insulation for the water temperature you are diving in and
your exercise rate.
7. Don't weight yourself heavier than neutral buoyancy with an empty tank.
Your weighting should allow you to make a safety stop at an appropriate depth in
accordance with the decompression schedule in use.
8. Inspect your valves, zipper and seals for proper performance before each dive.
9. Perform preventative maintenance and repairs on your suit and valves regularly, or
have them serviced by a qualied individual.
10. Know your limitations and do not exceed them.

5
ENGLISH
Use: This suit should only be used in conditions appropriate for this type of CE
certication, within user qualications and in accordance with the regulations of the
local jurisdiction. The maximum operating depth limit is indicated by the CE standards
for certifying breathing apparatus (i.e. 50 meters).
Variation of Buoyancy: Improper use or misuse of this drysuit could result in the loss
of buoyancy control, including uncontrolled descents and uncontrolled rapid ascents,
which could result in decompression sickness, air embolism, drowning and death. The
presence of a volume gas inside the suit will be subject to the effects of compression
and expansion relative to the hydrostatic pressure. Inappropriate use of the inator
and the purge could cause squeeze during the descent as well as a too-fast ascent,
which could result in a decompression accident. An undergarment used in combination
with this drysuit shall allow free passage of air between the user’s body and the
deation device for proper exhausting and ination. Do not use the drysuit as a lift bag.
If you use the drysuit as a lift bag and lose the grip on the object, you may become
excessively buoyant. This may result in rapid ascent. Rapid ascent is dangerous and
may cause air embolism or decompression sickness, either of which can result in
serious injury or death.
Ination Gas: Introducing gas into the suit should serve only to control the internal
volume. Use of a drysuit will in no way replace the need for a buoyancy compensation
device (BCD). This suit is intended for use with compressed air. Do not use any other
gas or mixture for ination of the suit. Using oxygen enriched gas with a percentage of
oxygen exceeding 40% for ination presents a risk of re and explosion. When using
argon there is a risk of this gas getting into a full-face mask and the breathing system
through the hood. The effects of breathing argon are more narcotic than nitrogen when
under increased partial pressure.
Guidance & Warnings

6
ENGLISH
Thermal Protection: This suit leaves your face and hands in direct contact with the
water. The temperature of the water in which you will use this suit will likely require that
you also wear a hood and gloves. This suit alone does not provide thermal protection.
Only undergarments with a thickness appropriate to the temperature of the water can
provide thermal protection. Several types of undergarments are available. The choice
of undergarment is inuenced by the material used in the drysuit and the temperature
of the water in which you plan to dive. An inappropriate choice of undergarment
could cause hypothermia or hyperthermia. Only specialized training will give you the
knowledge required to make the best choice of equipment.
Work Rate: Work rates will be inuenced by choice of undergarment being worn and
water temperature. Too high of a work rate in conjunction with a thick undergarment
and/or warm water temperature could cause hyperthermia. Only specialized training
will give you the knowledge required to make the best choice of equipment.
Fitting: Reference the appropriate size chart for your suit to assist with selecting the
correct size for your body. It is important that you try on the suit in a specialized dive
shop offering you the advice of qualied and experienced staff. If you choose a suit that
is too tight you may experience squeeze problems during the descent. If the suit is too
big for your size you may experience problems of over-expansion that could cause an
uncontrolled ascent. Neck and wrist seals need to be adapted to the size of the diver.
Your drysuit must be worn with footwear (boot/sock) that covers the drysock to protect
it from unnecessary wear and being punctured.
Allergic Reaction: Some individuals may be allergic to contact with materials in this
suit such as latex or neoprene. If you suffer from allergies, consult a doctor before
using the suit.
Guidance & Warnings

7
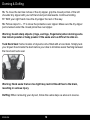
Exhaust Valve, Inator Valve & Low Pressure Hose
Exhaust Valve: Your drysuit is equipped with an adjustable high-ow auto-exhaust
valve allowing the highest degree of hands-off buoyancy control. For decreased
venting, rotate faceplate clockwise. For increased venting, rotate faceplate counter-
clockwise. Pushing down on the faceplate will allow manual air release.
Make sure that your exhaust valve body is screwed hand-tight into the suit before each
dive. Check the exhaust valve faceplate setting before each dive. If your valve is not
working correctly abandon your dive and have the valve inspected by an authorized
technician.
Low Pressure Hose & Inator Valve:
1. Screw the low pressure inate hose into the low-pressure port on your rst stage.
Do not use a high-pressure port!
2. Slide hose connector back to lock hose into place over inate valve nipple.
3. Pushing the button center on the inate valve will add air to your suit.
Important: Check that your inate valve body is screwed hand-tight into the suit before
each dive. If your valve is not working correctly abandon your dive and have the valve
inspected by your dealer.
ENGLISH

8
ENGLISH
Drysuit Care
Fabric Care: Rinse the outside of the suit with fresh clean water after each dive. If
needed, hand wash the garment using synthetic fabric cleaner such as Nikwax or
similar product.
Zipper Care: Keep your zipper free of sand and debris by spraying with clean fresh
water after every use. Stubborn debris lodged in the zipper can be removed with a
soft toothbrush and mild soap. When opening or closing a zipper, avoid catching
undergarment material in the dry zipper teeth. If zipper slider becomes jammed, do not
continue pulling. Back zipper up and clear debris or clothing. Do not force your zipper.
Keep your zipper lubricated, parafn wax is ideal. Do not use oil-based lubricants or
silicone spray as they can damage the zipper material. Lubricate zipper teeth after
each dive.
Latex and Silicone Seal Care: Latex and silicone seals offer a superior seal, however
they can be fragile. Avoid sharp objects (rings, earrings, ngernails) as they may tear
the seal. For lubrication use a food-grade vegetable based silicone spray in a pump
bottle (avoid aerosol). Baby powder, talcum powder or cornstarch are other great
alternatives. Extended exposure to sunlight will damage the seal. For latex seals avoid
contact with petroleum based products such as lotions and petroleum based silicone
lubricants as they will deteriorate latex rubber. Also for latex seals make sure your seals
are warmed up to room temperature before attempting to stretch them as extreme cold
may stiffen latex seals.
Fitting Latex and Silicone Seals: You may want to ne-tune the t of your latex or
silicone seals. If your seals seem too tight, they can be trimmed to create a comfortable
t. Using scissors, carefully trim off 1/4 inch (0.6 cm) at a time, checking the t each
time. You do not have to wear your suit during this process, just slide one wrist or your
neck into the seals to test the t as you go along. The seals should be snug but not
tight. You may want your dealer to assist you in tting your seals. Warning: Neck seals
that are too tight may restrict blood ow to the brain resulting in serious injury.

9
ENGLISH
Checks: Check all components for signs of damage or excess wear. Have serviced if
required.
Storage: When storing your drysuit, be careful not to fold the zipper back on itself.
For prolonged storage, it is best to hang your suit from the legs, with the zipper in the
open position. Hang it in a cool, dry place, out of direct sunlight and away from electric
motors or fumes (chlorine, diesel or gas). After prolonged storage check the seals for
cracking or loss of stretch. Natural rubber components generally have a lifetime of 5
years before needing replacement.
Folding:
1. With the zipper open, lay the suit facing down.
2. Roll the suit starting at the feet working toward the neck seal.
3. Loosely fold the arms together over the body of the suit.
Transport: For transport, do not stuff your suit in a bag that is too small or the zipper
may get bent.
Disposal: When your drysuit can no longer be repaired for safe use, dispose of the
garment in accordance with regulations within your jurisdiction.
Drysuit Care

10
ENGLISH
1
7
13
2
8
14
3
9
15
4
10
16
5
11
17
6
12
18
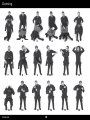
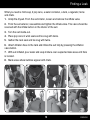
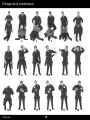
Donning

11
ENGLISH
1. Unzip main opening zippers and pull out the suspenders.
2. Roll the Core down to the inseam, exposing the two leg hole openings.
3. Sit down. Grip one of the Core leg hole openings on either side and put your leg in,
pulling the Core leg hole opening up to your crotch.
4. To get your foot all the way in the Core sock, roll the same leg opening down to the
knee. Again pull the Core leg hole opening up to the crotch. Your foot should now be in
the Core sock.
5. Follow steps 3 & 4 to don the other leg.
6. Stand up. Grip the Core waist opening on either side and pull it up to your waist.
The Core inseam should now be in place.
7. Pull the outer skin up to your waist.
8. Adjust suspenders for a snug yet comfortable t. The suspenders should hold the
suit up in the crotch.
9. Put your arm in the Core arm opening and push hand through the wrist seal, using
your free hand to expand the wrist opening. Use thumb loops on undergarment to hold
garment in place, eliminating bunching.
10. If you are not using dry gloves, be sure to tuck the undergarment thumb loops back
under the seal.
11. Follow steps 9-10 to don the other arm.
12. Reach back and ip the neck seal forward onto the head.
13. Using both hands, stretch the neck seal over your head. Make sure the seal is
sitting at against your neck for the best seal and comfort.
14. To close the dry zipper, with your right hand grip both sides of the zipper on your
right shoulder, pulling downwards. Continue holding.
15. With your left hand reach for the dry zipper pull and close the rst 3-4 inches.
Release your right hand and continue closing the zipper.
Donning

12
ENGLISH
16. To close the last few inches of the dry zipper, grip the closed portion of the left
shoulder dry zipper with your left hand and pull downwards. Continue holding.
17. With your right hand close the dry zipper the rest of the way.
18. Follow steps 14 – 17 to close the protective over zipper. Make sure the dry zipper
pull is tucked under the closed protective over zipper.
Warning: Avoid sharp objects (rings, earrings, ngernails) when donning suits.
Use talcum powder or baby powder if the seals are too difcult to slide on.
Tuck Neck Seal: Some models of drysuits come tted with a hood dam. Simply tuck
your drysuit hood inside the dam before your dive to minimize water ushing between
the hood and neck seal.
Warning: Neck seals that are too tight may restrict blood ow to the brain,
resulting in serious injury.
Dofng: When removing your drysuit, follow the same steps as above in reverse.
Donning & Dofng

13
ENGLISH
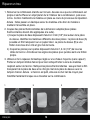
Finding a Leak
What you need is mild soap, 2 pop cans, a water container, a tank, a regulator, twine
and chalk.
1. Unzip the drysuit. From the suit interior, loosen and remove the inate valve.
2. From the suit exterior, reassemble and tighten the inate valve. The valve should be
reversed with the inate button on the interior of the suit.
3. Turn the suit inside-out.
4. Place pop cans in wrist seals and tie snug with twine.
5. Gather the neck seal and tie snug with twine.
6. Attach ination hose to the tank and inate the suit fully by pressing the ination
valve button.
7. With suit inated, pour water and soap mixture over suspected leak areas until hole
is located.
8. Mark areas where bubbles appear with chalk.
1
5
2
6
3
7
4
8

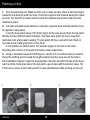
14
ENGLISH
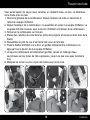
1. Turn drysuit inside out. Make sure the suit is clean and dry. Place a at hard object
inside the suit directly under the hole. The block supports the material during the repair
process. Tip: Stretch an elastic band around the material and block to help hold the
material in place.
2. Cut heat activated repair patches to size (two separate heat activate patches must
be applied in sequence).
i. Cut the base patch about 1/8" (3mm) larger all the way around than the top patch.
Identify the two different patch materials: The base layer patch (A) has a clear lm
laminated onto white paper backing. The top patch (B) has a smooth black nish on
one side and a matte grey nish on the other.
ii. Cut patches to extend about 1/2" past the edges of the hole on all sides.
Rounding the corners of the patch will make a clean edge nish.
3. Using a standard household clothing iron, set the iron to medium heat (no steam!).
Using the rubbing alcohol swab thoroughly clean/scrub the area around the hole in
the breathable material. Clean the heat patches: Give the smooth lm side of the base
patch and the matte grey side of the top patch a good wipe with the alcohol swap. Tip:
If the hole is small, circle it with pencil for easy identication while working on the suit.
Patching a Hole
1 2 3

15
ENGLISH
4. Place the base patch over the hole (paper up/smooth lm down). Cover the base
patch and your drysuit fabric with parchment paper before applying heat. Take heated
iron and apply pressure. Keep the iron moving in a circular motion. In 10-20 seconds
the lm will liquefy (you will see evidence of this through the parchment paper).
5. Remove the iron and carefully peel away the paper backing. Take care not to burn
ngers. The adhesive must have melted into the woven fabric "tricot" layer to act as an
effective bonding layer for the top patch.
6. Take the top patch and lay it over the base layer, matte grey side down. The rim of
exposed base layer of top patch is cut smaller. Lay the sheet of parchment paper over
the top patch and heat for 10-20 seconds. Apply pressure and keep the iron moving in
a circular motion. Remove heat and parchment paper. Let patch cool. Your drysuit is
now ready for use.
Patching a Hole
4 5 6

16
ENGLISH
Size Chart
2XS/XS SM/MD LG/XL 2XL/3XL 4XL+
155 - 165 CM 165 - 175 CM 175 - 185 CM 183 - 193 CM 183 - 208 CM
5'1" - 5'5" 5'5" - 5'9" 5'9" - 6'1" 6'0" - 6'4" 6'0" - 6'10"
41 - 59
KGS 55 - 77 KGS 73 - 95 KGS 91 - 114 KGS 105 - 160 KGS
90 - 130 LBS 120 - 170 LBS 160 - 210 LBS 200 - 250 LBS 230 - 350 LBS
76 - 94 CM 89 - 105 CM 99 - 114 CM 109 - 125 CM 114 - 148 CM
30" - 37" 35" - 41" 39" - 45" 43" - 49" 45" - 58"
56 - 79
CM 69 - 91 CM 79 - 102 CM 89 - 112 CM 104 - 147 CM
22" - 31" 27" - 36" 31" - 40" 35" - 44" 41" - 58"
69 - 91
CM 81 - 104 CM 91 - 114 CM 102 - 124 CM 117 - 147 CM
27" - 36" 32" - 41" 36" - 45" 40" - 49" 46" - 58"
66 - 74
CM 74 - 81 CM 76 - 84 CM 81 - 89 CM 84 - 97 CM
26" - 29" 29" - 32" 30" - 33" 32" - 35" 33" - 38"
CHEST
HEIGHT
BUTTOCKS
CROTCH TO
FLOOR
WEIGHT
WAIST

16
FRANÇAIS
Tableau des tailles
2XS/XS SM/MD LG/XL 2XL/3XL 4XL+
155 - 165 CM 165 - 175 CM 175 - 185 CM 183 - 193 CM 183 - 208 CM
5'1" - 5'5" 5'5" - 5'9" 5'9" - 6'1" 6'0" - 6'4" 6'0" - 6'10"
41 - 59
KGS 55 - 77 KGS 73 - 95 KGS 91 - 114 KGS 105 - 160 KGS
90 - 130 LBS 120 - 170 LBS 160 - 210 LBS 200 - 250 LBS 230 - 350 LBS
76 - 94 CM 89 - 105 CM 99 - 114 CM 109 - 125 CM 114 - 148 CM
30" - 37" 35" - 41" 39" - 45" 43" - 49" 45" - 58"
56 - 79
CM 69 - 91 CM 79 - 102 CM 89 - 112 CM 104 - 147 CM
22" - 31" 27" - 36" 31" - 40" 35" - 44" 41" - 58"
69 - 91
CM 81 - 104 CM 91 - 114 CM 102 - 124 CM 117 - 147 CM
27" - 36" 32" - 41" 36" - 45" 40" - 49" 46" - 58"
66 - 74
CM 74 - 81 CM 76 - 84 CM 81 - 89 CM 84 - 97 CM
26" - 29" 29" - 32" 30" - 33" 32" - 35" 33" - 38"
TOUR DE
POITRINE
HAUTEUR
TOUR DE
HANCHES
HAUTEUR
D'ENTREJAMBE
POIDS
TOUR DE TAILLE

15
FRANÇAIS
Réparer un trou
4. Positionnez la pièce de base sur l'accroc (côté papier vers le haut/lm lisse vers le
bas). Recouvrez la pièce de base et le matériau de votre combinaison étanche avec
du papier sulfurisé avant de passer le fer chaud. Appuyez avec votre fer chaud. Faites
tourner le fer constamment, d'un mouvement circulaire. En 10 à -20 secondes le lm
va se liquéer (vous le verrez à travers le papier sulfurisé).
5. Retirez le fer et pelez soigneusement le papier blanc. Faites attention à ne pas vous
brûler les doigts. L'adhésif doit avoir fondu dans l'épaisseur tricotée du matériau, an
de constituer une épaisseur de liaison efcace pour la pièce du dessus.
6. Posez la pièce du dessus sur l'épaisseur de base, le côté gris mat vers le bas. Les
bords de cette pièce du dessus ont été coupés un peu plus petits. Positionnez la
feuille de papier sulfurisé sur la pièce du dessus, et faites chauffer pendant 10 à -20
secondes. Appuyez, et faites tourner le fer constamment, d'un mouvement circulaire.
Retirez le fer et le papier sulfurisé. Laissez la pièce refroidir. Votre combinaison
étanche est maintenant prête à être utilisée.
4 5 6

14
FRANÇAIS
Réparer un trou
1. Retournez la combinaison étanche sur l'envers. Assurez-vous que la combinaison est
propre et sèche Placez un objet plat et dur à l'intérieur de la combinaison, juste sous
le trou. Ce bloc maintiendra le matériau en place au cours du processus de réparation.
Astuce : faites passer un élastique autour du matériau et du bloc de manière à
maintenir l'ensemble en place.
2. Coupez des pièces thermocollantes de la dimension adaptée (deux pièces
thermocollantes doivent être appliquées à la suite).
i.) Coupez la pièce de base dépassant d'environ 3 mm (1/8") tout autour de la pièce
du dessus. Identiez les matériaux différents des deux pièces : la pièce de base (A)
possède un lm transparent sur un papier blanc. La pièce du dessus (B) a une
nition noire lisse d'un côté et gris mat de l'autre.
ii.) Coupez les pièces pour qu'elles dépassent d'environ 1,2 cm (1/2") de tous les
côtés de l'accroc. Arrondissez les angles des pièces pour qu'elles aient une nition
propre.
3. Utilisez un fer à repasser domestique réglé sur une chaleur moyenne (sans vapeur!)
Frottez un tampon imbibé d'alcool pour bien nettoyer/frotter la zone du matériau
respirant autour de l'accroc. Nettoyez les pièces thermocollantes : essuyez bien le lm
transparent de la pièce de base et le côté gris mat de la pièce du dessus avec le
tampon d'alcool. Astuce : si l'accroc est petit, entourez-le d'un trait de crayon pour
l'identier facilement lorsque vous travaillez sur la combinaison.
1 2 3

13
FRANÇAIS
Trouver une fuite
Vous aurez besoin de: savon doux, canettes, un récipient d'eau, un bloc, un détendeur,
de la celle et de la craie.
1. Ouvrez la glissière de la combinaison. Depuis l'intérieur de celle-ci, desserrez et
retirez la soupape d'ination.
2. Depuis l'extérieur de la combinaison, ré-assemblez et serrez la soupape d'ination. La
soupape doit être inversée, avec le bouton d'ination à l'intérieur de la combinaison.
3. Retournez la combinaison sur l'envers.
4. Placez des canettes de soda dans les joints des poignets et serrez-les bien avec de la
celle.
5. Rassemblez le joint du cou et serrez-le bien avec de la celle.
6. Fixez le exible d'ination sur le bloc, et gonez entièrement la combinaison en
appuyant sur le bouton de la soupape d'ination.
7. Lorsque la combinaison est entièrement gonée, versez un mélange d'eau
savonneuse sur les zones de fuite supposées, jusqu'à ce que vous ayez localisé le
trou.
8. Marquez les zones où vous voyez des bulles avec de la craie.
1
5
2
6
3
7
4
8
La page est en cours de chargement...
La page est en cours de chargement...
La page est en cours de chargement...
La page est en cours de chargement...
La page est en cours de chargement...
La page est en cours de chargement...
La page est en cours de chargement...
La page est en cours de chargement...
La page est en cours de chargement...
La page est en cours de chargement...
La page est en cours de chargement...
La page est en cours de chargement...
-
 1
1
-
 2
2
-
 3
3
-
 4
4
-
 5
5
-
 6
6
-
 7
7
-
 8
8
-
 9
9
-
 10
10
-
 11
11
-
 12
12
-
 13
13
-
 14
14
-
 15
15
-
 16
16
-
 17
17
-
 18
18
-
 19
19
-
 20
20
-
 21
21
-
 22
22
-
 23
23
-
 24
24
-
 25
25
-
 26
26
-
 27
27
-
 28
28
-
 29
29
-
 30
30
-
 31
31
-
 32
32


