Kichler Lighting 43794BK Manuel utilisateur
- Taper
- Manuel utilisateur

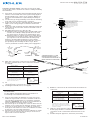
5) Établir les connexions de fil conformément aux instructions
ci-dessous.
6) Utiliser les deux (2) boules à billes et les deux (2) rondelles
de blocage pour fixer le couvercle après avoir établir les
connexions de fils conformément aux instructions ci-des
sous.
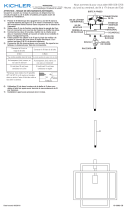
7) Installer l’ampoule approuvée, élément C (non fourni).
CAUTION – RISK OF SHOCK – Disconnect Power at the main
circuit breaker panel or main fuse box before starting and during
the installation.
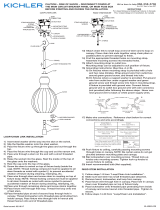
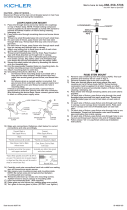
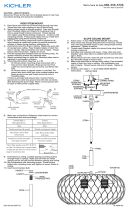
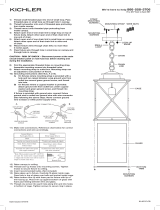
1) Pass fixture electrical wire and ground wire through desired
amount of stems D & E and screw together using supplied
threaded nipples into coupler on top of fixture. NOTE: one
(1) 12 inch stem minimum is required during mounting for
safety.
2) Screw in two (2) canopy mounting screws into the mounting
strap and connect mounting strap to outlet box.
3) Connect the two (2) loops, chain link with two (2) threaded
nipples to the canopy using the lockwasher and hexnut
supplied.
4) Route wires and ground wire through chain link and through
canopy into the electrical box. Connect the D & E stems to
the lower loop.
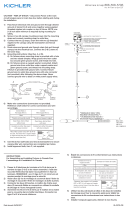
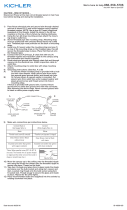
5) Grounding instructions: (See Illus. A or B).
A) On fixtures where mounting strap is provided with a hole
and two raised dimples. Wrap ground wire from outlet
box around green ground screw, and thread into hole.
B) On fixtures where a cupped washer is provided. Attach
ground wire from outlet box under cupped washer and
green ground screw, and thread into mounting strap.
If fixture is provided with ground wire. Connect fixture
ground wire to outlet box ground wire with wire connector
(not provided.) after following the above steps. Never
connect ground wire to black or white power supply wires.
6) Make wire connections (connectors not provided).
Reference chart below for correct connections and wire
accordingly.
7) Use the (2) two ball knobs and two (2) lockwashers to secure
canopy after wire connections are completed per below.
8) Install approved bulb, item C, not supplied.
1) Passer le fil électrique du luminaire et le fil de terre par le
nombre de tiges D et E et les visser ensemble à l’aide des
raccords filetés (fournis) dans l’accouplement en haut du
luminaire. REMARQUE : une (1) tige de 30 cm minimum est
requise pendant le montage pour la sécurité.
2) Visser deux (2) vis de montage du couvercle dans l’étrier de
montage et raccorder l’étrier de montage à la boîte à prises.
3) Connecter les deux (2) boucles, le maillon de chaîne avec
deux (2) raccords filetés au couvercle en utilisant la rondelle
de blocage et l’écrou hexagonal fournis.
4) Acheminer les fils et le fil de terre par le maillon de la chaîne
puis le couvercle dans le boîtier électrique. Connecter les
tiges D et E à la boucle inférieure.
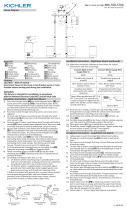
GREEN GROUND
SCREW
CUPPED
WASHER
OUTLET BOX
GROUND
FIXTURE
GROUND
DIMPLES
WIRE CONNECTOR
OUTLET BOX
GROUND
GREEN GROUND
SCREW
FIXTURE
GROUND
A
B
Connect Black or
Red Supply Wire to:
Connect
White Supply Wire to:
Black White
*Parallel cord (round & smooth) *Parallel cord (square & ridged)
Clear, Brown, Gold or Black
without tracer
Clear, Brown, Gold or Black
with tracer
Insulated wire (other than green)
with copper conductor
Insulated wire (other than green)
with silver conductor
*Note: When parallel wires (SPT I & SPT II)
are used. The neutral wire is square shaped
or ridged and the other wire will be round in
shape or smooth (see illus.)
Neutral Wire
Date Issued: 05/30/2017 IS-43794-CB
We’re here to help 866-558-5706
Hrs: M-F 9am to 5pm EST
Connecter le fil noir ou
rouge de la boite
Connecter le fil blanc de la boîte
A Noir A Blanc
*Au cordon parallèle (rond et lisse)
*Au cordon parallele (à angles droits el strié)
Au bransparent, doré, marron, ou
noir sans fil distinctif
Au transparent, doré, marron, ou
noir avec un til distinctif
Fil isolé (sauf fil vert) avec
conducteur en cuivre
Fil isolé (sauf fil vert) avec
conducteur en argent
*Remarque: Avec emploi d’un fil paralléle
(SPT I et SPT II). Le fil neutre est á angles
droits ou strié et l’autre fil doit étre rond ou
lisse (Voir le schéma).
Fil Neutre
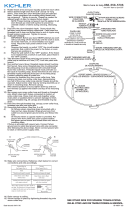
INSTRUCTIONS
For Assembling and Installing Fixtures in Canada Pour
L’assemblage et L’installation Au Canada
MOUNTING SCREWS / VIS DE MONTAGE
OUTLET BOX
COUVERCLE
MOUNTING STRAP / ÉTRIER DE MONTAGE
STRAP MOUNTING SCREWS / VIS DE L'ÉTRIER DE MONTAGE
WIRE CONNECTORS / CONNECTEURS DE FIL
(2) LOCK-UP KNOBS / BOULES DE BLOCAGE
(2) LOCKWASHER / RONDELLE DE BLOCAGE
LOOP / BOUCLE
NIPPLE / RACCORD FILETÉ
LOOP / BOUCLE
LOCKWASHER / RONDELLE DE BLOCAGE
HEXNU T / ÉCROU HEXAGONAL
CANOPY
CHAIN LINK / MAILLON DE CHAÎNE
D
E
C
BULB NOT
INCLUDED /
AMPOULE
NON COMPRISE
E
**MINIMUM OF ONE 12" STEM
REQUIRED FOR MOUNTING.** /
**UN MINIMUM D'UNE TIGE DE 12"
NÉCESSAIRE POUR LE MONTAGE.**
-
 1
1

Kichler Lighting 43794BK Manuel utilisateur
- Taper
- Manuel utilisateur
dans d''autres langues
- English: Kichler Lighting 43794BK User manual
Documents connexes
-
 Kichler Lighting 43793BK Manuel utilisateur
-
 Kichler Lighting 43953NI Manuel utilisateur
-
 Kichler Lighting 43869BK Manuel utilisateur
-
 Kichler Lighting 49835AZ Manuel utilisateur
-
 Kichler Lighting 43590AVI Manuel utilisateur
-
 Kichler Lighting 43958NBR Manuel utilisateur
-
 Kichler Lighting 43871OZ Manuel utilisateur
-
 Kichler Lighting 44038NI Manuel utilisateur
-
 Kichler Lighting 49747WZC Manuel utilisateur
-
 Kichler Lighting 43982BK Manuel utilisateur


