Ameriwood Home HD72265 Guide d'installation
- Taper
- Guide d'installation

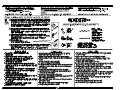
WARNING ADVERTENCIA AVERTISSEMENT
Unit can tip over causing severe injury
or death.
Anchor unit to stud or wall.
DO NOT
allow children to climb on unit.
Put heavy items on lower shelves or drawers.
Read and follow all assembly instructions.
Este mueble puede caerse por encima
causando daño serio o la muerte
Anolar el mueble a un espárrago muro.
NO
dejar que los niños suben por encima del mueble.
Poner los articulos mas pesados en los tableros o cajones inferiores.
Leer y sequir todos de los instucciones para el montaje.
L'unité peut basculer et causer des
blessures graves ou la mort.
Fixez l'unité au mur ou à un montant.
Ne laissez PAS les enfants grimper sur le meuble
Déposez les pièces lourdes sur les tablettes ou tiroirs
du bas.
Lire et suivre toutes les instructions d'assemblage.
STOP
ALTO
ARRÊT
DO NOT RETURN PRODUCT TO THE STORE
NO
REGRESAS ESTA PRODUCTO A LA TIENDA
NE
RETOURNEZ PAS LE PRODUIT AU MAGASIN
Individual stores do not stock parts.
Las tiendas no tiene partes.
Les magasins individuels ne gardent pas de pièces.
If a part is missing or damaged, please visit our website or call our toll-free customer
service line. We will gladly ship your replacement parts FREE of charge.
Si las partes están perdidas o dañadas Por favor visite nuestra página de Internet o
llame a nuestra línea de teléfono gratis de Servicio al Cliente. Nosotros le enviaremos
sus repuestos sin cargo adicional, serán totalmente gratis.
Si une pièce est manquante ou endommagée, veuillez visiter notre site web ou appelez
sans frais notre Service à la clientèle. Nous expédierons avec plaisir vos pièces de
rechange GRATUITEMENT.
Need Parts or
Assistance?
Nesacitas partes o
Asistancia?
Besoin de Pièces ou
d'assistance?
WWW.AMERIWOOD.COM/PARTS
or call toll free:
o llame a nuestra línea gratis:
ou appelez sans frais:
1-800-489-3351
For prompt, reliable service; please have your assembly manual ready.
Para servicio mas rapido y reliable por favor tenga esta manual listo.
Pour un service rapide et fiable, s'il vous plaît ayez votre livret d'assembage en
main.
-KEEP FOR REFERENCE- -GUARDAR PARA REFERENCIA-
-GARDEZ POUR RÉFÉRENCE-
B347390056PCOM2
7390056PCOM
Please Recycle
Recicle Por Favor
Réutilisez SVP
A Dorel Company
MERIWOOD
INDUSTRIES
TM


B347390056PCOM2
3 /20
?? www.ameriwood.com ??
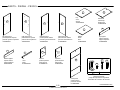
PARTS - PIEZAS - PIECES
left upper panel
panel izquierdo superior
panneau gauche supérieure
37390056010
back panel
panel trasero
panneau arriere
K739005600
A B
C
D
E
F
G
H
I
J
K
L
M
fixed shelf
estante fijo
étagère fixe
37390056070
top
cime
dessus
37390056050
bottom
fondo
fond
37390056060
right upper panel
panel derecho superior
panneau droit supérieure
37390056020
left lower panel
panel izquierdo inferior
panneau gauche inférieure
37390056030
top support
soporte superior
support supérieur
37390056080
right lower panel
panel derecho inferior
panneau droit inférieure
37390056040
bottom support
soporte inferior
support inférieur
37390056090
rail
carril
guide
37390056100
left door
puerta izquierda
porte gauche
37390056110
right door
puerta derecha
porte droite
37390056120
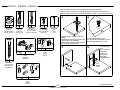
x
11
#A84050
safety bracket kit
juego del soporte de seguridad
ensemble de courroie de sécurite
1a
1b
1c
1d

B347390056PCOM2
4 /20
?? www.ameriwood.com ??
PARTS - PIEZAS - PIECES
x
4
4
#A21520
compression dowel
clavija de compresion
goujon de compression
x
5
9
#A12210
1/2" pan head
cabeza redondo 1/2"
tête ronde
x
84
#A65615
hinge
bisagra
charniera
x624
#A21110
nail
clavo
clou
tète plate 1 3/4"
cabeza plano 1 3/4"
1 3/4" flat head
x
#A13410
7
7
x
91
#A31200
catch
reten
loquet
x
10
1
#A55060
lock
seguro
verrou
x
3
16
cam bolt
#A22510
perno de leva
boulon de came
9a
9b
10a
10b
10c
10d
10e
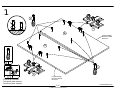
2
3
½ turn to fully
lock.
½ se vuelven a
totalmente
cerradura.
½ tour pour
verrouiller
complètement.
4
Tighten to fully seat. Do not over
tighten.
Apriétese a totalmente asiento. No
haga encima de apriétese.
Serrez pour mettre le siège bien en
place. Ne pas trop serrer.
Proper orientation of cam.
La orientación apropiada de leva.
Bonne orientation de la came.
1
This illustration shows how the CAM fastening system works.
Esta ilustración muestra el sistema de fijación de leva y como funciona.
Cette illustration montre le système de fixation CAME et son fonctionnement.
Lock
Apretar
Serrer
T
i
t
u
s
T
i
t
u
s
T
i
t
u
s
x
#A22570
cam lock
cerradura de leva
serrure de came
216

1
B347390056PCOM2
5 /20
?? www.ameriwood.com ??
Finished Edge
Borde Acabado
Bord Fini
x
84
x
3
8
Loosen to seperate.
Desajuste para separar.
Desserrez pour separer.
Finished Edge
Borde Acabado
Bord Fini
A
B
3
3
8
8

2
B347390056PCOM2
6 /20
?? www.ameriwood.com ??
3
x
3
4
2
Finished Edge
Borde Acabado
Bord Fini
Finished Edge
Borde Acabado
Bord Fini
C
D
x
24
Proper orientation of CAM LOCK
Posición correcta de la cerradura de leva.
Bonne orientation de la SERRURE DE CAME
T
i
t
u
s

3
B347390056PCOM2
7 /20
?? www.ameriwood.com ??
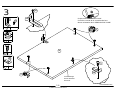
x
91
x
11
5
1x
9b
Finished Edge
Borde Acabado
Bord Fini
1a
1b
1a
1b
2
2
5
9b
E
Proper orientation of CAM LOCK
Posición correcta de la cerradura de leva.
Bonne orientation de la SERRURE DE CAME
T
i
t
u
s
x
24

4
B347390056PCOM2
8 /20
?? www.ameriwood.com ??
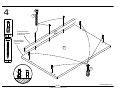
x
3
4
7
x
3
3
Finished Edge
Borde Acabado
Bord Fini
7
F
J
Finished Surface
Superficie Acabado
Surface Fini

5
B347390056PCOM2
9 /20
?? www.ameriwood.com ??
x
4
4
Approx.
7/16"
4
2
2
4
4
G
H
I
Proper orientation of CAM LOCK
Posición correcta de la cerradura de leva.
Bonne orientation de la SERRURE DE CAME
T
i
t
u
s
x
28

6
B347390056PCOM2
10 /20
?? www.ameriwood.com ??
B
E
G
H
Finished Edge
Borde Acabado
Bord Fini
Finished Edge
Borde Acabado
Bord Fini
Finished surface is facing up.
Superficie acabada esta hacia arriba.
La surface finie est orientée vers le haut.
UNLOCK
LOCK
APRETAR
DESAPRETAR
OUVRIR
SERRER
T
i
t
u
s

7
B347390056PCOM2
11 /20
?? www.ameriwood.com ??
E
G
B
A
Finished Edge
Borde Acabado
Bord Fini
UNLOCK
LOCK
APRETAR
DESAPRETAR
OUVRIR
SERRER
T
i
t
u
s

8
B347390056PCOM2
12 /20
?? www.ameriwood.com ??
7
x
4
Finished Edge
Borde Acabado
Bord Fini
A
B
F
7

9
B347390056PCOM2
13 /20
?? www.ameriwood.com ??
Finished Edge
Borde Acabado
Bord Fini
C
I
C
I
D
Finished Edge
Borde Acabado
Bord Fini
Finished Edge
Borde Acabado
Bord Fini
UNLOCK
LOCK
APRETAR
DESAPRETAR
OUVRIR
SERRER
T
i
t
u
s

10
B347390056PCOM2
14 /20
?? www.ameriwood.com ??
Finished Edge
Borde Acabado
Bord Fini
Finished Edge
Borde Acabado
Bord Fini
F
B
D
C
I
UNLOCK
LOCK
APRETAR
DESAPRETAR
OUVRIR
SERRER
T
i
t
u
s

11
B347390056PCOM2
15 /20
?? www.ameriwood.com ??
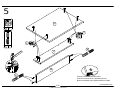
product collapse, and/or serious injury.
Por favor asegúrese que las Parte de atrás se atan
firmemente. Todos los clavos deben manejarse en las
partes recto y deben apretarse firmemente. El fracaso para
hacer para que podría causar inestabilidad, derrumbamiento
del producto, y/o la lesión seria.
S’il-vous-plaît assurez-vous que les PANNEAUX
ARRIÈRES sont attachés solidement. Tous les clous
doivent être enfoncés perpendiculairement et solidement
dans les parties. Sinon le meuble peut devenir instable,
s’effondrer subitement et/ou causer des blessures graves.
tightened firmly. Failure to do so could cause instability,
All nails must be driven into the parts straight and
Please make sure that the Backs are attached securely.
ADVERTENCIA
AVERTISSEMENT
WARNING
raw surface
superficie cruda
surface crue
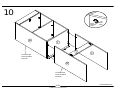
Unfold back panel and position as shown. Line up the large
holes in the back panel with the pilot holes in the bottom
support (I). Screw in six screws (5) as shown but do not tighten.
Align back panel with all outer edges and nail (6) straight down
into back edges as shown. Tighten the six screws (5) now.
5
6x
6x24
5
6
Finished Edge
Borde Acabado
Bord Fini
B
D
I
Desplegar el panel posterior y la posición como se muestra. Alinee los agujeros
grandes en la parte trasera con los orificios en el soporte inferior (I). Atornille 6
tornillos (5) como se muestra, pero no los apriete. Alinee el panel trasero con
todos los bordes y uñas (6) hacia abajo en los bordes posteriores como se
muestra. Apriete los seis tornillos (5) ahora.
Déplacez le panneau arrière et placez-le tel qu'illustré. Alignez les trous larges du panneau arrière avec
les trous de guidage dans le support inférieur (I). Vissez les six vis (5) tel qu'illustré mais ne pas serrez.
Alignez le panneau arrière avec tous les bords extérieurs et vissez (6) dans les bords arrière tel
qu'illustré. Serrez les six vis (5) maintenant.
IMPORTANT!
THE BACK PANEL IS A STRUCTURAL PART OF THIS UNIT AND MUST BE INSTALLED PROPERLY.
IMPORTANTE!
EL PANEL TRASERO ES UNA PARTE ESTRUCTURAL DE ESTA UNIDAD Y DEBE SER INSTALADO CORRECTAMENTE.
IMPORTANT!
LE PANNEAU ARRIÈRE EST UNE PIÈCE STRUCTURELLE DU MEUBLE ET DOIT ÊTRE INSTALLÉ CORRECTEMENT.

12
B347390056PCOM2
16 /20
?? www.ameriwood.com ??
x
8
2
x
10 1
10a
10c
10b
10d
10e
Key slot positioned vertical
when attached.
Ranura para la posición de
la llave vertical cuando se
une.
La fente de la clé est
positionnée verticalement
une fois fixée.
10a
10b
10c
10d
10e
8
8
Lock bar pointing straight up when
attached. (Same as key slot in front of
the lock.)
El seguro de la barra señala hacia
arriba cuando se unen. (Igual que la
ranura de la llave ante el seguro).
La barre de verrouillage pointe
directement vers le haut une fois
fixée. (Même sens que la fente de la
clé sur le devant de la serrure).
Points of barb on lock ring will
face the door.
Puntos de la lengüeta en el
seguro derecho frente a la puerta.
Les crans sur la bague de blocage
font face à la porte.
K

13
B347390056PCOM2
17 /20
?? www.ameriwood.com ??
x
8
2
x
91
9a
5
2x
8
8
9a
5
L

14
B347390056PCOM2
18 /20
?? www.ameriwood.com ??
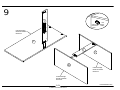
stud
montante
planche
wallboard
muro
mur
hole
agujero
trou
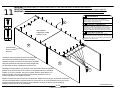
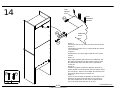
Option 2:
Drill a 3/16" diameter hole (5mm) in the wallboard. Tap
the wall anchor(1d) into the hole until it is flush. Fasten
the wall bracket (1a) to the wall anchor (1d) with the
screw (1c).
Opcion 2:
Taladre un agujero de 3/16" de diámetro (5mm) en la
pared. Golpea la ancla de pared (1d) en el agujero hasta
que sea parejo. Abroche la escuadra de pared (1a) al la
ancla de la pared (1d) con el tornillo (1c).
Option 2:
Percez un trou de 3/16" de diamètre (5 mm) dans le mur.
Enfoncez l'ancrage mural (1d) dans le trou jusqu'à ce
qu'il soit à égalité avec le mur. Fixez le support mural
(1a) à l'ancrage mural (1d) avec la vis (1c).
Option 1;
Securely screw (1c) into solid area of the wall as shown.
Opción 1;
Firmemente el tornillo (1c) en el área sólida de la pared
como mostrado.
L'option 1;
Solidement vis (1c) dans région solide du mur comme
montré.
x
11
1c
1d
1a
1c
1d

15
B347390056PCOM2
19 /20
?? www.ameriwood.com ??
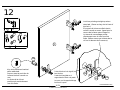
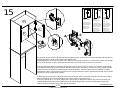
Loosen screw C
Adjust door.
Tighten screw C
*side view
Suelte el tornillo C
Acomode la puerta.
Ajuste el tornillo C
*la vista lateral
Défaites le vis C
Ajustez la porte.
Serrez le vis C
*le côté envisagent
Loosen screw C
Turn screw B to
move door.
Tighten screw C
Suelte el tornillo C
Dé vuelta el tornillo B
para mover la puerta.
Ajuste el tornillo C
Défaites le vis C
Le vis du tour B
déplacer la porte.
Serrez le vis C
Loosen screw A
Adjust door.
Tighten screw A
Suelte el tornillo A
Acomode la puerta.
Ajuste el tornillo A
Défaites le vis A
Ajustez la porte.
Serrez le vis A
A
C
B
K
L
E
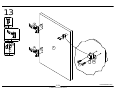
9a
9b
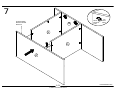
The catch (9a) will latch onto the catch strike (9b) when the right door closes. If needed, loosen screw in catch strike (9b) and make any
adjustments by sliding forward or backwards and then retighten screw.
To open right door (L), you need to open left door (K), release catch (9a) and open right door. To securely lock the doors, close the right
door (L) so the catch (9a) securely catched the catch strike (9b). Close the left door (K) and turn the lock clockwise.
Coger (9a) enganchará dentro de la agarradera derecha (9b) cuando se cierra la puerta a la derecha. Si es necesario, afloje el tornillo
en la agarradera derecha (9b) y realice los ajustes deslizando hacia delante o hacia atrás y, a continuación, vuelva a apretar el tornillo.
Para abrir la puerta a la derecha (L), usted necesita abrir puerta izquierda (K), suelte (9a) y abra la puerta a la derecha. Para fijarla
firmemente las puertas, cerrar la puerta a la derecha (L) para coger (9a) firmemente cogerá la agarradera derecha (9b). Cierre la puerta
izquierda (K) y gire la cerradura hacia la derecha.
Le loquet (9a) s'enclenchera dans la gâche (9b) lorsqu'on fermera la porte droite. Si nécessaire, desserrez la vis dans la gâche (9b) et
faites les ajustements nécessaire en faisant glisser vers l'avant ou l'arrière, puis resserrez la vis.
Pour ouvrir la porte droite (L), vous devez d'abord ouvrir la porte gauche (K), dégagez le loquet (9a), puis ouvrir la porte droite. Pour
verrouiller fermement les portes, fermez la porte droite (L) de sorte que le loquet (9a) s'enclenche solidement dans la gâche (9b).
Fermez la porte gauche (K) et tournez le verrou dans le sens horaire.

B347390056PCOM2
20 /20
?? www.ameriwood.com ??
MAXIMUM LOADS – CARGA MAXIMA - CHARGES MAXIMALES
This unit has been designed
to support the maximum
loads shown. Exceeding
these load limits could
cause sagging, instability,
product collapse, and/or
serious injury.
Esta unidad ha sido
diseñada para soportar la
carga máxima anotada. El
exceder estos límites puede
causar inestabilidad,
colapsarse y/o causar serias
lesiones.
Ce meuble a été conçu pour
supporter les charges
maximales indiquées. En
excédant ces limites de
charge, le meuble pourrait
devenir instable, s’effondrer,
et/ou causer des blessures
graves.
30 lbs.
13.6 kg.
50 lbs.
22.7 kg.
30 lbs.
13.6 kg.
CertificateofConformity
1.ThiscertificateappliestotheDorelHome
Furnishings,Inc.productidentifiedbythis
instructionmanual.
2.Thiscertificateappliestocomplianceof
thisproductwiththeCPSCBanon
Lead‐ContainingPaint(16CFR1303).
3.Thisproductisdistributedby:
DorelHomeFurnishings,Inc.
410
EastFirstStreetSouth
WrightCity,MO63390
636‐745‐3351
4.SiteofManufacture:
□TiffinOH
5.Seefrontpageofinstructionmanualfor
dateofmanufacture.
-
 1
1
-
 2
2
-
 3
3
-
 4
4
-
 5
5
-
 6
6
-
 7
7
-
 8
8
-
 9
9
-
 10
10
-
 11
11
-
 12
12
-
 13
13
-
 14
14
-
 15
15
-
 16
16
-
 17
17
-
 18
18
-
 19
19
-
 20
20


Ameriwood Home HD72265 Guide d'installation
- Taper
- Guide d'installation
dans d''autres langues
Documents connexes
-
Ameriwood Home 5836015PCOM Assembly Instructions Manual
-
Cosco HD35482 Manuel utilisateur
-
-
 Dorel Home HD04671 Guide d'installation
-
 Dorel Home 5841015PCOM Guide d'installation
-
Dorel HD93176 Manuel utilisateur
-
Altra Furniture HD56708 Mode d'emploi
-


Autres documents
-
Ameriwood HD07316 Guide d'installation
-
 Dorel Home 5853412COM Guide d'installation
-
-
-
 Dorel Home 4095341COM Guide d'installation
-
 Dorel Home 5855412COM Guide d'installation
-
SystemBuild 3897401COM Mode d'emploi
-
-
 Dorel Home Furnishings 9478015COM Le manuel du propriétaire
-
 Dorel Home 5749341COM Manuel utilisateur


