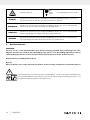
Parkside 700 A1-GB Manuel utilisateur
- Catégorie
- Tronçonneuses sans fil
- Taper
- Manuel utilisateur

TOP HANDLE PETROL CHAINSAW - PBBPS 700 A1
BENZIN-BAUMPFLEGESÄGE - PBBPS 700 A1
TRONÇONNEUSE D’ÉLAGAGE À ESSENCE - PBBPS 700 A1
8
GB IE NI CY MT DE AT CH
TOP HANDLE PETROL CHAINSAW
Operating and Safety Instructions.
Translation of Original Operating Manual
BENZIN-BAUMPFLEGESÄGE
Bedienungs- und Sicherheitshinweise.
Originalbetriebsanleitung
FR BE CH NL BE
TRONÇONNEUSE D’ÉLAGAGE À ESSENCE
Consignes d‘utilisation et de sécurité. Traduction des instructions d’origine
BENZINE-BOOMVERZORGINGSZAAG
Bedienings- en veiligheidsinstructies. Vertaling van de originele handleiding
CZ PL
BENZINOVÁ PILA PRO OŠETŘOVÁNÍ STROMŮ
Pokyny pro obsluhu a bezpečnostní pokyny. Překlad originálního
provozního návodu
BENZYNOWA PIŁA DO PIELĘGNACJI DRZEW
Wskazówki dotyczące obsługi i bezpieczeństwa. Tłumaczenie oryginalnej
instrukcji obsługi
SK ES
BENZÍNOVÁ PÍLA NA OŠETROVANIE STROMOV
Pokyny pre obsluhu a bezpečnostné pokyny. Preklad originálneho návodu
na obsluhu
MOTOSIERRA DE PODA DE GASOLINA
Instrucciones de utilización y de seguridad. Traducción del manual de
instrucciones original
DK IT MT CH
BENZIN TRÆPLEJESAV
Drifts- og sikkerhedsinstruktioner. Oversættelse af den originale
driftsvejledning
MOTOSEGA A BENZINA PER POTATURA
Indicazioni per l’uso e per la sicurezza. Traduzione delle istruzioni d’uso
originali
HU SI
BENZINES FAÁPOLÓ FŰRÉSZ
Kezelési és biztonsági útmutató. Az eredeti használati útmutató fordítása
BENCINSKA ŽAGA ZA NEGO DREVES
Navodila za upravljanje in varnostna opozorila. Prevod originalnega
navodila za uporabo
HR RO
BENZINSKA PILA ZA NJEGU STABALA
Upute za posluživanje i za Vašu sigurnost. Prijevod originalnih uputa za
uporabu
FERĂSTRĂU PENTRU ÎNGRIJIREA ARBORILOR, PE BENZINĂ
Instrucţiuni de utilizare şi de siguranţă. Traducerea instrucţiunilor de utilizare
originale
BG GR CY
БЕНЗИНОВ ТРИОН ЗА ПОДДЪРЖАНЕ НА ДЪРВЕТА
Инструкции за обслужване и безопасност. Превод на оригиналното
ръководство за експлоатация
ΒΕΝΖΙΝΟΚΙΝΗΤΟ ΑΛΥΣΟΠΡΙΟΝΟ ΠΕΡΙΠΟΙΗΣΗΣ ΔΕΝΤΡΩΝ
Οδηγίες χειρισμού και ασφαλείας. Μετάφραση του πρωτοτύπου των οδηγιών
χρήσης
IAN 403506_2204

GB IE NI CY MT
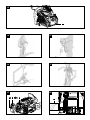
Before reading, unfold the page containing the illustrations and familiarise yourself with all functions of the device.
DE AT CH
Klappen Sie vor dem Lesen die Seite mit den Abbildungen aus und machen Sie sich anschließend mit allen Funktionen des Gerätes vertraut.
FR BE CH
Avant de lire le mode d‘emploi, ouvrez la page contenant les illustrations et familiarisez-vous ensuite avec toutes les fonctions de l‘appareil.
NL BE
Vouw vóór het lezen de pagina met de afbeeldingen open en maak u vertrouwd met alle functies van het apparaat.
CZ
Před čtením si otevřete stranu s obrázky a potom se seznamte se všemi funkcemi přístroje.
PL
Przed przeczytaniem proszę rozłożyć stronę z ilustracjami, a następnie proszę zapoznać się z wszystkimi funkcjami urządzenia.
SK
Pred čítaním si odklopte stranu s obrázkami a potom sa oboznámte so všetkými funkciami prístroja.
DK
Før du læser, vend siden med billeder frem og bliv bekendt med alle apparatets funktioner.
IT MT CH
Prima di leggere aprire la pagina con le immagini e prendere confidenza con le diverse funzioni dell’apparecchio.
HU
Olvasás előtt kattintson az ábrát tartalmazó oldalra és végezetül ismerje meg a készülék mindegyik funkcióját.
SI
Pred branjem odprite stran s slikami in se nato seznanite z vsemi funkcijami naprave.
HR
Prije nego što pročitate tekst, otvorite stranicu sa slikama i upoznajte se na osnovu toga sa svim funkcijama uređaja.
RO
Înainte de a citi instrucţiunile, priviţi imaginile şi familiarizaţi-vă cu toate funcţiile aparatului.
BG
Преди да прочетете отворете страницата с фигурите и след това се запознайте с всички функции на уреда.
GR CY
Πριν ξεκινήσετε την ανάγνωση, ανοίξτε τη σελίδα με τις εικόνες και εξοικειωθείτε με όλες τις λειτουργίες της συσκευής.
GB / IE / NI / CY / MT Operating and Safety Instructions Page 01
DE / AT / CH Bedienungs- und Sicherheitshinweise Seite 24
FR / BE / CH Consignes d‘utilisation et de sécurité Page 49
NL / BE Bedienings- en veiligheidsinstructies Pagina 75
CZ Pokyny pro obsluhu a bezpečnostní pokyny Strana 100
PL Wskazówki dotyczące obsługi i bezpieczeństwa Strona 124
SK Pokyny pre obsluhu a bezpečnostné pokyny Strana 149
ES Instrucciones de utilización y de seguridad Página 173
DK Drifts- og sikkerhedsinstruktioner Side 198
IT / MT / CH Indicazioni per l’uso e per la sicurezza Pagina 221
HU Kezelési és biztonsági útmutató Oldal 246
SI Navodila za upravljanje in varnostna opozorila Stran 271
HR Upute za posluživanje i za Vašu sigurnost Stranica 295
RO Instrucţiuni de utilizare şi de siguranţă Pagina 318
BG Инструкции за обслужване и безопасност Страница 345
GR / CY Οδηγίες χειρισμού και ασφαλείας Σελίδα 372

3
26
17
1
1514
171819
16
20
21
22
1 2 3 4 5 6 7
11
12
13
10
9
8
2
3
23
17
24
25
16

10.1 10.2
14 14
28
4
27
12
25
29
11
MIN MAX 32
7
2 1
3
2
9
6
227
1
30
31
3a
25
5
117 23
29
8
11
13

13
ig. 2
14
16
15
17
933
10 27
18
12
19

19
34
35
0,6 - 0,7 mm
20
22
36
23
18
21
28
2
31 30
21
28
2
31 30
Pos.3 Pos.2
Pos.1
24

1GB/IE/NI/CY/MT
Table of contents: Page:
1. Explanation of the symbols on the device ...................................................................2
2. User note .......................................................................................................................3
3. Introduction ....................................................................................................................4
4. Device description ........................................................................................................4
5. Scope of delivery ..........................................................................................................4
6. Proper use ......................................................................................................................5
7. Safety information .........................................................................................................5
8. Technical data ............................................................................................................ 10
9. Before commissioning ................................................................................................ 10
10. Commissioning ........................................................................................................... 12
11. Usage.......................................................................................................................... 14
12. Transport ..................................................................................................................... 16
13. Cleaning and maintenance ....................................................................................... 17
14. Storage ....................................................................................................................... 20
15. Disposal and recycling .............................................................................................. 21
16. Troubleshooting .......................................................................................................... 21
17. Warranty certificate ................................................................................................... 22
18. Exploded view ..........................................................................................................398
19. Declaration of conformity ........................................................................................ 400

2GB/IE/NI/CY/MT
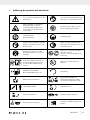
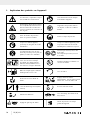
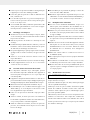
1. Explanation of the symbols on the device
Read, understand and follow all
warning information.
Read the entire operating manual
before using the device.
Warning! Risk of kick-back. Beware
of the kick-back of the chainsaw and
avoid making contact with the tip of
the guide bar.
Do not operate the device in rain or
in humid conditions.
Wear eye protection.
Wear hearing protection. Wear a safety helmet.
Always wear safety and anti-vibra-
tion gloves when using the device.
Always wear non-slip safety shoes
with cut protection when using the
device.
It is important to wear protective
clothing for feet, legs, hands and
forearms.
Always use the chainsaw with both
hands.
Do not use the chainsaw one-handed.
Attention! Chainsaw use in combina-
tion with rope climbing techniques.
Before starting work, ensure that
you familiarise yourself with all work
instructions!
Naked flames are forbidden in the
workplace!
Filling port for fuel.
Oil and fuel mixture 1:40 Direction of rotation
Oil tank cap for chain oil
Adjusting the chain brake:
White arrow: Chain brake inactive
Black arrow: Chain brake active
Cold start lever (choke) Release chain brake
Apply chain brake Installation direction of the saw chain
Chain lubrication setting Guaranteed sound power level of
the device.

3GB/IE/NI/CY/MT
Attention! Hot parts.
push
primer
6 times
Push primer 6 times
DANGER Signal word to indicate an imminently hazardous situation which, if not avoided, will result in death
or serious injury.
WARNING Signal word to indicate a potentially hazardous situation which, if not avoided, could result in death
or serious injury.
CAUTION Signal word to indicate a potentially hazardous situation which, if not avoided, could result in minor
or moderate injury.
NOTE Signal word to indicate a potentially hazardous situation which, if not avoided, could result in product
or property damage.
2. User note
WARNING:
Before initial commissioning, read the operating manual thoroughly and be sure to follow the safety in-
structions! These tree pruning saws may only be operated by “Tree pruning saw operators with additional
training for work using raised platforms or ladder platforms and/or using rope climbing techniques”!
Keep the operating manual in a safe place!
Note:
Please note that some national regulations could restrict the use of the machine.
This tree pruning saw is specially designed for tree pruning and tree surgery. All work with the pruning saw is specially
designed for tree care and tree surgery. All work with this pruning saw may only be carried out by trained pruning saw
operators!

4GB/IE/NI/CY/MT
3. Introduction
MANUFACTURER:
Scheppach GmbH
Günzburger Straße 69
D-89335 Ichenhausen
DEAR CUSTOMER,
We hope your new tool brings you much enjoyment and suc-
cess.
NOTE:
In accordance with the applicable product liability laws, the
manufacturer of this device assumes no liability for damage
to the device or caused by the device arising from:
• Improper handling,
• Failure to comply with the operating instructions.
• Repairs carried out by third parties, unauthorised special-
ists.
• Installing and replacing non-original spare parts,
• Application other than specified.
Please consider:
Read through the complete text in the operating manual be-
fore installing and commissioning the device.
The operating manual is intended to help the user to become
familiar with the machine and take advantage of its applica-
tion possibilities in accordance with the recommendations.
The operating manual includes important instructions for safe,
proper and economic operation of the device, for avoiding dan-
ger, for minimising repair costs and downtimes, and for increas-
ing the reliability and extending the service life of the device.
In addition to the safety instructions in this operating manual,
you must also observe the regulations applicable to the op-
eration of the device in your country.
Keep the operating manual package with the machine at all
times and store it in a plastic cover to protect it from dirt and
moisture. They must be read and carefully observed by all
operating personnel before starting the work.
The device may only be used by personnel who have been
trained to use it and who have been instructed with respect
to the associated hazards. The required minimum age must
be observed.
In addition to the safety instructions in this operating manual
and the separate regulations of your country, the generally
recognised technical rules relating to the operation of such
machines must also be observed.
We accept no liability for accidents or damage that occur due
to a failure to observe this manual and the safety instructions.
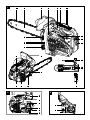
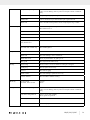
4. Device description
1. Saw chain
2. Guide rail
3. Front hand guard
4. Fuel pump primer
5. Throttle
6. Rear handle
7. Throttle interlock
8. Start pull cord
9. Air filter cover
10. Lock for the air filter cover
11. Chain oil tank cap
12. Front handle
13. Fuel tank cap
14. Cold start lever (choke)
15. On/off switch
16. Fixing nuts
17. Chain cover
18. Silencer
19. Suspension device
20. Spark plug wrench / slotted screwdriver
21. Guide bar cover
22. Mixing container
23. Chain tensioning screw
24. Claw stop
25. Chain catcher
26. Chain tensioning pin
27. Chain wheel
28. Guide groove
29. Fastening pins
30. Sprocket
31. Lubrication port
32. Oil adjustment screw
33. Air filter
34. Spark plug
35. Spark plug connector
36. Suction head
5. Scope of delivery
• Tree pruning saw
• Saw chain
• Guide rail
• Guide bar cover
• Spark plug wrench / slotted screwdriver
• Mixing container

5GB/IE/NI/CY/MT
6. Proper use
This device is a particularly light, handy tree pruning saw with
an overhead handle. The tree pruning saw has been specially
developed for tree surgery and tree care. These tree prun-
ing saws may therefore only be operated by “Tree pruning
saw operators with additional training for work using raised
platforms or ladder platforms and/or using rope climbing
techniques”.
For occasional use on thin wood, fruit tree care, branch trim-
ming or cutting to length.
Preparing firewood may only be completed as long as the
diameter of the wood does not exceed the cutting length
(20cm).
For this work, we recommend a conventional chainsaw with
extended handle clearance and cutting length.
Who is not permitted to use the device:
People who are not familiar with the operating manual, chil-
dren under the age of 16, people under the influence of alco-
hol, drugs or medication, and people who are tired or unwell.
The device is non-intended to be used exclusively for sawing
wood. The manufacturer is not liable for damage caused by
non-intended use or incorrect operation.
The device may only be used in the intended manner. Any
use beyond this is improper. The user/operator, not the manu-
facturer, is responsible for damages or injuries of any type
resulting from this.
An element of the intended use is also the observance of the
safety instructions, as well as the assembly instructions and
operating information in the operating manual.
Persons who operate and maintain the device must be famil-
iar with the manual and must be informed about potential
dangers.
In addition, the applicable accident prevention regulations
must be strictly observed.
Other general occupational health and safety-related rules
and regulations must be observed.
The liability of the manufacturer and resulting damages are
excluded in the event of modifications of the device.
Please observe that our equipment was not designed with the
intention of use for commercial or industrial purposes. We as-
sume no guarantee if the equipment is used in commercial or
industrial applications, or for equivalent work.
m DANGER
In accordance with the applicable product liability laws, the
manufacturer of this device assumes no liability for damage
to the device or caused by the device arising from:
• Installing and replacing non-original spare parts,
• Removing or changing safety components.
6.1 Improper use
• This device is not suitable for felling work.
• Do not use the guide rail as a lever to move tree trunks
or similar.
•
Sawing of wood with a diameter over 20cm is not allowed.
7. Safety information
7.1 General information
m WARNING
Always remain attentive, pay attention to what you are doing
and be sensible when working with the device. Do not use
the device while ill, tired or under the influence of drugs, al-
cohol or medication. A moment of inattention while operating
power tools may result in serious personal injury.
Avoid misuse, use the machine only as described under “In-
tended use”.
The operating manual contains important notices on how to
work safely and professionally with the chainsaw and how
to avoid hazards.
If a blockage still occurs between the material to be cut and
the saw chain, switch it off immediately. Wait until the saw
chain has come to a standstill. Remove the spark plug connec-
tor and put on cut-resistant gloves to remove the blockage. If
the guide rail (blade) has to be removed, follow the instructions
as described in the chapter “Installation”. After removing the
blockage and re-installation, a test run must be carried out.
If vibrations or mechanical noises are detected during this
process, stop work and contact an authorised service centre.
Should this hazard occur more often, we recommend a new
training.
■ Before start-up, read the operating manual for your device
and pay particular attention to the safety instructions.
■ Warning and information labels attached to the device
provide important information for safe operation.

6GB/IE/NI/CY/MT
■ In addition to the information in the operating manual, the
general safety and accident prevention regulations of the
legislature must be observed.
■ Keep packaging material away from children, there is a
risk of suffocation!
■ Inadequately informed operators can endanger them-
selves and others through improper use. The operator is
responsible for the safety of third parties.
■ Before starting work, check the function of the throttle.
This must automatically return to the neutral position after
release.
■ Do not work for more than 10 minutes at a time. It is advisa-
ble to take a break of 10 - 20 minutes between operations.
■ Only lend the device to users who have experience with
the device. The operating manual must be handed over
at the same time.
■ Some cutting tasks require special training and skills. If
you have any doubts, consult a specialist.
■ First-time users must be instructed to familiarise themselves
with the features of the device. Attend a state chainsaw
training course for your safety.
■ When not in use, the device must be set down in such a
way that no one is endangered. Secure from unauthorised
access.
■ The user of the device is responsible for all accidents and
hazards that cause damage to other people or their prop-
erty.
■ Children, young people and persons with reduced physi-
cal, sensory or mental abilities must not use the chainsaw.
Exceptions exist only for young people over 16 years of
age in the context of training under the supervision of a
professional.
■ The electric ignition system of the device generates a low
electromagnetic field. If you wear a pacemaker or similar
implant, consult your doctor before using the device to
avoid health risks.
■ Please note that improper maintenance, the use of non-
compliant spare parts, or the removal or modification of
safety devices can result in damage to the device and seri-
ous injury to the person working with it.
7.2 Personal protective equipment (PPE)
m DANGER
Always wear personal protective equipment (PPE) such as
eye protection (visor or goggles), head, hand, leg and foot
protection suitable for climbing trees!
- Wear a safety helmet with face protection or safety gog-
gles and hearing protection.
- Wear close-fitting protective clothing with a cut protection
insert.
- Wear non-slip safety shoes.
- Wear protective gloves.
■ Avoid loose clothing that can get caught.
■ Do not wear a scarf, tie or jewellery!
■ If you have long hair, use a hair net!
■ Wear a safety helmet for all work in the forest. This pro-
vides protection from falling branches. Check the safety
helmet regularly for damage. This must be replaced after
5 years at the latest. Only use approved safety helmets.
■ The face guard or safety goggles protect against shavings
and wood splinters. To prevent injuries to the eyes, you
must always wear a face guard or safety goggles when
working with the device.
■ Always wear hearing protection. The noise emitted by the
device may cause hearing damage.
■ Wear robust protective gloves made of tough material,
such as leather.
■ Wear a dust protection mask when sawing dry wood.
Sawdust may form.
■ When working in the tree, the user can fall. The user can
be seriously injured or killed. Wear equipment for fall pro-
tection.
7.3 Storage and transport
■ Switch off the chainsaw before any transport, even over
short distances. Engage the chain brake and fit the chain
guard.
■ Use the chain guard during transport and storage.
■ Secure the machine against tipping over during transport
(including in vehicles) to prevent fuel loss, damage or in-
jury.
■ Carry the device only by the front handle. In doing so, the
guide rail points backwards, away from your body.
■ Keep the hot silencer away from your body. There is a
risk of burns!
■ Clean and maintain the chainsaw before storage.
■ Store the device in a safe and dry location. Also secure it
from unauthorised access.
7.4 Environmental safety
■ National and/or municipal regulations may impose time
restrictions on the use of noise-generating, motorized de-
vices. Ask your local administration about this.
■ The device must not be operated indoors or in other poor-
ly ventilated areas. There is a danger of suffocation due to
the toxic exhaust gases / lubricating oil vapours.
■ Only carry out work in daylight.

7GB/IE/NI/CY/MT
■ Also, do not work in adverse weather conditions, such as
rain or wind. There is an increased risk of accidents here.
■ Keep your work area clean and tidy.
■ Keep children, other people and animals away before
and during work. If distracted, you can lose control of the
device.
■ Before starting work, make sure that there are no persons,
animals or property in the danger zone.
■ Do not work near wire fences or in areas with loose old wire.
■ Have fire extinguishers ready when working in highly flam-
mable environments such as dry grass, etc. There is a risk
of fire!
7.5 Refill with fuel
■ Petrol is very easily flammable. Keep away from naked
flames when refuelling and do not smoke while doing so.
There is a risk of fire!
■ Be careful not to spill petrol. Ensure that no petrol or chain
oil gets into the soil. Use suitable sheeting or similar to
help with this.
■ Refuel only in well-ventilated areas. Petrol vapours can
easily ignite or explode.
■ Switch off the engine before refuelling and allow the de-
vice to cool down. If petrol has been spilled, clean the
affected areas immediately. Also, do not let any fuel get
on your clothes, otherwise change immediately.
■ Also avoid skin and eye contact with petrol or lubricants
(oil).
■ Do not breathe in fuel vapours/lubricating oil vapours.
■ Watch out for leaks. If petrol is leaking, do not start the
engine. There is a danger from burns.
■ Carefully open the tank cap so that any overpressure can
slowly escape and no petrol sprays out.
7.6 Before commissioning
m WARNING
Always carry out checks before use and with the engine
switched off.
Check the device before each use and after it has fallen to the
ground to ensure that it is in safe operating condition.
Check that all moving parts are working properly. Many acci-
dents are caused by poorly maintained tools. Have damaged
parts repaired by qualified specialist personnel.
Only use the chainsaw and accessories in accordance with
these instructions. taking into account the working conditions
and the work to be performed. Using power tools for opera-
tions other than those intended can lead to hazardous situ-
ations.
■ Regularly check the chain brake for proper functioning
(front hand guard, see Fig. 2).
■ Check the guide bar to make sure it is mounted correctly.
■ Check that the saw chain is properly tensioned. Follow the
instructions for lubrication, chain tensioning and replacing
accessories. An improperly tensioned or lubricated chain
can break or increase the risk of kick-back.
■ Keep cutting tools sharp and clean. Sharpen regularly
and replace worn parts in good time. Properly maintained
cutting tools with sharp cutting edges are less likely to bind
and are easier to control.
■ Check that the throttle and the throttle interlock move easily.
The throttle lever must spring back to the starting position.
■ Check that there is enough fuel and chain lubricating oil
in the tank.
■ Check that the handles are clean, dry and free from oil
and dirt.
■ Never carry out the work alone. In an emergency, some-
one must be nearby.
■ Only use the chainsaw when standing on firm, safe and
level ground. Do not overreach. Slippery ground or unsta-
ble standing surfaces (e.g. on a ladder) can cause loss of
balance or loss of control of the chainsaw. Keep proper
footing and balance at all times. This will allow you to bet-
ter control the chainsaw in unexpected situations.
■ Do not work with the chainsaw in a tree. There is a risk of
injury when operating in a tree.
■ Never saw above shoulder height.
■ Always hold the chainsaw with your right hand on the rear
handle and your left hand on the front handle. Holding
the chainsaw using the opposite grip increases the risk of
injuries and must be avoided.
■ Keep all body parts away from the saw chain when the
chainsaw is running. Before starting the chainsaw, ensure
that the saw chain is not touching anything. When work-
ing with a chainsaw, a moment of carelessness can result
in clothing or body parts being caught by the saw chain.
■ Switch off the chainsaw immediately if you notice any no-
ticeable changes in the device’s behaviour.
■ If the chainsaw has come into contact with stones, nails or
other hard objects, stop the engine immediately and check
the saw chain and guide bar for damage.
■ Do not drop the chainsaw, do not hit it against obstacles
and never use the guide bar as a lever.
■ Only saw in wood with the chainsaw.
■ When cutting a branch that is under tension, expect it to
spring back. If the tension in the wood fibres is released,
the tensioned branch can hit the operator and/or wrest the
chainsaw from control.

8GB/IE/NI/CY/MT
■ Be especially careful when cutting undergrowth and
young trees. The thin material can get caught in the saw
chain and hit you or throw you off balance.
7.7 Vibrations
m WARNING
Avoid the risks associated with vibration, e.g. the risk of white
finger syndrome (circulatory disorders) by taking frequent
breaks from work where you rub your palms together, for
example.
■ Always wear protective gloves and make sure your hands
are warm.
■ Make sure that the chain is always sharp.
■ Take regular breaks from work.
7.8 Precautionary measures against kick-
back
m WARNING
Watch out for kick-back when working with the device. There
is a danger of injury. Avoid kick-backs through caution and
correct sawing technique.
■ Touching with the tip of the guide bar can sometimes lead
to an unexpected backward reaction, whereby the guide
bar whips up and in the direction of the operator.
■ Kickback can arise if the tip of the guide rail touches an ob-
ject or if the wood bends and the saw chain jams in the cut.
■ If the saw chain jams on the top edge of the guide rail, the
chainsaw can jerk back suddenly in the direction of the
operator in an uncontrolled manner.
■ If the saw chain jams on the lower edge of the guide rail,
the chainsaw can jerk forward suddenly away from the
operator in an uncontrolled manner.
■ Be extremely careful when using the chain of the chain-
saw to continue cutting into a cut that has already been
started.
■ Do not saw branches or pieces of wood that could change
their position during the sawing process or where the cut
closes during the sawing process.
■ Each of these reactions can lead to you losing control of
the saw and possibly suffering a serious injury. Never rely
solely on the safety equipment integrated in the chainsaw.
As a chainsaw user, take various measures to work without
accidents and injuries.
Kickback is the result misuse and/or incorrect operating pro-
cedures or conditions. It can be prevented by suitable precau-
tionary measures, as described in the following:
■ Hold the saw firmly with both hands, with the thumbs and
fingers enclosing the chainsaw handles. Bring your body
and arms into a position in which you can absorb the kick-
back forces. If suitable measures are implemented, the op-
erator will be able to withstand the kickback forces. Never
let go of the chainsaw.
■ Avoid an unusual body stance and never saw above
shoulder height. This will help to avoid unintentional con-
tact with the rail tip, and enable improved control of the
chainsaw in unexpected situations.
■ Always use replacement guide rails and saw chains pre-
scribed by the manufacturer. Incorrect replacement guide
bars and saw chains may cause the saw chain to break
and/or lead to kickback.
■ Adhere to the instructions of the manufacturer when sharp-
ening and maintaining the saw chain. If the depth limiter
is too low, this increases the tendency towards kickback.
■ Do not saw with the tip of the guide bar. There is a risk of
kick-back. (Fig. 7)
■ Make sure that there are no nails or metal pieces in the
cutting area. Pay special attention to nails or pieces of
iron around the cutting area. Also be careful when saw-
ing hardwoods where the chain can get caught. This can
cause kick-back.
■ Start cutting at full power and always keep the chainsaw
at maximum speed while sawing.
■ Make sure that there are no objects on the floor that you
can trip over.
7.9 Work behaviour and technique
■ Only work in good visibility and light conditions. Pay par-
ticular attention to slippery conditions, wetness, ice and
snow (danger of slipping). There is an increased risk of
slipping on freshly peeled wood (bark).
■ Never work on unstable ground. Watch out for obstacles
in the work area, risk of tripping. Secure footing must be
ensured at all times.
■ Never saw above shoulder height.
■ Never saw when standing on ladders.
■ Never climb into the tree with the chainsaw and carry out
work without appropriate restraint systems for man and
machine. We always recommend carrying out the work
from a work platform.
■ Do not bend too far when working.

9GB/IE/NI/CY/MT
■ Guide the chainsaw such that no part of your body is
within the extended pivot range of the saw chain.
■ Only saw wood with the chainsaw.
■ Do not touch the ground with the saw chain running.
■ Clean the cutting area of foreign bodies such as sand,
stones, nails, etc. Foreign bodies damage the sawing
device and can result in dangerous kick-back as well as
being flung away.
■ When sawing sawn timber, use a secure support (if pos-
sible, a sawhorse). The wood must not be held with the
foot or another person.
■ Round wood or logs should be secured against turning
while they are being cut.
■ Never work without a claw stop, the chainsaw can pull
the operator forward. Use the claw stop for cutting tree
trunks or thick branches. Using the claw stop increases
work safety, reduces personal strain when working and
vibrations are reduced.
■ For felling or cross-cutting, the serrated strip (claw stop)
must be applied to the wood to be cut. The use of the
spike bar is also recommended when cutting through thick
branches.
■ Before every cross-cut, firmly position the serrated strip and
only then saw into the wood with the saw chain running.
The saw is then lifted up using the rear grip and guided us-
ing the front handle. The spike bar acts as a pivot point. Re-
positioning is done using light pressure on the front handle.
Pull the chainsaw back slightly to do this. Insert the spike
bar deeper and lift up again using the rear grip.
■ Take care when cutting splintery wood. Cut pieces of
wood can be carried away (risk of injury).
■ When cutting using the top of the bar, the chainsaw can
be pushed towards the operator if the saw chain binds up.
For this reason, if possible, cut using the bottom side of the
bar as the chainsaw will be pulled away from the body
towards the wood.
■ Tensioned wood must always be cut on the compressed
side first. Only then perform the separating cut using the
opposite side. This prevents the rail from jamming.
■ When working in the tree, the chainsaw may fall down.
People can be seriously injured and material damage can
occur. Secure the chainsaw using the suspension device.
■ Before the saw chain is guided into the cutting area, it can
slip away to the side or jump up.
m ATTENTION
Increased risk of kickback!
In order to maintain full control at the moment of cutting all
the way through, reduce the pressing force towards the end
of the cut, without loosening your firm grip of the handles of
the chainsaw. Ensure that the saw chain does not come into
contact with the ground. After completing the cut, wait for
the saw chain to stop before removing the chainsaw. Always
switch off the chainsaw’s engine before moving from one tree
to the next tree.
m WARNING
In case of extended working periods, the operating person-
nel may suffer circulatory disturbances in their hands (vibra-
tion white finger) due to vibrations.
Raynaud’s syndrome is a vascular disease that causes the
small blood vessels on the fingers and toes to cramp in spasms.
The affected areas are no longer supplied with sufficient blood
and therefore appear extremely pale. The frequent use of
vibrating devices can cause nerve damage in people whose
circulation is impaired (e.g. smokers, diabetics).
If you notice unusual adverse effects, stop working immedi-
ately and seek medical advice.
Observe the following information to reduce hazards:
• Keep your body and especially your hands warm in cold
weather.
• Take regular breaks and move your hands to promote
circulation.
• Ensure as little vibration as possible at the machine via
regular maintenance and stable parts on the device.
7.10 Residual risks
m DANGER
RISK OF INJURY !
Contact with the saw chain can lead to fatal cuts.
Never touch the saw chain with your hands while it is running.
RISK OF KICK-BACK !
Kick-back can lead to fatal cuts.
DANGER OF BURNING !
The chain and guide bar heat up during operation.
The electric tool has been built according to state-
of-the-art and the recognised technical safety
rules. However, individual residual risks can
arise during operation.

10 GB/IE/NI/CY/MT
Furthermore, despite all precautions having been met, some
non-obvious residual risks may still remain.
Residual risks can be minimised if the “Safety instructions”
and “Proper use” are observed along with the whole of the
operating instructions.
8. Technical data
Machine without blade
Length x width x height .........................270 x 230 x 240 mm
Weight unfuelled, without cutting gear approx. .......... 3.4 kg
Weight unfuelled, with cutting gear approx. ...............3.8 kg
Tank for chain lubricating oil ........................................... 0.16 l
Fuel tank content...............................................................0.23 l
Oil and fuel mixture ...........................................................1:40
Cutting length ..................................................................20 cm
Blade length ..................................................................... 30 cm
Automatic chain oiling ......................................................... Yes
Chain pitch .................................................... 3/8” (9.525 mm)
Chain link thickness ..................................................... 1.27 mm
Chain type...................................................................3/8LP-40
Number of drive sprocket teeth ..............................................6
Tooth pitch of drive sprocket .............................................3/8″
Blade type .........................................................AP10-40-509P
Chain speed max. .......................................................... 21 m/s
Motor ........................................1 cylinder, 2 stroke air-cooled
Cubic capacity ...........................................................25.4 cm³
Max. engine power output per ISO 7293 .................0.7 kW
Idle speed n0 ................................................. 3300 ± 300 rpm
Maximum speed with cutting gear ........................11000 rpm
Spark plug ........................................................................ L8RTC
The noise pressure level should be reduced as far
as possible depending on use and the activities to
be completed so that the health of the operator is
not endangered. The noise pressure level at the
workplace can exceed 80 dB. In this case, noise
protection measures are required for the opera-
tor (e.g. wearing hearing protection).
Keep the noise level and vibration to a minimum!
• Only use devices which are free of defects.
• Maintain and clean the device at regular intervals.
• Adapt your working methods to the device.
• Do not overload the device.
• Have the device checked if necessary.
• Switch the device off if it is not in use.
• Wear gloves.
Measured sound pressure level LpA ..............................99.2 dB
Uncertainty KpA .....................................................................3 dB
Guaranteed sound power level LWA ...............................113 dB
Measured sound power level LWA .............................. 108.7 dB
Uncertainty KWA .................................................................... 3 dB
Vibration, front handle ................................................8.98 m/s²
Vibration, rear handle ................................................8.03 m/s²
Uncertainty.....................................................................1.5 m/s²
Wear hearing protection.
Excessive noise can result in a loss of hearing.
The specified device emissions values have been measured in
accordance with a standardised test procedure and can be
used for the comparison of one device with another.
The specified noise emission values can also be used for an
initial estimation of the exposure.
Warning:
• The noise emission values can vary from the specified val-
ues during the actual use of the device, depending on the
type and the manner in which the device is used, and in
particular the type of workpiece being processed.
• Try to keep the stress as low as possible. For example:
Limit working time. In doing so, all parts of the operating
cycle must be taken into account (such as times in which
the device is switched off or times in which it is switched
on, but is not running under a load).
9. Before commissioning
1. Open the packaging and carefully remove the device.
2. Remove the packaging material, as well as the packag-
ing and transport safety devices (if present).
3. Check whether the scope of delivery is complete.
4. Check the device and accessory parts for transport
damage.
5. If possible, keep the packaging until the expiry of the
warranty period.
6. Remove the quick start guide from the start pull cord (8).
ATTENTION
The device and the packaging are not children‘s toys! Do not
let children play with plastic bags, films or small parts! There
is a danger of choking or suffocating!

11GB/IE/NI/CY/MT
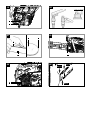
9.1 Mounting the guide rail (2) and tensioning
the saw chain (1)
m WARNING
Risk of injury!
Always wear protective gloves when touching the saw chain
(1). Danger of injury due to the sharp cutting teeth!
Only use approved combinations of saw chain (1) and guide
rail (2) (see chapter “Approved cutting gear”).
Always carry out assembly with the engine switched off.
Note
A new saw chain (1) stretches and needs to be re-tensioned
more often. Check and adjust the chain tension regularly.
Depending on wear, the guide rail (2) can be turned.
1. Set the chainsaw down on a level and stable surface.
2. Pull the front hand guard (3) back up to the stop to re-
lease the chain brake. (Fig. 2)
3. Remove the two fixing nuts (16) with the spark plug
wrench (20).
4. Remove the chain cover (17).
5. Turn the chain tensioning screw (23) (anti-clockwise) un-
til the chain tensioning pin (26) is at the right-hand stop
(Fig. 3). Use the slotted screwdriver (20) for this.
6. Slide the slotted hole of the guide rail (2) over the two
protruding fastening pins (29).
7. Place the saw chain (1) over the teeth of the chain wheel
(27). Insert the saw chain (1) accurately into the guide
rail (2). In the tip of the guide rail (2) there is a sprocket
(30) into whose teeth the saw chain (1) must be inserted.
(Fig. 6 and 18)
8. Pull slightly on the guide rail (2) to slightly pre-tension
the saw chain (1).
9. Fit the chain cover (17) back on. Make sure that the
internal chain tensioning pin (26) fits into the matching
hole in the guide rail (2). If necessary, adjust the chain
tensioning screw (23) with the slotted screwdriver (20).
10. Screw on the two fastening nuts (16) by hand. However,
make sure that you do not tighten them yet. The fasten-
ing nuts (16) are tightened only after tensioning the saw
chain (1).
9.2 Tensioning and checking the saw chain (1)
m WARNING
Put on protective gloves! Danger of injury due to the sharp
cutting teeth!
Check the chain tension regularly before each start-up.
Always carry out checks before starting up and with the engine
switched off.
1. Before tensioning, loosen the two fixing nuts (16) a little
with the spark plug wrench (20).
2. Turn the chain tensioning screw (23) clockwise with the
slotted screwdriver (20) to increase the tension.
3. Tighten the two fixing nuts (16) with the spark plug
wrench (20).
4. The saw chain (1) must be in contact with the underside
of the guide rail. Check whether the saw chain (1) can
be pulled over the guide rail (2) by hand (with the chain
brake released, pull the front hand guard (3) back).
NOTE
A new saw chain (1) stretches and needs to be re-tensioned
more often.
9.3 Mixing fuel
The engine must be operated with a fuel mixture of petrol
and engine oil.
m WARNING
Avoid direct skin contact with fuel and inhalation of fuel va-
pours.
Use only a mixture of unleaded petrol (min. RON 95) and
special 2-stroke engine oil (JASO FD/ISO - L - EGD). Mix the
fuel mixture as per the fuel mixing table.
Put the correct amount of petrol and 2-stroke oil into the
enclosed mixing bottle (22) (see “Fuel mixing table”). Then
shake the mixing container (22) well.
9.3.1 Fuel mixing table
Mixing process: 40 parts petrol to 1 part oil
Petrol ................................................ 2-stroke oil
0.5 litres...................................................12.5 ml

12 GB/IE/NI/CY/MT
9.4 Filling in fuel (Fig. 8)
m WARNING
Only fill the fuel when the engine is switched off and has
cooled down. There is a risk of fire!
1. Always clean the area around the fuel tank cap (13) be-
fore filling to prevent dirt from falling into the fuel tank.
Use a dry, lint-free cloth for this purpose.
2. Lay the device on its side with the fuel tank cap (13)
facing upwards.
3. Turn the fuel tank cap (13) anti-clockwise and open it.
The fuel tank cap (13) is connected to an anti-loss device
in the fuel tank and thus cannot fall off.
4. Pour the fuel mixture into the fuel tank. Do not spill fuel
when refuelling and do not fill the fuel tank to the brim.
5. Wipe up spilled fuel immediately.
6. Turn the fuel tank cap (13) clockwise to close it.
NOTE
Also check the chain oil after each fuel fill.
9.5 Drain the fuel
Only empty the fuel tank outdoors or in well-
ventilated rooms. Make sure that no fuel gets
into the soil (environmental protection). Use a
suitable and stable base.
1. Hold a collection container under the fuel tank.
2. Unscrew and remove the fuel tank cover (13) of the fuel
tank.
3. Drain the petrol/oil mixture completely.
4. Screw the fuel tank cover (13) back on by hand.
9.6 Fill in chain oil (Fig. 8)
m WARNING
Only fill the saw chain oil when the engine is switched off and
has cooled down. There is a risk of fire!
Never work without chain lubrication! If the saw chain (1)
runs dry, the cutting gear will be irreparably destroyed in a
short time.
Always check chain lubrication before working.
NOTE
Use only saw chain oil. Preferably biodegradable. Do not use
waste oil, engine oil, etc.
Check during work that the chain lubrication is working.
1. Always clean the area around the chain oil tank cap
(11) before filling so that no dirt falls into the chain oil
tank. Use a dry, lint-free cloth for this purpose.
2. Lay the device on its side with the chain oil tank cap (11)
is facing upwards.
3. Turn the chain oil tank cap (11) anti-clockwise and open
it. The chain oil tank cap (11) is connected to an anti-loss
device in the chain oil tank and thus cannot fall off.
4. Pour the bio chain oil into the chain oil tank. Do not spill
chain oil when refuelling and do not fill the chain oil
tank to the brim.
5. Wipe up spilled chain oil immediately.
6. Turn the chain oil tank cap (11) clockwise to close it.
10. Commissioning
m CAUTION
Please observe the legal provisions from the noise protection
ordinance.
Before each commissioning, check the device for the follow-
ing:
• Check the fuel system for leakage
• Faultless condition and completeness of the guards and
the cutting device
• Tight fit of all screw connections
• Smooth running of all moving parts
Working instructions
Familiarise yourself with handling the chainsaw before use.
10.1 Starting the engine
m ATTENTION
Move at least 3 metres away from the refuelling area before
starting the engine (Fig. 9).
Always pull the start pull cord (8) out straight. Hold the han-
dle of the start pull cord (8) firmly when the pull cord (8)
winds back in. Never let the start pull cord (8) whip back in.
Release the throttle lever (5) immediately after starting the
engine. Ensure that the engine speed has returned to idle be-
fore releasing the chain brake (push the front hand guard (3)
backwards).
Pull out the cold start lever (choke) (14) only for starting.

13GB/IE/NI/CY/MT
10.1.1 Starting the motor when cold
m WARNING
Engage the chain brake before every start-up (push the front
hand guard (3) forward).
m ATTENTION
Never allow the start pull cord (8) to spin back. This can result
in damage.
1. Remove the guide rail cover (21).
2. Set the chainsaw down on a firm and level surface. The
saw chain (1) must not come into contact with the floor.
3. Push the front hand guard (3) forwards until it latches
into place. The saw chain (1) is clamped by the chain
brake.
4. Press the fuel pump primer (4) 6x. (Fig. 1)
5. Switch the ON/OFF switch (15) to “ON”. (Fig. 1)
6. Pull out the cold start (choke) lever (14). (Fig. 10.2)
7. Hold the chainsaw firmly by the front handle (12) and
pull the start pull cord (8) out slowly until you feel the
first resistance.
8. Now pull the start pull cord (8) and the engine should
start. If the engine does not start, repeat the process. As
long as the cold start lever (choke) (14) is pulled out,
the engine will run for only a short time and then stop.
9. As soon as the engine has stopped, actuate the throttle
interlock (7) and the throttle (5) together. The cold start
(choke) lever (14) will automatically spring back to the
“warm start” operating position. (Fig. 10.1)
10. Now pull the start pull cord (8) again and the engine
should start.
If the engine does not start even after several attempts, read
the “Troubleshooting” chapter.
NOTE
With high outside temperatures, it may be necessary to start
the engine without the cold start lever (choke) (14) even when
the engine is cold!
• Release the chain brake by pulling the front hand guard
(3) backwards. (Fig. 2)
• CAUTION! The chain brake is now released. If the throt-
tle (5) is actuated together with the throttle interlock (7),
the saw chain (1) starts up.
10.1.2 Starting the motor when warm
(The device stood still for less than 15–20 minutes)
m WARNING
Engage the chain brake before every start-up (push the front
hand guard (3) forward).
1. Push the front hand guard (3) forwards until it latches
into place. The saw chain (1) is clamped by the chain
brake.
2. Switch the ON/OFF switch (15) to “ON”.
3. The cold start lever (choke) (14) does not have to be
pulled to start a warm engine.
4. Hold the chainsaw firmly by the front handle (12) and
pull the start pull cord (8) out slowly until you feel the
first resistance.
5. Now pull the start pull cord (8) quickly. The device
should start after 1–2 pulls. If the device has still not
started after 6 pulls, repeat the procedure described
under “Starting the engine when cold”.
10.2 Shutting the engine off
10.2.1 Emergency stop procedure
If it is necessary to stop the device immediately, set the ON/
OFF switch (15) to “OFF”. (Fig. 1)
10.2.2 Normal procedure
1. Release the throttle (5). The engine goes into idle speed.
2. Then set the ON/OFF switch (15) to “OFF”. (Fig. 1)
10.3 Operating while idle
m ATTENTION
When idling, the saw chain (1) must be stationary.
NOTE
If the saw chain (1) moves at idle or the engine stops on its
own when the throttle is released, a carburettor adjustment
must be made (see chapter “Maintenance of the carburettor
settings”).
1. Pick up the chainsaw.
2. Use the left hand to hold the front handle (12) firmly.
3. Use the right hand to hold the rear handle (6) firmly. The
heel of the hand rests on the throttle interlock (7) and the
index finger operates the throttle (5).
4. After actuating the throttle (5) once, the engine runs at
idle.
5. Allow the engine to warm up briefly.

14 GB/IE/NI/CY/MT
10.4 Checking and adjusting chain lubrication
m ATTENTION
• Never work without chain lubrication! If the saw chain (1)
runs dry, the cutting gear will be irreparably destroyed in
a short time.
• Always check chain lubrication before working.
Note
Only use saw chain oil, preferably biodegradable. Do not
use waste oil, engine oil, etc.
Hold the chainsaw during operation, at medium speed, over
a sawed-off tree stump or a suitable surface. If the lubrica-
tion is sufficient, a light film of oil will form on the tree stump
or surface.
• If necessary, the chain lubrication can be increased or de-
creased by means of the oil adjustment screw (32) (Fig. 11).
• Use the slotted screwdriver (20) supplied to help:
- First press and then turn the oil adjustment screw (32)
clockwise to reduce chain lubrication.
- First press and then turn the oil adjustment screw (32)
anti-clockwise to increase chain lubrication.
10.5 Checking the chain brake
m WARNING
The chain brake must be checked before each use.
The chain brake brakes the saw chain (1) immediately in the
event of kick-back.
1. Make sure that the front hand guard (3) is free of dirt
and moves easily.
2. Start the chainsaw and accelerate the saw chain (1) to
full speed (full throttle).
3. With the saw chain (1) running, operate the front hand
guard (3). The chain brake must brake and block the
saw chain (1) at max. speed.
m WARNING
Increased engine speed for too long with the chain brake
locked will damage the engine and the chain drive.
If the saw chain (1) still moves, contact the customer service.
11. Usage
11.1 Delimbing work
• Always be aware of the danger of branches snapping
back.
• Do not stand on the trunk when delimbing.
• Do not saw with the tip of the guide bar. (Fig. 7)
• Never saw several branches at once.
• Support the chainsaw with the claw stop (24) when de-
limbing, if possible.
• Make sure that at the end of the cut the chainsaw can
swing through under its own weight. It is no longer sup-
ported in the cut so hold it securely.
• Take a firm, stable and secure stance when delimbing.
11.1.1 Delimbing work in sections
Shorten long or thick branches before making the final cut.
Otherwise the saw chain (1) can easily jam.
11.1.2 Working on tensioned wood
It is essential to follow the correct sequence when working on
wood that is tensioned. Otherwise the saw chain (1) may jam
or kick-back may occur.
Tensioned wood must always be cut on the compressed side
first. Only then perform the separating cut using the opposite
side. (Fig. 24)
This prevents the saw chain (1) from jamming.
m ATTENTION
Property damage!
Lying wood must not touch the floor on the underside of the
cutting point, otherwise the saw chain (1) may be damaged.
Recoil
• If the saw chain (1) jams on the top edge of the guide rail
(2), the chainsaw can jerk back suddenly in the direction
of the operator in an uncontrolled manner.
Dragging
• If the saw chain (1) jams on the lower edge of the guide
rail (2), the chainsaw can jerk forward suddenly away
from the operator in an uncontrolled manner.
Safe work
• Keep the device in good working order to prevent injuries.
• After dropping the device, check for significant damage
or defects.
• Do not use the device whilst standing on a ladder or in an
unsafe position.
• Do not be tempted to make a rash cut. This could endan-
ger yourself and others.
La page est en cours de chargement...
La page est en cours de chargement...
La page est en cours de chargement...
La page est en cours de chargement...
La page est en cours de chargement...
La page est en cours de chargement...
La page est en cours de chargement...
La page est en cours de chargement...
La page est en cours de chargement...
La page est en cours de chargement...
La page est en cours de chargement...
La page est en cours de chargement...
La page est en cours de chargement...
La page est en cours de chargement...
La page est en cours de chargement...
La page est en cours de chargement...
La page est en cours de chargement...
La page est en cours de chargement...
La page est en cours de chargement...
La page est en cours de chargement...
La page est en cours de chargement...
La page est en cours de chargement...
La page est en cours de chargement...
La page est en cours de chargement...
La page est en cours de chargement...
La page est en cours de chargement...
La page est en cours de chargement...
La page est en cours de chargement...
La page est en cours de chargement...
La page est en cours de chargement...
La page est en cours de chargement...
La page est en cours de chargement...
La page est en cours de chargement...
La page est en cours de chargement...
La page est en cours de chargement...
La page est en cours de chargement...
La page est en cours de chargement...
La page est en cours de chargement...
La page est en cours de chargement...
La page est en cours de chargement...
La page est en cours de chargement...
La page est en cours de chargement...
La page est en cours de chargement...
La page est en cours de chargement...
La page est en cours de chargement...
La page est en cours de chargement...
La page est en cours de chargement...
La page est en cours de chargement...
La page est en cours de chargement...
La page est en cours de chargement...
La page est en cours de chargement...
La page est en cours de chargement...
La page est en cours de chargement...
La page est en cours de chargement...
La page est en cours de chargement...
La page est en cours de chargement...
La page est en cours de chargement...
La page est en cours de chargement...
La page est en cours de chargement...
La page est en cours de chargement...
La page est en cours de chargement...
La page est en cours de chargement...
La page est en cours de chargement...
La page est en cours de chargement...
La page est en cours de chargement...
La page est en cours de chargement...
La page est en cours de chargement...
La page est en cours de chargement...
La page est en cours de chargement...
La page est en cours de chargement...
La page est en cours de chargement...
La page est en cours de chargement...
La page est en cours de chargement...
La page est en cours de chargement...
La page est en cours de chargement...
La page est en cours de chargement...
La page est en cours de chargement...
La page est en cours de chargement...
La page est en cours de chargement...
La page est en cours de chargement...
La page est en cours de chargement...
La page est en cours de chargement...
La page est en cours de chargement...
La page est en cours de chargement...
La page est en cours de chargement...
La page est en cours de chargement...
La page est en cours de chargement...
La page est en cours de chargement...
La page est en cours de chargement...
La page est en cours de chargement...
La page est en cours de chargement...
La page est en cours de chargement...
La page est en cours de chargement...
La page est en cours de chargement...
La page est en cours de chargement...
La page est en cours de chargement...
La page est en cours de chargement...
La page est en cours de chargement...
La page est en cours de chargement...
La page est en cours de chargement...
La page est en cours de chargement...
La page est en cours de chargement...
La page est en cours de chargement...
La page est en cours de chargement...
La page est en cours de chargement...
La page est en cours de chargement...
La page est en cours de chargement...
La page est en cours de chargement...
La page est en cours de chargement...
La page est en cours de chargement...
La page est en cours de chargement...
La page est en cours de chargement...
La page est en cours de chargement...
La page est en cours de chargement...
La page est en cours de chargement...
La page est en cours de chargement...
La page est en cours de chargement...
La page est en cours de chargement...
La page est en cours de chargement...
La page est en cours de chargement...
La page est en cours de chargement...
La page est en cours de chargement...
La page est en cours de chargement...
La page est en cours de chargement...
La page est en cours de chargement...
La page est en cours de chargement...
La page est en cours de chargement...
La page est en cours de chargement...
La page est en cours de chargement...
La page est en cours de chargement...
La page est en cours de chargement...
La page est en cours de chargement...
La page est en cours de chargement...
La page est en cours de chargement...
La page est en cours de chargement...
La page est en cours de chargement...
La page est en cours de chargement...
La page est en cours de chargement...
La page est en cours de chargement...
La page est en cours de chargement...
La page est en cours de chargement...
La page est en cours de chargement...
La page est en cours de chargement...
La page est en cours de chargement...
La page est en cours de chargement...
La page est en cours de chargement...
La page est en cours de chargement...
La page est en cours de chargement...
La page est en cours de chargement...
La page est en cours de chargement...
La page est en cours de chargement...
La page est en cours de chargement...
La page est en cours de chargement...
La page est en cours de chargement...
La page est en cours de chargement...
La page est en cours de chargement...
La page est en cours de chargement...
La page est en cours de chargement...
La page est en cours de chargement...
La page est en cours de chargement...
La page est en cours de chargement...
La page est en cours de chargement...
La page est en cours de chargement...
La page est en cours de chargement...
La page est en cours de chargement...
La page est en cours de chargement...
La page est en cours de chargement...
La page est en cours de chargement...
La page est en cours de chargement...
La page est en cours de chargement...
La page est en cours de chargement...
La page est en cours de chargement...
La page est en cours de chargement...
La page est en cours de chargement...
La page est en cours de chargement...
La page est en cours de chargement...
La page est en cours de chargement...
La page est en cours de chargement...
La page est en cours de chargement...
La page est en cours de chargement...
La page est en cours de chargement...
La page est en cours de chargement...
La page est en cours de chargement...
La page est en cours de chargement...
La page est en cours de chargement...
La page est en cours de chargement...
La page est en cours de chargement...
La page est en cours de chargement...
La page est en cours de chargement...
La page est en cours de chargement...
La page est en cours de chargement...
La page est en cours de chargement...
La page est en cours de chargement...
La page est en cours de chargement...
La page est en cours de chargement...
La page est en cours de chargement...
La page est en cours de chargement...
La page est en cours de chargement...
La page est en cours de chargement...
La page est en cours de chargement...
La page est en cours de chargement...
La page est en cours de chargement...
La page est en cours de chargement...
La page est en cours de chargement...
La page est en cours de chargement...
La page est en cours de chargement...
La page est en cours de chargement...
La page est en cours de chargement...
La page est en cours de chargement...
La page est en cours de chargement...
La page est en cours de chargement...
La page est en cours de chargement...
La page est en cours de chargement...
La page est en cours de chargement...
La page est en cours de chargement...
La page est en cours de chargement...
La page est en cours de chargement...
La page est en cours de chargement...
La page est en cours de chargement...
La page est en cours de chargement...
La page est en cours de chargement...
La page est en cours de chargement...
La page est en cours de chargement...
La page est en cours de chargement...
La page est en cours de chargement...
La page est en cours de chargement...
La page est en cours de chargement...
La page est en cours de chargement...
La page est en cours de chargement...
La page est en cours de chargement...
La page est en cours de chargement...
La page est en cours de chargement...
La page est en cours de chargement...
La page est en cours de chargement...
La page est en cours de chargement...
La page est en cours de chargement...
La page est en cours de chargement...
La page est en cours de chargement...
La page est en cours de chargement...
La page est en cours de chargement...
La page est en cours de chargement...
La page est en cours de chargement...
La page est en cours de chargement...
La page est en cours de chargement...
La page est en cours de chargement...
La page est en cours de chargement...
La page est en cours de chargement...
La page est en cours de chargement...
La page est en cours de chargement...
La page est en cours de chargement...
La page est en cours de chargement...
La page est en cours de chargement...
La page est en cours de chargement...
La page est en cours de chargement...
La page est en cours de chargement...
La page est en cours de chargement...
La page est en cours de chargement...
La page est en cours de chargement...
La page est en cours de chargement...
La page est en cours de chargement...
La page est en cours de chargement...
La page est en cours de chargement...
La page est en cours de chargement...
La page est en cours de chargement...
La page est en cours de chargement...
La page est en cours de chargement...
La page est en cours de chargement...
La page est en cours de chargement...
La page est en cours de chargement...
La page est en cours de chargement...
La page est en cours de chargement...
La page est en cours de chargement...
La page est en cours de chargement...
La page est en cours de chargement...
La page est en cours de chargement...
La page est en cours de chargement...
La page est en cours de chargement...
La page est en cours de chargement...
La page est en cours de chargement...
La page est en cours de chargement...
La page est en cours de chargement...
La page est en cours de chargement...
La page est en cours de chargement...
La page est en cours de chargement...
La page est en cours de chargement...
La page est en cours de chargement...
La page est en cours de chargement...
La page est en cours de chargement...
La page est en cours de chargement...
La page est en cours de chargement...
La page est en cours de chargement...
La page est en cours de chargement...
La page est en cours de chargement...
La page est en cours de chargement...
La page est en cours de chargement...
La page est en cours de chargement...
La page est en cours de chargement...
La page est en cours de chargement...
La page est en cours de chargement...
La page est en cours de chargement...
La page est en cours de chargement...
La page est en cours de chargement...
La page est en cours de chargement...
La page est en cours de chargement...
La page est en cours de chargement...
La page est en cours de chargement...
La page est en cours de chargement...
La page est en cours de chargement...
La page est en cours de chargement...
La page est en cours de chargement...
La page est en cours de chargement...
La page est en cours de chargement...
La page est en cours de chargement...
La page est en cours de chargement...
La page est en cours de chargement...
La page est en cours de chargement...
La page est en cours de chargement...
La page est en cours de chargement...
La page est en cours de chargement...
La page est en cours de chargement...
La page est en cours de chargement...
La page est en cours de chargement...
La page est en cours de chargement...
La page est en cours de chargement...
La page est en cours de chargement...
La page est en cours de chargement...
La page est en cours de chargement...
La page est en cours de chargement...
La page est en cours de chargement...
La page est en cours de chargement...
La page est en cours de chargement...
La page est en cours de chargement...
La page est en cours de chargement...
La page est en cours de chargement...
La page est en cours de chargement...
La page est en cours de chargement...
La page est en cours de chargement...
La page est en cours de chargement...
La page est en cours de chargement...
La page est en cours de chargement...
La page est en cours de chargement...
La page est en cours de chargement...
La page est en cours de chargement...
La page est en cours de chargement...
La page est en cours de chargement...
La page est en cours de chargement...
La page est en cours de chargement...
La page est en cours de chargement...
La page est en cours de chargement...
La page est en cours de chargement...
La page est en cours de chargement...
La page est en cours de chargement...
La page est en cours de chargement...
La page est en cours de chargement...
La page est en cours de chargement...
La page est en cours de chargement...
La page est en cours de chargement...
La page est en cours de chargement...
La page est en cours de chargement...
La page est en cours de chargement...
La page est en cours de chargement...
La page est en cours de chargement...
La page est en cours de chargement...
La page est en cours de chargement...
La page est en cours de chargement...
La page est en cours de chargement...
La page est en cours de chargement...
La page est en cours de chargement...
La page est en cours de chargement...
La page est en cours de chargement...
La page est en cours de chargement...
La page est en cours de chargement...
La page est en cours de chargement...
La page est en cours de chargement...
La page est en cours de chargement...
La page est en cours de chargement...
La page est en cours de chargement...
La page est en cours de chargement...
La page est en cours de chargement...
La page est en cours de chargement...
La page est en cours de chargement...
La page est en cours de chargement...
La page est en cours de chargement...
La page est en cours de chargement...
La page est en cours de chargement...
La page est en cours de chargement...
La page est en cours de chargement...
La page est en cours de chargement...
-
 1
1
-
 2
2
-
 3
3
-
 4
4
-
 5
5
-
 6
6
-
 7
7
-
 8
8
-
 9
9
-
 10
10
-
 11
11
-
 12
12
-
 13
13
-
 14
14
-
 15
15
-
 16
16
-
 17
17
-
 18
18
-
 19
19
-
 20
20
-
 21
21
-
 22
22
-
 23
23
-
 24
24
-
 25
25
-
 26
26
-
 27
27
-
 28
28
-
 29
29
-
 30
30
-
 31
31
-
 32
32
-
 33
33
-
 34
34
-
 35
35
-
 36
36
-
 37
37
-
 38
38
-
 39
39
-
 40
40
-
 41
41
-
 42
42
-
 43
43
-
 44
44
-
 45
45
-
 46
46
-
 47
47
-
 48
48
-
 49
49
-
 50
50
-
 51
51
-
 52
52
-
 53
53
-
 54
54
-
 55
55
-
 56
56
-
 57
57
-
 58
58
-
 59
59
-
 60
60
-
 61
61
-
 62
62
-
 63
63
-
 64
64
-
 65
65
-
 66
66
-
 67
67
-
 68
68
-
 69
69
-
 70
70
-
 71
71
-
 72
72
-
 73
73
-
 74
74
-
 75
75
-
 76
76
-
 77
77
-
 78
78
-
 79
79
-
 80
80
-
 81
81
-
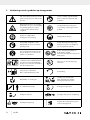 82
82
-
 83
83
-
 84
84
-
 85
85
-
 86
86
-
 87
87
-
 88
88
-
 89
89
-
 90
90
-
 91
91
-
 92
92
-
 93
93
-
 94
94
-
 95
95
-
 96
96
-
 97
97
-
 98
98
-
 99
99
-
 100
100
-
 101
101
-
 102
102
-
 103
103
-
 104
104
-
 105
105
-
 106
106
-
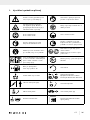 107
107
-
 108
108
-
 109
109
-
 110
110
-
 111
111
-
 112
112
-
 113
113
-
 114
114
-
 115
115
-
 116
116
-
 117
117
-
 118
118
-
 119
119
-
 120
120
-
 121
121
-
 122
122
-
 123
123
-
 124
124
-
 125
125
-
 126
126
-
 127
127
-
 128
128
-
 129
129
-
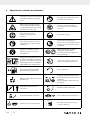 130
130
-
 131
131
-
 132
132
-
 133
133
-
 134
134
-
 135
135
-
 136
136
-
 137
137
-
 138
138
-
 139
139
-
 140
140
-
 141
141
-
 142
142
-
 143
143
-
 144
144
-
 145
145
-
 146
146
-
 147
147
-
 148
148
-
 149
149
-
 150
150
-
 151
151
-
 152
152
-
 153
153
-
 154
154
-
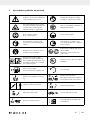 155
155
-
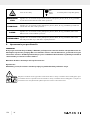 156
156
-
 157
157
-
 158
158
-
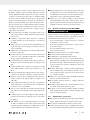 159
159
-
 160
160
-
 161
161
-
 162
162
-
 163
163
-
 164
164
-
 165
165
-
 166
166
-
 167
167
-
 168
168
-
 169
169
-
 170
170
-
 171
171
-
 172
172
-
 173
173
-
 174
174
-
 175
175
-
 176
176
-
 177
177
-
 178
178
-
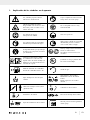 179
179
-
 180
180
-
 181
181
-
 182
182
-
 183
183
-
 184
184
-
 185
185
-
 186
186
-
 187
187
-
 188
188
-
 189
189
-
 190
190
-
 191
191
-
 192
192
-
 193
193
-
 194
194
-
 195
195
-
 196
196
-
 197
197
-
 198
198
-
 199
199
-
 200
200
-
 201
201
-
 202
202
-
 203
203
-
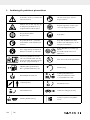 204
204
-
 205
205
-
 206
206
-
 207
207
-
 208
208
-
 209
209
-
 210
210
-
 211
211
-
 212
212
-
 213
213
-
 214
214
-
 215
215
-
 216
216
-
 217
217
-
 218
218
-
 219
219
-
 220
220
-
 221
221
-
 222
222
-
 223
223
-
 224
224
-
 225
225
-
 226
226
-
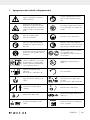 227
227
-
 228
228
-
 229
229
-
 230
230
-
 231
231
-
 232
232
-
 233
233
-
 234
234
-
 235
235
-
 236
236
-
 237
237
-
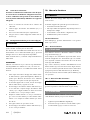 238
238
-
 239
239
-
 240
240
-
 241
241
-
 242
242
-
 243
243
-
 244
244
-
 245
245
-
 246
246
-
 247
247
-
 248
248
-
 249
249
-
 250
250
-
 251
251
-
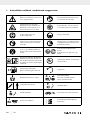 252
252
-
 253
253
-
 254
254
-
 255
255
-
 256
256
-
 257
257
-
 258
258
-
 259
259
-
 260
260
-
 261
261
-
 262
262
-
 263
263
-
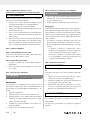 264
264
-
 265
265
-
 266
266
-
 267
267
-
 268
268
-
 269
269
-
 270
270
-
 271
271
-
 272
272
-
 273
273
-
 274
274
-
 275
275
-
 276
276
-
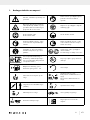 277
277
-
 278
278
-
 279
279
-
 280
280
-
 281
281
-
 282
282
-
 283
283
-
 284
284
-
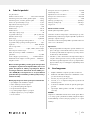 285
285
-
 286
286
-
 287
287
-
 288
288
-
 289
289
-
 290
290
-
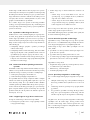 291
291
-
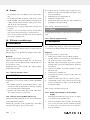 292
292
-
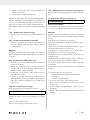 293
293
-
 294
294
-
 295
295
-
 296
296
-
 297
297
-
 298
298
-
 299
299
-
 300
300
-
 301
301
-
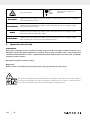 302
302
-
 303
303
-
 304
304
-
 305
305
-
 306
306
-
 307
307
-
 308
308
-
 309
309
-
 310
310
-
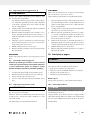 311
311
-
 312
312
-
 313
313
-
 314
314
-
 315
315
-
 316
316
-
 317
317
-
 318
318
-
 319
319
-
 320
320
-
 321
321
-
 322
322
-
 323
323
-
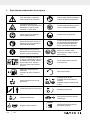 324
324
-
 325
325
-
 326
326
-
 327
327
-
 328
328
-
 329
329
-
 330
330
-
 331
331
-
 332
332
-
 333
333
-
 334
334
-
 335
335
-
 336
336
-
 337
337
-
 338
338
-
 339
339
-
 340
340
-
 341
341
-
 342
342
-
 343
343
-
 344
344
-
 345
345
-
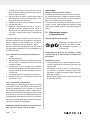 346
346
-
 347
347
-
 348
348
-
 349
349
-
 350
350
-
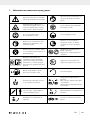 351
351
-
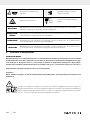 352
352
-
 353
353
-
 354
354
-
 355
355
-
 356
356
-
 357
357
-
 358
358
-
 359
359
-
 360
360
-
 361
361
-
 362
362
-
 363
363
-
 364
364
-
 365
365
-
 366
366
-
 367
367
-
 368
368
-
 369
369
-
 370
370
-
 371
371
-
 372
372
-
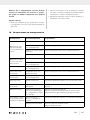 373
373
-
 374
374
-
 375
375
-
 376
376
-
 377
377
-
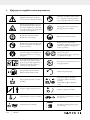 378
378
-
 379
379
-
 380
380
-
 381
381
-
 382
382
-
 383
383
-
 384
384
-
 385
385
-
 386
386
-
 387
387
-
 388
388
-
 389
389
-
 390
390
-
 391
391
-
 392
392
-
 393
393
-
 394
394
-
 395
395
-
 396
396
-
 397
397
-
 398
398
-
 399
399
-
 400
400
-
 401
401
-
 402
402
-
 403
403
-
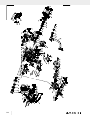 404
404
-
 405
405
-
 406
406
-
 407
407
-
 408
408


Parkside 700 A1-GB Manuel utilisateur
- Catégorie
- Tronçonneuses sans fil
- Taper
- Manuel utilisateur
dans d''autres langues
- italiano: Parkside 700 A1-GB Manuale utente
- slovenčina: Parkside 700 A1-GB Používateľská príručka
- română: Parkside 700 A1-GB Manual de utilizare
Autres documents
-
Scheppach 5910120903 Manuel utilisateur
-
 Central Park CPT2530CS_EL Le manuel du propriétaire
-
 Poulan Pro PL3816 Le manuel du propriétaire
-
Efco 147 Manuel utilisateur
-
 Forrest king 9011602 Le manuel du propriétaire
-
 Poulan Pro PR4016 Manuel utilisateur
-
Güde Benzin-Kettensäge KS 400-38 Le manuel du propriétaire


