La page est en cours de chargement...

This device complies with part 15 of the FCC Rules.
Operation is subject to the following two conditions:
(1) This device may not cause harmful interference, and
(2) this device must accept any interference received,
including interference that may cause undesired operation.
Caution: Changes or modications to this unit not
expressly approved by the party responsible for
compliance could void the user's authority to operate the
equipment.
This device contains licence-exempt transmitter(s)/receiv-
er(s) that comply with Innovation, Science and Economic
Development Canada’s licence-exempt RSS(s). Operation is
subject to the following two conditions:
(1) This device may not cause interference.
(2) This device must accept any interference, including
interference that may cause undesired operation of the
device.
L’émetteur/récepteur exempt de licence contenu dans le
présent appareil est conforme aux CNR d’Innovation,
Sciences et Développement économique Canada
applicables aux appareils radio exempts de licence.
L’exploitation est autorisée aux deux conditions suivantes :
1) L’appareil ne doit pas produire de brouillage;
2) L’appareil doit accepter tout brouillage radioélectrique
subi, même si le brouillage est susceptible d’en
compromettre le fonctionnement.
NOTE: This equipment has been tested and found to
comply with the limits for a Class B digital device, pursuant
to part 15 of the FCC Rules. These limits are designed to
provide reasonable protection against harmful interference
in a residential installation. This equipment generates, uses
and can radiate radio frequencyenergy and, if not installed
and used in accordance with the instructions, may cause
harmful interference to radio communications. However,
there is no guarantee that interference will not occur in a
particular installation. If this equipment does cause harmful
interference to radio or television reception, which can be
determined by turning the equipment o and on, the user
is encouraged to try to correct the interference by one or
more of the following measures:
WARNING: Important safety instructions
to be read before installation and use.
Incorrect installation or use can lead to serious injury and
will void manufacturer's liability and warranty. It is
important for the safety of persons to follow the enclosed
instructions.
Save these instructions for future reference.
• Do not expose to water, moisture, humid and damp
environments or extreme temperatures.
• Persons (including children) with reduced physical,
sensory or mental capabilities, or lack of experience and
knowledge, should not be allowed to use this product.
• Use or modication outside the scope of this instruction
manual will void warranty.
• Installation and programming to be performed by a
suitably qualied installer.
• Follow installation instructions.
• For use with motorized shading devices.
• Frequently inspect for improper operation.
Do not use if repair or adjustment is necessary.
• Keep clear when in operation.
• Replace battery with correctly specied type.
• Reorient or relocate the receiving antenna.
• Increase the separation between the equipment and receiver.
• Connect the equipment into an outlet on a circuit dierent
from that to which the receiver is connected.
• Consult the dealer or an experienced radio/TV technician
for help.
Operation Temperature Range: -10°C to +50°C
Ratings: 3VDC, 15mA
This product contains a coin/button cell battery. If the
coin/button cell battery is swallowed, it can cause severe
internal burns in just 2 hours and can lead to death.
Keep new and used batteries away from children. If the
battery compartment does not close securely, stop using
the product and keep it away from children.
If you think batteries might have been swallowed or placed
inside any part of the body, seek immediate medical
attention.
WARNING: Do not ingest battery,
Chemical Burn Hazard.
7 | Automate Programming Instructions | AC Tubular Motors ROLLEASE ACMEDA
Hold P1
Activate Pairing Mode
Sleep Mode
Reverse Direction
Reset To Factory Settings
Motor Response
Motor Response
Motor Response
Motor Response
Approx.
Approx.
Approx.
Approx.
NOTE
Reverse motor direction from P1 button only when
motor does not have any limits.
7 | Automate™ Programming Instructions | ARC™ Venetian Tilt Motor ROLLEASE ACMEDA
Hold P1
Activate Pairing
Mode
Motor Response
Approx.
Approx.
P1
Press Condition Function Achieved Visual
Feedback
Audible
Feedback Function Described
Short
Press
then
Release
(<2 sec)
If limit is NOT set None No Action None No Action
If limits are set Operational control
of motor, run to
limit. Stop if running
Motor runs None
Operational control
of motor after pairing
and limit setting is
completed first time
If motor is in
“Sleep Mode” &
limits are set
(Refer to Sec.10)
Wake and control
Motor
wakes and
runs in a
direction
None
Motor is restored from
Sleep mode and RF
control is active
3.2 Motor Configuration Options
The P1 Button is utilized to administer motor configuration as described below and beginning in Section 4.
Sleep Mode
Approx.
Motor Response
Reverse
Direction
Motor Response
Motor Response
RELEASE P1
RELEASE P1
RELEASE P1
Settings
Approx.
Reset To Factory
Internal Tubular Large Tubular
0.8 Cord Lift
Curtain Tilt Motor
P1
P1
0.6 Cord Lift
P1
13 | Automate™ Programming Instructions | Versa Drapery Motor ROLLEASE ACMEDA
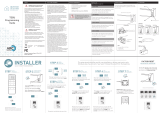
7 INITIAL SET UP
7.1 Pair motor with controller
Consult user manual for your
controller for information on
selecting channel.
Hold P1 button on
motor head.
Select channel on
controller.
Hold STOP on
controller.
Approx.
Motor Response Motor Response
Motor is now in setup mode and ready for setting limits
IMPORTANT
Notes:
• When limits are not set only one remote channel can be paired with the motor
• When limits are set, up to ten channels can be paired with the motor
.
Reversing motor direction using this method is only possible
during initial set-up
To check travel direction of shade, press UP or
DOWN on controller.
Quick Press = Step
Long Press = Continuous Travel
To reverse shade direction, hold both UP and
DOWN.
Until the motor responds.
Motor Response
IMPORTANT
OR
7.2 Check/ Change motor direction (initial set up)
Approx.
P1
P1
P1
SECS
5
SECS
2
SECS
5
BEEP
x1
JOG
x1
* Internal Tubular
Motor pictured.
Refer to “P1 Locations”
for specific devices
OR
SECS
5
SECS
14
(-) Cycle Through
Channels or Groups (+) Cycle Through
Channels or Groups
Up is Open
Shade Control
Down is Close
Shade Control
Stop is Stop or
Favorite Position
P2 Button Lock Button
BEEP
x3
JOG
x2BEEP
x3
JOG
x2BEEP
x3
JOG
x2
JOG
x1BEEP
x4
SECS
14
SECS
10
SECS
6
SECS
2
Do not dispose
of in general
waste.
FCC & ISED STATEMENT
MT02-0101-XXX008-A_V1.0_24112021
REMOTE STATE
Select the desired channel you
wish to program by scrolling
using the (+) or (-) Buttons.
* Internal Tubular Motor pictured above.
Refer to “P1 Locations” for specific devices
Refer to DISABLE LIMIT SETTINGS
for further details
Pressing the lock button will display
the state of the remote.
Locked Unlocked
3V (CR2450)

SECS
5
SECS
5
SECS
2SECS
2
BEEP
x1
JOG
x1
BEEP
x1
JOG
x1
BEEP
x3
JOG
x2
BEEP
x1
JOG
x1
BEEP
x1
JOG
x1
BEEP
x3
JOG
x2
SECS
6
ADD OR DELETE CONTROLLER OR CHANNEL
Press P2 on controller A
A A B
Press P2 on controller APress P2 on controller B
Hold (+) and (-)
buttons for 5 seconds
until “E” is displayed.
Select (+) or (-) to scroll to the
group that you want to hide.
Note: All groups above the selected
group inclusively will be hidden.
Hold (+) and (-) buttons
for 5 seconds until “15”
is displayed.
Select (+) or (-) and scroll through all
channels that you want to hide.
Note: All channels above the selected
channel inclusively will be hidden.
Cycle past Channel 1-15 and
Select a Group to program
from A-E.
Double tap the stop button to
enter level control mode
Note: Side bar arrows appear
Now Press (UP) or (DOWN) to set the desired
shade percentage. After 2 seconds the
shade/s will move to the desired position.
Once you selected the desired channel or
group, press (UP) or (DOWN) Buttons to
control the shade.
To lock the remote, press and hold the Lock Button for 6 seconds.
(The letter ”L” will be displayed).
To Unlock the remote, press and hold the
Lock Button again for 6 seconds.
(The letter ”U” will be displayed).
(Second Time)(First Time)
Note: Ensure all shade programming for all motors is completed before locking the remote.
Hold (-) and STOP buttons for 4 seconds.
During this time “G” will be displayed.
Select a Group from A - E to program.
(If no buttons are pressed for 90 seconds
the remote will exit out of this mode)
Remote is now in Group Programming Mode. Signal
Symbol will be shown and Individual Channel “1”
will be displayed.
DO NOT USE (-) BUTTON TO SELECT A CHANNEL
DISABLE LIMIT SETTING - LOCK BUTTON
/