Akitio MD4 U3e Guide d'installation

Catégorie
Éclairage mural
Taper
Guide d'installation
Adding Additional Drives
It is not possible to add more drives to an existing RAID array. When
adding new drives, they will be mounted as independent volumes until
the [MODE Change] button has been pressed to create a new RAID
array, at which time all the drives have to be formatted again.
Es ist nicht möglich zusätzliche Festplatten zu einem bestehenden
RAID-System hinzuzufügen. Neue Platten werden als unabhängige
Datenträger erkannt bis die Taste [MODE Change] gedrückt wurde, um
ein neues RAID-System zu erstellen, an welcher Stelle alle Platten
wieder formatiert werden müssen.
No es posible agregar más unidades a una matriz RAID existente. Al
agregar nuevas unidades, estas se montarán como volúmenes
independientes hasta que se pulse el botón [MODE Change] para crear
una nueva matriz RAID. En ese momento, todas las unidades tendrán
que formatearse de nuevo.
Il n'est pas possible d'ajouter des lecteurs à une baie RAID existante.
Lors de l'ajout de nouveaux lecteurs, ceux-ci peuvent être montés en
tant que volumes indépendants jusqu'à pression du bouton [MODE
Change] pour créer une nouvelle baie RAID, moment auquel les
lecteurs doivent être à nouveau formatés.
無法直接增加更多的磁碟到現有的磁碟陣列中。當新增新的磁碟時
,需重新在開機中按下[MODE Change]按鈕,以創建一個新的磁碟
陣列,屆時所有的磁碟都必須重新格式化。
无法直接增加更多的硬盘到现有的硬盘阵列中。当新增新的硬盘时
,需重新在开机中按下[MODE Change]按钮,以创建一个新的硬盘
阵列,届时所有的硬盘都必须重新格式化。
既存のRAIDアレイにドライブを追加することはできません。従って、新しいドラ
イブを追加すれば、[MODE変更]ボタンを押されて新しいRAIDアレイを作成
するまでに、独立したボリュームとして認識されます。[MODE Change]ボタ
ンを押されたら、全てのドライブをフォーマットと行います。
© 2014 by AKiTiO - All Rights Reserved
AKiTiO assumes no responsibility for any errors or dierences between the product you
may have and the one mentioned in this document and reserves the right to make
changes in the specications and/or design of this product without prior notice. The
diagrams contained in this document are for reference and may not fully represent the
real product. AKiTiO assumes no responsibility for any loss of data or les.
www.akitio.com
MD4 U3e
PN: E15-57881AA011
July 11, 2014 - v1.0
E15-57881AA011
Setup guide
Setup-Anleitung
Guía de conguración
Guide d'installation
安裝手冊
安装手册
セットアップガイド
EN DE ES FR JPCH-T CH-S
For the latest version of this document,
please download the PDF manual at
http://www.akitio.com/support/user-manuals
6
Rear View - Rückansicht - Vista posterior - Vue arrière
背面 - 背面 - リアビュー
USB 3.0
USB 3.0 port
USB 3.0 Anschluss
Puerto de USB 3.0
Port USB 3.0
USB 3.0 連接埠
USB 3.0 连接端口
USB 3.0 ポート
eSATA
eSATA port
eSATA Anschluss
Puerto de eSATA
Port eSATA
eSATA 連接埠
eSATA 连接端口
eSATA ポート
MODE Change
Push for 5 seconds during startup to save the new RAID mode.
Während des Startvorgangs für 5 Sekunden drücken, um die neue
RAID-Einstellung abzuspeichern.
Presione 5 segundos durante el inicio para guardar el nuevo modo RAID.
Appuyez pendant 5 secondes lors du démarrage pour enregistrer le
nouveau mode RAID.
啟動時按下5秒,更換磁碟陣列模式。
启动时按下5秒,更换硬盘阵列模式。
起動中に5秒間を長押しして、新規RAIDモードを変更します。
MODE Setting
Set your preferred RAID mode before formatting the drives.
Stellen Sie vor dem Formatieren der Platten Ihre bevorzugte RAID-Modi ein.
Establezca su modo RAID preferido antes de formatear las unidades.
Dénissez votre mode RAID préféré avant de formater les lecteurs.
格式化磁碟前,請先選擇您要的碟陣列模式。
格式化硬盘前,请先选择您要的阵列模式。
ドライブをフォーマットする前に、RAID モードを設定して下さい。
Front View - Frontansicht - Vista frontal - Vue de face
正面 - 正面 - フロントビュー
Blue = Power ON
Blau = Strom eingeschaltet
Azul = Encendido
Bleu = Allumé
藍色 = 電源開啟
蓝色 = 电源开启
ブルー = 電源オン
Green = Drive status OK
Flashing green = Data access (read/write)
Grün = Festplattenstatus OK
Grün blinkend = Datenzugri (lesen/schreiben)
Verde = Estado de la unidad correcto
Verde intermitente = Acceso a datos (lectura/escritura)
Vert = État lecteur OK
Vert clignotant = Accès aux données (lecture/écriture)
綠色 = 磁碟狀態正常
綠色閃爍 = 資料存取中
绿色 = 磁盘状态正常
绿色闪烁 = 资料存取中
グリーン点灯 = ドライブのステータス正常
グリーン点滅 = データアクセス(読取/書込)
1
2
3 4
Rebuild
Orange = Rebuilding (RAID 5/10)
Orange = Am Wiederherstellen (RAID 5/10)
Naranja = Reconstrucción (RAID 5/10)
Orange = Reconstruction (RAID 5/10)
橙色 = 重建資料 (RAID 5/10)
橙色 = 重建资料 (RAID 5/10)
オレンジ = レビュールド(RAID 5/10)
Initial Setup
Connect the interface cable with the computer and turn on the
computer (1). Set your preferred RAID mode (2), press and hold the
[MODE Change] button and turn on the device (3). Release the button
after about 5 seconds (4) and then format the drives (5) to complete the
initial setup.
Verbinden Sie das Schnittstellenkabel mit dem Computer und schalten
Sie diesen ein (1). Stellen Sie Ihre bevorzugte RAID-Modi ein (2),
drücken und halten Sie die Taste [MODE Change] und schalten Sie das
Gerät ein (3). Lassen Sie die Taste nach etwa 5 Sekunden los (4) und
formatieren Sie die Festplatten (5), um die Neueinrichtung
abzuschließen.
Conecte el cable de interfaz al ordenador y encienda el equipo (1).
Establezca su modo RAID preferido (2), pulse y mantenga presionado el
botón [
MODE Change
] y encienda el dispositivo (3). Suelte el botón
después de aproximadamente 5 segundos (4) y formatee a continuación
las unidades (5) para completar la conguración inicial.
Connectez le câble d'interface à l'ordinateur et allumez celui-ci (1).
Dénissez votre mode RAID préféré (2), appuyez sur le bouton [MODE
Change] et maintenez-le enfoncé, puis allumez l'appareil (3). Relâchez le
bouton après environ 5 secondes (4) et formatez les lecteurs (5) pour
terminer la conguration initiale.
與電腦連接(1)。設置您的選擇的磁碟陣列模式(2),按住
[MODE Change] 按鈕,然後開啟設備電源(3)。約5秒(4)後鬆開
按鈕,然後格式化磁碟(5)完成初始設定。
与电脑连接(1)。设置您的选择的硬盘阵列模式(2),按住
[MODE Change] 按钮,然后开启设备电源(3)。约5秒(4)后松开
按钮,然后格式化硬盘(5)完成初始设定。
(1)コンピュータにインタフェースケーブルにて接続して、コンピュータの電源を入れ
ます。(2)お好みのRAIDモードを設定してください。(3)[
MODE Change
]ボタ
ンを約5秒間長押しして、デバイスをオンにしてください。(4)[
MODE Change
]
ボタンを放してください。(5)初期設定を完了し、ドライブをフォーマットします。
4
Important
Always connect the interface cable and turn on your computer rst,
before turning on the power. Otherwise, the drives will not spin up
and the data cannot be accessed.
Only one interface can be used at any given time.
Schließen Sie immer zuerst das Schnittstellenkabel an und schalten
Sie den Computer ein, bevor Sie das Gerät einschalten. Andernfalls
laufen die Lauftwerke nicht an und Sie können somit nicht auf die
Daten zugreifen.
Es kann nur eine Schnittstelle zur selben Zeit verwendet werden.
Conecte siempre el cable de interfaz y encienda primero su
ordenador antes de conectar la alimentación. De lo contrario, las
unidades no girarán y no será posible acceder a los datos.
Solo puede utilizarse una única interfaz en cada momento.
Connectez toujours le câble d'interface et allumez d'abord votre
ordinateur, avant d'activer l'alimentation. Sinon, les lecteurs ne
tourneront pas et les données seront inaccessibles.
Une seule interface peut être utilisée à la fois.
裝置必須與電腦連接。否則,裝置不會啟動。
一次只能使用一種傳輸介面。
装置必须与电脑连接。否则,装置不会启动。
一次只能使用一种传输接口。
コンピュータ電源をオンにする前に確りインターフェイスケーブルを接続するこ
とを確認して下さいませ。
任意時点に一つのインタフェースしか使用できません。
5
MODE Setting
Replacing faulty drives
When a drive fails, the corresponding LED (1-4) turns o. If only one
drive is defective and the RAID mode is set to RAID 5 or RAID 10, the
data can still be accessed but it’s recommended to immediately replace
the faulty drive. If more than one drive at the same time fails or if the
RAID mode is set to RAID 0 or SPAN, all data will be lost. For JBOD, only
the data on that particular drive is lost.
1. Turn o the power and replace the faulty drive.
2. For RAID 5 and RAID 10, the RAID array is rebuilt automatically when
you turn the power back on. During this process, the rebuild LED
lights up orange. The time it takes to complete depends on the drive
capacity (~60MB/s).
3. For RAID 0 and SPAN, please follow the initial setup procedure.
4. For JBOD, simply format the new drive.
Make sure to backup all existing data rst!
The drives must be formatted after changing the RAID mode.
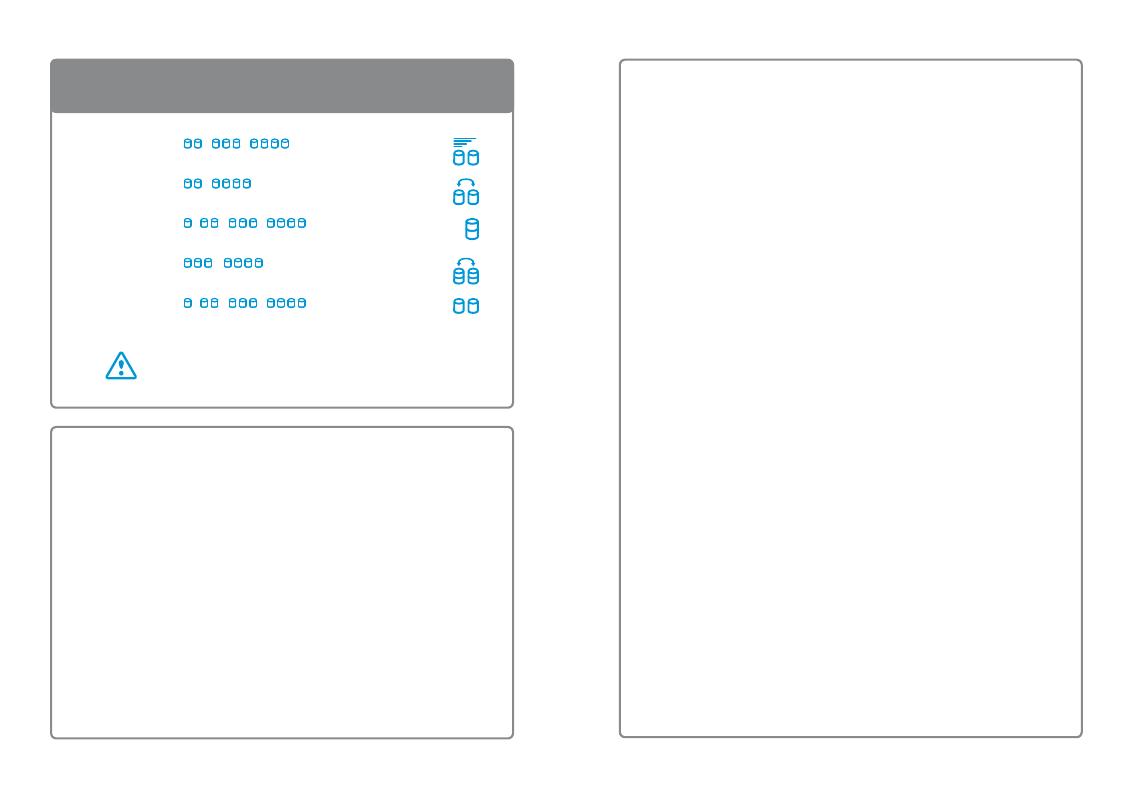
[ 0 ] RAID 0 / /
Disk striping for optimal performance.
[ 1 ] RAID 1/10 /
Disk mirroring for redundancy and backup.
[ 2 ] SPAN / / /
Disk spanning for large storage.
[ 3 ] RAID 5 /
Disk striping with parity for performance & redundancy.
[ 4 ] JBOD (PM) / / /
Non-RAID port multiplier for independent volumes.
Reemplazar unidades defectuosas
Cuando una unidad falla, el LED correspondiente (1-4) se apaga. Si solo
hay una unidad defectuosa y el modo RAID está congurado como RAID
5 o RAID 10, aún será posible acceder a los datos aunque se recomienda
reemplazar inmediatamente la unidad defectuosa. Si más de una unidad
falla al mismo tiempo o si el modo RAID está congurado como RAID 0 o
de expansión, se perderán todos los datos. En caso de modo JBOD, solo
se perderán los datos de esa unidad particular.
1. Desconecte la alimentación y reemplace la unidad defectuosa.
2. En caso de modo RAID 5 y 10, la matriz RAID se reconstruye autotica-
mente al volver a encender el dispositivo. Durante este proceso, el
indicador LED de reconstrucción se iluminaen color naranja. El tiempo
empleado dependerá de la capacidad de la unidad (~60 MB/s).
3. En caso de modo RAID 0 y de expansión, siga el procedimiento de
conguración inicial (Initial Setup).
4. En caso de modo JBOD, únicamente será necesario formatear la
nueva unidad.
Remplacement des lecteurs défectueux
Lorsqu'un lecteur est en panne, la DEL correspondante (1-4) s'éteint. Si
un seul lecteur est défectueux et que le mode RAID est RAID 5 ou RAID
10, les données restent accessibles, mais il est conseillé de remplacer
immédiatement le lecteur défectueux. Si plusieurs lecteurs tombent en
panne en même temps ou que le mode RAID est déni sur RAID 0 ou
SPAN, toutes les données seront perdues. Pour JBOD, seules les
données du lecteur défectueux sont perdues.
1. Éteignez l’alimentation et remplacez le lecteur défectueux.
2. Pour RAID 5 et RAID 10, la baie RAID est reconstruite automatique-
ment lorsque vous remettez l'appareil sous tension. Pendant ce
processus, la DEL de reconstruction s'allume en orange. La durée
nécessaire dépend de la capacité du lecteur (~60Mo/s).
3. Pour RAID 0 et SPAN, suivez la procédure de conguration initiale.
4. Pour JBOD, formatez simplement le nouveau lecteur.
  • Page 1 1
  • Page 2 2
  • Page 3 3
  • Page 4 4
  • Page 5 5
  • Page 6 6
  • Page 7 7
  • Page 8 8

Akitio MD4 U3e Guide d'installation

Catégorie
Éclairage mural
Taper
Guide d'installation