
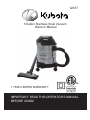
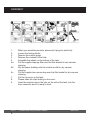
5 Gallon Stainless Steel Vacuum
Owner’s Manual
IMPORTANT: READ THIS OPERATOR’S MANUAL
BEFORE USING!
12017
1 YEAR LIMITED WARRANTY

12017 5 Gallon Wet & Dry Vacuum Cleaner ENGLISH
2
1. Do not leave appliance when plugged in. Unplug from outlet when not
in use and before servicing.
2.
Do not allow to be used as a toy.
Close attention is necessary when
used by or near children.
3.
Use only as described in this manual. Use only manufacturer’
s
recommended
attachments.
4. Do not use with damaged cord or plug. If appliance is not working as it
should, has been dropped, damaged, left outdoors, or dropped in
water. Return it to an authorized service center.
5. Do not pull or carry by cord, use cord as a handle, close a door on
cord, or pull cord around sharp edges or corners.
6.
Do not unplug by pulling on cord. To
unplug, grasp the plug, not the
cord.
7.
Do not handle plug or appliance with wet hands.
8. Do not put any object into openings. Do not use with any opening
blocked; keep free of dust, lint, hair and anything that may reduce air
À
RZ
.HHSKDLUORRVHFORWKLQJ¿QJHUVDQGDOOSDUWVRIERG\DZD\IURP
openings and moving parts.
10.
Turn off the control before unplugging.
11. Use extra care when cleaning on stairs.
IMPORTANT SAFETY INSTRUCTIONS
SAVE THESE INSTRUCTIONS
FOR HOUSEHOLD USE ONLY
READ ALL INSTRUCTIONS BEFORE USING YOUR VACUUM CLEANER
WARNING: To reduce the risk of electric shock, this appliance has a
SRODUL]HGSOXJRQHEODGHLVZLGHWKDQWKHRWKHU
7KLVSOXJZLOO¿WLQD
SRODUL]HGRXWOHWRQO\RQHZD\,IWKHSOXJGRHVQRW¿WIXOO\LQWKHRXWOHWUHYHUVH
WKHSOXJ,ILWVWLOOGRHVQRW¿WFRQWDFWDTXDOL¿HGHOHFWULFLDQWRLQVWDOOWKHSURSHU
Do not change the plug in any way.
WARNING: When using an electrical appliance, basic safety precau-
tions should always be followed, including the following:

12017 5 Gallon Wet & Dry Vacuum Cleaner ENGLISH
3
'RQRWXVHWRSLFNXSÀDPPDEOHRUFRPEXVWLEOHOLTXLGVVXFKDV
gasoline or use in areas where they may be present.
13. Do not pick up anything that is burning or smoking, such as cigarettes,
matches, or hot ashes.
'RQRWXVHZLWKRXWGXVWEDJDQGRU¿OWHUVLQSODFH
15. Look on your vacuum and follow all label and marking instructions.
16. Keep end of hose, wands and other openings away from your face
and body.
17. Always unplug this appliance before connecting or disconnecting
vacuum
hose.
18. Store the vacuum indoors. Put the vacuum away after use to prevent
tripping accidents.
19. Using improper voltage may result in damage to the motor and
possible injury to the user. Correct voltage is listed on the rating label.
20.
Do not use for any purpose other than described in this user’s guide.
21. If the cleaner is damaged, it must be repaired by the manufacturer or
LWVVHUYLFHDJHQWRUDVLPLODUO\TXDOL¿HGSHUVRQLQRUGHUWRDYRLGD
hazard.
22. Do not run appliance over cord. Keep cord away from heated
surfaces.
ATTENTION:
If the supply cord is damaged, it must replaced by the manufacturer or it’s
VHUYLFHDJHQWWRDVLPLODUO\TXDOL¿HGSHUVRQLQRUGHUWRDYRLGDKD]DUG%HIRUH
cleaning or maintaining the appliance, the power plug must be removed from
the socket-outlet. Check all the accessory before connect and use them to
make sure they are in correct position and there’s no any defects.
ATTENTION:
1. When push the switch to the “|” shelf, the vacuum cleaner will work alone.
2. When push the switch to the “0” shelf, the vacuum cleaner will not work.
3. This appliance is not intended for use by persons (including children) with
reduced physical, sensory or mental capabilities, or lack of experience and
knowledge, unless they have been given supervision or instruction concerning
use of the appliance by a person responsible for their safety.
4. Children should be supervised to ensure that they do not play with the
appliance.

12017 5 Gallon Wet & Dry Vacuum Cleaner ENGLISH
4
TECHNICAL DATA
Rated Voltage: 120V
1RUPDO)UHTXHQF\ +]
Rated Power: 850W
Capacity:
5 Gallon
Vacuity:
13Kpa
Conforms to UL
STD.1017
&HUWL¿HGWR&6$67'&12
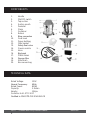
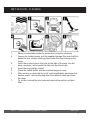
COMPONENTS
1. Handle
2. ON/OFF switch
3. T
op section
4. Suction mouth
5. Pedestal
6. Clasp
7. Container
8. Rollers
%ORZFRQQHFWLRQ
10. Cord hook
11. Paper dustbag
12. Filter basket
6DIHW\ÀRDWYDOYH
14. Crevice nozzle
15. Hose
%LJEUXVK
17. Plastic tubes
6SRQJH¿OWHU
19. Sofa brush
20. Non-woven bag

12017 5 Gallon Wet & Dry Vacuum Cleaner ENGLISH
5
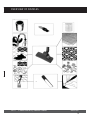
OVERVIEW OF NOZZLES

12017 5 Gallon Wet & Dry Vacuum Cleaner ENGLISH
6
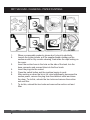
$66(0%/<
1. When you assemble products, please don’t plug into electricity.
2. Loosen the locking hooks.
3. Remove the suction group.
4. Remove the contents of the tank.
5. Assemble the wheels on the bottom of the tank.
C 2WNNVJGUWRRNKGFURQPIGſNVGTQXGTVJGſNVGTDCUMGVHQTYGVXCEWWO
cleaning.
6b. Slip the paper dustbag onto the suction mouth for dry vacuum
cleaning.
E 2WNNVJGUWRRNKGFPQPYQXGPDCIQXGTVJGſNVGTDCUMGVHQTFT[XCEWWO
cleaning.
7. Put the top cover on the tank.
8. Please make the clips locking on the cover.
9. Insert the suction hose in the hole on the side of the tank, turn the
hose connector and it is ready to work.

12017 5 Gallon Wet & Dry Vacuum Cleaner ENGLISH
7
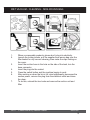
1. When you assemble products, please don’t plug into electricity.
.QQUGPVJGNQEMKPIJQQMURWNNVJGUWRRNKGFURQPIGſNVGTQXGTVJGſNVGT
basket for wet vacuum cleaning, then make the clips locking on the
cover.
3. Insert the suction hose in the hole on the side of the tank, turn the
JQUGEQPPGEVQTCPFEQPPGEVVJGVWDGKPVQVJGƀQQTDTWUJ
4.
Insert the plug into the socket.
5.
Press the switch button and the machine begins to work.
#HVGTYQTMKPIQTYJGPVJGDKPKUHWNNYJCVUKIPKſECPVN[FGETGCUGUVJG
suction power, remove the plug from the electrical outlet and clean
the drum.
7. To do this, unhook the two locks and remove the suction unit and
ſNVGT
WET VACUUM - CLEANING

12017 5 Gallon Wet & Dry Vacuum Cleaner ENGLISH
8
'5<9$&880&/($1,1*3$3(5'867%$*
1. When you assemble products, please don’t plug into electricity.
2. Loosen the locking hooks, pull the supplied paper dustbag on the
suction mouth for dry vacuum cleaning, then make the clips locking on
the
cover.
3. Insert the suction hose in the hole on the side of the tank, turn the
JQUGEQPPGEVQTCPFEQPPGEVVWDGKPVQVJGƀQQTDTWUJ
4.
Insert the plug into the socket.
5.
Press the switch button and the machine begins to work.
#HVGTYQTMKPIQTYJGPVJGDKPKUHWNNYJCVUKIPKſECPVN[FGETGCUGUVJG
suction power, remove the plug from the electrical outlet and clean
the drum. To do this, unhook the two locks and remove the suction
WPKVCPFſNVGT
7. To do this, unhook the two locks and remove the suction unit and
ſNVGT

12017 5 Gallon Wet & Dry Vacuum Cleaner ENGLISH
9
:(79$&880&/($1,1*121:29(1%$*
1. When you assemble products, please don’t plug into electricity.
2. Loosen the locking hooks, pull the supplied non-woven bag over the
ſNVGTDCUMGVHQTFT[XCEWWOENGCPKPIVJGPOCMGVJGENKRUNQEMKPIQP
the
cover.
3. Insert the suction hose in the hole on the side of the tank, turn the
hose
connector.
4.
Insert the plug into the socket.
5.
Press the switch button and the machine begins to work.
#HVGTYQTMKPIQTYJGPVJGDKPKUHWNNYJCVUKIPKſECPVN[FGETGCUGUVJG
suction power, remove the plug from the electrical outlet and clean
the
drum.
7. To do this, unhook the two locks and remove the suction unit and
ſNVGT

12017 5 Gallon Wet & Dry Vacuum Cleaner ENGLISH
1010
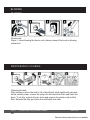
MAINTENANCE CLEANING
%/2:,1*
Please note:
Figure 1: when blowing the dust or ash, please connect the hose on blowing
connection.
Cleaning the tank:
#HVGTYQTMKPIQTYJGPVJGVCPMKUHWNNQHFWUVNKSWKFYJCVUKIPKſECPVN[FGETGCU-
es the suction power, remove the plug from the electrical outlet and clean the
drum. To do this, unhook the two locks and remove the suction unit and the
ſNVGT4GOQXGVJGſNVGTCPFENGCPVJGFWUVNKSWKFHTQOVCPM
%/2:,1*
Discover other power tools on our website.
-
 1
1
-
 2
2
-
 3
3
-
 4
4
-
 5
5
-
 6
6
-
 7
7
-
 8
8
-
 9
9
-
 10
10


