
www.comelitgroup.com
IT
EN
FR
NL
DE
ES
PT
1° edizione 11/2011 cod. 2G40000481
Manuale utente posto interno Planux Lux
Complimenti,
Avete acquistato un prodotto Comelit. Sicuro, resistente e di
qualità. Realizzato a regola d’arte e conforme alle norme di
legge. Grazie per aver scelto Comelit!
User manual for internal unit Planux Lux
Congratulations,
You have purchased a quality state of the art Comelit
product. That complies with all EC legal regulations and
standards. Thank you for choosing Comelit!
Manuel d'utilisation poste intérieur Planux Lux
Félicitations!
Vous venez d’acheter un produit Comelit. Sûr, résistant et
de qualité. Réalisé dans les règles de l’art et conforme aux
normes en vigueur. Merci d’avoir choisi Comelit!
Gebruikshandleiding Planux Lux-binnentoestel
Gefeliciteerd,
U heeft een kwaliteitsproduct van Comelit aangeschaft.
Dit product voldoet aan alle wettelijke EU-normen en
-regelgeving. Bedankt dat u voor Comelit heeft gekozen!
Benutzerhandbuch Innensprechstelle Planux Lux
Herzlichen Glückwunsch,
Sie haben ein Comelit Produkt erworben. Sicher,
widerstandsfähig und hochwertig. Produziert nach den
Regeln der Kunst und gemäß den gesetzlichen Vorgaben.
Danke, dass Sie Comelit gewählt haben!
Manual de uso de la unidad interna Planux Lux
Enhorabuena,
Habéis comprado un producto Comelit. Seguro, resistente y
de calidad. Realizado conforme a método y a las normas de
ley. ¡Gracias por haber elegido Comelit!
Manual técnico do posto interno Planux Lux
Parabéns,
Por ter comprado um produto Comelit. Seguro, resistente
e de qualidade. Realizado de forma profi ssional e de
acordo com as normas legais. Obrigado por ter escolhido
Comelit!

2 43
1
2
PT
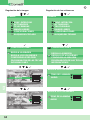
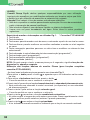
AVVERTENZE
Comelit Group S.pA. declina ogni responsabilità per un utilizzo improprio degli a
parecchi, per modifi che effettuate da altri a qualunque titolo e scopo, per l’uso di
accessori e materiali non originali.
Attenzione! Al fi ne di ridurre il rischio di guasti e scosse elettriche:
• Non aprire l’apparecchio o effettuare personalmente riparazioni. In caso di necessità
richiedere l’intervento di personale qualifi cato.
• Non inserire oggeti nè versare liquidi all’interno del dispositivo.
• Pulire con un panno inumidito con acqua. Evitare Alcool e altri prodotti aggressivi.
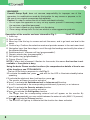
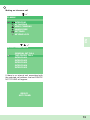
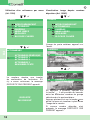
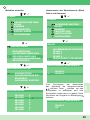
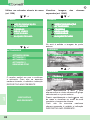
Utilizzo funzioni base monitor Planux Lux (per funzioni complete vedi FT/
PLANUX/01)
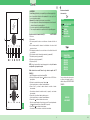
· I due LED lampeggiano a seguito di una chiamata Fig. 2.
Per attivare la fonica premere il pulsante
attendere che la luce del LED sia fi ssa
prima di parlare.
Per attivare la serratura elettronica premere il pulsante .
» Il monitor emetterà un tono a confermare l’avvenuta attivazione.
Premere il tasto 1 per attivare la funzione chiamata a centralino o chiamata
intercomunicante.
» Viene inviata una chiamata al centralino associato (se presente) o una chiamata
intercomunicante.
Premere il tasto 2 per attivare la funzione attuatore generico.
» Il monitor emetterà un tono a confermare l’avvenuta attivazione.
Premere il tasto per attivare la funzione autoaccensione.
» Sul video comparirà l’immagine del posto esterno associato. Premendo ripetutamente
il tasto si potrà basculare tra i posti esterni (MAX 2 se presenti).
Premere il tasto per per attivare la funzione privacy.
» Si accenderà il LED rosso ad indicare che la funzione è stata attivata.
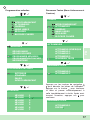
Descrizione monitor e informazioni utente Fig. 1.
1 Tasto fonica.
2 Tasto serratura.
3 Tasto menu: permette di accedere e uscire dal menu e di arretrare di un livello nel
menu.
4 Tasto conferma: permette di confermare le scelte effettuate e di accedere al livello
successivo nel menu.
5 Tasti navigazione: permettono di scorrere tra le varie voci e di modifi care il valore della
voce selezionata.
6 Tasto chiamata a centralino / chiamata intercomunicante (programmabile*).
7 Tasto attuatore generico (programmabile*).
8 Tasto autoaccensione (programmabile*).
9 Tasto privacy (dottore*).
NOTA Se dopo la pressione del tasto questo lampeggia per 4 secondi signifi ca funzione
non disponibile oppure impianto occupato.
* Vedi FT/PLANUX/01
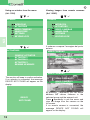
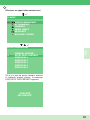
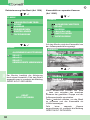
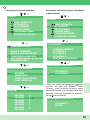
Realizar uma chamada de
intercomunicação
PLANUX
INTERCOMUNICAÇÃO
ACTUADORES
CÂMARAS
MÃOS LIVRES
CONFIGURAR
BLOQUEIO TECLADO
INTERCOMUNICAÇ
Ã
O
GERAL INTERNA
CHAMADA BIFAMILIAR
INTERCOM 1
INTERCOM 2
INTERCOM 3
INTERCOM 4
INTERCOM 5
Caso o posto interno não esteja associado
ao endereço de chamada escolhido, é
exibida a indicação DISPOSITIVO NÃO
PRESENTE.
DISPOSITIVO
NÃO PRESENTE

2 43
1
2
PT
AVVERTENZE
Comelit Group S.pA. declina ogni responsabilità per un utilizzo improprio degli a
parecchi, per modifi che effettuate da altri a qualunque titolo e scopo, per l’uso di
accessori e materiali non originali.
Attenzione! Al fi ne di ridurre il rischio di guasti e scosse elettriche:
• Non aprire l’apparecchio o effettuare personalmente riparazioni. In caso di necessità
richiedere l’intervento di personale qualifi cato.
• Non inserire oggeti nè versare liquidi all’interno del dispositivo.
• Pulire con un panno inumidito con acqua. Evitare Alcool e altri prodotti aggressivi.
Utilizzo funzioni base monitor Planux Lux (per funzioni complete vedi FT/
PLANUX/01)
· I due LED lampeggiano a seguito di una chiamata Fig. 2.
Per attivare la fonica premere il pulsante
attendere che la luce del LED sia fi ssa
prima di parlare.
Per attivare la serratura elettronica premere il pulsante .
» Il monitor emetterà un tono a confermare l’avvenuta attivazione.
Premere il tasto 1 per attivare la funzione chiamata a centralino o chiamata
intercomunicante.
» Viene inviata una chiamata al centralino associato (se presente) o una chiamata
intercomunicante.
Premere il tasto 2 per attivare la funzione attuatore generico.
» Il monitor emetterà un tono a confermare l’avvenuta attivazione.
Premere il tasto per attivare la funzione autoaccensione.
» Sul video comparirà l’immagine del posto esterno associato. Premendo ripetutamente
il tasto si potrà basculare tra i posti esterni (MAX 2 se presenti).
Premere il tasto per per attivare la funzione privacy.
» Si accenderà il LED rosso ad indicare che la funzione è stata attivata.
Descrizione monitor e informazioni utente Fig. 1.
1 Tasto fonica.
2 Tasto serratura.
3 Tasto menu: permette di accedere e uscire dal menu e di arretrare di un livello nel
menu.
4 Tasto conferma: permette di confermare le scelte effettuate e di accedere al livello
successivo nel menu.
5 Tasti navigazione: permettono di scorrere tra le varie voci e di modifi care il valore della
voce selezionata.
6 Tasto chiamata a centralino / chiamata intercomunicante (programmabile*).
7 Tasto attuatore generico (programmabile*).
8 Tasto autoaccensione (programmabile*).
9 Tasto privacy (dottore*).
NOTA Se dopo la pressione del tasto questo lampeggia per 4 secondi signifi ca funzione
non disponibile oppure impianto occupato.
* Vedi FT/PLANUX/01
Realizar uma chamada de
intercomunicação
PLANUX
INTERCOMUNICAÇÃO
ACTUADORES
CÂMARAS
MÃOS LIVRES
CONFIGURAR
BLOQUEIO TECLADO
INTERCOMUNICAÇ
Ã
O
GERAL INTERNA
CHAMADA BIFAMILIAR
INTERCOM 1
INTERCOM 2
INTERCOM 3
INTERCOM 4
INTERCOM 5
Caso o posto interno não esteja associado
ao endereço de chamada escolhido, é
exibida a indicação DISPOSITIVO NÃO
PRESENTE.
DISPOSITIVO
NÃO PRESENTE

3
IT
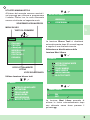
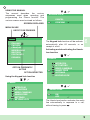
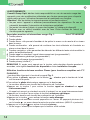
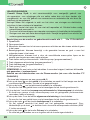
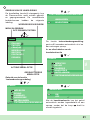
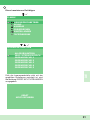
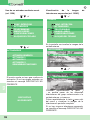
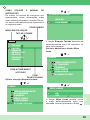
All’interno del manuale verranno mostrati i
vari passaggi per utilizzare e programmare
il monitor Planux Lux. Le varie schermate
saranno strutturate nel seguente modo:
UTILIZZO MANUALISTICA
LINGUE
ITALIANO
ENGLISH
FRANÇAIS
NEDERLANDS
DEUTSCH
PORTUGUÊS
ESPAÑOL
SCHERMATA VISUALIZZATA
MENU IN USO
VOCE ATTUALMENTE
ATTIVA
VOCE SELEZIONATA
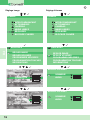
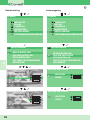
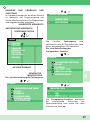
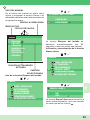
Utilizzo funzione blocco tasti
PLANUX
INTERCOMUNICANTE
ATTUATORI
TELECAMERE
MANI LIBERE
IMPOSTAZIONI
BLOCCO TASTI
TASTI DA PREMERE
BLOCCO TASTI
ANNULLA
CONFERMA
La funzione Blocco Tasti si disattiverà
automaticamente dopo 60 secondi oppure
a seguito di una chiamata ricevuta.
Attivazione e disattivazione della
funzione Mani Libere
PLANUX
INTERCOMUNICANTE
ATTUATORI
TELECAMERE
MANI LIBERE
IMPOSTAZIONI
BLOCCO TASTI
MANI LIBERE
ON
OFF
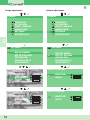
La funzione Mani Libere permette di
attivare la fonica automaticamente dopo
una chiamata senza dover premere il
pulsante

4
IT
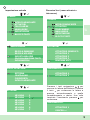
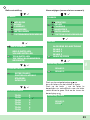
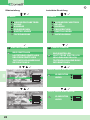
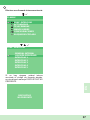
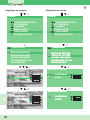
Regolazione immagine
PLANUX
INTERCOMUNICANTE
ATTUATORI
TELECAMERE
MANI LIBERE
IMPOSTAZIONI
BLOCCO TASTI
IMPOSTAZIONI
REGOLA IMMAGINE
REGOLA VOLUME
IMPOSTA MELODIE
PROGRAMMAZIONE TASTI
INFORMAZIONI
REGOLA IMMAGINE
CONTRASTO
LUMINOSITÀ
COLORE
REGOLA IMMAGINE
CONTRASTO
LUMINOSITÀ
COLORE
Regolazione volumi
PLANUX
INTERCOMUNICANTE
ATTUATORI
TELECAMERE
MANI LIBERE
IMPOSTAZIONI
BLOCCO TASTI
IMPOSTAZIONI
REGOLA IMMAGINE
REGOLA VOLUME
IMPOSTA MELODIE
PROGRAMMAZIONE TASTI
INFORMAZIONI
REGOLA VOLUMI
SUONERIA
AUDIO
REGOLA VOLUMI
SUONERIA
AUDIO

5
IT
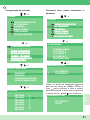
Impostazione melodie
PLANUX
INTERCOMUNICANTE
ATTUATORI
TELECAMERE
MANI LIBERE
IMPOSTAZIONI
BLOCCO TASTI
IMPOSTAZIONI
REGOLA IMMAGINE
REGOLA VOLUME
IMPOSTA MELODIE
PROGRAMMAZIONE TASTI
INFORMAZIONI
IMPOSTA MELODIE
ESTERNA
CENTRALINO
FUORIPORTA
INTERCOMUNICANTE
ESTERNA
MELODIA 1
MELODIA 2
MELODIA 3
MELODIA 4
MELODIA 5
MELODIA 6
MELODIA 7
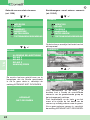
Rinomina Voci ( menu attuatori e
telecamere)
PLANUX
INTERCOMUNICANTE
ATTUATORI
TELECAMERE
MANI LIBERE
IMPOSTAZIONI
BLOCCO TASTI
ATTUATORI
ATTUATORE GENERICO
ATTUATORE 1
ATTUATORE 2
ATTUATORE 3
RINOMINA VOCI
RINOMINA VOCI
ATTUATORE 1
ATTUATORE 2
Premere i tasti navigazione per
scorrere le lettere dell’alfabeto; Premere
il tasto per confermare la lettera e
passare automaticamente a quella
immediatamente a destra. Una volta
terminato l’inserimento premere per
confermare.
RINOMINA VOCI
ATTUATORE 1
CANCELLO

6
IT
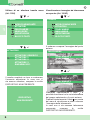
Utilizzo di un attuatore tramite menu
(Art. 1256)
PLANUX
INTERCOMUNICANTE
ATTUATORI
TELECAMERE
MANI LIBERE
IMPOSTAZIONI
BLOCCO TASTI
ATTUATORI
ATTUATORE GENERICO
ATTUATORE 1
ATTUATORE 2
ATTUATORE 3
RINOMINA VOCI
Il monitor emetterà un tono a confermare
l’avvenuta attivazione. In caso non ci
sia nessun attuatore, compare la scritta
DISPOSITIVO NON PRESENTE.
DISPOSITVO
NON PRESENTE
Visualizzazione immagine da telecamere
scorporate (Art. 1259C)
PLANUX
INTERCOMUNICANTE
ATTUATORI
TELECAMERE
MANI LIBERE
IMPOSTAZIONI
BLOCCO TASTI
A schermo compare l’immagine del posto
esterno
TELECAMERE
TELECAMERA 1
TELECAMERA 2
RINOMINA VOCI
TELECAMERE
TELECAMERA 1
TELECAMERA 2
RINOMINA VOCI
Premendo ripetutamente il tasto è
possibile basculare tra le varie telecamere
del gruppo selezionato e il posto esterno.
Premere ripetutamente il tasto per uscire
dal menu e visualizzare a pieno schermo
l’immagine della telecamera.
In caso non ci sia nessuna telecamera
scorporata compare la scritta
DISPOSITIVO NON PRESENTE.

7
IT
Effetuare una chiamata intercomunicante
PLANUX
INTERCOMUNICANTE
ATTUATORI
TELECAMERE
MANI LIBERE
IMPOSTAZIONI
BLOCCO TASTI
INTERCOMUNICANTE
CH GENERALE INTERNA
CH BIFAMILIARE
INTERCOM 1
INTERCOM 2
INTERCOM 3
INTERCOM 4
INTERCOM 5
In caso non ci sia il posto interno associato
all’indirizzo di chiamata scelto, compare la
scritta DISPOSITIVO NON PRESENTE.
DISPOSITVO
NON PRESENTE

EN
8
WARNINGS
Comelit Group S.pA. does not assume responsibility for improper use of the
apparatus, for modifi cations made by third parties for any reason or purpose, or for
the use of non-original accessories and materials.
Caution! In order to reduce the risk of faults and electric shocks:
• Do not open the apparatus or carry out any repairs yourself. If necessary, request
the services of qualifi ed personnel.
• Do not insert objects or pour liquids into the device.
• Clean using a damp cloth. Do not use alcohol or other aggressive products.
Using the basic Planux monitor functions (for comprehensive details of how to use
all the functions, see FT/PLANUX/01)
· The two LEDs fl ash in response to a call Fig. 2.
To activate the audio line, press
and wait for the LED to illuminate steadily before
speaking.
To activate the electronic door lock function, press .
» The monitor will beep to confi rm activation.
Press 1 to activate the Switchboard call or Intercom call function.
» A call is transmitted to the corresponding switchboard (if present) or an intercom.
Press 2 to activate the Generic actuator function.
» The monitor will beep to confi rm activation.
Press to activate the Self-ignition function.
» The image from the corresponding external unit will appear on the monitor. By
pressing repeatedly, you can switch between the external units (MAX. 2 if present).
Press to activate the Privacy function.
» The red LED will light up to indicate that the function has been activated.
Description of the monitor and user information Fig. 1.
1 Audio key.
2 Door lock key.
3 Menu key: Use this key to access and exit the menu, and to go back one level in the
menu.
4 Confi rm key: Confi rms the selection made and provides access to the next menu level.
5 Navigation keys: Use these keys to scroll through the headings and modify the value of
the selected heading.
6 Switchboard call / Intercom call key (programmable*).
7 Generic actuator key (programmable*).
8 Self-ignition key (programmable*).
9 Privacy (Doctor*) key.
NOTE If, after a key is pressed, it fl ashes for 4 seconds, this means the function is not
available or the system is busy.
* See FT/PLANUX/01

EN
9
The manual describes the various
sequences used when operating and
programming the Planux monitor. The
various screens are structured as follows:
USING THE MANUAL
LINGUE
ITALIANO
ENGLISH
FRANÇAIS
NEDERLANDS
DEUTSCH
PORTUGUÊS
ESPAÑOL
SCREEN DISPLAYED
MENU IN USE
OPTION CURRENTLY
ACTIVE
OPTION SELECTED
Using the Keypad lock function
PLANUX
INTERCOM
ACTUATORS
VIDEO CAMERAS
HANDS FREE
SETTINGS
KEYPAD LOCK
KEYS TO BE PRESSED
KEYPAD LOCK
CANCEL
CONFIRM
The Keypad lock function will de-activate
automatically after 60 seconds, or on
receipt of a call.
Activating and de-activating the Hands-
free function
PLANUX
INTERCOM
ACTUATORS
VIDEO CAMERAS
HANDS FREE
SETTINGS
KEYPAD LOCK
HANDS FREE
ON
OFF
The Hands-free function activates the audio
line automatically in response to a call,
without having to press

EN
10
Image adjustment
PLANUX
INTERCOM
ACTUATORS
VIDEO CAMERAS
HANDS FREE
SETTINGS
KEYPAD LOCK
SETTINGS
ADJUST IMAGE
ADJUST VOLUME
SET MELODY
PROGRAM KEYS
INFORMATION
ADJUST IMAGE
CONTRAST
BRIGHTNESS
COLOR
ADJUST IMAGE
CONTRAST
BRIGHTNESS
COLOR
Volume adjustment
PLANUX
INTERCOM
ACTUATORS
VIDEO CAMERAS
HANDS FREE
SETTINGS
KEYPAD LOCK
SETTINGS
ADJUST IMAGE
ADJUST VOLUME
SET MELODY
PROGRAM KEYS
INFORMATION
ADJUST VOLUME
RINGTONE
AUDIO
ADJUST VOLUME
RINGTONE
AUDIO

EN
11
Setting the melody
PLANUX
INTERCOM
ACTUATORS
VIDEO CAMERAS
HANDS FREE
SETTINGS
KEYPAD LOCK
SETTINGS
ADJUST IMAGE
ADJUST VOLUME
SET MELODY
PROGRAM KEYS
INFORMATION
SET MELODY
EXTERNAL
SWITCHBOARD
OUTSIDE DOOR
INTERCOM
EXTERNAL
MELODY 1
MELODY 2
MELODY 3
MELODY 4
MELODY 5
MELODY 6
MELODY 7
Renaming headings (Actuator and
Camera menus)
PLANUX
INTERCOM
ACTUATORS
VIDEO CAMERAS
HANDS FREE
SETTINGS
KEYPAD LOCK
ACTUATORS
GENERIC ACTUATOR
ACTUATOR 1
ACTUATOR 2
ACTUATOR 3
RENAME HEADINGS
RENAME HEADINGS
ACTUATOR 1
ACTUATOR 2
Use the navigation keys to scroll
through the letters of the alphabet;
press to confi rm the letter and move
automatically to the one immediately to
its right. Once you have completed this
procedure, press to confi rm.
RENAME HEADINGS
ACTUATOR 1
GATE

EN
12
Using an actuator from the menu
(Art. 1256)
PLANUX
INTERCOM
ACTUATORS
VIDEO CAMERAS
HANDS FREE
SETTINGS
KEYPAD LOCK
ACTUATORS
GENERIC ACTUATOR
ACTUATOR 1
ACTUATOR 2
ACTUATOR 3
RENAME HEADINGS
The monitor will beep to confi rm activation.
If no actuator is connected, the message
DEVICE NOT FOUND will appear on the
display.
DEVICE
NOT FOUND
Viewing images from remote cameras
(Art. 1259C)
PLANUX
INTERCOM
ACTUATORS
VIDEO CAMERAS
HANDS FREE
SETTINGS
KEYPAD LOCK
A schermo compare l’immagine del posto
esterno
VIDEO CAMERAS
VIDEO CAMERA 1
VIDEO CAMERA 2
RENAME HEADINGS
VIDEO CAMERAS
VIDEO CAMERA 1
VIDEO CAMERA 2
RINOMINA VOCI
By pressing repeatedly, you can switch
between the various cameras in the
selected group and the external unit.
Press repeatedly to exit the menu and
view the image from the camera on the
full screen.
If no remote camera is connected, the
message DEVICE NOT FOUND will
appear on the display..

EN
13
Making an intercom call
PLANUX
INTERCOM
ACTUATORS
VIDEO CAMERAS
HANDS FREE
SETTINGS
KEYPAD LOCK
INTERCOMUNICANTE
GENERAL INT CALL
TWO-FAMILY CALL
INTERCOM 1
INTERCOM 2
INTERCOM 3
INTERCOM 4
INTERCOM 5
If there is no internal unit associated with
the selected call address, the text DEVICE
NOT FOUND will appear.
DEVICE
NOT FOUND

FR
14
AVERTISSEMENTS
Comelit Group S.pA. décline toute responsabilité en cas de mauvais usage des
appareils, pour des modifi cations effectuées par d’autres personnes pour n’importe
quelle raison et pour l’utilisation d’accessoires et matériaux non d’origine.
Attention ! Afi n de réduire le risque de pannes et les électrocutions :
• Ne pas ouvrir l’appareil ni effectuer personnellement les réparations. En cas de
nécessité, demander l’intervention de techniciens spécialisés.
• Ne jamais introduire d’objets, ni verser des liquides, à l’intérieur du dispositif.
• Nettoyer avec un chiffon humidifi é avec de l’eau. Éviter d’utiliser de l’alcool ou
d’autres produits agressifs.
Utilisation fonctions de base moniteur Planux (pour fonctions complètes voir FT/
PLANUX/01)
· Les deux leds clignotent à la suite d’un appel Fig. 2.
Pour activer la phonie, appuyer sur le bouton
, attendre que la lumière de la led
soit fi xe avant de parler.
Pour activer la gâche électronique, appuyer sur le bouton .
» Le moniteur émettra une tonalité de confi rmation de l’activation.
Appuyer sur la touche 1 pour activer la fonction appel au standard ou appel
intercommunicant.
» Un appel est envoyé au standard associé (si présent) ou un appel intercommunicant.
Appuyer sur la touche 2 pour activer la fonction actionneur générique.
» Le moniteur émettra une tonalité de confi rmation de l’activation.
Appuyer sur la touche pour activer la fonction auto-allumage.
» l’image du poste extérieur associé apparaîtra sur l’écran. En appuyant plusieurs fois
sur la touche , on pourra basculer entre les postes extérieurs (MAXI 2 si présents).
Appuyer sur la touche pour activer la fonction privacy.
» La led rouge s’allume pour indiquer que la fonction a été activée.
Description moniteur et informations usager Fig. 1.
1 Touche phonie.
2 Touche gâche.
3 Touche menu : elle permet d’accéder et de quitter le menu ou de reculer d’un niveau
dans le menu.
4 Touche confi rmation : elle permet de confi rmer les choix effectués et d’accéder au
niveau suivant dans le menu.
5 Touches navigation : elles permettent de dérouler les différents textes et de modifi er la
valeur du texte sélectionné.
6 Touche appel au standard / appel intercommunicant (programmable*).
7 Touche actionneur générique (programmable*).
8 Touche auto-allumage (programmable*).
9 Touche privacy (docteur*).
REMARQUE Si, après avoir appuyé sur la touche, cette dernière clignote pendant 4
secondes, cela signifi e fonction non disponible ou bien installation occupée.
* Voir FT/PLANUX/01

FR
15
Les différents passages pour utiliser et
programmer le moniteur Planux sont
illustrés dans le manuel. Les différentes
pages seront structurées de la manière
suivante :
UTILISATION DU MANUEL
LINGUE
ITALIANO
ENGLISH
FRANÇAIS
NEDERLANDS
DEUTSCH
PORTUGUÊS
ESPAÑOL
PAGE VISUALISÉE
MENU UTILISÉ
TEXTE
ACTUELLEMENT ACTIF
TEXTE SÉLECTIONNÉ
Utilisation fonction Blocage Touches
PLANUX
INTERCOMMUNICANT
ACTIONNEURS
CAMÉRAS
MAINS LIBRES
RÉGLAGES
BLOCAGE CLAVIER
TOUCHES À APPUYER
BLOCAGE CLAVIER
ANNULER
CONFIRMER
La fonction Blocage Touches se
désactivera automatiquement après 60
secondes ou à la suite d’un appel reçu
Activation et désactivation de la
fonction Mains Libres
PLANUX
INTERCOMMUNICANT
ACTIONNEURS
CAMÉRAS
MAINS LIBRES
RÉGLAGES
BLOCAGE CLAVIER
MAINS LIBRES
ON
OFF
La fonction Mains Libres permet d’activer
automatiquement la phonie après un appel
sans devoir appuyer sur le bouton

FR
16
Réglage image
PLANUX
INTERCOMMUNICANT
ACTIONNEURS
CAMÉRAS
MAINS LIBRES
RÉGLAGES
BLOCAGE CLAVIER
R
É
GLAGES
RÉGLER IMAGE
RÉGLER VOLUMES
PROGRAMMER MÉLODIES
PROGRAMMATION TOUCHES
INFORMATIONS
R
É
GLER IMAGE
CONTRASTE
LUMINOSITÉ
COULEUR
R
É
GLER IMAGE
CONTRASTE
LUMINOSITÉ
COULEUR
Réglage Volumes
PLANUX
INTERCOMMUNICANT
ACTIONNEURS
CAMÉRAS
MAINS LIBRES
RÉGLAGES
BLOCAGE CLAVIER
R
É
GLAGES
RÉGLER IMAGE
RÉGLER VOLUMES
PROGRAMMER MÉLODIES
PROGRAMMATION TOUCHES
INFORMATIONS
R
É
GLER VOLUMES
SONNERIE
AUDIO
R
É
GLER VOLUMES
SONNERIE
AUDIO

FR
17
Programmation mélodies
PLANUX
INTERCOMMUNICANT
ACTIONNEURS
CAMÉRAS
MAINS LIBRES
RÉGLAGES
BLOCAGE CLAVIER
R
É
GLAGES
RÉGLER IMAGE
RÉGLER VOLUMES
PROGRAMMER MÉLODIES
PROGRAMMATION TOUCHES
INFORMATIONS
PROGRAMMER M
É
LODIES
EXTÉRIEUR
STANDARD
PALIER
INTERCOMMUNICANT
EXT
É
RIEUR
MÉLODIE 1
MÉLODIE 2
MÉLODIE 3
MÉLODIE 4
MÉLODIE 5
MÉLODIE 6
MÉLODIE 7
Renommer Textes (Menu Actionneurs et
Caméras)
PLANUX
INTERCOMMUNICANT
ACTIONNEURS
CAMÉRAS
MAINS LIBRES
RÉGLAGES
BLOCAGE CLAVIER
ACTIONNEURS
ACTIONNEUR GÉNÉRIQUE
ACTIONNEUR 1
ACTIONNEUR 2
ACTIONNEUR 3
RENOMMER TEXTE
RENOMMER TEXTE
ACTIONNEUR 1
ACTIONNEUR 2
Appuyer sur les touches de navigation
pour dérouler les lettres de l’alphabet ;
appuyer sur la touche pour confi rmer
la lettre et passer automatiquement à
celle immédiatement à droite. Après avoir
terminé l’insertion, appuyer sur pour
confi rmer.
RENOMMER TEXTE
ACTIONNEUR 1
PORTAIL

FR
18
Utilisation d’un actionneur par menu
(Art. 1256)
PLANUX
INTERCOMMUNICANT
ACTIONNEURS
CAMÉRAS
MAINS LIBRES
RÉGLAGES
BLOCAGE CLAVIER
ACTIONNEURS
ACTIONNEUR GÉNÉRIQUE
ACTIONNEUR 1
ACTIONNEUR 2
ACTIONNEUR 3
RENOMMER TEXTE
Le moniteur émettra une tonalité
de confi rmation de l’activation. S’il
n’y a aucun actionneur, le message
DISPOSITIF PAS PRESENT apparaît.
DISPOSITIF
PAS PRESENT
Visualisation image depuis caméras
déportées (Art. 1259C)
PLANUX
INTERCOMMUNICANT
ACTIONNEURS
CAMÉRAS
MAINS LIBRES
RÉGLAGES
BLOCAGE CLAVIER
L’image du poste extérieur apparaît sur
l’écran.
CAM
É
RAS
CAMÉRA 1
CAMÉRA 2
RENOMMER TEXTE
CAM
É
RAS
CAMÉRA 1
CAMÉRA 2
RENOMMER TEXTE
En appuyant à plusieurs reprises sur
la touche , il est possible de basculer
entre les différentes caméras du groupe
sélectionné et le poste extérieur.
Appuyer plusieurs fois sur la touche pour
quitter le menu et visualiser à plein écran
l’image de la caméra.
Si aucune caméra déportée n’est
présente, le message DISPOSITIF PAS
PRÉSENT apparaît.
La page charge ...
La page charge ...
La page charge ...
La page charge ...
La page charge ...
La page charge ...
La page charge ...
La page charge ...
La page charge ...
La page charge ...
La page charge ...
La page charge ...
La page charge ...
La page charge ...
La page charge ...
La page charge ...
La page charge ...
La page charge ...
La page charge ...
La page charge ...
La page charge ...
La page charge ...
La page charge ...
La page charge ...
La page charge ...
La page charge ...
-
 1
1
-
 2
2
-
 3
3
-
 4
4
-
 5
5
-
 6
6
-
 7
7
-
 8
8
-
 9
9
-
 10
10
-
 11
11
-
 12
12
-
 13
13
-
 14
14
-
 15
15
-
 16
16
-
 17
17
-
 18
18
-
 19
19
-
 20
20
-
 21
21
-
 22
22
-
 23
23
-
 24
24
-
 25
25
-
 26
26
-
 27
27
-
 28
28
-
 29
29
-
 30
30
-
 31
31
-
 32
32
-
 33
33
-
 34
34
-
 35
35
-
 36
36
-
 37
37
-
 38
38
-
 39
39
-
 40
40
-
 41
41
-
 42
42
-
 43
43
-
 44
44
-
 45
45
-
 46
46


dans d''autres langues
- italiano: Comelit Planux Lux Manuale utente
- English: Comelit Planux Lux User manual
- español: Comelit Planux Lux Manual de usuario
- Deutsch: Comelit Planux Lux Benutzerhandbuch
- Nederlands: Comelit Planux Lux Handleiding
- português: Comelit Planux Lux Manual do usuário
Documents connexes
-
Comelit FT PLANUX 03 Operation & Programming Manual
-
-
-
-
-
-
-
-
-