BLACK+DECKER LCC140 Guide d'installation
- Catégorie
- Coupe-herbe
- Taper
- Guide d'installation

1
40V MAX* LITHIUM TRIMMER / EDGER
INSTRUCTION MANUAL
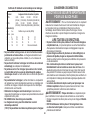
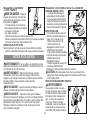
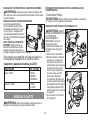
KEY INFORMATION YOU SHOULD KNOW:
• Theguardmustbeinstalledbeforetrimmingoredging-if
not,themotorwilloverheat(page8).
• Whenreplacingtheline,useonly.065inchdiameter
ROUNDline(B&DModel#AF-100isrecommended)-
otherwisethetoolwillnotfunctionproperly(page11).
• Donotbumpthefeedheadagainsttheground-itwill
disruptthefeedmechanism.
•
ForuseonlywithLBseries36vor40vMax*batteries.
Model # LST136
SAVE THIS MANUAL FOR FUTURE REFERENCE.
VEA EL ESPANOL EN LA CONTRAPORTADA.
POUR LE FRANÇAIS, VOIR LA COUVERTURE ARRIÈRE.
INSTRUCTIVODEOPERACIÓN,CENTROSDESERVICIO
YPÓLIZADEGARANTÍA.ADVERTENCIA:LÉASEESTE
INSTRUCTIVOANTESDEUSARELPRODUCTO.
Thank you for choosing Black & Decker! Go to
www.BlackandDecker.com/NewOwner
to register your new product.
Model Number LST136
PLEASE READ BEFORE RETURNING
THIS PRODUCT FOR ANY REASON:
Ifyouhaveaquestionorexperienceaproblemwithyour
Black&Deckerpurchase,goto
WWW.BLACKANDDECKER.COM/INSTANTANSWERS
forinstantanswers24hoursaday.
Ifyoucan’tfindtheanswerordonothaveaccesstotheinternet,
call1-800-544-6986from8a.m.to5p.m.ESTMon.-Fri
tospeakwithanagent.
Pleasehavethecatalognumberavailablewhenyoucall.
*Maximuminitialbatterypackvoltage(measuredwithouta
workload)is40volts.Thenominalvoltageis36.

SAFETY GUIDELINES - DEFINITIONS
Itisimportantforyoutoreadandunderstandthismanual.The
informationitcontainsrelatestoprotectingYOURSAFETYand
PREVENTINGPROBLEMS.Thesymbolsbelowareusedtohelp
yourecognizethisinformation.
DANGER: Indicatesanimminentlyhazardoussituationwhich,
ifnotavoided,willresultindeathorseriousinjury.
WARNING: Indicatesapotentiallyhazardoussituationwhich,if
notavoided,couldresultindeathorseriousinjury.
CAUTION: Indicatesapotentiallyhazardoussituationwhich,if
notavoided,mayresultinminorormoderateinjury.
NOTICE: Usedwithoutthesafetyalertsymbolindicatesa
potentiallyhazardoussituationwhich,ifnotavoided,mayresultin
propertydamage.
2
TABLE OF CONTENTS
SafetyGuidelines-Definitions.................................................2
ImportantSafetyWarningsandInstructions............................2
Components.............................................................................4
ImportantSafetyInstructionsforBatteryChargers..................4
ImportantSafetyInstructionsforBatteryPacks.......................5
Assembly/Adjustment............................................................8
OperatingInstructions..............................................................9
ReplacementAccessories.......................................................10
Maintenance............................................................................12
Troubleshooting.......................................................................12
ServiceInformation..................................................................13
FullThree-YearHomeUseWarranty......................................15
WARNING: Whenusingelectricgardeningappliances,basic
safetyprecautionsshouldalwaysbefollowedtoreduceriskoffire,
electricshock,andpersonalinjury,includingthefollowing.
Read All Instructions
•ALWAYS WEAR EYE PROTECTION–Wearsafetyspectacles
orgogglesatalltimeswhenthistoolispluggedin.
•GUARD–Donotusethistoolwithoutguardattached.
•DRESS PROPERLY–Donotwearlooseclothingorjewelry.
Theycanbecaughtinmovingparts.Rubberglovesand
substantialrubbersoledfootweararerecommendedwhen
workingoutdoors.Don’toperatethetoolwhenbarefootor
wearingopensandals.Wearheavy long pantstoprotectyour
legs.Wearprotectivehaircoveringtocontainlonghair.
•NYLON LINE–Keepface,handsandfeetclearofrotatingnylon
lineatalltimes.
•THE ROTATING LINE PERFORMS A CUTTING FUNCTION–
Usecarewhentrimmingaroundscreensanddesirableplantings.
•KEEP ALL BYSTANDERS AWAY–atasafedistancefrom
workarea,especiallychildren.
•IMPORTANT WARNING–WhenbeingusedasanEdger,
stones,piecesofmetalandotherobjectscanbethrownout
athighspeedbytheline.Thetoolandguardaredesignedto
reducethedanger.However,thefollowingspecialprecautions
shouldbetaken:MAKE SUREthatotherpersonsandpetsareatleast
100feet(30m)away.
•TO REDUCE THE RISKofrebound(ricochet)injury,work
goingawayfromanynearbysolidobjectsuchaswall,steps,
largestone,tree,etc.Usegreatcarewhenworkingclosetosolid
objectsandwherenecessary,doedgingortrimmingbyhand.
•AVOID ACCIDENTALLY STARTING–Don’tcarryplugged-in
toolwithfingerontrigger.
•DO NOT FORCE THE TOOL–ataratefasterthantherateat
IMPORTANT SAFETY WARNINGS
AND INSTRUCTIONS

3
whichitisabletocuteffectively.
•USE THE RIGHT TOOL–Donotusethistoolforanyjobexcept
thatforwhichitisintended.
•DON’T OVERREACH–Keepproperfootingandbalanceatalltimes.
•DAMAGE TO UNIT–Ifyoustrikeorbecomeentangledwitha
foreignobject,stoptoolimmediately,unplug,checkfordamage
andhaveanydamagerepairedbeforefurtheroperationis
attempted.Donotoperatewithabrokenhuborspool.
•DISCONNECT TOOL–whennotinuse,whenreplacingline,or
priortocleaning.
•AVOID DANGEROUS ENVIRONMENTAL CONDITIONS–Do
notuseelectrictoolsindamporwetlocations.Followall
instructionsinthisInstructionManualforproperoperationofyour
tool.Don’tusethetoolintherain.
•DO NOT OPERATEportableelectrictoolsingaseousor
explosiveatmospheres.Motorsinthesetoolsnormallyspark,and
thesparksmightignitefumes.
•STORE IDLE TOOLS INDOORS–Whennotinuse,toolsshouldbe
storedindoorsinadry,locked-upplaceoutofreachofchildren.
•STAY ALERT–Donotoperatethisunitwhenyouaretired,ill,
orundertheinfluenceofalcohol,drugs,ormedication.
•MAINTAIN APPLIANCES WITH CARE–Followinstructionsin
maintenancesection.Keephandlesdry,cleanandfreefromoil
andgrease.
•CHECK DAMAGED PARTS–Beforefurtheruseofthe
appliance,aguardorotherpartthatisdamagedshouldbe
carefullycheckedtodeterminethatitwilloperateproperlyand
performitsintendedfunction.Checkforalignmentofmoving
parts,bindingofmovingparts,breakageofparts,mounting,and
anyotherconditionthatmayaffectitsoperation.Aguardorother
partthatisdamagedshouldbeproperlyrepairedorreplaced
byanauthorizedservicecenterunlessotherwiseindicated
elsewhereinthismanual.
•DONOTimmersetoolinwaterorsquirtitwithahose.DONOT
allowanyliquidtogetinsideit.
•DONOTstorethetoolonoradjacenttofertilizersorchemicals.
•DONOTcleanwithapressurewasher.
•Keepguardsinplaceandinworkingorder.
•Keephandsandfeetawayfromcuttingarea.
WARNING: Donotusetooliftheswitchtriggerdoesnotturn
thetoolonoroff.Anytoolthatcannotbecontrolledwiththeswitch
triggerisdangerousandmustberepaired.
SAVE THESE INSTRUCTIONS
Thelabelonyourtoolmayincludethefollowingsymbols.The
symbolsandtheirdefinitionsareasfollows:
V volts A.................amperes
Hz.............hertz W................watts
min...........minutes
..............alternatingcurrent
..........directcurrent
n
o...............noloadspeed
..............
ClassIIConstruction
.............earthingterminal
..............safetyalertsymbol.../min.......revolutionsor
reciprocationsperminute
WARNING: Some dust created by this product contains
chemicals known to the State of California to cause cancer,
birth defects or other reproductive harm. Some examples of
these chemicals are:
•compoundsinfertilizers
•compoundsininsecticides,herbicidesandpesticides
•arsenicandchromiumfromchemicallytreatedlumber
Toreduceyourexposuretothesechemicals,wearapprovedsafety
equipmentsuchasdustmasksthatarespeciallydesignedtofilterout
microscopicparticles.

4
SAVE THESE INSTRUCTIONS: Thismanualcontainsimportant
safetyinstructionsforbatterychargers.
•Beforeusingcharger,readallinstructionsandcautionarymarkings
oncharger,batterypack,andproductusingbatterypack.
WARNING: Shock hazard.Donotallowanyliquidtoget
insidecharger.
CAUTION: Burn hazard. Toreducetheriskofinjury,charge
onlydesignatedBlack & Decker batteries.Othertypesofbatteries
mayburstcausingpersonalinjuryanddamage.
CAUTION: Undercertainconditions,withthechargerplugged
intothepowersupply,thechargercanbeshortedbyforeign
material.Foreignmaterialsofaconductivenaturesuchas,butnot
limitedto,steelwool,aluminumfoil,oranybuildupofmetallic
particlesshouldbekeptawayfromchargercavities.Alwaysunplug
thechargerfromthepowersupplywhenthereisnobatterypackin
thecavity.Unplugchargerbeforeattemptingtoclean.
WARNING:
•DO NOT attempt to charge the battery pack with any chargers
other than the ones in this manual.The charger and battery
pack are specifically designed to work together.
•These chargers are not intended for any uses other than
charging designated Black & Decker rechargeable batteries.
Any other uses may result in risk of fire, electric shock or
electrocution.
•Do not expose charger to rain or snow.
•Pull by plug rather than cord when disconnecting charger.
This will reduce risk of damage to electric plug and cord.
•Make sure that cord is located so that it will not be stepped
on, tripped over, or otherwise subjected to damage or stress.
•Do not use an extension cord unless it is absolutely
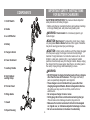
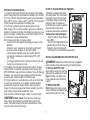
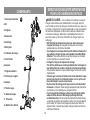
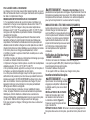
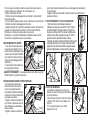
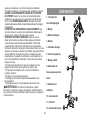
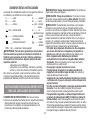
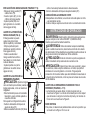
1. On/Off Switch
2. Handle
3. Lock Off Button
4. Battery
5. Charge Indicator
6. Power Command
7. Auxillary Handle
8. Height Adjust
Locking Clamp
9. Trimmer Head
10. Edge Guide
11. Guard
12. Spool Housing
8
3
4
7
COMPONENTS
2
IMPORTANT SAFETY INSTRUCTIONS
FOR BATTERY CHARGERS
10
1
11
12
9
5
6
A

necessary.Use of improper extension cord could result in risk of
fire, electric shock, or electrocution.
•An extension cord must have adequate wire size (AWG or
American Wire Gauge) for safety.The smaller the gauge number
of the wire, the greater the capacity of the cable, that is 16 gauge
has more capacity than 18 gauge. When using more than one
extension to make up the total length, be sure each individual
extension contains at least the minimum wire size.
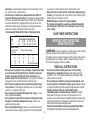
Recommended Minimum Wire Size for Extension Cords
•Do not place any object on top of charger or place the charger
on a soft surface that might block the ventilation slots and
result in excessive internal heat. Place the charger in a
position away from any heat source.The charger is ventilated
through slots in the top and the bottom of the housing.
•Do not mount charger on wall or permanently affix charger
to any surface.The charger is intended to use on a flat, stable
surface (i.e., table top, bench top).
•Do not operate charger with damaged cord or plug —have
them replaced immediately.
•Do not operate charger if it has received a sharp blow, been
dropped, or otherwise damaged in any way. Take it to an
authorized service center.
•Do not disassemble charger; take it to an authorized service
center when service or repair is required. Incorrect reassembly
5
may result in a risk of electric shock, electrocution or fire.
•Disconnect the charger from the outlet before attempting any
cleaning. This will reduce the risk of electric shock. Removing the
battery pack will not reduce this risk.
•NEVER attempt to connect 2 chargers together.
•The charger is designed to operate on standard household
electrical power (120 Volts). Do not attempt to use it on any
other voltage.
SAVE THESE INSTRUCTIONS
Important safety InstructIons
for battery packs
WARNING: For safe operation, read this manual and manuals
originally supplied with tool before using the charger.
Thebatterypackisnotfullychargedoutofthecarton.Beforeusing
thebatterypackandcharger,readthesafetyinstructionsbelow.
Thenfollowchargingproceduresoutlined.
READ ALL INSTRUCTIONS
•Do not incinerate the battery pack even if it is severely
damaged or is completely worn out.The battery pack can
explode in a fire. Toxic fumes and materials are created when
battery packs are burned.
•Do not charge or use battery in explosive atmospheres, such
as in the presence of flammable liquids, gases or dust. Inserting
or removing the battery from the charger may ignite the dust or fumes.
•If battery contents come into contact with the skin,
immediately wash area with mild soap and water. If battery
liquid gets into the eye, rinse water over the open eye for 15
minutes or until irritation ceases. If medical attention is needed, the
battery electrolyte for Li-ion batteries is composed of a mixture of
liquid organic carbonates and lithium salts.
• Contents of opened battery cells may cause respiratory irritation.
Provide fresh air. If symptoms persist, seek medical attention.
Minimum Gauge for Cord Sets
Volts Total Length of Cord in Feet
120V 0-25 26-50 51-100 101-150
240V 0-50 51-100 101-200 201-300
Ampere Rating
MoreNotmore AmericanWireGauge
ThanThan
0 - 6 18 16 16 14
6 - 10 18 16 14 12
10 - 12 16 16 14 12
12 - 16 14 12 NotRecommended

6
WARNING: Burn hazard. Battery liquid may be flammable if
exposed to spark or flame.
•Charge the battery packs only in Black & Decker chargers.
•DO NOT splash or immerse in water or other liquids. This may
cause premature cell failure.
•Do not store or use the tool and battery pack in locations where
outside sheds or metal buildings in summer).
WARNING: Never attempt to open the battery pack for any
reason. If battery pack case is cracked or damaged, do not insert into
charger. Do not crush, drop or damage battery pack. Do not use a
battery pack or charger that has received a sharp blow, been
dropped, run over or damaged in any way (i.e., pierced with a nail,
hit with a hammer, stepped on). Damaged battery packs should be
returned to service center for recycling.
WARNING: Fire hazard. Do not store or carry battery so that
metal objects can contact exposed battery terminals. For example, do
not place battery in aprons, pockets, tool boxes, product kit boxes, drawers,
etc., with loose nails, screws, keys, etc. Transporting batteries can
possibly cause fires if the battery terminals inadvertently come in
contact with conductive materials such as keys, coins, hand tools and
the like. The US Department of Transportation Hazardous Material
Regulations (HMR) actually prohibit transporting batteries in commerce or on
airplanes (i.e., packed in suitcases and carry-on luggage) UNLESS they are
properly protected from short circuits. So when transporting individual
batteries, make sure that the battery terminals are protected and well
insulated from materials that could contact them and cause a short circuit.
NOTE: Batteries should not be put in checked baggage.
STORAGE RECOMMENDATIONS
1.Thebeststorageplaceisonethatiscoolanddryawayfrom
directsunlightandexcessheatorcold.
2.Longstoragewillnotharmthebatterypackorcharger.
CHARGING PROCEDURE
BlackandDeckerchargersaredesignedtochargeBlackandDecker
batterypacks:LCS36(2hrs),LCS436(6hrs).
1.Plugthechargerintoanappropriateoutletbeforeinsertingthe
batterypack.
2.Insertthebatterypackintothecharger.
3.ThegreenLEDwillflashindicatingthatthebatteryis
beingcharged.
4.ThecompletionofchargeisindicatedbythegreenLED
remainingoncontinuously.Thepackisfullychargedand
maybeusedatthistimeorleftonthecharger.
Recharge discharged batteries as soon as possible after
use or battery life may be greatly diminished.
CHARGER DIAGNOSTICS
Thischargerisdesignedtodetectcertainproblemsthatcanarise
withthebatterypacksorthepowersource.Problemsareindicated
byoneLEDflashingindifferentpatterns.
BAD BATTERY
Thechargercandetectaweakordamagedbattery.Thered
LEDflashesinthepatternindicatedonthelabel.Ifyousee
thisbadbatteryblinkpattern,donotcontinuetochargethe
battery.Returnittoaservicecenteroracollectionsitefor
recycling.
HOT/COLD PACK DELAY
Whenthechargerdetectsabatterythatisexcessivelyhot
orexcessivelycold,itautomaticallystartsaHot/ColdPack
Delay,suspendingcharginguntilthebatteryhasnormalized.
Afterthishappens,thechargerautomaticallyswitchestothe
PackChargingmode.Thisfeatureensuresmaximumbattery
life.TheredLEDflashesinthepatternindicatedonthelabel
whenthehot/coldpackdelayisdetected.
LEAVING THE BATTERY IN THE CHARGER
Thechargerandbatterypackcanbeleftconnectedwiththegreen
LEDglowingindefinitely.Thechargerwillkeepthebatterypack
freshandfullycharged.

7
IMPORTANT CHARGING NOTES
1.Longestlifeandbestperformancecanbeobtainedifthebattery
packischargedwhentheairtemperatureisbetween60°Fand80°F
(16°-27°C).DONOTchargethebatterypackinanairtemperature
below+40°F(+4.5°C),orabove+105°F(+40.5°C).Thisisimportant
andwillpreventseriousdamagetothebatterypack.
2.Thechargerandbatterypackmaybecomewarmtotouch
whilecharging.Thisisanormalcondition,anddoesnotindicatea
problem.Tofacilitatethecoolingofthebatterypackafteruse,avoid
placingthechargerorbatterypackinawarmenvironmentsuchas
inametalshed,oranuninsulatedtrailer.
3.Ifthebatterypackdoesnotchargeproperly:
a.Checkcurrentatreceptaclebyplugginginalamporother
appliance
b.Checktoseeifreceptacleisconnectedtoalightswitch
whichturnspoweroffwhenyouturnoutthelights.
c.Movechargerandbatterypacktoalocationwherethe
surroundingairtemperatureisapproximately60°F-80°F
(16°-27°C).
d.Ifchargingproblemspersist,takethetool,batterypackand
chargertoyourlocalservicecenter.
4.Thebatterypackshouldberechargedwhenitfailstoproduce
sufficientpoweronjobswhichwereeasilydonepreviously.DO
NOTCONTINUEtouseundertheseconditions.Followthecharging
procedure.Youmayalsochargeapartiallyusedpackwhenever
youdesirewithnoadverseaffectonthebatterypack.
5.Foreignmaterialsofaconductivenaturesuchas,butnotlimited
to,steelwool,aluminumfoil,oranybuildupofmetallicparticles
shouldbekeptawayfromchargercavities.Alwaysunplugthe
chargerfromthepowersupplywhenthereisnobatterypackinthe
cavity.Unplugchargerbeforeattemptingtoclean.
6.Donotfreezeorimmersechargerinwateroranyotherliquid.
WARNING: Shock hazard.Donotallowanyliquidtoget
insidecharger. Never attempt to open the battery pack for any
reason. If the plastic housing of the battery pack breaks or cracks,
return to a service center for recycling.
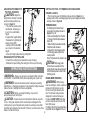
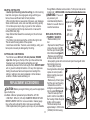
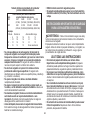
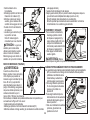
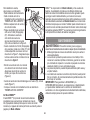
STATE OF CHARGE INDICATOR (FIGURE B)
Thebatteryisequippedwithastate
ofchargeindicator.Thiscanbeused
todisplaythecurrentlevelofcharge
inthebatteryduringuseandduring
charging.Itdoesnotindicatetool
functionalityandissubjecttovariation
basedonproductcomponents,
temperatureandend-userapplication.
Checking state of charge during use:
•Pressthestateofchargeindicator
button(B1).
•ThefourLED’s(B2)willilluminate
indicatingthepercentofchargein
thebattery.SeechartinfigureB.
•IfLEDlightdoesnotilluminate,chargebattery.
INSTALLING AND REMOVING THE BATTERY PACK
WARNING: Make certain the lock-off button is engaged to
prevent switch actuation before removing or installing battery.
TO INSTALL BATTERY PACK:
Insertbatterypackintotooluntilfully
seatedandanaudibleclickisheard
(figure C).Makesurebatterypack
isfullyseatedandfullylatchedinto
position.
TO REMOVE BATTERY
PACK: Depressthebatteryrelease
buttoninthebackofthebatterypack
andpullbatterypackoutoftool.
C
B
B2
B1

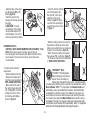
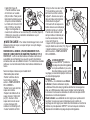
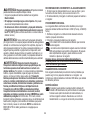
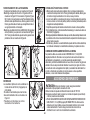
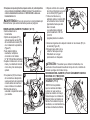
tabclicksintoplace(Ensure
thattheguiderails(D1)on
theguard(D2)arecorrectly
alignedwiththeguiderails
(D3)onthetrimmerhead(D4)
(figure D).
Thelockingtab(D5)
shouldsnappedintothehousing
slot(D6).
•Securetheguardwiththe
screw(E1)(figure E).
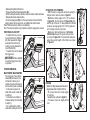
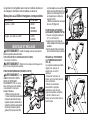
ATTACHING THE AUXILIARY
HANDLE (FIGURES F AND G)
•Pushtheauxiliaryhandle
(F1)ontothetube(F2).
•Slidethebolt(G1)through
theholesintheauxiliary
handle.
•Tightentheknob(G2)
ontotheboltbyturningit
clockwise.
ADJUSTING THE POSITION
OF THE AUXILIARY HANDLE
(FIG. G)
Theauxiliaryhandlecanbe
adjustedtoprovideoptimum
balanceandcomfort.
•Loosentheknobonthe
boltbyturningitcounter
clockwise.
•Gentlyslidetheauxiliary
handleupordownthetube
tothedesiredheight.
•Tightentheknobontothe
boltbyturningitclockwise.
8
WARNING: Beforeassembly,makesurethatthetoolis
switchedoffandthebatteryhasbeenremoved.
ASSEMBLY TOOLS REQUIRED (NOT SUPPLIED):
-PhillipsScrewdriver
WARNING: Removethebatterybeforeattemptingtoattachany
ofthefollowingcomponents.
ATTACHING THE GUARD
(FIGURES D AND E)
WARNING: NEVER
OPERATETOOLWITHOUT
GUARDFIRMLYINPLACE.
Theguardmustalwaysbe
properlyattachedonthetoolto
protecttheuser.
•Removethescrewfromthe
guard.
•Keepingtheguardsquareto
thetrimmerheadslideitfully
intoplaceuntiltheretaining
E
E1
F
F1
F2
ASSEMBLY & ADJUSTMENT
G
G2
G1
D
D2
D1
D3
D4
D6
D5
LI-ION Battery Packs and Chargers
Thisproductcanacceptanyofthebatteriesand
chargerslistedinthechartbelow.
Batteries:LI-ION LBX36
LBXR36
LBXR2036
Chargers:LI-ION LCS36
LCS436
Description Cat. #

9
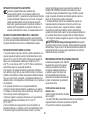
ADJUSTING THE HEIGHT OF
THE TOOL (FIGURE H)
CAUTION: Adjustthe
lengthofthetrimmertoobtain
properworkingpositionsas
showninfigure N.
•Thistoolhasatelescopic
mechanism,allowingyou
tosetittoacomfortable
height.
Toadjusttheheightsetting:
•Releasetheheightadjust
lockingclamp(H1).
•Gentlypullthetube(H2)
upordowntothedesired
height.
•Closetheheightadjustlockingclamp(H1).
RELEASING THE CUTTING LINE
Intransit,thecuttinglineistapedtothespoolhousing.
•Removethetapeholdingthecuttinglinetothespoolhousing.
OPERATING INSTRUCTIONS
WARNING: Alwaysusepropereyeprotectionthatconforms
toANSIZ87.1(CAN/CSAZ94.3)whileoperatingthispowertool.
WARNING:Removethebatterybeforemakinganyassembly,
adjustments,orchangingaccessories.Suchpreventivesafetymeasures
reducetheriskofstartingthe
trimmer
accidentally.
CAUTION: Beforeyoubegintrimming,onlyusethe
appropriatetypeofcuttingline.
CAUTION: Inspectareatobetrimmedandremoveanywire,
cord,orstring-likeobjectswhichcouldbecomeentangledinthe
rotatinglineorspool.Beparticularlycarefultoavoidanywirewhich
mightbebentoutwardlyintothepathofthetool,suchasbarbsatthe
baseofachainlinkfence.
SETTING THE TOOL TO TRIMMING OR EDGING MODE
(FIGURE I, J AND K)
•Thetoolcanbeusedintrimmingmodeasshowninfigure Iorin
edgingmodetotrimoverhanginggrassalonglawnedgesandflower
bedsasshowninfigure K.
TRIMMING MODE
Fortrimming,thetrimmerhead
shouldbeinthepositionshownin
figure I.Ifitisnot:
•Removethebatteryfromthetool.
•Pressandholdtheheadrelease
button(I1).
•Whileholdingtheauxillaryhandle,
rotatetheheadclockwise.
•Releasetheheadreleasebutton.
•Lifttheedgeguide(J1)intothe
closedposition.
Note:Theheadwillonlyrotateinone
direction.
CAUTION: Wireedgeguide
shouldonlybeusedwheninthe
edgingmode.Keepwireedgeguide
intheretractedpositionwheninthe
trimmingmode.
EDGING MODE (FIGURE K)
WARNING:Whenbeing
usedasanEdger,stones,piecesof
metalandotherobjectscanbe
thrownoutathighspeedbythe
line.Thetrimmerandguardare
designedtoreducethedanger.
However,MAKE SUREthatother
personsandpetsareatleast100
feet(30m)away.
Foredging,thetrimmerheadshouldbein
thepositionshowninfigure K.Ifitisnot:
H
H1
H2
I
K
I1
K2
J
J1
K1

10
•Removethebatteryfromthetool.
•Pressandholdtheheadreleasebutton(K1).
•Whileholdingtheauxillaryhandle,rotatetheheadcounterclockwise.
•Releasetheheadreleasebutton.
•Droptheedgeguide(K2)intotheopenposition.Ensurethatthe
edgingguideisallthewaydown,anaudibleclickwillbeheard.
Note:Theheadwillonlyrotateinonedirection.
Note:TheAutoFeedSystemmaynotoperatecorrectlyifedgeguideisnotused.
SWITCHING ON AND OFF
•Toswitchthetoolon,press
inandholdthelockoffbutton
(L1)thensqueezethetrigger
lever(L2).Oncethetoolis
runningyoumayreleasethe
lockoffbutton(L1).
•Toswitchthetooloff,release
thetriggerlever.
WARNING:Neverattempt
tolockthetriggerleverinthe
onposition.
POWER COMMAND -
MAX POWER / MAX RUNTIME
Themaxpower/maxruntime
feature(M1)islocatedonthe
toolhandle.Itallowsyouto
optimizethetoolsperformance
andboostthepowerasneeded.
•Tochoosemaxpowerto
tacklethickweeds,rotatedial
tosetting6.
•Tochoosemaxruntimeto
increasebatteryliferotatedial
tosetting1.
•Foracombinationofboth,
rotatedialtosettingfrom2to5.
OPERATING THE TRIMMER
•Withtheuniton,angleunitandslowlyswingthe
trimmersidetosideasshowninfigure N.
•Maintainacuttingangleof5°to10°asshown
infigure N1.Donotexceed10°(figure N2).Cut
withthetipoftheline.Tokeepdistancefromhard
surfacesuseedgeguide(10).Pulltheguideout
untilitsnapssecurelyintoplace
•Maintainaminimumdistanceof24 inches
(609.6 mm)betweentheguardandyourfeet
asshowninfigure N3.Toacheivethisdistance
adjusttheoverallheightofthetrimmerasshown
infigure H.
EDGING
Optimumcuttingresultsareachievedon
edgesdeeperthan2inches(50mm).
•Donotusethetooltocreateedges
ortrenches.
•Guidethetoolasshowninfigure O.
•Tomakeaclosercut,slightlytiltthe
tool.
L
L1
L2
M
M1
N
O
N3
5
O
-10
O
N1
5
O
-10
O
N2

11
HELPFUL CUTTING TIPS
•Use the tip of the string to do the cutting;donotforcestring
headintouncutgrass.Useedgeguidealongsuchthingsas
fences,housesandflowerbedsforbestpractices.
•Wireandpicketfencescauseextrastringwear,evenbreakage.
Stoneandbrickwalls,curbs,andwoodmaywearstringrapidly.
•Donotallowspoolcaptodragongroundorothersurfaces.
•Inlonggrowthcutfromthetopdownanddonotexceed12
inches(304.8mm)high.
•Keeptrimmertiltedtowardtheareabeingcut;thisisthebest
cuttingarea.
•Thetrimmercutswhenpassingtheunitfromtherighttoleft.
Thiswillavoidthrowingdebrisattheoperator.
•Avoidtreesandshrubs.Treebark,woodmoldings,siding,and
fencepostscaneasilybedamagedbythestring.
CUTTING LINE / LINE FEEDING
Yourtrimmeruses.065 inch (1.65 mm) diameter, ROUND
nylon line.Duringuse,thetipsofthenylonlineswillbecome
frayedandwornandthespecialselffeedingspoolwill
automaticallyfeedandtrimafreshlengthofline.DO NOT BUMP
unitongroundinattempttofeedlineorforanyotherpurposes.
Cuttinglinewillwearfasterandrequiremorefeedingifthe
cuttingoredgingisdonealongsidewalksorotherabrasive
surfacesorheavierweedsarebeingcut.
REPLACEMENT ACCESSORIES
CAUTION: Beforeyoubegintrimming,onlyusetheappropriate
typeofcuttingline.
UseBlack&DeckerreplacementspoolModelNo.AF-100.
•USEONLY.065inch(1.65mm)DIAMETERROUNDNYLON
MONOFILAMENTLINE.Donotuseserratedorheaviergauge
line,astheywilloverloadthemotorandcauseoverheating.
•Otherreplacementparts(guards,spoolcaps,etc.)areavailable
throughBlack&Deckerservicecenters.Tofindyourlocalservice
locationcall:1-800-544-6986 or visit www.blackanddecker.com.
WARNING: Theuseof
anyaccessorynot
recommendedbyBlack&
Deckerforusewiththistool
couldbehazardous.
REPLACING THE SPOOL
(FIGURES P, Q AND R)
•Removebatteryfrom
tool.
•Depressthetabs(P1)and
removethespoolcap(P2)
fromthespoolhousing(P3)
inthetrimmerhead(figure P).
•ReplacespoolwithBlack
&Deckermodel#AF-100.
•Graspemptyspoolwithonehandandspoolhousingwithother
handandpullspoolout.
•Iflever(Q1) inbaseof
housingbecomesdislodged,
replaceincorrectposition
beforeinsertingnewspool
intohousing.
•Removeanydirtandgrass
fromthespoolandhousing.
•Unfastentheendofthe
cuttinglineandguidetheline
intotheeyelet(R2)figure R.
•Takethenewspooland
pushitontotheboss(Q2)in
thehousing.Rotatethespool
slightlyuntilitisseated.
Thelineshouldprotrude
approximately4-13/16inches
(122mm)fromthehousing.
P
Replacement
spool
Model#
AF-100
Q
P1
P2
P1
P3
Q1
Q2

12
•Alignthetabsonthespool
capwiththeslots(R1)inthe
housing(figure R).
•Pushthecapontothe
housinguntilitsnapssecurely
intoplace.
CAUTION: Toavoid
tooldamage,ifthecutting
lineprotrudesbeyondthe
trimmingblade,cutitoffso
thatitjustreachestheblade.
REWINDING SPOOL
(USE ONLY .065 IN. ROUND DIAMETER LINE) (FIGURES S, T & U)
NOTE:Handwoundspoolsfrombulklinearelikelyto
becometangledmorefrequentlythanBlack&Deckerfactory
woundspools.Forbestresults,factorywoundspoolsare
recommended.
Torewindspool,followthe
stepsbelow:
•Removebatteryfromtool.
•Removetheemptyspool
fromthetoolasdescribedin
REPLACING THE SPOOL”.
•Makeafoldattheendof
thecuttinglineatabout3/4
inch(19mm)(S1).Feedthe
cuttinglineintooneofthe
lineholdingslots(S2)as
showninfigure S.
•Insertthe3/4inch(19mm)
endofthebulklineinto
thehole(T1)inthespool
adjacenttotheslotas
showninfigure T. Make
surethelineispulledtight
againstthespoolasshown
infigure T.
•Windthecuttinglineontothespoolin
thedirectionofthearrowonthespool.
Makesuretowindthelineonneatlyand
inlayers.Donotcrisscross(figure U).
•Whenthewoundcuttinglinereaches
therecesses(T2),cuttheline.(figure T).
•Fitthespoolontothetoolasdescribed
in“REPLACING THE SPOOL”.
THE RBRC™ SEAL
TheRBRC™(Rechargeable
BatteryRecyclingCorporation)
SealontheLi-Ionbattery(or
batterypack)indicatesthatthecoststorecyclethebattery
(orbatterypack)attheendofitsusefullifehavealreadybeenpaidby
Black & Decker.RBRC™incooperationwithBlack & Deckerand
otherbatteryusers,hasestablishedprogramsintheUnitedStates
tofacilitatethecollectionofspentLi-Ionbatteries.Helpprotectour
environmentandconservenaturalresourcesbyreturningthespent
Li-IonbatterytoanauthorizedBlack & Deckerservicecenterortoyour
localretailerforrecycling.Youmayalsocontactyourlocalrecyclingcenter
forinformationonwheretodropoffthespentbattery.
RBRC™isaregistered
trademarkoftheRechargeable Battery Recycling Corporation.
T
U
R
S
R1
R2
S1
S2
T1
T2

13
maIntenance
WARNING: Toavoidseriousinjury,removethebatteryfrom
thetoolbeforeperforminganymaintenance.
1. Keeptheairintakeslots cleantoavoidoverheating.
2. Yourtrimmerlinecandryoutovertime.Tokeepyourlineintop
condition,storesparepre-woundspoolsorbulklineinaplastic,
sealablebagwithatablespoonofwater.
3. Plasticpartsmaybecleanedbyusingamildsoapandadamprag.
4.Thelinecutterontheedgeoftheguardcandullovertime.Itis
recommendedyouperiodicallytouch-upthesharpnessofthe
bladewithafile.
trouble shootIng guIDe
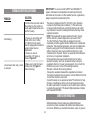
problem
Toolrunsslowly.
Automaticlinefeeddoesnot
feedmoreline.
solutIon
•Removebatteryfromtool.
•Checkthatthespoolhousing
canrotatefreely.Carefullyclean
itifnecessary.
•Checkthatthecuttingline
doesnotprotrudemorethan
approximately4-13/16inches
(122mm)fromthespool.
Ifitdoes,cutitoffsothatitjust
reachesthelinetrimmingblade.
•Morelineisfedwhentheline
shortenstoapproximately3
inches(76.2mm).Todetermine
ifthelineisnotfeeding,letline
wearpastthispoint.
problem
Automaticlinefeeddoesnot
feedmoreline.
solutIon
•Keepthetabsdepressedand
removethespoolfromthespool
housinginthetrimmerhead.
•Ensurethatthelineisnot
crisscrossedonthespoolas
detailedinfigure U.Ifitis,
unwindthecuttingline,then
winditbackonthespoolneatly
sothatthelinesdonotcross.
•Inspecttracksatthebottomof
spoolfordamage.Ifdamaged,
replacespool.
•Readthecodeonthebackof
spool.Ifitreads“PA66”call
customerserviceforareplacement.
Ifitreads“ABS”thisisnottheissue.
•Pullthecuttinglineuntilit
protrudesapproximately4-13/16
inches(122mm)fromthespool.If
insufficientcuttinglineisleftonthe
spool,installanewspoolofcutting
line.
•Alignthetabsonthespoolcap
withthecutoutsinthehousing.
•Pushthespoolcapontothehousing
untilitsnapssecurelyintoplace.
•Ifthecuttinglineprotrudes
beyondthetrimmingblade,cut
itoffsothatitjustreachestheblade.
Iftheautomaticlinefeedstilldoes
notworkorthespoolisjammed,try
thefollowingsuggestions:
•Carefullycleanthespooland
housing.
•Removethespoolandcheckifthe
leverinthespoolhousingcan
movefreely.

trouble shootIng contInueD
14
IMPORTANT: ToassureproductSAFETYandRELIABILITY,
repairs,maintenanceandadjustmentshouldbeperformedby
authorizedservicecentersorotherqualifiedserviceorganizations,
alwaysusingidenticalreplacementparts.
Thisdevicecomplieswithpart15oftheFCCrules.Operation
issubjecttothefollowingtwoconditions:(1)Thisdevicemay
notcauseharmfulinterference,and(2)thisdevicemustaccept
anyinterferencereceived,includinginterferencethatmaycause
undesiredoperation.
NOTE: Thisequipmenthasbeentestedandfoundtocomply
withthelimitsforaClassBdigitaldevice,pursuanttoPart
15oftheFCCRules.Theselimitsaredesignedtoprovide
reasonableprotectionagainstharmfulinterferenceinaresidential
installation.Thisequipmentgenerates,usesandcanradiateradio
frequencyenergyand,ifnotinstalledandusedinaccordance
withtheinstructions,maycauseharmfulinterferencetoradio
communications.However,thereisnoguaranteethatinterference
willnotoccurinaparticularinstallation.
Ifthisequipmentdoescauseharmfulinterferencetoradioor
televisionreception,whichcanbedeterminedbyturningthe
equipmentoffandon,theuserisencouragedtotrytocorrectthe
interferencebyoneormoreofthefollowingmeasures:
•Reorientorrelocatethereceivingantenna.
•Increasetheseparationbetweentheequipmentandreceiver.
•Connecttheequipmentintoanoutletonacircuitdifferentfromthat
towhichthereceiverisconnected.
•Consultthedealeroranexperiencedradio/TVtechnicianforhelp.
Changesormodificationstothisunitnotexpresslyapprovedby
thepartyresponsibleforcompliancecouldvoidtheuser’sauthority
tooperatetheequipment.ThisClassBdigitalapparatuscomplies
withCanadianICES-003.
servIce InformatIon
AllBlack&DeckerServiceCentersarestaffedwithtrained
personneltoprovidecustomerswithefficientandreliablepower
toolservice.Whetheryouneedtechnicaladvice,repair,orgenuine
problem
Overfeeding
Lineunravelswhencaporspool
isremoved.
solutIon
•Removethespoolandunwind
thecuttingline,thenwinditon
neatlyagain.Replacethespool
intothehousing.
•Ensureyouarecuttingwith
thetipoftheline(7inches
(177.8mm)fromthespool).
Usetheedgeguideifneededto
ensureproperspaceis
maintained.
•Ensureyouarenot
exceedinga10°angleas
showninfigure N1.
•Makesuretoparkthelinesin
holdingslots(S2)figure S
beforeremoving.

15
Importedby
Black&Decker(U.S.)Inc.,
701E.JoppaRd.
Towson,MD21286U.S.A.
factoryreplacementparts,contacttheBlack&Deckerlocation
nearestyou.Tofindyourlocalservicelocation,call:1-800-544-6986
or visit www.blackanddecker.com
full three-year home use warranty
Black&Decker(U.S.)Inc.warrantsthisproductforthreeyears
againstanydefectsinmaterialorworkmanship.Thedefective
productwillbereplacedorrepairedatnochargeineitheroftwo
ways:
Thefirst,whichwillresultinexchangesonly,istoreturntheproduct
totheretailerfromwhomitwaspurchased(providedthatthestore
isaparticipatingretailer).Returnsshouldbemadewithinthetime
periodoftheretailer’spolicyforexchanges(usually30to90days
afterthesale).Proofofpurchasemayberequired.Pleasecheck
withtheretailerfortheirspecificreturnpolicyregardingreturnsthat
arebeyondthetimesetforexchanges.
Thesecondoptionistotakeorsendtheproduct(prepaid)toa
Black&DeckerownedorauthorizedServiceCenterforrepairor
replacementatouroption.Proofofpurchasemayberequired.
Thiswarrantydoesnotapplytoaccessories.Thiswarrantygivesyou
specificlegalrightsandyoumayhaveotherrightswhichvaryfrom
statetostate.Shouldyouhaveanyquestions,contactthemanager
ofyournearestBlack&DeckerServiceCenter.Thisproductisnot
intendedforcommercialuse.
LATIN AMERICA:Thiswarrantydoesnotapplytoproductssold
inLatinAmerica.ForproductssoldinLatinAmerica,checkcountry
specificwarrantyinformationcontainedinthepackaging,callthe
localcompanyorseethewebsiteforwarrantyinformation.
FREE WARNING LABEL REPLACEMENT:Ifyourwarninglabels
becomeillegibleoraremissing,call1-800-544-6986 forafree
replacement.

16
TAILLE-BORDURE / COUPE-BORDURE
AVEC PILE AU LITHIUM DE 40 V MAX*
VOICI DES RENSEIGNEMENTS IMPORTANTS
QU’IL VOUS FAUT CONNAÎTRE :
•Lepare-maindoitêtreinstalléavantdedébuterletaillage
oulacoupesinonlemoteursurchauffera.
•UtiliserseulementunfilRONDde1,7mm(0,065po)
dediamètrelorsduremplacement(modèleAF-100de
B&Drecommandé),sinonl’appareilnefonctionnerapas
correctement.
•Éviterdefrapperlatêted’alimentationcontrelesol.En
effet,celaendommageralemécanismed’alimentation.
•Utiliseruniquementavecunbloc-pilesde36Voude40V
max*desérieLBdeB&D.
MODE D’EMPLOI
À LIRE AVANT DE RETOURNER CE PRODUIT
POUR QUELQUE RAISON QUE CE SOIT :
Sidesquestionsoudesproblèmessurgissentaprèsl’achatd’unproduit
Black&Decker,consulterlesiteWeb
HTTP://WWW.BLACKANDDECKER.COM/INSTANTANSWERS
Silaréponseestintrouvableouenl’absenced’accèsàl’Internet,
composerle1-800-544-6986de8hà17hHNE,dulundiauvendredi,
pourparleravecunagent.
Prièred’avoirlenumérodecataloguesouslamainlorsdel’appel.
pourobtenirdesréponsesinstantanément24heuresparjour.
CONSERVER CE MANUEL POUR UN USAGE ULTÉRIEUR.
Merci d’avoir choisi Black & Decker!
Consulter le site Web www.
BlackandDecker.com/NewOwner
pour enregistrer votre nouveau produit.
Numéro de modèle LST136
*Latensioninitialemaximaledubloc-piles(mesuréesanschargede
travail)estde40volts.Latensionnominaleestde36.

17
LIGNES DIRECTRICES EN MATIÈRE DE
SÉCURITÉ - DÉFINITIONS
Ilestimportantquevouslisiezetcompreniezcemoded’emploi.Les
informationsqu’ilcontientconcernentVOTRESÉCURITÉetvisentà
ÉVITERTOUTPROBLÈME.Lessymbolesci-dessousserventà
vousaideràreconnaîtrecetteinformation.
DANGER : Indiqueunesituationdangereuseimminentequi,
siellen’estpasévitée,causeralamortoudesgravesblessures.
AVERTISSEMENT : Indiqueunesituationpotentiellement
dangereusequi,siellen’estpasévitée,pourraitcauserlamort
oudegravesblessures.
MISE EN GARDE :Indiqueunesituationpotentiellement
dangereusequi,siellen’estpasévitée,pourraitcauserdes
blessuresmineuresoumodérées.
AVIS :Utilisésanslesymboled’alerteàlasécurité,indiqueune
situationpotentiellementdangereusequi,siellen’estpasévitée,
peutrésulterendesdommagesàlapropriété.
AVERTISSEMENT : Lorsquedesoutilsdejardinage
électriquessontutilisés,desprécautionsdebaseenmatièrede
sécuritédoiventtoujoursêtresuiviesafinderéduirelerisque
d’incendie,dechocélectriqueetdeblessurecorporelle,
notammentlessuivantes.
Lire toutes les directives
•TOUJOURS PORTER UNE PROTECTION OCULAIRE-Porter
deslunettesoudeslunettesprotectricesentouttempslorsquecet
outilestbranché.
•DISPOSITIF DE PROTECTION–Nepasutilisercetoutilsans
lesdispositifsdeprotectionenplace.
•S’HABILLER DE MANIÈRE APPROPRIÉE-Nepasporterde
vêtementsamplesnidebijoux.Ilspeuvents’enchevêtrerdans
lespiècesmobiles.Desgantsencaoutchoucetdeschaussures
adéquatesàsemellesencaoutchoucsontrecommandéslorsde
travauxàl’extérieur.Nepasutiliserl’outilaveclespiedsnusou
dessandalesouvertes.Porterdespantalonslongspourprotéger
vosjambes.Secouvrirlescheveuxs’ilssontlongs.
•FIL EN NYLON-Tenirlevisage,lesmainsetpiedsloindufilde
nylonrotatifentouttemps.
•LE FIL EN ROTATION EXÉCUTE UNE COUPE-Êtreattentif
lorsdetaillageautourdegrillagesetdeplates-bandes.
•TENIR ÉLOIGNÉ TOUS LES SPECTATEURS-Àunedistance
sécuritairedel’airedetravail,particulièrementlesenfants.
•AVERTISSEMENT IMPORTANT :lorsquel’outilestutilisé
commecoupebordure,despierres,morceauxdemétaletautres
objetspeuventêtreprojetésàhautevitesseparlefil.L’outilet
ledispositifdeprotectionsontconçuspourréduirelerisque.
Toutefois,lesprécautionsspécialessuivantesdoiventêtreprises
•S’ASSURERquetoutepersonneetanimauxsontéloignésd’au
moins30m(100pi).
•POUR RÉDUIRE LE RISQUEdeblessuresparricochet,travaillez
envouséloignantdetoutobjetsolidetelunmur,desmarches,de
grossespierres,d’arbres,etc.Soyeztrèsprudentlorsdetravaux
prèsd’objetssolideset,lecaséchéant,taillezoucoupezmanuellement.
•ÉVITER LES DÉMARRAGES ACCIDENTELS-Nepas
transporterd’outilbranchéavecledoigtsurladétente.
•NE PAS FORCER L’OUTIL-àtourneràunevitesseplusrapide
quecellepourlaquelleilestcapabledecouperefficacement.
•UTILISER LE BON OUTIL-Nepasutilisercetoutilpourtout
autretypedetravailsaufpourceluipourlequelilestprévu.
•NE PAS TROP TENDRE LES BRAS-Conserversonéquilibre
entouttemps.
•OUTIL ENDOMMAGÉ -Sivousfrappezoudevenezenchevêtrer
dansunobjet,arrêtezimmédiatementl’outil,débranchez-lepuis
inspectezpourtoutetracededommagesquidevrontêtreréparés
avantuneautreutilisation.Nepasutiliseravecunmoyeuouune
bobinebrisés.
•DÉBRANCHER L’OUTIL–Lorsqueinactif,lorsderemplacement
defilouavantunnettoyage.
•ÉVITER LES CONDITIONS ENVIRONNEMENTALES
DANGEREUSES-Nepasutiliserd’outilsélectriquesdansdes
AVERTISSEMENTS DE SÉCURITÉ ET
DIRECTIVES DE PREMIÈRE IMPORTANCE

18
lieuxhumidesoumouillés.Suivretouteslesdirectivesdece
moded’emploipouruneutilisationadéquatedevotreoutil.Nepas
utiliserl’outilsouslapluie.
•NE PAS UTILISERd’outilsélectriquesportatifsdansunmilieu
gazeuxoudéflagrant.Lesmoteursdecesoutilsproduisent
normalementdesétincellesquipourraientenflammerdesvapeurs.
•RANGER LES OUTILS INUTILISÉS À L’INTÉRIEUR–Lorsqu’ils
nesontpasutilisés,lesoutilsdoiventêtrerangésàl’intérieur,dansun
endroitsecetverrouillé,horsdeportéedesenfants.
–Nepasutiliserl’appareilencasdefatigue
oudemaladieousousl’influenced’alcool,dedroguesoude
médicaments.
•PRENDRE SOIN DES OUTILS ÉLECTRIQUES –Suivreles
directivesfigurantàlasectionEntretien.Maintenirlespoignées
sèches,propresetexemptesd’huileetdegraisse.
•VÉRIFIER LES PIÈCES ENDOMMAGÉES–Avanttoute
utilisationultérieuredel’appareilélectrique,undispositifde
protectionendommagé,outouteautrepièceendommagée,doit
êtreexaminésoigneusementafind’assurerunfonctionnement
adéquatselonsafonctionprévue.Vérifierl’alignementdespièces
mobiles,laprésencedegrippagedespiècesmobiles,derupture
•NEPASimmergerl’outildansl’eauoul’arroserauboyau.
ÉVITERlapénétrationdetoutliquidedansl’outil.
•NEPASrangerl’outilsurdesengraisoudesproduitschimiques
ouprèsdeceux-ci.
•NEPASnettoyeravecunnettoyeuràpression.
•Maintenirlespare-mainsenplaceetenétatdefonctionnement.
•Tenirlesmainsetlespiedséloignésdelazonedecoupe.
AVERTISSEMENT : Nepasutiliserl’outilsiladétentene
fonctionnepas.Toutoutilquinepeutêtrerégléparladétenteest
dangereuxetdoitêtreréparé.
CONSERVER CES MESURES.
L’étiquetteapposéesurvotreoutilpourraitcomprendrelessymboles
suivants.Lessymbolesetleursdéfinitionssontindiquésci-après:
V ....................volts A..................ampères
Hz .................. hertz W ................watts
min ................minutes
ou AC.....courant
alternatif
ou DC......courant continu
n
o ................. sous vide
..................Construction de classe I
.................borne de
(mis à la terre)
mise à la minute
.................
Construction de classe II .............. symbole
RPM ou .../min..........tours à la minute d´avertissement
AVERTISSEMENT : Certaines poussières produites par cet
util contiennent des produits chimiques reconnus par l’État de
la Californie comme pouvant causer le cancer, les anomalies
congénitales et d’autres dangers pour la reproduction. Voici
quelques exemples de ces produits chimiques :
•composésprésentsdanslesengrais
•composésprésentsdanslesinsecticides,herbicidesetpesticides
•arsenicetchromeprovenantdeboistraitéchimiquement
Pourréduirevotreexpositionàcesproduitschimiques,porter
unéquipementdesécuritéapprouvécommeunmasqueanti-
poussièresconçuspécialementpourfiltrerlesparticulesmicroscopiques.
CONSERVER CES DIRECTIVES : cemoded’emploicomprend
d’importantesdirectivesdesécuritépourleschargeursdepiles.
•Avantd’utiliserlechargeur,liretouteslesdirectivesettousles
avertissementsfigurantsurlechargeur,lebloc-pilesetleproduit
utiliséaveclebloc-piles.
AVERTISSEMENT : risque de choc électrique. Éviterla
pénétrationdetoutliquidedanslechargeur.
MISE EN GARDE : risque de brûlure. Pourréduirelerisque
deblessures,chargeruniquementdespilesBlack & Decker
conseillées.D’autrestypesdepilespeuventexploseretprovoquer
desblessurescorporellesetdesdommages.

19
MISE EN GARDE : danscertainescirconstances,lorsquele
chargeurestbranchéaublocd’alimentation,lechargeurpeutêtre
court-circuitépardescorpsétrangersconducteurstelsque,maissans
s’ylimiter,lalained’acier,lepapierd’aluminiumoutouteaccumulation
departiculesmétalliques.Ilsdoiventêtremaintenusàdistancedes
ouverturesduchargeur.Débranchersystématiquementcelui-cisi
aucunbloc-pilesn’yestinséré.Débrancherlechargeuravanttout
nettoyage.
•NE PAS tenter de charger le bloc-piles avec autre chose qu’un
chargeur de marque. Les chargeurs et blocs-piles sont conçus
spécialement pour fonctionner ensemble.
•Ces chargeurs ne sont pas destinés à être utilisés à d’autres fins
que celles de charger les piles rechargeables conseillées Black
& Decker. Toute autre utilisation risque de provoquer un incendie,
un choc électrique ou une électrocution.
•Protéger le chargeur de la pluie et de la neige.
•Tirer la fiche plutôt que le cordon pour débrancher le chargeur ou
pour débrancher les cordons à l’aide de la fonction de guirlande.
Cela permet de réduire le risque d’endommager la fiche ou le cordon
d’alimentation.
• S’assurer que le cordon est situé en lieu sûr de manière à ce que
personne ne marche ni ne trébuche dessus ou à ce qu’il ne soit
pas endommagé ni soumis à une tension.
•Ne pas utiliser de rallonge à moins que cela ne soit absolument
nécessaire.L’utilisation d’une rallonge inadéquate risque d’entraîner
un incendie, un choc électrique ou une électrocution.
•Pour la sécurité de l’utilisateur, utiliser une rallonge de calibre
adéquat (AWG, American Wire Gauge [calibrage américain
normalisé des fils]).Plus le numéro de calibre de fil est petit et plus
sa capacité est grande, par exemple un calibre 16 a plus de capacité
qu’un calibre 18. Si plus d’une rallonge est utilisée pour obtenir la
longueur totale, s’assurer que chaque rallonge présente au moins le
calibre de fil minimum.
1. Interrupteur marche/
arrêt
2. Poignée
3. Bouton de
verrouillage
4. Bloc-piles
5. Indicateur de charge
6. Contrôle de
puissance
7. Poignée auxiliaire
8. Tendeur pour régler
la hauteur
9. Tête de coupe
10. Guide de coupe
11. Pare-main
12. Boîtier de la bobine
8
3
4
7
COMPOSANTS
2
10
1
11
12
9
5
6
DIRECTIVES DE SÉCURITÉ IMPORTANTES
POUR LES CHARGEURS DE PILES
A

20
Calibre de fil minimum recommandé pour les rallonges
•Ne pas installer le chargeur sur un mur ni le fixer de manière
permanente sur toute surface. Le chargeur est destiné à une
utilisation sur une surface plane et stable (c.-à-d. un dessus de
table ou d’établi).
•Ne pas faire fonctionner le chargeur si la fiche ou le cordon est
endommagé;les remplacer immédiatement.
•Ne jamais se servir d’un chargeur qui a subi un choc violent,
qui est tombé par terre ou qui est endommagé de quelque
manière que ce soit. Le faire vérifier dans un centre de réparation
autorisé.
•Ne pas démonter le chargeur; confier l’entretien ou la réparation
de l’appareil à un centre de réparation autorisé. Le remontage non
conforme du chargeur comporte des risques de choc électrique,
d’électrocution ou d’incendie.
•Débrancher le chargeur avant de le nettoyer. Cela réduira le
risque de choc électrique. Le risque ne sera pas éliminé en enlevant
simplement le bloc-piles.
•NE JAMAIS relier deux chargeurs ensemble.
•Le chargeur est conçu pour être alimenté en courant
domestique standard
(120 V). Ne pas utiliser une tension supérieure pour le chargeur.
CONSERVER CES DIRECTIVES
AVERTISSEMENT : Pour un fonctionnement sûr, lire le présent
manuel et les manuels fournis avec l’outil avant d’utiliser le chargeur.
Lebloc-pilesn’estpascomplètementchargéàlasortiede
l’emballage.Avantd’utiliserlebloc-pilesetlechargeur,lireles
directivesdesécuritéci-après.Respecterensuitelesconsignesde
chargementdécrites.
LIRE TOUTES LES DIRECTIVES.
•Ne pas incinérer le bloc-piles, même s’il est très endommagé ou
complètement usé, car il pourrait exploser au contact des flammes.
Des vapeurs et des matières toxiques sont dégagées lorsque les
blocs-piles sont incinérés.
• Ne pas charger ou utiliser de pile dans un milieu déflagrant, en
présence de liquides, de gaz ou de poussière inflammables.
Insérer ou retirer la pile du chargeur peut enflammer de la poussière
ou des émanations.
•Si le contenu de la pile entre en contact avec la peau, laver
immédiatement la zone touchée au savon doux et à l’eau.Si le
liquide de la pile entre en contact avec les yeux, rincer l’œil ouvert à
l’eau pendant 15 minutes ou jusqu’à ce que l’irritation cesse. Si des
soins médicaux sont nécessaires, l’électrolyte des piles au lithium-ion
est composé d’un mélange de carbonates organiques liquides et de
sels de lithium.
•Le contenu des éléments de pile ouverts peut provoquer une
irritation respiratoire. Exposer la personne à de l’air frais. Si les
symptômes persistent, obtenir des soins médicaux.
AVERTISSEMENT : Risque de brûlure. Le liquide de la pile
peut s’enflammer s’il est exposé à des étincelles ou à une flamme.
•Chargeruniquementlesblocs-pilesaumoyendechargeursBlack &
Decker.
•NE PAS éclabousser le bloc-piles ni l’immerger dans l’eau
ou dans tout autre liquide.Cela peut entraîner une défaillance
prématurée de l’élément.
Calibre minimal des cordons de rallonge
Tension Longueur totale du cordon en pieds
120V 0-25 26-50 51-100 101-150
(0-7,6m)(7,6-15,2m)(15,2-30,4m)(30,4-45,7m)
240V 0-50 51-100 101-200 201-300
(0-15,2m)(15,2-30,4m)(30,4-60,9m)(60,9-91,4m)
Intensité (A)
Au Au Calibremoyendesfils(AWG)
moins plus
0 - 6 18 16 16 14
6 - 10 18 16 14 12
10 - 12 16 16 14 12
12 - 16 14 12 Nonrecommandé
DIRECTIVES DE SÉCURITÉ IMPORTANTES
POUR LES BLOCS-PILES
La page est en cours de chargement...
La page est en cours de chargement...
La page est en cours de chargement...
La page est en cours de chargement...
La page est en cours de chargement...
La page est en cours de chargement...
La page est en cours de chargement...
La page est en cours de chargement...
La page est en cours de chargement...
La page est en cours de chargement...
La page est en cours de chargement...
La page est en cours de chargement...
La page est en cours de chargement...
La page est en cours de chargement...
La page est en cours de chargement...
La page est en cours de chargement...
La page est en cours de chargement...
La page est en cours de chargement...
La page est en cours de chargement...
La page est en cours de chargement...
La page est en cours de chargement...
La page est en cours de chargement...
La page est en cours de chargement...
La page est en cours de chargement...
La page est en cours de chargement...
La page est en cours de chargement...
La page est en cours de chargement...
La page est en cours de chargement...
-
 1
1
-
 2
2
-
 3
3
-
 4
4
-
 5
5
-
 6
6
-
 7
7
-
 8
8
-
 9
9
-
 10
10
-
 11
11
-
 12
12
-
 13
13
-
 14
14
-
 15
15
-
 16
16
-
 17
17
-
 18
18
-
 19
19
-
 20
20
-
 21
21
-
 22
22
-
 23
23
-
 24
24
-
 25
25
-
 26
26
-
 27
27
-
 28
28
-
 29
29
-
 30
30
-
 31
31
-
 32
32
-
 33
33
-
 34
34
-
 35
35
-
 36
36
-
 37
37
-
 38
38
-
 39
39
-
 40
40
-
 41
41
-
 42
42
-
 43
43
-
 44
44
-
 45
45
-
 46
46
-
 47
47
-
 48
48


BLACK+DECKER LCC140 Guide d'installation
- Catégorie
- Coupe-herbe
- Taper
- Guide d'installation
dans d''autres langues
Documents connexes
-
Black & Decker LST136 Manuel utilisateur
-
-
-
-
-
-
BLACK+DECKER LST140C Manuel utilisateur
-
-
-
Black & Decker GLC3630L Le manuel du propriétaire