Valor 1800DWKV2 Le manuel du propriétaire
- Taper
- Le manuel du propriétaire

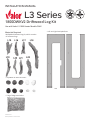
• Left and right hand platforms
Left Right
1800DWKV2 Driftwood Log Kit
Use with Valor L3 1800 Heater Models ONLY
INSTALLATION MANUAL
L3 Series
4008051-01
©2019, Miles Industries Ltd.
Materials Required
1800DWKV2 Driftwood Log Kit, which contains:
• 8 Driftwood logs
• 10 pebbles of assorted colors
• 1 bag of beige vermiculite

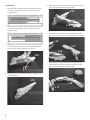
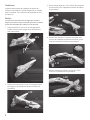
Installation
1. Place left hand media platform around the burner
as shown. The platform rests in place and is not
screwed down.
2. Place right hand media platform around the burner
as shown. The platform rests in place and is not
screwed down.
3. Find log L15 and turn it over. Locate the right angle
cutout in the bottom of the log. This corresponds
with the right angle of the burner corner.
4. Place log L15 over the burner corner, resting on the
media platform.
L15
L15
5. Place log L16 on top of L15, across the burner, to the
front of the media platform as shown.
6. Place log L17 on top of the pilot shield, across the
burner, to the front of the media platform as shown.
7. Place the pin on log L18 into the hole on the rear
media platform. Place L18 over the burner to the
front of the media platform as shown.
L15
L16
L15
L16
L17
L17
L18
2

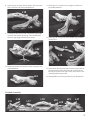
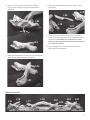
11. Place log L21 on top of L22, resting on the front of
the media platform.
12. Place log L20 on the rear of the media tray, between
L18 and L22.
13. Place vermiculite by hand (do not pour vermiculite as
the bag contains dust particles that could block the
burner ports) and cover the burner, and onto the sur-
rounding media tray as well.
14. Place pebbles on the vermiculite to your preference.
L22
L21
L22
L21
L20
L18
8. Place log L19 on top of L18 as shown. Rest the other
end on the front of the media platform.
9. Find log L22 and turn it over. Locate the right angle
cutout in the bottom of the log. This corresponds
with the right angle of the burner corner.
10. Place log L22 over the burner corner, resting on the
media platform.
L18
L19
L22
L22
Finished AssemblyL22
L22 L21
L20
L19
L18
L17L16
L15
3

Designed and Manufactured by / for
Miles Industries Ltd.
190 – 2255 Dollarton Highway, North Vancouver, B.C., CANADA V7H 3B1
Tel. 604-984-3496 Fax 604-984-0246
www.valorfi replaces.com
Because our policy is one of constant development and improvement, details may vary slightly from those given in this
publication.
4
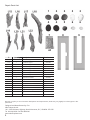
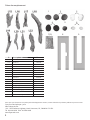
ID Quantity Description Part Number
L15 1 Drif twood Log L15 40 07985
L16 1 Drift wood Log L16 4007986
L17 1 Drif twood Log L17 40 07987
L18 1 Drift wood Log L18 4007988
L19 1 Drift wood Log L19 4007989
L20 1 Driftwood Log L20 4007990
L21 1 Driftwood Log L21 4007991
L22 1 Driftwood Log L22 4007992
1 1 Brown Beach Pebble 4003082
2 2 Grey Beach Pebble 4003083
3 2 White Beach Pebble 4003084
4 2 Black Beach Pebble 4003085
5 1 Small Grey Beach Pebble 4003086
6 2 Beige Beach Pebble 4003087
7 2 Bag - Grade 1A Beige Vermiculite 4002940
8 1 Right Hand Platform 4004955AH
9 1 Left Hand Platform 4004956AH
Repair Parts List
7
x2
89
1 2 2 3 3
4 4 5 6 6

Bois de grève 1800DWKV2
Utilisez avec les foyers Valor L3 1800 SEULEMENT
GUIDE D’INSTALLATION
Série L3
Pièces requises
Ensemble Bois de grève 1800DWKV2 contenant :
• 8 bûches
• 10 galets
• 1 sac de vermiculite
• Plateforme de métal en 2 pièces
Plateforme côté gauche Plateforme côté droit
5

Plateforme
Placez les deux pièces de la plateforme autour du
brûleur tel qu’indiqué. La pièces de gauche est coupée
pour la veilleuse. Les ouvertures de la plateforme vont
en-dessous.
Bûches
Les directives données dans les pages qui suivent in-
diquent la meilleure façon de placer les bûches et autres
pièces de l’ensemble pour obtenir un feu optimal.
1. Placez la bûche L15 sur le coin arrière gauche du
brûleur. Une encoche à angle droit sous la bûche
aide à la localiser.
2. Placez le bout étroit de L16 sur L15 et posez le bout
plus large sur la plateforme devant le brûleur tel
qu’indiqué.
3. Placez le bout large de L17 sur l’écran de la veilleuse
et le bout étroit sur la plateforme devant le brûleur
tel qu’indiqué.
4. Placez L18 à côté de L17 insérant sa cheville dans
un trou de la plateforme derrière le brûleur; posez
l’autre bout devant le brûleur tel qu’indiqué.
5. Placez L19 devant le brûleur, un bout sur L18 et
l’autre sur la plateforme tel qu’indiqué.
L15
L15
L15
L16
L15
L16
L17
L17
L18
L18
L19
6

8. Placez L20 derrière le brûleur entre L18 et L22 tel
qu’indiqué.
9. Placez de la vermiculite à la main sur le brûleur le
couvrant d’une couche puis sur la plateforme autour
des bûches. NE VERSEZ PAS à partir du sac pour
éviter que de la poussière de vermiculite ne bloque
les orifices du brûleur.
10. Placez des galets sur la vermiculite selon la pré-
férence du consommateur.
6. Placez L22 sur le coin arrière droit du brûleur.
Une encoche à angle droit sous la bûche aide à
la localiser.
7. Placez le bout étroit de L21 sur L22 puis le bout plus
large sur la plateforme devant le brûleur.
Ensemble installé
L22 L21
L20
L19
L18
L17L16
L15
L22
L22
L22
L21
L22
L21
L20
L18
7

8
ID Description PIèce n
o
L15 Bûche L15 40 07985
L16 Bûche L16 40 07986
L17 Bûche L17 40 07987
L18 Bûche L18 40 07988
L19 Bûche L19 40 07989
L20 Bûche L20 4007990
L21 Bûche L21 4007991
L22 Bûche L22 4007992
1Galet brun 4003082
2 Galets gris (2) 4003083
3 Galets blancs (2) 4003084
4 Galets noirs (2) 4003085
5 Petit galet gris 4003086
6 Galets beiges (2) 4003087
7 Vermiculite beige grade 1A - 2 sacs 4002940
8 Plateforme, côté droit 4004955AH
9 Plateforme, côté gauche 4004956AH
Pièces de remplacement
23
456
7 (2) 8 9
1
Conçue et fabriquée par / pour
Miles Industries Ltd.
190 – 2255 Dollarton Highway, North Vancouver, BC, CANADA V7H 3B1
Tél. 604-984-3496 Téléc. 604-984-0246
www.foyervalor.com
Parce que nous favorisons une politique de développement continu, certains détails de la présente publication peuvent varier.
-
 1
1
-
 2
2
-
 3
3
-
 4
4
-
 5
5
-
 6
6
-
 7
7
-
 8
8


Valor 1800DWKV2 Le manuel du propriétaire
- Taper
- Le manuel du propriétaire
dans d''autres langues
- English: Valor 1800DWKV2 Owner's manual

