TP-LINK tp-link Tapo D130 Wired Video Doorbell Mode d'emploi
- Taper
- Mode d'emploi

*Images may dier from your actual product.
©2023 TP-Link 7106510017 REV1.0.0
Tapo Wired Video Doorbell
Tapo D130
Quick Start Guide
Before You Start
OR
Tapo
WARNING: Risk of Electric Shocks
• Ensure that your existing doorbell works by ringing the
doorbell.
• Locate your existing doorbell chime.
• Make sure the doorbell is in an area with a strong Wi-Fi signal.
• Disconnect power at the fuse or circuit breaker before
installing.
• You can always nd detailed wiring and installation instructions
in the Tapo app.
Take care to avoid electric shocks.
*Recommended Installation Height: 1.2 m (4 ft) above the ground
Option 2. Mount to the wall
Install Your Doorbell
03 /
Flip the page over to complete setup.
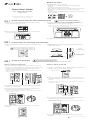
1. Remove your existing doorbell on the door. Disconnect the
wires.
2. (Optional) Select the mounting wedge to adjust the viewing
angle of the doorbell.
Preparations for Installing Your Doorbell
02 /
Without Mounting Wedge
Without
Mounting Wedge
With Vertical
Mounting Wedge
With Horizontal Mounting Wedge
15°
5°
Take care to avoid electric shocks.
01 / Install Jumper Wire for Your Existing Chime
1. Turn o the circuit breaker. Make sure the power is o by
ringing your doorbell a few times.
OFF
Take care to avoid electric shocks.
2. Remove the chime cover and take a photo of the wiring in
case you want to reconnect it.
Note: If your doorbell chime has dierent markings, refer to instructions in
the Tapo app or consult a licensed electrician.
3. Slightly loosen the screws for the Front and Trans of your
front doorbell, then insert the jumper wire.
4. Tighten the screws and replace the chime cover.
Option 1. Stick to a clean wall
*This equipment shall be installed at a height of fewer than 2 meters.
1. Attach the included adhesive to the back of the bracket or the
wedge you have selected. If you use the wedge, ax the
bracket and the wedge with screws.
4. Mount the doorbell to the bracket and turn on the circuit
breaker.
3. Connect the wires to the two terminals at the back of the
doorbell, and tighten the terminal screws.
2. Route the wires through the bracket. Stick the bracket with
adhesive to a clean wall.
Note: This is applicable with tile, glass, marble, metal, stainless steel, and
hard wall surfaces.
Note: If the wires are too short, use the included extension wires and wire
nuts to make them longer.
WedgeAdhesiveAdhesive
3M
3M
3M
3M
1. Route the wires through the mounting template and stick the
template. Drill two holes where indicated.
Φ=6 mm (15/64 in.)
Note: When mounting to uneven walls, stick the foam pad on the back of
the bracket or wedge.
2. Route the wires through the bracket. Insert two anchors into
the holes and use the screws to ax the bracket over the
anchors.
3. Connect the wires to the two terminals at the back of the
doorbell, then tighten the terminal screws.
4. Mount the doorbell to the bracket and turn on the circuit
breaker.
Note: If the wires are too short, use the included extension wires and wire
nuts to make them longer.
Wedge
(Optional)
Foam Pad
(Optional)

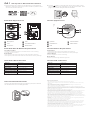
04 / Set Up Your Doorbell and Chime
1. Download the Tapo app from the App Store or Google Play.
Open the app and log in with your TP-Link ID. If you don't have
an account, create one rst.
OR
Doorbell Appearance
Doorbell Slot & Button Explanation Chime Button Explanation
Chime Appearance
Press to adjust the volume of the ring.
Volume Button
Volume Button
Press to cycle through dierent ringtones.
Music Button
Music Button
1
Reset Button
Reset Button
Ring Button
Lens
LED
microSD Card Slot
microSD Card Slot
Loosen the screws and insert a microSD card for local recording.
*microSD card not included.
Reset Button
•Press and hold for 5 seconds: Reset Wi-Fi settings
•Press and hold for 10 seconds: Reset to factory settings
•Use a pin to press and hold for 5 seconds: Reset Wi-Fi settings
•Use a pin to press and hold for 10 seconds: Reset to factory settings
1
1
Microphone
1
2
2
2
3
3
3
Reset Button
LED
Speaker
1
2
3
55
5 5
6
6
4
4
4 4
2. Tap the button in the app and select your model. Follow
the instructions in the Tapo app to set up your doorbell. Then
plug in your chime and pair with the doorbell.
Doorbell LED Indication
Blinking red and green
Blinking red slowly
Solid white
Blinking red quickly
Solid red
Blinking green quickly
Solid amber
Starting up
Connected to the cloud
Ready for setup
Connecting to Wi-Fi
Connected to Wi-Fi
Doorbell resetting
Doorbell updating
Blinking red and green
Blinking red slowly
Solid green
Blinking red quickly
Solid red
Blinking green quickly
Solid amber
Starting up
Connected to the cloud
Ready for setup
Connecting to Wi-Fi
Connected to Wi-Fi
Chime resetting
Chime updating
Chime LED Indication
How to Detach Doorbell
Use the doorbell detaching pin provided if you wish to detach
the doorbell from the mounting bracket.
Safety Information
• Do not use the device where wireless devices are not allowed.
• Keep the device away from re or hot environments. DO NOT immerse in water or any
other liquid.
• Do not disassemble, repair or modify the product.
• Do not use the product if the casing has been broken. Danger of electric shock.
• Never touch the product with wet hands.
• Do not place near automatically controlled devices such as re alarms. Radio waves
emitted from this product may cause such devices to malfunction resulting in an accident.
• Observe restrictions on using wireless products in fuel depots, chemical plants or when
blasting operations are in progress.
• Do not use liquid to clean the product. Only use a dry cloth.
• Never put metal objects inside the product. If a metal object enters the product turn o
the circuit breaker and contact an authorised electrician.
• This product is not intended to be used when providing medical care. Consult the
manufacturer of any personal medical devices, such as pacemakers or hearing aids to
determine if they are adequality shielded from external RF (radio frequency) energy.
• Do not use this product in health care facilities. Hospitals or health care facilities may be
using equipment that could be sensitive to external RF energy.
• Do not use this product near water for example near a bath tub, wash bowl, kitchen sink or
laundry tub, in a wet basement or near a swimming pool.
• The product should be kept free from excessive smoke, dust or high temperature and
vibration.
• This product should not be exposed to direct sunlight
• Do not place heavy objects on top of the product.
• This product may interfere with other electronic products such as TV, radios, personal
computers, phones or other wireless devices.
• This equipment can be powered only by equipment that complies with Power Source
Class 2 ( PS2) or Limited Power Source(LPS) dened in the standard of IEC 62368-1.
• Doorbell Operating Temperature: -20 °C ~ 45°C (-4°F ~ 113°F)
• Chime Operating Temperature: 0 °C ~ 40°C (32°F ~ 104°F)
Please read and follow the above safety information when operating the device. We cannot
guarantee that no accidents or damage will occur due to improper use of the device.
Please use this product with care and operate at your own risk.
microSD

Radiation Exposure Statement:
This EUT is compliance with SAR for general population/uncontrolled exposure limits in
RSS-102 and had been tested in accordance with the measurement methods and
procedures specified in IEEE 1528 and IEC 62209. This equipment should be installed and
operated with minimum distance 1.0 cm between the radiator and your body. This device
and its antenna(s) must not be co-located or operating in conjunction with any other antenna
or transmitter.
Déclaration d'exposition aux radiations :
Cet adaptateur est conforme au SAR pour la population générale/limites d'exposition non
contrôlées dans RSS-102 et a été testé conformément aux méthodes et procédures de
mesure spécifiées dans IEEE 1528 et CEI 62209. Cet équipement doit être installé et utilisé
avec une distance minimale de 5 mm entre le radiateur et votre corps. Cet appareil et ses
antennes ne doivent pas être situés ou fonctionner en conjonction avec une autre antenne
ou un autre émetteur.
Radiation Exposure Statement:
This equipment complies with IC radiation exposure limits set forth for an uncontrolled
environment. This equipment should be installed and operated with minimum distance 20cm
between the radiator & your body.
Déclaration d'exposition aux radiations:
Cet équipement est conforme aux limites d'exposition aux rayonnements IC établies pour un
environnement non contrôlé. Cet équipement doit être installé et utilisé avec un minimum de
20 cm de distance entre la source de rayonnement et votre corps.
Industry Canada Statement
CAN ICES-3 (B)/NMB-3(B)
Canadian Compliance Statement
This device contains licence-exempt transmitter(s)/receiver(s) that comply with Innovation,
Science and Economic Development Canada’s licence-exempt RSS(s). Operation is subject
to the following two conditions:
(1) This device may not cause interference.
(2) This device must accept any interference, including interference that may cause
undesired operation of the device.
L’émetteur/récepteur exempt de licence contenu dans le présent appareil est conforme aux
CNR d’Innovation, Sciences et Développement économique Canada applicables aux
appareils radio exempts de licence. L’exploitation est autorisée aux deux conditions
suivantes :
1) L’appareil ne doit pas produire de brouillage;
2) L’appareil doit accepter tout brouillage radioélectrique subi, même si le brouillage est
susceptible d’en compromettre le fonctionnement.
FCC compliance information statement
This equipment has been tested and found to comply with the limits for a Class B digital
device, pursuant to part 15 of the FCC Rules. These limits are designed to provide
reasonable protection against harmful interference in a residential installation. This
equipment generates, uses and can radiate radio frequency energy and, if not installed
and used in accordance with the instructions, may cause harmful interference to radio
communications. However, there is no guarantee that interference will not occur in a
particular installation. If this equipment does cause harmful interference to radio or
television reception, which can be determined by turning the equipment off and on, the
user is encouraged to try to correct the interference by one or more of the following
measures:
•Reorient or relocate the receiving antenna.
•Increase the separation between the equipment and receiver.
•Connect the equipment into an outlet on a circuit different from that to which the
receiver is connected.
•Consult the dealer or an experienced radio/ TV technician for help.
This device complies with part 15 of the FCC Rules. Operation is subject to the
following two conditions:
1)This device may not cause harmful interference.
2)This device must accept any interference received, including interference that may
cause undesired operation.
Any changes or modifications not expressly approved by the party responsible for
compliance could void the user’s authority to operate the equipment.
Note: The manufacturer is not responsible for any radio or TV interference caused by
unauthorized modifications to this equipment. Such modifications could void the user’s
authority to operate the equipment.
FCC RF Radiation exposure Statement
This equipment complies with FCC RF radiation exposure limits set forth for an
uncontrolled environment. This device and its antenna must not be co-located or
operating in conjunction with any other antenna or transmitter.
“To comply with FCC RF exposure compliance requirements, this grant is applicable to
only Mobile Configurations. The antennas used for this transmitter must be installed to
provide a separation distance of at least 20 cm from all persons and must not be co-
located or operating in conjunction with any other antenna or transmitter.”
-
 1
1
-
 2
2
-
 3
3


TP-LINK tp-link Tapo D130 Wired Video Doorbell Mode d'emploi
- Taper
- Mode d'emploi
dans d''autres langues
Documents connexes
Autres documents
-
Maximus VD01-05A1W-BK Manuel utilisateur
-
Wyze WVDPC Mode d'emploi
-
REOLINK Video Doorbell PoE Video Doorbell WiFi Manuel utilisateur
-
eufy Security T8210C Mode d'emploi
-
Wyze WVDB1A Mode d'emploi
-
 ADT Pulse Pulse DBC835 HD DoorBell Camera Le manuel du propriétaire
-
Netatmo NDBUS Guide d'installation
-
Lorex B241AJ Series Mode d'emploi
-
-
MAXHUB UCS10 Manuel utilisateur
