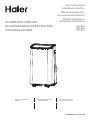
Haier QPWA14YZMW Le manuel du propriétaire
- Catégorie
- Climatiseurs mobiles
- Taper
- Le manuel du propriétaire

49-5000468 Rev. 1 02-21 GEA
Owner’s Manual and
Installation Instruction
Manual del propietario y
instrucciones de instalación
Manual d’utilisation et
instructions d’installation
QPCA09
QPCA10
QPCA12
El diseño puede variar según
el número de modelo La conception peut varier
selon le numéro de modèle
Design may vary by model
number
Portable Air Conditioner
Accondicionadores De Aire Para Sala
Climatiseur portable

249-5000468 Rev. 1
ENGLISH

49-5000468 Rev. 1 3
ENGLISH
TABLE OF CONTENTS
RECORD KEEPING
Thank you for purchasing this Haier product. This user manual
will help you get the best performance from your new air
conditioner.
Para referencia futura, registre el modelo y el número de serie
ubicados en el deshumidificador y la fecha de compra.
Staple your proof of purchase to this manual to aid in
obtaining warranty service if needed.
____________________________________________________
Model number
____________________________________________________
Serial number
____________________________________________________
Date of purchase
HAIER WEBSITE
Have a question or need assistance with your appliance? Try the Haier Website 24 hours a day, any day of the year! You
can also shop for more great Haier products and take advantage of all our on-line support services designed for your
convenience. In the US: Haierappliances.com
IMPORTANT SAFETY INFORMATION .............................................................................. 4
CONTROLS .......................................................................................................5
CARE AND CLEANING ............................................................................................ 8
INSTALLATION INSTRUCTIONS ................................................................................. 10
TROUBLESHOOTING ........................................................................................... 14
WIFI SETUP ..................................................................................................... 15
LIMITED WARRANTY .............................................................................................16

449-5000468 Rev. 1
ENGLISH
IMPORTANT SAFETY INSTRUCTIONS
WARNING To reduce the risk of fire, electrical
shock, injury to persons, or damage when using the air
conditioner, follow basic precautions, including the
following:
• Read all of the instructions before using this appliance.
• Plug into a grounded 3 prong outlet.
• Do not remove ground prong.
• Do not use an adapter.
• Do not use an extension cord.
• Do not operate the air conditioner if it has a damaged
cord or plug, if it is not working properly, or if it has been
damaged or dropped.
• The air conditioner should be serviced only by qualified
service personnel. Call an authorized service company
for examination, repair, or adjustment.
• Disconnect power before servicing.
• Disconnect power before cleaning.
NOTE: Turning off power by pressing the Power button
does NOT disconnect the appliance from the power
supply.
• Do not install or use the air conditioner in any area where
the atmosphere contains combustible gases or where
the atmosphere is contaminated. Avoid any chemicals
coming in contact with your air conditioner.
• Do not store anything directly on top of the air
conditioner.
• Use two or more people to move and install air
conditioner.
• Never operate the air conditioner without the filters in
place.
• Do not use the air conditioner near a bathtub, shower or
wash basin or other wet area.
SAFETY INFORMATION
IMPORTANT SAFETY INFORMATION
READ ALL INSTRUCTIONS BEFORE USING THE APPLIANCE
READ AND SAVE THESE INSTRUCTIONS

49-5000468 Rev. 1 5
ENGLISH
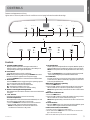
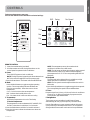
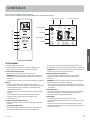
Features and appearance will vary.
Lights next to the touch pads on the air conditioner control panel indicate the selected settings.
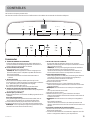
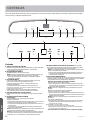
CONTROLS
Controls
A. CONTROL PANEL DISPLAY
Displays the Set Temperature in degrees Fahrenheit or
degrees Celsius, or the hours remaining in a Time Delay. The
corresponding indicator light will illuminate.
B. Power Button
Turns ON/OFF power to the air conditioner.
NOTE: Turning off power by pressing the POWER button does
NOT disconnect the appliance from the power supply.
• Press the POWER button. The Power indicator will illuminate.
C. Mode Button
Press the MODE button to toggle among the operating options.
The corresponding indicator will illuminate:
Cool – Cools the room to the set temperature
Dry – Reduces the humidity in the room
Fan – Circulates the air in the room without cooling.
D. Remote Control Signal Receiving Window
Aim the Remote Control at this window so the Control will receive
the signal.
E. + and – Buttons
Adjusts the Temperature or Hours in Time Delay.
To Set the Temperature:
The temperature can be set between 61ºF and 89ºF (17ºC and
30º C) when the air conditioner is in Cool mode.
1. Press the MODE button until the Cool mode is selected.2
2. Press the + or – buttons to select the Temperature.
NOTE: The temperature cannot be set when the air
conditioner is in either Fan or Dry mode.
F. Fan Speed Button
The fan speed can be adjusted from Low speed, Medium speed, to
High speed when the air conditioner is either in Cool or Fan mode.
NOTE: The fan speed cannot be adjusted when the unit is in Dry
mode.
• Press the Fan Speed button to toggle among the three speeds.
The corresponding fan speed indicator will illuminate.
G. Timer Button
Program a time from (1-hour to 24-hours) for the air conditioner
to turn Off or On. When a Time Delay is programmed, the Timer
indicator light will illuminate.
While the air conditioner is operating:
1. Press the TIMER button.
2. Press the + or – buttons to select the number of hours you want
the air conditioner to continue to operate before turning Off.
NOTE: Wait approximately 5 seconds for the Turn-Off time to be
saved.
While the air conditioner is off:
1. Press the TIMER button.
2. Press the + or – buttons to select the number of hours you want
the air conditioner to remain off before turning On.
NOTE: Wait approximately 5 seconds for the Turn-On time to be
saved.
To cancel the timer:
• Press the Timer button once, the hours remaining will flash, press
the timer button again and the timer will be canceled.
H. WiFi Connect Pad (on some Models)
1. Connect your air conditioner to WiFi router.
2. Press and hold the TIMER button for 3 seconds to connect the
app or disconnect the app.
Refer to the “WiFi Set up” section for more information.
Temp / Time
HighMedLowCool Fan Dry
GF
E
DCB
A
H (on some models)
A
FEDCB GH

649-5000468 Rev. 1
ENGLISH
Cool Mode
Use the COOL mode for cooling.
To set the COOL mode:
1. Press the MODE pad until the COOL indicator light is lit.
2. Press the FANóäç÷òöè÷ÑÒÐÑÖÎÍÒÞÖòõÕØàéäñ
speed.
3. Press + or - to set the desired temperature between 61°F
and 89°F in 1°F increments.
After settings have been made, the display will change back
to show the room temperature.
The temperature control is used to maintain the room
temperature. The compressor will cycle on and off to keep
the room at the set level of comfort. Set the temperature
control at a lower number and the indoor air will become
cooler. Set the temperature control at a higher number
and the indoor air will become warmer. NOTE: If the air
conditioner is off and is then turned on while set to COOL,
it will take approximately 3 minutes for the compressor to
start and cooling to begin.
Cooling Descriptions
For Normal Cooling—Select the COOL mode and HIGH,
MEDIUM, or LOW fan speed with a middle set temperature.
For Maximum Cooling—Select the COOL mode
and HIGH fan speed with a lower set temperature.
For Quieter & Nighttime Cooling—Select the COOL mode
and LOW fan speed with a middle set temperature.
NOTE: If you switch from COOL or DRY mode setting to
OFF, wait 3 minutes before restarting.
DRY Mode—Dehumidification
Use the DRY mode to provide dehumidification only. The
fan will run at a fixed speed at this setting, so a fan speed
cannot be set. Keep windows and doors closed for the best
dehumidifying effects.
To set the DRY mode:
•Press the MODE pad until the DRY indicator light is lit.
Òñ÷ëèÍÛâðòçèäöè÷÷èðóèõä÷øõèúìïïñò÷åèçìöóïäüèç
Êé÷èõÍÛâðòçèëäöåèèñöè÷÷ëèçìöóïäüúìïïæëäñêèåäæî÷ò
show the room temperature.
NOTE: Òéüòøöúì÷æëéõòðäÍÛâöè÷÷ìñê÷òØÏÏòõ÷òäéäñ
setting, wait at least 3 minutes before switching back to a
ÍÛâöè÷÷ìñê
FAN Mode
Use the FAN mode to provide air circulation and filtering
without cooling.
To set the FAN mode:
• Press the FAN pad until the desired indicator light for high,
medium, or low fan speed is lit.
Since fan only settings do not provide cooling, a set
÷èðóèõä÷øõèúìïïñò÷åèçìöóïäüèçÊé÷èõÏÊ×öóèèçëäö
been set, the display will change back to show the room
temperature.
The exhaust hose and window kit do not need to be installed
when operating in fan mode.”
HEAT Mode
Use the Heat mode at Low, Med, High or Auto Fan Speed
for heating. Use the Temperature Increase (+) /Decrease (-)
pads to set the desired temperature between 61°F and 86°F
in 1°F increments.
An electronic thermostat is used to maintain the room
temperature. The heater will cycle on and off to keep the
room at the set level of comfort.
Power Outage Recovery Feature
In the case of a power outage or interruption, the unit will
automatically re-start in the settings last used after the
power is restored.
NOTE: If the TIMER was set before the power outage, it will
need to be reset after power is restored.
The display will always default to show the room temperature.
When the air conditioner is turned on, it will automatically start in the last mode and fan settings selected.
CONTROLS

49-5000468 Rev. 1 7
ENGLISH
Features and appearance may vary.
Icons on the remote control indicate the selected settings
ć
C
A
B
C
D
E
F
REMOTE CONTROL
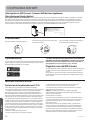
1. Insert the two batteries (provided).
2. Aim the remote control at the signal receiver on the
control panel to operate the air conditioner.
A. Power
Turns ON/OFF power to the air conditioner.
NOTE: Turning off power by pressing the Power button does
NOT disconnect the appliance from the power supply.
• Press the Power button. The Power indicator will illuminate.
B. Mode
Press the Mode button to toggle among the operating
options. The corresponding indicator will illuminate:
Heat (on some models) - Heats the room to the set
temperature
Cool – Cools the room to the set temperature
DRY – Reduces the humidity in the room
Fan – Circulates the air in the room without cooling
C. Temperature
Adjusts the Temperature or Hours in Time Delay.
To Set the Temperature:
The temperature can be set between 61ºF and 89ºF (17ºC
and 30º C) when the air conditioner is in Cool mode.
1. Press the Mode button until the Cool mode is selected.
2. Press the Up Arrow or Down Arrow buttons to select the
Temperature.
NOTE: The temperature cannot be set when the air
conditioner is in either Fan or DRY mode.
NOTE: The Up Arrow and Down Arrow buttons, when pressed
at the same time, allow you to select between displaying
the temperature in ºC or ºF. The corresponding indicator will
illuminate.
D. Fan Speed
The fan speed can be adjusted from Low, Medium, to High
speed when the air conditioner is in operation.
NOTE: The fan speed cannot be adjusted when the unit is in
DRY mode.
• Press the Fan Speed button to toggle among the three speeds.
The corresponding fan speed indicator will illuminate.
E. Timer
Program a time from (1-hour to 24-hours) for the air conditioner
to turn Off or On. When a Time Delay is programmed, the
Timer indicator light will illuminate.
F. Swing Button
The louvers on your portable air conditioner will open
automatically (do not pry them open or push them shut).
Use the Swing Button on your remote to adjust the louvers
in the position you would like them to be in, or to operate in
Swing mode the louvers will continue to move up and down.
Cool
WiFi Swing Fan Speed
Fan
Dry
Heat
CONTROLS

849-5000468 Rev. 1
ENGLISH
Air Filter
The air filters should be cleaned at least every two weeks for
your unit to operate at optimum efficiency.
CAUTION DO NOT operate the air conditioner
without a filter because dirt and lint will clog it and reduce
performance.
To remove:
1. Unplug or disconnect power.
2. Pull to remove upper filter panel.
3. Wash or vacuum the dust from the air filters.
NOTE: If washed, gently shake the filter to remove the
excess water and dust particles trapped in the filter.
4. Reinstall the filters.
5. Plug in or reconnect power.
CLEANING 1. Unplug or disconnect power.
2. Use only a soft cloth dampened with water to clean the
cabinet.
NOTE:
•
Do not use a liquid or spray cleaner to clean the air
conditioner.
•
DO NOT use chemicals, abrasives, ammonia, chlorine
bleach, concentrated detergents, solvents or scouring
pads. Some of these chemicals/items may damage and/
or discolor your air conditioner.
3. Dry thoroughly with a soft cloth.
4. Plug in or reconnect power.
WARNING
Electrical Shock Hazard
Disconnect power before cleaning.
Failure to do so can result in death or electrical shock.
CARE AND CLEANING

49-5000468 Rev. 1 9
ENGLISH
How to Insert the Batteries in the Remote Control
1. Remove the battery cover by sliding it according to the
arrow direction.
2. Insert new batteries, making sure that the (+) and (–) of
battery are installed correctly.
3. Reattach the cover by sliding it back into position.
NOTES:
• Use 2 “AAA” (1.5 volt) alkaline batteries. Do not use
rechargeable batteries.
• Remove the batteries from the remote control if the
system is not going to be used for a long time.
• Do not mix old and new batteries. Do not mix alkaline,
standard (carbon-zinc) or rechargeable (ni-cad, ni-mh, etc)
batteries.
Storage
If the unit is not being used for a long period of time:
To Empty the Internal Water Tank:
1. Unplug or disconnect power.
2. Drain the water from the water tank. (See “Internal Water
Tank section” above.)
3. Use the original packaging to repack the unit to avoid a
buildup of dust or dirt.
4. Store the air conditioner in a cool, dry location.
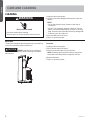
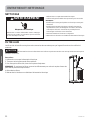
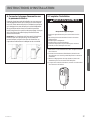
Internal Water Tank
The Water Full indicator (“FL” on the control panel display)
illuminates when the internal water tank has filled with
condensed water.
To Empty the Internal Water Tank:
1. Unplug or disconnect power.
2. Place a shallow 1 quart or larger pan (not included) below
the lower drain located on the back (near the bottom) of
the air conditioner.
3. Remove the cap and the rubber plug and drain the water
tank.
4. Re-insert the drain plug and screw the cap snugly into
place.
5. Plug in or reconnect power. water plug Drain cap
CARE AND CLEANING

10 49-5000468 Rev. 1
ENGLISH
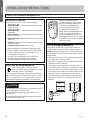
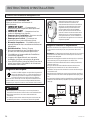
LOCATION REQUIREMENTS
• Place the air conditioner on a flat, level surface in a
location that is at least 30” (76.2 cm) from any wall.
NOTE: A minimum clearance of 30” (76.2 cm) from the
air conditioner to the wall must be maintained to ensure
proper airflow.
• Maintain a minimum 30” (76.2 cm) clearance around the
air conditioner to not block airflow.
• Keep the air conditioner free of any obstructions such
as drapes, curtains, blinds, etc.
• The exhaust hose should be free of any obstructions.
• Do not place the air conditioner on an unstable or raised
surface because it could fall and cause damage or injury.
•
Do not place the air conditioner in direct sunlight or near
a heat source such as baseboard heaters, stoves, etc.
• The window panel can be installed in a window with a
minimum 20” (55.88 cm) to a maximum 46” (121.92)
opening.
20"
(55.88 cm) 20"
BEFORE YOU BEGIN
Read these instructions completely and carefully.
• IMPORTANT — Save these instructions for local
inspector’s use.
• IMPORTANT — Observe all governing codes and
ordinances.
• Note to Installer – Be sure to leave these instructions
with the Consumer.
• Note to Consumer – Keep these instructions for future
reference.
• Skill level – Installation of this appliance requires basic
mechanical skills.
• Completion time – Approximately 1 hour
• We recommend that two people install this product.
• Proper installation is the responsibility of the installer.
• Product failure due to improper installation is not
covered under the Warranty.
• You MUST use all supplied parts and use proper
installation procedures as described in these
instructions when installing this air conditioner.
CAUTION
Do not, under any circumstances, cut or remove the third
(ground) prong from the power cord.
Do not change the plug on the power cord of this air
conditioner.
Aluminium house wiring may present special problems—
consult a qualified electrician.
Power cord includes a current
interrupter device. A test and reset
button is provided on the plug case.
The device should be tested on
a periodic basis by first pressing
÷ëèÝÎÜÝåø÷÷òñäñç÷ëèñ÷ëè
ÛÎÜÎÝåø÷÷òñúëìïèóïøêêèçìñ÷ò÷ëè
òø÷ïè÷Òé÷ëèÝÎÜÝåø÷÷òñçòèöñò÷
÷õìóòõìé÷ëèÛÎÜÎÝåø÷÷òñúìïïñò÷
stay engaged, discontinue use of the
air conditioner and contact a qualified
service technician.
RESET
TEST
ÎÕÎÌÝÛÒÌÊÕÛÎÚÞÒÛÎÖÎ×ÝÜ
Some models require a 115/120-volt AC,
60-Hz grounded outlet protected with a 15-amp
time-delay fuse or circuit breaker.
The 3-prong grounding plug minimizes the possibility of
electric shock hazard. If the wall outlet you plan to use is
only a 2-prong outlet, it is your responsibility to have it
replaced with a properly grounded 3-prong wall outlet.
Questions? visit our Website at: haierappliances.com.
INSTALLATION INSTRUCTIONS

49-5000468 Rev. 1 11
ENGLISH
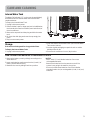
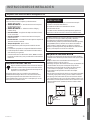
1. Control Panel
2. Swing Air Louvers
3. Casters
4. Exhaust hose assembly
5. Window sealing plate assembly
6. Remote Control
7. Filter Panel
8. Power Cord Hook (2)
9. Handle (2)
10. Air Vent - exhaust
11. Continuous Drainage hole
12. Air inlet grille
13. Drainage hole
14. Power Cord and plug
1
3
6
7
9
11
12
14
13
8
10
2
PARTS INCLUDED
(Appearance may vary)
INSTALLATION INSTRUCTIONS

12 49-5000468 Rev. 1
ENGLISH
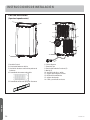
2. INSTALL EXHAUST HOSE
ASSEMBLY TO BACK OF UNIT
Install the exhaust hose assembly by screwing the hose
counterclockwise into the exhaust port on the back of
the Air Conditioner.
1. UNPACK AIR CONDITIONER
• Remove packaging materials. Save the carton and the
foam packaging for storing the air conditioner when
not in use.
NOTE: There are NO packing materials inside the air
conditioner to remove—Do Not open the cabinet.
• Properly dispose of/recycle all packing material.
• Handle the air conditioner gently.
• Keep the air conditioner upright and level. Do not set
the air conditioner on its side, front, back or upside
down.
WARNING
Excessive Weight Hazard
Use two or more people to move and install air
conditioner.
Failure to do so can result in back or other injury.
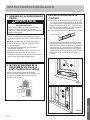
3. INSTALL WINDOW PANELS
A. Measure the window opening. For a 20”
opening, use just the middle panel of the
Window Kit with the opening for the Exhaust
Hose Adapter. For openings from 20” to 33”,
insert one side panel to the middle panel, for
openings from 33” to 46”, insert both side
panels.
B. Place the Window Kit into the window opening
(the Cam Locks should be towards you) and
slide the side panels (if being used) outward to
fill the opening. Lock the panels in place with
the Cam Locks. Apply the foam seals to the
top, bottom and ends to provide the best seal.
Slide the window shut against the Window Kit.
Indoor
Indoor
Cam lock
INSTALLATION INSTRUCTIONS

49-5000468 Rev. 1 13
ENGLISH
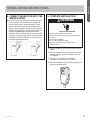
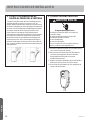
4. CONNECT EXHAUST HOSE TO THE
WINDOW PANEL
Place the Air Conditioner close to the window ensuring
there is at least 20” of clearance from the wall and
any other obstructions. Extend the hose so that it
reaches the Window Kit. Insert the Exhaust Hose
Adapter into the opening in the Window Kit and slide
it into the locking position. Ensure that the hose runs
straight to the window with no excess extension.
Important: The Air Conditioner must be vented to the
outside. Do not use a longer hose or extend the hose
included with the Air Conditioner or the unit will not
cool properly and will overheat.
5. COMPLETE INSTALLATION
A. Plug the power cord into a grounded 3 prong
outlet.
B. Press the Reset button on the plug to ensure
the safety plug is providing power to the Air
Conditioner.
C. Allow 20” of clearance around the Air
Conditioner for proper air circulation
D. When removing the Air Conditioner, be sure to
remove the Window Kit.
WARNING
Electrical Shock Hazard
Plug into a grounded 3 prong outlet.
Do not remove the ground prong from the power
cord plug.
Do not use an adapter.
Do not use an extension cord.
Failure to do so can result in death, fire or
electrical shock.
RESET
TEST
INSTALLATION INSTRUCTIONS

14 49-5000468 Rev. 1
ENGLISH
Problem Possible Causes Solution
Unit does not start or
operate Power supply cord is not plugged into an
outlet. Plug the power cord into a grounded 3 prong
outlet.
Power supply cord has tripped. Press and release the RESET button on the power
supply cord.
The Power button has not been pressed. Press the Power button on the Control Panel or
Remote Control to turn ON the air conditioner.
There is no power to the electrical outlet. Plug a working lamp into the outlet to check for
power.
A household fuse has blown or a circuit
breaker has tripped. Replace the fuse or reset the circuit breaker.
The control was programmed for a Time
Delay. Cancel the Time Delay. See “Control Panel.”
The batteries in the remote control are dead. Replace the batteries.
The internal water tank is full.
NOTE: The air conditioner automatically
turns off, and the Water Full indicator
illuminates to alert you of this condition.
Empty the water tank. See “Air Conditioner
Care.”
Remote control is not
working Batteries are dead. Replace the batteries.
Batteries are installed incorrectly. Make sure the batteries are inserted in the
correct position.
Air conditioner is
working but the room
is not cooling.
The room temperature is hot.
NOTE: On extremely hot and humid days,the
air conditioner will take longer to cool the
room.
Allow time for the room to cool when you first
turn on the unit.
Make sure the air conditioner has an adequate
BTU rating for the size of the room being cooled.
The control is set incorrectly to Fan or DRY
mode. Set the Mode to Cool and the Fan Speed to High.
Airflow is restricted. Remove any obstacles to the airflow and redirect
airflow for uniform cooling.
Temperature set too high. Lower the set temperature.
Air filters are dirty or restricted. Clean the air filter. See “Air Conditioner Care.”
Air conditioner installed incorrectly Check the exhaust hose and window panel for
proper installation.
Doors and windows are open. Close the doors and windows to the room being
cooled to prevent cooled air from escaping.
Error Codes
Error Codes Meaning
E1 Abnormal sense of coil pipe sensor
E2 Abnormal sense of room temperature sensor
E4 Anti-frozen protection
FL Full water
TROUBLESHOOTING TIPS

49-5000468 Rev. 1 15
ENGLISH
REGULATORY INFORMATION
FCC/IC Compliance Statement:
This device complies with Part 15 of the FCC Rules. Operation is
subject to the following two conditions:
1. This device may not cause harmful interference.
2. This device must accept any interference received, including
interference that may cause undesired operation.
This equipment has been tested and found to comply with the limits
for a Class B digital device, pursuant to Part 15 of the FCC Rules.
These limits are designed to provide reasonable protection against
harmful interference in a residential installation. This equipment
generates uses and can radiate radio frequency energy and, if not
installed and used in accordance with the instructions, may cause
harmful interference to radio communications. However, there
is no guarantee that interference will not occur in a particular
installation. If this equipment does cause harmful interference to
radio or television reception, which can be determined by turning the
equipment off and on, the user is encouraged to try to correct the
interference by one or more of the following measures:
• Reorient or relocate the receiving antenna.
• Increase the separation between the equipment and receiver.
• Connect the equipment into an outlet on a circuit different from
that to which the receiver is connected.
• Consult the dealer or an experienced radio/television technician
for help.
Labelling: Changes or modifications to this unit not expressly
approved by the manufacturer could void the user’s authority to
operate the equipment.
*Select Models Only
This product has WiFi capability and requires Internet connectivity
and a wireless router to enable interconnection with an Energy
Management System, and/or with other external devices, systems
or applications.
Use of the Works with Apple HomeKit™ logo means that an
electronic accessory has been designed to connect specifically to
iPod touch®, iPhone®, or iPad®, respectively, and has been certified
by the developer to meet Apple® performance standards. Apple is
not responsible for the operation of this device or its compliance
with safety and regulatory standards.
How it Works
Download the Haier Home App
Use the app to connect your room air
conditioner to WiFi Once connected, use the app to turn
down your air conditioner as you leave
work.
CHANGE TEMP
TO 65
Haier Appliances WiFi Connect (for customers in the United States)
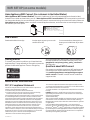
Haier Appliances WiFi Connect Enabled*. If your Air Conditioner (AC) has a Connected Appliance Information label
located on the outside as shown below, your AC is Haier Appliances WiFi Connect Enabled. A WiFi
communication card is built
into the product allowing it to communicate with your smart phone for remote monitoring, control and notifications. Please visit
haierappliances.com/connect to learn more about connected appliance features, and to learn what connected appliance apps
will work with your smart phone.
Network: GE_MODULE_XXXX
PASSWORD: XXXXXXXX
MAC ID: XX-XX-XX-XX-XX-XX
CONTAINS FCCID: ZKJ-WCATA006 CONTAINS IC: 100229A-WCATA006
165D1656P001
WIFI SETUP (on some models)
Getting Started
To connect your room air conditioner, you’ll need the Haier
Appliances App. The app will walk you through the connection
process. Download the app from iTunes or Google Play.
All connected appliance data is held in strict accordance with
the Haier Appliances Connected Data Privacy Policy. Visit
geappliances.com/privacy/privacy_policy_connected to
view this policy.
Questions about WiFi Connect
Get answers you need about setting up WiFi appliances and
connecting to your home network in our support articles.
Visit products.geappliances.com/appliance/gea-support-
search-content to view WiFi connect room air conditioner
support articles.

16 49-5000468 Rev. 1
ENGLISH
Staple your receipt here. Proof of the original purchase date is
needed to obtain service under the warranty.
EXCLUSION OF IMPLIED WARRANTIES - Your sole and exclusive remedy is product repair as provided in this Limited
Warranty. Any implied warranties, including the implied warranties of merchantability or fitness for a particular purpose,
are limited to one year or the shortest period allowed by law.
For US Customers: This limited warranty is extended to the original purchaser and any succeeding owner for products
purchased for home use within the USA. If the product is located in an area where service by a Haier Appliances Authorized
Servicer is not available, you may be responsible for a trip charge or you may be required to bring the product to an
Authorized Haier Appliances Service location for service. In Alaska, the limited warranty excludes the cost of shipping or
service calls to your home.
Some states do not allow the exclusion or limitation of incidental or consequential damages. This limited warranty gives
you specific legal rights, and you may also have other rights which vary from state to state. To know what your legal rights
are, consult your local or state consumer affairs office or your state’s Attorney General.
Warrantor US:
GE Appliances, a Haier company
Louisville, KY 40225
• Customer instruction. This owner’s manual provides
information regarding operating instructions and user
controls.
• Improper installation. If you have an installation problem,
or if the air conditioner is of improper capacity, contact
your dealer or installer. You are responsible for providing
adequate electrical connecting facilities.
• Failure of the product resulting from modifications to the
product or due to unreasonable use including failure to
provide reasonable and necessary maintenance.
• Replacement of house fuses or resetting of circuit
breakers.
• Failure due to corrosion on models not corrosion-
protected.
• Damage to the product caused by improper power
supply voltage, accident, fire, floods or acts of God.
• Incidental or consequential damage caused by possible
defects with this air conditioner.
• Damage caused after delivery.
What Will Not Cover:
For The Period Of: Haier Appliances Will Replace:
One Year
From the date of the
original purchase
Replacement, repair, or refund of the original retail price for any product which fails due to a
defect in materials or workmanship. If the unit is exchanged, the replacement unit is warranted
for the remainder of your product’s original one-year warranty period. Haier Appliances will, at its
sole discretion, replace the product with a product of the same or comparable functionality and
quality or refund the original retail price.
• Properly pack your unit. We recommend using the original
carton and packing materials.
• Return the product to the retail location where it was
purchased.
• Include in the package a copy of the sales receipt or other
evidence of date of original purchase. Also print your name
and address and a description of the defect.
In Order to Make a Warranty Claim During the First 90 Days from the Date of Original Purchase:
• Locate your original sales receipt and make a note of your
model and serial number.
• Visit haierappliances.com to initiate the product
replacement process.
• You will be asked to provide your name, address, date of
purchase, model and serial number.
• Haier Appliances will arrange for a carton to be sent to your
home to recover the product.
• Please return all requested materials (postage pre-paid)
in the carton provided. Please include a description of the
defect.
• You should receive your replacement product or refund
within 7 to 10 business days after your package is received.
In Order to Make a Warranty Claim During the Remainder of the One-Year Warranty:
LIMITED WARRANTY

49-5000468 Rev. 1 17
FRANÇAIS
TABLE DES MATIÈRES
Merci d’acheter ce produit Haier. Ce manuel d’utilisation vous
aidera à obtenir le meilleur rendement de votre nouveau
climatiseur.
Para referencia futura, registre el modelo y el número de serie
ubicados en el deshumidificador y la fecha de compra.
Agrafez votre preuve d’achat à ce manuel pour faciliter le
service de la garantie en cas de besoin.
____________________________________________________
Numéro de modèle
____________________________________________________
Numéro de série
____________________________________________________
Date d’achat
SITE WEB HAIER
Vous avez une question ou vous avez besoin d’aide pour votre appareil électroménager? Visitez le site Web de Haier 24
heures par jour, tous les jours de l’année! Vous pouvez aussi y trouver d’autres produits Haier formidables et tirer avantage
de tous nos services d’assistance en ligne. Aux États-Unis : Haierappliances com
CONSIGNES DE SÉCURITÉ ....................................................................................... 4
CONTRÔLES ......................................................................................................5
ENTRETIEN ET NETTOYAGE ..................................................................................... 8
INSTRUCTIONS D’INSTALLATION ............................................................................... 10
DES CONSEILS DE DÉPANNAGE ................................................................................. 14
CONFIGURATION DU WI-FI ...................................................................................... 15
GARANTIE .......................................................................................................16
CONSERVER DANS VOS DOSSIERS

18 49-5000468 Rev. 1
FRANÇAIS
CONSIGNES DE SÉCURITÉ IMPORTANTES
CONSIGNES DE SÉCURITÉ IMPORTANTES
LISEZ TOUTES LES INSTRUCTIONS AVANT D’UTILISER L’APPAREIL
LISEZ ET CONSERVEZ CES INSTRUCTIONS
INSTRUCTIONS DE SÉCURITÉ IMPORTANTES
WARNING Afin de réduire le risque d’incendie, de
choc électrique, de blessures corporelles ou de dommage
lors de l’utilisation du climatiseur, observez des
précautions élémentaires dont les suivantes :
• Lisez toutes les instructions avant d’utiliser cet appareil.
• Branchez l’appareil dans une prise à 3 trous avec mise à la
terre.
• Ne retirez pas la broche de mise à la terre.
• N’utilisez pas un adaptateur.
• N’utilisez pas un cordon de rallonge.
• N’utilisez pas le climatiseur si son cordon ou sa fiche sont
endommagés, s’il ne fonctionne pas correctement ou s’il
a été échappé ou endommagé autrement.
• Le climatiseur doit être réparé et entretenu par un
personnel qualifié seulement. Contactez une entreprise
en réparation autorisée pour l’inspection, la réparation ou
l’ajustement de l’appareil.
• Coupez l’alimentation électrique avant une réparation ou
un entretien.
• Coupez l’alimentation électrique avant le nettoyage.
REMARQUE : Mettre l’appareil hors tension en appuyant
sur le bouton Power (marche-arrêt) NE coupe PAS
l’alimentation électrique à l’appareil.
• N’installez pas et n’utilisez pas le climatiseur dans une
zone où l’atmosphère contient des gaz combustibles ou
est contaminée. Évitez de mettre un produit chimique en
contact avec votre climatiseur.
• Ne rangez aucune objet directement sur le dessus du
climatiseur.
• Utilisez deux personnes ou plus pour déplacer ou installer
le climatiseur.
• Ne faites pas fonctionner le climatiseur sans que le filtre
ne soit en place.
• N’utilisez pas le climatiseur près d’une baignoire, d’une
douche, d’un lavabo ou d’un autre endroit mouillé.

49-5000468 Rev. 1 19
FRANÇAIS
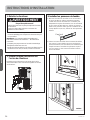
CONTRÔLES
Commandes
A. ÉCRAN DU PANNEAU DE COMMANDE
Affiche le réglage de la température en degrés Fahrenheit ou
les heures restantes du délai programmé avec la minuterie. Le
témoin lumineux correspondant va s’allumer.
B. Bouton marche/arrêt (Power)
Met le climatiseur sous ou hors tension.
REMARQUE : Mettre l’appareil hors tension en appuyant sur
le bouton Power (marche-arrêt) NE coupe PAS l’alimentation
électrique à l’appareil.
• Pressez le bouton Power. Le témoin lumineux Power va
s’allumer.
C. Bouton des modes
Pressez le bouton Mode pour défiler parmi les options de
fonctionnement. Le témoin lumineux correspondant va s’allumer :
Cool – Refroidit la pièce à la température du réglage.
Dry – Réduit l’humidité dans la pièce.
Fan – Fait circuler l’air dans la pièce sans refroidissement.
D. Fenêtre de réception du signal de la télécommande
Orientez la télécommande vers cette fenêtre afin que le panneau
de commande reçoive le signal.
E. Boutons plus (+) et moins (-)
Règlent la température, ou les heures du délai programmé avec la
minuterie.
Pour régler la température :
Vous pouvez régler la température entre 64°F et 86°F (18°C et
30°C) lorsque le climatiseur est mode de refroidissement.
1. Pressez le bouton Mode jusqu’à sélectionner le mode Cool.
2. Pressez les boutons (+) ou (-) pour sélectionner la température.
REMARQUE : Vous ne pouvez pas régler la température lorsque le
climatiseur se trouve dans le mode Fan ou Dry.
F. Bouton de vitesse du ventilateur
Vous pouvez régler le ventilateur à basse (Low), moyenne
(Medium) ou haute (High) vitesse lorsque le climatiseur se trouve
dans le mode Cool ou Fan.
REMARQUE : Vous ne pouvez pas régler la vitesse du ventilateur
lorsque le climatiseur se trouve dans le mode Dry.
• Pressez le bouton Fan pour faire défiler les trois vitesses. Le
témoin lumineux de la vitesse correspondante va s’allumer.
G. Bouton de la minuterie (Timer)
Permet de programmer un délai (de 1 à 24 heures) pour démarrer
ou arrêter le climatiseur. Lorsqu’un délai est programmé, le
témoin lumineux de la minuterie va s’allumer.
Alors que le climatiseur fonctionne :
1. Pressez le bouton Timer.
2. Pressez les boutons (+) ou (-) pour sélectionner le nombre
d’heures durant lequel le climatiseur doit continuer à fonctionner
avant de s’éteindre.
REMARQUE : Attendez environ 5 secondes pour sauvegarder le
délai.
Alors que le climatiseur est en arrêt :
1. Appuyez sur le bouton Timer.
2. Pressez les boutons (+) ou (-) pour sélectionner le nombre
d’heures durant lequel le climatiseur doit rester en arrêt avant de
se mettre en marche.
REMARQUE : Attendez environ 5 secondes pour sauvegarder le
délai.
Pour annuler la minuterie :
• Pressez le bouton Timer une fois, les heures qui restent vont
clignoter, pressez le bouton Timer de nouveau et la minuterie sera
annulée.
H. Touche de connexion Wi-Fi (certains modèles)
1. Pressez le bouton Timer durant 3 secondes pour connecter ou
déconnecter l’application.
2. Connectez votre climatiseur au routeur Wi-Fi. Reportez-vous à la
section « Configuration du Wi-Fi » pour des précisions.
Temp / Time
HighMedLowCool Fan Dry
GF
E
DCB
A
H (on some models)
GFEDCBA
Les fonctions et l’aspect peuvent varier.
Les témoins lumineux à côté des touches à effleurement sur le tableau de commandes du climatiseur indiquent

20 49-5000468 Rev. 1
FRANÇAIS
Mode de chauffage
Utilisez le mode de chauffage à vitesse de ventilation
basse, moyenne, élevée ou automatique pour le chauffage.
Utilisez les touches d’augmentation (+) / diminution (-) de la
température pour régler la température désirée entre 61 ° F
et 86 ° F par incréments de 1 ° F.
Un thermostat électronique est utilisé pour maintenir la
température ambiante. Le radiateur s’allumera et s’éteindra
pour maintenir la pièce au niveau de confort défini.
CONTRÔLES
Mode de refroidissement (Cool)
Utilisez le mode COOL pour refroidir la pièce.
Pour régler le mode COOL :
1. Pressez la touche MODE jusqu’à ce que le témoin lumineux COOL
s’allume.
2. Pressez la touche FAN pour régler la vitesse du ventilateur à
HIGH, MEDIUM ou LOW.
3. Appuyez sur (+) ou (-) pour régler la température désirée entre
61°F et 89°F par sauts de 1°F.
Une fois les réglages terminés, l’écran retournera à l’affichage de la
température ambiante.
La commande de température est utilisée pour maintenir la
température ambiante. Le compresseur va s’allumer et s’éteindre
en alternance pour maintenir la pièce au niveau de confort que vous
avez réglé. Réglez la commande de température à une valeur plus
basse et l’air intérieur deviendra plus froid. Réglez la commande de
température à une valeur plus haute et l’air intérieur deviendra plus
chaud.
REMARQUE : Si le climatiseur est éteint et qu’il est allumé alors
qu’il est réglé à COOL, il faudra environ 3 minutes pour démarrer le
compresseur et le refroidissement.
Réglage du refroidissement
Pour un refroidissement normal — Sélectionnez le mode COOL et
la vitesse de ventilateur HIGH, MEDIUM ou LOW avec un réglage de
température moyen.
Pour un refroidissement maximal — Sélectionnez le mode COOL et
la vitesse de ventilateur HIGH avec un réglage de température bas.
Pour un refroidissement plus silencieux et de nuit — Sélectionnez
le mode COOL et la vitesse de ventilateur LOW avec un réglage de
température moyen.
REMARQUE : Si vous passez du mode COOL ou DRY à la mise en
arrêt (OFF), attendez 3 minutes avant de redémarrer.
Mode DRY — Déshumidification
Utilisez le mode DRY pour la déshumidification seulement. Avec ce
mode, le ventilateur tourne à une vitesse fixe qu’il est impossible
de modifier. Gardez les fenêtres et les portes fermées pour une
déshumidification plus efficace.
Pour régler le mode DRY :
• Pressez la touche MODE jusqu’à ce que le témoin lumineux DRY
s’allume.
Dans le mode DRY, le réglage de température n’est pas affiché.
Une fois le mode DRY réglé, l’écran retournera à l’affichage de la
température ambiante.
REMARQUE : Si vous passez de DRY à OFF ou à FAN, attendez au
moins 3 minutes avant de revenir à DRY.
Si vous utilisez le climatiseur dans le mode DRY comme
déshumidificateur durant une longue période de temps :
1. Débranchez le cordon d’alimentation électrique.
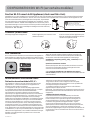
2. Connectez un flexible sur l’orifice d’évacuation supérieur (voyez
la page 10, évacuation supérieure no 11) et acheminez le flexible
vers un drain de plancher.
3. Rebranchez le cordon d’alimentation et pressez MODE jusqu’à ce
que le témoin lumineux DRY s’allume.
Mode FAN (ventilateur)
Utilisez le mode FAN pour faire circuler et filtrer l’air sans
refroidissement.
Pour régler le mode FAN :
• Pressez la touche FAN jusqu’à ce que le témoin lumineux de
la vitesse de votre choix (HIGH, MEDIUM ou LOW) s’allume.
Étant donné qu’un réglage de ventilateur seul ne génère
pas de refroidissement, le réglage de température ne sera
pas affiché. Une fois la vitesse de ventilateur réglée, l’écran
retournera à l’affichage de la température a mbiante. Il n’est
pas nécessaire d’installer le tuyau d’évacuation et la trousse
de fenêtre lorsqu’on fonctionne en mode FAN.
Par défaut, l’écran affiche toujours la température ambiante.
Lorsque le climatiseur est mis sous tension, il démarre automatiquement avec les derniers réglages du mode et du ventilateur.
Fonction de récupération suivant une panne de courant
En cas de panne de courant ou d’interruption, le climatiseur
va redémarrer automatiquement dans les réglages utilisés en
dernier avant le rétablissement du courant.
REMARQUE : Si la minuterie a été réglée avant la panne de
courant, elle devra être réglée de nouveau une fois le courant
rétabli.
La page est en cours de chargement...
La page est en cours de chargement...
La page est en cours de chargement...
La page est en cours de chargement...
La page est en cours de chargement...
La page est en cours de chargement...
La page est en cours de chargement...
La page est en cours de chargement...
La page est en cours de chargement...
La page est en cours de chargement...
La page est en cours de chargement...
La page est en cours de chargement...
La page est en cours de chargement...
La page est en cours de chargement...
La page est en cours de chargement...
La page est en cours de chargement...
La page est en cours de chargement...
La page est en cours de chargement...
La page est en cours de chargement...
La page est en cours de chargement...
La page est en cours de chargement...
La page est en cours de chargement...
La page est en cours de chargement...
La page est en cours de chargement...
La page est en cours de chargement...
-
 1
1
-
 2
2
-
 3
3
-
 4
4
-
 5
5
-
 6
6
-
 7
7
-
 8
8
-
 9
9
-
 10
10
-
 11
11
-
 12
12
-
 13
13
-
 14
14
-
 15
15
-
 16
16
-
 17
17
-
 18
18
-
 19
19
-
 20
20
-
 21
21
-
 22
22
-
 23
23
-
 24
24
-
 25
25
-
 26
26
-
 27
27
-
 28
28
-
 29
29
-
 30
30
-
 31
31
-
 32
32
-
 33
33
-
 34
34
-
 35
35
-
 36
36
-
 37
37
-
 38
38
-
 39
39
-
 40
40
-
 41
41
-
 42
42
-
 43
43
-
 44
44
-
 45
45


Haier QPWA14YZMW Le manuel du propriétaire
- Catégorie
- Climatiseurs mobiles
- Taper
- Le manuel du propriétaire
dans d''autres langues
- English: Haier QPWA14YZMW Owner's manual
- español: Haier QPWA14YZMW El manual del propietario
Documents connexes
-
Haier QPSA13 Le manuel du propriétaire
-
Haier QPWA14YZMW Guide d'installation
-
Haier QPCA11YBMW Manuel utilisateur
-
-
-
-
Haier HPP08XCR Mode d'emploi
-
-