Smeg SE232TD1 Manuel utilisateur
- Catégorie
- Plaques de cuisson
- Taper
- Manuel utilisateur

(6
37
(1
'(
)5
(/
69
12
),
52
1/
6(7'


INSTRUCCIONES PARA LA INSTALACIÓN Y RECOMENDACIONES DE USO Y MANTENIMIENTO
ENCIMERAS VITROCERÁMICAS TOUCH CONTROL.....................................................................................6
INSTRUÇÕES DE INSTALAÇÃO E RECOMENDAÇÕES PARA A UTILIZAÇÃO E MANUTENÇÃO
PLACAS DE COZINHA VITROCERÂMICAS TOUCH CONTROL..................................................................16
INSTALLATION INSTRUCTIONS AND RECOMMENDATIONS FOR USING AND MAINTAINING
CERAMIC HOT PLATES TOUCH CONTROL..................................................................................................26
MONTAGEANLEITUNG UND EMPFEHLUNGEN ZUR VERWENDUNG UND WARTUNG
GLASKERAMIK-KOCHFELDER MIT TOUCH CONTROL.....................................................................................35
INSTRUCTIONS POUR L'INSTALLATION ET CONSEILS D'UTILISATION ET D'ENTRETIEN
PLAQUES DE CUISSON VITROCÉRAMQIUE TOUCH CONTROL.......................................................................45
ȅǻǾīǿǼȈǼīȀǹȉǹȈȉǹȈǾȈȀǹǿȈȊȈȉǹȈǼǿȈīǿǹȉǾȋȇǾȈǾȀǹǿȈȊȃȉǾȇǾȈǾȉȍȃ
ȀǼȇǹȂǿȀȍȃǼȈȉǿȍȃȆȁǾȀȉȇǹǹĭǾȈ55
INSTALLATIONSANVISNINGAR OCH REKOMMENDATIONER FÖR ANVÄNDNING OCH UNDERHÅLL
KERAMIKHÄLLAR MED TOUCHKONTROLL........................................................................................................65
INSTALLASJONSANVISNINGER OG ANBEFALT BRUK OG VEDLIKEHOLD
BERØRINGSSTYRT KJERAMISK KOMFYR...........................................................................................................75
ASENNUSOHJEET JA KÄYTTÖÄ JA HUOLTOA KOSKEVAT SUOSITUKSET
KERAAMISET KEITTOTASOT KOSKETUSPAINIKKEILLA..................................................................................84
,16758&ğ,81,'(,167$/$5(ù,5(&20$1'Ă5,'(87,/,=$5(ù,Ì175(ğ,1(5(
3/,7('(*Ă7,7,1&25325$%,/(9,752&(5$0,&(728&+&21752/93
AANWIJZINGEN VOOR DE INSTALLATIE EN RAADGEVINGEN VOOR GEBRUIK EN ONDERHOUD
KERAMISCHE KOOKPLATEN TOUCH CONTROL................................................................................................102
ES
DE
EN
PT
FR
RO
NL
SV
FI
GR
NO

3
Modelo SE232TD1 - SE232TX1
1 Placa radiante de double zone 1.700/800
2 Placa radiente de 1.200 W
- Indicador de calor residual. (H)
- Potencia eléctrica máxima: 2.900 Watios.
- Tensión de alimentación: 230 Voltios.
- Frecuencia: 50/60 Herzios.
Modelo SE232TD1 - SE232TX1
1 Elemento de double zone 1.700/800
2 Elemento de 1.200 W.
- Pilotos indicadores de calor residual. (H )
- Potência eléctrica máxima: 2.900 watts
- Tensão de alimentação: 230 Volts.
- Frequência: 50/60 Hertzs.
Model SE232TD1 - SE232TX1
1 1.700/800 double zone radiant hotplate
2 1.200 W radiant hotplate.
- Residual heat indicator (H)
- Maximum electric power: 2.900 Watios.
- Supply power: 230 Voltios.
- Frequency: 50/60 Hertzs.
Modelo SE232TD1 - SE232TX1
1 Strahlungs-Kochzone mit 1.700/800
2 Strahlungs-Kochzone mit 1.200 W.
- Restwärme-Anzeige (H)
- Maximale elektrische Leistung: 2.900 W.
- Versorgungsspannung: 230 V.
- Frequenz: 50/60 Hz.
Modèle SE232TD1 - SE232TX1
1 Plaque rayonnante de double zone 1.700/800
2 Plaque rayonnante de 1.200 W.
- Témoin de chaleur résiduelle (H)
- Puissance électrique maximale:2.900 Watts
- Tension d'alimentation: 230 Volts.
- Fréquence: 50/60 Hertz.
ES
PT
GB
DE
FR
Malli SE232TD1 - SE232TX1
1 800/1700 W kaksipiirinen säteilykeittolevy
2 1200 W säteilykeittolevy.
- Jäännöslämmön ilmaisin (H)
- Suurin sähkövirta: 2900 wattia
- Virtalähde: 230 volttia
- Taajuus: 50/60 Hz
FI
Model SE232TD1 - SE232TX1
1 800/1.700 W dubbel circuit stralende
kookplaat
2 1.200 W stralende kookplaat.
- Residuele warmte-indicator (H)
- Maximum elektrisch vermogen: 2.900 watt.
- Stroomvoorziening: 230 Volt.
- Frequentie: 50/60 Hertz.
NL
Modell SE232TD1 - SE232TX1
1 800/1.700 W dobbelkretsstrålende varmeplate
2 1.200 W strålende varmeplate.
- Restvarmeindikator (H)
- Maksimum elektrisk strøm: 2900 watt.
- Forsyningsstrøm: 230 volt.
- Frekvens: 50/60 Hertz.
NO
Modell SE232TD1 - SE232TX1
1 800/1 700 W utstrålande värmeplatta med
dubbelkrets
2 1 200 W utstrålande värmeplatta.
- Restvärme-indikator (H)
0D[LPDOHOHNWULVNHႇHNWZDWW
- Ingående ström: 230 Volt.
- Frekvens: 50/60 Hertz.
SE

4
ȂȠȞIJȑȜȠ6(7'6(7;
:ǹțIJȚȞȚțȒİıIJȓĮȝİįȓʌȜĮțȪțȜȦȝĮ
:ǹțIJȚȞȚțȒİıIJȓĮ
ǼȞįİȚțIJȚțȒȜȣȤȞȓĮȣʌȠȜȠȓʌȠȣșİȡȝȩIJȘIJĮȢ+
ȂȑȖȚıIJȘİʌĮȖȦȖȚțȒȚıȤȪȢ:DWW
ȉȐıȘʌĮȡȠȤȒȢ9ROW
ȈȣȤȞȩIJȘIJĮ+HUW]V
Model SE232TD1 - SE232TX1
1 1.700/800* W induction hotplate.
2 1.200* W suprafata de inductie
øQGLFDWRUFDOGXUDUH]LGXDOD+
- Energie electrica maxima: 2.900 Watt.
- Energie electrica: 230 Volt.
- Frecventa: 50/60 Hertzs.
GR
RO

EN
25
*XLGHWR8VLQJWKH,QVWUXFWLRQV%RRNOHW
Dear customer,
We are delighted that you have put your trust in us.
:HDUHFRQ¿GHQWWKDWWKHQHZKREWKDW\RXKDYHSXUFKDVHG
will fully satisfy your needs.
This modern, functional and practical model has been man-
ufactured using top quality materials that have undergone
strict quality controls throughout the manufacturing process.
Before installing and using it, we would ask that you read
this Manual carefully and follow the instructions closely, as
this will guarantee better results when using the appliance.
Keep this Instruction Manual in a safe place so that you can
refer to it easily and thus abide by the guarantee conditions.
,QRUGHUWREHQH¿WIURPWKLV*XDUDQWHHLWLVHVVHQWLDOWKDW
you submit the purchase receipt together with the Guar-
DQWHH&HUWL¿FDWH
<RX VKRXOG NHHS WKH *XDUDQWHH &HUWL¿FDWH
RUZKHUHUHOHYDQWWKHWHFKQLFDOGDWDVKHHWWRJHWKHU
ZLWKWKH,QVWUXFWLRQ0DQXDOIRUWKHGXUDWLRQRIWKH
XVHIXOOLIHRIWKHDSSOLDQFH,WKDVLPSRUWDQWWHFKQLFDO
LQIRUPDWLRQDERXWWKHDSSOLDQFH
Safety instructions
%HIRUH¿UVWXVH\RXVKRXOGFDUHIXOO\UHDGWKHLQVWDOODWLRQ
and connection instructions.
These hob models may be installed in the same kitchen
furniture units as SMEG brand ovens.
For your safety, installation should be carried out by an
authorised technician and should comply with existing in-
stallation standards. Likewise, any internal work on the hob
VKRXOGRQO\EHGRQHE\60(*¶VWHFKQLFDOVWDႇLQFOXGLQJ
WKHFKDQJHRIWKHÀH[LEOHVXSSO\FDEOHRIWKHDSSOLDQFH
6DIHW\ZDUQLQJV
,IWKHFHUDPLFJODVVEUHDNV
RUFUDFNVLPPHGLDWHO\XQSOXJ
WKHVWRYHWRSWRDYRLGHOHFWULF
VKRFNV
7KLVDSSOLDQFHLVQRWGH-
VLJQHGWRZRUNZLWKDQH[WHUQDO
WLPHUQRW EXLOW LQWR WKH DSSOL-
ance) or a separate remote
control system.
'RQRWVWHDPFOHDQWKLVGH-
vice.
7KHGHYLFHDQGLWVDFFHVVLEOH
SDUWVPD\KHDWXSGXULQJRSHU-
DWLRQ$YRLGWRXFKLQJWKHKHDW-
LQJHOHPHQWV&KLOGUHQ\RXQJHU
WKDQ\HDUVROGPXVWVWD\DZD\
IURPWKHVWRYHWRSXQOHVVWKH\
are permanently supervised.
7KLVGHYLFH PD\ VROHO\ EH
XVHGE\FKLOGUHQ\HDUVROGRU
ROGHU SHRSOH ZLWK LPSDLUHG
SK\VLFDO VHQVRU\ RU PHQWDO
DELOLWLHVRUWKRVHZKRODFNH[-
SHULHQFHDQGNQRZOHGJH21/<
ZKHQVXSHUYLVHGRULIWKH\KDYH
EHHQJLYHQDGHTXDWHLQVWUXF-
WLRQRQWKHXVHRIWKHGHYLFHDQG
XQGHUVWDQGWKHGDQJHUVLWVXVH
involves. User cleaning and
maintenance may not be done
E\XQVXSHUYLVHGFKLOGUHQ
&KLOGUHQPXVWQRWSOD\ZLWK
WKHGHYLFH
Precaution. It is dangerous
WRFRRNZLWKIDWRURLOZLWKRXW
EHLQJSUHVHQWDVWKHVHPD\
FDWFK ¿UH 1HYHU WU\ WR H[WLQ-
JXLVKD¿UHZLWKZDWHULQWKLV
HYHQWGLVFRQQHFWWKHGHYLFH
DQGFRYHUWKHÀDPHVZLWKDOLG
a plate or a blanket.
'RQRWVWRUHDQ\REMHFWRQ
WKHFRRNLQJDUHDVRIWKHVWRYH-
top. Prevent a possible fire
KD]DUG

EN
26
:KHQWKHKRWSODWHVDUHLQ
RSHUDWLRQRUKDYHUHFHQWO\EHHQ
LQRSHUDWLRQVRPHDUHDVZLOOEH
KRWDQGFDQEXUQ&KLOGUHQ
VKRXOGEHNHSWZHOODZD\
'RQRWSODFHPHWDOREMHFWV
VXFKDVNQLYHVIRUNVVSRRQV
RUOLGVRQWKHVXUIDFHRIWKHKRE
DVWKH\PD\JHWYHU\KRW
,I\RXDUHIU\LQJRLONHHSDQ
H\HRQWKHFRRNLQJDVWKHLQGXF-
WLRQKREVKHDWXSYHU\TXLFNO\
DQGWKH\FRXOGLJQLWH
,WLVDGYLVDEOHQRWWRXVHWKH
LQGXFWLRQKREGXULQJWKHS\UR-
OLWLF FOHDQLQJ IXQFWLRQ LQ WKH
FDVHRIWKHS\UROLWLFRYHQVGXH
WRWKHKLJKWHPSHUDWXUHUHD
FKHGE\WKLVDSSOLDQFH

EN
27
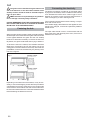
Installation
INSTALLATION AND SETUP SHOULD BE CARRIED
OUT BY AN AUTHORISED TECHNICIAN IN LINE WITH
CURRENT INSTALLATION STANDARDS.
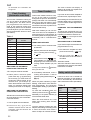
3RVLWLRQLQJWKHKRE
To install these models, an opening with the dimensions
VKRZQLQ¿JXUHZLOOEHFXWLQWRWKHXQLW¶VZRUNWRS
The worktop fastening system is suitable for units 20, 30
and 40 mm thick.
The minimum distance between the surface supporting
the cooking pans and the lower part of the kitchen unit or
the hood located above the hob should be 650 mm. If the
hood’s installation instructions recommend that the gap is
greater than this, you should follow this advice.
The unit where the hob and oven will be located will be
VXLWDEO\¿[HG
INSTALLATION WITH CUTLERY DRAWER OR LOWER
CABINET
In mixed induction - vitroceramic hobs, if you would like
to have a cabinet or a cutlery drawer under the hob, it is
necessary to put a separation board in between the two.
The board should be situated 20 mm below the underside
of the hob, leaving a free space of at least 20 mm until the
HQGRIWKHFDELQHW¿JXUH
This prevents accidental contact with the hot surface of
the casing of the heating elements under the apparatus
¿JXUH
3OHDVHGRQRWVWRUHREMHFWVWKDWFDQREVWUXFWWKH
KREIDQVRUSRVVLEO\ÀDPPDEOHPDWHULDOVLQWKHGUDZ-
er.
INSTALLATION WITH FAN OVEN UNDER THE HOB
The oven should be installed according to the correspond-
ing manual.
An opening of 20 mm should be made in the back part of
WKHFDELQHWLQRUGHUWRDOORZFROGDLUWRHQWHUVHH¿JXUH
:KHQKREVDUHKDQGOHGEHIRUHEHLQJLQVWDOOHG
FDUHVKRXOGEHWDNHQLQFDVHWKHUHLVDQ\SURWUXGLQJ
SDUWRUVKDUSHGJHZKLFKFRXOGFDXVHLQMXU\
:KHQLQVWDOOLQJXQLWVRUDSSOLDQFHVDERYHWKH
KREWKHKREVKRXOGEHSURWHFWHGE\DERDUGVRWKDW
WKHJODVVFDQQRWEHGDPDJHGE\DFFLGHQWDOEORZVRU
KHDY\ZHLJKWV
fig. 1
490
Minimum distance
WRZDOO
Minimum ventilation
distances
)LWWLQJKROHV
SE232TD1 - SE232TX1

EN
28
7KHJOXHVXVHGLQPDQXIDFWXULQJWKHNLWFKHQXQLW
DQGLQWKHDGKHVLYHRQWKHGHFRUDWLYHODPLQDWHRIWKH
ZRUNWRSVXUIDFHVKRXOGEHPDGHWRWROHUDWHWHPSHUD-
WXUHVRIXSWR&
SMEG assumes no responsibility for any malfunc-
tion or damage caused by faulty installation.
PLEASE REMEMBER THAT THE GUA RANTEE DOES
NOT COVER THE GLASS IF IT SUFFERS A VIOLENT
BLOW OR IF IT IS USED IMPROPERLY.
)DVWHULQJWKHKRE
When the gap has been properly sized, the sealing washer
should be put on the lower face of the glass. Silicone should
not be applied between the glass and the unit worktop
because if it becomes necessary to remove the hob from
its position, the glass could break when trying to detach it.
To secure the hob to the cabinet, four brackets should be
fastened to the existing hole son the bottom part of the
casing (two in the front and two in the back). There are two
possibilities of where the brackets may be placed, just as
LVVKRZQLQ¿JXUH
¿J Sealing washer
Sealing washer
Depending on the thickness of the cabinet, it may be nec-
essary to use the self tapping screws that are provided as
compliments for securing; insert them in the circular holes
of the bracket. The thread of this hole will be made when
the screw is inserted inside of it. The thread should be made
before fastening the bracket to the hob.
&RQQHFWLQJWKHHOHFWULFLW\
The electric connection is made via an omnipolar switch
or plug where accessible, which is suitable for the intensity
to be tolerated and which has a minimum gap of 3 mm
between its contacts, which will ensure disconnection in
case of emergency or when cleaning the hob.
The connection should include correct earthing, in compli-
ance with current norms.
,IWKHÀH[LEOHVXSSO\FDEOH¿WWHGWRWKHVHDSSOLDQFHVHYHU
needs to be changed, it should be replaced by SMEG’s
RႈFLDOVHUYLFH
The input cable should not be in contact either with the
body of the hob or with the body of the oven, if the oven is
installed in the same unit.

EN
29
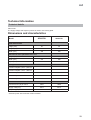
7HFKQLFDO,QIRUPDWLRQ
7HFKQLFDOGHWDLOV
Class 3 hob.
The supply voltage and frequency will be as shown on the rating plate.
'LPHQVLRQVDQGFKDUDFWHULVWLFV
Model SE232TD1 SE232TX1
Hob dimensions
Height (mm) 62 49
Length (mm) 510 500
Width (mm) 300 300
'LPHQVLRQVRIWKHSODFHPHQWLQWKHXQLW
Length (mm) 490 280
Width (mm) 270 480
Depth (mm) 58 40
&RQ¿JXUDWLRQ
Induction hotplate 2,300 / 3,200* W
Induction hotplate 1,400 / 1,800* W
Radiant hotplate 700 / 1,700 W 1 1
Radiant hotplate 1,200 W 1 1
Radiant hotplate 1,800 W
Electrics
Nominal Power (W) for 230 V 2900 2900
Supply voltage (V) 230 V 230 V
Frequency (Hz) 50/60 50/60
* Induction power with the Power function enabled.

EN
30
Use and
Maintenance
8VHULQVWUXFWLRQVRIWKH
7RXFK&RQWURO
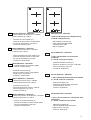
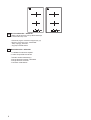
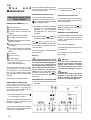
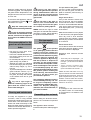
HANDLING ELEMENTS ¿J
൬2QRႇWRXFKNH\
2 Hot plate selection touch keys.
൮ **Power and/or residual heat
displays.
൯ “Decrease” power touch key.
൰ “Increase” power touch key.
൱ Double burner selection touch key
(double hot plate).
൲ Locking touch key for the rest of
touch keys.
൳ **Hot plate double zone indicatior
(only next to double burner hot
plates).
൴ **Lock icon.
൬൫ Timer touch key.
൬൬ **Timer display
൬൭ The timed cooking surface indicator
* Depending on model
** Only visible while running.
The manoeuvres are done by means
of the touch keys. You do not need
to exert force on the desired touch
key, you only need to touch it with
\RXU¿QJHUWLSWRDFWLYDWHWKHUHTXLUHG
function.
(DFKDFWLRQLVQRWL¿HGE\DEHHS
SWITCHING ON THE DEVICE
:KHQWKHKRELVFRQQHFWHGIRUWKH¿UVW
time, it will be locked and the related
SLORWOLJKWZLOOEHRQ7RXQORFNLW¿UVW
touch locking touch key (7) until the
SLORWOLJKWVZLWFKHVRႇ
1 Touch the switching on touch key
(1) for at least one second.
The Touch Control is activated and a 0
appears with 50% brightness on all
the power displays (3).
If any zone has residual heat indication
before switch on ,the display continue
s showing ''H'' instead of 0.
If you do not take any action in the next
10 seconds the touch control will
VZLWFKRႇDXWRPDWLFDOO\
SWITCHING ON A HOT PLATE
Once the Touch Control has been
activated by means of the touch key
(1), the power indicators of the hot
plates will display a 0 (3).
1 Press the touch key for the selected
hot plate (2). The related power
indicator ( 3 ) will be activated
and brightness of indicator will
increase.
2 Using the touch key or (4/5),
choose the desired power level.
The and touch keys are
repetitive, so if you keep them pressed
they increase or decrease with a 0.5
second interval.
Only one hot plate can be selected at
the same time
Warning:
7RRSHUDWHDKRWSODWHLWPXVW
EHVHOHFWHG¿UVW:KHQ\RXZDQWWR
XVHDKRWSODWHFKHFNWKHEULJKWQHVV
RI WKH SRZHU LQGLFDWRU$IWHU
FKRRVLQJKRWSODWHEULJKWQHVVRI
SRZHULQGLFDWRUVKRXOGLQFUHDVH
4XLFN VZLWFKRQ DW PD[LPXP
SRZHU Once you have selected the
hot plate, press the touch key (4)
once. The hot plate will be activated at
full power.
SWITCHING OFF THE HOT PLATE
1 The hot plate must previously be
selected.
2 Using the touch key (4), lower
the power level to 0.
4XLFNVZLWFKRႇDOWHUQDWLYHV
L,IXVHUNHHS¿QJHURQWKHVHOHFWLRQ
sensor for 2 seconds, the related zone
ZLOOEHVZLWFKHGRႇ
ii) When you press touch keys and
(4/5) simultaneously, the hot plate
ZLOOVZLWFKRႇTXLFNO\
RESIDUAL HEAT INDICATOR
The power indicator of the hot plate will
display an H when the glass surface
reaches a temperature that could
cause burning.
When this risk disappears,
LWKHGLVSOD\VZLWFKHVRႇLIWKHGHYLFH
is in stand by),
ii) or displays 0 (if the appliance is
still running).
Warning:
,QDILUVWUXQ + LQGLFDWLRQ PD\
DSSHDULQDVKRUWWLPHRQWKHSRZHU
GLVSOD\7KLVVKRZLQJLV UHODWHG
ZLWKVHWXSRSHUDWLRQDQGLWGRHV
QRWPHDQWKHFRRNLQJ]RQHLVKRW
Warning:
+LQGLFDWLRQLVXVHGIRUWKHVDIHW\
SXUSRVHVLQDQ\FDVH(YHQLIWKH
SRZHULVFXWRႇIRUDORQJWLPHDIWHU
SRZHURQ+LQGLFDWLRQDSSHDUV

EN
31
SWITCHING OFF THE DEVICE
7KHGHYLFHFDQEHVZLWFKHGRႇDWDQ\
WLPH E\ SUHVVLQJ WKH JHQHUDO RQRႇ
touch key (1). In standby mode an
H will appear in the zones that are hot.
The rest of the displays will not light up.
'RXEOHEXUQHUKRWSODWH
If your cooker has this option, the
double burner hot plate offers the
possibility of using the inside ring or
also, in addition, the outside one,
depending on the size of the pot or
pan.
SWITCHING ON THE DOUBLE
HOT PLATE
1 The related hot plate must be
selected.
2 Select the desired power (from 1
to 9) using the touch key or
(4/5).
3 Press the double hot plate touch
key (6) to activate the double
burner. When the double zone will
be activated, double zone indicator
(8) light on.
SWITCHING OFF THE DOUBLE
HOT PLATE
1 The key, by which its double burner
hot plate was switced on previously
is selected.
2 Press the double hot plate touch
key (6) to deactivate the double
burner. The double burner indicator
ZLOOOLJKWRႇDQGWKHRXWHUULQJZLOO
be deactivated
/RFNLQJRIWKHWRXFKNH\V
RIWKHFRRNLQJKRE
To prevent undesired manipulation
you can lock the entire unit, except
for the on/off touch key, using the
locking touch key (7). This function
is useful for child safety. When the lock
is activated, the lock indicator light (9)
comes on.
However, remember when the touch
FRQWUROLVRQWKHRQRႇWRXFKNH\
DOORZV\RXWRVZLWFKLWRႇHYHQLI
the lock is activated (the lock indicator
light (9) on).
On the other hand, if the touch control
LV VZLWFKHG Rႇ WKH ORFNLQJ IXQFWLRQ
GRHV QRW DOORZ WKH RQRႇ WRXFK NH\
(1) to be used.
To deactivate the locking function,
press the locking touch key (7)
RQFHDJDLQ/RFNLQGLFDWRUOLJKWRႇ
and touch control will be ready for use.
CHILD LOCK
7KH FKLOG ORFN LV GLႇHUHQW DQG PRUH
complicated than key lock. User can
activate key lock via one sensor. But
child lock need a sensor sequence.
The Child Lock is being used to
prevent children from turning on
the hob.
$FWLYDWLQJ&KLOG/RFN
1. The hob is switched on via (1)
2Q2ႇWRXFKNH\
2. Any zone should not be selected.
When any zone is not selected,
(5) Increase power touch key and
(4) decrease power touch key
and minus sensors is hold for 3
seconds at same time. At the end
of this period, a short buzzer sound
is heard
3. After buzzer signal , the (7)
locking touch key is touched (there
is no need to keep press for a long
time) and a long buzzer sound is
heard and the Child Lock will be
activated and all power display
shows “L”.
During Child Lock, if user touch any
sensor (Main sensor included) , “L”
ZLOOÀDVKRQGLVSOD\
Warning : Child lock status is not
being stored. If the energy of the hob
is butted, child lock status could not
be preserved.
'HDFWLYDWLQJ&KLOG/RFN
To be able to deactivate Child Lock,
the Child Lock should be activated
before and all power display show “L”
1. (5) Increase power touch key
and (4) decrease power touch
key and minus sensors is hold for
3 seconds at same time. At the end
of the this period, a short buzzer
sound is heard,
2. After buzzer signal , is touched to
the (7) locking touch key (there
is no need to keep press for a long
time) and a long buzzer sound is
heard and the Child Lock will be
green-yellow
blue
brown
grey
black
green-yellow
blue
brown
grey
black
green-yellow
blue
brown
grey
black
green-yellow
blue
brown
grey
black
green-yellow
blue
brown
grey
black
¿J
'212786(/
green-yellow
blue
brown

EN
32
de activated and “Indication will
EHOLJKWRႇ
)ODVK&RRNLQJ
(Automatic cook start)
This function facilitates cooking as
you do not need to be present while
it is being done. The touch control
pre-programmes the chosen hot
plate at the maximum power and
subsequently lowers it to the desired
power level (which you have selected)
after an approximate amount of time
(see table 1).
Table 1
-
0
1
2
3
4
5
6
7
8
0
60
180
288
390
510
150
210
270
9
Selected
power
Automatic Cook Start
Function
SWITCHING THE AUTOMATIC
COOK START FUNCTION ON
1 The hot plate must be selected.
2 Select power 9 and then press
power touch key (5).After using
the touch key you must lower the
continuous cooking power to the
desired level, (for example 6).
When the automatic cook function
VWDUWV $ LQGLFDWLRQ ÀDVKHV ZLWK
desired power level on the display.
SWITCHING THE AUTOMATIC
COOK START FUNCTION OFF
After at least 10 seconds have elapsed
since the beginning of the automatic
cook start function:
1 The hot plate must be selected.
2 Press touch key (5) till the
indicator reaches level 9 and the
automatic cook start function will
be deactivated.
Timer Function
This function makes it easier to cook,
as you do not need to be present
throughout the process: the timed hot
SODWHV ZLOO VZLWFK Rႇ DXWRPDWLFDOO\
after the set time has lapsed. There
is a separate timer for each hot plate,
which allows all of the hot plates to be
timed simultaneously.
With these models you can use the
clock as a timer for the hotplates for
times ranging from 1 to 99 minutes. All
the cooking areas can be programmed
individually and in a simultaneous
manner.
TIMING ONE HOTPLATE
1 The cooking zone to be timed must
be selected.
2 Select a power level for the hotplate
from 1 to 9 using the touch keys
or (5/4).
3 Press clock touch key (10).
Timer indicator (11) will display 00.
Depending on the model, the timed
cooking surface indicator (12) will
ÀDVK
On the power indicator (3), ZLOOÀDVK
during the time set.
4 Immediately afterwards, enter a
cooking time between 1 and 99
minutes, by using the touch keys or
(5/4).
When the power indicator (3) stops
ÀDVKLQJLWZLOOVWDUWWRFRXQWGRZQWKH
time automatically. The respective
timed hotplate disolay (11) will continue
ÀDVKLQJ
Or, when the countdown starts, the
relevant power level and ZLOOÀDVK
alternately on the power indicator (3)
of the relevant heater area.
When the clock reaches 01, it will
switch from counting down minutes
to seconds.
Once the selected cooking time has
elapsed, the heating zone being timed
LV WXUQHG Rႇ DQG WKH FORFN HPLWV D
series of beeps for several seconds.
The timer indicator will display a
ÀDVKLQJ EHVLGH WKH KRWSODWH WKDW
has been disconnected.
If you wish to time another hotplate at
the same time, repeat steps 3 and 4.
,IWKHKHDWLQJ]RQHWXUQHGRႇLVKRWLWV
indicator displays an H or otherwise an
7RWXUQRႇWKHDXGLEOHVLJQDOWRXFK
any sensor.
CHANGING THE PROGRAMMED
TIME
To change the progrmmed time, you
must press the touch key of the timed
hotplate (2) to select it and then the
clock (10). You may then read
and change the time.
DISCONNECTION OF THE TIMER
If you want to stop the timer before the
programmed time is up
1 First select the hotplate and then
press clock touch key (10).
2 Use the touch key (4) to
recude the time to 00. The clock is
cancelled.
Alternative metod :
After zone selection if timer touch key
is pressed for two seconds, the related
timer will be cancelled.
6DIHW\VZLWFKRႇIXQFWLRQ
If due to an error one or several hot
SODWHVGRQRWVZLWFKRႇWKHDSSOLDQFH
will be automatically disconnected
after a set amount of time (see table 2).
1
2
3
4
5
6
7
8
9
10
Table 2
5
5
4
3
2
2
2
1
Selected
power
level
MAXIMUM OPERATION
TIME
(in hours)

EN
33
:KHQWKH³VDIHW\VZLWFKRႇ´IXQFWLRQ
has been triggered, a 0 is displayed if
the glass surface temperature is not
dangerous for the user or an H if there
is a burn risk.
To reconnect the appliance, switch it
RႇE\SUHVVLQJWKHRQRႇNH\ (1) and
then switch it on again.
.HHSWKH FRQWURO SDQHO RI WKH
KHDWLQJDUHDVFOHDQDQGGU\DWDOOWLPHV
In case of operating problems
RULQFLGHQWVQRWPHQWLRQHGLQWKLV
PDQXDOGLVFRQQHFWWKHDSSOLDQFH
DQGFRQWDFWWKH60(*WHFKQLFDO
service.
5HFRPPHQGDWLRQIRUWKH
good use of vitroceramic
KREV
* Use pots or pans with thick,
FRPSOHWHO\ÀDWERWWRPV
* Pans with a smaller diameter than
the shown heating area are not
recommended.
* Do not slide pots and pans over the
glass as they may scratch it.
* Although the glass can withstand
knocks from large pots and pans
without sharp edges, try not to
knock it.
* To prevent damage to the ceramic
glass induction surface, try not
to slide the pots and pans over
the glass, and keep the bottoms
of the vessels clean and in good
condition.
Try not to spill sugar or
SURGXFWVFRQWDLQLQJVXJDURQ WKH
JODVVZKLOHWKHVXUIDFHLVKRWDV
WKHVHFRXOGGDPDJHLW
Cleaning and maintenance
To keep the appliance in good
condition, clean it using suitable
products and implements once it has
cooled down. This will make the job
easier and avoid the build-up of dirt
Never use harsh cleaning products or
tools that could scratch the surface, or
steam-operated equipment.
A pot or pan may become
VWXFNWRWKHJODVVGXHWRDSURGXFW
KDYLQJPHOWHGEHWZHHQWKHP'R
QRWWU\WROLIWWKHSRWZKLOHWKHKRW
SODWHLVFROG7KLVFRXOGFDXVHWKH
glass break.
'RQRW VWHS RQWKH JODVV RU
lean on it as it could break and
FDXVHLQMXU\'RQRWXVHWKHJODVV
DVDVXUIDFHIRUSXWWLQJREMHFWV
SMEG reserves the right to make
changes to its manuals that it deems
QHFHVVDU\RUXVHIXOZLWKRXWDႇHFWLQJ
the product’s essential features.
Environmental
considerations
7KHV\PERO RQWKHSURGXFW
RULWV SDFNDJLQJ PHDQV WKDW WKLV
product cannot be treated like
RUGLQDU\KRXVHKROGZDVWH7KLV
product must be taken to a recycling
collection point for electrical and
electronic appliances. By ensuring
WKDWWKLV SURGXFW LV GLVSRVHG RI
FRUUHFWO\ \RX ZLOO DYRLG KDUPLQJ
WKHHQYLURQPHQWDQGSXEOLFKHDOWK
ZKLFKFRXOGKDSSHQLIWKLVSURGXFW
LVQRWKDQGOHGSURSHUO\)RUPRUH
detailed information about recycling
WKLVSURGXFW SOHDVH FRQWDFW \RXU
ORFDODXWKRULW\KRXVHKROGZDVWH
VHUYLFH RU WKH VWRUH ZKHUH \RX
SXUFKDVHGWKHSURGXFW
7KHSDFNDJLQJPDWHULDOVXVHGDUH
environmentally-friendly and can
be recycled completely. Plastic
FRPSRQHQWVDUHPDUNHG!3(/'
!(36HWF'LVSRVHSDFNDJLQJ
PDWHULDOVOLNHKRXVHKROGZDVWHLQ
your local container.
,IVRPHWKLQJGRHVQRWZRUN
Before calling the technical service,
perform the verifications specified
below.
7KHDSSOLDQFHGRHVQRWZRUN
Ensure that the power cable is plugged
in.
7KHSRWVWLFNVWRWKHJODVV
If there is molten material between
the pot and the glass, set the hot
plate to maximum power and try to
separate them.
Single Sensor Error :
If any of the sensors is active more
than 10 seconds, this error situation
occurs and error code”F1” is showed.
7KLVHUURUFDQEHUHODWHGZLWKGLႇHUHQW
roots. One of them is that there may
be an object (fork, knife…) on the any
of the sensor.
Make sure that there is no any object
on the control unit, hob glass is wiped
with a dry cloth. If error situation
continue after this solution, please
WDNHRXWSOXJRUVZLWFKRႇIXVHVZLWFK
for 10 second.
Plural Sensor Error:
If more than 2 sensors are sensed at
same time, this error situation occurs
and error code”F2” is displayed.
3RWHQWLDO URRW UHDVRQV RI WKH
problem :
• There may be an object(pot…) or
ZDWHUDFFXPXODWLRQRYHUÀRZOLTXLG
from pot…) that cover more than 2
sensors
• Touch control location may
exposure more heat or steam
(from oven bottom of the hob…)
Please be sure that there is no any
REMHFWRQWKHVHQVRUVDQGVZLWFKHGRႇ
all steam and heat sources. Then,hob
glass is wiped with a dry cloth. If error
situation continue after this solution,
SOHDVHWDNHRXWSOXJRUVZLWFKRႇIXVH
switch for 10 second.
FC Error:
Fc message on the control and the
hot plates switch off: Overheating
in the electronics. Let thestove cool
for a while.
-
 1
1
-
 2
2
-
 3
3
-
 4
4
-
 5
5
-
 6
6
-
 7
7
-
 8
8
-
 9
9
-
 10
10
-
 11
11
-
 12
12
-
 13
13
-
 14
14


Smeg SE232TD1 Manuel utilisateur
- Catégorie
- Plaques de cuisson
- Taper
- Manuel utilisateur
dans d''autres langues
- English: Smeg SE232TD1 User manual
Autres documents
-
Haier SERIES 7 HWS77GDAU1 VINSKAP Manuel utilisateur
-
Brandt BPV1641B Le manuel du propriétaire
-
sauter SPV264HB Le manuel du propriétaire
-
-
Bellini BPD170EG Mode d'emploi
-
CONTINENTAL EDISON CECP9060MBXD Manuel utilisateur
-
Samsung Table à gaz - NA64H3110AS Manuel utilisateur
-
-
York TIWM012B21S Manuel utilisateur
-
Saeco RI9829/11 Manuel utilisateur