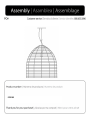
ROOMS TO GO 90682305 Assembly Instructions
- Taper
- Assembly Instructions

LT8230

2 |

3 |

4 |
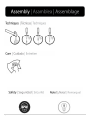
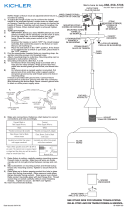
A
B
D
F
G
X2
X1
x1
X1
X1
E
x1
Not included
No incluido
Non inclus
X2

5 |
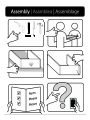
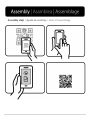
Assembly Help | Ayuda de montaje | Aide à l’assemblage

6 |
English
Note! Installation by a certified electrician is recommended.
• Find your main fuse or breaker box in your
home.
• Turn off and/or unscrew all fuses.
• Turn off all circuit breaker switches that
control power to the room in which you
are working.
• Turn any wall switches off. If any pull chains
or switches are on the fixture, turn off.
Note! Do not damage any wire insulation during installation.
Note! Ensure no rough or sharp edges are in contact with any
wires.
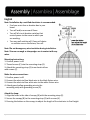
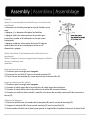
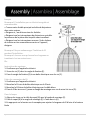
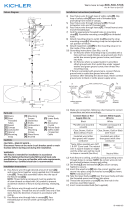
Mounting Instructions:
1. Confirm power is off.
2. Thread screws (C) into the mounting strap (E).
3. Attach the mounting strap (E) to an electrical box
with screws (C).
Make the wire connections:
1. Confirm power is off.
2. Connect the electrical box black wire to the black fixture wire.
3. Connect the electrical box white wire to the white fixture wire.
4. Attach green/yellow grounding wire to the
mounting strap with grounding screw (D).
Attach the lamp:
1. Align the holes in the side of canopy (B) with the mounting strap (E).
2. Secure the canopy (B) to the mounting strap (E) with screws (A).
3. Pressing the button on the canopy to adjust the length of the steel wire to final height

7 |
Español
¡Nota! Se recomienda la instalación por un electricista
certificado.
• Encuentra tu fusible principal o caja de fusibles en tu
casa.
• Apague y / o desatornille todos los fusibles.
• Apague todos los interruptores de circuito que
controlar el poder a la habitación en la que estan
trabajando.
• Apague cualquier interruptor de pared. Si alguna
cadena de tirón o los interruptores están en el
dispositivo, apague.
¡Nota! No dañar el aislamiento del cable durante la
instalación.
¡Nota! Asegúrese de que ningún borde áspero o afilado
entre en contacto con
alambres
Instrucciones de montaje:
1. Confirme que la energía esté apagada.
2. Enrosque los tornillos (C) en la correa de montaje (E).
3. Fije la correa de montaje (E) a una caja eléctrica con tornillos (C).
Haga las conexiones de cables:
1. Confirme que la energía esté apagada.
2. Conecte el cable negro de la caja eléctrica al cable negro del artefacto.
3. Conecte el cable blanco de la caja eléctrica al cable del accesorio blanco.
4. Conecte un cable de tierra verde / amarillo a la correa de montaje con tornillo de conexión a
tierra (D).
Adjuntar la lámpara:
1. Alinee los orificios en el costado de la campana (B) con la correa de montaje (E).
2. Asegure la cubierta (B) a la correa de montaje (E) con los tornillos (A).
3. Presionando el botón en el dosel para ajustar la longitud del alambre de acero a la altura final

8 |
français
Remarque! L'installation par un électricien agréé est
recommandée.
• Trouvez votre fusible principal ou boîte de disjoncteur
dans votre maison.
• Éteignez et / ou dévissez tous les fusibles.
• Éteignez tous les interrupteurs de disjoncteur contrôler
la puissance de la pièce dans laquelle vous travaillent.
• Éteignez tous les interrupteurs muraux. Si des chaînes
de traction ou les commutateurs sont sur l'appareil,
éteignez.
Remarque! Ne pas endommager l'isolation de fil
pendant l'installation.
Remarque! Assurez-vous qu'aucun bord rugueux ou
tranchant n'est en contact avec
fils.
Instructions de montage:
1. Confirmez que l'appareil est éteint.
2. Vissez les vis (C) dans la sangle de fixation (E).
3. Fixez la sangle de fixation (E) à une boîte électrique avec les vis (C).
Faites les connexions de fil:
1. Confirmez que l'appareil est éteint.
2. Branchez le fil noir du boîtier électrique sur le fil noir.
3. Branchez le fil blanc du boîtier électrique sur le câble blanc.
4. Fixez le fil de terre vert / jaune au Sangle de montage avec vis de mise à la terre (D).
Fixez la lampe:
1. Alignez les trous sur le côté du capot (B) avec la bande de montage (E).
2. Fixez le capot (B) à la sangle de montage (E) à l’aide des vis (A).
3. En appuyant sur le bouton sur la canopée pour ajuster la longueur du fil d'acier à la hauteur
finale

9 |
-
 1
1
-
 2
2
-
 3
3
-
 4
4
-
 5
5
-
 6
6
-
 7
7
-
 8
8
-
 9
9


ROOMS TO GO 90682305 Assembly Instructions
- Taper
- Assembly Instructions
dans d''autres langues
- English: ROOMS TO GO 90682305
- español: ROOMS TO GO 90682305
Documents connexes
Autres documents
-
 Kichler Lighting 43354CH Manuel utilisateur
-
 Hinkley 3023DG Guide d'installation
-
 Hinkley 29307 Rhodes 1 Light Outdoor Hanging Lantern Manuel utilisateur
-
 Hinkley Lighting 4811KZ Guide d'installation
-
 Hinkley 2530 Danbury 23 Inch Tall 3 Light Outdoor Hanging Lantern Manuel utilisateur
-
 Hinkley 34106BNG Manuel utilisateur
-
Golden Lighting 606SFMPRBZTEA Mode d'emploi
-
 Hampton Bay 17201 Guide d'installation
-
 Kichler Lighting 44360DWG Manuel utilisateur


