La page est en cours de chargement...

2
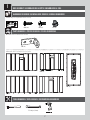
AVANT L’ASSEMBLAGE :
• Assembler sur une surface de niveau
• Nous recommandons 2+ adultes pour l’assemblage
• Vídeos et guides d’aide sont disponibles
Scannez le code ci-dessous pour voir l’assemblage.
http://go.lifetime.com/150playlist
Légende des icônes.......................4
Avertissements et avis...................5
Identifi cateur de pièces.................6
Assemblage de la boÎte................7
Assemblage du couvercle............13
Avertissements supplémentaires...23
Nettoyage et entretien.................27
Enregistrement........................28
Garantie..............................30
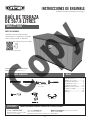
OUTILS REQUIS SOMMAIRE
CONTACTER AUX SERVICES À LA CLIENTÈLE LIFETIME
®
:
Composer le 1-800-225-3865
Du lundi au vendredi 7 h – 17 h (HNR)
et samedi 9 h – 13 h (HNR)
t’Chat en direct: www.lifetime.com
(cliquer sur la languette « Ask An Expert »)
Videos educatifs: www.youtube.com/lifetimeproducts
QUESTIONS ?
N° DE MODÈLE ET RÉFÉRENCE DU PRODUIT (vous aurez besoin des deux lorsque vous nous contactez)
N° de modèle : 60254
Référence du produit :
For English, see page 1. Para el español, ver la página 3.
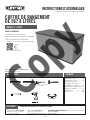
INSTRUCTIONS D’ASSEMBLAGE
MODEL #60091
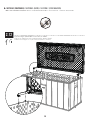
COFFRE DE RANGEMENT
DE 567.8 LITRES
MODÈLE n° 60254
7/16 po (11 mm)
1/2 po (13 mm)
3/8 po (10 mm), 7/16 po (11 mm),
1/2 po (13 mm)
Pour les services à la clientèle du continent européen :
É-mail : [email protected]
Copy
La page est en cours de chargement...

4
• Indicates the parts to be used for a section.
• Indique les pièces à utiliser pour une section.
• Indica las piezas que se usarán en una sección.
• Indicates special heed should be taken when reading.
• Indique qu’une attention spéciale doit être prise lors de la lecture.
• Indica que uno debe prestar atención al leer.
• Indicates the hardware to be used for a section.
• Indique la quincaillerie à utiliser pour une section.
• Indica el herraje que se usará en una sección.
• Indicates the tools to be used for a section.
• Indique les outils à utiliser pour une section.
• Indica el instrumental que se usará en una sección.
• Indicates no hardware required for a specifi c page.
• Indique qu’aucun matériel n’est requis pour une page précise.
• Indica que no se necesita herraje en una página específi ca.
• Indicates no parts required for a specifi c section.
• Indique qu’aucune pièce n’est requise pour une section précise.
• Indica que no se necesitan partes en una sección específi ca.
• Indicates to use/not to use an electric drill for a specifi c step.
• Indique quand utiliser ou ne pas utiliser une perceuse électrique pour une étape précise.
• Indica usar o no usar un taladro eléctrico en un paso específi co.
ICON LEGEND / LÉGENDE DES ICÔNES / LEYENDA DE ÍCONOS
• These Nuts are centerlock nuts. They are designed to be tight; therefore, they will be harder to tighten. Tighten until fl ush
with the metal or plastic.
• Ces écrous son écrous de blocage central. Ils sont conçus à être serrés; ensuite, ils seront plus diffi ciles à resserrer. Serrer
jusqu’à ce qu’ils soient au ras du métal ou plastique.
• Estas tuercas son tuercas de bloque central. Ellas son diseñadas para ser apretadas; entonces, ellas serán más difícil
ajustar. Apretar hasta que ellas estén al ras del metal o plástico.
1184609 C 1/19/2018
Copy

5
English:
• Failure to follow these warnings may result in serious injury or property damage and will void warranty.
• To ensure safety, do not attempt to assemble this product without following the instructions carefully.
• Assemble on a level surface.
• Be aware that plastic pieces can be damaged by overtightening the screws. To avoid damage, we strongly recommend
the use of a drill with a low torque setting. A #2 Phillips screwdriver may also be used.
• Two capable adults are required for assembly.
• All who participate in the assembly process should wear safety glasses throughout the assembly.
• Do not use or store hot objects near the product.
• Proper and complete assembly are essential to reduce the risk of accident or injury.
• Most injuries are caused by misuse and/or not following instructions.
• Other warnings may be viewed towards the end of this manual.
Français :
• Le non-respect de ces avertissements peut entraîner en conséquence des blessures sérieuses ou dommages à la propriété et annulera la
garantie.
• Pour assurer votre sécurité, ne tentez pas d’assembler ce produit sans suivre attentivement les instructions.
• Assemblez ce produit sur une surface nivelée.
• Il est possible d’endommager les pièces en plastique en serrant les vis excessivement. Pour éviter d’endommager le
plastique, nous recommandons vivement l’usage d’une perceuse électrique de faible puissance. Vous pouvez aussi
utiliser un tournevis cruciforme n° 2.
• Deux adultes sont requis pour assembler ce produit.
• Toutes les personnes qui participent à l’assemblage doivent porter des lunettes de sécurité tout le long de l’assemblage.
• N’utilisez pas et ne conservez pas d’objets chauds près du produit.
• L’assemblge correct et complet est essentiel pour réduire le risque de dangers ou de blessures.
• La plupart des blessures sont causées par l’abus ou le non-respect des instructions.
• Vous pouvez lire d’autres avertissements vers la fi n de ce manuel.
Español:
• El incumplimiento de seguir estas advertencias puede resultar en lesiones graves o daño a la propiedad y anulará la garantía.
• Para asegurar la seguridad, no intente armar este producto sin seguir detenidamente las instrucciones.
• Ensamble este producto sobre una superfi cie nivelada.
• Es posible endañar las piezas de plástico por apretar demasiado los tornillos. Para evitar dañar el plástico, recomendamos
que use un taladro eléctrico de baja potencia. Se puede usar también un destornillador de punta Phillips No. 2.
• Dos adultos competentes son requeridos para ensamblar este producto.
• Todos los que participan en el ensamble deben llevar gafas de seguridad a lo largo del ensamble.
• No use ni almacene objetos calientes cerca el producto.
• El armado propio y completo son esenciales para reducir el riesgo de accidentes y lesiones.
• La mayoría de las lesiones son causadas por el uso erróneo y/o el incumplimiento de seguir las instrucciones.
• Se pueden ver otras advertencias al fi nal de este manual.
WARNINGS & NOTICES / AVERTISSEMENTS ET AVIS / ADVERTENCIAS Y AVISOS

6
EZC
Metal Parts / Pièces en métal / Piezas de metal
Plastic Parts / Pièces en plastique / Piezas de plástico
Hardware Bag / Sac de quincaillerie / Bolsa de herraje
PARTS REQUIRED / PIÈCES REQUISES / PIEZAS REQUERIDAS
HARDWARE REQUIRED / QUINCAILLERIE REQUISE / HERRAJE REQUERIDO
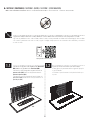
PARTS IDENTIFIER / IDENTIFICATEUR DE PIÈCES / IDENTIFICADOR DE PIEZAS
AMZ (x1) AGN (x1)
AGY (x1)ANA (x1)
ANC (x1)
AND (x1)
EZA (x1)
EYY (x1)
BET (x4)
AAO (x4)
EZB (x2)
AKF (x2)
EYW (x1)

7
AMZ (x1) AGN (x1)
AGY (x1)ANA (x1)
ANC (x1)
ADW (x26)
Plastic Parts / Pièces en plastique / Piezas de plástico
Metal Parts / Pièces en métal / Piezas de metal
Hardware Bag / Sac de quincaillerie / Bolsa de herraje
TOOLS REQUIRED / OUTILS REQUIS / INSTRUMENTAL REQUERIDO
PARTS REQUIRED / PIÈCES REQUISES / PIEZAS REQUERIDAS
HARDWARE REQUIRED / QUINCAILLERIE REQUISE / HERRAJE REQUERIDO
BOX ASSEMBLY / ASSEMBLAGE DE LA BOÎTE / ENSAMBLE DE LA CAJA
1
DRC (x1)
ADJ (x1)
EYW (x1)
7/16 in/po (11 mm)
EZC

TOOLS AND HARDWARE REQUIRED / OUTILS ET QUINCAILLERIE REQUIS / INSTRUMENTAL Y HERRAJE REQUERIDOS
X SECTION 1 (CONTINUED) / SECTION 1 (SUITE) / SECCIÓN 1 (CONTINUACIÓN)
8
ANC
ANA
1.1 1.2
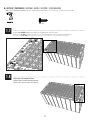
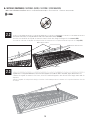
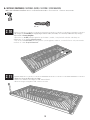
• Insert the six (6) tabs at the bottom of the Rear Panel
(ANA) into the six (6) slots in the Floor Panel (ANC).
• Insérer les six (6) languettes au bord inférieur du
panneau arrière (ANA) dans les six (6) fentes dans le
panneau de plancher (ANC).
• Insertar las seis (6) lengüetas al borde inferior del
panel trasero (ANA) dentro de las seis (6) ranuras en el
panel de piso (ANC).
• Slide the Rear Panel to the left until it stops.
• Faire glisser le panneau arrière à gauche jusqu’à
ce qu’il s’arrête.
• Deslizar el panel trasero a la izquierda hasta que
se pare.
LIFETIME
©
• If you have trouble with this section, follow the code below to view a video on the assembly for this section.
• En cas de problèmes avec cette section, suivre le code en bas pour voir un vidéo sur l’assemblage à cette section.
• En caso de problemas con esta sección, seguir el código debajo para ver un video sobre la instalación y ensamble
en esta sección.
http://go.lifetime.com/150boxassembly

TOOLS AND HARDWARE REQUIRED / OUTILS ET QUINCAILLERIE REQUIS / INSTRUMENTAL Y HERRAJE REQUERIDOS
X SECTION 1 (CONTINUED) / SECTION 1 (SUITE) / SECCIÓN 1 (CONTINUACIÓN)
9
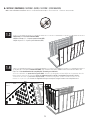
AMZ
AGN
AGN
1.3
• Repeat steps 1.1–1.2 for the Front Panel (AMZ).
• Répéter les étapes 1.1 – 1.2 pour le panneau avant (AMZ).
• Repetir los pasos 1.1–1.2 para el panel delantero (AMZ).
1.4
• Fold over the ends of the Left Side Panel (AGN), and insert the tabs at the bottom of the Panel into the slots in the
Floor Panel. You should hear the tabs snap into place. The notch goes at the back.
• Plier les extrémités du panneau latéral gauche (AGN), et insérer les languettes au bord inférieur du panneau dans les
fentes dans le panneau de plancher. Insérer les languettes jusqu’à ce qu’elles s’enclenchent. L’encoche va à l’arrière.
• Doblar los extremos del panel lateral izquierdo (AGN), e insertar las lengüetas al borde inferior del panel en las
ranuras en el panel de piso. Insertar las lengüetas hasta que se encajen en su lugar. La muesca va en la parte trasera.
• Notch
• Encoche
• Muesca

TOOLS AND HARDWARE REQUIRED / OUTILS ET QUINCAILLERIE REQUIS / INSTRUMENTAL Y HERRAJE REQUERIDOS
X SECTION 1 (CONTINUED) / SECTION 1 (SUITE) / SECCIÓN 1 (CONTINUACIÓN)
10
1.5
1.6
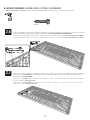
• Secure the Left Side Panel to the Rear Panel
with four (4) Screws (ADW). Then, secure the Panel
to Front Panel using four (4) more Screws (ADW).
• Attacher bien le panneau latéral gauche au
panneau arrière à l’aide de quatre (4) vis (ADW).
Ensuite, attacher bien le panneau au panneau
avant à l’aide de quatre (4) vis (ADW) en plus.
• Sujetar bien el panel lateral izquierdo al
panel trasero usando cuatro (4) tornillos (ADW).
Entonces, sujetar el panel al panel delantero
usando cuatro (4) tornillos (ADW) adicionales.
ADW (x16)
• Repeat steps 1.4–1.5 for the right side.
• Répéter les étapes 1.4 – 1.5 pour le côté droit.
• Repetir los pasos 1.4–1.5 para el lado derecho.
ADW
ADW
ADW
ADW

TOOLS AND HARDWARE REQUIRED / OUTILS ET QUINCAILLERIE REQUIS / INSTRUMENTAL Y HERRAJE REQUERIDOS
X SECTION 1 (CONTINUED) / SECTION 1 (SUITE) / SECCIÓN 1 (CONTINUACIÓN)
11
ADW (x10)
1.7
1.8
• Insert a Screw (ADW) through each of the five (5) tabs on the Left Side Panel.
• Insérer une vis (ADW) à travers chaque une des cinq (5) languettes dans le panneau latéral gauche.
• Insertar un tornillo (ADW) por cada una de las cinco (5) lengüetas en el panel lateral izquierdo.
• Repeat step 1.8 for the Right Side Panel.
• Répéter l’étape 1.8 pour le panneau latéral droit.
• Repetir el paso 1.8 para el panel lateral derecho.
ADW
ADW
ADW
ADW
ADW

TOOLS AND HARDWARE REQUIRED / OUTILS ET QUINCAILLERIE REQUIS / INSTRUMENTAL Y HERRAJE REQUERIDOS
X SECTION 1 (CONTINUED) / SECTION 1 (SUITE) / SECCIÓN 1 (CONTINUACIÓN)
12
• Attach the Locking Tab (EYW) to the Front Panel using the hadware indicated.
• Attacher la languette de verrouillage (EYW) au panneau avant à l’aide de la quincaillerie indiquée.
• Sujetar la lengüeta de cierre (EYW) al panel delantero usando el herraje indicado.
DRC (x1)
DRC
EYW
ADJ
ADJ (x1)
7/16 in/po
(11 mm)
1.9

13
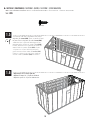
AND (x1)
EZA (x1)
Metal Parts / Pièces en métal / Piezas de metal
Plastic Parts / Pièces en plastique / Piezas de plástico
Hardware Bag / Sac de quincaillerie / Bolsa de herraje
TOOLS REQUIRED / OUTILS REQUIS / INSTRUMENTAL REQUERIDO
PARTS REQUIRED / PIÈCES REQUISES / PIEZAS REQUERIDAS
HARDWARE REQUIRED / QUINCAILLERIE REQUISE / HERRAJE REQUERIDO
LID ASSEMBLY / ENSAMBLE DE LA TAPA / ASSEMBLAGE DU COUVERCLE
2
BES (x6)
EYY (x1)
AAB (x6)
BET (x4)
BCK (x6)
AAO (x4)
EZB (x2)
DRF (x4)
AKF (x2)
EZC
7/16 in/po, 1/2 in/po
(11 mm, 13 mm)
7/16 in/po
(11 mm)
1/2 in/po
(13 mm)

14
TOOLS AND HARDWARE REQUIRED / OUTILS ET QUINCAILLERIE REQUIS / INSTRUMENTAL Y HERRAJE REQUERIDOS
X SECTION 2 (CONTINUED) / SECTION 2 (SUITE) / SECCIÓN 2 (CONTINUACIÓN)
• Attach the Lid Locking Tab (EYY) to the Lid Support (EZA) using the hardware indicated.
• Attacher la languette de verrouillage pour le couvercle (EYY) au support du couvercle (EZA) à l’aide de la quincaillerie indiquée.
• Sujetar la lengüeta de cierre para la tapa (EYY) al soporte de la tapa (EZA) usando el herraje indicado.
LIFETIME
©
• If you have trouble with this section, follow the code below to view a video on the assembly for this section.
• En cas de problèmes avec cette section, suivre le code en bas pour voir un vidéo sur l’assemblage à cette section.
• En caso de problemas con esta sección, seguir el código debajo para ver un video sobre la instalación y ensamble
en esta sección.
http://go.lifetime.com/150gallidassembly
BES (x2)
BES
BES
EYY (x1)
EYY
EZA
EZA
AAB (x2)
AAB
AAB
AAB
7/16 in/po
(11 mm)
7/16 in/po
(11 mm)
2.1
• These Nuts (AAB) are centerlock nuts. They are
designed to be tight; therfore, they will be harder to
tighten. Continue turning them until they are flush with
the Lid Locking Tab (EYY).
• Ces écrous (AAB) son écrous de blocage central.
Ils sont conçus à être serrés; ensuite, ils seront plus
difficiles à resserrer. Continuez de les resserrer jusqu’à
ce qu’ils soient a ras de la languette de verrouillage
pour le couvercle (EYY).
• Estas tuercas (AAB) son tuercas de bloque central.
Ellas son diseñadas para ser apretadas; entonces, ellas
serán más difícil ajustar. Siga girándolas hasta que
estén a ras de la lengüeta de cierre para la tapa (EYY).

15
TOOLS AND HARDWARE REQUIRED / OUTILS ET QUINCAILLERIE REQUIS / INSTRUMENTAL Y HERRAJE REQUERIDOS
X SECTION 2 (CONTINUED) / SECTION 2 (SUITE) / SECCIÓN 2 (CONTINUACIÓN)
2.2
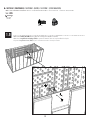
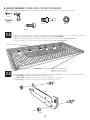
• Rotate the Lid Support downward, and insert the opposite end into the slot in the front, right corner of the Lid.
• Tourner le support du couvercle ver le bas, et insérer l’extrémité opposée dans la fente dans l’angle avant droit du
couvercle.
• Girar el soporte de la tapa hacia abajo, e insertar el extremo opuesto en la ranura en la esquina delantera derecha
de la tapa.
2.3
• Insert an end of the Lid Support into the slot in the front corner of the Lid (AND).
• Insérer une extrémité du support du couvercle dans la fente dans l’angle avant gauche du couvercle (AND).
• Insertar un extremo del soporte de la tapa dentro de la ranura en la esquina delantera izquierda de la tapa (AND).
AND
Front / Avant / Delantero
Rear / Arrière / Trasero
Notch / Encoche / Muesca

16
TOOLS AND HARDWARE REQUIRED / OUTILS ET QUINCAILLERIE REQUIS / INSTRUMENTAL Y HERRAJE REQUERIDOS
X SECTION 2 (CONTINUED) / SECTION 2 (SUITE) / SECCIÓN 2 (CONTINUACIÓN)
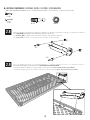
• Attach the Lid Support to the Lid using the hardware indicated. Do not overtighten.
• Attacher le support du couvercle au couvercle à l’aide de la quincaillerie indiquée. Ne pas trop serrer.
• Sujetar el soporte de la tapa a la tapa usando el herraje indicado. No apretar demasiado.
• The Hinge (EZB) goes together this way for the left side of the Lid.
• La charnière (EZB) se monte dans cette manière pour le côté gauche du couvercle.
• La bisagra (EZB) se monta en esta manera para el lado izquierdo de la tapa.
EZB
BET
BET
AAO
AAO
2.4
2.5
• Notches at the rear of the Lid.
• Encoches à l’arrière du couvercle.
• Muescas al trasero de la tapa.
Front / Avant / Delantero
BCK
BCK
BCK
BCK
BCK
BCK
1/2"
(13 mm)
BCK (x6)
1/2"
(13 mm)
BET (x2)
AAO (x2)

17
TOOLS AND HARDWARE REQUIRED / OUTILS ET QUINCAILLERIE REQUIS / INSTRUMENTAL Y HERRAJE REQUERIDOS
X SECTION 2 (CONTINUED) / SECTION 2 (SUITE) / SECCIÓN 2 (CONTINUACIÓN)
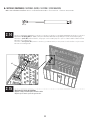
• By design, the Screws (DRF) are slightly larger than the holes; therefore, it is easier to perform this step using a
socket wrench. Do not overtighten.
• À dessein, les vis (DRF) sont plus grandes que les trous ; ensuite, c’est plus facile exécuter cette étape en utilisant
une clé de douilles. Ne pas trop serrer.
• Por diseño, los tornillos (DRF) son más grandes que los agujeros; entonces, es más fácil hacer este paso usando
una llave de cubos. No apretar demasiado.
2.6
2.7
• Insert the left Hinge into the slot and rotate it downard as shown. The Ball Studs face toward the inside.
• Insérer la charnière gauche dans la fente, et tourner-la vers le bas comme illustré. Les clous à rotule font face vers l’intérieur.
• Insertar la bisagra izquierda en la ranura, y girarla hacia abajo como se muestra. Los pernos de articulación dan por adentro.
DRF (x2)
DRF
DRF

18
TOOLS AND HARDWARE REQUIRED / OUTILS ET QUINCAILLERIE REQUIS / INSTRUMENTAL Y HERRAJE REQUERIDOS
X SECTION 2 (CONTINUED) / SECTION 2 (SUITE) / SECCIÓN 2 (CONTINUACIÓN)
1/2 in/po
(13 mm)
1/2 in/po
(13 mm)
• The Hinge (EZB) goes together this way for the right side of the Lid.
• La charnière (EZB) se monte dans cette manière pour le côté droit du couvercle.
• La bisagra (EZB) se monta en esta manera para el lado derecho de la tapa.
2.8
2.9
• Insert the right Hinge as you did the left. The Ball Studs face toward the inside.
• Insérer la charnière droite de la même façon que la gauche. Les clous à rotule font face vers l’intérieur.
• Insertar la bisagra derecha de la misma manera que la izquierda. Los pernos de articulación dan por adentro.
EZB
BET
BET
AAO
AAO
BET (x2)
AAO (x2)

19
TOOLS AND HARDWARE REQUIRED / OUTILS ET QUINCAILLERIE REQUIS / INSTRUMENTAL Y HERRAJE REQUERIDOS
X SECTION 2 (CONTINUED) / SECTION 2 (SUITE) / SECCIÓN 2 (CONTINUACIÓN)
• By design, the Screws (DRF) are slightly larger than the holes; therefore, it is easier to perform this step using a
socket wrench. Do not overtighten.
• À dessein, les vis (DRF) sont plus grandes que les trous ; ensuite, c’est plus facile exécuter cette étape en
utilisant une clé de douilles. Ne pas trop serrer.
• Por diseño, los tornillos (DRF) son más grandes que los agujeros; entonces, es más fácil hacer este paso usando
una llave de cubos. No apretar demasiado.
• Rotate the hinges to 90° angles as shown.
• Tourner les charnières aux angles de 90° comme illustré.
• Girar las bisagras a ángulos de 90° como se muestra.
2.10
2.11
DRF (x2)
DRF
DRF
La page est en cours de chargement...

21
TOOLS AND HARDWARE REQUIRED / OUTILS ET QUINCAILLERIE REQUIS / INSTRUMENTAL Y HERRAJE REQUERIDOS
X SECTION 2 (CONTINUED) / SECTION 2 (SUITE) / SECCIÓN 2 (CONTINUACIÓN)
BES (x4)
BES
BES
7/16"
(11 mm)
7/16"
(11 mm)
AAB (x4)
2.13
• Secure the Left Hinge to the Side Panel using the hardware provided. Repeat the last step for the right Hinge.
• Attacher la charnière gauche au panneau latéral à l’aide de la quincaillerie indiquée. Répéter l’étape précédente pour
la charnière droite.
• Sujetar la bisagra izquierda al panel lateral usando el herraje indicado. Repetir el paso anterior para la bisagra derecha.
AAB
AAB

22
TOOLS AND HARDWARE REQUIRED / OUTILS ET QUINCAILLERIE REQUIS / INSTRUMENTAL Y HERRAJE REQUERIDOS
X SECTION 2 (CONTINUED) / SECTION 2 (SUITE) / SECCIÓN 2 (CONTINUACIÓN)
AKF (x2)
AKF
• Orient the Gas Spring (AKF) as shown, and press until the Ball Studs snap into place in the ends of the Spring.
• Orienter le piston (AKF) comme illustré, et appuyer sur le ressort jusqu’à ce que les clous à rotule s’attachent aux
extrémités du ressort à gaz.
• Orientar el amortiguador (AKF) como se muestra, y presionar hasta que los pernos de articulación se sujeten a los
extremos del amortiguador.
2.14
2.15
• Repeat the last step for the right Hinge.
• Répéter l’étape précédente pour la charnière droite.
• Repetir el paso anterior para la bisagra derecha.

23
> 90°
<
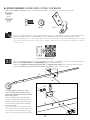
90°
• The Gas Spring helps prevent the automatic closing of the Lid. Do not open the Lid more than 90°.
• Le piston aide à empêcher le fermeture automatique du couvercle. N’ouvrer le couvercle que 90°.
• El amortiguador de gaz ayuda a prevenir el cierre automático de la tapa. No abrir la tapa más de 90°.
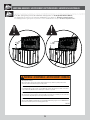
ADDITIONAL WARNINGS / AVERTISSEMENTS SUPPLÉMENTAIRES / ADVERTENCIAS ADICIONALES
!
!
• Keep fingers free of hinge.
• This product is NOT a toy chest. This product is NOT intended for use by children. To prevent possible risk of
suffocation, do NOT allow children to play inside this product.
• Conserver les doigts loin de la charnière.
• Ce produit N’EST PAS un coffre de jouets. Ce produit N’EST PAS destiné à être utilisé par les infants. Pour éviter le
risque de suffocation, NE PAS laisser les enfants jouer à l’intérieur de ce produit.
• Mantener los dedos lejos de la bisagra.
• Este producto NO es un baúl de juguetes. Este producto NO está diseñado para ser utilizado por niños. Para evitar
una posible asfixia, NO permitir que los niños juegen dentro de este producto.
• Halten Sie die Finger fern vom Scharnier.
• Dieses Produkt ist KEINE Spielzeugkiste. Dieses Produkt ist NICHT für Kinder geeignet. Lassen Sie KEINE Kinder im
Innenraum des Produkts spielen, da Erstickungsgefahr besteht.
1189189
WARNING / ADVERTENCIA / AVERTISSEMENT / WARNUNG
!
La page est en cours de chargement...
La page est en cours de chargement...
La page est en cours de chargement...
La page est en cours de chargement...
La page est en cours de chargement...
La page est en cours de chargement...
La page est en cours de chargement...
La page est en cours de chargement...
La page est en cours de chargement...
-
 1
1
-
 2
2
-
 3
3
-
 4
4
-
 5
5
-
 6
6
-
 7
7
-
 8
8
-
 9
9
-
 10
10
-
 11
11
-
 12
12
-
 13
13
-
 14
14
-
 15
15
-
 16
16
-
 17
17
-
 18
18
-
 19
19
-
 20
20
-
 21
21
-
 22
22
-
 23
23
-
 24
24
-
 25
25
-
 26
26
-
 27
27
-
 28
28
-
 29
29
-
 30
30
-
 31
31
-
 32
32


Lifetime 60254 Le manuel du propriétaire
- Taper
- Le manuel du propriétaire
- Ce manuel convient également à
dans d''autres langues
- English: Lifetime 60254 Owner's manual
- español: Lifetime 60254 El manual del propietario
Documents connexes
-
Lifetime 60254 Le manuel du propriétaire
-
Lifetime 60215 Le manuel du propriétaire
-
-
-
-
-
-
-
Lifetime 60186 Le manuel du propriétaire
-
Lifetime 60367 Le manuel du propriétaire