
3
rd
Party Integration Guide
v5.1.1
Remedy Help Desk (v4.2 and v5)
HP Service Desk (v4.2 and v5)
Volume V of V
March 2006
www.esecurity.net
©1999-2006 e-Security, Inc. All rights reserved.

Preface
Preface
The e-Security Technical documentation is general-purpose operation and
reference guide. This documentation is intended for Information Security
Professionals. The text in this documentation is designed to serve as a source of
reference about e-Security’s Enterprise Security Management System. There is
additional documentation available on the e-Security web portal.
e-Security Technical documentation is broken down into five different volumes.
They are:
Volume I – Sentinel™ 5 Install Guide
Volume II – Sentinel™ 5 User’s Guide
Volume III – Sentinel™ 5 Wizard User’s Guide
Volume IV – Sentinel™ 5 User’s Reference Guide
Volume V – Sentinel™ 5 3
rd
Party Integration Guide
Volume I – Sentinel Install Guide
This guide explains how to install:
Sentinel Server
Sentinel Console
Sentinel Correlation Engine
Sentinel Crystal Reports
Wizard Agent Builder
Wizard Agent Manager
Advisor
Volume II – Sentinel User’s Guide
This guide discusses:
Sentinel Console Operation
Sentinel Features
Sentinel Architecture
Sentinel Communication
Vulnerability assessment
Event monitoring
Event filtering
Event correlation
Sentinel Data Manager
Event Configuration for Business
Relevance
Mapping Service
Historical reporting
Wizard Host Management
Incidents
Cases
User management
Workflow
Volume III – Wizard User’s Guide
This guide discusses:
Wizard Agent Builder Operation
Wizard Agent Manager
Agents
Wizard Host Management
Building and maintaining agents
Volume IV - Sentinel User’s Reference Guide
This guide discusses:
Wizard scripting language User Permissions

Preface
Wizard parsing commands
Wizard administrator functions
Wizard and Sentinel meta-tags
Sentinel correlation engine
Correlation command line options
e-Security database schema
Volume V - Sentinel 3
rd
Party Integration Guide
Remedy
HP OpenView Operations
HP Service Desk

Table of Contents
Chapter 1 – Remedy Integration.....................................................................1-1
Configuration..............................................................................................................1-1
Remedy to e-Security Sentinel Data Flow..............................................................1-5
Installing Sentinel...................................................................................................1-9
Remedy to Sentinel Data Flow Configuration............................................................1-9
Chapter 2 – Remedy Help Desk Operations ..................................................2-1
Remedy Help Desk Operations..................................................................................2-1
Manually Reconfiguring the Remedy Interface Settings............................................2-1
Remedy Settings....................................................................................................2-1
Resetting the Remedy Password...........................................................................2-2
Chapter 3 – Installing HP OpenView Service Desk for Windows.................3-1
System Requirements................................................................................................3-1
Installation..................................................................................................................3-2
Configuring HP OpenView Service Desk...............................................................3-2
Enabling Service Desk to Sentinel (bi-directional) Interface ..................................3-3
Chapter 4 – HP OpenView Service Desk Integration ....................................4-1
HP OpenView Service Desk ......................................................................................4-1
Sending Incidents to HP OpenView Service Desk.................................................4-2
HP OpenView Service Desk Client ........................................................................4-3
HP OpenView Service Desk – Bi-Directional Interface..........................................4-5
Manually Reconfiguring the HP OpenView Service Desk Interface Settings.........4-6
Appendix A – Sentinel Copyright Information..............................................A-1
i

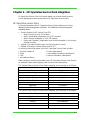
Chapter 1 – Remedy Integration
Remedy integration for Sentinel v4.2 or v5 can be used to create workflow
applications that are integrated with both the Remedy Trouble Ticketing System
and Sentinel system. Key features with the Remedy integration are:
Ability to create a new case in Remedy Help Desk based on an incident in
e-Security Sentinel.
Ability to update a related case in Help Desk, when e-security Sentinel
incident is updated.
Ability to update an e-security Sentinel incident when a related Case in Help
Desk is updated.
Configuration
To change the Remedy Help Desk Case form
1. Login into Remedy Administrator > Forms, double-click on HPD
HelpDesk.
2. In order to support integration with e-Security Sentinel, the Help Desk
Case form needs a character (EsecIncidentId) and attachment pool
(Attachment Pool) field to be added. These field entries will be used to
add incident attachments to the form.
3. To add the EsecIncidentId character field:
Click on the 'New Character Field' button and place it somewhere on
the form.
1-1

Chapter 1 – Remedy Integration
Under the Display tab, set a label.
Under the Database tab, in the Name field set the name to
EsecIncidentID.
4. To add the Attachment Pool character field with the following three fields:
EsecEvents, EsecVuln and EsecAdv.
Click the 'Create Attachment Pool' button.
Under the Display tab, in the label field enter a label name (ex: esec
attachments).
Under Attach Fields, in the 'Enter Attachments Field Label', enter:
à EsecEvent and click Add
à EsecVuln and click Add
à EsecAdv and click Add
5. Click Save.
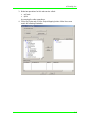
Creating the web service
1. In Remedy Administrator, in the navigation pane high-light 'Web
Services'. Right-click > New Web Services and click the 'Web Services'
tab.
2. Using the Help Desk Case as a base form, create a WebService called
'EsecToHelpDesk' and select Base Form 'HPD HelpDesk'.
1-2

e-Security, Inc
.
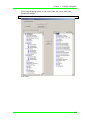
3. Make two operations for this web service called:
opCreate
opSet
by removing the other operations.
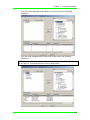
4. Select OpCreate and click the Output Mapping button. Make the screen
match the following illustration.
1-3

Chapter 1 – Remedy Integration
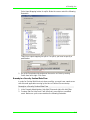
Select Input Mapping button for opCreate. Make the screen match the
following illustration.
NOTE: To remove an item, high-light it > right-click > cut.
Click Save.
1-4

e-Security, Inc
.
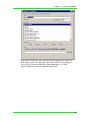
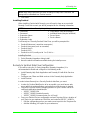
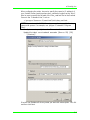
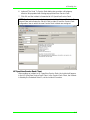
Select Input Mapping button for opSet. Make the screen match the following
illustration.
There is no output mapping for opSet. For opSet, you have to specify a
qualification:
5. Go to the Permissions tab and move the service to Public by moving
Public from left to right. Click Save.
Remedy to e-Security Sentinel Data Flow
In order for Sentinel WebService to be accessible, you must have a web server
with Axis web application running by the time of Sentinel Server startup.
Remedy to e-Security Sentinel Data Flow
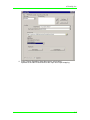
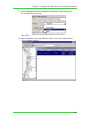
1. In the Remedy Administrator, high-light Filters and right-click Add Filter.
2. Create a filter for Help Desk Case form that is executed on a modified
event. Make sure your screen matches the following illustration.
1-5

Chapter 1 – Remedy Integration
3. Under the 'If Action' tab, in the 'New Action' drop down menu select 'Set
field' action, in the 'Set Field' pane select 'WEB SERVICE' and provide
the URL for e-Sentinel WebService (http://<webserver IP or DNS
name>:8080/axis/services/EsecWebService?wsdl).
1-6

e-Security, Inc
.
4. In the 'Choose Operation' drop down menu, select select
'updateEsecIncident' method and set the Input and Output mapping.
1-7

Chapter 1 – Remedy Integration
Click the Output Mapping button. Make your screen match the following
illustration.
Click the Input Mapping button. Make your screen match the following
illustration.
NOTE: To set your Map, select an item on the left (i.e. incidentId), select an item
on the right (i.e. EsecIncidentId) and click the Map button.
1-8

e-Security, Inc
.
NOTE: After setup, whenever you save a change in Help Desk Case form, the
change will be submitted to a Sentinel service.
5. Click Save.
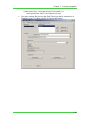
Installing Sentinel
When installing Sentinel with Remedy, you will need to have an account with
Remedy. From this account you will be prompted for the following information.
NOTE: You must have Remedy Integration permission.
Username
Password
Requestor Name
Requester ID
Requestor Login
Group Name (may be left blank)
Individual Name (may be left Blank)
Server Name
Service Name
For Remedy to e-Security Sentinel Data Flow, you will be prompted for:
Sentinel Webserver (<machine name:port>)
Sentinel Username (such as esecadm)
Sentinel UserID
Sentinel UUID
Sentinel Lock ID (usually set to 1 or 2, this is....
Installing Sentinel
1. Select Remedy integration during install.
2. Have the above information available during the install process.
Remedy to Sentinel Data Flow Configuration
If you will be using the 3
rd
Party Integration (Remedy Integration), it is
recommended to install and configure in the following order:
Install Remedy Help Desk Application and Remedy 6.0 with Web Services
Plug-in.
Configure new Filters and Web services in the Remedy Help Application.
Install Sentinel
In order to have Remedy to e-Security Sentinel data flow, you must:
In order for Sentinel WebService to be accessible, you must have a web
server with Axis web application running before sentinel server is started.
Copy all the jar files from the following location on your Sentinel Server to
<axis web application>\webclient\lib.
à %ESEC_HOME%\lib
à %ESEC_HOME%\sentinel\console
à %ESEC_HOME%\communicator (for v4.2 only)
Copy your Sentinel Server configuration.xml and .keystore file to a location of
your choice to your webserver. Both files are located at %ESEC_HOME%.
à Edit the configuration.xml on your web server to point to the .keystore file.
à Add the following JVM option to your webserver,
1-9

Chapter 1 – Remedy Integration
Dcom.esecurity.configurationfile=<path to
configuration.xml>\configuration.xml
You must create a filter for the Help Desk Case form that is executed on a
“Modified” event. This filter calls the e-Security web server.
1-10

Chapter 2 – Remedy Help Desk Operations
Remedy integration can be used to create workflow applications. Features with
the Remedy integration are:
Ability to create a new case in Remedy Help Desk based on an incident in
e-Security Sentinel.
Ability to update a related case in Help Desk, when e-security Sentinel
incident is updated.
Ability to update an e-security Sentinel incident when a related Case in Help
Desk is updated.
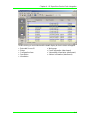
Remedy Help Desk Operations
How to send an Incident for Remedy Help Desk
1. Click the Incidents tab.
2. In the navigator pane, expand the Incident Views folder and high light
Incident View Manager.
NOTE: If you already have an incident set for another external system, you
cannot change it.
3. Expand one of the incident views and double-click on your incident. Your
incident will open.
4. Click the Remedy button.
The Incident will be updated with an External Data tab and Remedy button.
How to update an Incident to Remedy Help Desk
1. Click the Incidents tab.
2. Expand the navigator pane on the left and double-click an incident that is
set to Remedy Help Desk.
3. Click the Remedy button in the Incident. Annotation will be added under
the External tab.
Manually Reconfiguring the Remedy Interface Settings
During the initial installation of the Remedy Help Desk Interface, the Remedy
settings are stored in the das_query.xml file. Use the information in this section
of the documentation if you need to modify these settings after installation.
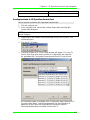
Remedy Settings
Remedy settings are stored in the das_query.xml file under the
RemedyARServerService component as follows:
2-1

Chapter 2 – Remedy Help Desk Operations
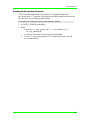
Resetting the Remedy Password
The Remedy passwords are stored in an encrypted format in the das_query.xml
file. Therefore, if you need to reset the passwords stored in this file, you must
use the utility described below.
To reset the Remedy interface password
1. cd %ESEC_HOME%/sentinel/bin/
2. Enter:
extconfig -n das_query.xml [-r remedy_password]
-r is the Remedy password
2-2

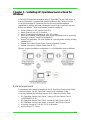
Chapter 3 – Installing HP OpenView Service Desk for
Windows
e-Security’s bi-directional integration with HP OpenView Service Desk, which is
licensed separately, provides new valuable features to the Sentinel Console.
e-Security leverages HP OpenView Service Desk’s Asset Management
capabilities to provide referential information to aide in the response to security
threats and attacks. These new features provide the ability to:
Send Incident(s) to HP Service Desk (SD)
Attach Event(s) to a HP SD Incident
Attach Vulnerability Information to a HP SD Incident
Query and Populate Configuration Item (Asset) information both in e-security
Security’s Sentinel Console Incident and SD
Round Trip Integration: SD send updates to e-security and e-security sending
updates to SD
Update SD Incident Status from e-Security’s Sentinel Console
Update e-Security’s Incident Status from HP SD
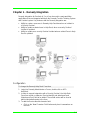
Below is a typical installation configuration. Your configuration may be different.
System Requirements
For hardware and software requirements for HP OpenView Service Desk Client,
Server and Agent, see HP OpenView Service Desk Installation Guide.
e-Security supports the following versions of HP OpenView Service Desk:
HP OpenView Service Desk Server - Version 4.5 with Service Pack 8
(4.5.0588.0802 SP 8)
HP OpenView Service Desk Client - Version 4.5 with Service Pack 8
HP OpenView Service Desk Agent - Version 4.5 with Service Pack 8
e-Security Sentinel 4.2.1.8 or 4.2.1.15 for Windows
Any 3rd Party FTP Server
3-1

Chapter 3 - Installing HP OpenView Service Desk for Windows
HP OpenView Service Desk Server and Client must be installed on a machine
that is to be designated as the Service Desk Server. Consult the HP OpenView
Service Desk Installation Guide for assistance with installing Service Desk.
To enable this bi-directional interface, a HP OpenView Agent must be installed
on the same machine where das_cmd.bat is installed. The Bi-directional interface
allows HP Service Desk to notify Sentinel whenever the Status of an Incident that
originated from Sentinel has been changed by a Service Desk user. These
incidents must originate from the Sentinel Console.
In order for Service Desk to handle attachments, an FTP server must be installed
(typically on the Service Desk Server), and Service Desk must be configured to
communicate with it. Any third party FTP server can be used. Consult the
Installation Guide of your FTP server for assistance installing the FTP server.
Installation
If you are also installing HP OpenView Operations, it is recommended to install
HP OpenView Operations before HP OpenView Service Desk.
NOTE: During initial installation of the 3rd Party HP OpenView Service
Desk Interface, the Service Desk and OpenView settings are stored in the
das_query.xml file. To change any of these settings (such as username
or password), see Operation - HP OpenView and Service Desk for
Windows 2000.
It is recommended to install in the following order:
FTP Server
NOTE: See the Installation Guide of your FTP server for assistance in
installing your FTP server.
HP OpenView Service Desk Server with Service Pack 8 – can the same as
the FTP server
HP OpenView Service Desk Client with Service Pack 8
HP OpenView Service Desk Agent with Service Pack 8 (to enable bi-
directional interface) – must on a the machine where DAS is installed
NOTE: See HP OpenView Service Desk Installation Guide for assistance
in installing the HP OpenView Service Desk software.
Install Sentinel 3
rd
Party Integration
à HP OpenView Service Desk
NOTE: For installation information, see the e-Security Sentinel v4.2.1.8
Release Notes and Sentinel Installation Guide v4.2 for Windows and
Solaris.
Configuring HP OpenView Service Desk
Configuration of HP OpenView Service Desk is accomplished through the
Service Desk Client. Before modifying the configuration of HP Service Desk to
communicate to the FTP Server, have the following information available:
Name – IP address of your FTP Server
Username/Password – any user set in the FTP Server
3-2

e-Security, Inc.
Target Folder – recommend entering "./". This places your FTP directory to
the current FTP directory.
Uncheck 'Use Passive FTP'
Check 'Save attachment in background'
NOTE: For more information, see the Post Installation Tasks section of
the HP OpenView Service Desk Installation Guide for detailed
configuration steps.
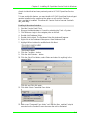
To set Attachment Settings
1. Start the HP Service Desk Client.
2. Click Tools > System.
3. Click System Panel in the navigator pane on the left.
4. Double-click Attachment Settings. Enter:
Name – IP address of your FTP Server
Username/Password – any user set in the FTP Server
Target Folder – recommend entering "./". This places your FTP
directory to the current FTP directory.
Uncheck 'Use Passive FTP'
Check 'Save attachment in background'
NOTE: For more information, see the Post-Installation Tasks section of
the HP OpenView Service Desk Installation Guide for detailed
configuration steps.
5. Click Test Connection.
6. Click Apply and then OK.
Enabling Service Desk to Sentinel (bi-directional) Interface
This option allows HP OVO OpenView Service Desk to notify Sentinel whenever
the Status of an Incident (that originated from Sentinel) has been changed by a
Service Desk user. This allows you to provide the ability to track the current state
3-3

Chapter 3 - Installing HP OpenView Service Desk for Windows
of each Incident that has been previously sent to HP OVO OpenView Service
Desk.
To have enable this feature, you must install a HP OVO OpenView Service Agent
must be installed on the same machine where as e-Security’s Sentinel
(das_cmd.bat) is installed. This allows HP Service Desk to execute Sentinel's
das_cmd utility.
Enabling bi-directional interface
1. Start the Service Desk Client.
2. Bring up the Administrator’s Console by selecting the Tools > System.
3. Click Business Logic in the navigator pane on the left.
4. Double-click Database Rules.
5. Double-click Incident. The Database Rules list window will appear.
6. Right-click in the Database Rules pane > New Database Rule.
7. Highlight 'When incident is modified' and click Next.
8. Click the Condition... button.
9. Click the Add Criterion... button.
10. Click the Quick Find button, select Status and select 'is anything' in the
operator field.
Click OK and Click OK again.
11. Click Add. Select Command Exec Action.
12. Add a new “Command Exec Action” such that the “das_cmd.bat” script is
executed on the Sentinel Server whenever the rule is evaluated.
3-4
La page est en cours de chargement...
La page est en cours de chargement...
La page est en cours de chargement...
La page est en cours de chargement...
La page est en cours de chargement...
La page est en cours de chargement...
La page est en cours de chargement...
La page est en cours de chargement...
La page est en cours de chargement...
La page est en cours de chargement...
La page est en cours de chargement...
La page est en cours de chargement...
La page est en cours de chargement...
-
 1
1
-
 2
2
-
 3
3
-
 4
4
-
 5
5
-
 6
6
-
 7
7
-
 8
8
-
 9
9
-
 10
10
-
 11
11
-
 12
12
-
 13
13
-
 14
14
-
 15
15
-
 16
16
-
 17
17
-
 18
18
-
 19
19
-
 20
20
-
 21
21
-
 22
22
-
 23
23
-
 24
24
-
 25
25
-
 26
26
-
 27
27
-
 28
28
-
 29
29
-
 30
30
-
 31
31
-
 32
32
-
 33
33


dans d''autres langues
- English: Novell Sentinel 5.1.3 User guide
Documents connexes
Autres documents
-
Savin 8700W Guide d'installation
-
Tannoy SENTINEL SM1 Manuel utilisateur
-
 Cabletron Systems GIGAswitch GSR-8 Getting Started Manual
-
Sentinel Hub Guide d'installation
-
Adobe ROBOHTML 9 Le manuel du propriétaire
-
GE AZ75H18DAC Owner's Manual and Installation Instructions
-
-
-
-
